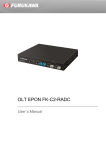
1
LGB5124A LGB5128A SFP Gigabit Managed Switch Eco Command-Line Interface (CLI) Management Guide BLACK BOX ® Customer Support Information Order toll-free in the U.S.: Call 877-877-BBOX (outside U.S. call 724-746-5500) FREE technical support 24 hours a day, 7 days a week: Call 724-746-5500 or fax 724-746-0746 Mailing address: Black Box Corporation, 1000 Park Drive, Lawrence, PA 15055-1018 Web site: www.blackbox.com • E-mail: [email protected] ABOUT THIS GUIDE Disclaimer Black Box Network Services shall not be liable for damages of any kind, including, but not limited to, punitive, consequential or cost of cover damages, resulting from any errors in the production information or specifications set forth in this document and Black Box Network Services may revise this document at any time without notice. PURPOSE This guide gives specific information on how to operate and use the management functions of the switch. AUDIENCE CONVENTIONS The guide is intended for use by network administrators who are responsible for operating and maintaining network equipment; consequently, it assumes a basic working knowledge of general switch functions, the Internet Protocol (IP), and Simple Network Management Protocol (SNMP). The following conventions are used throughout this guide to show information: NOTE: Emphasizes important information or calls your attention to related features or instructions. WARNING: Alerts you to a potential hazard that could cause personal injury. CAUTION: Alerts you to a potential hazard that could cause loss of data, or damage the system or equipment. RELATED PUBLICATIONS The following publication details the hardware features of the switch, including the physical and performance-‐related characteristics, and how to install the switch: The Installation Guide Also, as part of the switch’s software, there is an online web-‐based help that describes all management related features. 2 Publication date: Feb., 2012 Revision A1 CLI Reference Guide Release Date Revision V1.28 04/02/2012 A1 Revision History 3 Publication date: Feb., 2012 Revision A1 CLI Reference Guide CONTENTS ABOUT THIS GUIDE ............................................................................................... 2 Revision History ................................................................................................................ 3 Chapter 1 Operation of CLI Management ................................................................. 6 Chapter 2 AAA Commands of CLI .......................................................................... 11 Chapter 3 Access Commands of CLI ..................................................................... 18 Chapter 4 Account Commands of CLI .................................................................... 21 Chapter 5 ACL Commands of CLI .......................................................................... 23 Chapter 6 Aggregation Commands of CLI .............................................................. 28 Chapter 7 Arp-inspection Commands of CLI .......................................................... 31 Chapter 8 Auth Commands of CLI .......................................................................... 34 Chapter 9 Config-file Commands of CLI ................................................................. 36 Chapter 10 DHCP Relay Commands of CLI ............................................................ 37 Chapter 11 DHCP Snooping Commands of CLI ...................................................... 40 Chapter 12 Diagnostic Commands of CLI ................................................................ 43 Chapter 13 Easyport Commands of CLI ................................................................... 45 Chapter 14 Event Commands of CLI ........................................................................ 51 Chapter 15 Fdb Commands of CLI ........................................................................... 53 Chapter 16 Firmware Commands of CLI .................................................................. 57 Chapter 17 GARP Commands of CLI ....................................................................... 60 Chapter 18 GVRP Commands of CLI ....................................................................... 63 Chapter 19 HTTPs Commands of CLI ...................................................................... 66 Chapter 20 IGMP Commands of CLI ........................................................................ 68 Chapter 21 IP Commands of CLI ............................................................................. 73 Chapter 22 IP-Source-Guard Commands of CLI ...................................................... 77 Chapter 23 IPv6 Commands of CLI .......................................................................... 83 Chapter 24 LACP Commands of CLI ....................................................................... 85 Chapter 25 LLDP Commands of CLI ........................................................................ 88 Chapter 26 LLDP Media Commands of CLI ............................................................. 94 Chapter 27 Loop protection Commands of CLI ...................................................... 102 Chapter 28 Port Mirroring Commands of CLI ......................................................... 106 4 Publication date: Feb., 2012 Revision A1 CLI Reference Guide Chapter 29 MLD Commands of CLI ....................................................................... 108 Chapter 30 MVR Commands of CLI ....................................................................... 118 Chapter 31 NAS Commands of CLI ....................................................................... 121 Chapter 32 Port configuration Commands of CLI ................................................... 131 Chapter 33 Port security Commands of CLI ........................................................... 139 Chapter 34 Privilege level Commands of CLI ......................................................... 144 Chapter 35 Private VLAN Commands of CLI ......................................................... 146 Chapter 36 QoS Commands of CLI ........................................................................ 148 Chapter 37 Reboot Commands of CLI ................................................................... 168 Chapter 38 SFlow Commands of CLI ..................................................................... 169 Chapter 39 Single IP Commands of CLI ................................................................ 172 Chapter 40 SMTP Commands of CLI ..................................................................... 174 Chapter 41 SNMP Commands of CLI .................................................................... 179 Chapter 42 SSH Commands of CLI ....................................................................... 187 Chapter 43 STP Commands of CLI ........................................................................ 188 Chapter 44 Syslog Commands of CLI .................................................................... 203 Chapter 45 System Commands of CLI ................................................................... 207 Chapter 46 Thermal Protection Commands of CLI ................................................ 211 Chapter 47 System time Commands of CLI ........................................................... 213 Chapter 48 UPnP Commands of CLI ..................................................................... 217 Chapter 49 VCL Commands of CLI ........................................................................ 219 Chapter 50 VLAN Commands of CLI ..................................................................... 223 Chapter 51 Voice VLAN Commands of CLI ........................................................... 229 Chapter 52 EEE Commands of CLI ........................................................................ 234 Chapter 53 Global Commands of CLI .................................................................... 236 5 Publication date: Feb., 2012 Revision A1 CLI Reference Guide Chapter 1 Initial Configuration Operation of CLI Management This chapter instructs you how to configure and manage the SFP Gigabit Managed Switch Eco through the CLI interface. With this facility, you can easily access and monitor, through the console port of the switch, all switch status, including MIBs status, each port activity, Spanning tree status, port aggregation status, multicast traffic, VLAN and priority status, even illegal access record and so on. The serial port’s configuration requirements are as follows: ◆ Default Baud rate—115,200 bps ◆ Character Size—8 Characters ◆ Parity—None ◆ Stop bit—One ◆ Data bits—8 ◆ Flow control—none The default username is “admin” and password is empty. For the first time to use, please enter the default username and password, and then click the Enter button. The login process now is completed. About Null Console Cable identity: Figure 1: Serial Port (DB9 DTE) Pin-Out The DB9 cable is used for connecting a terminal or terminal emulator to the Managed Switch’s RS-‐232 port to access the command-‐line interface. The table below shows the pin assignments for the DB9 cable. Function Carrier Receive Data Transmit Data Data Terminal Ready Signal Ground Data Set Ready Request To Send Clear To Send 6 Mnemonic CD RXD TXD DTR Pin 1 2 3 4 GND DSR RTS CTS 5 6 7 8 Publication date: Feb., 2012 Revision A1 CLI Reference Guide 7 Publication date: Feb., 2012 Revision A1 CLI Reference Guide CONNECTING TO THE CONSOLE PORT The DB9 serial port on the switch’s front panel is used to connect to the switch for out-‐of-‐band console configuration. The command-‐line-‐driven configuration program can be accessed from a terminal or a PC running a terminal emulation program. The pin assignments used to connect to the serial port are provided in the following table. 8 Publication date: Feb., 2012 Revision A1 Figure 2: Plug in the Console Port Figure 3: Console configure After the SFP Gigabit Managed Switch Eco finishes configuring configuration the it interface, you can access It via Console port. For instance, it will show the following screen and ask you to input your username and password to login and access authentication. The default username is “admin” and password is empty. For first-‐time use, please enter the default username and password, and then click the <Enter> button. The login process now is completed. In this login menu, you have to input the complete username and password respectively; the switch will not give you a shortcut to username automatically. This looks inconvenient, but is safer. CLI Reference Guide Figure 4: Console CLI interface NOTE: You can type “?” or “help” to get the switch help includes syntax or all function explaining. The screen shot as below figure displayed. CLI Reference Guide Chapter 2 AAA Commands of CLI AAA This section shows you to use an AAA (Authentication, Authorization, Accounting) server to provide access control to your network. The AAA server can be a TACACS+ or RADIUS server to create and manage objects that contain settings for using AAA servers. Table1: AAA Commands in CLI acc-‐radius: Syntax: Parameter : Command Function acc-radius Configure RADIUS accounting Server accounting Configure Accounting mode authorization Configure Authorization mode deadtime Configure server dead time fallback-author Configure Authorization mode radius Configure RADIUS authentication server show Show AAA information tacacs+ Configure TACACS+ authentication server timeout Configure server response timeout The command lets you configure the RADIUS accounting server parameter. acc-radius <Line> <index> <enable/disable> <ip-hostname> <0-65535> <index> The RADIUS accounting Server index. The available value is from 1 to 5 <disable/enable> To enable or disable the RADIUS accounting service. <ip-hostname> The RADIUS accounting server IP address or hostname. <0-65535> The RADIUS accounting server UDP port. If the port is set to 0 (zero), then the default port (1813) is used. <LINE> Secret shared with external accounting server. The Available value is up to 29 characters long. EXAMPLE: Switch(aaa)# acc-radius 1 enable 192.168.2.22 65535 radius Switch(aaa)# show config Server Timeout : 15 seconds Server Dead Time : 300 seconds TACACS+ Authorization and Accounting Configuration: Authorization : Disable Fallback to Local Authorization: Disable Accounting : Disable Publication date: Feb., 2012 Revision A1 CLI Reference Guide RADIUS Server -----RADIUS Server -----1 2 3 4 5 Authentication Server Configuration: Mode IP Address or Host Name Port Secret -------- --------------------------- ----- -----------------------------Authentication Server Configuration: Mode IP Address or Host Name Port Secret -------- --------------------------- ----- -----------------------------Disabled Disabled Disabled Disabled Disabled 1812 1812 1812 1812 1812 RADIUS Accounting Server Configuration: Server Mode IP Address or Host Name Port Secret ------ -------- --------------------------- ----- -----------------------------1 2 3 4 5 Enabled 192.168.2.22 Disabled Disabled Disabled Disabled 65535 radius 1813 1813 1813 1813 TACACS+ Authentication Server Configuration: Server Mode IP Address or Host Name Port Secret ------ -------- --------------------------- ----- -----------------------------1 Disabled 2 Disabled 3 Disabled 4 Disabled 5 Disabled Switch(aaa)# accounting : Syntax: Parameter : 49 49 49 49 49 The command lets you enable or disable the RADIUS accounting operation mode. accounting <enable/disable> <disable> Globally disable Accounting operation mode. <enable> Globally enable Accounting operation mode. EXAMPLE: Switch(aaa)# accounting enable Server disconnect! Switch(aaa)# accounting disable Switch(aaa)# NOTE: If you didn’t connect the RADIUS Server already then the switch will show “Server disconnect”. 13 Publication date: Feb., 2012 Revision A1 CLI Reference Guide authorization: Syntax: Parameter : To configure (enable/disable) RADIUS Authorization mode. authorization <enable/disable> <disable> Globally disable Authorization operation mode. <enable> Globally enable Authorization operation mode. EXAMPLE: Switch(aaa)# authorization enable Switch(aaa)# deadtime: Syntax: Parameter : Default Setting : The command lets you configure the RADIUS server deadtime. deadtime <0-3600> <0-3600> Time that a server is considered dead if it doesn't answer a request. The available value is from 0 to 3600 second None EXAMPLE: Switch(aaa)# deadtime 3600 Server disconnect! Switch(aaa)# NOTE: If you didn’t connect the RADIUS Server already then the switch will show “Server disconnect”. fallback-‐author: The command lets you configure the fallback function of RADIUS authorization with enable/disable if remote authorization fails. Syntax: fallback-author <disable/ enable>. Parameter : <disable> Disable fallback function. <enable> Enable fallback function if remote authorization fails. EXAMPLE: Switch(aaa)# fallback-author enable Server disconnect! 14 Publication date: Feb., 2012 Revision A1 CLI Reference Guide NOTE: If you didn’t connect the RADIUS Server already then the switch will show “Server disconnect”. radius: The command lets you configure the RADIUS Server detail parameter Syntax: Parameter : radius <index> <enable/disable> <ip-hostname> <0-65535> <Line> . <index> The RADIUS accounting Server index. The available value is from 1 to 5 <disable/enable> To enable or disable the RADIUS accounting service. <ip-hostname> The RADIUS accounting server IP address or hostname. <0-65535> The RADIUS accounting server UDP port. If the port is set to 0 (zero), then the default port (1813) is used. <LINE> Secret shared with external accounting server. The Available value is up to 29 characters long. EXAMPLE: Switch(aaa)# radius 1 enable 192.168.2.22 0 radius Server disconnect! NOTE: If you didn’t connect the RADIUS Server already then the switch will show “Server disconnect”. Show: Syntax: The command lets you display the RADIUS AAA information. Show <config> Show <statistics> <1-5> Parameter : <config> To show AAA configuration <statistics> To show RADIUS statistics <1-5> The RADIUS Server Index EXAMPLE: 15 Publication date: Feb., 2012 Revision A1 CLI Reference Guide Switch(aaa)# show config Server Timeout : 15 seconds Server Dead Time : 300 seconds TACACS+ Authorization and Accounting Configuration: Authorization : Disable Fallback to Local Authorization: Disable Accounting : Disable RADIUS Authentication Server Configuration: Server Mode IP Address or Host Name Port Secret ------ -------- --------------------------- ----- -----------------------------1 2 3 4 5 Disabled Disabled Disabled Disabled Disabled 1812 1812 1812 1812 1812 RADIUS Accounting Server Configuration: Server Mode IP Address or Host Name Port Secret ------ -------- --------------------------- ----- -----------------------------1 2 3 4 5 Disabled Disabled Disabled Disabled Disabled 1813 1813 1813 1813 1813 TACACS+ Authentication Server Configuration: Server Mode IP Address or Host Name Port Secret ------ -------- --------------------------- ----- -----------------------------1 Disabled 2 Disabled 3 Disabled 4 Disabled 5 Disabled Switch(aaa)# Switch(aaa)# 49 49 49 49 49 show statistics 1 Server #1 (0.0.0.0:1812) RADIUS Authentication Statistics: Rx Access Accepts 0 Tx Access Requests Rx Access Rejects 0 Tx Access Retransmissions Rx Access Challenges 0 Tx Pending Requests Rx Malformed Acc. Responses 0 Tx Timeouts Rx Bad Authenticators 0 Rx Unknown Types 0 Rx Packets Dropped 0 State: Disabled Round-Trip Time: 0 ms Server #1 (0.0.0.0:1813) RADIUS Accounting Statistics: Rx Responses 0 Tx Requests Rx Malformed Responses 0 Tx Retransmissions Rx Bad Authenticators 0 Tx Pending Requests Rx Unknown Types 0 Tx Timeouts Rx Packets Dropped 0 State: Disabled Round-Trip Time: 0 ms Switch(aaa)# tacacs+ : 0 0 0 0 0 0 0 0 The command lets you configure the TACACS+ authentication server detail parameter. 16 Publication date: Feb., 2012 Revision A1 Syntax: Parameter : tacacs+ <index> <enable/disable> <ip-hostname> <0-65535> <Line> <index> The TACACS+ authentication Server index. The available value is from 1 to 5. <disable/enable> To enable or disable the TACACS+ authentication service. <ip-hostname> The TACACS+ authentication server IP address or hostname. <0-65535> The TACACS+ authentication server UDP port. If the port is set to 0 (zero), then the default port (1813) is used. <LINE> Secret shared with an external accounting server. The available value is up to 29 characters long. EXAMPLE: Switch(aaa)# tacas+ 1 enable 192.168.2.22 0 tacacs Server disconnect! NOTE: If you didn’t connect the TACACS+ Server already then the switch will show “Server disconnect”. timeout : Syntax: Parameter : The command lets you configure server response timeout timeout <3-3600> <3-3600> The Timeout, which can be set to a number between 3 and 3600 seconds, is the maximum time to wait for a reply from a server. EXAMPLE: Switch(aaa)# timeout 360 Switch(aaa)# Publication date: Feb., 2012 Revision A1 CLI Reference Guide Access Commands of CLI Chapter 3 Access This section explains how to configure the switch’s access management table, including HTTP/HTTPS, SNMP, and TELNET/SSH. You can manage the Switch over an Ethernet LAN, or over the Internet.. Table 2: Access Commands in CLI Command Function add Add or modify access management entry clear Clear access management statistics delete Delete access management entry mode Configure the access management mode show Show access management information add: Syntax: add The command lets you add or modify the access management entry <1-16> <ipv4/ipv6> <ip-address> <ip-address> <all> <snmp> <telnet> <web> Parameter : <1-16> Set the entry index <ipv4> IPv4 format address <ipv6> IPv6 format address <ip-address> Start IP address <ip-address> End IP address <all> All interfaces on the switch physical ports <snmp> Set the SNMP interface <telnet> Set up the TELNET/SSH interface <web> Set the HTTP/HTTPS interface EXAMPLE: 18 Publication date: Feb., 2012 Revision A1 CLI Reference Guide Switch(access)# add 1 ipv4 192.168.1.1 Switch(access)# show config Access Management Mode : Disabled 192.168.1.241 all W: WEB/HTTPS S: SNMP T: TELNET/SSH Index Start IP Address End IP Address W S T ----- ------------------------------- ------------------------------ - - 1 192.168.1.1 192.168.1.241 Y Y Y Switch(access)# clear: The command lets you clear access management statistics Syntax: Parameter : Clear < statistics> <None> Clear access management statistics EXAMPLE: Switch(access)# clear statistics Switch(access)# delete: Syntax: Parameter : The command lets you delete access management entry. Delete <1-16> <1-16> Entry index EXAMPLE: Switch(access)# delete 1 Switch(access)# show config Access Management Mode : Disabled W: WEB/HTTPS S: SNMP T: TELNET/SSH Index Start IP Address End IP Address W S T ----- ------------------------------- ------------------------------ - - Switch(access)# mode: Syntax: Parameter : The command lets you configure the access management mode mode <disable> <enable> <disable> Disable access management mode operation <enable> Enable access management mode operation EXAMPLE: 19 Publication date: Feb., 2012 Revision A1 CLI Reference Guide Switch(access)# mode enable Switch(access)# Switch(access)# show config Access Management Mode : Enabled W: WEB/HTTPS S: SNMP T: TELNET/SSH Index Start IP Address End IP Address W S T ----- ------------------------------- ------------------------------ - - 1 192.168.2.22 192.168.2.250 Y Y Y Switch(access)# show: Syntax: Parameter : The command lets you display access setting information show < config> / < statistics> <config> Show access management configuration <statistics> Show access management statistics EXAMPLE: Switch(access)# show config Access Management Mode : Enabled W: WEB/HTTPS S: SNMP T: TELNET/SSH Index Start IP Address End IP Address W S T ----- ------------------------------- -----------------------------UDP Port Switch(access)# show statistics Client Receive Allow Discard ------ ---------- ---------- ---------HTTP 0 0 0 HTTPS 0 0 0 SNMP 0 0 0 TELNET 0 0 0 SSH 0 0 0 20 Publication date: Feb., 2012 Revision A1 CLI Reference Guide Account Commands of CLI Chapter 4 Account Only the administrator can create, modify, or delete the username and password. The administrator can modify other guest identities’ password without confirming the password, but must modify the administrator-‐equivalent identity. A guest-‐equivalent identity can modify his password only. You must confirm the administrator/guest identity in the Authorization field before configuring the username and password. Only one administrator is allowed to exist and cannot be deleted. In addition, up to four guest accounts can be created. Table 3: Account Commands add: Syntax: Parameter : Command Function add Add or modify user account delete Delete user account show Show user account information This command lets you add or modify user account add <1-15> <word> <word> <1-15> User privilege level <WORD> Up to 32 characters to identify the user name <WORD>: The password for this user name EXAMPLE: Switch(account)# add 10 david david Switch(account)# show User Name Privilege Level -------------------------------- ---------------admin 15 david 10 delete: Syntax: Parameter : This command lets you delete a new operator user or add one in the switch. delete <WORD> <WORD> Up to 32 characters to identify the user name 21 Publication date: Feb., 2012 Revision A1 CLI Reference Guide EXAMPLE: Switch(account)# delete 12 Switch(account)# show User Name Privilege Level -------------------------------- ---------------admin 15 Switch(account)# show : Syntax: Parameter : The command lets you display user account information that you set in the switch. Show <name> <name> Up to 32 characters to identify the user name EXAMPLE: Switch(account)# show User Name Privilege Level -------------------------------- ---------------admin 15 Switch(account)# 22 Publication date: Feb., 2012 Revision A1 CLI Reference Guide ACL Commands of CLI Chapter 5 ACL The switch access control list (ACL) is probably the most commonly used object in the IOS. It is used for packet filtering, but also for selecting types of traffic to be analyzed, forwarded, or influenced in some way. The ACLs are divided into EtherTypes: IPv4, ARP protocol, MAC, and VLAN parameters etc. Here we will just go over the standard and extended access lists for TCP/IP. As you create ACEs for ingress classification, you can assign a policy for each port. The policy number is 1–8, however, each policy can be applied to any port. This makes it very easy to determine what type of ACL policy you will be working with. Table 4: ACL Commands ace : Syntax: Parameter : Command Function ace Add or modify access control entry action Configure ACL port default action Clear Clear all ACL counters delete To delete the ACE (Access Control Entry) configuration on the switch logging Configure ACL port default logging operation move Move ACE policy Configure ACL port policy rate-limiter To set ACL rate limit show Show ACL information shutdown Configure ACL port default shut down operation The command lets you add or modify Access Control Entry. ace <index> <1-256> : If the ACE ID is specified and an entry with this ACE ID already exists, the ACE will be modified. Otherwise, a new ACE will be added. <0-256>: If the next ACE ID is non-zero, the ACE will be placed before this ACE in the list. If the next ACE ID is zero, the ACE will be placed last in the list. policy: Policy ACE keyword, the rule applies to all ports configured with the specified policy. port: Port ACE keyword, the rule applies to the specified port only. 23 Publication date: Feb., 2012 Revision A1 CLI Reference Guide switch: Switch ACE keyword, the rule applies to all ports <port-list> : available value is from switch physic port density, format: 1,3-5 any: Any frame can match this ACE. arp : Only ARP frames can match this ACE. Notice the ARP frames won't match the ACE with Ethernet type. etype: Only Ethernet Type frames can match this ACE. icmp : Only ICMP frames can match this ACE. Notice the ICM frames won't match the ACE with Ethernet type. ipv4: Only IPv4 frames can match this ACE. Notice the IPv4 frames won't match the ACE with Ethernet type. tcp : Only TCP frames can match this ACE. Notice the TCP frames won't match the ACE with Ethernet type. udp: Only UDP frames can match this ACE. Notice the UDP frames won't match the ACE with Ethernet type. EXAMPLE: Switch(acl)# ace 1 0 port 1 ipv4 Switch(acl/ace-port(ipv4))# Switch(acl/ace-port(ipv4))# show ACE ID : 1 Rate Limiter: Disabled Ingress Port: 1 Port Copy : Disabled Mirror : Disabled Type : User Logging : Disabled Frame Type : IPv4 Shutdown : Disabled Action : Permit Counter : 0 MAC Parameters -------------DMAC Type : Any VLAN Parameters --------------802.1Q Tagged: Any VLAN ID : Any Tag Priority : Any IP Parameters ------------Protocol : Any Source : Any Destination : Any TTL : Any Fragment : Any Options : Any Switch(acl/ace-port(any))# Switch(acl/ace-port(ipv4))# end Success! ACE ID 1 added last action: Syntax: Parameter : The command lets you configure ACL port default action action <port-list> <deny> <permit>. <port-list> : available value is from switch physical port density, format: 1,3-5 deny : Deny forwarding 24 Publication date: Feb., 2012 Revision A1 CLI Reference Guide permit : Permit forwarding EXAMPLE: Switch(acl)# action 1 permit Switch(acl)# Switch(acl)# show port Rate Port Policy Action Limiter Port Copy Mirror Logging Shutdown Counter ---- ------ ------ -------- ------------ -------- -------- -------- ---------1 1 Deny Disabled Disabled Disabled Disabled Disabled 0 2 1 Permit Disabled Disabled Disabled Disabled Disabled 0 3 1 Permit Disabled Disabled Disabled Disabled Disabled 0 4 1 Permit Disabled Disabled Disabled Disabled Disabled 0 5 1 Permit Disabled Disabled Disabled Disabled Disabled 0 …………….. Rate Limiter -----------1 2 3 4 delete : Syntax: Parameter : Rate -----------1 PPS 1 PPS 1 PPS 1 PPS This command lets you delete the ACE (Access Control Entry) configuration on the switch. delete <1-256>. <1-256> ACE ID must be exist EXAMPLE: Switch(acl)# delete 1 Switch(acl)# Switch(acl)# show acl-config Number of ACEs: 0 logging : Syntax: Parameter : This command lets you configure ACL port default logging operation. logging <port-list> enable/disable <port-list> : Port list, available value is from switch physic port density, format: 1,3-5 disable : Frames received on the port are not logged enable : Frames received on the port are stored in the system log EXAMPLE: Switch(acl)# logging 1 disable Switch(acl)# Switch(acl)# show port Rate Port Policy Action Limiter Port Copy Logging Shutdown Counter ---- ------ ------ -------- ------------ -------- -------- ---------1 0 Permit Disabled25Disabled Disabled Disabled Publication 1615 date: Feb., 2012 2 0 Permit Disabled Disabled Disabled Disabled 0 Revision A1 3 0 Permit Disabled Disabled Disabled Disabled 0 4 0 Permit Disabled Disabled Disabled Disabled 0 5 0 Permit Disabled Disabled Disabled Disabled 0 CLI Reference Guide move: Syntax: Parameter : This command lets you move ACE configuration between two indexes. Move <1-256> <0-256> <1-256> ACE ID must exist <0-256> If the next ACE ID is non-zero, the ACE will be placed before this ACE in the list. If the next ACE ID is zero, the ACE will be placed last in the list. EXAMPLE: Switch(acl)# move 1 Switch(acl)# policy: Syntax: Parameter : 0 This command lets you set ACL port policy on switch. policy <port-list> <1-8> <port-list> Port list, available value is from switch physical port density, format: 1,3-5 <1-8> Policy number EXAMPLE: Switch(acl)# policy Switch(acl)# port-‐rate: Syntax: Parameter : 1 1 This command lets you set acl port-‐rate on switch. port-rate <port-list> <1-8> <port-list> Port list, available value is from switch physical port density, format: 1,3-5 disable Disable rate limit <1-16> Rate limiter ID EXAMPLE: Switch(acl)# Switch(acl)# port-rate 1 1 26 Publication date: Feb., 2012 Revision A1 CLI Reference Guide rate-‐limiter: Syntax: Parameter : This command lets you set the access control rule with rate limiter on the switch. rate-limiter <1-16> <kbps> <0-10000> <1-16> Rate limiter ID kbps Kbits per second pps Packets per second <0-10000> Rate in 100Kbps EXAMPLE: Switch(acl)# rate-limiter 1 kbps 100 Switch(acl)# show : Syntax: Parameter : This command lets you show all access control entry settings or information of the switch. show acl-config/acl-status/port/rate-limiter acl-config acl-status port Show ACL configuration Show ACL status Show ACL port configuration rate-limiter Show ACL rate limiter EXAMPLE: Switch(acl)# show acl-config Number of ACEs: 0 27 Publication date: Feb., 2012 Revision A1 CLI Reference Guide Switch(acl)# show port Rate Port Policy Action Limiter Port Copy Mirror Logging Shutdown Counter ---- ------ ------ -------- ------------ -------- -------- -------- ---------1 1 Permit 1 Disabled Disabled Disabled Disabled 0 2 1 Permit Disabled Disabled Disabled Disabled Disabled 0 3 1 Permit Disabled Disabled Disabled Disabled Disabled 0 4 1 Permit Disabled Disabled Disabled Disabled Disabled 0 5 1 Permit Disabled Disabled Disabled Disabled Disabled 0 6 1 Permit Disabled Disabled Disabled Disabled Disabled 0 7 1 Permit Disabled Disabled Disabled Disabled Disabled 0 8 1 Permit Disabled Disabled Disabled Disabled Disabled 0 9A 1 Permit Disabled Disabled Disabled Disabled Disabled 0 10A 1 Permit Disabled Disabled Disabled Disabled Disabled 0 9B 1 Permit Disabled Disabled Disabled Disabled Disabled 0 10B 1 Permit Disabled Disabled Disabled Disabled Disabled 0 Rate Limiter -----------1 2 3 4 5 --More--, q Rate -----------1 PPS 1 PPS 1 PPS 1 PPS 1 PPS to quit Aggregation Commands of CLI Chapter 6 Aggregation The Aggregation is used to configure the Link Aggregation settings. You can bundle more than one port with the same speed, full duplex, and the same MAC to be a single logical port; so, the logical port aggregates the bandwidth of these ports. This means you can apply your current Ethernet equipment’s settings to build the bandwidth aggregation. For example, if there are three Fast Ethernet ports aggregated in a logical port, then this logical port has bandwidth that’s three times as high as a single Fast Ethernet port’s bandwidth. Table 5: Aggregation Commands delete: Syntax: Parameter : Command Function delete Delete command group Configure the link aggregation group mode Configure the link aggregation traffic distribution mode Show Show aggregation group information This command lets you delete the link aggregation entry on switch. delete <group> <group> The link aggregation group that you want to delete. EXAMPLE: 28 Publication date: Feb., 2012 Revision A1 CLI Reference Guide Switch(aggregation)# delete group 2 Switch(aggregation)# show Aggregation Mode ---------------Source MAC : Disabled Destination MAC : Disabled IP Address : Disabled TCP/UDP Port : Disabled group: Syntax: Parameter : This command lets you configure the link aggregation group. group <1-14> <port-list> <1-14> The Aggregation group id. <port-list> available value is from the switch physical port density, format: 1,3-5 EXAMPLE: Switch(aggregation)# group 2 5-7 Switch(aggregation)# mode: Syntax: Parameter : The command lets you configure the link aggregation traffic distribution mode. mode dmac/ ip/ port/ smac disable/enable dmac Destination MAC address. ip Source and destination IP address. port Source and destination UDP/TCP port smac Source MAC address disable Disable field in traffic distribution enable Enable field in traffic distribution EXAMPLE: Switch(aggregation)# mode ip disable Switch(aggregation)# Switch(aggregation)# show Aggregation Mode ---------------Source MAC : Disabled Destination MAC : Disabled IP Address : Disabled TCP/UDP Port : Disabled show: This command lets you display all aggregation Group configurations ID Name Type Configured Aggregated Ports on the sPorts witch. -------- ------ ------ ---------------- ---------------2 LLAG2 Static Switch(aggregation)# 5-7 29 None Publication date: Feb., 2012 Revision A1 CLI Reference Guide Syntax: Parameter : show <cr> <cr> means you just press the Enter key. EXAMPLE: Switch(aggregation)# show Aggregation Mode ---------------Source MAC : Enabled Destination MAC : Disabled IP Address : Disabled TCP/UDP Port : Enabled Group ID Name Type Configured Ports Aggregated Ports -------- ------ ------ ---------------- ---------------2 LLAG2 Static 5-7 None Switch(aggregation)# 30 Publication date: Feb., 2012 Revision A1 CLI Reference Guide Arp-‐inspection Commands of CLI Chapter 7 Arp inspection The section describes how to configure the switch’s ARP Inspection parameters. You can configure ARP Inspection to manage the ARP table. Table 6: Arp-inspection Commands add: Syntax: Parameter : Command Function add Add ARP inspection static entry delete Delete ARP inspection static entry mode Configure ARP inspection mode port-mode Configure ARP inspection port mode show Show ARP inspection information This command lets you add ARP inspection static entry. add <port-list> <1-4094> <ip-address> <mac-address> <port-list> Port list, available value is from switch physical port density, format: 1,3-5 <1-4094> VLAN ID, available value is from 1 to 4094 <ip-address> IP address allowed for doing ARP request <mac-address> MAC address, format 0a-1b-2c-3d-4e-5f EXAMPLE: Switch(arp-inspection)# add 1 Switch(arp-inspection)# delete: Syntax: Parameter : 5 192.168.1.2 0a-1b-2c-3d-4e-5f This command lets you delete ARP inspection static entry. delete <port-list> <1-4094> <ip-address> <mac-address> <port-list> Port list, available value is from switch physical port density, format: 1,3-5 <1-4094> VLAN ID, available value is from 1 to 4094. <ip-address> IP address allowed for ARP request. <mac-address> MAC address, format 0a-1b-2c-3d-4e-5f 31 Publication date: Feb., 2012 Revision A1 CLI Reference Guide EXAMPLE: Switch(arp-inspection)# delet 1 Switch(arp-inspection)# 5 192.168.1.2 0a-1b-2c-3d-4e-5f mode : The command lets you configure ARP inspection mode Syntax: Parameter : delete <port-list> <1-4094> <ip-address> <mac-address> <port-list> Port list, available value is from switch physical port density, format: 1,3-5 <1-4094> VLAN ID, available value is from 1 to 4094 <ip-address> IP address allowed for doing ARP request <mac-address> MAC address, format 0a-1b-2c-3d-4e-5f EXAMPLE: Switch(arp-inspection)# mode disable Switch(arp-inspection)# port-‐mode: Syntax: Parameter : The command lets you configure ARP inspection port mode. Port-mode <port-list> disable/ enable <port-list> available value is from switch physical port density, format: 1,3-5 disable Disable ARP inspection port mode enable Enable ARP inspection port mode EXAMPLE: Switch(arp-inspection)# port-mode 1 disable Switch(arp-inspection)# show: Syntax: Parameter : The command lets you display the ARP inspection configuration information. show config/ status config Show ARP inspection configuration status Show ARP inspection static and dynamic entry EXAMPLE: 32 Publication date: Feb., 2012 Revision A1 CLI Reference Guide Switch(arp-inspection)# show config ARP Inspection Mode : Disabled Port Port Mode ---- --------1 Disabled 2 Disabled 3 Disabled 4 Disabled 5 Disabled 6 Disabled 7 Disabled 8 Disabled 9 Disabled 10 Disabled 11 Disabled 12 Disabled 13 Disabled 14 Disabled 15 Disabled 16 Disabled 17 Disabled 18 Disabled 19 Disabled 20 Disabled 21 Disabled 22 Disabled 23 Disabled 24 Disabled 25 Enabled 26 Disabled 27 Disabled 28 Disabled Switch(arp-inspection)# 33 Publication date: Feb., 2012 Revision A1 CLI Reference Guide Auth Commands of CLI Chapter 8 Auth method This page shows how to configure a user with authentication when he logs into the switch via one of the management client interfaces. Table 7: Auth Method Commands fallback: Syntax: Parameter : Command Function fallback Configure local authentication fallback method Configure authentication method show Show Authentication configuration The command lets you configure the local authentication fallback function. fallback < console>/< ssh >/ < telnet >/ < web >, disable/enable <console> <ssh> Sets the authenticate method fallback via console Sets the authenticate method fallback via ssh <telnet> Sets the authenticate method fallback via telnet <web> Sets the authenticate method fallback via web disable Disable local authentication if remote authentication fails enable Enable local authentication if remote authentication fails EXAMPLE: Switch(auth)# fallback ssh disable Switch(auth)# method Syntax: Parameter : : The command lets you configure Authentication method function. method < console>/< ssh >/ < telnet >/ < web >, radius / tacats+ <console> <ssh> local Sets the authenticate method via console Sets the authenticate method via ssh <telnet> <web> local / none / Sets the authenticate method via telnet Sets the authenticate method via web Use local authentication 34 Publication date: Feb., 2012 Revision A1 CLI Reference Guide none Authentication disabled telnet tacacs+ Use remote RADIUS authentication Use remote TACACS+ authentication EXAMPLE: Switch(auth)# method ssh local Switch(auth)# show: The command lets you display the ARP inspection configuration information. Syntax: Parameter : show <cr> <cr> means you just press the Enter key. EXAMPLE: Switch(auth)# show Client Authentication Method Local Authentication Fallback ------- --------------------- ----------------------------console local Disabled telnet local Disabled ssh local Disabled web local Disabled10B Disabled 35 Publication date: Feb., 2012 Revision A1 CLI Reference Guide Config-‐file Commands of CLI Chapter 9 Config-‐file This section describes how to export and import the Switch configuration. Any current configuration files will be exported as XML format. Table 8: Config-file Commands export: Syntax: Parameter : Command Function export Export configuration file to TFTP server import Import configuration file from TFTP server The command lets you run the export function to export the switch configuration to TFTP server. export < ip-address> <WORD> <ip-address> <WORD> The TFTP server ip address Configuration file name EXAMPLE: Switch(config-file)# export 192.168.1.100 Switch(config-file)# Import: Syntax: Parameter : testfile The command lets you run the import start function to import the switch configuration from TFTP server. import < ip-address> <WORD> <ip-address> <WORD> The TFTP server ip address Configuration file name EXAMPLE: Switch(config-file)# import 192.168.1.100 Switch(config-file)# 36 testfile Publication date: Feb., 2012 Revision A1 CLI Reference Guide DHCP Relay Commands of CLI Chapter 10 DHCP Relay The section describes how to forward DHCP requests to another specific DHCP server via DHCP relay. The DHCP servers may be on another network. Table 9: DHCP Relay Commands clear: Syntax: Parameter : Command Function clear Clear DHCP relay statistics mode Configure DHCP relay mode relay-option Configure DHCP relay agent information option server Configure DHCP relay server show Show DHCP relay information The command lets you clear DHCP relay statistics that you set on the switch. clear < statistics > statistics The parameter lets you to clear DHCP relay statistics EXAMPLE: Switch(dhcp-relay)# clear statistics Switch(dhcp-relay)# mode: The command lets you configure DHCP relay mode on the switch. Syntax: Parameter : mode disable/ enable disable The parameter disables DHCP relay mode. Enable The parameter enables DHCP snooping mode. NOTE: When DHCP relay mode operation is set to enable, the agent forwards and transfers DHCP messages between the clients and the server when they are not on the same subnet domain. The DHCP broadcast message won't flood for security considerations. EXAMPLE: 37 Publication date: Feb., 2012 Revision A1 CLI Reference Guide Switch(dhcp-relay)# mode disable Switch(dhcp-relay)# relay-‐option: Syntax: Parameter : The command lets you configure DHCP relay agent information. relay-option disable/ enable disable The parameter means you to disable DHCP relay agent information option mode. Enable The parameter means you to enable DHCP relay agent information option mode. NOTE: The agent inserts specific information (option 82) into a DHCP message when forwarding to DHCP server and removes it from a DHCP message when transferring to DHCP client. If the agent receives a DHCP message that already contains relay agent information, it will enforce the policy. EXAMPLE: Switch(dhcp-relay)# relay-option disable Switch(dhcp-relay)# server: Syntax: Parameter : The command lets you configure DHCP relay server ip address on the switch. server <ip-address> <ip-address> Type in the DHCP server IP address. EXAMPLE: Switch(dhcp-relay)# server 192.168.1.100 Switch(dhcp-relay)# show config DHCP Relay Mode : Disabled DHCP Relay Server : 192.168.1.100 DHCP Relay Information Mode : Disabled DHCP Relay Information Policy : Replace Switch(dhcp-relay)# show: The command lets you display DHCP relay information 38 Publication date: Feb., 2012 Revision A1 CLI Reference Guide Syntax: Parameter : show config/statistics config The parameter lets you set DHCP relay configuration. statistics The parameter lets you set DHCP relay statistics. EXAMPLE: Switch(dhcp-relay)# show config DHCP Relay Mode : Disabled DHCP Relay Server : 192.168.1.100 DHCP Relay Information Mode : Disabled DHCP Relay Information Policy : Replace Switch(dhcp-relay)# show statistics Server Statistics: -----------------Transmit to Server : Receive from Server : Receive Missing Circuit ID : Receive Bad Circuit ID : Client Statistics: -------------------Transmit to Client Receive from Client Replace Agent Option Drop Agent Option Switch(dhcp-relay)# : : : : 0 Transmit Error : 0 Receive Missing Agent Option : 0 Receive Missing Remote ID : 0 Receive Bad Remote ID : 0 0 0 0 39 Transmit Error : Receive Agent Option : Keep Agent Option : 0 0 0 0 0 0 0 Publication date: Feb., 2012 Revision A1 CLI Reference Guide DHCP Snooping Commands of CLI Chapter 11 DHCP snooping The section describes how to configure the switch’s DHCP Snooping parameters. DHCP Snooping can prevent attackers from adding their own DHCP servers to the network. Table 10: DHCP Snooping Commands clear: Syntax: Parameter : Command Function clear Clear DHCP snooping statistics mode Configure DHCP snooping mode Port-mode Configure DHCP snooping port mode show Show DHCP snooping information The command lets you clear DHCP snooping statistics entry that you set on the switch. clear <statistics> <port-list> statistics Clear DHCP snooping statistics <port-list> Port list, available value is from 1 to 10B format:1,3-5 EXAMPLE: Switch(dhcp-snooping)# clear statistics 1 Switch(dhcp-snooping)# mode: The command lets you configure DHCP snooping mode Syntax: Parameter : mode disable /enable disable The parameter disables DHCP snooping mode enable The parameter enables DHCP snooping mode. NOTE: When enabling DHCP snooping mode operation, the request DHCP messages will be forwarded to trusted ports and only allowed to reply to packets from trusted ports. EXAMPLE: 40 Publication date: Feb., 2012 Revision A1 CLI Reference Guide Switch(dhcp-snooping)# mode disable Switch(dhcp-snooping)# port-‐mode: Syntax: Parameter : The command lets you configure DHCP snooping port mode Mode <port-list> trusted/ untrusted <port-list> Port list, available value is from 1 to 10B format:1,3-5 trusted Configures the port as trusted sources of the DHCP message untrusted Configures the port as untrusted sources of the DHCP message EXAMPLE: Switch(dhcp-snooping)# port-mode 1 trusted Switch(dhcp-snooping)# Switch(dhcp-snooping)# show config DHCP Snooping Mode : Disabled Port Port Mode ---- --------1 trusted 2 untrusted 3 untrusted 4 untrusted 5 untrusted 6 untrusted 7 untrusted 8 untrusted 9 untrusted 10 untrusted 11 untrusted 12 untrusted 13 untrusted 14 untrusted 15 untrusted 16 untrusted 17 untrusted 18 untrusted --More--, q to quit Switch(dhcp-snooping)# show: Syntax: Parameter : The command lets you show DHCP snooping information. show config/ statistics config Show DHCP snooping configuration statistics Show DHCP snooping statistics EXAMPLE: 41 Publication date: Feb., 2012 Revision A1 CLI Reference Guide Switch(dhcp-snooping)# port-mode 1 trusted Switch(dhcp-snooping)# Switch(dhcp-snooping)# show config DHCP Snooping Mode : Disabled Port Port Mode ---- --------1 trusted 2 untrusted 3 untrusted 4 untrusted 5 untrusted 6 untrusted 7 untrusted 8 untrusted 9 untrusted 10 untrusted 11 untrusted 12 untrusted 13 untrusted 14 untrusted 15 untrusted 16 untrusted 17 untrusted 18 untrusted --More--, q to quit Switch(dhcp-snooping)# Switch(dhcp-snooping)# show statistics 1 Port 1 Statistics: Receive Packets Packets ------------------------------------------------------------------------Rx Discover 0 Tx Discover Rx Offer 0 Tx Offer Rx Request 0 Tx Request Rx Decline 0 Tx Decline Rx ACK 0 Tx ACK Rx NAK 0 Tx NAK Rx Release 0 Tx Release Rx Inform 0 Tx Inform Rx Lease Query 0 Tx Lease Query Rx Lease Unassigned 0 Tx Lease Unassigned Rx Lease Unknown 0 Tx Lease Unknown Rx Lease Active 0 Tx Lease Active Switch(dhcp-snooping)# 42 Transmit 0 0 0 0 0 0 0 0 0 0 0 0 Publication date: Feb., 2012 Revision A1 CLI Reference Guide Diagnostic Commands of CLI Chapter 12 Diagnostic This section provides a set of basic system diagnosis. It let users know that whether the system is health or needs to be fixed. The basic system check includes ICMP Ping, ICMPv6, and VeriPHY Cable Diagnostics. Table 11: Diagnostic Commands Command Function Uses the ICMP protocol's mandatory ECHO_REQUEST datagram to elicit an ICMP ECHO_RESPONSE from a host or gateway. Uses the ICMP protocol's mandatory ECHO_REQUEST datagram to elicit an ICMP ECHO_RESPONSE from a host or gateway. ping ping6 veriphy ping: Syntax: Parameter : Run cable diagnostics. The command lets you use the ICMP protocol's mandatory ECHO_REQUEST datagram to elicit an ICMP ECHO_RESPONSE from a host or gateway clear <ip-hostname> <60-1400> <ip-hostname> <60-1400> Hostname or IP address Size of ICMP echo packet EXAMPLE: Switch(diagnostic)# ping 192.168.6.200 80 PING server 192.168.6.200, 80 bytes of data. 88 bytes from 192.168.6.200: icmp_seq=0, time=0ms 88 bytes from 192.168.6.200: icmp_seq=1, time=0ms 88 bytes from 192.168.6.200: icmp_seq=2, time=0ms 88 bytes from 192.168.6.200: icmp_seq=3, time=0ms 88 bytes from 192.168.6.200: icmp_seq=4, time=0ms Sent 5 packets, received 5 OK, 0 bad Switch(diagnostic)# ping6: Syntax: Parameter : The command lets you use the ICMP protocol's mandatory ECHO_REQUEST datagram to elicit an ICMP ECHO_RESPONSE from a host or gateway clear <ipv6-address> <60-1400> <ipv6-address> <60-1400> The parameter for IPv6 address Size of ICMP echo packet 43 Publication date: Feb., 2012 Revision A1 CLI Reference Guide EXAMPLE: Switch(diagnostic)# ping6 ff06:0:0:0:0:0:0:c3 80 PING6 server ff06::c3, 80 bytes of data. 88 bytes from 192.168.6.200: icmp_seq=0, time=0ms 88 bytes from 192.168.6.200: icmp_seq=1, time=0ms 88 bytes from 192.168.6.200: icmp_seq=2, time=0ms 88 bytes from 192.168.6.200: icmp_seq=3, time=0ms 88 bytes from 192.168.6.200: icmp_seq=4, time=0ms Sent 5 packets, received 5 OK, 0 bad Switch(diagnostic)# veriphy: Syntax: Parameter : The command lets you run cable diagnostics veriphy <port-list> <port-list> Port list, available value is from 1 to 10B format:1,3-5 EXAMPLE: Switch(diagnostic)# veriphy 1 Starting VeriPHY, please wait Port Pair A Length Pair B Length Pair C Length Pair D Length ----- ------- ------- ------- ------- ------- ------- ------- -----1 OK 255 OK 255 OK 255 OK 255 Switch(diagnostic)# 44 Publication date: Feb., 2012 Revision A1 CLI Reference Guide Easyport Commands of CLI Chapter 13 Easyport Easy Port provides a convenient way to save and share common configurations. You can use it to enable features and settings based on the location of a switch in the network and for mass configuration deployments across the network. You could easily implement included Voice IP phone, Wireless Access Point and IP Camera…etc. You can leverage configuration to run a converged voice, video, and data network considering quality of service (QoS), bandwidth, latency, and high performance. Table 12: Easyport Commands ip-‐cam: Syntax: Command Function ip-cam To set the IP-CAM Configuration on the switch ip-phone To set the IP-Phone Configuration on the switch wifi-ap To set the WIFI-AP Configuration on the switch. The command lets you configure ip-‐cam easily on the switch through profile and rule. ip-cam <port-list> (1st level), below: 2nd level <access-vlan> <1-4094>. <admin-edge> disable/ enable. <auto-logout> <10-3600> <bpdu-guard> disable/ enable. <end> <psec-action> both/ none/ shutdown/ trap. <psec-limit> <1-50> <psec-mode> disable/ enable. <quit> <restore> default/ user <save> start/ user <show> <traffic-class> <0-7> <vlan-mode> access/ hybrid/ trunk. Parameter : <port-list> Port list, available value is from 1 to 10B format:1,3-5 (1st level), below are 2nd level parameter. 45 Publication date: Feb., 2012 Revision A1 CLI Reference Guide <access-vlan> The parameter configures access VLAN for IP Camera. <1-4094> Access VLAN ID, available value is from 1 to 4094. <admin-edge> The parameter lets you configure spanning tree admin-edge for IP Camera. disable Disable spanning tree admin edge. enable Enable spanning tree admin edge. <bpdu-guard> The parameter lets you configure spanning tree BPDU guard for IP Camera. disable Disable spanning tree BPDU guard. enable Enable spanning tree BPDU guard. <end> The parameter lets you finish Easy Port setting and return. <psec-action> The parameter lets you configure port security action for IP Camera. both Send a SNMP trap and shutdown the port. none Do nothing. shutdown Shutdown the port. trap Send a SNMP trap. <psec-limit> The parameter lets you configure port security maximum for IP Camera. <1-50> Max. number of MAC addresses. <psec-mode> The parameter lets you configure port security mode for IP Camera. disable Disable port security. enable Enable port security. <show> The parameter lets you display Easy Port parameter. <traffic-class> The parameter lets you configure traffic class for IP Camera. <0-7> 0:Low, 7:High. <vlan-mode> The parameter lets you configure VLAN mode for IP Camera. access Untag all frames. hybrid Tag all frames except VLAN ID same as PVID. trunk Tag all frames. NOTE: The command configuration has level rule, you need to set the port-list that you want to assign setting profile first, and then enter to 2nd level to set every parameter. EXAMPLE: 46 Publication date: Feb., 2012 Revision A1 CLI Reference Guide Switch(easyport)# ip-cam 22 Switch(easyport/ip-cam)# vlan-mode trunk Switch(easyport/ip-cam)# access-vlan 8 Switch(easyport/ip-cam)# traffic-class 7 Switch(easyport/ip-cam)# psec-action both Switch(easyport/ip-cam)# psec-limit 40 Switch(easyport/ip-cam)# psec-mode enable Switch(easyport/ip-cam)# admin-edge enable Switch(easyport/ip-cam)# bpdu-guard enable Switch(easyport/ip-cam)# show Role : IP-CAM Access VLAN : 8 VLAN Mode : Trunk Traffic Class : 7 Port Security Mode : Enabled Port Security Action : Trap & Shutdown Port Security Limit : 40 STP Admin Edge : Enabled STP BPDU Guard : Enabled Switch(easyport/ip-cam)# ip-‐phone: Syntax: The command lets you configure ip-‐phone easily on the switch through profile and rule ip-phone <port-list> (1st level), below: 2nd level <access-vlan> <1-4094>. <admin-edge> disable/ enable. <auto-logout> <10-3600> <bpdu-guard> disable/ enable. <end> <psec-action> both/ none/ shutdown/ trap. <psec-limit> <1-50> <psec-mode> disable/ enable. <show> <traffic-class> <0-7> <vlan-mode> access/ hybrid/ trunk. <voice-vlan> <1-4094> Parameter : <port-list> Port list, available value is from 1 to 10B format:1,3-5 (1st level), below are 2nd level parameter. <access-vlan> The parameter lets you configure access VLAN for IP Camera. <1-4094> Access VLAN ID, available value is from 1 to 4094. <admin-edge> The parameter lets you to configure spanning tree admin-edge for IP Camera. 47 Publication date: Feb., 2012 Revision A1 CLI Reference Guide disable Disable spanning tree admin edge. enable Enable spanning tree admin edge. <bpdu-guard> The parameter lets you configure spanning tree BPDU guard for IP Camera. disable Disable spanning tree BPDU guard. enable Enable spanning tree BPDU guard. <end> The parameter lets you finish Easy Port setting and return. <psec-action> The parameter lets you configure port security action for IP Camera. both Send a SNMP trap and shutdown the port. none Do nothing. shutdown Shutdown the port. trap Send a SNMP trap. <psec-limit> The parameter lets you configure port security maximum for IP Camera. <1-50> Max. number of MAC addresses. <psec-mode> The parameter lets you configure port security mode for IP Camera. disable Disable port security. enable Enable port security. <show> The parameter lets you to display Easy Port parameter. <traffic-class> The parameter lets you configure traffic class for IP Camera. <0-7> 0:Low, 7:High. <vlan-mode> The parameter lets you configure VLAN mode for IP Camera. access Untag all frames. hybrid Tag all frames except VLAN ID same as PVID. trunk Tag all frames. <voice-mode> The parameter lets you configure VLAN mode for IP Camera. <1-4094> Voice VLAN ID, available value is from 1 to 4094. EXAMPLE: witch(easyport)# ip-phone 22 Switch(easyport/ip-phone)# access-vlan 20 Switch(easyport/ip-phone)# voice-vlan 20 Switch(easyport/ip-phone)# psec-mode enable Switch(easyport/ip-phone)# psec-limit 30 Switch(easyport/ip-phone)# traffic-class 7 48 Publication date: Feb., 2012 Revision A1 CLI Reference Guide Switch(easyport/ip-phone)# vlan-mode access Switch(easyport/ip-phone)# psec-action both Switch(easyport/ip-phone)# save start Switch(easyport/ip-phone)# show Role : IP-Phone Access VLAN : 20 VLAN Mode : Access Voice VLAN : 20 Traffic Class : 7 Port Security Mode : Enabled Port Security Action : Trap & Shutdown Port Security Limit : 30 STP Admin Edge : Enabled STP BPDU Guard : Enabled Switch(easyport/ip-phone)# wifi-‐ap: The command lets you configure WiFi-‐AP easily on the switch through profile and rule Syntax: wifi-ap <port-list> (1st level), below: 2nd level <access-vlan> <1-4094>. <admin-edge> disable/ enable. <auto-logout> <10-3600> <bpdu-guard> disable/ enable. <end> <psec-action> both/ none/ shutdown/ trap. <psec-limit> <1-50> <psec-mode> disable/ enable. <show> <traffic-class> <0-7> <vlan-mode> access/ hybrid/ trunk. Parameter : <port-list> Port list, available value is from 1 to 10B format:1,3-5 (1st level), below are 2nd level parameter. <access-vlan> The parameter lets you configure access VLAN for IP Camera. <1-4094> Access VLAN ID, available value is from 1 to 4094. <admin-edge> The parameter lets you configure spanning tree admin-edge for IP Camera. disable Disable spanning tree admin edge. enable Enable spanning tree admin edge. <bpdu-guard> The parameter lets you configure spanning tree BPDU guard for IP Camera. disable Disable spanning tree BPDU guard. enable Enable spanning tree BPDU guard. 49 Publication date: Feb., 2012 Revision A1 CLI Reference Guide <end> The parameter lets you finish Easy Port setting and return. <psec-action> The parameter lets you configure port security action for IP Camera. both Send a SNMP trap and shutdown the port. none Do nothing. shutdown Shutdown the port. trap Send a SNMP trap. <psec-limit> The parameter lets you configure port security maximum for IP Camera. <1-50> Max. number of MAC addresses. <psec-mode> The parameter lets you configure port security mode for IP Camera. disable Disable port security. enable Enable port security. <show> The parameter lets you display Easy Port parameter. <traffic-class> The parameter lets you configure traffic class for IP Camera. <0-7> 0:Low, 7:High. <vlan-mode> The parameter lets you configure VLAN mode for IP Camera. access Untag all frames. hybrid Tag all frames except VLAN ID same as PVID. trunk Tag all frames. EXAMPLE: Switch(easyport/wifi-ap)# access-vlan 55 Switch(easyport/wifi-ap)# admin-edge disable Switch(easyport/wifi-ap)# bpdu-guard disable Switch(easyport/wifi-ap)# psec-action both Switch(easyport/wifi-ap)# psec-limit 30 Switch(easyport/wifi-ap)# psec-mode enable Switch(easyport/wifi-ap)# traffic-class 4 Switch(easyport/wifi-ap)# vlan-mode hybrid Switch(easyport/wifi-ap)# show Role : WIFI-AP Access VLAN : 55 VLAN Mode : Hybrid Traffic Class : 4 Port Security Mode : Enabled Port Security Action : Trap & Shutdown Port Security Limit : 30 STP Admin Edge : Disabled STP BPDU Guard : Disabled Switch(easyport/wifi-ap)# 50 Publication date: Feb., 2012 Revision A1 CLI Reference Guide Event Commands of CLI Chapter 14 Event The function is used to set an Alarm trap and get the Event log. The Trap Events Configuration function is used to enable the switch to send out the trap information while pre-‐defined trap events occur. Table 13: Event Commands group: Syntax: Parameter : Command Function group Configure trap event severity level show Show trap event configuration The command lets you configure trap event severity level Group <group-name><port-list> <group-name> Trap event group name <0-7> Severity level <0> Emergency: system is unusable <1> Alert: action must be taken immediately <2> Critical: critical conditions <3> Error: error conditions <4> Warning: warning conditions <5> Notice: normal but significant condition <6> Informational: informational messages <7> Debug: debug-level messages EXAMPLE: Switch(event)# group acl 5 Switch(event)# show Group Name Severity Level -------------------------------- ---------------ACL Notice ACL_Log Debug Access_Mgmt Info Auth_Failed Warning Cold_Start Warning Config_Info Info Firmware_Upgrade Info Import_Export Info LACP Info Passwd_Change Info Port_Security Info Thermal_Protect Info VLAN Info Warm_Start Warning Switch(event)# 51 Publication date: Feb., 2012 Revision A1 CLI Reference Guide Show: Syntax: Parameter : The command lets you display trap event configuration that you set on the switch show <cr> <cr> means press the Enter key. EXAMPLE: Switch(event)# show Group Name Severity Level -------------------------------- ---------------ACL Critical ACL_Log Debug Access_Mgmt Info Auth_Failed Warning Cold_Start Warning Config_Info Info Firmware_Upgrade Info Import_Export Info Link_Status Warning Login Info Logout Info Mgmt_IP_Change Info Module_Change Notice NAS Info Passwd_Change Info Port_Security Info Thermal_Protect Info VLAN Info Warm_Start Warning Switch(event)# 52 Publication date: Feb., 2012 Revision A1 CLI Reference Guide Fdb Commands of CLI Chapter 15 Fdb (Filtering Data Base) Filtering Data Base Configuration gathers many functions, including MAC Table Information and Static MAC Learning that cannot be categorized to some function type. MAC table Switching of frames is based upon the DMAC address contained in the frame. The switch builds up a table that maps MAC addresses to switch ports to direct the frames to the ports (based upon the DMAC address in the frame). This table contains both static and dynamic entries. The static entries are configured by the network administrator if the administrator wants to do a fixed mapping between the DMAC address and switch ports. The frames also contain a MAC address (SMAC address) that shows the MAC address of the equipment sending the frame. The SMAC address is used by the switch to automatically update the MAC table with these dynamic MAC addresses. Dynamic entries are removed from the MAC table if no frame with the corresponding SMAC address has been seen after a configurable age time. Table 14: fdb Commands age-‐time: Syntax: Parameter : Command Function age-time Configure aging time of MAC address delete Delete commands flush Flush out dynamic learned MAC address learning Configure learning mode of switch ports static-mac Configure static MAC address show Show MAC address table information The command lets you configure the age-‐time of MAC address age-time disable/ <10-10000> disable The parameter lets you disable automatic aging. <10-1000000> The parameter lets you configure the available age-time value is from 10 to 1000000 secs. EXAMPLE: 53 Publication date: Feb., 2012 Revision A1 CLI Reference Guide Switch(fdb)# age-time 1000 Switch(fdb)# show configuration Automatic Aging : Enabled Aging Time : 1000 seconds Port Learning Mode ---- ------------1 Auto 2 Auto 3 Auto 4 Auto ………. Switch(fdb)# delete: The command lets you delete a static MAC address entry that you set on the switch. Syntax: Parameter : delete static-mac <mac-address> <1-4094> static mac entry. the parameter means you want to delete a static MAC <mac-address> the parameter is MAC address, format 0a-1b-2c-3d-4e-5f. <1-4094> VLAN ID, available value is from 1 to 4094. EXAMPLE: Switch(fdb)# static-mac 00-1F-3B-6A-3B-11 3 22 Switch(fdb)# show static-mac No VID MAC Address Ports ---- ---- ----------------- --------------1 3 00-1f-3b-6a-3b-11 22 Total static MAC address : 1 Switch(fdb)# delete static-mac 00-1F-3B-6A-3B-11 3 Switch(fdb)# show static-mac Total static MAC address : 0 Switch(fdb)# flush: The command lets you flush out dynamic learned MAC address Syntax: Parameter : flush <cr> <cr> means press the Enter key. EXAMPLE: Switch(fdb)# flush Switch(fdb)# 54 Publication date: Feb., 2012 Revision A1 CLI Reference Guide learning: The command lets you configure learning mode of switch ports on the switch Syntax: Parameter : learning <port-list> auto/ disable/ secure <port-list> Its physical port available value is from 1 to 28 format: 1,3-5. auto Learning is done automatically as soon as a frame with unknown SMAC is received. disable The parameter lets you disable learning. secure Only static MAC entries are learned, all other frames are dropped. EXAMPLE: Switch(fdb)# learning 2 disable Switch(fdb)# learning 4 secure Switch(fdb)# show configuration Automatic Aging : Enabled Aging Time : 300 seconds Port Learning Mode ---- ------------1 Auto 2 Disabled 3 Auto 4 Secure ………….. Switch(fdb)# static-‐mac: The command lets you configure static MAC address on the switch Syntax: Parameter : static-mac <mac-address> <1-4094> <port-list>/block <mac-address> the parameter is MAC address, format 0a-1b-2c-3d-4e-5f. <1-4094> VLAN ID, available value is from 1 to 4094. <port-list> Its physical port available value is from 1 to 28 format: 1,3-5. block The parameter lets you block the specific MAC address for all ports. EXAMPLE: 55 Publication date: Feb., 2012 Revision A1 CLI Reference Guide Switch(fdb)# static-mac 00-1F-3B-6A-3B-11 33 2 Switch(fdb)# show static-mac No VID MAC Address Ports ---- ---- ----------------- --------------1 33 00-1f-3b-6a-3b-11 2 Total static MAC address : 1 Switch(fdb)# show: The command lets you display the MAC Table or configuration information set on the switch Syntax: show configuration <cr>. show mac-table <mac-address> <cr> show mac-table port <port-list> <cr> show mac-table vid <1-4094> <cr> show static-mac <cr> Parameter : configuration Show MAC address table configuration. mac-table Show MAC address table. <mac-address> the parameter is MAC address, format 0a-1b-2c-3d-4e-5f. <port-list> Its physical port available value is from 1 to 28 format: 1,3-5. <1-4094> VLAN ID, available value is from 1 to 4094. static-mac Show static MAC address. <cr> means press the Enter key. EXAMPLE: Switch(fdb)# static-mac 00-1F-3B-6A-3B-11 33 2 Switch(fdb)# show static-mac No VID MAC Address Ports ---- ---- ----------------- --------------1 33 00-1f-3b-6a-3b-11 2 Total static MAC address : 1 Switch(fdb)# 56 Publication date: Feb., 2012 Revision A1 CLI Reference Guide Firmware Commands of CLI Chapter 16 firmware This section describes how to upgrade Firmware. The Switch can be enhanced with more value-‐added functions by installing firmware upgrades. Table 15: firmware Commands Command show swap upgrade Function Show information about active and alternate firmware images Activate the alternate firmware image Upgrade system firmware show: The command lets you display the active and alternate firmware image version information Syntax: Parameter : show <cr> <cr> means press the Enter key. EXAMPLE: Switch(firmware)# show Active Image -----------Image : managed Version : GEPoEL2-ESW28KX (standalone) v1.14 Date : 2011-12-21T10:41:33+08:00 Alternate Image --------------Image : managed.bk Version : GEPoEL2-ESW28KX (standalone) v1.13 Date : 2011-12-08T11:37:00+08:00 Switch(firmware)# swap: Syntax: Parameter : The command lets you swap the active firmware image to alternate firmware image or reverse between them swap <cr> <cr> means press the Enter key. EXAMPLE: 57 Publication date: Feb., 2012 Revision A1 CLI Reference Guide Switch(firmware)# swap ... Erase from 0x40fd0000-0x40fdffff: . ... Program from 0x87ff0000-0x88000000 to 0x40fd0000: . ... Program from 0x87ff000a-0x87ff000c to 0x40fd000a: . Alternate image activated, now rebooting. Switch(firmware)# +M25PXX : Init device with JEDEC ID 0xC22018. Jaguar-1 board detected (VSC7460 Rev. B). RedBoot(tm) bootstrap and debug environment [ROMRAM] Non-certified release, version 1_12-Vitesse - built 12:04:16, Aug 8 2011 Copyright (C) 2000, 2001, 2002, 2003, 2004, 2005, 2006, 2007, 2008, 2009 Free Software Foundation, Inc. RedBoot is free software, covered by the eCos license, derived from the GNU General Public License. You are welcome to change it and/or distribute copies of it under certain conditions. Under the license terms, RedBoot's source code and full license terms must have been made available to you. Redboot comes with ABSOLUTELY NO WARRANTY. Platform: VCore-III (MIPS32 24KEc) JAGUAR RAM: 0x80000000-0x88000000 [0x80020c88-0x87fe1000 available] FLASH: 0x40000000-0x40ffffff, 256 x 0x10000 blocks == Executing boot script in 1.000 seconds - enter ^C to abort RedBoot> fis load -d managed Image loaded from 0x80040000-0x807083f8 RedBoot> go Username: W snmp 00:00:02 23/snmp_conf_read_stack#4909: Warning: version mismatc h, creating defaults W snmp 00:00:02 23/snmp_conf_read_stack#5001: Warning: version mismatch, creatin g defaults W snmp 00:00:02 23/snmp_conf_read_stack#5043: Warning: conf_sec_open failed or s ize mismatch, creating defaults W snmp 00:00:02 23/snmp_conf_read_stack#5093: Warning: version mismatch, creatin g defaults W priv_lvl 00:00:02 23/VTSS_PRIVILEGE_conf_read_stack#432: Warning: conf_sec_ope n failed or size mismatch, creating defaults W port 00:00:03 23/port_conf_read#2766: Warning: conf_sec_open failed or size mi smatch, creating defaults Username: admin Password: Login in progress... Switch# firmware Switch(firmware)# show Active Image -----------Image : managed Version : GEPoEL2-ESW28KX (standalone) v1.13 Date : 2011-12-08T11:37:00+08:00 Alternate Image --------------Image : managed.bk Version : GEPoEL2-ESW28KX (standalone) v1.14 Date : 2011-12-21T10:41:33+08:00 Switch(firmware)# upgrade : The command lets you upgrade the system firmware to active or alternate division 58 Publication date: Feb., 2012 Revision A1 CLI Reference Guide Syntax: upgrade <ipv6-address> <word> upgrade <ip-hostname> <word> Parameter : <ipv6-address> TFTP server ipv6 address. IPv6 address is in 128-bit records represented as eight fields of up to four hexadecimal digits with a colon separating each field (:). For example, 'fe80::215:c5ff:fe03:4dc7'. The symbol ':: is a special syntax that can be used as a shorthand way of representing multiple 16-bit groups of contiguous zeros, but it can only appear once. It also used following a legal IPv4 address. For example, '::192.1.2.34'. <ip-hostname> TFTP server ip address or hostname <word> Firmware image file name NOTE: This page facilitates an update of the firmware controlling the switch. Uploading software will update all managed switches to the location of a software image and click. After the software image is uploaded, a page announces that the firmware update is initiated. After about a minute, the firmware is updated and the switch restarts. WARNING: While the firmware is being updated, Web access appears to be defunct. The front LED flashes Green/Off with a frequency of 10 Hz while the firmware update is in progress. Do not restart or power off the device at this time or the switch may fail to function afterwards. EXAMPLE: Switch(firmware)# upgrade 192.168.1.100 managed.bk Switch(firmware)# show Active Image -----------Image : managed Version : GEPoEL2-ESW28KX (standalone) v1.13 Date : 2011-12-08T11:37:00+08:00 Alternate Image --------------Image : managed.bk Version : GEPoEL2-ESW28KX (standalone) v1.14 Date : 2011-12-21T10:41:33+08:00 Switch(firmware)# 59 Publication date: Feb., 2012 Revision A1 CLI Reference Guide GARP Commands of CLI Chapter 17 GARP The Generic Attribute Registration Protocol (GARP) provides a generic framework whereby devices in a bridged LAN, e.g. end stations and switches, can register and de-‐register attribute values, such as VLAN Identifiers, with each other. In doing so, the attributes are propagated to devices in the bridged LAN, and these devices form a ¡°reachability¡± tree that is a subset of an active topology. GARP defines the architecture, rules of operation, state machines, and variables for the registration and de-‐registration of attribute values. A GARP participation in a switch or an end station consists of a GARP application component, and a GARP Information Declaration (GID) component associated with each port or the switch. The propagation of information between GARP participants for the same application in a bridge is carried out by the GARP Information Propagation (GIP) component. Protocol exchanges take place between GARP participants by means of LLC Type 1 services, using the group MAC address and PDU format defined for the GARP application concerned. Table 16: garp Commands applicant: Command Function applicant Enable/Diable applicant administrative control join-time Set the GARP join timer configuration leave-all Set the GARP leave all timer configuration leave-time Set the GARP leave timer configuration show Show the GARP configuration The command lets you enable or disable the applicant administrative control Syntax: Parameter : applicant <port-list> <non-participant/ normal-participant> <port-list> Port list, available value is from 1 to 14 format: 1,3-5. <non-participant> non-participant Set applicant administrative control to <normal-participant> Disable applicant administrative control to normal-participant. EXAMPLE: 60 Publication date: Feb., 2012 Revision A1 CLI Reference Guide Switch(garp)# applicant 3 non-participant Switch(garp)# join-‐time: The command lets you set the GARP join timer configuration on the switch Syntax: Parameter : join-time <port-list> <time-value> <port-list> Port list, available value is from 1 to 14 format: 1,3-5. <time-value> join time value, available value is from 200 to 400 seconds. EXAMPLE: Switch(garp)# join-time 3-5 200 Error! Set jointimer failed NOTE: If you didn’t set the GARP environment already, then the switch will show “Set jointimer failed”. leave-‐all: Syntax: Parameter : The command lets you set the GARP leave all timer configurations on the switch leave-all <port-list> <timer-value> <port-list> Port list, available value is from 1 to 14 format: 1,3-5. <timer-value> leave all time value, available value is from 10000 to 100000 seconds. EXAMPLE: Switch(garp)# leave-all 3-5 10000 Error! Set leavealltimer failed Switch(garp)# NOTE: If you didn’t set the GARP environment already, then the switch will show “Set leave all timer failed”. leave-‐time: Syntax: Parameter : The command lets you set GARP leave timer configuration on the switch leave-time <port-list> <timer-value> <port-list> Port list, available value is from 1 to 14 format: 1,3-5. <timer-value> leave all time value, available value is from 10000 to 61 Publication date: Feb., 2012 Revision A1 CLI Reference Guide 100000 seconds. EXAMPLE: Switch(garp)# leave-time 3-5 600 Error! Set leavetimer failed Switch(garp)# NOTE: If you didn’t set the GARP environment already, then the switch will show “Set leavetimer failed”. show: Syntax: Parameter : The command lets you display the GARP configuration that you set on the switch show <statistic> <port-list> <statistic> Show the basic GARP port statistics <port-list> Port list, available value is from 1 to 14 format: 1,3-5. EXAMPLE: Switch(garp)# show statistic 3-5 ? <cr> Switch(garp)# show statistic 3-5 Port Peer MAC Failed Count ---- ----------------- -----------3 4 5 Switch(garp)# Switch(garp)# NOTE: If you didn’t set the GARP environment already, then the switch will show “empty field value”. 62 Publication date: Feb., 2012 Revision A1 CLI Reference Guide GVRP Commands of CLI Chapter 18 GVRP GVRP is an application based on Generic Attribute Registration Protocol (GARP), mainly used to automatically and dynamically maintain the group membership information of the VLANs. The GVRP offers the function providing the VLAN registration service through a GARP application. It makes use of GARP Information Declaration (GID) to maintain the ports associated with their attribute database and GARP Information Propagation (GIP) to communicate among switches and end stations. With GID information and GIP, GVRP state machines maintain the contents of Dynamic VLAN Registration Entries for each VLAN and propagate this information to other GVRP-‐aware devices to setup and update their knowledge database, the set of VLANs associated with currently active members, and through which ports these members can be reached. Table 17: gvrp Commands clear: Syntax: Parameter : Command Function clear Clear the basic GVRP port statistics control Enable/Disable GVRP globally mode Enable/Disable GVRP on port rrole Enable/Disable GVRP restricted role on port show Show the GVRP configuration The command lets you clear the basic GVRP port statistics recorded by the switch clear <port-list> <port-list> Port list, available value is from 1 to 14 format: 1,3-5. EXAMPLE: Switch(gvrp)# clear 3-5 Switch(gvrp)# NOTE: If you set the GVRP on a port, you can show the port GVRP statistics information or clear all records on the port. 63 Publication date: Feb., 2012 Revision A1 CLI Reference Guide control: Syntax: Parameter : The command lets you enable or disable the GVRP globally control disable/ enable disable The parameter lets you disable GVRP function globally. enable The parameter lets you enable GVRP function globally. EXAMPLE: Switch(gvrp)# control enable Switch(gvrp)# mode: Syntax: Parameter : The command lets you enable or disable the GVRP function on a port mode <port-list> disable/ enable <port-list> Port list, available value is from 1 to 14 format: 1,3-5. disable The parameter lets you disable GVRP function on a port. enable The parameter lets you enable GVRP function on a port. EXAMPLE: Switch(gvrp)# mode 3-5 enable Switch(gvrp)# rrole: The command lets you enable or disable the GVRP restricted role on port Syntax: Parameter : mode <port-list> disable/ enable <port-list> Port list, available value is from 1 to 14 format: 1,3-5. disable The parameter disables GVRP function on port. enable The parameter enables GVRP function on port. EXAMPLE: Switch(gvrp)# rrole 3-5 enable Switch(gvrp)# 64 Publication date: Feb., 2012 Revision A1 CLI Reference Guide show: The command lets you display the GVRP function information Syntax: Parameter : show config / statistics config Show the GVRP configuration. statistics Show the basic GVRP port statistics. EXAMPLE: Switch(gvrp)# show config GVRP global mode : Enabled Port Mode Restricted Role ---- --------- --------------1 Diabled Diabled 2 Diabled Diabled 3 Enabled Enabled 4 Enabled Enabled 5 Enabled Enabled 6 Diabled Diabled 7 Diabled Diabled 8 Diabled Diabled 9 Diabled Diabled …………….. Switch(gvrp)# Switch(gvrp)# show statistics 1-10 Port Joins Tx Count Leaves Tx Count ---- -------------------- -------------------1 0 0 2 0 0 3 0 0 4 0 0 5 0 0 6 0 0 7 0 0 8 0 0 9 0 0 …………… Switch(gvrp)# 65 Publication date: Feb., 2012 Revision A1 CLI Reference Guide HTTPs Commands of CLI Chapter 19 Https This section shows you how to use HTTPS to securely access the Switch. HTTPS is a secure communication protocol that combines authentication and data encryption to provide secure encrypted communication via the browser. Table 18: HTTPs Commands Command Function mode Configure the HTTPS mode redirect Configure the HTTPS redirect mode show Show the HTTPs configuration mode: The command lets you configure the HTTPs enable or disable on the switch Syntax: Parameter : mode disable/enable disable The parameter lets you disable HTTPS mode operation enable The parameter lets you enable HTTPS mode operation EXAMPLE: Switch(https)# mode enable Switch(https)# redirect: The command lets you configure the HTTPs redirect mode enable or disable Syntax: Parameter : redirect disable/enable disable The parameter lets you disable redirect mode operation enable The parameter lets you enable redirect mode operation EXAMPLE: Switch(https)# redirect enable Switch(https)# 66 Publication date: Feb., 2012 Revision A1 CLI Reference Guide show: The command lets you display the HTTPs all setting on the switch or status information Syntax: Parameter : show <cr> <cr> means press the Enter key. EXAMPLE: Switch(https)# show HTTPS Mode : Enabled HTTPS Redirect Mode : Enabled Switch(https)# 67 Publication date: Feb., 2012 Revision A1 CLI Reference Guide IGMP Commands of CLI Chapter 20 IGMP The function establishes the multicast groups to forward the multicast packet to the member ports, and avoids wasting the bandwidth while IP multicast packets are running over the network. This is because a switch that does not support IGMP or IGMP Snooping cannot tell the multicast packet from the broadcast packet, so it can only treat them all as broadcast packets. Without IGMP Snooping, the multicast packet forwarding function is plain and nothing is different from broadcast packet. A switch that supports IGMP Snooping with the query, report, and leave functions, a type of packet exchanged between IP Multicast Router/Switch and IP Multicast Host, can update the information of the Multicast table when a member (port) joins or leaves an IP Multicast Destination Address. With this function, once a switch receives an IP multicast packet, it will forward the packet to the members who previously joined a specified IP multicast group. The packets will be discarded by the IGMP Snooping if the user transmits multicast packets to the multicast group that had not been built up in advance. IGMP mode enables the switch to issue IGMP function that enables IGMP proxy or snooping on the switch, which connects to a router closer to the root of the tree. This interface is the upstream interface. The router on the upstream interface should be running IGMP. Table 19: IGMP Commands Command Function compatibility Set the Versions of IGMP Operating on Hosts and Routers delete Delete commands that you set on the switch fast-leave Set per-port Fast Leave filtering The IP Multicast Group that will be filtered flooding Set IGMP Flooding Mode lmqi Set per-VLAN Last Member Query Interval proxy Set IGMP Proxy Mode qi Set per-VLAN Query Interval qri Set per-VLAN Query Response Interval querier Set per-VLAN IGMP Querier router Set Router Port rv Set per-VLAN Robustness Variable show Show IGMP Snooping Information 68 Publication date: Feb., 2012 Revision A1 CLI Reference Guide compatibility: Syntax: Parameter : snooping Set IGMP Snooping Mode ssm-range Set IGMP SSM Range state Enable/Disable per-VLAN IGMP Snooping Mode throttling Set per-port Throttling uri Set per-VLAN Unsolicited Report Interval The command lets you configure the compatibility parameters on the switch compatibility <vlan-list> Forced-IGMPv1/ Forced-IGMPv2/ Forced-IGMPv3 /IGMP-Auto <vlan-list> VLAN list, available value is from 1 to 4094 format: 1, 3-5. Forced-IGMPv1 : Set IGMPv1 of IGMP operating on hosts and routers Forced-IGMPv2 : Set IGMPv2 of IGMP operating on hosts and routers Forced-IGMPv3 : Set IGMPv3 of IGMP operating on hosts and routers IGMP-Auto: Set auto mode of IGMP operating on hosts and routers EXAMPLE: Switch(igmp)# compatibility 1 IGMP-Auto Switch(igmp)# show status 1 Querier Rx Tx Rx Rx Rx Rx VID Status Query Query V1 Join V2 Join V3 Join V2 Leave ---- ------ ---------- ---------- ---------- ---------- ------------------Switch(igmp)# delete: Syntax: Parameter : The command lets you delete the setting on the switch delete <port-list> <ipmc-address> <port-list> The switch physical port, available value is from 1 to 28 format: 1,3-5. ipmc-address: Type which ipmc-address to delete IGMP filtering group. Available range from 224.0.0.0 to 239.255.255.255 EXAMPLE: Switch(igmp)# delete Switch(igmp)# 3 224.0.0.2 NOTE: If you type illegal ipmc-address, then switch won’t allow you to delete it. The screen will display e.g. Invalid argument "223.224.223.224" 69 Publication date: Feb., 2012 Revision A1 fast-‐leave: The command lets you configure fast-‐leave per-‐port on the switch Syntax: Parameter : fast-leave <port-list> disable/ enable <port-list> The switch physical port, available value is from 1 to 28 format: 1,3-5. disable: Disable the port fast-leave function. enable: Enable the port fast-leave function. NOTE: When you enable IGMP fast-leave processing, the switch immediately removes a port when it detects an IGMP version 2 leave message on that port. EXAMPLE: Switch(igmp)# fast-leave 1 disable Switch(igmp)# filtering: Syntax: Parameter : The command lets you configure filtering and the IP Multicast Group that will be filtered filtering <port-list> <ipmc-address> <port-list> The switch physical port, available value is from 1 to 28, format: 1,3-5. ipmc-address: Type which ipmc-address to delete IGMP filtering group. Available range from 224.0.0.0 to 239.255.255.255 EXAMPLE: Switch(igmp)# filtering 5 224.0.0.1 Switch(igmp)# NOTE: If you type illegal ipmc-address, then switch won’t allow you to filter it. The screen will display e.g. Invalid argument "223.224.223.224" flooding: Syntax: Parameter : The command lets you configure the flooding mode on the switch flooding enable/ disable disable: To disable the flooding function. enable: To enable the flooding function. Publication date: Feb., 2012 Revision A1 CLI Reference Guide EXAMPLE: Switch(igmp)# flooding enable Switch(igmp)# show config IGMP Snooping : Disabled IGMP Flooding Control : Enabled IGMP Proxy : Disabled IGMP SSM Range: 232.0.0.0/8 Port Router Dynamic Router Fast Leave Group Throttling Number ---- -------- -------------- ---------- ----------------------1 Disabled No Disabled Unlimited 2 Disabled No Disabled Unlimited 3 Disabled No Disabled Unlimited 4 Disabled No Disabled Unlimited 5 Disabled No Disabled Unlimited 6 Disabled No Disabled Unlimited 7 Disabled No Disabled Unlimited 8 Disabled No Disabled Unlimited 9 Disabled No Disabled Unlimited ………. Switch(igmp)# lmqi: Syntax: Parameter : The command lets you set per-‐VLAN Last Member Query Interval on the switch lmqi <vlan-list> <0-31744> <vlan-list>: VLAN list, available value is from 1 to 4094, and the format: 1,3-5. <0-31744>: Range: 0–31744 tenths of sec, Default:100 tenths of sec EXAMPLE: Switch(igmp)# lmqi 45 379 Switch(igmp)# proxy: The command lets you enable or disable the IGMP proxy function on the switch Syntax: Parameter : proxy enable/ disable disable: To disable the IGMP proxy function. enable: To enable the IGMP proxy function. EXAMPLE: Switch(igmp)# proxy enable Switch(igmp)# show config 71 Publication date: Feb., 2012 Revision A1 CLI Reference Guide IGMP Snooping : Disabled IGMP Flooding Control : Enabled IGMP Proxy : Enabled IGMP SSM Range: 232.0.0.0/8 Port Router Dynamic Router Fast Leave Group Throttling Number ---- -------- -------------- ---------- ----------------------1 Disabled No Disabled Unlimited 2 Disabled No Disabled Unlimited 3 Disabled No Disabled Unlimited 4 Disabled No Disabled Unlimited 5 Disabled No Disabled Unlimited 6 Disabled No Disabled Unlimited 7 Disabled No Disabled Unlimited 8 Disabled No Disabled Unlimited 9 Disabled No Disabled Unlimited ………. Switch(igmp)# 72 Publication date: Feb., 2012 Revision A1 CLI Reference Guide IP Commands of CLI Chapter 21 IP IP is an acronym for Internet Protocol. It is a protocol used for communicating data across an internet network. IP is a "best effort" system, which means that no packet of information sent over is assured to reach its destination in the same condition it was sent. Each device connected to a Local Area Network (LAN) or Wide Area Network (WAN) is given an Internet Protocol address, and this IP address is used to identify the device uniquely among all other devices connected to the extended network. The current version of the Internet protocol is IPv4, which has 32-‐bits Internet Protocol addresses allowing for in excess of four billion unique addresses. This number is reduced drastically by the practice of webmasters taking addresses in large blocks, the bulk of which remain unused. There is a rather substantial movement to adopt a new version of the Internet Protocol, IPv6, which would have 128-‐bits Internet Protocol addresses. This number can be represented roughly by a three with thirty-‐nine zeroes after it. However, IPv4 is still the protocol of choice for most of the Internet. Table 20: IP Commands dhcp: Command Function dhcp Enable/Disable DHCP client dns-proxy Enable/Disable DNS proxy mgmt-vlan Set the management VLAN ID name-server Set DNS IP address setup Set the IP address show Show ip information The command lets you configure the DHCP client Syntax: dhcp disable/ enable/ renew Parameter : disable: Disable DHCP client enable: Enable DHCP client renew: Force DHCP client to renew IP address EXAMPLE: 73 Publication date: Feb., 2012 Revision A1 CLI Reference Guide Switch(ip)# dhcp enable Switch(ip)# show Configured Current --------------- --------------DHCP Client : Enabled IP Address : 192.168.20.1 0.0.0.0 IP Mask : 255.255.255.0 0.0.0.0 IP Gateway : 192.168.20.250 0.0.0.0 VLAN ID : 1 1 DNS Server : 0.0.0.0 0.0.0.0 DNS Proxy : Enabled dns-‐proxy: Syntax: Parameter : The command lets you configure DNS proxy dns-proxy disable/ enable disable: Disable DNS proxy operation enable: Enable DNS proxy operation EXAMPLE: Switch(ip)# dns-proxy enable Switch(ip)# show Configured Current --------------- --------------DHCP Client : Enabled IP Address : 192.168.20.1 0.0.0.0 IP Mask : 255.255.255.0 0.0.0.0 IP Gateway : 192.168.20.250 0.0.0.0 VLAN ID : 1 1 DNS Server : 0.0.0.0 0.0.0.0 DNS Proxy : Enabled mgmt-‐vlan: The command lets you set the management VLAN ID Syntax: Parameter : mgmt-vlan <1-4094> disable/ enable <1-4094> Management VLAN ID, available value is from 1 to 4094 EXAMPLE: Switch(ip)# mgmt-vlan 2 Switch(ip)# show Configured Current --------------- --------------DHCP Client : Disabled IP Address : 192.168.20.1 192.168.20.1 IP Mask : 255.255.255.0 255.255.255.0 IP Gateway : 192.168.20.250 192.168.20.250 VLAN ID : 2 2 DNS Server : 0.0.0.0 0.0.0.0 DNS Proxy : Disabled name-‐server: The command lets you set DNS IP address 74 Publication date: Feb., 2012 Revision A1 Syntax: Parameter : name-server <ip-address> <ip-address> DNS IP address EXAMPLE: Switch(ip)# name-server 192.168.20.10 Switch(ip)# show Configured Current --------------- --------------DHCP Client : Disabled IP Address : 192.168.20.1 192.168.20.1 IP Mask : 255.255.255.0 255.255.255.0 IP Gateway : 192.168.20.250 192.168.20.250 VLAN ID : 2 2 DNS Server : 192.168.20.10 192.168.20.10 DNS Proxy : Disabled setup: Syntax: Parameter : The command lets you to configure the IP address setup <ip-address> <ip-mask> <ip-address> <ip-address> IP address <ip-mask> IP subnet mask <ip-address> Gateway IP address EXAMPLE: Switch(ip)# setup 192.168.20.10 255.255.255.0 192.168.20.250 Switch(ip)# show Configured Current --------------- --------------DHCP Client : Disabled IP Address : 192.168.20.10 192.168.20.10 IP Mask : 255.255.255.0 255.255.255.0 IP Gateway : 192.168.20.250 192.168.20.250 VLAN ID : 2 2 DNS Server : 0.0.0.0 0.0.0.0 DNS Proxy : Disabled NOTE: The IP address and the router must be on the same subnet. show: Syntax: Parameter : The command lets you show IP information show <cr> <cr> means press the Enter key. EXAMPLE: Publication date: Feb., 2012 Revision A1 CLI Reference Guide Switch(ip)# show DHCP Client IP Address IP Mask IP Gateway VLAN ID DNS Server DNS Proxy Configured Current --------------- --------------: Disabled : 192.168.20.10 192.168.20.10 : 255.255.255.0 255.255.255.0 : 192.168.20.250 192.168.20.250 : 2 2 : 0.0.0.0 0.0.0.0 : Disabled 76 Publication date: Feb., 2012 Revision A1 CLI Reference Guide IP-‐Source-‐Guard Commands of CLI Chapter 22 IP-‐Source -‐Guard The section describes how to configure the IP Source Guard detail parameters of the switch. You could use the IP Source Guard configure to enable or disable the switch port. Table 21: IP-Source-Guard Commands add: Syntax: Parameter : Command Function add Add or modify IP source guard static entry delete Delete IP source guard static entry limit IP source guard port limitation for dynamic entries mode Configure IP source guard mode port-mode Configure IP source guard port mode show Show IP source guard information translate Translate IP source guard dynamic entries into static entries The command lets you add or modify IP source guard static entry. add <port-list> <1-4094> <ip-address> <ip-mask> <port-list> available value is from the switch physical port density, format: 1,3-5 <1-4094>: VLAN ID, available value is from 1 to 4094 <ip-address>: IP address allowed for doing IP source guard <ip-mask>: IP mask for allowed IP address EXAMPLE: Switch(ip-source-guard)# add 1 1 192.168.1.1 255.255.0.0 Switch(ip-source-guard)# show binding-table Type Port VLAN IP Address MAC Address ------- ---- ---- --------------- ----------------Static 1 1 192.168.1.1 5a-80-70-64-60-80 delete: The command lets you delete IP source guard static entry 77 Publication date: Feb., 2012 Revision A1 CLI Reference Guide Syntax: Parameter : delete <port-list> <1-4094> <ip-address> <ip-mask> <port-list>: available value is from 1 to 28 format: 1,3-5 <1-4094>: VLAN ID, available value is from 1 to 4094 <ip-address>: IP address <ip-mask>: IP mask for allowed IP address EXAMPLE: Switch(ip-source-guard)# delete 1 1 192.168.1.1 255.255.255.0 Switch(ip-source-guard)# show binding-table Type Port VLAN IP Address MAC Address ------- ---- ---- --------------- ----------------- limit: Syntax: Parameter : This command lets you set up IP source guard port limitation for dynamic entries. limit <port-list> <0-2>/ Unlimited <port-list> available value is from the switch physical port density, format: 1,3-5 <0-2>: Specify the maximum number of dynamic clients that can be learned on given port. If the port mode is enabled and the value of max dynamic client is equal to 0, it means only allow the IP packets forwarding that are matched in static entries on the specific port unlimited. Unlimited: dynamic clients EXAMPLE: 78 Publication date: Feb., 2012 Revision A1 CLI Reference Guide Switch(ip-source-guard)# limit 1 0 Switch(ip-source-guard)# show config IP Source Guard Mode : Disabled Port ---1 2 3 4 5 6 7 8 9 10 11 12 13 14 15 16 17 18 19 20 21 22 23 24 25 26 27 28 mode: Syntax: Parameter : Port Mode --------Disabled Disabled Disabled Disabled Disabled Disabled Disabled Disabled Disabled Disabled Disabled Disabled Disabled Disabled Disabled Disabled Disabled Disabled Disabled Disabled Disabled Disabled Disabled Disabled Disabled Disabled Disabled Disabled Dynamic Entry Limit ------------------0 unlimited unlimited unlimited unlimited unlimited unlimited unlimited unlimited unlimited unlimited unlimited unlimited unlimited unlimited unlimited unlimited unlimited unlimited unlimited unlimited unlimited unlimited unlimited unlimited unlimited unlimited unlimited This command lets you configure IP source guard mode. mode enable/disable disable: Globally disable IP source guard mode enable: Globally enable IP source guard mode. All configured ACEs will be lost when the mode is enabled. EXAMPLE: 79 Publication date: Feb., 2012 Revision A1 CLI Reference Guide Switch(ip-source-guard)# mode enable Switch(ip-source-guard)# show config IP Source Guard Mode : Enabled Port ---1 2 3 4 5 6 7 8 9 10 11 12 13 14 15 16 17 18 19 20 21 22 23 24 25 26 27 28 Port Mode --------Disabled Disabled Disabled Disabled Disabled Disabled Disabled Disabled Disabled Disabled Disabled Disabled Disabled Disabled Disabled Disabled Disabled Disabled Disabled Disabled Disabled Disabled Disabled Disabled Disabled Disabled Disabled Disabled Dynamic Entry Limit ------------------0 unlimited unlimited unlimited unlimited unlimited unlimited unlimited unlimited unlimited unlimited unlimited unlimited unlimited unlimited unlimited unlimited unlimited unlimited unlimited unlimited unlimited unlimited unlimited unlimited unlimited unlimited unlimited 80 Publication date: Feb., 2012 Revision A1 CLI Reference Guide port-‐mode: Syntax: Parameter : This command sets IP source guard port mode. Move <port-list> enable/disable <port-list> available value is from the switch physical port density, format: 1,3-5 disable: Disable IP source guard port mode. enable: Enable IP source guard port mode. EXAMPLE: Switch(ip-source-guard)# port-mode 1 enable Switch(ip-source-guard)# show config IP Source Guard Mode : Enabled Port ---1 2 3 4 5 6 7 8 9 10 11 12 13 14 15 16 17 18 19 20 21 22 23 24 25 26 27 28 show: Syntax: Parameter : Port Mode --------Enabled Disabled Disabled Disabled Disabled Disabled Disabled Disabled Disabled Disabled Disabled Disabled Disabled Disabled Disabled Disabled Disabled Disabled Disabled Disabled Disabled Disabled Disabled Disabled Disabled Disabled Disabled Disabled Dynamic Entry Limit ------------------unlimited unlimited unlimited unlimited unlimited unlimited unlimited unlimited unlimited unlimited unlimited unlimited unlimited unlimited unlimited unlimited unlimited unlimited unlimited unlimited unlimited unlimited unlimited unlimited unlimited unlimited unlimited unlimited This command shows IP source guard information. show binding-table/ config binding-table: Show IP-MAC binding table config: Show IP source guard configuration 81 Publication date: Feb., 2012 Revision A1 CLI Reference Guide EXAMPLE: Switch(ip-source-guard)# show binding-table Type Port VLAN IP Address MAC Address ------- ---- ---- --------------- ----------------Static 1 1 192.168.1.1 5a-80-70-64-60-80 translate: Syntax: Parameter : This command translates IP source guard dynamic entries into static entries. translate <cr>: means press the Enter key. EXAMPLE: Switch(ip-source-guard)# translate IP Source Guard: Translate 0 dynamic entries into static entries. 82 Publication date: Feb., 2012 Revision A1 CLI Reference Guide IPv6 Commands of CLI Chapter 23 IPv6 This section describes how to configure the switch-‐managed IPv6 information. The Configured column is used to view or change the IPv6 configuration. And the Current column is used to show the active IPv6 configuration. Configure the switch-‐managed IPv6 information on this page. The Configured column is used to view or change the IPv6 configuration. The Current column is used to show the active IPv6 configuration. Table 22: IPv6 Commands autoconfig: Syntax: Parameter : Command Function autoconfig Configure IPv6 autoconfig mode setup Set the IPv6 address show Show IPv6 information The command lets you configure IPv6 autoconfig mode. autoconfig disable/ enable/ renew disable: Disable autoconfig mode enable: Enable autoconfig mode renew: Force to renew IPv6 address EXAMPLE: Switch(ipv6)# autoconfig enable Switch(ipv6)# show config Auto Configuration : Enabled Address : ::192.168.1.1 Prefix : 96 Gateway : :: setup: Syntax: Parameter : The command lets you set the IPv6 address setup <ipv6-address> <deny> <permit>. <ipv6-address>: IPv6 address is in 128-bit records represented as eight fields of up to four hexadecimal digits with a colon separating each field (:). For example, 'fe80::215:c5ff:fe03:4dc7'. The symbol '::' is a special syntax that can be used as a shorthand way of representing multiple 83 Publication date: Feb., 2012 Revision A1 CLI Reference Guide 16-bit groups of contiguous zeros; but it can only appear once. It is also used following a legal IPv4 address. For example, '::192.1.2.34' <1-128>: IPv6 prefix <ipv6-address>: Gateway IPv6 address IPv6 address is in 128-bit records represented as eight fields of up to four hexadecimal digits with a colon separating each field (:). For example, 'fe80::215:c5ff:fe03:4dc7'. The symbol '::' is a special syntax that can be used as a shorthand way of representing multiple 16-bit groups of contiguous zeros; but it can only appear once. It is also used following a legal IPv4 address. For example, '::192.1.2.34' EXAMPLE: witch(ipv6)# setup ::192.168.6.1 1 ::192.168.0.0 Switch(ipv6)# show config Auto Configuration : Enabled Address : ::192.168.6.1 Prefix : 1 Gateway : ::192.168.0.0 show: Syntax: Parameter : This command shows IPv6 information on the switch. show config/ current config: Show IPv6 configuration current: Show IPv6 current information EXAMPLE: Switch(ipv6)# show config Auto Configuration : Disabled Address : ::192.168.6.1 Prefix : 96 Gateway : :: Switch(ipv6)# show current Active Configuration for IPv6: (Static with Stateless) Link-Local Address : fe80::240:c7ff:fe34:3400 Address : ::192.168.6.1 Prefix : 96 Gateway : :: 84 Publication date: Feb., 2012 Revision A1 CLI Reference Guide LACP Commands of CLI Chapter 24 LACP Ports using Link Aggregation Control Protocol (according to IEEE 802.3ad specification) as their trunking method can choose their unique LACP GroupID to form a logic “trunked port”. The benefit of using LACP is that a port makes an agreement with its peer port before it becomes a ready member of a “trunk group” (also called aggregator). LACP is safer than the other trunking method—static trunk. Table 23: LACP Commands clear: Syntax: Parameter : Command Function clear Clear command key Configure the LACP key mode Configure the LACP mode role Configure the LACP role Show Show LACP information This command lets you clear the link aggregation entry on switch. clear statistics statistics: Clear LACP statistics. EXAMPLE: Switch(lacp)# clear statistics Switch(lacp)# show statistics Port Rx Frames Tx Frames Rx Unknown Rx Illegal ---- ---------- ---------- ---------- ---------1 0 0 0 0 2 0 0 0 0 3 0 0 0 0 4 0 0 0 0 key: Syntax: Parameter : This command lets you configure the LACP key. key <port-list> <1-65535>/ auto <port-list> available value is from the switch physical port density, format: 1,3-5 <1-65535>: LACP key auto: The Auto setting will set the key as appropriate by the physical 85 Publication date: Feb., 2012 Revision A1 CLI Reference Guide link speed, 10Mb = 1, 100Mb = 2, 1Gb = 3 EXAMPLE: Switch(lacp)# key 1 10000 Switch(lacp)# show config Port Mode Key Role ---- -------- ----- -----1 Disabled 10000 Active 2 Disabled Auto Active 3 Disabled Auto Active 4 Disabled Auto Active 5 Disabled Auto Active mode: Syntax: Parameter : The command lets you configure the LACP mode. mode <port-list> disable/enable <port-list> available value is from the switch’s physical port density, format: 1,3-5 disable: Disable LACP protocol enable: Enable LACP protocol EXAMPLE: Switch(lacp)# mode 1 enable Switch(lacp)# show config Port Mode Key Role ---- -------- ----- -----1 Enabled Auto Active 2 Disabled Auto Active 3 Disabled Auto Active 4 Disabled Auto Active role: This command lets you configure the LACP role Syntax: Parameter : role <port-list> active/ passive <port-list> available value is from the switch physical port density, format: 1,3-5 active: Initiate LACP negotiation, and transmit LACP packets each second passive: Listen for LACP packets EXAMPLE: 86 Publication date: Feb., 2012 Revision A1 CLI Reference Guide Switch(lacp)# role 1 passive Switch(lacp)# show config Port Mode Key Role ---- -------- ----- -----1 Disabled Auto Passive 2 Disabled Auto Active 3 Disabled Auto Active show: This command shows LACP information. Syntax: Parameter : show config/ statistics/ status config: Show LACP configuration statistics: Show LACP statistics status: Show LACP status EXAMPLE: Switch(lacp)# show config Port Mode Key Role ---- -------- ----- -----1 Disabled Auto Passive 2 Disabled Auto Active Switch(lacp)# show statistics Port Rx Frames Tx Frames Rx Unknown Rx Illegal ---- ---------- ---------- ---------- ---------1 0 0 0 0 2 0 0 0 0 3 0 0 0 0 witch(lacp)# show status Port Mode ---- -------1 Disabled 2 Disabled 3 Disabled Key ----- Aggr ID ------- 87 Partner System ID Partner Port ----------------- ------------ Publication date: Feb., 2012 Revision A1 CLI Reference Guide LLDP Commands of CLI Chapter 25 LLDP The switch supports the LLDP. For current information on your switch model, The Link Layer Discovery Protocol (LLDP) provides a standards-‐based method for enabling switches to advertise themselves to adjacent devices and to learn about adjacent LLDP devices. The Link Layer Discovery Protocol (LLDP) is a vendor-‐neutral Link Layer protocol in the Internet Protocol Suite used by network devices for advertising their identity, capabilities, and neighbors on a IEEE 802 local area network, principally wired Ethernet. The protocol is formally referred to by the IEEE as Station and Media Access Control Connectivity Discovery specified in standards document IEEE 802.1AB. Table 24: LLDP Commands cdp-‐aware: Syntax: Parameter : Command Function cdp-aware Configure CDP (Cisco Discovery Protocol) aware mode clear Clear LLDP statistics delay Configure ARP inspection mode hold Configure LLDP Tx hold value interval Configure LLDP transmission interval mode Configure the LLDP mode option-tlv Configure LLDP Optional TLVs reinit Configure LLDP reinit delay show Show LLDP information This command lets you configure CDP (Cisco Discovery Protocol) aware mode. add <port-list> disable/ enable <port-list> available value is from the switch physical port density, format: 1,3-5 disable: Disable CDP awareness enable: Enable CDP awareness (CDP discovery information is added to the LLDP neighbor table) EXAMPLE: 88 Publication date: Feb., 2012 Revision A1 CLI Reference Guide Switch(lldp)# cdp-aware 1 enable Switch(lldp)# show config Interval : 30 Hold : 4 Tx Delay : 2 Reinit Delay: 2 Port System System System Management CDP Port Mode Description Name Description Capability Address awareness ---- -------- ----------- -------- ----------- ----------- ---------- --------1 Disabled Enabled Enabled Enabled Enabled Enabled Enabled 2 Disabled Enabled Enabled Enabled Enabled Enabled Disabled 3 Disabled Enabled Enabled Enabled Enabled Enabled Disabled clear: This command lets you clear LLDP statistics. Syntax: clear Parameter : <cr> EXAMPLE: Switch(lldp)# clear Switch(lldp)# show statistics LLDP global counters Neighbor entries was last changed at 2011-01-01 00:00:00 (5600 sec. ago). Total Neighbors Entries Added 0. Total Neighbors Entries Deleted 0. Total Neighbors Entries Dropped 0. Total Neighbors Entries Aged Out 0. LLDP local counters Rx Tx Port Frames Frames -------------1 0 0 2 0 0 3 0 0 Rx Errors -----0 0 0 Rx Rx TLV Rx TLV Rx TLV Discards Errors Unknown Organz. -------- ------------ ------0 0 0 0 0 0 0 0 0 0 0 0 0 0 0 Aged ----- delay : The command lets you configure LLDP Tx delay. 89 Publication date: Feb., 2012 Revision A1 CLI Reference Guide Syntax: Parameter : delay <1-8192> <1-8192>: LLDP transmission delay EXAMPLE: Switch(lldp)# delay 5 Switch(lldp)# show config Interval : 30 Hold : 4 Tx Delay : 5 Reinit Delay: 2 Port System System System Management CDP Port Mode Description Name Description Capability Address awareness ---- -------- ----------- -------- ----------- ----------- ---------- --------1 Disabled Enabled Enabled Enabled Enabled Enabled Disabled 2 Disabled Enabled Enabled Enabled Enabled Enabled Disabled 3 Disabled Enabled Enabled Enabled Enabled Enabled Disabled hold: Syntax: Parameter : The command lets you configure LLDP Tx hold value. hold <2-10> <2-10>: LLDP hold value EXAMPLE: Switch(lldp)# hold 10 Switch(lldp)# show config Interval : 30 Hold : 10 Tx Delay : 2 Reinit Delay: 2 Port System System System Management CDP Port Mode Description Name Description Capability Address awareness ---- -------- ----------- -------- ----------- ----------- ---------- --------1 Disabled Enabled Enabled Enabled Enabled Enabled Disabled 2 Disabled Enabled Enabled Enabled Enabled Enabled Disabled 3 Disabled Enabled Enabled Enabled Enabled Enabled Disabled interval: Syntax: Parameter : The command lets you configure LLDP transmission interval. interval <5-32768> <5-32768>: LLDP transmission interval EXAMPLE: 90 Publication date: Feb., 2012 Revision A1 CLI Reference Guide Switch(lldp)# interval 40 Switch(lldp)# show config Interval : 40 Hold : 4 Tx Delay : 2 Reinit Delay: 2 Port System System System Management CDP Port Mode Description Name Description Capability Address awareness ---- -------- ----------- -------- ----------- ----------- ---------- --------1 Disabled Enabled Enabled Enabled Enabled Enabled Disabled 2 Disabled Enabled Enabled Enabled Enabled Enabled Disabled 3 Disabled Enabled Enabled Enabled Enabled Enabled Disabled mode: Syntax: Parameter : The command lets you configure the LLDP mode. mode <port-list> disable/ enable <port-list> available value is from switch physic port density, format: 1,3-5 disable: The switch will not send out LLDP information, and will drop LLDP information received from neighbors enable: The switch will send out LLDP information, and will analyze LLDP information received from neighbors EXAMPLE: Switch(lldp)# mode 1 enable Switch(lldp)# show config Interval : 30 Hold : 4 Tx Delay : 2 Reinit Delay: 2 Port System System System Management CDP Port Mode Description Name Description Capability Address awareness ---- -------- ----------- -------- ----------- ----------- ---------- --------1 Enabled Enabled Enabled Enabled Enabled Enabled Disabled 2 Disabled Enabled Enabled Enabled Enabled Enabled Disabled 3 Disabled Enabled Enabled Enabled Enabled Enabled Disabled option-‐tiv: Syntax: Parameter : The command lets you configure LLDP Optional TLVs. option-tlv <port-list> mgmt-addr/ port-desc/ sys-capa/ sys-desc/ sys-name disable/ enable <port-list> available value is from the switch physical port density, format: 1,3-5 mgmt-addr: Management IP address 91 Publication date: Feb., 2012 Revision A1 CLI Reference Guide port-desc: Port description sys-capa: System capability sys-desc: System description sys-name: System name disable Disable TLV enable Enable TLV EXAMPLE: Switch(lldp)# option-tlv 1 mgmt-addr disable Switch(lldp)# option-tlv 1 port-desc disable Switch(lldp)# option-tlv 1 sys-capa disable Switch(lldp)# option-tlv 1 sys-desc disable Switch(lldp)# option-tlv 1 sys-name disable Switch(lldp)# show config Interval : 30 Hold : 4 Tx Delay : 2 Reinit Delay: 2 Port System System System Management CDP Port Mode Description Name Description Capability Address awareness ---- -------- ----------- -------- ----------- ----------- ---------- --------1 Disabled Disabled Disabled Disabled Disabled Disabled Disabled 2 Disabled Enabled Enabled Enabled Enabled Enabled Disabled 3 Disabled Enabled Enabled Enabled Enabled Enabled Disabled reinit: Syntax: Parameter : The command lets you configure LLDP reinit delay. reinit <1-10> <1-10>: LLDP reinit delay EXAMPLE: Switch(lldp)# reinit 10 Switch(lldp)# show config Interval : 30 Hold : 4 Tx Delay : 2 Reinit Delay: 10 show: Syntax: Parameter : The command show LLDP information. show config/ info/ statistics config: Show LLDP configuration info: Show LLDP neighbor device information statistics: Show LLDP statistics 92 Publication date: Feb., 2012 Revision A1 CLI Reference Guide EXAMPLE: Switch(lldp)# show config Interval : 30 Hold : 4 Tx Delay : 2 Reinit Delay: 2 Port System System System Management CDP Port Mode Description Name Description Capability Address awareness ---- -------- ----------- -------- ----------- ----------- ---------- --------1 Disabled Enabled Enabled Enabled Enabled Enabled Disabled 2 Disabled Enabled Enabled Enabled Enabled Enabled Disabled Switch(lldp)# show info 1 No LLDP entries found Switch(lldp)# show statistics LLDP global counters Neighbor entries was last changed at 2011-01-01 00:00:00 (8222 sec. ago). Total Neighbors Entries Added 0. Total Neighbors Entries Deleted 0. Total Neighbors Entries Dropped 0. Total Neighbors Entries Aged Out 0. LLDP local counters Rx Tx Rx Rx Rx TLV Rx TLV Rx TLV Port Frames Frames Errors Discards Errors Unknown Organz. -------------------------- ------------ ------1 0 0 0 0 0 0 0 0 2 0 0 0 0 0 0 0 0 93 Aged ----- Publication date: Feb., 2012 Revision A1 CLI Reference Guide LLDP Media Commands of CLI Chapter 26 LLDP Media Media Endpoint Discovery is an enhancement of LLDP, known as LLDP-‐MED, that provides the following facilities: Auto-‐discovery of LAN policies (such as VLAN, Layer 2 Priority and Differentiated services (Diffserv) settings) enabling plug and play networking. Device location discovery to allow creation of location databases and, in the case of Voice over Internet Protocol (VoIP), Enhanced 911 services. Extended and automated power management of Power over Ethernet (PoE) end points. Inventory management, allowing network administrators to track their network devices, and determine their characteristics (manufacturer, software and hardware versions, serial or asset number). This page allows you to configure the LLDP-‐MED. This function applies to VoIP devices that support LLDP-‐MED. Table 25: LLDP Media Commands civic: Syntax: Parameter : Command Function civic Configure LLDP-MED civic address location coordinate Configure LLDP-MED coordinate location delete Delete the selected policy ecs Configure LLDP-MED Emergency Call Service fast Configure LLDP-MED fast start repeat count policy Configure LLDP-MED policy port-policy Configure LLDP-MED port policy show Show LLDP-MED information The command lets you configure LLDP-‐MED civic address location function. civic additional-code/… <LINE> additional-code: Additional code additional-info: Additional location info apartment: Unit (Apartment, suite) block: Neighbourhood, block building: Building (structure) city: City, township, shi (Japan) 94 Publication date: Feb., 2012 Revision A1 CLI Reference Guide comm-name: Postal community name country-code: The two-letter ISO 3166 country code county: County, parish, gun (Japan), district district: City division, borough, city district, ward, chou(Japan) floor: Floor house-no: House number house-no-suffix: House number suffix landmark: Landmark or vanity address leading-street-direction: Leading street direction name: Name (residence and office occupant) p.o.box: Post office box (P.O. BOX) place-type: Place type room-number: Room number state: National subdivisions (state, canton, region, province, prefecture) street: StreetRoom number National subdivisions (state, canton, region, province, prefecture) Stree street-suffix: Street suffix trailing-street-suffix: Trailing street suffix zip_code: Postal/zip code <LINE>: The value for the Civic Address Location entry EXAMPLE: 95 Publication date: Feb., 2012 Revision A1 CLI Reference Guide Switch(lldpmed)# civic city taipei Switch(lldpmed)# civic floor 1 Switch(lldpmed)# show config Fast Start Repeat Count Location Coordinates -------------------Latitude Longitude Altitude Map datum : 4 : : : : 0.0000 North 0.0000 East 0.0000 meter(s) WGS84 Civic Address Location ---------------------Country code : National subdivison : County : City : taipei City district : Block (Neighborhood) : Street : Street Dir : Trailling Street : Street Suffix : House No. : House No. Suffix : Landmark : Additional Location Info : Name : Zip : Building : Unit : Floor : 1 Room No. : Placetype : Postal Community Name : P.O. Box : Addination Code : Emergency Call Service coordinate: Syntax: : The command lets you configure LLDP-‐MED coordinate location function. coordinate altitude <coordinate-value> floor/ meter coordinate datum nad83-mllw/ nad83-navd88/ wgs84 coordinate latitude <coordinate-value> north/ south coordinate longitude <coordinate-value> east/ west Parameter : altitude: Altitude <coordinate-value>: -32767 to 32767 Meters or floors with max. 4 digits floor: Representing altitude in a form more relevant in buildings that have different floor-to-floor dimensions meter: Representing meters of Altitude defined by the vertical datum specified datum : Map datum 96 Publication date: Feb., 2012 Revision A1 CLI Reference Guide nad83-mllw North American Datum 1983, CRS Code 4269, Prime Meridian Name: Greenwich; The associated vertical datum is Mean Lower Low Water (MLLW). This datum pair is to be used when referencing locations on water/sea/ocean nad83-navd88 North American Datum 1983, CRS Code 4269, Prime Meridian Name: Greenwich; The associated vertical datum is the North American Vertical Datum of 1988 (NAVD88). This datum pair is to be used when referencing locations on land, not near tidal water (which would use Datum = NAD83/MLLW) wgs84 (Geographical 3D) - World Geodesic System 1984, CRS Code 4327, Prime Meridian Name: Greenwich latitude: Latitude <coordinate-value>: 0 to 90 degress with max. 4 digits north: North of the equator south: South of the equator longitude: Longitude <coordinate-value>: 0 to 180 degress with max. 4 digits east: East of the prime meridian west: West of the prime meridian EXAMPLE: itch(lldpmed)# coordinate altitude 10 floor Switch(lldpmed)# coordinate datum nad83-mllw Switch(lldpmed)# coordinate latitude 60 north Switch(lldpmed)# coordinate longitude 30 east Switch(lldpmed)# show config Fast Start Repeat Count Location Coordinates -------------------Latitude Longitude Altitude Map datum delete: : 4 : : : : 60.0000 North 30.0000 East 10.0000 floor NAD83/MLLW The command lets you delete the selected policy. 97 Publication date: Feb., 2012 Revision A1 CLI Reference Guide Syntax: Parameter : delete <0-31> <0-31>: Policy ID, available value is from 0 to 31 EXAMPLE: Switch(lldpmed)# delete 1 Switch(lldpmed)# show policy Policy Id Application Type Tag Vlan ID L2 Priority DSCP --------- ------------------------ -------- ------- ----------- ---- ecs: Syntax: Parameter : ecs The command lets you configure LLDP-‐MED Emergency Call Service. <number> <number>: The numerical digit string for the Emergency Call Service EXAMPLE: Switch(lldpmed)# ecs 0921555678 Switch(lldpmed)# show config Fast Start Repeat Count Location Coordinates -------------------Latitude Longitude Altitude Map datum Emergency Call Service fast: Syntax: Parameter : : 4 : : : : 60.0000 North 30.0000 East 10.0000 floor NAD83/MLLW : 0921555678 The command lets you configure LLDP-‐MED fast start repeat count function. fast < console>/< ssh >/ < telnet >/ < web >, / tacats+ local / none / radius <1-10>: The number of times the fast start LLDPDU is being sent during the activation of the fast start mechanism defined by LLDP-MED EXAMPLE: 98 Publication date: Feb., 2012 Revision A1 CLI Reference Guide witch(lldpmed)# fast 10 Switch(lldpmed)# show config Fast Start Repeat Count Location Coordinates -------------------Latitude Longitude Altitude Map datum policy: : 10 : : : : 60.0000 North 30.0000 East 10.0000 floor NAD83/MLLW The command lets you configure LLDP-‐MED policy. Syntax: Parameter : policy tagged/ untagged <1-4094> <0-7> <0-63> guest-voice/… tagged: The device is using tagged frames untagged: The device is using untagged frames <1-4094>: VLAN ID, available value is from 1 to 4094 <0-7>: Layer 2 priority to be used for the specified application type <0-63>: DSCP value to be used to provide Diffserv node beha viour for the specified application type as defined in IETF RFC 2474 guest-voice Guest Voice to support a separate limited feature-set voice service for guest users and visitors with their own IP Telephony handsets and other similar appliances supporting interactive voice services guest-voice-signaling Guest Voice Signaling (conditional) for use in network topologies that require a different policy for the guest voice signaling than for the guest voice media softphone-voice Softphone Voice for use by softphone applications on typical data centric devices, such as PCs or laptops. This class of endpoints frequently does not support multiple VLANs, if at all,and are typically configured to use an untagged VLAN or a single tagged data specific VLAN streaming-video Streaming Video for use by broadcast or multicast based video content distribution and other similar applications supporting streaming video services that require specific network policy treatment. Video applications relying on TCP with buffering would not be an intended use of this application type. video-conferencing Video Conferencing for use by dedicated Video Conferencing equipment and other similar appliances supporting real-time 99 Publication date: Feb., 2012 Revision A1 CLI Reference Guide interactive video/audio services. video-signaling ideo Signaling (conditional) for use in network topologies that require a separate policy for the video signaling than for the video media voice Voice for use by dedicated IP Telephony handsets and other similar appliances supporting interactive voice services. These devices are typically deployed on a separate VLAN for ease of deployment and enhanced security by isolation from data applications voice-signaling Voice Signaling (conditional) for use in network topologies that require a different policy for the voice signaling than for the voice media EXAMPLE: Switch(lldpmed)# policy tagged 1 0 60 guest-voice New policy added with policy id: 1 Switch(lldpmed)# show policy Policy Id Application Type Tag Vlan ID L2 Priority DSCP --------- ------------------------ -------- ------- ----------- ---0 Guest Voice Tagged 1 0 60 port-‐policy: Syntax: Parameter : The command lets you configure LLDP-‐MED port policy function. port-policy <port-list> <0-31> disable/enable <port-list> available value is from switch physic port density, format: 1,3-5 <0-31>: Policy ID, available value is from 0 to 31 disable: Disable the policy to a given port enable: Enable the policy to a given port EXAMPLE: Switch(lldpmed)# port-policy 1 2 enable Switch(lldpmed)# show port-policy Port Policies ---------------1 2 2 none 3 none 4 none 5 none 100 Publication date: Feb., 2012 Revision A1 show: The command lets you display LLDP-‐MED information. Syntax: Parameter : show config/ info/ policy/ port-policy config: Show LLDP-MED configuration info: Show LLDP-MED neighbor device information policy: Show LLDP-MED policy configuration port-policy: Show LLDP-MED port policy configuration EXAMPLE: witch(lldpmed)# show config Fast Start Repeat Count Location Coordinates -------------------Latitude Longitude Altitude Map datum : 10 : : : : 60.0000 North 30.0000 East 10.0000 floor NAD83/MLLW Civic Address Location ---------------------Country code : National subdivison : County : City : taipei City district : Block (Neighborhood) : Street : Street Dir : Trailling Street : Street Suffix : House No. : House No. Suffix : Landmark : Additional Location Info : Name : Zip : Building : Unit : Floor : 1 Room No. : Placetype : Postal Community Name : P.O. Box : Addination Code : Emergency Call Service : 0921555678 Switch(lldpmed)# show info 1 No LLDP-MED entries found Switch(lldpmed)# show policy Policy Id Application Type Tag Vlan ID L2 Priority DSCP --------- ------------------------ -------- ------- ----------- ---0 Guest Voice Tagged 1 0 60 Switch(lldpmed)# show port-policy Port Policies ---------------1 2 2 none 3 none Publication date: Feb., 2012 Revision A1 CLI Reference Guide Loop protection Commands of CLI Chapter 27 Loop protection The loop detection is used to detect the presence of traffic. When the switch receives a packet’s (looping detection frame) MAC address that’s the same as the one from a port, show Loop Protection happens. The port will be locked when it receives the looping detection frames. Table 26: Loop protection Commands interval: Command Function interval Configure loop protection transmit interval mode Configure loop protection mode port-action Configure loop protection port action port-mode Configure loop protection port mode port-transmit Configure loop protection port transmit mode show Display loop protection information shutdown Configure loop protection shutdown time The command lets you configure loop protection transmit interval. Syntax: interval <1-10> Parameter : <1-10> Transmit time interval EXAMPLE: Switch(loop-protect)# interval 3 Switch(loop-protect)# show config Loop Protection : Disabled Transmission Time : 3 Shutdown Time : 180 mode: Syntax: Parameter : The command lets you configure loop protection mode. mode disable/ enable disable: Disable loop protection operation enable: Enable loop protection operation EXAMPLE: 102 Publication date: Feb., 2012 Revision A1 CLI Reference Guide Switch(loop-protect)# mode enable Switch(loop-protect)# show config Loop Protection : Enabled Transmission Time : 3 Shutdown Time : 180 Port ---1 2 3 4 port-‐action: Syntax: Parameter : Mode -------Enabled Enabled Enabled Enabled Action Transmit ---------------- -------Shutdown Enabled Shutdown Enabled Shutdown Enabled Shutdown Enabled The command lets you configure loop protection port action. port-action <port-list> both/ log/ shutdown <port-list>: available value is from switch physical port density, format: 1,3-5 both: Shutdown the port and log event log: Log the event only shutdown: Shutdown the port EXAMPLE: Switch(loop-protect)# port-action 1 both Switch(loop-protect)# show config Loop Protection : Disabled Transmission Time : 3 Shutdown Time : 180 Port Mode Action Transmit ---- -------- ---------------- -------1 Enabled Shutdown and Log Enabled 2 Enabled Shutdown Enabled Switch(loop-protect)# port-action 1 log Switch(loop-protect)# show config Loop Protection : Disabled Transmission Time : 3 Shutdown Time : 180 Port Mode Action Transmit ---- -------- ---------------- -------1 Enabled Log Only Enabled 2 Enabled Shutdown Enabled Switch(loop-protect)# port-action 1 shutdown Switch(loop-protect)# show config Loop Protection : Disabled Transmission Time : 3 Shutdown Time : 180 Port Mode Action Transmit ---- -------- ---------------- -------1 Enabled Shutdown Enabled 2 Enabled Shutdown Enabled 103 Publication date: Feb., 2012 Revision A1 CLI Reference Guide port-‐mode: Syntax: Parameter : The command lets you configure loop protection port mode. port-mode <port-list> disable/ enable <port-list> available value is from switch physical port density, format: 1,3-5 disable: Disable loop protection operation enable: Enable loop protection operation EXAMPLE: Switch(loop-protect)# port-mode 1 disable Switch(loop-protect)# show config Loop Protection : Disabled Transmission Time : 3 Shutdown Time : 180 Port Mode ---- -------1 Disabled 2 Enabled 3 Enabled port-‐transmit: Syntax: Parameter : Action Transmit ---------------- -------Shutdown Enabled Shutdown Enabled Shutdown Enabled The command lets you configure loop protection port transmit mode. reinit <1-10> <port-list> available value is from switch physical port density, format: 1,3-5 disable: Passively looking for looped PDUs enable: Actively generating loop protection PDU's EXAMPLE: Switch(loop-protect)# port-transmit 1 disable Switch(loop-protect)# show config Loop Protection : Disabled Transmission Time : 3 Shutdown Time : 180 Port Mode Action Transmit ---- -------- ---------------- -------1 Disabled Shutdown Disabled 2 Enabled Shutdown Enabled show: Syntax: The command display loop protection information. show config/ status 104 Publication date: Feb., 2012 Revision A1 CLI Reference Guide Parameter : config: Show loop protection configuration status: Show loop protection status EXAMPLE: Switch(loop-protect)# show config Loop Protection : Disabled Transmission Time : 5 Shutdown Time : 180 Port ---1 2 3 4 Mode -------Enabled Enabled Enabled Enabled Action Transmit ---------------- -------Shutdown Enabled Shutdown Enabled Shutdown Enabled Shutdown Enabled Switch(loop-protect)# show status Port Action Transmit Loops Status Loop Time of Last Loop ---- ---------------- -------- -------- -------- ---------------------1 Shutdown Enabled 0 Down 2 Shutdown Enabled 0 Down 3 Shutdown Enabled 0 Down 4 Shutdown Enabled 0 Down - shutdown: Syntax: Parameter : The command lets you configure loop protection shutdown time. shutdown <0-604800> <0-604800>: Shutdown time interval. A value of zero disables re-enabling the port EXAMPLE: Switch(loop-protect)# shutdown 200 Switch(loop-protect)# show config Loop Protection : Disabled Transmission Time : 3 Shutdown Time : 200 105 Publication date: Feb., 2012 Revision A1 CLI Reference Guide Port Mirroring Commands of CLI Chapter 28 Mirroring You can mirror traffic from any source port to a target port for real-‐time analysis. You can then attach a logic analyzer or RMON probe to the target port and study the traffic crossing the source port in a completely unobtrusive manner. Mirror Configuration is used to monitor the traffic of the network. For example, we assume that Port A and Port B are Monitoring Port and Monitored Port respectively, thus, the traffic received by Port B will be copied to Port A for monitoring. Table 27: Port Mirroring Commands analyzer-‐port: Command Function analyzer-port Configure analyzer port port-mode Configure port mode show Show port mirroring information The command lets you configure an analyzer port on the switch. Syntax: analyzer-port disable/ <port> Parameter : disable: Disable port mirroring <port>: Analyzer port, available value is from 1 to switch physical port density EXAMPLE: Switch(mirror)# analyzer-port 1 Switch(mirror)# show Analyzer Port: 1 Port Mode ---- -------1 Disabled 2 Disabled port-‐mode: The command lets you configure port mode on the switch. Syntax: Parameter : port-mode <port-list> disable/ enable/ rx-only/ tx-only <port-list> available value is from switch physical port density, format: 1,3-5 106 Publication date: Feb., 2012 Revision A1 CLI Reference Guide disable: The parameter disables DHCP relay mode. Enable: The parameter enables DHCP snooping mode. rx-only: Enable Rx mirroring tx-only: Enable Tx mirroring EXAMPLE: Switch(mirror)# Switch(mirror)# Switch(mirror)# Switch(mirror)# Switch(mirror)# port-mode port-mode port-mode port-mode show 2 3 4 1 enable rx-only tx-only disable Analyzer Port: 1 Port ---1 2 3 4 show: Mode -------Disabled Enabled Rx-only Tx-only The command lets you show port mirroring information. Syntax: Parameter : show <cr> EXAMPLE: Switch(mirror)# show Analyzer Port: Disabled Port ---1 2 3 4 Mode -------Disabled Disabled Disabled Disabled 107 Publication date: Feb., 2012 Revision A1 CLI Reference Guide MLD Commands of CLI Chapter 29 MLD Curiously enough, a network node that acts as a source of IPv6 multicast traffic is only an indirect participant in MLD snooping—it just provides multicast traffic, and MLD doesn’t interact with it. (Note, however, that in an application like desktop conferencing, a network node may act as both a source and an MLD host, but MLD interacts with that node only in its role as an MLD host.) A source node creates multicast traffic by sending packets to a multicast address. In IPv6, addresses with the first eight bits set (that is, “FF” as the first two characters of the address) are multicast addresses, and any node that listens to such an address will receive the traffic sent to that address. Application software running on the source and destination systems cooperates to determine what multicast address to use. (Note that this is a function of the application software, not of MLD.) When MLD snooping is enabled on a VLAN, the switch acts to minimize unnecessary multicast traffic. If the switch receives multicast traffic destined for a given multicast address, it forwards that traffic only to ports on the VLAN that have MLD hosts for that address. It drops that traffic for ports on the VLAN that have no MLD hosts. Table 28: MLD Commands Command Function compatibility Set the Versions of MLD Operating on Hosts and Routers delete Delete commands fast-leave Set per-port Fast Leave filtering The IP Multicast Group that will be filtered flooding Set MLD Flooding Mode lmqi Set the per-VLAN Last Member Query Interval proxy Set MLD Proxy Mode qi Set the per-VLAN Query Interval qri Set the per-VLAN Query Response Interval querier Enable/Disable the per-VLAN MLD Querier router Set Router Port rv Set the per-VLAN Robustness Variable show Show MLD Information snooping Set MLD Snooping Mode ssm-range Set MLD SSM Range 108 Publication date: Feb., 2012 Revision A1 CLI Reference Guide compatibility: Syntax: Parameter : state Enable/Disable the per-VLAN MLD Snooping throttling Set per-port Throttling uri Set the per-VLAN Unsolicited Report Interval The command lets you set the Versions of MLD Operating on Hosts and Routers. compatibility < vlan-list > Forced-MLDv1/ Forced-MLDv2/ MLD-Auto <vlan-list>: VLAN list, available value is from 1 to 4094 format: 1,3-5 Forced-MLDv1: Set MLDv1 of MLD operating on hosts and routers Forced-MLDv2: Set MLDv2 of MLD operating on hosts and routers MLD-Auto: Set auto mode of MLD operating on hosts and routers EXAMPLE: Switch(mld)# compatibility 1 forced-MLDv1 delete: The command lets you delete commands Syntax: Parameter : delete <port-list> <ipv6-address> <port-list> available value is from switch physical port density, format: 1,3-5 <ipv6-address>: Delete MLD filtering group. EXAMPLE: Switch(mld)# delete 1 fe80::202:b3ff:fe1e:8329 Switch(mld)# show config MLD Snooping : Disabled MLd Flooding Control : Enabled MLd Proxy : Disabled fast-‐leave: Syntax: Parameter : The command lets you set per-‐port Fast Leave fast-leave <port-list> disable/ enable <port-list> available value is from switch physical port density, format: 1,3-5 disable: Disable fast leave enable: Enable fast leave 109 Publication date: Feb., 2012 Revision A1 CLI Reference Guide EXAMPLE: Switch(mld)# fast-leave 1 enable Switch(mld)# show config MLD Snooping : Disabled MLd Flooding Control : Enabled MLd Proxy : Disabled MLD SSM Range: Port Router ---- -------1 Disabled 2 Disabled 3 Disabled 4 Disabled filtering: Syntax: Parameter : ff3e::/96 Dynamic Router Fast Leave Group Throttling Number -------------- ---------- ----------------------No Enabled Unlimited No Disabled Unlimited No Disabled Unlimited No Disabled Unlimited The command lets you to set the IP Multicast Group that will be filtered. filtering <port-list> <ipv6-address> <port-list> available value is from switch physical port density, format: 1,3-5 <ipv6-address>: IPv6 address is in 128-bit records represented as eight fields of up to four hexadecimal digits with a colon separating each field (:). For example, 'fe80::215:c5ff:fe03:4dc7'. The symbol '::' is a special syntax that can be used as a shorthand way of representing multiple 16-bit groups of contiguous zeros; but it can only appear once. It also used following a legal IPv4 address. For example, '::192.1.2.34' EXAMPLE: Switch(mld)# filtering 1 fe80::215:c5ff:fe03:4dc7 Switch(mld)# show config MLD Snooping : Disabled MLd Flooding Control : Enabled MLd Proxy : Disabled MLD SSM Range: Port Router ---- -------1 Disabled 2 Disabled 3 Disabled 4 Disabled ff3e::/96 Dynamic Router Fast Leave Group Throttling Number -------------- ---------- ----------------------No Enabled Unlimited No Disabled Unlimited No Disabled Unlimited No Disabled Unlimited VID State Querier Compatibility RV QI QRI LLQI URI ---- -------- -------- ------------- --- ----- ----- ----- ----1 Disabled Enabled Port Filtering Groups ---- -------------------------------------1 6665:3830:3a3a:3231:353a:6335:6666:3a66 2 No Filtering Group 3 No Filtering Group flooding: The command lets you set MLD Flooding Mode. 110 Publication date: Feb., 2012 Revision A1 CLI Reference Guide Syntax: Parameter : flooding disable/ enable disable: Disable unregistered IPMCv6 traffic flooding. Enable: Enable unregistered IPMCv6 traffic flooding. EXAMPLE: Switch(mld)# flooding disable Switch(mld)# show config MLD Snooping : Disabled MLd Flooding Control : Disabled MLd Proxy : Disabled lmqi: Syntax: Parameter : The command lets you set the per-‐VLAN Last Member Query Interval lmqi <vlan-list> <0-31744> <vlan-list>: VLAN list, available value is from 1 to 4094 format: 1,3-5. <0-31744>: Range:0~31744 tenths of sec, default:100 tenths of sec. EXAMPLE: Switch(mld)# lmqi 1 31744 proxy: Syntax: Parameter : The command lets you set MLD Proxy Mode proxy disable/ enable disable: Disable MLD proxy. Enable: Enable MLD proxy. EXAMPLE: Switch(mld)# proxy enable Switch(mld)# show config MLD Snooping : Disabled MLd Flooding Control : Disabled MLd Proxy : Enabled qi: Syntax: The command lets you set the per-‐VLAN Query Interval qi <vlan-list> <1-255> 111 Publication date: Feb., 2012 Revision A1 CLI Reference Guide <vlan-list>: VLAN list, available value is from 1 to 4094 format: 1,3-5. Parameter : <1-255>: Range:1–255 sec, default:125 sec EXAMPLE: Switch(mld)# state 1 enable Switch(mld)# qi 1 888 Switch(mld)# show config MLD Snooping : Disabled MLd Flooding Control : Enabled MLd Proxy : Disabled MLD SSM Range: Port Router ---- -------1 Disabled 2 Disabled ff3e::/96 Dynamic Router Fast Leave Group Throttling Number -------------- ---------- ----------------------No Disabled Unlimited No Disabled Unlimited VID State Querier Compatibility RV QI QRI LLQI URI ---- -------- -------- ------------- --- ----- ----- ----- ----1 Enabled En qri: Syntax: Parameter : The command lets you set the per-‐VLAN Query Response Interval qri <vlan-list> <0-31744> <vlan-list>: VLAN list, available value is from 1 to 4094 format: 1,3-5. <0-31744>: Range:0–31744 tenths of sec, default:100 tenths of sec. EXAMPLE: Switch(mld)# state 1 enable Switch(mld)# qri 1 555 Switch(mld)# show config MLD Snooping : Disabled MLd Flooding Control : Enabled MLd Proxy : Disabled MLD SSM Range: Port Router ---- -------1 Disabled 2 Disabled ff3e::/96 Dynamic Router Fast Leave Group Throttling Number -------------- ---------- ----------------------No Disabled Unlimited No Disabled Unlimited VID State Querier Compatibility RV QI QRI LLQI URI ---- -------- -------- ------------- --- ----- ----- ----- ----1 Enabled Enabled IGMP-Auto 2 888 555 10 1 querier: The command lets you Enable/Disable the per-‐VLAN MLD Querier 112 Publication date: Feb., 2012 Revision A1 CLI Reference Guide Syntax: Parameter : querier <vlan-list> disable/ enable <vlan-list>: VLAN list, available value is from 1 to 4094 format: 1,3-5. disable: Disable the per-VLAN MLD querie. Enable: Enable the per-VLAN MLD querier. EXAMPLE: Switch(mld)# querier 1 enable Switch(mld)# show config MLD Snooping : Disabled MLd Flooding Control : Enabled MLd Proxy : Disabled MLD SSM Range: Port Router ---- -------1 Disabled 2 Disabled ff3e::/96 Dynamic Router Fast Leave Group Throttling Number -------------- ---------- ----------------------No Disabled Unlimited No Disabled Unlimited VID State Querier Compatibility RV QI QRI LLQI URI ---- -------- -------- ------------- --- ----- ----- ----- ----1 Enabled Enabled IGMP-Auto 99 888 555 10 1 router: Syntax: Parameter : The command lets you set Router Port router <port-list> disable/ enable <port-list> available value is from switch physical port density, format: 1,3-5. disable: Disable router port Enable: Enable router port. EXAMPLE: Switch(mld)# router 1 enable Switch(mld)# show config MLD Snooping : Enabled MLd Flooding Control : Disabled MLd Proxy : Enabled MLD SSM Range: Port Router ---- -------1 Enabled 2 Disabled 3 Disabled 4 Disabled rv: Syntax: ff3e::/96 Dynamic Router Fast Leave Group Throttling Number -------------- ---------- ----------------------No Disabled Unlimited No Disabled Unlimited No Disabled Unlimited No Disabled Unlimited The command lets you set the per-‐VLAN Robustness Variable rv <vlan-list> <2-255> 113 Publication date: Feb., 2012 Revision A1 CLI Reference Guide Parameter : <vlan-list>: VLAN list, available value is from 1 to 4094 format: 1,3-5. <2-255>: Range:2–255, default:2. EXAMPLE: Switch(mld)# rv 1 99 Switch(mld)# show config MLD Snooping : Disabled MLd Flooding Control : Enabled MLd Proxy : Disabled MLD SSM Range: Port Router ---- -------1 Disabled 2 Disabled ff3e::/96 Dynamic Router Fast Leave Group Throttling Number -------------- ---------- ----------------------No Disabled Unlimited No Disabled Unlimited VID State Querier Compatibility RV QI QRI LLQI URI ---- -------- -------- ------------- --- ----- ----- ----- ----1 Enabled Enabled IGMP-Auto 99 888 555 10 1 show: Syntax: The command lets you show MLD Information show config show groups/ ssm/ status/ version <1-4094> Parameter : config: Show MLD Configuration groups: Entries in the MLD Group table ssm: Entries in the MLDv2 information table status: Show MLD status version: Show MLD working querier/host version currently <1-4094>: VLAN ID, available value is from 1 to 4094 EXAMPLE: 114 Publication date: Feb., 2012 Revision A1 CLI Reference Guide Switch(mld)# show config MLD Snooping : Disabled MLd Flooding Control : Enabled MLd Proxy : Disabled MLD SSM Range: Port Router ---- -------1 Disabled 2 Disabled 3 Disabled 4 Disabled ff3e::/96 Dynamic Router Fast Leave Group Throttling Number -------------- ---------- ----------------------No Disabled Unlimited No Disabled Unlimited No Disabled Unlimited No Disabled Unlimited VID State Querier Compatibility RV QI QRI LLQI URI ---- -------- -------- ------------- --- ----- ----- ----- ----1 Disabled Enabled Port ---1 2 3 4 snooping: Syntax: Parameter : Filtering Groups -------------------------------------No Filtering Group No Filtering Group No Filtering Group No Filtering Group The command lets you set MLD Snooping Mode snooping disable/ enable disable: Disable the global MLD snooping Enable: Enable the global MLD snooping EXAMPLE: Switch(mld)# snoop enable Switch(mld)# show config MLD Snooping : Enabled MLd Flooding Control : Disabled MLd Proxy : Enabled ssm-‐range: Syntax: Parameter : The command lets you set MLD SSM Range ssm-range <ipv6-address> <8-128> <ipv6-address>: Set MLD SSM range address. <8-128>: Set MLD SSM range value. EXAMPLE: ssm-range ::ffff:192.168.1.6 10 state: The command lets you Enable/Disable the per-‐VLAN MLD Snooping 115 Publication date: Feb., 2012 Revision A1 relay-option disable/ enable Syntax: <vlan-list>: VLAN list, available value is from 1 to 4094 format: 1,3-5. Parameter : disable: Disable the per-VLAN MLD snooping Enable: Enable the per-VLAN MLD snooping EXAMPLE: Switch(mld)# state 1 enable Switch(mld)# show config MLD Snooping : Disabled MLd Flooding Control : Enabled MLd Proxy : Disabled MLD SSM Range: Port Router ---- -------1 Disabled 2 Disabled ff3e::/96 Dynamic Router Fast Leave Group Throttling Number -------------- ---------- ----------------------No Disabled Unlimited No Disabled Unlimited VID State Querier Compatibility RV QI QRI LLQI URI ---- -------- -------- ------------- --- ----- ----- ----- ----1 Enabled Enabled IGMP-Auto 99 888 555 10 1 throtting: The command lets you set per-‐port Throttling throtting <port-list> <0-10> Syntax: <port-list> available value is from switch physic port density, format: 1,3-5. Parameter : <0-10>: Set port group limit number, range:0–10, 0:unlimited EXAMPLE: witch(mld)# throttling 1 10 Switch(mld)# show config MLD Snooping : Enabled MLd Flooding Control : Disabled MLd Proxy : Enabled MLD SSM Range: Port Router ---- -------1 Disabled 2 Disabled 3 Disabled 4 Disabled uri: Syntax: Parameter : ff3e::/96 Dynamic Router Fast Leave Group Throttling Number -------------- ---------- ----------------------No Disabled 10 No Disabled Unlimited No Disabled Unlimited No Disabled Unlimited The command lets you set the per-‐VLAN Unsolicited Report Interval uri <vlan-list> <0-31744> <vlan-list>: VLAN list, available value is from 1 to 4094 format: 1,3-5. Publication date: Feb., 2012 Revision A1 CLI Reference Guide <0-31744>: Range:0~31744 sec, default:1 sec EXAMPLE: Switch(mld)# uri 1 777 Switch(mld)# show config MLD Snooping : Disabled MLd Flooding Control : Enabled MLd Proxy : Disabled MLD SSM Range: Port Router ---- -------1 Disabled 2 Disabled ff3e::/96 Dynamic Router Fast Leave Group Throttling Number -------------- ---------- ----------------------No Disabled Unlimited No Disabled Unlimited VID State Querier Compatibility RV QI QRI LLQI URI ---- -------- -------- ------------- --- ----- ----- ----- ----1 Enabled Enabled IGMP-Auto 99 888 555 10 777 117 Publication date: Feb., 2012 Revision A1 CLI Reference Guide MVR Commands of CLI Chapter 30 MVR The MVR feature enables multicast traffic forwarding on the Multicast VLAN. In a multicast television application, a PC or a television with a set-‐top box can receive the multicast stream. Multiple set-‐top boxes or PCs can be connected to one subscriber port, which is a switch port configured as an MVR receiver port. When a subscriber selects a channel, the set-‐top box or PC sends an IGMP join message to Switch A to join the appropriate multicast. Uplink ports that send and receive multicast data to and from the multicast VLAN are called MVR source ports. Table 29: MVR Commands Command Function immediate-leave Configure MVR port state about immediate leave mode Configure MVR mode port-mode Configure MVR port mode port-type Configure MVR port type show Show command immediate-‐leave: Syntax: Parameter : The command lets you configure MVR port state about immediate leave immediate-leave <port-list> disable/ enable <port-list>: available value is from switch physical port density, format: 1,3-5 disable: Disable immediate leave on the specific port enable: Enable immediate leave on the specific port EXAMPLE: Switch(mvr)# immediate-leave 1 enable Switch(mvr)# show config MVR Mode : Disabled Muticast VLAN ID : 100 Port ---1 2 3 4 Port Mode --------Disabled Disabled Disabled Disabled Port Type --------Receive Receive Receive Receive Immediate Leave ----------------Enabled Disabled Disabled Disabled 118 Publication date: Feb., 2012 Revision A1 mode: Syntax: Parameter : The command lets you configure MVR mode mode disable/ enable <1-4094> disable: Disable MVR enable: Enable multicast traffic forwarding on the Multicast VLAN <1-4094>: Multicast VLAN ID, available is from 1 to 4094 EXAMPLE: Switch(mvr)# mode enable 1 Switch(mvr)# show config MVR Mode : Enabled Muticast VLAN ID : 1 port-‐mode: Syntax: Parameter : The command lets you configure MVR port mode port-mode <port-list> disable/ enable <port-list>: available value is from switch physical port density, format: 1,3-5 disable: Disable MVR on the specific port enable: Enable MVR on the specific port EXAMPLE: Switch(mvr)# port-mode 1 enable Switch(mvr)# show config MVR Mode : Disabled Muticast VLAN ID : 1 Port ---1 2 3 4 port-‐type: Syntax: Parameter : Port Mode --------Enabled Disabled Disabled Disabled Port Type --------Receive Receive Receive Receive Immediate Leave ----------------Enabled Disabled Disabled Disabled The command lets you configure MVR port type port-type <port-list> receiver/ source <port-list>: available value is from switch physical port density, format: 1,3-5 receiver: Define the port as receiver port source: Define the port as source port Publication date: Feb., 2012 Revision A1 CLI Reference Guide EXAMPLE: witch(mvr)# port-type 2 source Switch(mvr)# show config MVR Mode : Disabled Muticast VLAN ID : 1 Port ---1 2 3 4 show: Syntax: Parameter : Port Mode --------Enabled Disabled Disabled Disabled Port Type --------Receive Source Receive Receive Immediate Leave ----------------Enabled Disabled Disabled Disabled The command lets you show command show config/ group/ statistics config: Show MVR configuration group: Show MVR group information statistics: Show MVR statistics information EXAMPLE: Switch(mvr)# show config MVR Mode : Disabled Muticast VLAN ID : 100 Port ---1 2 3 4 Port Mode --------Disabled Disabled Disabled Disabled Port Type --------Receive Receive Receive Receive Immediate Leave ----------------Disabled Disabled Disabled Disabled Switch(mvr)# show group Switch(mvr)# show statistics 120 Publication date: Feb., 2012 Revision A1 CLI Reference Guide NAS Commands of CLI Chapter 31 NAS The section describes how to configure the switch’s Network Access Server parameters. Use the NAS server to connect users to a variety of resources, including Internet access, conference calls, printing documents on shared printers, or by simply logging on to the Internet. Table 30: NAS Commands Command agetime clear Syntax: Parameter : Clear NAS statistics eapol-timeout Configure the time between EAPOL retransmissions guest-vlan Configure the Guest VLAN mode hold-time Configure the time in seconds before a MAC-address that failed authentication gets a new authentication chance mode Configure the NAS mode port-guest-vlan Configure the Guest VLAN mode of switch ports port-radius-qos Configure the RADIUS-assigned QoS mode of switch ports port-radius-vlan Configure the RADIUS-assigned VLAN mode of switch ports port-state agetime: Function Configure the time in seconds between check for activity on successfully authenticated MAC addresses Configure the NAS port state radius-qos Configure the RADIUS-assigned QoS mode radius-vlan Configure the RADIUS-assigned VLAN mode reauth-period Configure the period between reauthentications reauthentication Configure the NAS reauthentication mode restart Restart NAS authentication process show Show NAS information The command lets you configure the time in seconds between checks for activity on successfully authenticated MAC addresses. agetime <10-1000000> <10-1000000>: Time in seconds between checks for activity on a MAC address that succeeded authentication. EXAMPLE: 121 Publication date: Feb., 2012 Revision A1 CLI Reference Guide Switch(nas)# agetime 9999 Switch(nas)# show config Mode : Disabled Reauthentication : Disabled Reauthentication Period : 3600 EAPOL Timeout : 30 Age Period : 9999 Hold Time : 10 RADIUS QoS : Disabled RADIUS VLAN : Disabled Guest VLAN : Disabled Guest VLAN ID : 1 Maximum Reauthentication Count : 2 Allow Guest VLAN if EAPOL Frame Seen : Disabled clear: Syntax: Parameter : The command lets you clear NAS statistics clear <port-list> <port-list>: available value is from switch physical port density, format: 1,3-5 EXAMPLE: Switch(nas)# clear 1 eapol-‐timeout: The command lets you configure the time between EAPOL retransmissions Syntax: Parameter : eapol-timeout <1-65535> <1-65535>: Time in seconds between EAPOL retransmissions EXAMPLE: Switch(nas)# eapol-timeout 8888 Switch(nas)# show config Mode : Disabled Reauthentication : Disabled Reauthentication Period : 3600 EAPOL Timeout : 8888 Age Period : 9999 Hold Time : 10 RADIUS QoS : Disabled RADIUS VLAN : Disabled Guest VLAN : Disabled Guest VLAN ID : 1 Maximum Reauthentication Count : 2 Allow Guest VLAN if EAPOL Frame Seen : Disabled 122 Publication date: Feb., 2012 Revision A1 guest-‐vlan: Syntax: The command lets you configure the Guest VLAN mode guest-vlan disable enable <1-4094> <1-255> allow_if_eapol_seen disable/ enable Parameter : disable: Disable Guest VLAN Enable: Enable Guest VLAN <1-4094>: Guest VLAN ID used when entering the Guest VLAN <1-255>: The number of times a Request Identity EAPOL frame is sent without reasponse before considering entering the Guest VLAN allow_if_eapol_seen: The switch remembers if an EAPOL frame has been received on the port for the life-time of the port. Once the switch considers whether to enter the Guest VLAN, it will first check if this option is enabled or disabled disable: The Guest VLAN can only be entered if no EAPOL frames have been received on a port for the lifetime of the port enable: The Guest VLAN can be entered even if an EAPOL frame has been received during the lifetime of the port EXAMPLE: Switch(nas)# guest-vlan enable 90 150 allow_if_eapol_seen enable Switch(nas)# show config Mode : Disabled Reauthentication : Disabled Reauthentication Period : 3600 EAPOL Timeout : 8888 Age Period : 9999 Hold Time : 10 RADIUS QoS : Disabled RADIUS VLAN : Disabled Guest VLAN : Enabled Guest VLAN ID : 90 Maximum Reauthentication Count : 150 Allow Guest VLAN if EAPOL Frame Seen : Enabled hold-‐time: Syntax: Parameter : The command lets you configure the time in seconds before a MAC-‐address that failed authentication gets a new authentication chance old-time <10-1000000> <10-1000000>: Hold time before MAC addresses that failed authentication expire EXAMPLE: Publication date: Feb., 2012 Revision A1 CLI Reference Guide Switch(nas)# hold-time 7777 Switch(nas)# show config Mode : Disabled Reauthentication : Disabled Reauthentication Period : 3600 EAPOL Timeout : 8888 Age Period : 9999 Hold Time : 7777 RADIUS QoS : Disabled RADIUS VLAN : Disabled Guest VLAN : Enabled Guest VLAN ID : 90 Maximum Reauthentication Count : 150 Allow Guest VLAN if EAPOL Frame Seen : Enabled mode: Syntax: Parameter : The command lets you configure the NAS mode mode disable/ enable disable: Globally disable NAS operation mode Enable: Globally enable NAS operation mode EXAMPLE: Switch(nas)# mode enable Switch(nas)# show config Mode : Enabled Reauthentication : Disabled Reauthentication Period : 3600 EAPOL Timeout : 8888 Age Period : 9999 Hold Time : 7777 RADIUS QoS : Disabled RADIUS VLAN : Disabled Guest VLAN : Enabled Guest VLAN ID : 90 Maximum Reauthentication Count : 150 Allow Guest VLAN if EAPOL Frame Seen : Enabled port-‐guest-‐vlan: Syntax: Parameter : The command lets you configure the Guest VLAN mode of switch ports port-guest-vlan <port-list> disable/ enable <port-list>: available value is from switch physic port density, format: 1,3-5 disable: Disable Guest VLAN Enable: Enable Guest VLAN EXAMPLE: 124 Publication date: Feb., 2012 Revision A1 CLI Reference Guide Switch(nas)# port-guest-vlan 1 enable Switch(nas)# show port-config Port Admin State RADIUS-Assigned QoS RADIUS-Assigned VLAN Guest VLAN ---- ------------------ ------------------- ----------------------------1 Force Authorized Disabled Disabled Enabled 2 Force Authorized Disabled Disabled Disabled 3 Force Authorized Disabled Disabled Disabled 4 Force Authorized Disabled Disabled Disabled port-‐radius-‐qos: Syntax: Parameter : The command lets you configure the RADIUS-‐assigned QoS mode of switch ports port-radius-qos <port-list> disable/ enable <port-list>: available value is from switch physical port density, format: 1,3-5 disable: Disable RADIUS-assigned QoS Enable: Enable RADIUS-assigned QoS EXAMPLE: Switch(nas)# port-radius-qos 2 enable Switch(nas)# show port-config Port Admin State RADIUS-Assigned QoS RADIUS-Assigned VLAN Guest VLAN ---- ------------------ ------------------- ----------------------------1 Force Authorized Disabled Disabled Enabled 2 Force Authorized Enabled Disabled Disabled 3 Force Authorized Disabled Disabled Disabled 4 Force Authorized Disabled Disabled Disabled port-‐radius-‐vlan: Syntax: Parameter : The command lets you configure the RADIUS-‐assigned VLAN mode of switch ports port-radius-vlan <port-list> disable/ enable <port-list>: available value is from switch physical port density, format: 1,3-5 disable: Disable RADIUS-assigned VLAN Enable: Enable RADIUS-assigned VLAN EXAMPLE: 125 Publication date: Feb., 2012 Revision A1 CLI Reference Guide Switch(nas)# port-radius-vlan 3 enable Switch(nas)# show port-config Port Admin State RADIUS-Assigned QoS RADIUS-Assigned VLAN Guest VLAN ---- ------------------ ------------------- ----------------------------1 Force Authorized Disabled Disabled Enabled 2 Force Authorized Enabled Disabled Disabled 3 Force Authorized Disabled Enabled Disabled 4 Force Authorized Disabled Disabled Disabled port-‐state: Syntax: Parameter : The command lets you configure the NAS port state port-state <port-list> force-auth/ force-unauth/ mac-based/ multi/ port-based/ single <port-list>: available value is from switch physic port density, format: 1,3-5 force-auth: Port access is allowed force-unauth: Port access is not allowed mac-based: Switch authenticates on behalf of the client multi: Multiple Host NAS Authentication port-based: Port-based NAS Authentication single: Single Host NAS Authentication EXAMPLE: Switch(nas)# port-state 4 force-unauth Switch(nas)# port-state 5 mac-based Switch(nas)# port-state 6 multi Switch(nas)# port-state 7 port-based Switch(nas)# port-state 8 single Switch(nas)# show port-config Port Admin State RADIUS-Assigned QoS RADIUS-Assigned VLAN Guest VLAN ---- ------------------ ------------------- ----------------------------1 Force Authorized Disabled Disabled Disabled 2 Force Authorized Disabled Disabled Disabled 3 Force Authorized Disabled Disabled Disabled 4 Force Unauthorized Disabled Disabled Disabled 5 MAC-Based Auth Disabled Disabled Disabled 6 Multi 802.1X Disabled Disabled Disabled 7 Port-based 802.1X Disabled Disabled Disabled 8 Single 802.1X Disabled Disabled Disabled radius-‐qos: Syntax: Parameter : The command lets you configure the RADIUS-‐assigned QoS mode radius-qos disable/ enable disable: Disable RADIUS-assigned QoS Enable: Enable RADIUS-assigned QoS 126 Publication date: Feb., 2012 Revision A1 CLI Reference Guide EXAMPLE: Switch(nas)# radius-qos enable Switch(nas)# show config Mode : Enabled Reauthentication : Disabled Reauthentication Period : 3600 EAPOL Timeout : 8888 Age Period : 9999 Hold Time : 7777 RADIUS QoS : Enabled RADIUS VLAN : Disabled Guest VLAN : Enabled Guest VLAN ID : 90 Maximum Reauthentication Count : 150 Allow Guest VLAN if EAPOL Frame Seen : Enabled radius-‐vlan: Syntax: Parameter : The command lets you configure the RADIUS-‐assigned VLAN mode radius-vlan disable/ enable disable: Disable RADIUS-assigned VLAN Enable: Enable RADIUS-assigned VLAN EXAMPLE: Switch(nas)# radius-vlan enable Switch(nas)# show config Mode : Enabled Reauthentication : Disabled Reauthentication Period : 3600 EAPOL Timeout : 8888 Age Period : 9999 Hold Time : 7777 RADIUS QoS : Enabled RADIUS VLAN : Enabled Guest VLAN : Enabled Guest VLAN ID : 90 Maximum Reauthentication Count : 150 Allow Guest VLAN if EAPOL Frame Seen : Enabled reauth-‐period: Syntax: Parameter : The command lets you configure the period between reauthentications reauth-period <1-3600> <1-3600>: Period between reauthentications EXAMPLE: 127 Publication date: Feb., 2012 Revision A1 CLI Reference Guide Switch(nas)# reauth-period 666 Switch(nas)# show config Mode : Enabled Reauthentication : Disabled Reauthentication Period : 666 EAPOL Timeout : 8888 Age Period : 9999 Hold Time : 7777 RADIUS QoS : Enabled RADIUS VLAN : Enabled Guest VLAN : Enabled Guest VLAN ID : 90 Maximum Reauthentication Count : 150 Allow Guest VLAN if EAPOL Frame Seen : Enabled reauthentication: Syntax: Parameter : The command lets you configure the NAS reauthentication mode reauthentication disable/ enable disable: Disable NAS reauthentication Enable: Enable NAS reauthentication EXAMPLE: Switch(nas)# reauthentication enable Switch(nas)# show config Mode : Enabled Reauthentication : Enabled Reauthentication Period : 666 EAPOL Timeout : 8888 Age Period : 9999 Hold Time : 7777 RADIUS QoS : Enabled RADIUS VLAN : Enabled Guest VLAN : Enabled Guest VLAN ID : 90 Maximum Reauthentication Count : 150 Allow Guest VLAN if EAPOL Frame Seen : Enabled reatart: Syntax: Parameter : The command lets you restart NAS authentication process restart <port-list> reauthenticate/ reinitialize <port-list>: available value is from switch physical port density, format: 1,3-5 reauthenticate: Schedules a reauthentication whenever the quiet-period of the port runs out (EAPOL-based authentication). For MAC-based authentication, reauthentication will be attempted immediately reinitialize: Forces a reinitialization of the clients on the port and 128 Publication date: Feb., 2012 Revision A1 CLI Reference Guide thereby a reauthentication immediately EXAMPLE: Switch(nas)# restart 1 reauthenticate show: Syntax: Show NAS information show config / port-config/ status show statistics <port-list> Parameter : config: Show NAS configuration port-config: Show NAS port configuration statistics: Show NAS statistics <port-list>: available value is from switch physical port density, format: 1,3-5 status: Show NAS status EXAMPLE: 129 Publication date: Feb., 2012 Revision A1 CLI Reference Guide Switch(nas)# show config Mode : Disabled Reauthentication : Disabled Reauthentication Period : 3600 EAPOL Timeout : 30 Age Period : 300 Hold Time : 10 RADIUS QoS : Disabled RADIUS VLAN : Disabled Guest VLAN : Disabled Guest VLAN ID : 1 Maximum Reauthentication Count : 2 Allow Guest VLAN if EAPOL Frame Seen : Disabled Switch(nas)# show port-config Port Admin State RADIUS-Assigned QoS RADIUS-Assigned VLAN Guest VLAN ---- ------------------ ------------------- ----------------------------1 Force Authorized Disabled Disabled Disabled 2 Force Authorized Disabled Disabled Disabled 3 Force Authorized Disabled Disabled Disabled 4 Force Authorized Disabled Disabled Disabled Switch(nas)# show statistics 1 Port 1 EAPOL Statistics: Rx Total Rx Response/Id Rx Response Rx Start Rx Logoff Rx Invalid Type Rx Invalid Length 0 Tx Total 0 Tx Request/Id 0 Tx Request 0 0 0 0 Port 1 Backend Server Statistics: Rx Access Challenges Rx Other Requests Rx Auth. Successes Rx Auth. Failures 0 0 0 0 0 0 0 Tx Responses 0 Switch(nas)# show status Port Port State Last Source Last ID QoS VLAN ---- --------------------- ----------------- ------------------ -------------1 Link Down 2 Link Down 3 Link Down 4 Link Down - 130 Publication date: Feb., 2012 Revision A1 CLI Reference Guide Port configuration Commands of CLI Chapter 32 Port This chapter describes how to view the current port configuration and how to configure ports to non-‐default settings, including: Linkup/Linkdown Speed (Current and configured) Flow Control (Current Rx, Current Tx and Configured) Maximum Frame Size Excessive Collision Mode Power Control. Table 31: Port Commands clear: Syntax: Parameter : Command Function clear Clear port counter description Interface specific description excessive-collision Configure excessive collision operation flow-control Configure flow operation max-frame Configure maximum receive frame size port-state Configure port state operation power-saving Configure power saving operation show Show port information speed-duplex Configure speed duplex operation The command lets you clear port counters clear <port-list> <port-list>: available value is from switch physical port density, format: 1,3-5 EXAMPLE: 131 Publication date: Feb., 2012 Revision A1 CLI Reference Guide Switch(port)# clear 1 Switch(port)# show simple-counter Port Packets Bytes Errors Drops Filtered ------ ------------------ --------------------- ---------- ---------- ---------1/Rx 0 0 0 0 0 1/Tx 0 0 0 0 ------------------------------------------------------------------------------2/Rx 0 0 0 0 0 2/Tx 0 0 0 0 ------------------------------------------------------------------------------3/Rx 0 0 0 0 0 3/Tx 0 0 0 0 ------------------------------------------------------------------------------ description: Syntax: Parameter : The command lets you display Interface specific description description <port-list> <LINE> <port-list>: available value is from switch physical port density, format: 1,3-5 <LINE>: Up to 47 characters describing this interface EXAMPLE: Switch(port)# description 1 david Switch(port)# show configuration Port State Speed Duplex Flow Control Max. Frame Excessive Power Description ------------------------------------------------------------------------------1 Enabled Auto 10056 david ------------------------------------------------------------------------------2 Enabled Auto 10056 ------------------------------------------------------------------------------3 Enabled Auto 10056 ------------------------------------------------------------------------------- excessive-‐collision: Syntax: Parameter : The command lets you configure excessive collision operation excessive-collision <port-list> discard/ restart <port-list>: available value is from switch TP port number, format: 1,3-5 discard: Discard the packet when excessive collisions occur restart: Retransmit the packet, regardless of the number of collisions 132 Publication date: Feb., 2012 Revision A1 CLI Reference Guide EXAMPLE: Switch(port)# excessive-collision 21 restart Switch(port)# show configuration Port State Speed Duplex Flow Control Max. Frame Excessive Power Description ------------------------------------------------------------------------------1 Enabled Auto 10056 david ------------------------------------------------------------------------------2 Enabled Auto 10056 ------------------------------------------------------------------------------21 Enabled SFP_Auto_AMS Disabled 10056 Restart Disabled ------------------------------------------------------------------------------22 Enabled SFP_Auto_AMS Disabled 10056 Discard Disabled ------------------------------------------------------------------------------- flow-‐control: Syntax: Parameter : The command lets you configure flow operation flow-control <port-list> disable/ enable <port-list>: available value is from switch TP port number, format: 1,3-5 disable: Disable flow control operation enable: Enable flow control operation EXAMPLE: 133 Publication date: Feb., 2012 Revision A1 CLI Reference Guide Switch(port)# flow-control 21 enable Switch(port)# show configuration Port State Speed Duplex Flow Control Max. Frame Excessive Power Description ------------------------------------------------------------------------------1 Enabled Auto 10056 david ------------------------------------------------------------------------------2 Enabled Auto 10056 ------------------------------------------------------------------------------21 Enabled SFP_Auto_AMS Enabled 10056 Restart Disabled ------------------------------------------------------------------------------22 Enabled SFP_Auto_AMS Disabled 10056 Discard Disabled ------------------------------------------------------------------------------23 Enabled SFP_Auto_AMS Disabled 10056 Discard Disabled ------------------------------------------------------------------------------- max-‐frame: Syntax: Parameter : The command lets you configure maximum receive frame size max-frame <port-list> <1518-10056> <port-list>: available value is from switch physical port density, format: 1,3-5 <1518-10056>: Maximum receive frame size in bytes EXAMPLE: Switch(port)# max-frame 1 1600 Switch(port)# show configuration Port State Speed Duplex Flow Control Max. Frame Excessive Power Description ------------------------------------------------------------------------------1 Enabled Auto 1600 david ------------------------------------------------------------------------------2 Enabled Auto 10056 ------------------------------------------------------------------------------3 Enabled Auto 10056 - port-‐state: Syntax: The command lets you configure port state operation port-state <port-list> disable/ enable 134 Publication date: Feb., 2012 Revision A1 CLI Reference Guide Parameter : <port-list>: available value is from switch physical port density, format: 1,3-5 disable: Disable port state operation enable: Enable port state operation EXAMPLE: Switch(port)# port-state 1 disable Switch(port)# show configuration Port State Speed Duplex Flow Control Max. Frame Excessive Power Description ------------------------------------------------------------------------------1 Disabled Auto 1600 david ------------------------------------------------------------------------------2 Enabled Auto 10056 ------------------------------------------------------------------------------3 Enabled Auto 10056 - power-‐saving: Syntax: Parameter : The command lets you configure power saving operation power-saving <port-list> actiphy/ disable/ dynamic/ enable <port-list>: available value is from switch physical port density, format: 1,3-5 actiphy: Enable ActiPHY power control disable: Disable power saving dynamic: Enable dynamic power control enable: Enable power saving EXAMPLE: 135 Publication date: Feb., 2012 Revision A1 CLI Reference Guide Switch(port)# power-saving 21 actiphy Switch(port)# power-saving 22 dynamic Switch(port)# power-saving 23 enable Switch(port)# show configuration Port State Speed Duplex Flow Control Max. Frame Excessive Power Description ------------------------------------------------------------------------------1 Disabled Auto 1600 david ------------------------------------------------------------------------------2 Enabled Auto 10056 ------------------------------------------------------------------------------21 Enabled SFP_Auto_AMS Enabled 10056 Restart ActiPHY ------------------------------------------------------------------------------22 Enabled SFP_Auto_AMS Disabled 10056 Discard Dynamic ------------------------------------------------------------------------------23 Enabled SFP_Auto_AMS Disabled 10056 Discard Enabled ------------------------------------------------------------------------------24 Enabled SFP_Auto_AMS Disabled 10056 Discard Disabled ------------------------------------------------------------------------------- Show: Syntax: The command lets you show port information show configuration detail-counter <port-list> sfp <port-list> simple-counter status <port-list> Parameter : configuration: Show port configuration detail-counter: Show detailed traffic statistics for specific switch port <port-list>: Port number sfp: Show sfp information <port-list>: SFP port number, available value is from SFP port number simple-counter: Show general traffic statistics for all switch ports status: Show port status <port-list>: available value is from switch physical port density, format: 1,3-5 EXAMPLE: 136 Publication date: Feb., 2012 Revision A1 CLI Reference Guide Switch(port)# show simple-counter Port Packets Bytes Errors Drops Filtered ------ ------------------ --------------------- ---------- ---------- ---------1/Rx 0 0 0 0 0 1/Tx 0 0 0 0 ------------------------------------------------------------------------------2/Rx 0 0 0 0 0 2/Tx 0 0 0 0 ------------------------------------------------------------------------------3/Rx 0 0 0 0 0 3/Tx 0 0 0 0 ------------------------------------------------------------------------------4/Rx 0 0 0 0 0 4/Tx 0 0 0 0 ------------------------------------------------------------------------------------------------------------------------------------------------------------21/Rx 37999 14338676 10258 6 6 21/Tx 8922 1817882 0 0 ------------------------------------------------------------------------------22/Rx 0 0 0 0 0 22/Tx 0 0 0 0 ------------------------------------------------------------------------------23/Rx 0 0 0 0 0 23/Tx 0 0 0 0 ------------------------------------------------------------------------------24/Rx 10875 2276667 0 3 3 24/Tx 39016 14923782 0 0 speed-‐duplex: Syntax: Parameter : The command lets you configure speed duplex operation speed-duplex <port-list> 10-full/ 10-half…/ 100fx-ams <port-list>: available value is from switch physical port density, format: 1,3-5 10-full: Force speed duplex to 10-full operation 10-half: Force speed duplex to 10-half operation 100-full: Force speed duplex to 100-full operation 100-half: Force speed duplex to 100-half operation 1000-full: 1000x: Force speed duplex to 1000-full operation Force speed duplex to 1000BASE-X operation 1000x-ams: 1000BASE-X with auto media sense 100fx : Force speed duplex to 100BASE-FX operation 100fx-ams: 100BASE-FX with auto media sense 10g-full: Force speed duplex to 10G-full operation auto: Enable auto speed duplex configuration 137 Publication date: Feb., 2012 Revision A1 CLI Reference Guide sfp-auto-ams: Auto detection of SFP with auto media sense EXAMPLE: Switch(port)# speed-duplex 1 100-full Switch(port)# speed-duplex 2 1000-full Switch(port)# show configuration Port State Speed Duplex Flow Control Max. Frame Excessive Power Description ------------------------------------------------------------------------------1 Disabled 100 Full 1600 david ------------------------------------------------------------------------------2 Enabled 1G Full 10056 ------------------------------------------------------------------------------- 138 Publication date: Feb., 2012 Revision A1 CLI Reference Guide Port security Commands of CLI Chapter 33 Port security This section shows you how to configure the Port Security settings of the Switch. You can use the Port Security feature to restrict input to an interface by limiting and identifying MAC addresses. Table 32: Port security Commands Command Function action Configure the action involved with exceeding the limit aging Configure the aging mode and period limit Configure the max. number of MAC addresses that can be learned on the port mode action: Syntax: Parameter : Configure the global limit control mode port-mode Configure the port mode reopen Reopen one or more ports whose limit is exceeded and shut down show Show port security status The command lets you configure the action involved with exceeding the limit action <port-list> both/ none/ shutdown/ trap <port-list>: available value is from switch physical port density, format: 1,3-5 both: Send a SNMP trap and shutdown the port none: Do nothing shutdown: Shutdown the port trap: Send a SNMP trap EXAMPLE: 139 Publication date: Feb., 2012 Revision A1 CLI Reference Guide Switch(port-security)# Switch(port-security)# Switch(port-security)# Switch(port-security)# Switch(port-security)# Mode : Disabled Aging : Disabled Age Period: 3600 Port ---1 2 3 4 5 action 1 both action 2 none action 3 shutdown action 4 trap show config Mode Limit Action -------- ----- --------------Disabled 4 Trap & Shutdown Disabled 4 None Disabled 4 Shutdown Disabled 4 Trap Disabled 4 None aging: The command lets you configure the aging mode and period Syntax: aging disable enable <10-10000000> Parameter : disable: Disable aging enable: Enable aging <10-10000000>: Aging time in seconds between checks for activity on a MAC address EXAMPLE: Switch(port-security)# aging enable 20 Switch(port-security)# show config Mode : Disabled Aging : Enabled Age Period: 20 limit: The command lets you configure the max. number of MAC addresses that can be learned on the port Syntax: Parameter : limit <port-list> <1-1024> <port-list>: available value is from switch physical port density, format: 1,3-5 <1-1024>: Max. number of MAC addresses on selected port EXAMPLE: 140 Publication date: Feb., 2012 Revision A1 CLI Reference Guide Switch(port-security)# limit 1 999 Switch(port-security)# show config Mode : Disabled Aging : Enabled Age Period: 20 Port Mode Limit Action ---- -------- ----- --------------1 Disabled 999 Trap & Shutdown 2 Disabled 4 None 3 Disabled 4 Shutdown mode: The command lets you configure the global limit control mode Syntax: Parameter : mode disable/ enable disable: Globally disable port security enable: Globally enable port security EXAMPLE: Switch(port-security)# mode enable Switch(port-security)# show config Mode : Enabled Aging : Enabled Age Period: 20 port-‐mode: The command lets you configure the port mode Syntax: Parameter : port-mode <port-list> disable/ enable <port-list>: available value is from switch physical port density, format: 1,3-5 disable: Disable port security on selected port enable: Enable port security on selected port EXAMPLE: Switch(port-security)# port-mode 1 enable Switch(port-security)# show config Mode : Disabled Aging : Enabled Age Period: 20 Port ---1 2 3 4 5 Mode Limit Action -------- ----- --------------Enabled 999 Trap & Shutdown Disabled 4 None Disabled 4 Shutdown Disabled 4 Trap Disabled 4 None 141 Publication date: Feb., 2012 Revision A1 reopen: The command lets you to reopen one or more ports whose limit is exceeded and shut down Syntax: Parameter : reopen <port-list> <port-list>: available value is from switch physical port density, format: 1,3-5 EXAMPLE: Switch(port-security)# reopen 1 Switch(port-security)# show config Mode : Disabled Aging : Enabled Age Period: 20 Port ---1 2 3 4 Mode Limit Action -------- ----- --------------Enabled 999 Trap & Shutdown Disabled 4 None Disabled 4 Shutdown Disabled 4 Trap show: The command lets you show port security status Publication date: Feb., 2012 Revision A1 CLI Reference Guide Syntax: show config/ switch-status port-status <port> Parameter : config: Show port security configuration port-status: Show MAC addresses learned by port security <port>: Port number, available value is from switch physic port density switch-status: Show port security switch status EXAMPLE: Switch(port-security)# show config Mode : Disabled Aging : Disabled Age Period: 3600 Port ---1 2 3 4 Mode Limit Action -------- ----- --------------Disabled 4 None Disabled 4 None Disabled 4 None Disabled 4 None Switch(port-security)# show port-status 1 MAC Address VID State Time of Addition Age/Hold Time ----------------- ---- ---------- ------------------------- ------------<none> Switch(port-security)# show switch-status Users: L = Limit Control 8 = 802.1X D = DHCP Snooping Port Users State ---- ----- ------------1 --Disabled 2 --Disabled 3 --Disabled MAC Count --------0 0 0 143 Publication date: Feb., 2012 Revision A1 CLI Reference Guide Privilege level Commands of CLI Chapter 34 privilege This page provides an overview of the privilege levels. The switch provides user set Account, Aggregation, Diagnostics, EEE, GARP, GVRP, IP, IPMC Snooping LACP LLDP LLDP MED MAC Table MRP MVR MVRP Maintenance Mirroring POE Ports Private VLANs QoS SMTP SNMP Security Spanning Tree System Trap Event VCL VLANs Voice VLAN Privilege Levels form 1 to 15 . Table 33: privilege Commands Command Function group Configure a privilege level group show Show privilege configuration group: The command lets you configure a privilege level group Syntax: Parameter : group <group-name> <1-15> <group-name>: Privilege group name <1-15>: Privilege level EXAMPLE: Switch(privilege)# group account 13 Switch(privilege)# show Privilege Current Level: 15 Group Name Privilege Level -------------------------------- ---------------Account 13 Aggregation 10 Diagnostics 10 show: Syntax: Parameter : The command lets you show privilege configuration show <cr> <cr> means press the Enter key. EXAMPLE: 144 Publication date: Feb., 2012 Revision A1 CLI Reference Guide Switch(privilege)# show Privilege Current Level: 15 Group Name Privilege Level -------------------------------- ---------------Account 13 Aggregation 10 Diagnostics 10 EPS 10 ERPS 10 ETH_LINK_OAM 10 EVC 10 GARP 10 GVRP 10 IP 10 IPMC_Snooping 10 LACP 10 LLDP 10 LLDP_MED 10 Loop_Protect 10 MAC_Table 10 MEP 10 MVR 10 Maintenance 15 Mirroring 10 PTP 10 Ports 10 Private_VLANs 10 QoS 10 SMTP 10 SNMP 10 Security 10 Spanning_Tree 10 System 10 Trap_Event 10 VCL 10 VLAN_Translation 10 VLANs 10 145 Publication date: Feb., 2012 Revision A1 CLI Reference Guide Private VLAN Commands of CLI Chapter 35 Private VLAN In a private VLAN, communication between ports in that private VLAN is not permitted. A VLAN can be configured as a private VLAN. Table 34: Private VLAN Commands delete: Command Function delete Delete private VLAN group port-isolate Configure port isolation private-vlan Configure private VLAN group show Show private VLAN information The command lets you delete private VLAN group Syntax: delete private-vlan <1- X> private-vlan: private VLAN KEYWORD Parameter : <1- X>: Private VLAN ID. The allowed range for a Private VLAN ID is the same as the switch port number range EXAMPLE: Switch(pvlan)# delete private-vlan 12 NOTE: In Private VLAN ID <1-X>, the number X is the max value you can set based on the port count on the switch. port-‐isolate: The command lets you configure port isolation Syntax: Parameter : port-isolate <port-list> disable/ enable <port-list>: available value is from switch physical port density, format: 1,3-5 disable: Disable port isolation enable: Enable port isolation EXAMPLE: 146 Publication date: Feb., 2012 Revision A1 CLI Reference Guide Switch(pvlan)# port-isolate 1 enable Switch(pvlan)# show port-isolate Port Isolation ---- --------1 Enabled 2 Disabled 3 Disabled 4 Disabled private-‐vlan: Syntax: Parameter : The command lets you configure private VLAN group private-vlan <1-X> <1-X>: Private VLAN ID. The allowed range for a Private VLAN ID is the same as the switch port number range EXAMPLE: Switch(pvlan)# private-vlan 2 10 Switch(pvlan)# show private-vlan PVLAN ID Ports -------- --------------1 1-26 2 10 NOTE: In Private VLAN ID <1-X>, the number X is the max value you can set based on the port count on the switch. show: Syntax: Parameter : The command lets you show private VLAN information show port-isolate/ private-vlan port-isolate: Show port isolation information private-vlan: Show private VLAN membership information EXAMPLE: Switch(pvlan)# show port-isolate Port Isolation ---- --------1 Disabled 2 Disabled 3 Disabled 4 Disabled 5 Disabled Switch(garp)# Switch(pvlan)# show private-vlan PVLAN ID Ports -------- --------------1 1-29 NOTE: The default Private VLAN includes all port members on the switch. Use 29-port switch as example. 147 Publication date: Feb., 2012 Revision A1 CLI Reference Guide Chapter 36 QoS QoS Commands of CLI The switch supports four QoS queues per port with strict or weighted fair queuing scheduling. It supports QoS Control Lists (QCL) for advance programmable QoS classification, based on IEEE 802.1p, Ethertype, VID, IPv4/IPv6 DSCP and UDP/TCP ports and ranges. The switch provides high flexibility when classifying incoming frames to a QoS class. The QoS classification looks for information up to Layer 4, including IPv4 and IPv6 DSCP, IPv4 TCP/UDP port numbers, and user priority of tagged frames. This QoS classification mechanism is implemented in a QoS control list (QCL). The QoS class assigned to a frame is used throughout the device for providing queuing, scheduling, and congestion control guarantees to the frame according to what was configured for that specific QoS class. The switch supports advanced memory control mechanisms providing excellent performance of all QoS classes under any traffic scenario, including jumbo frame. It provides a super priority queue with dedicated memory and strict highest priority in the arbitration. The ingress super priority queue allows traffic recognized as CPU traffic to be received and queued for transmission to the CPU even when all the QoS class queues are congested. Table 35: QoS Commands Command Function delete Delete QCE dscp-classification Configure DSCP ingress classification dscp-map dscp-remap dscp-translation dscp-trust Configure DSCP mapping table. This table is used to map QoS class and DP level based on DSCP value. DSCP value used to map QoS class and DPL is either translated DSCP value or incoming frame DSCP value Configure DSCP egress remap table. This table is used if the port egress remarking mode is 'remap' and the purpose is to map the DSCP and DP level to a new DSCP value Configure global ingress DSCP translation table. If port DSCP translation is enabled, translation table is used to translate incoming frame's DSCP value and the translated value is used to map QoS class and DP level Configure trusted DSCP value used for QoS classification. The DSCP value to be checked for trust is either a translated value if DSCP translation is enabled for the ingress port or incoming frame DSCP value if translation is disabled for the port. Trusted DSCP value is only used for QoS classification port-classify QoS ingress port classification port-dscp QoS port DSCP configuration port-policer Port policer 148 Publication date: Feb., 2012 Revision A1 CLI Reference Guide delete: Syntax: Parameter : port-scheduler QoS egress port schedulers port-shaper Port shaper qce Add or modify QoS control entry queue-shaper Queue shaper show Show QoS information storm Configure storm rate control tag-remarking QoS egress port tag remarking show Show the GVRP configuration The command lets you delete QCE delete <1-256> <1-256>: QCE ID must be exist EXAMPLE: Switch(qos)# delete 1 NOTE: If you set the GVRP on port then you could show the port GVRP statistics information or clear all records on port. dscp-‐classification: Syntax: The command lets you configure DSCP ingress classification dscp-classification map <class-list> <0-63> mode <dscp-list> disable/ enable Parameter : map: Configure DSCP ingress classification mapping table. This table is used to map DSCP from QoS class and DP level. The DSCP needs to be classified depending on port DSCP classification and DSCP classification mode. Incoming frame DSCP may be translated before using the value for classification <class-list>: QoS class list, available value is from 0 to 7 <0-63>: Mapped DSCP mode: Configure DSCP ingress classification mode. If port DSCP classification is 'selected', DSCP will be classified based on QoS class and DP level only for DSCP value with classification mode 'enabled'. DSCP may be translated DSCP if translation is enabled for the port <dscp-list>: DSCP list, format : 1,3,5-7 disable: Disable DSCP ingress classification 149 Publication date: Feb., 2012 Revision A1 CLI Reference Guide enable: Enable DSCP ingress classification EXAMPLE: Switch(qos)# dscp-classification map 7 10 Switch(qos)# show class-map QoS Class DSCP --------- ---0 0 1 0 2 0 3 0 4 0 5 0 6 0 7 10 Switch(qos)# dscp-classification mode 1 enable Switch(qos)# show dscp-translation Ingress Ingress Egress DSCP Translation Classify Remap ---- ----------- -------- --------0 0 Disabled 0 1 1 Enabled 1 2 2 Disabled 2 3 3 Disabled 3 4 4 Disabled 4 dscp-‐map: Syntax: Parameter : The command lets you configure DSCP mapping table dscp-map <dscp-list> <0-7> <0-3> <dscp-list>: DSCP list, format : 1,3,5-7 <0-7>: QoS classenable The parameter let you enable GVRP function on port. <0-3>: Drop Precedence Level EXAMPLE: Switch(qos)# dscp-map 2 6 2 Switch(qos)# show dscp-map DSCP Trust QoS Class DP Level --------- -------- --------- -------0 (BE) Disabled 0 0 1 Disabled 0 0 2 Disabled 6 2 3 Disabled 0 0 dscp-‐remap: The command lets you configure DSCP egress remap table Syntax: Parameter : dscp-remap <dscp-list> <0-63> <dscp-list>: DSCP list, format : 1,3,5-7 150 Publication date: Feb., 2012 Revision A1 CLI Reference Guide <0-63>: Egress remapped DSCP EXAMPLE: Switch(qos)# dscp-remap 3 44 Switch(qos)# show dscp-translation Ingress Ingress Egress DSCP Translation Classify Remap ---- ----------- -------- --------0 0 Disabled 0 1 1 Enabled 1 2 2 Disabled 2 3 3 Disabled 44 4 4 Disabled 4 dscp-‐translation: The command lets you configure global ingress DSCP translation table Syntax: Parameter : dscp-translation <dscp-list> <0-63> <dscp-list>: DSCP list, format : 1,3,5-7 <0-63>: Translated DSCP EXAMPLE: Switch(qos)# dscp-translation 4 55 Switch(qos)# show dscp-translation Ingress Ingress Egress DSCP Translation Classify Remap ---- ----------- -------- --------0 0 Disabled 0 1 1 Enabled 1 2 2 Disabled 2 3 3 Disabled 44 4 55 Disabled 4 5 5 Disabled 5 dscp-‐trust: Syntax: Parameter : The command lets you configure trusted DSCP value that is used for QoS classification dscp-trust <port-list> <dscp-list>: DSCP list, format : 1,3,5-7 disable: Set DSCP as untrusted DSCP enable: Set DSCP as trusted DSCP EXAMPLE: 151 Publication date: Feb., 2012 Revision A1 CLI Reference Guide Switch(qos)# dscp-trust 6 enable Switch(qos)# show dscp-map DSCP Trust QoS Class DP Level --------- -------- --------- -------0 (BE) Disabled 0 0 1 Disabled 0 0 2 Disabled 6 2 3 Disabled 0 0 4 Disabled 0 0 5 Disabled 0 0 6 Enabled 0 0 7 Disabled 0 0 port-‐classify: Syntax: The command lets you configure QoS ingress port classification port-classify class <port-list> <0-7> dei <port-list> <0-1> dpl <port-list> <0-3> dscp <port-list> disable/ enable map <port-list> <0-7> <0-1> <0-7> <0-3> pcp <port-list> <0-7> tag <port-list> disable/ enable Parameter : class: Configure the default QoS class <port-list>: available value is from switch physical port density, format: 1,3-5 <0-7>: QoS class for frames not classified in any other way. There is a one to one mapping between QoS class, queue and priority. A QoS class of 0 (zero) has the lowest priority dei: Configure the default DEI for untagged frames <port-list>: available value is from switch physical port density, format: 1,3-5 <0-1>: Drop Eligible Indicator. It is a 1-bit field in the VLAN tag dpl: Configure the default DP level <port-list>: available value is from switch physical port density, format: 1,3-5 <0-3>: DP level for frames not classified in any other way dscp: Configure DSCP based classification mode <port-list>: available value is from switch physical port density, format: 1,3-5 disable: Disable DSCP based classification enable: Enable DSCP based classification map: Configure the port classification map. This map is used when port classification tag is enabled, and the purpose is to translate the Priority Code Point (PCP) and Drop Eligible Indicator (DEI) from a tagged frame to QoS class and DP level <port-list>: available value is from switch physical port density, 152 Publication date: Feb., 2012 Revision A1 CLI Reference Guide format: 1,3-5 <0-7>: Priority Code Point <0-1>: Drop Eligible Indicator <0-7>: QoS class <0-3>: Drop precedence level pcp: Configure the default PCP for untagged frames <port-list>: available value is from switch physical port density, format: 1,3-5 <0-7>: Priority Code Point. It is a 3-bit field storing the priority level for the 802.1Q frame tag: Configure the classification mode for tagged frames <port-list>: available value is from switch physical port density, format: 1,3-5 disable: Use default QoS class and DP level for tagged frames enable: Use mapped versions of PCP and DEI for tagged frames EXAMPLE: Switch(qos)# port-classify class 7 4 Switch(qos)# show port-classify Port QoS class DP level PCP DEI Tag class. DSCP Based ---- --------- -------- --- --- ---------- ---------1 0 0 0 0 Disabled Disabled 2 0 0 0 0 Disabled Disabled 3 0 0 0 0 Disabled Disabled 4 0 0 0 0 Disabled Disabled 5 0 0 0 0 Disabled Disabled 6 0 0 0 0 Disabled Disabled 7 4 0 0 0 Disabled Disabled 8 0 0 0 0 Disabled Disabled Switch(qos)# port-classify dei 1 1 Switch(qos)# show port-classify Port QoS class DP level PCP DEI Tag class. DSCP Based ---- --------- -------- --- --- ---------- ---------1 0 0 0 1 Disabled Disabled 2 0 0 0 0 Disabled Disabled 3 0 0 0 0 Disabled Disabled Switch(qos)# port-classify dpl 2 3 Switch(qos)# show port-classify Port QoS class DP level PCP DEI Tag class. DSCP Based ---- --------- -------- --- --- ---------- ---------1 0 0 0 1 Disabled Disabled 2 0 3 0 0 Disabled Disabled 3 0 0 0 0 Disabled Disabled 153 Publication date: Feb., 2012 Revision A1 CLI Reference Guide Switch(qos)# port-classify dscp 3 enable Switch(qos)# show port-classify Port QoS class DP level PCP DEI Tag class. DSCP Based ---- --------- -------- --- --- ---------- ---------1 0 0 0 1 Disabled Disabled 2 0 3 0 0 Disabled Disabled 3 0 0 0 0 Disabled Enabled Switch(qos)# port-classify map 4 5 1 6 3 Switch(qos)# show port-map 4 Port PCP DEI QoS class DP level ---- --- --- --------- -------4 0 0 1 0 0 1 1 1 1 0 0 0 1 1 0 1 2 0 2 0 2 1 2 1 3 0 3 0 3 1 3 1 4 0 4 0 4 1 4 1 5 0 5 0 5 1 6 3 6 0 6 0 6 1 6 1 7 0 7 0 7 1 7 1 Switch(qos)# port-classify pcp 5 3 Switch(qos)# show port-classify Port QoS class DP level PCP DEI ---- --------- -------- --- --1 0 0 0 1 2 0 3 0 0 3 0 0 0 0 4 0 0 0 0 5 0 0 3 0 Tag class. ---------Disabled Disabled Disabled Disabled Disabled DSCP Based ---------Disabled Disabled Enabled Disabled Disabled Switch(qos)# port-classify tag 6 enable Switch(qos)# show port-classify Port QoS class DP level PCP DEI Tag class. DSCP Based ---- --------- -------- --- --- ---------- ---------1 0 0 0 1 Disabled Disabled 2 0 3 0 0 Disabled Disabled 3 0 0 0 0 Disabled Enabled 4 0 0 0 0 Disabled Disabled 5 0 0 3 0 Disabled Disabled 6 0 0 0 0 Enabled Disabled port-‐dscp: Syntax: Parameter : The command lets you do QoS port DSCP configuration port-dscp <port-list> classification: Configure DSCP classification based on QoS class and DP level. This enables per port to map new DSCP value based on QoS class and DP level <port-list>: available value is from switch physical port density, format: 1,3-5 all: Classify all DSCP 154 Publication date: Feb., 2012 Revision A1 CLI Reference Guide disable: Disable DSCP ingress classification selected: Classify only selected DSCP for which classification is enabled as specified in DSCP Translation window for the specific DSCP zero: Classify DSCP if DSCP = 0 egress-remark: Configure the port DSCP remarking mode <port-list>: available value is from switch physical port density, format: 1,3-5 disable: Disable DSCP egress rewrite enable: Enable DSCP egress rewrite with the value received from analyzer remap: Rewrite DSCP in egress frame with remapped DSCP translation: Configure DSCP ingress translation mode. If translation is enabled for a port, incoming frame DSCP value is translated and the translated value is used for QoS classification <port-list>: available value is from switch physical port density, format: 1,3-5 disable: Disable DSCP ingress translation enable: Enable DSCP ingress translation EXAMPLE: Switch(qos)# port-dscp classification 1 all Switch(qos)# port-dscp classification 2 selected Switch(qos)# port-dscp classification 3 zero Switch(qos)# show port-dscp Port DSCP translation Ingress classification Egress remark ---- ---------------- ---------------------- ------------1 Disabled All Disabled 2 Disabled Selected Disabled 3 Disabled DSCP = 0 Disabled 4 Disabled Disabled Disabled Switch(qos)# port-dscp egress-remark 4 enable Switch(qos)# port-dscp egress-remark 5 remap Switch(qos)# show port-dscp Port DSCP translation Ingress classification Egress remark ---- ---------------- ---------------------- ------------1 Disabled All Disabled 2 Disabled Selected Disabled 3 Disabled DSCP = 0 Disabled 4 Disabled Disabled Enabled 5 Disabled Disabled Remapped Switch(qos)# port-dscp translation 6 enable Switch(qos)# show port-dscp Port DSCP translation Ingress classification Egress remark ---- ---------------- ---------------------- ------------1 Disabled All Disabled 2 Disabled Selected Disabled 3 Disabled DSCP = 0 Disabled 4 Disabled Disabled Enabled 5 Disabled Disabled Remapped 6 Enabled Disabled Disabled 155 Publication date: Feb., 2012 Revision A1 CLI Reference Guide port-‐policer: Syntax: Parameter : The command lets you do Port policer port-policer flow-control/ mode <port-list> disable/ enable rate <port-list> Kbps/… fps <1-10000>/<100-10000000> flow-control: Configure the port policer flow control mode mode: Configure the port policer mode rate: Configure the port policer rate Kbps: Rate in kilo bits per second (Kbps) <100-10000000>: Rate Kfps: Rate in kilo frame per second (Kfps) <1-10000>: Rate Mbps: Rate in mega bits per second (Mbps) <1-10000>: Rate fps: Rate in frame per second (fps) <100-10000000>: Rate <port-list>: available value is from switch physical port density, format: 1,3-5 disable: Disable port policer flow control enable: Enable port policer flow control EXAMPLE: Switch(qos)# port-policer flow-control 1 enable Switch(qos)# show port-policer Port Mode Rate Flow Control ---- -------- --------- -----------1 Disabled 500 kbps Enabled 2 Disabled 500 kbps Disabled 3 Disabled 500 kbps Disabled 4 Disabled 500 kbps Disabled Switch(qos)# port-policer mode 2 enable Switch(qos)# show port-policer Port Mode Rate Flow Control ---- -------- --------- -----------1 Disabled 500 kbps Disabled 2 Enabled 500 kbps Disabled 3 Disabled 500 kbps Disabled 4 Disabled 500 kbps Disabled Switch(qos)# port-policer rate 3 mbps 99 Switch(qos)# show port-policer Port Mode Rate Flow Control ---- -------- --------- -----------1 Disabled 500 kbps Disabled 2 Disabled 500 kbps Disabled 3 Disabled 99 Mbps Disabled 4 Disabled 500 kbps Disabled port-‐schedulers: The command lets you do QoS egress port schedulers 156 Publication date: Feb., 2012 Revision A1 CLI Reference Guide Syntax: port-scheduler mode <port-list> strict/ weighted weight <port-list> <0-5> <1-100> Parameter : mode: Configure the port scheduler mode <port-list>: available value is from switch physical port density, format: 1,3-5 strict: Strict priority scheduler mode weighted: Weighted scheduler mode weight: Configure the port scheduler weight <port-list>: available value is from switch physical port density, format: 1,3-5 <0-5>: Weighted queue <1-100>: Scheduler weight EXAMPLE: Switch(qos)# port-scheduler mode 1 weighted Switch(qos)# show scheduler-mode Port Mode ---- -------1 Weighted 2 Strict 3 Strict Switch(qos)# port-scheduler weight 2 5 99 witch(qos)# show scheduler-weight 2 Port Queue Weight ---- ----- --------2 0 17 (9%) 1 17 (9%) 2 17 (9%) 3 17 (9%) 4 17 (9%) 5 99 (55%) port-‐shaper: Syntax: Parameter : The command lets you do Port shaper port-shaper mode <port-list> disable/ enable rate <port-list> <100-10000000> mode: Configure the port shaper mode <port-list>: available value is from switch physical port density, format: 1,3-5 disable: Disable enable: Enable rate: Configure the port shaper rate <port-list>: available value is from switch physical port density, format: 1,3-5 157 Publication date: Feb., 2012 Revision A1 CLI Reference Guide <100-10000000>: Rate in kilo bits per second (Kbps) EXAMPLE: Switch(qos)# port-shaper mode 1 enable Switch(qos)# show port-shaper Port Mode Rate ---- -------- --------1 Enabled 500 kbps 2 Disabled 500 kbps 3 Disabled 500 kbps Switch(qos)# port-shaper rate 2 999 Switch(qos)# show port-shaper Port Mode Rate ---- -------- --------1 Enabled 500 kbps 2 Disabled 999 kbps 3 Disabled 500 kbps 4 Disabled 500 kbps qce: Syntax: The command lets you add or modify QoS control entry qce <1-256> <0-256> <port-list> any/…/ snap class default/<0-7> classified-dscp default/<0-63> dei any/<0-1> dmac any/…/unicast sp default/<0-3> end <cr> pcp 0-1/ 0-3/2-3/4-5/4-7/ 6-7/any/<0-7> show <cr> smac <oui-address>/ any tag any/disable/enable vid any/<vlan-range> Parameter : <1-256>: If the QCE ID parameter <qce_id> is specified and an entry with this QCE ID already exists, the QCE will be modified. Otherwise, a new QCE will be added. <0-256>: If the next QCE ID is non zero, the QCE will be placed before this QCE in the list. If the next QCE ID is zero, the QCE will be placed last in the list. <port-list>: Port member for QCE any: Only Ethernet Type frames can match this QCE etype: Only Ethernet Type frames can match this QCE 158 Publication date: Feb., 2012 Revision A1 CLI Reference Guide ipv4: Only IPv4 frames can match this QCE ipv6: Only IPv6 frames can match this QCE llc: Only LLC frames can match this QCE snap: Only SNAP frames can match this QCE class: Action of QoS class for this QCE default: Basic classification <0-7>: QoS class value classified-dscp: Action of DSCP for this QCE default: Basic classification <0-63>: DSCP value dei: Specify whether frames can hit the action according to DEI any: Don't care <0-1>: Drop Eligible Indicator value dmac: Configure destination MAC address for this QCE any: Don't care broadcast: Frame must be broadcast multicast: Frame must be multicast unicast: Frame must be unitcast dp: Action of drop precedence level for this QCE default: Basic classification <0-3>: Drop precedence level end: Finish QCE setting and return to QoS mode pcp: Specify whether frames can hit the action according to PCP 0-1: Priority Code Point (0-1) 0-3: Priority Code Point (0-3) 2-3: Priority Code Point (2-3) 4-5: Priority Code Point (4-5) 4-7: Priority Code Point (4-7) 6-7: Priority Code Point (6-7) any: Don't care <0-7>: Priority Code Point show: Show QCE smac: Configure source MAC address for this QCE <oui-address>: A frame that hits this QCE matches this source OUI address value any: Don't care tag: Specify whether frames can hit the action according to the 802.1Q tagged 159 Publication date: Feb., 2012 Revision A1 CLI Reference Guide any: Don't care disable: Untagged frame only enable: Tagged frame only vid: Specify the VLAN ID filter for this QCE any: No VLAN ID filter is specified. (VLAN ID filter status is don't-care.) <vlan-range>: A frame that hits this QCE matches this VLAN range EXAMPLE: Switch(qos)# qce 13 23 Switch(qos/qce-etype)# Switch(qos/qce-etype)# Switch(qos/qce-etype)# Switch(qos/qce-etype)# Switch(qos/qce-etype)# Switch(qos/qce-etype)# Switch(qos/qce-etype)# Switch(qos/qce-etype)# Switch(qos/qce-etype)# Switch(qos/qce-etype)# QCE ID : 13 Frame Type : Ethernet 25 etype class 7 classified-dscp 63 dei 1 dmac unicast dp 3 pcp 5 smac any tag enable vid 21-25 show Port VLAN Parameters --------------Tag : Tagged VID : 21-25 PCP : 5 DEI : 1 MAC Parameters -------------SMAC : Any DMAC Type: Unicast Ethernet Parameters ------------------Ether Type : Any queue-‐shaper: Syntax: Parameter : : 25,29 Action Parameters ----------------Class : 7 DP : 3 DSCP : 63 The command lets you do Queue shaper queue-shaper excess <port-list> <queue-list> disable/ enable excess: Configure the port queue excess bandwidth mode mode: Configure the port queue shaper mode rate: Configure the port queue shaper rate <port-list>: available value is from switch physical port density, format: 1,3-5 <queue-list>: Queue list, available value is from 0 to 7 disable: Disable use of excess bandwidth enable: Enable use of excess bandwidth 160 Publication date: Feb., 2012 Revision A1 CLI Reference Guide EXAMPLE: Switch(qos)# queue-shaper excess 1 7 enable Switch(qos)# show queue-shaper 1 Port Queue Mode Rate Excess ---- ----- -------- --------- -------1 0 Disabled 500 kbps Disabled 1 Disabled 500 kbps Disabled 2 Disabled 500 kbps Disabled 3 Disabled 500 kbps Disabled 4 Disabled 500 kbps Disabled 5 Disabled 500 kbps Disabled 6 Disabled 500 kbps Disabled 7 Disabled 500 kbps Enabled show: Syntax: Parameter : The command lets you show QoS information show <port-list> class-map: Show QoS class and DP level to DSCP mapping dscp-map: Show DSCP to QoS class and DP level mapping dscp-translation: Show DSCP ingress and egress translation port-classify: Show QoS ingress port classification port-dscp: Show port DSCP configuration port-map: Show port classification (PCP, DEI) to (QoS class, DP level) mapping table <port-list>: available value is from switch physical port density, format: 1,3-5 port-policer: Show port policer configuration port-shaper: Show port shaper configuration qce: Show QCL control list <1-256>: QCE ID qcl-status: Show QCL status combined: Show the combined status conflicts: Show all conflict status static: Show the static user configured status voice-vlan: Show the status by Voice VLAN queue-shaper: Show port queue shaper configuration <port-list>: available value is from switch physical port density, format: 1,3-5 remarking-map: Show port tag remarking mapping table <port-list>: available value is from switch physical port density, format: 1,3-5 scheduler-mode: Show port scheduler mode configuration scheduler-weight: Show port scheduler weight configuration 161 Publication date: Feb., 2012 Revision A1 CLI Reference Guide storm: Show storm control configuration tag-remarking: Show port tag remarking configuration wred: Show WRED configuration EXAMPLE: Switch(qos)# show class-map QoS Class DSCP --------- ---0 0 1 0 2 0 3 0 4 0 5 0 6 0 7 0 Switch(qos)# show dscp-map DSCP Trust QoS Class DP Level --------- -------- --------- -------0 (BE) Disabled 0 0 1 Disabled 0 0 2 Disabled 0 0 3 Disabled 0 0 Switch(qos)# show dscp-translation Ingress Ingress Egress DSCP Translation Classify Remap ---- ----------- -------- --------0 0 Disabled 0 1 1 Disabled 1 2 2 Disabled 2 3 3 Disabled 3 Switch(qos)# show port-classify Port QoS class DP level PCP DEI Tag class. DSCP Based ---- --------- -------- --- --- ---------- ---------1 0 0 0 0 Disabled Disabled 2 0 0 0 0 Disabled Disabled 3 0 0 0 0 Disabled Disabled 162 Publication date: Feb., 2012 Revision A1 CLI Reference Guide Switch(qos)# show port-dscp Port DSCP translation Ingress classification Egress remark ---- ---------------- ---------------------- ------------1 Disabled Disabled Disabled 2 Disabled Disabled Disabled 3 Disabled Disabled Disabled Switch(qos)# show port-map 1 Port PCP DEI QoS class DP level ---- --- --- --------- -------1 0 0 1 0 0 1 1 1 1 0 0 0 Switch(qos)# show port-policer Port Mode Rate Flow Control ---- -------- --------- -----------1 Disabled 500 kbps Disabled 2 Disabled 500 kbps Disabled 3 Disabled 500 kbps Disabled Switch(qos)# show port-shaper Port Mode Rate ---- -------- --------1 Disabled 500 kbps 2 Disabled 500 kbps 3 Disabled 500 kbps 163 Publication date: Feb., 2012 Revision A1 CLI Reference Guide Switch(qos)# show qce 200 Switch(qos)# show Number of QCEs: 0 Switch(qos)# show Number of QCEs: 0 Switch(qos)# show Number of QCEs: 0 Switch(qos)# show qcl-status combined qcl-status conflicts qcl-status static qcl-status voice-vlan Switch(qos)# show queue-shaper 1 Port Queue Mode Rate Excess ---- ----- -------- --------- -------1 0 Disabled 500 kbps Disabled 1 Disabled 500 kbps Disabled 2 Disabled 500 kbps Disabled 3 Disabled 500 kbps Disabled 4 Disabled 500 kbps Disabled 5 Disabled 500 kbps Disabled 6 Disabled 500 kbps Disabled 7 Disabled 500 kbps Disabled Switch(qos)# show remarking-map 1 Port QoS class DP level PCP DEI ---- --------- -------- --- --1 0 0 1 0 0 1 1 1 1 0 0 0 1 1 0 1 2 0 2 0 2 1 2 1 3 0 3 0 3 1 3 1 4 0 4 0 4 1 4 1 5 0 5 0 5 1 5 1 6 0 6 0 6 1 6 1 7 0 7 0 7 1 7 1 164 Publication date: Feb., 2012 Revision A1 CLI Reference Guide Switch(qos)# show scheduler-mode Port Mode ---- -------1 Strict 2 Strict 3 Strict Switch(qos)# show scheduler-weight 1 Port Queue Weight ---- ----- --------1 0 17 (17%) 1 17 (17%) 2 17 (17%) 3 17 (17%) 4 17 (17%) 5 17 (17%) Switch(qos)# show storm Unicast Port Mode Rate ---- -------- --------1 Disabled 500 kbps 2 Disabled 500 kbps 3 Disabled 500 kbps 4 Disabled 500 kbps Broadcast Unknown Mode Rate Mode Rate -------- --------- -------- --------Disabled 500 kbps Disabled 500 kbps Disabled 500 kbps Disabled 500 kbps Disabled 500 kbps Disabled 500 kbps Disabled 500 kbps Disabled 500 kbps Switch(qos)# show tag-remarking ? <cr> Switch(qos)# show tag-remarking Port Mode PCP DEI ---- ---------- --- --1 Classified 0 0 2 Classified 0 0 3 Classified 0 0 Switch(qos)# show wred Queue Mode Min. Threshold Max. DP 1 Max. DP 2 Max. DP 3 ----- -------- -------------- --------- --------- --------0 Disabled 0 1 5 10 1 Disabled 0 1 5 10 2 Disabled 0 1 5 10 3 Disabled 0 1 5 10 4 Disabled 0 1 5 10 5 Disabled 0 1 5 10 storm: Syntax: Parameter : The command lets you configure storm rate control storm broadcast/ unicast/ unknown <port-list> disable/ enable Kbps/…/ fps <1-10000>/ <100-10000000> broadcast: Broadcast frame storm control unicast: Unicast frame storm control unknown: Unknown frame storm control <port-list>: available value is from switch physical port density, format: 1,3-5 disable: Disable port storm control enable: Enable port storm control Kbps: Rate in kilo bits per second (Kbps) 165 Publication date: Feb., 2012 Revision A1 CLI Reference Guide Kfps: Rate in kilo frame per second (Kfps) Mbps: Rate in mega bits per second (Mbps) fps: Rate in frame per second (fps) <1-10000>/ <100-10000000>: Rate EXAMPLE: Switch(qos)# storm broadcast 1 enable mbps 99 Switch(qos)# storm unicast 2 enable mbps 88 Switch(qos)# storm unknown 3 enable fps 777 Switch(qos)# show storm Unicast Broadcast Unknown Port Mode Rate Mode Rate Mode Rate ---- -------- --------- -------- --------- -------- --------1 Disabled 500 kbps Enabled 99 Mbps Disabled 500 kbps 2 Enabled 88 Mbps Disabled 500 kbps Disabled 500 kbps 3 Disabled 500 kbps Disabled 500 kbps Enabled 777 fps 4 Disabled 500 kbps Disabled 500 kbps Disabled 500 kbps 5 Disabled 500 kbps Disabled 500 kbps Disabled 500 kbps tag-‐remarking: Syntax: The command lets you do QoS egress port tag remarking tag-remarking dei <port-list> <0-1> map <port-list> <class-list> <dpl-list> <0-7> <0-1> mode <port-list> classified/ default/ mapped pcp <port-list> <0-7> Parameter : dei: Configure the default DEI. This value is used when port tag remarking mode is set to 'default' <port-list>: available value is from switch physical port density, format: 1,3-5 <0-1>: Drop Eligible Indicator map: Configure the port tag remarking map. This map is used when port tag remarking mode is set to 'mapped', and the purpose is to translate the classified QoS class (0-7) and DP level (0-1) to PCP and DEI <class-list>: QoS class list, available value is from 0 to 7 <dpl-list>: Drop precedence level list, available value is from 0 to 1 <0-7>: Priority Code Point <0-1>: Drop Eligible Indicator mode: Configure the port tag remarking mode classified: Use classified PCP/DEI values default: Use default PCP/DEI values mapped: Use mapped versions of QoS class and DP level 166 Publication date: Feb., 2012 Revision A1 CLI Reference Guide pcp: Configure the default PCP. This value is used when port tag remarking mode is set to 'default' <0-7>: Priority Code Point EXAMPLE: Switch(qos)# tag-remarking dei 1 1 Switch(qos)# tag-remarking mode 2 mapped Switch(qos)# tag-remarking pcp 3 7 Switch(qos)# show tag-remarking Port Mode PCP DEI ---- ---------- --- --1 Classified 0 1 2 Mapped 0 0 3 Classified 7 0 4 Classified 0 0 Switch(qos)# tag-remarking map 2 7 1 7 1 wred: Syntax: Parameter : The command lets you configure Weighted Random Early Detection wred <queue-list> disable/ enable <0-100> <0-100> <0-100> <0-100> <queue-list>: Queue list, available value is from 0 to 5 disable: Disable enable: Enable <0-100>: Minimum threshold <0-100>: Maximum Drop Probability for DP level 1 <0-100>: Maximum Drop Probability for DP level 2 <0-100>: Maximum Drop Probability for DP level 3 EXAMPLE: Switch(qos)# wred 5 enable 10 20 30 40 Switch(qos)# show wred Queue Mode Min. Threshold Max. DP 1 Max. DP 2 Max. DP 3 ----- -------- -------------- --------- --------- --------0 Disabled 0 1 5 10 1 Disabled 0 1 5 10 2 Disabled 0 1 5 10 3 Disabled 0 1 5 10 4 Disabled 0 1 5 10 5 Enabled 10 20 30 40 167 Publication date: Feb., 2012 Revision A1 CLI Reference Guide Chapter 37 Reboot Reboot Commands of CLI This section describes how to restart the switch for any maintenance needs. Any configuration files or scripts that you saved in the switch should still be available afterwards. Table 36: Reboot Commands Command Function reboot Reboot the system reboot: The command lets you reboot the system Syntax: Parameter : Reboot <cr> <cr> means press the Enter key. EXAMPLE: Switch# reboot 168 Publication date: Feb., 2012 Revision A1 CLI Reference Guide SFlow Commands of CLI Chapter 38 SFlow The sFlow Collector configuration for the switch can be monitored and modified here. Up to 1 Collector is supported. This page allows for configuring sFlow collector IP type, sFlow collector IP Address, Port Number, for each sFlow Collector Table 37: SFlow Commands collector: Syntax: Parameter : Command Function collector sFlow Collector Configuration sampler sFlow sampler Configuration show Show sFlow The command lets you set sFlow Collector Configuration collector IPv4/ IPv6 <ip-address> <1-65535> <0-2147483647> <200-1500> IPv4: IP type IPv6: IP type <ip-address>: IP address <1-65535>: TCP/UDP port number. By default, the port number is 6343 <0-2147483647>: Set the receiver timeout for list of receiver ID (RID). Collector cannot collect samples unless receivertimeout <200-1500>: Set the reciever datagram length for list of receiver ID (RID) EXAMPLE: Switch(sflow)# collector ipv4 192.168.100.100 6345 99 1500 Switch(sflow)# show % Incomplete command Switch(sflow)# show collector Configured Current ---------------- ---------------Collector Id 1 1 IP Type IPv4 IPv4 IP Address 192.168.100.100 192.168.100.100 Port 6345 6345 Time Out 99 90 Timer is still alive! Datagram Size 1500 1500 169 Publication date: Feb., 2012 Revision A1 sampler: Syntax: Parameter : The command lets you sFlow sampler Configuration sampler <port-list> ALL/ RX/ TX/ none <0-4095> <14-200> <0-3600> <port-list>: available value is from switch physical port density, format: 1,3-5 ALL: Sample on both RX and TX RX: Sample on RX TX: Sample on TX none: Sampling is disabled <0-4095>: sampled If parameter sample_rate is 'N' then 1/N of packets is <14-200>: Configures the size of the header of the sampled frame to be copied to the Queue for further processing. The Max header size ranges from 14 to 200 bytes. <0-3600>: Configures the polling interval for the counter sampling. The accepted value for Counter Polling Interval ranges from 0 to 3600 seconds. Default value is 0 seconds, which means polling is disabled. EXAMPLE: Switch(sflow)# Switch(sflow)# sFlow sFlow Ports Instance ----- -------1 1 2 1 3 1 4 1 show sampler 2 aLL 400 199 3600 show sampler Sampler Sampling Max Hdr Counter Polling Type Rate Size Interval -------- -------- ------- --------------None 0 128 0 ALL 400 199 3600 None 0 128 0 None 0 128 0 The command lets you show sFlow Syntax: Parameter : show collector/ sampler collector: Show sFlow collector sampler: Show sFlow sampler EXAMPLE: Publication date: Feb., 2012 Revision A1 CLI Reference Guide Switch(sflow)# show collector Configured Current ---------------- ---------------Collector Id 1 1 IP Type IPv4 IPv4 IP Address 0.0.0.0 0.0.0.0 Port 6343 6343 Time Out 0 0 Timer is still alive! Datagram Size 1400 1400 Switch(sflow)# sFlow sFlow Ports Instance ----- -------1 1 2 1 3 1 4 1 show sampler Sampler Sampling Max Hdr Counter Polling Type Rate Size Interval -------- -------- ------- --------------None 0 128 0 None 0 128 0 None 0 128 0 None 0 128 0 171 Publication date: Feb., 2012 Revision A1 CLI Reference Guide Single IP Commands of CLI Chapter 39 Single IP Single IP Management (SIM), a simple and useful method to optimize network utilities and management, is designed to manage a group of switches as a single entity, called an SIM group. Implementing the SIM feature will have the following advantages for users: Simplify management of small workgroups or wiring closets while scaling networks to handle increased bandwidth demand. Reduce the number of IP addresses needed on the network. Virtual stacking structure -‐ Eliminate any specialized cables for stacking and remove the distance barriers that typically limit topology options when using other stacking technology. Table 38: Single IP Commands connect: Syntax: Parameter : Command Function connect Connect to slave switch group-name Configure single ip group name mode Configure single ip mode show Show single ip information The command lets you connect to slave switch connect <1-16> <1-16>: Slave switch index EXAMPLE: Switch(sip)# connect 1 group-‐name: The command lets you configure single IP group name Syntax: Parameter : group-name disable/ enable <WORD>: Up to 64 characters describing group name EXAMPLE: 172 Publication date: Feb., 2012 Revision A1 CLI Reference Guide Switch(sip)# group-name david Switch(sip)# show config Mode : Disabled Group Name : david mode: Syntax: Parameter : The command lets you configure single IP mode mode disable/ master/ slave disable: Disable single ip operation master: Configure as master slave: Configure as slave EXAMPLE: Switch(sip)# mode master Switch(sip)# show c Mode : Master Group Name : david show: Syntax: Parameter : The command lets you show single IP information show config/ info config: Show single ip configuration info: Show single ip group information EXAMPLE: Switch(sip)# show config Mode : Disabled Group Name : VirtualStack Switch(sip)# show info Index Model Name MAC Address ----- --------------- ----------------- 173 Publication date: Feb., 2012 Revision A1 CLI Reference Guide SMTP Commands of CLI Chapter 40 SMTP The function is used to set a Alarm trap when the switch alarms, then you can set the SMTP server to send you the alarm mail. Table 39: SMTP Commands delete: Syntax: Command Function delete Delete command level Configure Severity level mail-address Configure email user name return-path Configure email sender sender Configure email sender server Configure email server show Show email configuration username Show DHCP snooping information The command lets you delete command delete mail-address <1-6> return-path/ sender/ server/ username Parameter : mail-address: Delete email address <1-6>: Delete email address id return-path: Delete return path sender: Delete sender server: Delete email server username: Delete username and password EXAMPLE: Switch(smtp)# delete mail-address 2 Switch(smtp)# show Mail Server : User Name : Password : Severity level : Info Sender : Return Path : Email Adress 1 : Email Adress 2 : Email Adress 3 : Email Adress 4 : Email Adress 5 : Email Adress 6 : 174 Publication date: Feb., 2012 Revision A1 CLI Reference Guide level: The command lets you configure Severity level Syntax: Parameter : level <0-7> <0-7>: Severity level <0> Emergency: system is unusable <1> Alert: action must be taken immediately <2> Critical: critical conditions <3> Error: error conditions <4> Warning: warning conditions <5> Notice: normal but significant condition <6> Informational: informational messages <7> Debug: debug-level messages EXAMPLE: Switch(smtp)# level 7 Switch(smtp)# show Mail Server : User Name : Password : Severity level : Debug Sender : Return Path : Email Adress 1 : Email Adress 2 : Email Adress 3 : Email Adress 4 : Email Adress 5 : Email Adress 6 : mail-‐address: Syntax: Parameter : The command lets you configure email user name mail-address <1-6> <mail-address> <1-6>: Email address index <mail-address>: Up to 47 characters describing mail address EXAMPLE: 175 Publication date: Feb., 2012 Revision A1 CLI Reference Guide Switch(smtp)# mail-address 6 [email protected] Switch(smtp)# show Mail Server : User Name : Password : Severity level : Debug Sender : Return Path : Email Adress 1 : Email Adress 2 : Email Adress 3 : Email Adress 4 : Email Adress 5 : Email Adress 6 : [email protected] return-‐path: Syntax: Parameter : The command lets you configure the address of email sender return-path <return-path> <return-path>: Up to 47 characters describing return path EXAMPLE: Switch(smtp)# return-path [email protected] Switch(smtp)# show Mail Server : User Name : Password : Severity level : Debug Sender : Return Path : [email protected] Email Adress 1 : Email Adress 2 : Email Adress 3 : Email Adress 4 : Email Adress 5 : Email Adress 6 : [email protected] sender: The command lets you configure email sender Syntax: Parameter : sender <sender> <sender>: Up to 47 characters describing sender EXAMPLE: 176 Publication date: Feb., 2012 Revision A1 CLI Reference Guide Switch(smtp)# sender tech Switch(smtp)# show Mail Server : User Name : Password : Severity level : Debug Sender : david Return Path : david@mail. tech.com.tw Email Adress 1 : Email Adress 2 : Email Adress 3 : Email Adress 4 : Email Adress 5 : Email Adress 6 : [email protected] server: The command lets you configure email server Syntax: Parameter : mode server <server>: Up to 47 characters describing email server EXAMPLE: Switch(smtp)# server davidserver Switch(smtp)# show Mail Server : davidserver User Name : Password : Severity level : Debug Sender : davidtech Return Path : [email protected] Email Adress 1 : Email Adress 2 : Email Adress 3 : Email Adress 4 : Email Adress 5 : Email Adress 6 : [email protected] show: The command lets you show email configuration Syntax: Parameter : show <cr> <cr> means it without any parameter needs to type. NOTE: When enable DHCP snooping mode operation, the request DHCP messages will be forwarded to trusted ports and only allowed reply packets from trusted ports. EXAMPLE: 177 Publication date: Feb., 2012 Revision A1 CLI Reference Guide Switch(smtp)# show Mail Server : User Name : Password : Severity level : Info Sender : Return Path : Email Adress 1 : Email Adress 2 : Email Adress 3 : Email Adress 4 : Email Adress 5 : Email Adress 6 : username: The command lets you configure email user name Syntax: Parameter : mode username password <username>: Up to 47 characters describing user name <password>: Up to 47 characters describing password EXAMPLE: Switch(smtp)# username david 1111 Switch(smtp)# show Mail Server : davidserver User Name : david Password : ******** Severity level : Debug Sender : davidtech Return Path : [email protected] Email Adress 1 : Email Adress 2 : Email Adress 3 : Email Adress 4 : Email Adress 5 : Email Adress 6 : [email protected] 178 Publication date: Feb., 2012 Revision A1 CLI Reference Guide SNMP Commands of CLI Chapter 41 SNMP Any Network Management System (NMS) running the Simple Network Management Protocol (SNMP) can manage the Managed devices equipped with SNMP agent, provided that the Management Information Base (MIB) is installed correctly on the managed devices. The SNMP is a protocol that is used to govern the transfer of information between SNMP manager and agent and traverses the Object Identity (OID) of the management Information Base (MIB), described in the form of SMI syntax. SNMP agent is running on the switch to response the request issued by SNMP manager. Basically, it is passive except when issuing the trap information. The switch supports a switch to turn on or off the SNMP agent. If you set the field SNMP “Enable”, SNMP agent will be started up. All supported MIB OIDs, including RMON MIB, can be accessed via SNMP manager. If the field SNMP is set “Disable”, SNMP agent will be de-‐activated, and the related Community Name, Trap Host IP Address, Trap and all MIB counters will be ignored. Table 40: SNMP Commands access: Syntax: Command Function access Configure SNMP access community Configure SNMP community delete Delete command engine-id Set SNMP Engine ID getcommunity Configure SNMP Get Community group Configure SNMP groups mode Enable/Disable SNMP mode setcommunity Configure SNMP Set Community show Show SNMP command trap Configure SNMP trap user Configure SNMP users view Configure SNMP views The command lets you configure SNMP access access any/ usm AuthNoPriv/ AuthPriv/ NoAuthNoPriv <WORD> <WORD> access v1/ v2c AuthNoPriv <WORD> <WORD> 179 Publication date: Feb., 2012 Revision A1 CLI Reference Guide Parameter : <WORD>: group name: max 32 chars any: Security Model usm: Security Model AuthNoPriv: Security Level. If security_model is not usm, the security_level value must be NoAuthNoPriv AuthPriv: Security Level. If security_model is not usm, the security_level value must be NoAuthNoPriv NoAuthNoPriv: Security Level. If security_model is not usm, the security_level value must be NoAuthNoPriv <WORD>: read_view_name: The scope for a specified instance can read, None is reserved for Empty. <WORD>: write_view_name: The scope for a specified instance can write, None is reserved for Empty. v1: Security Model v2c: Security Model AuthNoPriv: Security Level. If security_model is not usm, the security_level value must be NoAuthNoPriv EXAMPLE: Switch(snmp)# access g usm noAuthNoPriv v v Switch(snmp)# show access SNMPv3 Accesses Table: Idx Group Name Model SecurityLevel Read View Name Write View Name --- ---------------- ----- -------------- ---------------- ---------------1 g usm NoAuth, NoPriv v v comminity: Syntax: Parameter : The command lets you configure SNMP community community <WORD> <WORD> <ip-address> <ip-mask> <WORD>: packet community: max 32 chars<60-1400> Size of ICMP echo <WORD>: user name: max 32 chars <ip-address>: SNMP access source ip <ip-mask>: SNMP access source address mask EXAMPLE: 180 Publication date: Feb., 2012 Revision A1 CLI Reference Guide witch(snmp)# community david pm 192.168.6.127 255.255.255.0 Switch(snmp)# show community SNMP Community Table: Idx Community UserName Source IP Source Mask --- ---------------- ---------------- --------------- --------------1 david pm 192.168.6.127 255.255.255.0 Number of entries: 1 delete: Syntax: Parameter : The command lets you delete command delete access/ community/ group/ trap/ user/ view <1-14>/<1-4>/<1-6>/<1-10>/<1-48> access: Delete snmpv3 access entry <1-14>: table index community: Delete community entry <1-4>: table index group: Delete snmpv3 groups entry <1-14>: table index trap: Delete trap entry <1-6>: table index user: Delete snmpv3 users entry <1-10>: table index view: Delete snmpv3 views entry <1-48>: table index EXAMPLE: Switch(snmp)# delete access 14 engine-‐id: Syntax: Parameter : The command lets you set SNMP Engine ID engine-id <HEX> <HEX>: the format may not be all zeros or all 'ff'H,and is restricted to 5 - 32 octet string EXAMPLE: 181 Publication date: Feb., 2012 Revision A1 CLI Reference Guide Switch(snmp)# engine-id ffffffffffffffff getcommunity: Syntax: Parameter : The command lets you configure SNMP Get Community getcommunity <WORD> <WORD>: community: max 32 chars, default : public EXAMPLE: Switch(snmp)# getcommunity rose Switch(snmp)# show snmp SNMP Configuration -------------------------------Get Community : rose Set Community Mode : Enable Set Community : jack group: Syntax: Parameter : The command lets you configure SNMP groups group <WORD> usm/ v1/ v2c <WORD>:user name: max 32 chars usm: Security Model v1: Security Model v2c: Security Model EXAMPLE: 182 Publication date: Feb., 2012 Revision A1 CLI Reference Guide Switch(snmp)# group pm v1 ccc Switch(snmp)# show group SNMPv3 Groups Table: Idx Model Security Name Group Name --- ----- -------------------------------- -------------------------------1 v1 pm ccc Number of entries: 1 Switch(snmp)# group pm v2c aaa Switch(snmp)# show group SNMPv3 Groups Table: Idx Model Security Name Group Name --- ----- -------------------------------- -------------------------------1 v2c pm aaa mode: Syntax: Parameter : The command lets you Enable/Disable SNMP mode mode disable/ enable disable: Disable SNMP mode enable: Enable SNMP mode EXAMPLE: Switch(snmp)# mode enable Switch(snmp)# show mode SNMPv3 State Show SNMP State SNMPv3 Engine ID setcommunity: Syntax: Parameter : : Enabled : 80001455030040c7232600 The command lets you configure SNMP Set Community setcommunity disable/ enable disable: Disable SNMP Set Community enable: Enable SNMP Set Community <WORD>: community: max 32 chars, default : private EXAMPLE: 183 Publication date: Feb., 2012 Revision A1 CLI Reference Guide Switch(snmp)# setcommunity enable jack Switch(snmp)# show snmp SNMP Configuration -------------------------------Get Community : eee Set Community Mode : Enable Set Community : jack show: Syntax: Parameter : The command lets you show SNMP command show access/ community/ group/ mode/ snmp/ trap/ user/ view access: Show snmpv3 access entry community: Show snmpv3 community entry group: Show snmpv3 groups entry mode: Show snmp configuration snmp: Show snmp community configuration trap: Show snmp trap entry user: Show snmpv3 users entry view: Show snmpv3 views entry EXAMPLE: Switch(snmp)# show access SNMPv3 Accesses Table: Idx Group Name Model SecurityLevel Read View Name Write View Name --- ---------------- ----- -------------- ---------------- ---------------Number of entries: 0 Switch(snmp)# show community SNMP Community Table: Idx Community UserName Source IP Source Mask --- ---------------- ---------------- --------------- --------------1 david pm 192.168.6.127 255.255.255.0 Number of entries: 1 trap: Syntax: Parameter : The command lets you configure SNMP trap trap <1-6> v2/ v3 ipv4/ ipv6 <ip-address> <1-65535> <0-7> <1-6>: trap index : 1 - 6 184 Publication date: Feb., 2012 Revision A1 CLI Reference Guide v2: version v3: version ipv4: Trap host IP type ipv6: Trap host IP type <ip-address>: Trap host IPv4 address <1-65535>: trap port <0-7> Severity level <0> Emergency: system is unusable <1> Alert: action must be taken immediately <2> Critical: critical conditions <3> Error: error conditions <4> Warning: warning conditions <5> Notice: normal but significant condition <6> Informational: informational messages <7> Debug: debug-level messages EXAMPLE: Switch(snmp)# trap 2 v2 ipv4 192.168.6.127 65535 7 aaa Switch(snmp)# show trap SNMPv3 Trap Host Configuration: Community Severity Auth. Priv. No Ver Server IP Port Security Name Level Protocol Protocol -- --- --------------- ---- ----------------------- --------- --------- -------1 2 v2c 192.168.6.127 65535 aaa Debug 3 4 5 6 user: Syntax: Parameter : The command lets you configure SNMP users user <WORD> AuthNoPriv/ AuthPriv/ NoAuthNoPriv MD5/ SHA <WORD> <WORD>: user name: max 32 chars AuthNoPriv: Security_Level AuthPriv: Security_Level NoAuthNoPriv: Security_Level MD5: Authentication Protocol SHA: Authentication Protocol <WORD>: MD5 Authentication Password is restricted to 8 - 32 EXAMPLE: 185 Publication date: Feb., 2012 Revision A1 CLI Reference Guide Switch(snmp)# user wade authnoPriv md5 12345678 Switch(snmp)# show user SNMPv3 Users Table: Index User Name Security Level Auth Priv ----- -------------------------------- -------------- ---- ---1 wade AuthNoPriv MD5 None Number of entries: 1 view: Syntax: Parameter : The command lets you configure SNMP views view <WORD> excluded/ included <WORD> <WORD>: view name: max 32 chars excluded: view_type included: view_type <WORD>: oid_subtree: The OID defining the root of the subtree. EXAMPLE: Switch(snmp)# view viewdavid included .1.3.6.1.2 Switch(snmp)# show view SNMPv3 Views Table: Idx View Name View Type OID Subtree --- -------------------------------- --------- -------------------------------1 viewdavid included .1.3.6.1.2 186 Publication date: Feb., 2012 Revision A1 CLI Reference Guide SSH Commands of CLI Chapter 42 SSH This section shows you how to use SSH (Secure SHell) to securely access the Switch. SSH is a secure communication protocol that combines authentication and data encryption to provide secure encrypted communication. Table 41: SSH Commands mode: Syntax: Parameter : Command Function mode Configure the SSH mode show Show SSH configuration The command lets you configure the SSH mode mode disable/ enable disable: Disable SSH mode operation enable: Enable SSH mode operation EXAMPLE: Switch(ssh)# mode enable Switch(ssh)# show SSH Mode : Enabled show: Syntax: Parameter : The command lets you show SSH configuration show <cr> <cr> means press the Enter key. EXAMPLE: Switch(ssh)# show SSH Mode : Enabled 187 Publication date: Feb., 2012 Revision A1 CLI Reference Guide Chapter 43 STP STP Commands of CLI The Spanning Tree Protocol (STP) can be used to detect and disable network loops, and to provide backup links between switches, bridges, or routers. This allows the switch to interact with other bridging devices (that is, an STP-‐compliant switch, bridge or router) in your network to ensure that only one route exists between any two stations on the network, and provide backup links which automatically take over when a primary link goes down. STP -‐ STP uses a distributed algorithm to select a bridging device (STP-‐ compliant switch, bridge, or router) that serves as the root of the spanning tree network. It selects a root port on each bridging device (except for the root device) that incurs the lowest path cost when forwarding a packet from that device to the root device. Then it selects a designated bridging device from each LAN that incurs the lowest path cost when forwarding a packet from that LAN to the root device. All ports connected to designated bridging devices are assigned as designated ports. After determining the lowest cost spanning tree, it enables all root ports and designated ports, and disables all other ports. Network packets are therefore only forwarded between root ports and designated ports, eliminating any possible network loops. Once a stable network topology has been established, all bridges listen for Hello BPDUs (Bridge Protocol Data Units) transmitted from the Root Bridge. If a bridge does not get a Hello BPDU after a predefined interval (Maximum Age), the bridge assumes that the link to the Root Bridge is down. This bridge will then initiate negotiations with other bridges to reconfigure the network to reestablish a valid network topology. Table 42: STP Commands Command Function CName Set MSTP Configuration name FwdDelay Set FwdDelay MaxAge Set Maxage MaxHops Set MaxHops Statistics Clear STP port statistics Txhold Set TxHold Version Set force-version bpduFilter Set edge port BPDU Filtering bpduGuard Set edge port BPDU Guard migrate-check Set the STP mCheck (Migration Check) variable for ports 188 Publication date: Feb., 2012 Revision A1 CLI Reference Guide CName: Syntax: Parameter : msti-vlan Map Vlan ID(s) to an MSTI p-AutoEdge Set the STP autoEdge port parameter p-bpduGuard Set the bpduGuard port parameter p-cost Set the STP port instance path cost p-edge Set the STP adminEdge port parameter p-mode Set the STP enabling for a port p-p2p Set the STP point2point port parameter p-priority Set the STP port instance priority priority Set the bridge instance priority r-role Set the MSTP restrictedRole port parameter r-tcn Set the MSTP restrictedTcn port parameter recovery Set edge port error recovery timeout show Show Region config, MSTI vlan mapping, instance parameters and port parameters The command lets you Set MSTP Configuration name CName <WORD> <0-65535> <WORD>: A text string up to 32 characters long <0-65535>: MSTP revision-level(0~65535) EXAMPLE: Switch(stp)# cName david 65535 Switch(stp)# show cName Configuration name: david Configuration rev.: 65535 FwdDelay: Syntax: Parameter : The command lets you Set FwdDelay FwdDelay <4-30> <4-30>: MSTP forward delay (4-30, and max_age <= (forward_delay -1)*2)) EXAMPLE: 189 Publication date: Feb., 2012 Revision A1 CLI Reference Guide Switch(stp)# fwdDelay 30 witch(stp)# show instance STP Configuration Protocol Version: MSTP Max Age : 20 Forward Delay : 30 Tx Hold Count : 6 Max Hop Count : 20 BPDU Filtering : Disabled BPDU Guard : Disabled Error Recovery : 0 seconds Error Recovery : Disabled MaxAge: Syntax: Parameter : The command lets you Set Maxage maxage <6-40> <6-40>: STP maximum age time (6-40, and max_age <= (forward_delay-1)*2) EXAMPLE: Tx Hold Count : 6 Max Hop Count : 20 BPDU Filtering : Disabled BPDU Guard : Disabled Error Recovery : 0 seconds Error Recovery : Disabled MaxHops: Syntax: Parameter : The command lets you Set MaxHops maxhops <6-40> <6-40>: STP BPDU MaxHops (6-40)) EXAMPLE: Switch(stp)# maxhops 38 Switch(stp)# show instance STP Configuration Protocol Version: MSTP Max Age : 39 Forward Delay : 30 Tx Hold Count : 6 Max Hop Count : 38 BPDU Filtering : Disabled BPDU Guard : Disabled Error Recovery : 0 seconds Error Recovery : Disabled Statistics: The command lets you Clear STP port statistics 190 Publication date: Feb., 2012 Revision A1 CLI Reference Guide Syntax: Parameter : statistics clear clear: Clear the selected port statistics EXAMPLE: Switch(stp)# statistics clear Port Rx MSTP Tx MSTP Rx RSTP Tx RSTP Rx STP Tx STP Rx TCN T x TCN Rx Ill. Rx Unk. --------- -------- -------- -------- -------- ------- ------- ------- ------ ------- ------- TxHold: Syntax: Parameter : The command lets you Set TxHold txhold <1-10> <1-10>: STP Transmit Hold Count (1-10) EXAMPLE: Switch(stp)# txhold 9 Switch(stp)# show instance STP Configuration Protocol Version: MSTP Max Age : 39 Forward Delay : 30 Tx Hold Count : 9 Max Hop Count : 38 BPDU Filtering : Disabled BPDU Guard : Disabled Error Recovery : 0 seconds Error Recovery : Disabled Version: Syntax: Parameter : The command lets you Set force-‐version version mstp/ rstp/ stp mstp: Multiple Spanning Tree Protocol rstp: Rapid Spanning Tree Protocol stp: Spanning Tree Protocol EXAMPLE: 191 Publication date: Feb., 2012 Revision A1 CLI Reference Guide Switch(stp)# version stp Switch(stp)# show instance STP Configuration Protocol Version: Compatible (STP) Max Age : 39 Forward Delay : 30 Tx Hold Count : 9 Max Hop Count : 38 BPDU Filtering : Disabled BPDU Guard : Disabled Error Recovery : 0 seconds Error Recovery : Disabled bpduFilter: Syntax: Parameter : The command lets you Set edge port BPDU Filtering on the switch bpdufilter disable/ enable disable: Disable BPDU Filtering for Edge ports enable: Enable BPDU Filtering for Edge ports EXAMPLE: Switch(stp)# bpdufilter enable Switch(stp)# show instance STP Configuration Protocol Version: Compatible (STP) Max Age : 39 Forward Delay : 30 Tx Hold Count : 9 Max Hop Count : 38 BPDU Filtering : Enabled BPDU Guard : Disabled Error Recovery : 0 seconds Error Recovery : Disabled bpduGuard: Syntax: Parameter : The command lets you Set edge port BPDU Guard bpduguard disable/ enable disable: Disable BPDU Guard for Edge ports enable: Enable BPDU Guard for Edge ports EXAMPLE: 192 Publication date: Feb., 2012 Revision A1 CLI Reference Guide Switch(stp)# bpduguard enable Switch(stp)# show instance STP Configuration Protocol Version: Compatible (STP) Max Age : 39 Forward Delay : 30 Tx Hold Count : 9 Max Hop Count : 38 BPDU Filtering : Enabled BPDU Guard : Enabled Error Recovery : 0 seconds Error Recovery : Disabled migrate-‐check: Syntax: Parameter : The command lets you Set the STP mCheck (Migration Check) variable for ports migrate-check <port-list> <port-list>: available value is from switch physical port density, format: 1,3-5 EXAMPLE: Switch(stp)# migrate-check 1 msti-‐vlan: Syntax: Parameter : The command lets you Map Vlan ID(s) to an MSTI msti-vlan add/ del <0-7> <1-4094> add: Add a VLAN to a MSTI del: clear MSTP MSTI VLAN mapping configuration <0-7>: STP bridge instance no (0-7, CIST=0, MSTI1=1, ...) <1-4094>: available from 1 to 4094 EXAMPLE: 193 Publication date: Feb., 2012 Revision A1 CLI Reference Guide Switch(stp)# msti-vlan add 1 4094 Switch(stp)# show msti-vlan MSTI VLANs mapped to MSTI ---- -------------------MSTI1 4094 MSTI2 No VLANs mapped MSTI3 No VLANs mapped MSTI4 No VLANs mapped MSTI5 No VLANs mapped MSTI6 No VLANs mapped MSTI7 No VLANs mapped p-‐AutoEdge: The command lets you Set the STP autoEdge port parameter Syntax: p-autoEdge aggregations/<port-list> disable/ enable Parameter : aggregations: available value is for aggregated port <port-list>: available value is from switch physic port density, format: 1,3-5 disable: disable: Disable MSTP autoEdges enable: enable : Enable MSTP autoEdge EXAMPLE: Switch(stp)# p-autoEdge aggregations enable Switch(stp)# show pconf Port ---Aggr Mode AdminEdge AutoEdge restrRole restrTcn bpduGuard Point2point -------- ------------------ ------------------ --------------------Disabled Disabled Enabled Disabled Disabled Disabled Enabled Port Mode ---- -------1 Disabled 2 Disabled 3 Disabled AdminEdge AutoEdge -----------------Disabled Enabled Disabled Enabled Disabled Enabled restrRole restrTcn -----------------Disabled Disabled Disabled Disabled Disabled Disabled bpduGuard Point2point --------------------Disabled Auto Disabled Auto Disabled Auto Switch(stp)# p-autoEdge 1 disable Switch(stp)# show pconf Port ---Aggr Mode AdminEdge AutoEdge restrRole restrTcn bpduGuard Point2point -------- ------------------ ------------------ --------------------Disabled Disabled Enabled Disabled Disabled Disabled Enabled Port Mode ---- -------1 Disabled 2 Disabled 3 Disabled AdminEdge AutoEdge -----------------Disabled Disabled Disabled Enabled Disabled Enabled 194 restrRole restrTcn -----------------Disabled Disabled Disabled Disabled Disabled Disabled bpduGuard Point2point --------------------Disabled Auto Disabled Auto Disabled Auto Publication date: Feb., 2012 Revision A1 p-‐bpduGuard: Syntax: Parameter : The command lets you Set the bpduGuard port parameter p-bpduGuard aggregations/<port-list> disable/ enable aggregations: available value is for aggregated port <port-list>: available value is from switch physic port density, format: 1,3-5 disable: disable: Disable port BPDU Guard enable: enable : Enable port BPDU Guard EXAMPLE: witch(stp)# p-bpduGuard aggregations enable Switch(stp)# show pconf Port ---Aggr Mode AdminEdge AutoEdge restrRole restrTcn bpduGuard Point2point -------- ------------------ ------------------ --------------------Disabled Disabled Disabled Disabled Disabled Enabled Enabled Port Mode ---- -------1 Disabled 2 Disabled 3 Disabled AdminEdge AutoEdge restrRole restrTcn bpduGuard Point2point ------------------ ------------------ --------------------Disabled Disabled Disabled Disabled Disabled Auto Disabled Disabled Disabled Disabled Disabled Auto Disabled Disabled Disabled Disabled Disabled Auto Switch(stp)# p-bpduGuard 1 enable Switch(stp)# show pconf Port Mode AdminEdge AutoEdge restrRole restrTcn bpduGuard Point2point ---- -------- ------------------ ------------------ --------------------Aggr Disabled Disabled Enabled Disabled Disabled Enabled Enabled Port Mode ---- -------1 Disabled 2 Disabled 3 Disabled p-‐cost: Syntax: Parameter : AdminEdge AutoEdge -----------------Disabled Disabled Disabled Enabled Disabled Enabled restrRole restrTcn -----------------Disabled Disabled Disabled Disabled Disabled Disabled bpduGuard Point2point --------------------Enabled Auto Disabled Auto Disabled Auto The command lets you Set the STP port instance path cost p-cost <0-7> aggregations/<port-list> <0-200000000> <0-7>: STP bridge instance no (0-7, CIST=0, MSTI1=1, ...) aggregations: available value is for aggregated port <port-list>: available value is from switch physic port density, format: 1,3-5 <0-200000000>: STP port path cost (1-200000000) or The value zero means auto status EXAMPLE: Publication date: Feb., 2012 Revision A1 CLI Reference Guide Switch(stp)# p-cost 0 aggregations 2000000 Switch(stp)# show p-config 0 MSTI ---CIST Port ---Aggr Path Cost Priority ---------- -------2000000 128 MSTI ---CIST CIST CIST Port Path Cost Priority ---- ---------- -------1 Auto 128 2 Auto 128 3 Auto 128 Switch(stp)# p-cost 1 3 9999 Switch(stp)# show p-config 1 MSTI Port Path Cost ---- ---- ---------MSTI1 Aggr Auto Priority -------128 MSTI Port ---- ---MSTI1 1 MSTI1 2 MSTI1 3 Priority -------128 128 128 p-‐edge: Syntax: Parameter : Path Cost ---------Auto Auto 9999 The command lets you Set the STP adminEdge port parameter p-edge aggregations/<port-list> disable/ enable aggregations: available value is for aggregated port <port-list>: available value is from switch physical port density, format: 1,3-5 disable: disable: Disable MSTP protocol enable: enable : Enable MSTP protocol EXAMPLE: Switch(stp)# p-edge aggregations enable Switch(stp)# show pconf Port ---Aggr Mode AdminEdge AutoEdge restrRole restrTcn bpduGuard Point2point -------- ------------------ ------------------ --------------------Disabled Enabled Enabled Disabled Disabled Enabled Enabled Port Mode AdminEdge AutoEdge restrRole restrTcn bpduGuard Point2point ---- -------- ------------------ ------------------ --------------------1 Disabled Disabled Disabled Disabled Disabled Enabled Auto 2 Disabled Disabled Enabled Disabled Disabled Disabled Auto 196 Publication date: Feb., 2012 Revision A1 CLI Reference Guide p-‐mode: Syntax: Parameter : The command lets you Set the STP enabling for a port p-mode aggregations/<port-list> disable/ enable aggregations: available value is for aggregated port <port-list>: available value is from switch physic port density, format: 1,3-5 disable: disable: Disable MSTP protocol enable: enable : Enable MSTP protoc EXAMPLE: Switch(stp)# p-mode aggregations enable Switch(stp)# show pconf Port ---Aggr Mode AdminEdge AutoEdge restrRole restrTcn bpduGuard Point2point -------- ------------------ ------------------ --------------------Enabled Disabled Enabled Disabled Disabled Enabled Enabled Port Mode AdminEdge AutoEdge restrRole restrTcn bpduGuard Point2point ---- -------- ------------------ ------------------ --------------------1 Disabled Disabled Disabled Disabled Disabled Enabled Auto 2 Disabled Disabled Enabled Disabled Disabled Disabled Auto p-‐p2p: The command lets you Set the STP point2point port Syntax: p-p2p aggregations/<port-list> auto/ disable/ enable Parameter : aggregations: available value is for aggregated port <port-list>: available value is from switch physical port density, format: 1,3-5 auto: auto: Automatic MSTP point2point detection disable: disable: Disable MSTP point2point enable: enable : Enable MSTP point2point EXAMPLE: 197 Publication date: Feb., 2012 Revision A1 CLI Reference Guide Switch(stp)# p-p2p aggregations auto Switch(stp)# show pconf Port ---Aggr Mode AdminEdge AutoEdge restrRole restrTcn bpduGuard Point2point -------- ------------------ ------------------ --------------------Enabled Disabled Enabled Disabled Disabled Enabled Auto Port Mode AdminEdge AutoEdge restrRole restrTcn bpduGuard Point2point ---- -------- ------------------ ------------------ --------------------1 Disabled Disabled Disabled Disabled Disabled Enabled Auto 2 Disabled Disabled Enabled Disabled Disabled Disabled Auto Switch(stp)# p-p2p 2 disable Switch(stp)# show pconf Port ---Aggr Mode AdminEdge AutoEdge restrRole restrTcn bpduGuard Point2point -------- ------------------ ------------------ --------------------Enabled Disabled Enabled Disabled Disabled Enabled Auto Port Mode ---- -------1 Disabled 2 Disabled 3 Disabled p-‐priority: Syntax: Parameter : AdminEdge AutoEdge -----------------Disabled Disabled Disabled Enabled Disabled Enabled restrRole restrTcn -----------------Disabled Disabled Disabled Disabled Disabled Disabled bpduGuard Point2point --------------------Enabled Auto Disabled Disabled Disabled Auto The command lets you Set the STP port instance priority p-priority <0-7> aggregations/<port-list> <0-240> <0-7>: STP bridge instance no (0-7, CIST=0, MSTI1=1, ...) aggregations: available value is for aggregated port <port-list>: available value is from switch physic port density, format: 1,3-5 <0-240>: STP bridge priority (0/16/32/48/.../224/240) EXAMPLE: 198 Publication date: Feb., 2012 Revision A1 CLI Reference Guide Switch(stp)# p-priority 3 aggregations 240 Switch(stp)# show p-config 3 MSTI Port Path Cost ---- ---- ---------MSTI3 Aggr Auto Priority -------240 MSTI Port ---- ---MSTI3 1 MSTI3 2 Priority -------128 128 Path Cost ---------Auto Auto Switch(stp)# p-priority 1 2 224 Switch(stp)# show p-config 1 MSTI Port Path Cost ---- ---- ---------MSTI1 Aggr Auto Priority -------128 MSTI Port ---- ---MSTI1 1 MSTI1 2 Priority -------128 224 priority: Syntax: Parameter : Path Cost ---------Auto Auto The command lets you Set the bridge instance priority priority <0-7> <0-240> <0-7>: STP bridge instance no (0-7, CIST=0, MSTI1=1, ...) <0-240>: STP bridge priority (0/4096/8192/12288/.../57344/61440) EXAMPLE: Switch(stp)# priority 0 61440 Switch(stp)# show priority MSTI# Bridge Priority ----CIST r-‐role: Syntax: Parameter : ---------------61440 The command lets you Set the MSTP restrictedRole port parameter r-role aggregations/<port-list> disable/ enable aggregations: available value is for aggregated port <port-list>: available value is from switch physic port density, format: 1,3-5 disable: Disable MSTP restricted role enable: Enable MSTP restricted role EXAMPLE: 199 Publication date: Feb., 2012 Revision A1 CLI Reference Guide Switch(stp)# r-role aggregations enable Switch(stp)# show pconf Port ---Aggr Mode AdminEdge AutoEdge restrRole restrTcn bpduGuard Point2point -------- ------------------ ------------------ --------------------Enabled Disabled Enabled Enabled Disabled Enabled Auto Port Mode ---- -------1 Disabled 2 Disabled 3 Disabled AdminEdge AutoEdge -----------------Disabled Disabled Disabled Enabled Disabled Enabled restrRole restrTcn -----------------Disabled Disabled Disabled Disabled Disabled Disabled bpduGuard Point2point --------------------Enabled Auto Disabled Disabled Disabled Auto Switch(stp)# r-role 2 enable Switch(stp)# show pconf Port ---Aggr Mode AdminEdge AutoEdge restrRole restrTcn bpduGuard Point2point -------- ------------------ ------------------ --------------------Enabled Disabled Enabled Enabled Disabled Enabled Auto Port Mode AdminEdge AutoEdge restrRole restrTcn bpduGuard Point2point ---- -------- ------------------ ------------------ --------------------1 Disabled Disabled Disabled Disabled Disabled Enabled Auto 2 Disabled Disabled Enabled Enabled Disabled Disabled Disabled r-‐tcn: Syntax: Parameter : The command lets you Set the MSTP restrictedTcn port parameter r-tcn aggregations/<port-list> disable/ enable aggregations: available value is for aggregated port <port-list>: available value is from switch physic port density, format: 1,3-5 disable: Disable MSTP restricted TCN enable: Enable MSTP restricted TCN EXAMPLE: Switch(stp)# r-tcn aggregations enable Switch(stp)# show pconf Port ---Aggr Mode AdminEdge AutoEdge restrRole restrTcn bpduGuard Point2point -------- ------------------ ------------------ --------------------Enabled Disabled Enabled Enabled Enabled Enabled Auto Port Mode AdminEdge AutoEdge restrRole restrTcn bpduGuard Point2point ---- -------- ------------------ ------------------ --------------------1 Disabled Disabled Disabled Disabled Disabled Enabled Auto 2 Disabled Disabled Enabled Enabled Disabled Disabled Disabled recovery: The command lets you Set edge port error recovery timeout 200 Publication date: Feb., 2012 Revision A1 CLI Reference Guide Syntax: Parameter : recovery <30-86400> <30-86400>: Time before error-disabled ports are reenabled (30-86400 seconds, 0 disables) EXAMPLE: Switch(stp)# recovery 86400 Switch(stp)# show instance STP Configuration Protocol Version: Compatible (STP) Max Age : 39 Forward Delay : 30 Tx Hold Count : 9 Max Hop Count : 38 BPDU Filtering : Enabled BPDU Guard : Enabled Error Recovery : 86400 seconds Error Recovery : Disabled Show: Syntax: The command lets you Show Region config, MSTI vlan mapping, instance parameters, and port parameters show CName/ Statistics/ instance/ msti-vlan/ msti-vlan / pconf show Status/ p-config <0-7> Parameter : CName: Show MSTP Configuration name Statistics: Show STP port statistics Status: Show STP Bridge status <0-7>: STP bridge instance no (0-7, CIST=0, MSTI1=1, ...) instance: Show instance status msti-vlan: Show MSTP MSTI VLAN mapping configuration p-config: Show the STP port instance configuration <0-7>: STP bridge instance no (0-7, CIST=0, MSTI1=1, ...) pconf: Show STP Port configuration priority: show the bridge instance priority EXAMPLE: 201 Publication date: Feb., 2012 Revision A1 CLI Reference Guide Switch(stp)# show cName Configuration name: 00-40-c7-23-26-00 Configuration rev.: 0 Switch(stp)# show instance STP Configuration Protocol Version: MSTP Max Age : 20 Forward Delay : 15 Tx Hold Count : 6 Max Hop Count : 20 BPDU Filtering : Disabled BPDU Guard : Disabled Error Recovery : 0 seconds Error Recovery : Disabled Switch(stp)# show pconf Port ---Aggr Mode AdminEdge AutoEdge restrRole restrTcn bpduGuard Point2point -------- ------------------ ------------------ --------------------Disabled Disabled Enabled Disabled Disabled Disabled Enabled Port Mode ---- -------1 Disabled 2 Disabled 3 Disabled AdminEdge AutoEdge -----------------Disabled Enabled Disabled Enabled Disabled Enabled 202 restrRole restrTcn -----------------Disabled Disabled Disabled Disabled Disabled Disabled bpduGuard Point2point --------------------Disabled Auto Disabled Auto Disabled Auto Publication date: Feb., 2012 Revision A1 CLI Reference Guide Syslog Commands of CLI Chapter 44 Syslog The Syslog is a standard for logging program messages. It allows separation of the software that generates messages from the system that stores them and the software that reports and analyzes them. It can be used as well to generalize informational, analysis, and debugging messages. It is supported by a wide variety of devices and receivers across multiple platforms. Table 43: Syslog Commands clear: Syntax: Parameter : Command Function clear Clear syslog entry level Configure syslog level mode Configure syslog mode server Configure syslog server IP address show Show syslog information The command lets you Clear syslog entry clear <cr> <cr> means press the Enter key. EXAMPLE: 203 Publication date: Feb., 2012 Revision A1 CLI Reference Guide Switch(syslog)# clear Switch(syslog)# show log <0> Emergency: 0 <1> Alert : 0 <2> Critical : 0 <3> Error : 0 <4> Warning : 0 <5> Notice : 0 <6> Info : 0 <7> Debug : 0 All : 0 ID Level Time Message ---- --------- ------------------- -------------------------------------<none> level: The command lets you Configure syslog level Syntax: Parameter : level <0-7> <0-7>: Severity level <0> Emergency: system is unusable <1> Alert: action must be taken immediately <2> Critical: critical conditions <3> Error: error conditions <4> Warning: warning conditions <5> Notice: normal but significant condition <6> Informational: informational messages <7> Debug: debug-level messages EXAMPLE: Switch(syslog)# level 7 Switch(syslog)# show config Server Mode : Disabled Server Address 1 : Server Address 2 : Syslog Level : Debug 204 Publication date: Feb., 2012 Revision A1 CLI Reference Guide mode: The command lets you Configure syslog mode Syntax: Parameter : mode disable/ enable disable: Disable syslog mode enable: Enable syslog mode EXAMPLE: Switch(syslog)# mode enable Switch(syslog)# show config Server Mode : Enabled Server Address 1 : Server Address 2 : Syslog Level : Debug server: The command lets you Configure syslog server IP address Syntax: Parameter : server <1-2> <ip-hostname> <1-2>: Syslog Server No. <ip-hostname>: Syslog server IP address or host name EXAMPLE: Switch(syslog)# server 2 192.168.6.1 Switch(syslog)# show config Server Mode : Enabled Server Address 1 : Server Address 2 : 192.168.6.1 Syslog Level : Debug show: The command lets you Show syslog information Syntax: show config show detail-log <log-id> show log <0-7> Parameter : config: Show syslog configuration detail-log: Show detailed syslog information <log-id>: Log ID log: Show syslog entry <0-7> : Show syslog entry that match the level EXAMPLE: 205 Publication date: Feb., 2012 Revision A1 CLI Reference Guide witch(syslog)# show config Server Mode : Disabled Server Address 1 : Server Address 2 : Syslog Level : Info Switch(syslog)# show detail-log 2 ID : 2 Level : Warning Time : 2011-01-01 01:00:27 Message: Link up on port 2 Switch(syslog)# show log 2 <0> Emergency: 0 <1> Alert : 0 <2> Critical : 0 <3> Error : 0 <4> Warning : 8 <5> Notice : 0 <6> Info : 12 <7> Debug : 0 All : 20 ID Level Time Message ---- --------- ------------------- -------------------------------------<none> 206 Publication date: Feb., 2012 Revision A1 CLI Reference Guide Chapter 45 System System Commands of CLI After you login, the switch shows you the system information. This page is default and tells you the basic information of the system, including “Model Name”, “System Description”, “Contact”, “Device Name”, “System Up Time”, “BIOS Version”, “Firmware Version”, “Hardware-‐Mechanical Version”, “Serial Number”, “Host IP Address”, “Host Mac Address”, “Device Port”, “RAM Size” , “Flash Size”. With this information, you will know the software version used, MAC address, serial number, how many ports are good and so on. This is helpful while malfunctioning. Table 44: System Commands Command Function contact Configure system contact location Configure system location name Configure device name show Show system information contact: The command lets you Configure system contact Syntax: Parameter : contact <LINE> <LINE>: Up to 255 characters describing system contact information EXAMPLE: 207 Publication date: Feb., 2012 Revision A1 CLI Reference Guide Switch(system)# contact david +886123456789 Switch(system)# show Model Name : GEPoEL2-ESW26 System Description : 24-Port 10/100/1000Base-T + 2 (100/1G) SFP PoE+ L2 Plus Managed Switch Location : Contact : david +886123456789 Device Name : GEPoEL2-ESW26 System Uptime : 3d 01:46:45 Current Time : 2011-01-04 02:46:45 BIOS Version : v1.00 Firmware Version : v1.28 Hardware-Mechanical Version : v1.00-v1.00 Series Number : 010199887766 Host IP Address : 192.168.6.127 Subnet Mask : 255.255.255.0 Gateway IP Address : 0.0.0.0 Host MAC Address : 00-40-c7-23-26-00 Console Baudrate : 115200 RAM Size : 64 Flash Size : 16 CPU Load (100ms, 1s, 10s) : 0%, 18%, 16% Bridge FDB Size : 8192 MAC addresses Transmit Queue : 8 queues per port Maximum Frame Size : 9600 location: Syntax: Parameter : The command lets you Configure system location location <LINE> <LINE>: Up to 255 characters describing system location EXAMPLE: Switch(system)# location taipei Switch(system)# show Model Name : GEPoEL2-ESW26 System Description : 24-Port 10/100/1000Base-T + 2 (100/1G) SFP PoE+ L2 Plus Managed Switch Location : taipei Contact : david +886123456789 Device Name : GEPoEL2-ESW26 System Uptime : 3d 01:47:59 Current Time : 2011-01-04 02:47:59 BIOS Version : v1.00 Firmware Version : v1.28 Hardware-Mechanical Version : v1.00-v1.00 Series Number : 010199887766 Host IP Address : 192.168.6.127 Subnet Mask : 255.255.255.0 Gateway IP Address : 0.0.0.0 Host MAC Address : 00-40-c7-23-26-00 Console Baudrate : 115200 RAM Size : 64 Flash Size : 16 CPU Load (100ms, 1s, 10s) : 0%, 18%, 16% Bridge FDB Size : 8192 MAC addresses Transmit Queue : 8 queues per port Maximum Frame Size : 9600 208 Publication date: Feb., 2012 Revision A1 name: Syntax: Parameter : The command lets you Configure device name name <WORD> <WORD>: Up to 255 characters describing device name EXAMPLE: Switch(system)# name davidswitch Switch(system)# show Model Name : GEPoEL2-ESW26 System Description : 24-Port 10/100/1000Base-T + 2 (100/1G) SFP PoE+ L2 Plus Managed Switch Location : taipei Contact : david +886123456789 Device Name : davidswitch System Uptime : 3d 01:49:43 Current Time : 2011-01-04 02:49:43 BIOS Version : v1.00 Firmware Version : v1.28 Hardware-Mechanical Version : v1.00-v1.00 Series Number : 010199887766 Host IP Address : 192.168.6.127 Subnet Mask : 255.255.255.0 Gateway IP Address : 0.0.0.0 Host MAC Address : 00-40-c7-23-26-00 Console Baudrate : 115200 RAM Size : 64 Flash Size : 16 CPU Load (100ms, 1s, 10s) : 14%, 13%, 16% Bridge FDB Size : 8192 MAC addresses Transmit Queue : 8 queues per port Maximum Frame Size : 9600 show: Syntax: Parameter : The command lets you Show system information show <cr> <cr> means press the Enter key. EXAMPLE: Publication date: Feb., 2012 Revision A1 CLI Reference Guide Switch(system)# show Model Name : GEPoEL2-ESW26 System Description : 24-Port 10/100/1000Base-T + 2 (100/1G) SFP PoE+ L2 Plus Managed Switch Location : Contact : Device Name : GEPoEL2-ESW26 System Uptime : 3d 01:45:29 Current Time : 2011-01-04 02:45:29 BIOS Version : v1.00 Firmware Version : v1.28 Hardware-Mechanical Version : v1.00-v1.00 Series Number : 010199887766 Host IP Address : 192.168.6.127 Subnet Mask : 255.255.255.0 Gateway IP Address : 0.0.0.0 Host MAC Address : 00-40-c7-23-26-00 Console Baudrate : 115200 RAM Size : 64 Flash Size : 16 CPU Load (100ms, 1s, 10s) : 0%, 21%, 17% Bridge FDB Size : 8192 MAC addresses Transmit Queue : 8 queues per port Maximum Frame Size : 9600 EXAMPLE: Switch(system)# show Model Name : GEPoEL2-ESW26 System Description : 24-Port 10/100/1000Base-T + 2 (100/1G) SFP PoE+ L2 Plus Managed Switch Location : Contact : Device Name : GEPoEL2-ESW26 System Uptime : 3d 01:45:29 Current Time : 2011-01-04 02:45:29 BIOS Version : v1.00 Firmware Version : v1.28 Hardware-Mechanical Version : v1.00-v1.00 Series Number : 010199887766 Host IP Address : 192.168.6.127 Subnet Mask : 255.255.255.0 Gateway IP Address : 0.0.0.0 Host MAC Address : 00-40-c7-23-26-00 Console Baudrate : 115200 RAM Size : 64 Flash Size : 16 CPU Load (100ms, 1s, 10s) : 0%, 21%, 17% Bridge FDB Size : 8192 MAC addresses Transmit Queue : 8 queues per port Maximum Frame Size : 9600 210 Publication date: Feb., 2012 Revision A1 CLI Reference Guide Thermal Protection Commands of CLI Chapter 46 Thermal The section describes how to inspect and configure the current setting for controlling thermal protection. Thermal protection is used to protect the chip from getting overheated. Only the LGB5128A supports this feature. When the temperature exceeds the configured thermal protection temperature, ports will be turned off in order to decrease the power consumption. It is possible to arrange the ports with different priorities. Each priority can be given a temperature at which the corresponding ports will be turned off. Table 45: Thermal Protection Commands Command Function port-priority Configure the port priority priority-temp Configure the temperature at which the ports will shut down show Show thermal protection information port-‐priority: The command lets you Configure the port priority Syntax: Parameter : port-priority <port-list> <0-3> <port-list>: available value is from switch physical port density, format: 1,3-5 <0-3>: Port priority EXAMPLE: Switch(thermal)# port-priority 1 3 Switch(thermal)# show Priority Temperature -------- ----------0 255 C 1 255 C 2 255 C 3 255 C Port ---1 2 3 priority-‐temp: Priority Chip Temperature Port status -------- ---------------- --------------------------------------------3 60 C Port link operating normally 0 59 C Port link operating normally 0 59 C Port link operating normally The command lets you Configure the temperature at which the ports will shut down 211 Publication date: Feb., 2012 Revision A1 Syntax: Parameter : priority-temp <0-3> <0-255> <0-3>: Port priority <0-255>: The temperature at which the ports with the corresponding priority will be turned off EXAMPLE: Switch(thermal)# priority-temp 1 99 Switch(thermal)# show Priority Temperature -------- ----------0 255 C 1 99 C 2 255 C 3 255 C Port ---1 2 3 show: Syntax: Parameter : Priority Chip Temperature Port status -------- ---------------- --------------------------------------------3 59 C Port link operating normally 0 59 C Port link operating normally 0 59 C Port link operating normally The command lets you Show thermal protection information show <cr> <cr> means press the Enter key. EXAMPLE: Switch(thermal)# show Priority Temperature -------- ----------0 255 C 1 255 C 2 255 C 3 255 C Port ---1 2 3 4 Priority Chip Temperature Port status -------- ---------------- --------------------------------------------0 59 C Port link operating normally 0 59 C Port link operating normally 0 59 C Port link operating normally 0 59 C Port link operating normally Publication date: Feb., 2012 Revision A1 System time Commands of CLI Chapter 47 Time This page configures the switch Time. Time configure includes Time Configuration and NTP Configuration The switch provides manual and automatic ways to set the system time via NTP. Manual setting is simple and you just input “Year”, “Month”, “Day”, “Hour”, “Minute” and “Second” within the valid value range indicated in each item. Table 46: Time Commands clock-‐source: Command Function clock-source Enable/Diable applicant administrative control daylight Set the GARP join timer configuration delete Set the GARP leave all timer configuration manual Set the GARP leave timer configuration ntp Configure NTP server show Show the GARP configuration time-zone Configure system time zone The command lets you configure the clock source Syntax: clock-source local/ ntp local: Local settings Parameter : ntp: Use NTP to synchronize system clock EXAMPLE: Switch(time)# clock-source ntp Switch(time)# show daylight Clock Source : NTP Server Local Time : 2011-01-01 07:19:44 (YYYY-MM-DD HH:MM:SS) Time Zone Offset : 0 (min) Daylight Savings : Disabled daylight: The command indicates Daylight Savings operation Syntax: daylight disable enable <1-1440> By-dates <YYYY:MM:DD> <HH:MM> Publication date: Feb., 2012 Revision A1 CLI Reference Guide <YYYY:MM:DD> <HH:MM> enable <1-1440> Recurring <DAY> <WORD> <MONTH> <HH:MM> <DAY> <WORD> <MONTH> <HH:MM> Parameter : disable: Disable Daylight Savings operation enable: Enable Daylight Savings operation <1-1440>: Minute. Time Set Offset. By-dates: Manually enter day and time that DST starts and ends <YYYY:MM:DD>: Day that DST starts <HH:MM>: Time that DST starts <YYYY:MM:DD>: Day that DST ends <HH:MM>: Time that DST ends Recurring: DST occurs on the same date every year <DAY>: Sun, Mon, Tue, Wed, Thu, Fri, Sat at which DST begins every year <WORD>: first, 2, 3, 4, last at which DST begins every year <MONTH>: Jan, Feb, Mar, Apr, May, Jun, Jul, Aug, Sep, Oct, Nov, Dec at which DST begins every year <HH:MM>: The time at which DST begins every year <DAY>: Sun, Mon, Tue, Wed, Thu, Fri, Sat at which DST ends every year <WORD>: first, 2, 3, 4, last at which DST ends every year <MONTH>: Jan, Feb, Mar, Apr, May, Jun, Jul, Aug, Sep, Oct, Nov, Dec at which DST ends every year <HH:MM>: The time at which DST ends every year EXAMPLE: Switch(time)# daylight enable 1440 by-dates 2012:03:01 10:00 2012:04:01 09:00 Switch(time)# show daylight Clock Source : NTP Server Local Time : 2011-01-01 07:23:21 (YYYY-MM-DD HH:MM:SS) Time Zone Offset : 0 (min) Daylight Savings : Enabled Time Set Offset : 1440 (min) Daylight Savings Type : By dates From : 2012-03-01 10:00 (YYYY-MM-DD HH:MM) To : 2012-04-01 09:00 (YYYY-MM-DD HH:MM) Switch(time)# daylight enable 1000 recurring wed 2 jan 11:00 sun 3 may 12:00 Switch(time)# show daylight Clock Source : NTP Server Local Time : 2011-01-01 07:28:43 (YYYY-MM-DD HH:MM:SS) Time Zone Offset : 0 (min) Daylight Savings : Enabled Time Set Offset : 1000 (min) Daylight Savings Type : Recurring From : Day:Wed Week:2 Month:Jan Time:11:00 To : Day:Sun Week:3 Month:May Time:12:00 214 Publication date: Feb., 2012 Revision A1 CLI Reference Guide delete: Syntax: Parameter : The command lets you delete NTP server delete <1-5> <1-5>: NTP server index EXAMPLE: Switch(time)# delete 1 manual: Syntax: Parameter : The command lets you configure system time manually manual <YYYY:MM:DD> <HH:MM:SS> <YYYY:MM:DD>: Date of system, example: 2011:06:25 <HH:MM:SS>: Time, example: 23:10:55 EXAMPLE: Switch(time)# manual 2011:12:12 10:00:00 Switch(time)# show daylight Clock Source : Local Settings Local Time : 2011-12-12 10:00:07 (YYYY-MM-DD HH:MM:SS) Time Zone Offset : 0 (min) Daylight Savings : Enabled Time Set Offset : 1000 (min) Daylight Savings Type : Recurring From : Day:Wed Week:2 Month:Jan Time:11:00 To : Day:Sun Week:3 Month:May Time:12:00 ntp: Syntax: Parameter : The command lets you configure NTP server ntp <1-5> <ipv6-address>/<ip-hostname> <1-5>: NTP server index <ipv6-address>: NTP server IPv6 address IPv6 address is in 128-bit records represented as eight fields of up to four hexadecimal digits with a colon separating each field (:). For example, 'fe80::215:c5ff:fe03:4dc7'. The symbol '::' is a special syntax that can be used as a shorthand way of representing multiple 16-bit groups of contiguous zeros, but it can only appear once. It is also used following a legal IPv4 address. For example, '::192.1.2.34' <ip-hostname>: NTP server IP address or hostname EXAMPLE: 215 Publication date: Feb., 2012 Revision A1 CLI Reference Guide Switch(time)# ntp 1 64.90.182.55 Switch(time)# show ntp Index Server IP host address or a host name string ---------------------------------------------------------1 64.90.182.55 show: Syntax: Parameter : The command lets you show time information show daylight/ ntp daylight: Show time information ntp: Show NTP information EXAMPLE: Switch(time)# show daylight Clock Source : Local Settings Local Time : 2011-01-01 07:17:29 (YYYY-MM-DD HH:MM:SS) Time Zone Offset : 0 (min) Daylight Savings : Disabled Switch(time)# show ntp Index Server IP host address or a host name string ---------------------------------------------------------1 2 3 4 5 time-‐zone: Syntax: Parameter : The command lets you configure system time zone time-zone <HH:MM> <HH:MM>: The time difference between GMT and local time, the possible value is from GMT-12:00 to GMT+12:00 EXAMPLE: Switch(time)# time-zone 01:00 Switch(time)# show daylight Clock Source : NTP Server Local Time : 2011-12-12 11:14:24 (YYYY-MM-DD HH:MM:SS) Time Zone Offset : 60 (min) Daylight Savings : Enabled Time Set Offset : 1000 (min) Daylight Savings Type : Recurring From : Day:Wed Week:2 Month:Jan Time:11:00 To : Day:Sun Week:3 Month:May Time:12:00 216 Publication date: Feb., 2012 Revision A1 UPnP Commands of CLI Chapter 48 UPnP UPnP is an acronym for Universal Plug and Play. The goals of UPnP are to allow devices to connect seamlessly and to simplify the implementation of networks in the home (data sharing, communications, and entertainment) and in corporate environments for simplified installation of computer components. Table 47: UPnP Commands duration: Syntax: Parameter : Command Function duration Configure the advertising duration mode Configure UPnP mode show Show UPnP configuration ttl Configure the TTL value of the IP header in SSDP message The command lets you Configure the advertising duration duration <100-86400> <100-86400>: UPnP duration range EXAMPLE: Switch(upnp)# duration 86400 Switch(upnp)# show UPnP Mode : Disabled UPnP TTL : 4 UPnP Advertising Duration : 86400 mode: The command lets you Configure UPnP mode Syntax: Parameter : mode disable/ enable disable: Disable UPnP enable: Enable UPnP EXAMPLE: Publication date: Feb., 2012 Revision A1 CLI Reference Guide Switch(upnp)# mode enable Switch(upnp)# show UPnP Mode : Enabled UPnP TTL : 4 UPnP Advertising Duration : 86400 show: The command lets you Show UPnP configuration Syntax: Parameter : show <cr> <cr> means it without any parameter needs to type. EXAMPLE: Switch(upnp)# show UPnP Mode : Enabled UPnP TTL : 4 UPnP Advertising Duration : 86400 ttl: The command lets you Configure the TTL value of the IP header in SSDP message Syntax: Parameter : ttl <1-255> <1-255>: UPnP TTL value EXAMPLE: Switch(upnp)# ttl 255 Switch(upnp)# show UPnP Mode : Enabled UPnP TTL : 255 UPnP Advertising Duration : 86400 218 Publication date: Feb., 2012 Revision A1 CLI Reference Guide VCL Commands of CLI Chapter 49 VCL VLAN Control List indicates two types of VLAN: MAC address-‐based VLAN and Protocol -‐based VLAN. MAC address-‐based VLAN decides the VLAN for forwarding an untagged frame based on the source MAC address of the frame. MAC-‐based VLANs group VLAN members by MAC address. With MAC-‐based VLAN configured, the device adds a VLAN tag to an untagged frame according to its source MAC address. MAC-‐based VLANs are mostly used in conjunction with security technologies such as 802.1X to provide secure, flexible network access for terminal devices. Protocol -‐based VLAN supports Protocol including Ethernet LLC and SNAP Protocol. Table 48: vcl Commands delete: Syntax: Command Function delete Delete command mac-vlan Configure MAC-based VLAN membership protocol-vlan Configure protocol-based VLAN show Show VCL status command The command lets you Delete command delete mac-vlan <mac-address> delete protocol-vlan protocol Ethernet <0x0600-0xffff> llc <0x00-0xff> <0x00-0xff> snap <oui-address> <0x0000-0xffff> delete protocol-vlan vlan <WORD> Parameter : mac-vlan: Delete MAC-based VLAN entry <mac-address>: MAC address, format 0a-1b-2c-3d-4e-5f protocol-vlan: Delete protocol-based VLAN entry protocol: Delete protocol-based VLAN ethertype protocol to group mapping Ethernet: Delete protocol-based VLAN Ethernet-II protocol to group mapping <0x0600-0xffff>: Ether type llc: Delete protocol-based VLAN LLC protocol to group mapping 219 Publication date: Feb., 2012 Revision A1 CLI Reference Guide <0x00-0xff>: DSAP value <0x00-0xff>: SSAP value snap: Delete protocol-based VLAN SNAP protocol to group mapping <oui-address>: 00-40-c7 OUI address, format : <0x0000-0xffff>: Protocol ID is the Ethernet type field value for the protocol running on top of SNAP vlan: Delete protocol-based VLAN group to VLAN mapping <WORD>: Up to 16 characters protocol-based VLAN group name to describe EXAMPLE: Switch(vcl)# delete mac-vlan 00-00-00-00-00-11 Switch(vcl)# delete protocol-vlan vlan david NOTE: You need to set MAC VLAN or Protocol VLAN first, then you can delete and clear the configuration. mac-‐vlan: Syntax: Parameter : The command lets you Configure MAC-‐based VLAN membership mac-vlan <mac-address> <1-4094> <port-list> <mac-address>: MAC address, format 0a-1b-2c-3d-4e-5f <1-4094>: VLAN ID, available value is from 1 to 4094 <port-list>: available value is from switch physical port density, format: 1,3-5 EXAMPLE: Switch(vcl)# mac-vlan 0a-1b-2c-3d-4e-5f 4094 2 Switch(vcl)# show mac-config MAC Address VID Ports ----------------- ---- ----0a-1b-2c-3d-4e-5f 4094 2 protocol-‐vlan: Syntax: Parameter : The command lets you Configure protocol-‐based VLAN protocol-vlan <port-list> disable/ enable protocol: protocol-based VLAN ethertype protocol to group mapping 220 Publication date: Feb., 2012 Revision A1 CLI Reference Guide Ethernet: protocol-based VLAN Ethernet-II protocol to group mapping <0x0600-0xffff>: Ether type llc: protocol-based VLAN LLC protocol to group mapping <0x00-0xff>: DSAP value <0x00-0xff>: SSAP value snap: protocol-based VLAN SNAP protocol to group mapping <oui-address>: 00-40-c7 OUI address, format : <0x0000-0xffff>: Protocol ID is the Ethernet type field value for the protocol running on top of SNAP vlan: protocol-based VLAN group to VLAN mapping <WORD>: Up to 16 characters to describe protocol-based VLAN group name EXAMPLE: Switch(vcl)# protocol-vlan protocol Ethernet 0XFFFF david Switch(vcl)# show protocol-vlan Protocol Type Protocol (Value) Group Name ------------- ------------------------ ---------------Ethernet ETYPE:0xffff david Switch(vcl)# protocol-vlan protocol snap 00-10-cc 0xeeee kevin Switch(vcl)# show protocol-vlan Protocol Type Protocol (Value) Group Name ------------- ------------------------ ---------------SNAP OUI-00:10:cc; PID:0xeeee kevin Ethernet ETYPE:0xffff david Switch(vcl)# protocol-vlan vlan jack 3000 1 Switch(vcl)# show protocol-vlan Protocol Type Protocol (Value) Group Name ------------- ------------------------ ---------------SNAP OUI-00:10:cc; PID:0xeeee kevin Ethernet ETYPE:0xffff david Group Name VID Ports ---------------- ---- ----jack 3000 1 show: The command lets you Show VCL status command Syntax: show mac-config mac-status combined/ nas/ static protocol-vlan Parameter : mac-config: Show MAC-based VLAN entry 221 Publication date: Feb., 2012 Revision A1 CLI Reference Guide mac-status: Show MAC-based VLAN status combined: database Show all the combined VCL MAC-based VLAN nas: Show the VCL MAC-based VLAN configured by NAS static: Show the VCL MAC-based VLAN entries configured by the administrator protocol-vlan: Show protocol-based VLAN configuration EXAMPLE: Switch(vcl)# show mac-config MAC Address VID Ports ----------------- ---- ----00-00-00-00-00-00 3 5,6 00-00-00-00-00-11 1 1,2 00-00-00-00-00-22 2 3,4 00-00-00-00-00-33 1 2,3 Switch(vcl)# show mac-status combined MAC Address VID Ports ----------------- ---- ---------------------0a-1b-2c-3d-4e-5f 4094 2 Switch(vcl)# show protocol-vlan Protocol Type Protocol (Value) Group Name ------------- ------------------------ ---------------SNAP OUI-00:10:cc; PID:0xeeee kevin Ethernet ETYPE:0xffff david Group Name VID Ports ---------------- ---- ----jack 3000 1 222 Publication date: Feb., 2012 Revision A1 CLI Reference Guide Chapter 50 VLAN VLAN Commands of CLI You can assign a specific VLAN for management purposes. The management VLAN is used to establish an IP connection to the switch from a workstation connected to a port in the VLAN. This connection supports a VSM, SNMP, and Telnet session. By default, the active management VLAN is VLAN 1. Only one management VLAN can be active at a time. Table 49: VLAN Commands Command Function delete Delete VLAN group egress-rule Configure egress-rule of switch ports forbidden Configure forbidden VLAN group frame-type Configure frame type of switch ports ingress-filtering Configure ingress filtering of switch ports port-type Configure port type of switch ports pvid Configure port VLAN ID show Show VLAN information tag-group Configure tag-based VLAN group tpid Configure the TPID used for Custom S-ports. This is a global setting for all the Custom S-ports delete: The command lets you Delete VLAN group Syntax: Parameter : delete forbidden/ group <1-4094> forbidden: Delete VLAN forbidden group group: Delete tag-based VLAN group <1-4094>: VLAN ID, available value is from 1 to 4094 EXAMPLE: Switch(vlan)# delete forbidden 1 Switch(vlan)# delete group 1 egress-‐rule: The command lets you Configure egress-‐rule of switch ports 223 Publication date: Feb., 2012 Revision A1 CLI Reference Guide Syntax: Parameter : egress-rule <port-list> access/ hybrid/ trunk <port-list>: available value is from switch physical port density, format: 1,3-5 access: Untag all frames hybrid: Tag all frames except VLAN ID same as PVID trunk: Tag all frames EXAMPLE: Switch(vlan)# egress-rule 1 access Switch(vlan)# egress-rule 2 hybrid Switch(vlan)# egress-rule 3 trunk Switch(vlan)# show port-config TPID for Custom S-port : 0x88a8 Port PVID Frame Type Ingress Filter Egress Rule Port Type ---- ---- ---------- -------------- ----------- ------------1 1 All Disabled Access UnAware 2 1 All Disabled Hybrid UnAware 3 1 All Disabled Trunk UnAware forbidden: The command lets you Configure forbidden VLAN group Syntax: Parameter : forbidden <1-4094> <WORD> <port-list> <1-4094>: VLAN ID, available value is from 1 to 4094 <WORD>: Up to 33 characters describing VLAN name <port-list>: available value is from switch physical port density, format: 1,3-5 EXAMPLE: Switch(vlan)# forbidden 1 david 2-5 Switch(vlan)# show forbidden VID VLAN Name Ports ---- -------------------------------- ----------------1 david 2-5 frame-‐type: The command lets you Configure frame type of switch ports Syntax: Parameter : frame-type <port-list> all/ tagged/ untagged <port-list>: available value is from switch physical port density, format: 1,3-5 all: Accept all frames 224 Publication date: Feb., 2012 Revision A1 CLI Reference Guide tagged: Accept tagged frames only untagged: Accept untagged frames only EXAMPLE: Switch(vlan)# frame-type 1 tagged Switch(vlan)# frame-type 2 untagged Switch(vlan)# show port-config TPID for Custom S-port : 0x88a8 Port PVID Frame Type Ingress Filter Egress Rule Port Type ---- ---- ---------- -------------- ----------- ------------1 1 Tagged Disabled Access UnAware 2 1 Untagged Disabled Hybrid UnAware 3 1 All Disabled Trunk UnAware ingress-‐filtering: The command lets you Configure ingress filtering of switch ports Syntax: Parameter : ingress-filtering <port-list> disable/ enable <port-list>: available value is from switch physical port density, format: 1,3-5 disable: Disable ingress filtering enable: Enable ingress filtering. If ingress port is not a member of the classified VLAN of the frame, the frame is discarded. EXAMPLE: Switch(vlan)# ingress-filtering 1 enable Switch(vlan)# show port-config TPID for Custom S-port : 0x88a8 Port PVID Frame Type Ingress Filter Egress Rule Port Type ---- ---- ---------- -------------- ----------- ------------1 1 Tagged Enabled Access UnAware 2 1 Untagged Disabled Hybrid UnAware 3 1 All Disabled Trunk UnAware port-‐type: The command lets you Configure port type of switch ports Syntax: Parameter : port-type <port-list> c-port/ s-custom-port/ s-port/ unaware <port-list>: available value is from switch physical port density, format: 1,3-5 c-port: Customer port s-custom-port: Custom Service port 225 Publication date: Feb., 2012 Revision A1 CLI Reference Guide s-port: Service port unaware: VLAN unaware port EXAMPLE: Switch(vlan)# port-type 2 c-port Switch(vlan)# port-type 3 s-port Switch(vlan)# port-type 4 s-custom-port Switch(vlan)# show port-config TPID for Custom S-port : 0x88a8 Port ---1 2 3 4 PVID ---1 1 1 1 Frame Type ---------Tagged Untagged All All Ingress Filter Egress Rule Port Type -------------- ----------- ------------Enabled Access UnAware Disabled Hybrid C-Port Disabled Trunk S-Port Disabled Hybrid S-Custom-Port pvid: The command lets you Configure port VLAN ID Syntax: Parameter : pvid <port-list> <1-4094> <port-list>: available value is from switch physical port density, format: 1,3-5 <1-4094>: VLAN ID, available value is from 1 to 4094 EXAMPLE: Switch(vlan)# pvid 1 4000 Switch(vlan)# show port-config TPID for Custom S-port : 0x88a8 Port PVID Frame Type Ingress Filter Egress Rule Port Type ---- ---- ---------- -------------- ----------- ------------1 4000 All Disabled Hybrid UnAware 2 1 All Disabled Hybrid UnAware 3 1 All Disabled Hybrid UnAware show: The command lets you Show VLAN information Syntax: show forbidden/ port-config show port-status combined/ gvrp/ … / voice show vlan combined/ gvrp/ … / voice Parameter : forbidden: Show VLAN forbidden group port-config: Show VLAN port configuration port-status: Show VLAN port status combined: VLAN port status for combined VLAN Users 226 Publication date: Feb., 2012 Revision A1 CLI Reference Guide gvrp: VLAN port status for GVRP mstp: VLAN port status for MSTP mvr: VLAN port status for MVR nas: VLAN port status for NAS static: Static VLAN port status voice: VLAN port status for Voice VLAN vlan: Show VLAN group combined: Show all the combined VLAN database gvrp: Show the VLANs configured by GVRP mstp: Show the VLANs configured by MSTP mvr: Show the VLANs configured by MVR nas: Show the VLANs configured by NAS static: Show the VLAN entries configured by the administrator vcl: Show the VLANs configured by VCL voice: Show the VLANs configured by Voice VLAN EXAMPLE: Switch(vlan)# show port-config TPID for Custom S-port : 0x88a8 Port PVID Frame Type Ingress Filter Egress Rule Port Type ---- ---- ---------- -------------- ----------- ------------1 1 All Disabled Hybrid UnAware 2 1 All Disabled Hybrid UnAware 3 1 All Disabled Hybrid UnAware Switch(vlan)# show port-status combined Port PVID Frame Type Ingress Filter Tx Tag UVID Port Type Conflict ---- ---- ---------- -------------- ----------- ---- -------------------1 1 All Disabled Untag This 1 UnAware No 2 1 All Disabled Untag This 1 UnAware No 3 1 All Disabled Untag This 1 UnAware No Switch(vlan)# show vlan combined VID VLAN Name User Ports ---- -------------------------------- ---------- ----------------1 default Combined 1-26 tag-‐group: The command lets you Configure tag-‐based VLAN group Syntax: Parameter : tag-group <1-4094> <WORD> <port-list> <1-4094>: VLAN ID, available value is from 1 to 4094 227 Publication date: Feb., 2012 Revision A1 CLI Reference Guide <WORD>: Up to 33 characters describing VLAN name <port-list>: available value is from switch physical port density, format: 1,3-5 EXAMPLE: Switch(vlan)# tag-group 3000 david 2 Switch(vlan)# show vlan VID VLAN Name User Ports ---- -------------------------------- ---------- ----------------1 default Static 1-26 3000 david Static 2 tpid: The command lets you Configure the TPID used for Custom S-‐ports. This is a global setting for all the Custom S-‐ports Syntax: Parameter : tpid <0x0600-0xffff>: Configure TPID value, available value is from 0x600 to 0xffff EXAMPLE: Switch(vlan)# tpid 0xffff Switch(vlan)# show port-config TPID for Custom S-port : 0xffff Port PVID Frame Type Ingress Filter Egress Rule Port Type ---- ---- ---------- -------------- ----------- ------------1 1 All Disabled Hybrid UnAware 2 1 All Disabled Hybrid UnAware 3 1 All Disabled Hybrid UnAware 228 Publication date: Feb., 2012 Revision A1 Voice VLAN Commands of CLI Chapter 51 Voice VLAN Voice VLAN is VLAN configured specially for voice traffic. By adding the ports with voice devices attached to voice VLAN, we can perform QoS-‐related configuration for voice data, ensuring the transmission priority of voice traffic and voice quality. The Voice VLAN feature enables voice traffic forwarding on the Voice VLAN, then the switch can classify and schedule network traffic. It is recommended that there be two VLANs on a port—one for voice, one for data. Before connecting the IP device to the switch, the IP phone should configure the voice VLAN ID correctly. Table 50: Voice VLAN Commands config: Syntax: Command Function config Configure Voice VLAN delete Delete commands discovery Configure Voice VLAN discovery protocol oui Create Voice VLAN OUI entry. Modify OUI table will restart auto detect OUI process port-mode Configure Voice VLAN port mode security Configure Voice VLAN port security mode show Show Voice VLAN information The command lets you Configure Voice VLAN config disable config enable <1-4094> <10-1000000> <0-7> Parameter : disable: Disable Voice VLAN mode operation enable: Enable Voice VLAN mode operation <1-4094>: VLAN ID, available value is from 1 to 4094 <10-1000000>: Voice VLAN secure aging time, available value is from 10 to 1000000 <0-7>: Voice VLAN traffic class, all traffic on the Voice VLAN will apply this class, available value is from 0(Low) to 7(High) EXAMPLE: Publication date: Feb., 2012 Revision A1 CLI Reference Guide Switch(voice-vlan)# config enable 2 8888 7 Switch(voice-vlan)# show config Voice VLAN Mode : Enabled Voice VLAN VLAN ID : 2 Voice VLAN Age Time(seconds) : 8888 Voice VLAN Traffic Class : 7 Port Mode ---- -------1 Disabled 2 Disabled 3 Disabled Security -------Disabled Disabled Disabled Discovery Protocol -----------------OUI OUI OUI delete: The command lets you Delete command Syntax: Parameter : delete oui <oui-address> oui: Delete Voice VLAN OUI entry. Modify OUI table will restart auto detect OUI process <oui-address>: OUI address, format : 0a-1b-2c EXAMPLE: Switch(voice-vlan)# delete oui 0a-1b-2c discovery: The command lets you Configure Voice VLAN discovery protocol Syntax: Parameter : discovery <port-list> both/ lldp/ oui <port-list>: available value is from switch physical port density, format: 1,3-5 both: Both OUI and LLDP lldp: Detect telephony device by LLDP oui: Detect telephony device by OUI address EXAMPLE: 230 Publication date: Feb., 2012 Revision A1 CLI Reference Guide Switch(voice-vlan)# discovery 2 both Switch(voice-vlan)# discovery 3 lldp Switch(voice-vlan)# show config Voice VLAN Mode : Enabled Voice VLAN VLAN ID : 2 Voice VLAN Age Time(seconds) : 8888 Voice VLAN Traffic Class : 7 Port Mode ---- -------1 Disabled 2 Disabled 3 Disabled Security -------Disabled Disabled Disabled Discovery Protocol -----------------OUI Both LLDP oui: The command lets you Create Voice VLAN OUI entry. Modify OUI table will restart auto detect OUI process Syntax: Parameter : oui <oui-address> <LINE> <oui-address>: OUI address, format : 0a-1b-2c <LINE>: Up to 32 characters describing OUI address EXAMPLE: Switch(voice-vlan)# oui 0a-1b-2c david Switch(voice-vlan)# show oui No Telephony OUI Description -- ------------- ---------------1 00-01-E3 Siemens AG phones 2 00-03-6B Cisco phones 3 00-0F-E2 H3C phones 4 00-60-B9 Philips and NEC AG phones 5 00-D0-1E Pingtel phones 6 00-E0-75 Polycom phones 7 00-E0-BB 3Com phones 8 0A-1B-2C david port-‐mode: The command lets you Configure Voice VLAN port mode Syntax: Parameter : port-mode <port-list> auto/ disable/ force <port-list>: available value is from switch physical port density, format: 1,3-5 auto: Enable auto detect mode. It detects whether there is VoIP phone attached on the specific port and configure the Voice VLAN members automatically disable: Disjoin from Voice VLAN force: Forced join to Voice VLAN EXAMPLE: 231 Publication date: Feb., 2012 Revision A1 CLI Reference Guide Switch(voice-vlan)# port-mode 1 auto Switch(voice-vlan)# port-mode 2 force Switch(voice-vlan)# show config Voice VLAN Mode : Enabled Voice VLAN VLAN ID : 2 Voice VLAN Age Time(seconds) : 8888 Voice VLAN Traffic Class : 7 Port Mode ---- -------1 Auto 2 Forced 3 Disabled Security -------Disabled Disabled Disabled Discovery Protocol -----------------OUI OUI OUI security: The command lets you Configure Voice VLAN port security mode Syntax: Parameter : security <port-list> disable/ enable <port-list>: available value is from switch physical port density, format: 1,3-5 disable: Disjoin from Voice VLAN enable: Enable Voice VLAN security mode. When the function is enabled, all non-telephone MAC addresses in Voice VLAN will be blocked for 10 seconds. EXAMPLE: Switch(voice-vlan)# security 1 enable Switch(voice-vlan)# show config Voice VLAN Mode : Enabled Voice VLAN VLAN ID : 2 Voice VLAN Age Time(seconds) : 8888 Voice VLAN Traffic Class : 7 Port Mode Security Discovery Protocol ---- -------- -------- -----------------1 Disabled Enabled OUI 2 Disabled Disabled OUI 3 Disabled Disabled OUI show: The command lets you Show Voice VLAN information Syntax: Parameter : show config: config/ oui Show Voice VLAN configuration oui: Show OUI address EXAMPLE: 232 Publication date: Feb., 2012 Revision A1 CLI Reference Guide Switch(voice-vlan)# show config Voice VLAN Mode : Disabled Voice VLAN VLAN ID : 1000 Voice VLAN Age Time(seconds) : 86400 Voice VLAN Traffic Class : 7 Port Mode ---- -------1 Disabled 2 Disabled 3 Disabled Security -------Disabled Disabled Disabled Discovery Protocol -----------------OUI OUI OUI Switch(voice-vlan)# show oui No Telephony OUI Description -- ------------- ---------------1 00-01-E3 Siemens AG phones 2 00-03-6B Cisco phones 3 00-0F-E2 H3C phones 4 00-60-B9 Philips and NEC AG phones 5 00-D0-1E Pingtel phones 6 00-E0-75 Polycom phones 7 00-E0-BB 3Com phones 233 Publication date: Feb., 2012 Revision A1 Chapter 52 EEE EEE Commands of CLI The section which allows the user to inspect and configure the current EEE port settings. Only the LGB5128A supports EEE Commands. EEE is a power saving option that reduces the power usage when there is very low traffic use (or no traffic). EEE works by powering down circuits when there is no traffic. When a port gets data to be transmitted all circuits are powered up. The time it takes to power up the circuits is named wakeup time. The default wakeup time is 17 us for 1Gbit links and 30 us for other link speeds. EEE devices must agree upon the value of the wakeup time in order to make sure that both the receiving and transmitting device have all circuits powered up when traffic is transmitted. The devices can exchange information about the devices’ wakeup time using the LLDP protocol. For maximizing the power saving, the circuit isn't started when transmit data are ready for a port, but is instead queued until 3000 bytes of data are ready to be transmitted. It does not cause a large delay if data less then 3000 bytes will be transmitted, data are always transmitted after 48 us, giving a maximum latency of 48 us + the wakeup time. If desired, you can minimize the latency for specific frames by mapping the frames to a specific queue (done with QOS), and then mark the queue as an urgent queue. When an urgent queue gets data to be transmitted, the circuits will be powered up at once and the latency will be reduced to the wakeup time. Table 51: EEE Commands Command Function mode Configure EEE mode show Show EEE information urgent-queue Configure EEE urgent queue mode: The command lets you Configure EEE mode Syntax: Parameter : mode <port-list> disable/ enable <port-list>: available value is from switch physical port density, format: 1,3-5 disable: Disable Energy Efficient Ethernet enable: Enable Energy Efficient Ethernet EXAMPLE: Publication date: Feb., 2012 Revision A1 CLI Reference Guide Switch(eee)# mode 2 enable Switch(eee)# show Port Mode Urgent Queues ---- -------- ------------1 Disabled none 2 Enabled none 3 Disabled none show: The command lets you Show EEE information Syntax: Parameter : show <cr> <cr>: means it without any parameter needs to type. EXAMPLE: Switch(eee)# show Port Mode Urgent Queues ---- -------- ------------1 Disabled none 2 Disabled none 3 Disabled none urgent-‐queue: The command lets you Configure EEE urgent queue Syntax: Parameter : urgent-queue <port-list> <queue-list> disable/ enable <port-list>: available value is from switch physical port density, format: 1,3-5 <queue-list>: Queue list, format : 1,3-5 disable: Queue will postpone the transmission until 3000 bytes are ready to be transmitted enable: Queues set will activate transmission of frames as soon as any data is available EXAMPLE: Switch(eee)# urgent-queue 1 4 enable Switch(eee)# show Port Mode Urgent Queues ---- -------- ------------1 Disabled 4 2 Enabled none 3 Disabled none 235 Publication date: Feb., 2012 Revision A1 Global Commands of CLI Chapter 53 Global The Global commands is probably the most commonly used in the CLI console. It is used for global configuration at any level of command. Table 53: Global Commands Command Function auto-logout Configure time of inactivity before automatic logout exit Exit from current mode help Show available commands history Show a list of previously run commands logout Disconnect quit Disconnect restore Restore running configuration save Save running configuration auto-‐logout: Syntax: Parameter : The command lets you Configure time of inactivity before automatic logout auto-logout <10-3600> <10-3600>: Time in seconds of inactivity before automatic logout. EXAMPLE: Switch# auto-logout 3600 exit: Syntax: Parameter : The command lets you Exit from current mode exit <cr>: means press the Enter key. EXAMPLE: Switch(aaa)# exit Switch# Publication date: Feb., 2012 Revision A1 help: Syntax: Parameter : This command lets you Show available commands help <cr>: means press the Enter key. EXAMPLE: Switch# help Commands available: aaa access account acl aggregation arp-inspection auth history: Syntax: Parameter : Authentication, Authorization, Accounting Access management User account management Access control list Link Aggregation ARP inspection Authentication method This command lets you Show a list of previously run commands history <cr>: means press the Enter key. EXAMPLE: Switch# history Command history: 0. help 1. history 2. 0 3. history 4. 3 5. history Publication date: Feb., 2012 Revision A1 CLI Reference Guide logout: Syntax: Parameter : This command lets you Disconnect logout <cr>: means press the Enter key. EXAMPLE: Switch# logout Username: quit: Syntax: Parameter : This command lets you Disconnect quit <cr>: means press the Enter key. EXAMPLE: Switch# quit Username: restore: Syntax: This command lets you Restore running configuration restore default keep-ip/ <cr> restore user Parameter : default: Restore configuration as factory default user: Restore configuration as user configuration keep-ip: Restore configuration as factory default unless ip address <cr> EXAMPLE: Switch# restore default keep-ip Switch# restore user 238 Publication date: Feb., 2012 Revision A1 CLI Reference Guide save: Syntax: Parameter : This command lets you Save running configuration save start/ user start: Save running configuration as start configuration user: Save running configuration as user configuration EXAMPLE: Switch# save start Switch# save user 239 Publication date: Feb., 2012 Revision A1 Publication date: Feb., 2012 Revision A1 Black Box Tech Support: FREE! Live. 24/7. Tech support the way it should be. Great tech support is just 30 seconds away at 724-746-5500 or blackbox.com. About Black Box Black Box provides an extensive range of networking and infrastructure products. You’ll find everything from cabinets and racks and power and surge protection products to media converters and Ethernet switches all supported by free, live 24/7 Tech support available in 30 seconds or less. © Copyright 2013. Black Box Corporation. All rights reserved. Black Box® and the Double Diamond logo are registered trademarks of BB Technologies, Inc. Any third-party trademarks appearing in this manual are acknowledged to be the property of their respective owners. LGB5124A_LGB5128A CLI Guide, version 1 724-746-5500 | blackbox.com