1
ENGLISH
FRANÇAIS
OWNER’S MANUAL
DRYER
Please read this owner’s manual thoroughly before operating and keep it
handy for reference at all times.
DLEY1701*
DLGY1702*
P/No. : MFL67652510
www.lg.com
2
TABLE OF CONTENTS
TABLE OF CONTENTS
3
IMPORTANT SAFETY INSTRUCTIONS
3
4
4
WHAT TO DO IF YOU SMELL GAS
BASIC SAFETY PRECAUTIONS
CALIFORNIA SAFE DRINKING WATER AND
TOXIC ENFORCEMENT ACT
GROUNDING INSTRUCTIONS
SAFETY INSTRUCTIONS FOR INSTALLATION
SAFETY INSTRUCTIONS FOR CONNECTING
ELECTRICITY
5
5
7
26
HOW TO USE
26
27
28
28
28
29
30
30
30
Operating the Dryer
Cycle Guide
Sorting Load
Loading the Dryer
Check the Lint Filter Before Every Load
Cycle Settings and Options
Special Functions
Custom Program
Steam Functions
31
MAINTENANCE
8
PRODUCT FEATURES
9
INTRODUCING YOUR DRYER
31
Regular Cleaning
9
9
10
11
Parts
Accessories
Control Panel Features
Display
32
TROUBLESHOOTING
32
Before Calling for Service
12
INSTALLATION INSTRUCTIONS
34
SPECIFICATIONS
12
13
13
14
15
16
17
19
20
22
23
Preview Installation Order
Installation Location Requirements
Clearances
Leveling the Dryer
Reversing the Door
Installing the Side Vent Kit
Venting the Dryer
Connecting Inlet Hose
Connecting Gas Dryers
Connecting Electric Dryers
Special Requirements for Manufactured or
Mobile Homes
Final Installation Check
Installation Test (Duct Check)
35
USING SMART DIAGNOSISTM
36
WARRANTY
23
24
IMPORTANT SAFETY INSTRUCTIONS
3
IMPORTANT SAFETY INSTRUCTIONS
WWARNING
For your safety, the information in this manual must be followed to minimize the risk of fire or explosion, electric
shock, or to prevent property damage, injury to persons, or death.
Your safety and the safety of others is very important.
We have provided many important safety messages in this manual and on your appliance. Always read and obey all
safety messages.
This is the safety alert symbol.
This symbol alerts you to potential hazards that can kill or hurt you and others.
All safety messages will follow the safety alert symbol and either the word DANGER, WARNING, or CAUTION.
W
These words mean:
WDANGER
You will be killed or seriously injured if you don’t immediately follow instructions.
WWARNING
You can be killed or seriously injured if you don’t follow instructions.
WCAUTION
You may be slightly injured or cause damage to the product if you do not follow instructions.
All safety messages will tell you what the potential hazard is, tell you how to reduce the chance of injury, and tell
you what can happen if the instructions are not followed.
t%POPUJOTUBMMBDMPUIFTESZFSXJUIGMFYJCMFQMBTUJDWFOUJOHNBUFSJBMT*GGMFYJCMFNFUBMGPJMUZQF
EVDUJT
JOTUBMMFEJUNVTUCFPGBTQFDJGJDUZQFJEFOUJGJFECZUIFBQQMJBODFNBOVGBDUVSFSBTTVJUBCMFGPSVTFXJUI
DMPUIFTESZFST'MFYJCMFWFOUJOHNBUFSJBMTBSFLOPXOUPDPMMBQTFCFFBTJMZDSVTIFEBOEUSBQMJOU5IFTF
DPOEJUJPOTXJMMPCTUSVDUDMPUIFTESZFSBJSGMPXBOEJODSFBTFUIFSJTLPGGJSF
t%POPUTUPSFPSVTFHBTPMJOFPSPUIFSGMBNNBCMFWBQPSTBOEMJRVJETJOUIFWJDJOJUZPGUIJTBQQMJBODFPSBOZ
PUIFSBQQMJBODFT
t*OTUBMMBUJPOBOETFSWJDFNVTUCFQFSGPSNFECZBRVBMJGJFEJOTUBMMFSTFSWJDFBHFODZPSUIFHBTTVQQMJFS
t*OTUBMMUIFDMPUIFTESZFSBDDPSEJOHUPUIFNBOVGBDUVSFSTJOTUSVDUJPOTBOEMPDBMDPEFT
t4BWFUIFTFJOTUSVDUJPOT
8)"550%0*':064.&--("4
%POPUUSZUPMJHIUBNBUDIPSDJHBSFUUFPSUVSOPOBOZHBTPSFMFDUSJDBMBQQMJBODF
%POPUUPVDIBOZFMFDUSJDBMTXJUDIFT%POPUVTFBOZQIPOFJOZPVSCVJMEJOH
$MFBSUIFSPPNCVJMEJOHPSBSFBPGBMMPDDVQBOUT
*NNFEJBUFMZDBMMZPVSHBTTVQQMJFSGSPNBOFJHICPSTQIPOF'PMMPXUIFHBTTVQQMJFSTJOTUSVDUJPOT
DBSFGVMMZ
*GZPVDBOOPUSFBDIZPVSHBTTVQQMJFSDBMMUIFGJSFEFQBSUNFOU
WWARNING:This product contains chemicals known to the State of California to cause cancer and birth defects or
other reproductive harm. Wash hands after handling.
ENGLISH
READ ALL INSTRUCTIONS BEFORE USE
4
IMPORTANT SAFETY INSTRUCTIONS
IMPORTANT SAFETY INSTRUCTIONS
READ ALL INSTRUCTIONS BEFORE USE
WWARNING
For your safety, the information in this manual must be followed to minimize the risk of fire or explosion, electric
shock, or to prevent property damage, injury to persons, or death.
#"4*$4"'&5:13&$"65*0/4
WWARNING
To reduce the risk of fire, electric shock, or injury to persons when using this appliance, follow basic precautions,
including the following:
t3FBEBMMJOTUSVDUJPOTCFGPSFVTJOHUIFESZFS
t#FGPSFVTFUIFESZFSNVTUCFQSPQFSMZJOTUBMMFEBT
described in this manual.
t%POPUQMBDFJUFNTFYQPTFEUPDPPLJOHPJMTJOZPVS
ESZFS*UFNTDPOUBNJOBUFEXJUIDPPLJOHPJMTNBZ
DPOUSJCVUFUPBDIFNJDBMSFBDUJPOUIBUDPVMEDBVTF
BMPBEUPDBUDIGJSF
t%POPUESZBSUJDMFTUIBUIBWFCFFOQSFWJPVTMZDMFBOFE
in, washed in, soaked in, or spotted with gasoline, drycleaning solvents, or other flammable or explosive
substances as they give off vapors that could ignite or
explode.
t%POPUSFBDIJOUPUIFESZFSJGUIFESVNPSBOZPUIFS
QBSUJTNPWJOH
t%POPUSFQBJSPSSFQMBDFBOZQBSUPGUIFESZFS
or attempt any servicing unless specifically
recommended in this owner’s manual or in published
user-repair instructions that you understand and have
the skills to carry out.
t%POPUUBNQFSXJUIDPOUSPMT
t#FGPSFUIFESZFSJTSFNPWFEGSPNTFSWJDFPSEJTDBSEFE
remove the door to the drying compartment.
t%POPUBMMPXDIJMESFOUPQMBZPOPSJOUIFESZFS$MPTF
supervision of children is necessary when the dryer is
used near children.
t%POPUVTFGBCSJDTPGUFOFSTPSQSPEVDUTUPFMJNJOBUF
static unless recommended by the manufacturer of
the fabric softener or product.
t%POPUVTFIFBUUPESZBSUJDMFTDPOUBJOJOHGPBN
SVCCFSPSTJNJMBSMZUFYUVSFESVCCFSMJLFNBUFSJBMT
t,FFQBSFBBSPVOEUIFFYIBVTUPQFOJOHBOEBEKBDFOU
surrounding areas free from the accumulation of lint,
dust, and dirt.
t5IFJOUFSJPSPGUIFESZFSBOEFYIBVTUWFOUTIPVMECF
cleaned periodically by qualified service personnel.
t%POPUJOTUBMMPSTUPSFUIFESZFSXIFSFJUXJMMCF
exposed to the weather.
t"MXBZTDIFDLUIFJOTJEFPGUIFESZFSGPSGPSFJHO
objects.
t$MFBOMJOUTDSFFOCFGPSFPSBGUFSFBDIMPBE
t%POPUTUPSFQMBTUJDQBQFSPSDMPUIJOHUIBUNBZ
CVSOPSNFMUPOUPQPGUIFESZFSEVSJOHPQFSBUJPO
$"-*'03/*"4"'&%3*/,*/(8"5&3"/%509*$&/'03$&.&/5"$5
This act requires the governor of California to publish a list of substances known to the state to cause cancer, birth
defects, or other reproductive harm and requires businesses to warn customers of potential exposure to such
substances.
Gas appliances can cause minor exposure to four of these substances, namely benzene, carbon monoxide,
formaldehyde, and soot, caused primarily by the incomplete combustion of natural gas or LP fuels.
Properly adjusted dryers will minimize incomplete combustion. Exposure to these substances can be minimized
further by properly venting the dryer to the outdoors.
IMPORTANT SAFETY INSTRUCTIONS
5
IMPORTANT SAFETY INSTRUCTIONS
WWARNING
For your safety, the information in this manual must be followed to minimize the risk of fire or explosion, electric
shock, or to prevent property damage, injury to persons, or death.
(306/%*/(*/4536$5*0/4
This appliance must be grounded. In the event of
malfunction or breakdown, grounding will reduce
the risk of electric shock by providing a path of least
resistance for electric current. This appliance must be
equipped with a cord having an equipment-grounding
conductor and a grounding plug. The plug must be
plugged into an appropriate outlet that is properly
installed and grounded in accordance with all local
codes and ordinances.
Do not modify the plug provided with the appliance. If
it will not fit the outlet, have a proper outlet installed by
a qualified electrician.
This appliance must be connected to a grounded metal,
permanent wiring system or an equipment-grounding
conductor must be run with the circuit conductors and
connected to the equipment-grounding terminal or
lead on the appliance.
Electric shock can result if the dryer is not properly
grounded.
WWARNING
Improper connection of the equipment-grounding conductor can result in a risk of electric shock. Check with a
qualified electrician or service person if you are in doubt that the appliance is properly grounded.
4"'&5:*/4536$5*0/4'03*/45"--"5*0/
WWARNING
To reduce the risk of fire, electric shock, or injury to persons when using this appliance, follow basic precautions,
including the following:
t1SPQFSMZHSPVOEESZFSUPDPOGPSNXJUIBMM
HPWFSOJOHDPEFTBOEPSEJOBODFT Follow details in
the installation instructions. Electric shock can result if
the dryer is not properly grounded.
t#FGPSFVTFUIFESZFSNVTUCFQSPQFSMZJOTUBMMFE as
described in this manual. Electric shock can result if
the dryer is not properly grounded.
t*OTUBMMBOETUPSFUIFESZFSXIFSFJUXJMMOPUCF
FYQPTFEUPUFNQFSBUVSFTCFMPXGSFF[JOHPS
FYQPTFEUPUIFXFBUIFS
t"MMSFQBJSTBOETFSWJDJOHNVTUCFQFSGPSNFE
CZBOBVUIPSJ[FETFSWJDFSVOMFTTTQFDJGJDBMMZ
SFDPNNFOEFEJOUIJTPXOFSTNBOVBM6TFPOMZ
BVUIPSJ[FEGBDUPSZQBSUTFailure to follow this
warning can cause serious injury, fire, electric shock, or
death.
t5PSFEVDFUIFSJTLPGFMFDUSJDTIPDLEPOPUJOTUBMM
UIFESZFSJOIVNJETQBDFT Failure to follow this
warning can cause serious injury, fire, electric shock, or
death.
t$POOFDUUPBQSPQFSMZSBUFEQSPUFDUFEBOETJ[FE
QPXFSDJSDVJUUPBWPJEFMFDUSJDBMPWFSMPBEImproper
power circuit can melt, creating electric shock and/or
fire hazard.
t3FNPWFBMMQBDLJOHJUFNTBOEEJTQPTFPGBMM
TIJQQJOHNBUFSJBMTQSPQFSMZFailure to do so can
result in death, explosion, fire, or burns.
t1MBDFESZFSBUMFBTUJODIFTBCPWFUIFGMPPSGPS
BHBSBHFJOTUBMMBUJPOFailure to do so can result in
death, explosion, fire, or burns.
t,FFQBMMQBDLBHJOHGSPNDIJMESFO Packaging
material can be dangerous for children. There is a risk
of suffocation.
t%POPUJOTUBMMOFBSBOPUIFSTPVSDFPGIFBUTVDIBT
BTUPWFDPPLJOHPWFO Failure to do so can cause
deform, smoke and fire.
t%POPUQMBDFDBOEMFTTNPLJOHNBUFSJBMTPSPUIFS
GMBNNBCMFTPOUPQPGUIFQSPEVDU Dripping wax,
smoke, or fire can result.
t3FNPWFBMMQSPUFDUJWFWJOZMGJMNGSPNUIFQSPEVDU
Failure to do so can cause product damage, smoke or
fire.
ENGLISH
READ ALL INSTRUCTIONS BEFORE USE
6
IMPORTANT SAFETY INSTRUCTIONS
IMPORTANT SAFETY INSTRUCTIONS
READ ALL INSTRUCTIONS BEFORE USE
WWARNING
For your safety, the information in this manual must be followed to minimize the risk of fire or explosion, electric
shock, or to prevent property damage, injury to persons, or death.
4"'&5:*/4536$5*0/4'03*/45"--"5*0/
WWARNING
To reduce the risk of injury to persons, follow all industry recommended safety procedures including the use of long
sleeved gloves and safety glasses. Failure to follow all of the safety warnings in this manual could result in property
damage, injury to persons, or death.
Exhaust/Ducting:
t(BTESZFST.645CFFYIBVTUFEUPUIFPVUTJEF
Failure to follow these instructions can result in fire or
death.
t5IFESZFSFYIBVTUTZTUFNNVTUCFFYIBVTUFE
UPUIFPVUTJEFPGUIFEXFMMJOH*GUIFESZFSJTOPU
FYIBVTUFEPVUEPPSTTPNFGJOFMJOUBOEMBSHF
BNPVOUTPGNPJTUVSFXJMMCFFYQFMMFEJOUPUIF
MBVOESZBSFB. An accumulation of lint in any area of
the home can create a health and fire hazard.
t6TFPOMZSJHJENFUBMPSGMFYJCMFNFUBMJODI
EJBNFUFSEVDUXPSLJOTJEFUIFESZFSDBCJOFUPSGPS
FYIBVTUJOHUPUIFPVUTJEF6TFPGQMBTUJDPSPUIFS
DPNCVTUJCMFEVDUXPSLDBODBVTFBGJSF Punctured
ductwork can cause a fire if it collapses or becomes
otherwise restricted in use or during installation.
t%VDUXPSLJTOPUQSPWJEFEXJUIUIFESZFSBOEZPV
TIPVMEPCUBJOUIFOFDFTTBSZEVDUXPSLMPDBMMZ5IF
FOEDBQTIPVMEIBWFIJOHFEEBNQFSTUPQSFWFOU
CBDLESBGUXIFOUIFESZFSJTOPUJOVTF Failure to
follow these instructions can result in fire or death.
t5IFFYIBVTUEVDUNVTUCFJODIFTDN
JO
EJBNFUFSXJUIOPPCTUSVDUJPOT5IFFYIBVTUEVDU
TIPVMECFLFQUBTTIPSUBTQPTTJCMF.BLFTVSF
UPDMFBOBOZPMEEVDUTCFGPSFJOTUBMMJOHZPVSOFX
dryer. Failure to follow these instructions can result in
fire or death.
t3JHJEPSTFNJSJHJENFUBMEVDUJOHJTSFDPNNFOEFE
GPSVTFCFUXFFOUIFESZFSBOEUIFXBMM*OTQFDJBM
JOTUBMMBUJPOTXIFOJUJTJNQPTTJCMFUPNBLFB
DPOOFDUJPOXJUIUIFBCPWFSFDPNNFOEBUJPOTB6-
MJTUFEGMFYJCMFNFUBMUSBOTJUJPOEVDUNBZCFVTFE
CFUXFFOUIFESZFSBOEXBMMDPOOFDUJPOPOMZ5IF
VTFPGUIJTEVDUJOHXJMMBGGFDUESZJOHUJNF Failure to
follow these instructions can result in fire or death.
t%0/05VTFTIFFUNFUBMTDSFXTPSPUIFSGBTUFOFST
XIJDIFYUFOEJOUPUIFEVDUUIBUDPVMEDBUDIMJOUBOE
SFEVDFUIFFGGJDJFODZPGUIFFYIBVTUTZTUFN Secure
all joints with duct tape. For complete details, follow
the Installation Instructions. Failure to follow these
instructions can result in fire or death.
IMPORTANT SAFETY INSTRUCTIONS
7
IMPORTANT SAFETY INSTRUCTIONS
WWARNING
For your safety, the information in this manual must be followed to minimize the risk of fire or explosion, electric
shock, or to prevent property damage, injury to persons, or death.
4"'&5:*/4536$5*0/4'03$0//&$5*/(&-&$53*$*5:
WWARNING
To reduce the risk of fire, electric shock, or injury to persons when using this appliance, follow basic precautions,
including the following:
t%POPUVOEFSBOZDJSDVNTUBODFTDVUPSSFNPWF
UIFHSPVOEQSPOHGSPNUIFQPXFSDPSETo prevent
injury to persons or damage to the dryer, the electrical
power cord must be plugged into a properly grounded
outlet.
t'PSQFSTPOBMTBGFUZUIJTESZFSNVTUCFQSPQFSMZ
HSPVOEFEFailure to do so can result in electric shock
or injury.
t3FGFSUPUIFJOTUBMMBUJPOJOTUSVDUJPOTJOUIJTNBOVBM
GPSTQFDJGJDFMFDUSJDBMSFRVJSFNFOUTGPSZPVSNPEFM
Failure to follow these instructions can create an
electric shock hazard and/or a fire hazard.
t5IJTESZFSNVTUCFQMVHHFEJOUPBQSPQFSMZ
HSPVOEFEPVUMFU&MFDUSJDTIPDLDBOSFTVMUJGUIF
ESZFSJTOPUQSPQFSMZHSPVOEFE)BWFUIFXBMM
PVUMFUBOEDJSDVJUDIFDLFECZBRVBMJGJFEFMFDUSJDJBO
UPNBLFTVSFUIFPVUMFUJTQSPQFSMZHSPVOEFE
Failure to follow these instructions can create an
electric shock hazard and/or a fire hazard.
t5IFESZFSTIPVMEBMXBZTCFQMVHHFEJOUPJUTPXO
JOEJWJEVBMFMFDUSJDBMPVUMFUXIJDIIBTBWPMUBHF
SBUJOHUIBUNBUDIFTUIFSBUJOHQMBUFThis provides
sparkling performance and also prevents overloading
house wiring circuits which could cause a fire hazard
from overheated wires.
t/FWFSVOQMVHZPVSESZFSCZQVMMJOHPOUIFQPXFS
DPSE"MXBZTHSJQQMVHGJSNMZBOEQVMMTUSBJHIUPVU
GSPNUIFPVUMFUThe power cord can be damaged,
resulting in a risk of fire and electric shock.
t3FQBJSPSSFQMBDFJNNFEJBUFMZBMMQPXFSDPSETUIBU
IBWFCFDPNFGSBZFEPSPUIFSXJTFEBNBHFE%POPU
VTFBDPSEUIBUTIPXTDSBDLTPSBCSBTJPOEBNBHF
BMPOHJUTMFOHUIPSBUFJUIFSFOEThe power cord can
melt, creating an electric shock and/or fire hazard.
t8IFOJOTUBMMJOHPSNPWJOHUIFESZFSCFDBSFGVMOPU
UPQJODIDSVTIPSEBNBHFUIFQPXFSDPSEThis will
prevent injury and prevent damage to the dryer from
fire and electric shock.
4"7&5)&4&*/4536$5*0/4
ENGLISH
READ ALL INSTRUCTIONS BEFORE USE
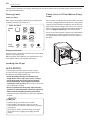
PRODUCT FEATURES
PRODUCT FEATURES
EASY-TO-USE CONTROL PANEL
An entire selection of user-friendly functions make operating the dryer easy.
EASY-ACCESS REVERSIBLE DOOR
The wide-opening door provides easy access for loading and unloading. The door hinge can be reversed to
adjust for installation location.
STEAM FUNCTIONS
LG’s steam technology allows you to inject fabrics with a swirling jet of steam to refresh clothes, reduce static,
and make ironing easier. Simply select the Steam Fresh™ cycle or Wrinkle Care cycle.
Flow Sense™ DUCT BLOCKAGE SENSING SYSTEM INDICATOR
The Flow Sense™ duct blockage sensing system detects and alerts you to restrictions in the installed household
ductwork that reduce exhaust airflow through the dryer. If you see the alert: Clean or repair the ducts to
SFNPWFUIFSFTUSJDUJPOT,FFQZPVSEVDUTDMFBOUPIFMQJODSFBTFFGGJDJFODZBOESFEVDFMPOHESZJOHUJNFTDBVTFE
by blocked ducts.
Smart Diagnosis™
Should you experience any technical difficulty with your dryer, it has the capability of transmitting data via
your telephone to the Customer Information Center. The call center agent records the data transmitted from
ZPVSNBDIJOFBOEVTFTJUUPBOBMZ[FUIFJTTVFQSPWJEJOHBGBTUBOEFGGFDUJWFEJBHOPTJTSFGFSUPQBHF
D
8
ES
C
ER
IGN
TIFIE
D
Protocol P154
Sanitization Performance of
Residential Clothes dryer
INTRODUCING YOUR DRYER
9
INTRODUCING YOUR DRYER
ENGLISH
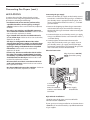
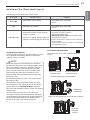
Parts
Reversible
door
Control
panel
Lint filter
Leveling
feet
Power cord
location
(Gas
models)
Power cord
location
(Electric
models)
Gas
connection
location
(Gas models)
Water inlet
valve
Exhaust
duct
outlet
Accessories
Optional accessories
Included accessories
Y connector
Hose
Drying rack
Side vent kit
(sold separately)
Kit No.
383EEL9001B
NOTE
t$POUBDU-($VTUPNFS4FSWJDFBUJO$BOBEB
JGBOZBDDFTTPSJFTBSFNJTTJOH
t'PSZPVSTBGFUZBOEGPSFYUFOEFEQSPEVDUMJGFVTFPOMZBVUIPSJ[FEDPNQPOFOUT5IFNBOVGBDUVSFSJTOPU
SFTQPOTJCMFGPSQSPEVDUNBMGVODUJPOPSBDDJEFOUTDBVTFECZUIFVTFPGTFQBSBUFMZQVSDIBTFEVOBVUIPSJ[FE
DPNQPOFOUTPSQBSUT
t5IFJNBHFTJOUIJTPXOFSTNBOVBMNBZCFEJGGFSFOUGSPNUIFBDUVBMDPNQPOFOUTBOEBDDFTTPSJFTBOEBSF
TVCKFDUUPDIBOHFCZUIFNBOVGBDUVSFSXJUIPVUQSJPSOPUJDFGPSQSPEVDUJNQSPWFNFOUQVSQPTFT
10
INTRODUCING YOUR DRYER
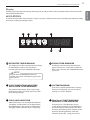
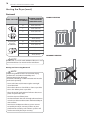
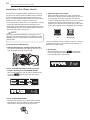
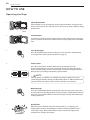
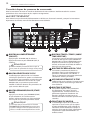
Control Panel Features
Following are instructions for starting and using your new dryer. Please refer to specific sections of this manual for
more detailed information.
WWARNING
To reduce the risk of fire, electric shock, or injury to persons, read this entire manual, including the Important Safety
Instructions, before operating this dryer.
G
F
D
E
A 108&30/0''#6550/
Press to turn the dryer ON. Press again to turn
the dryer OFF.
NOTE
Pressing the ON/OFF button during a cycle will
cancel that cycle and any load settings will be lost.
B $:$-ᦖ/4
Press the Cycle button repeatedly to scroll
through the cycle selections until the desired
cycle is selected. The standard presets for the
selected cycle will be shown in the display.
On MANUAL DRY cycles, these settings can be
adjusted using the cycle setting buttons anytime
before starting the cycle.
C 45"351"64ᦖ/
Press this button to start the selected cycle. If
the dryer is running, use this button to pause
the cycle without losing the current settings.
NOTE
If you do not press the START/PAUSE button to
SFTVNFBDZDMFXJUIJONJOVUFTUIFESZFSUVSOT
off automatically.
A
H
B
C
D .03&5*.&-&445*.ᦖ/4
Use these buttons with the Time Dry and other
MANUAL DRY cycles to adjust the drying time.
Press the More Time button to increase the
selected manual cycle time by one minute;
press Less Time to decrease the cycle time by
one minute.
E $:$-&4&55*/(#6550/4
Use these buttons to select the desired cycle
settings for the selected cycle. The current
settings are shown in the display. Press the
button for that option to select other settings.
F 5*.&"/%45"564%*41-":
The display shows the settings, estimated time
remaining, options, and status messages for
your dryer.
G 015*0/#6550/4
The option buttons allow you to select
additional cycle options. Certain buttons also
allow you to activate special functions by
QSFTTJOHBOEIPMEJOHUIFCVUUPOGPSTFDPOET
H 45&".'6/$5*0/4
LG’s steam technology allows you to inject
fabrics with a swirling jet of steam to refresh
clothes, reduce static, and make ironing
easier. Simply select the Steam Fresh™ cycle or
Wrinkle Free cycle.
INTRODUCING YOUR DRYER
11
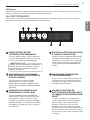
Display
WWARNING
To reduce the risk of fire, electric shock, or injury to persons, read this entire manual, including the Important Safety
Instructions, before operating this dryer.
F
D
B
C
E
A &45*."5&%5*.&3&."*/*/(
This display shows the estimated time remaining
for SENSOR DRY cycles or the actual time
remaining for Time Dry or MANUAL DRY cycles.
NOTE
A
D $-&"/'*-5&33&.*/%&3
The display will show Clean Filter when the
dryer is turned on as a reminder to check the
filter. It turns off when the START/PAUSE button
is pressed.
The cycle time on SENSOR DRY cycles may
fluctuate as the dryer recalculates drying time for
optimal results.
B $:$-&$0.1-&5*0/*/%*$"503
8*5)$)&$,'*-5&33&.*/%&3
This portion of the display shows which stage
PGUIFESZJOHDZDMFJTDVSSFOUMZVOEFSXBZ$MFBO
'JMUFS%SZJOH$PPMJOH
C $)*-%-0$,*/%*$"503
When Child Lock is set, the Child Lock indicator
will appear and all buttons are disabled except
the POWER button. This prevents children from
changing settings while the dryer is operating.
E $6450.130(3".
If you have a special combination of settings
that you use frequently, you can save these
settings as a Custom Program.
F 'MPX4FOTF%6$5#-0$,"(&
4&/4*/(4:45&.*/%*$"503
The Flow Sense™ duct blockage sensing
system detects and alerts you to blockages in
the ductwork that reduce exhaust flow from
the dryer. Maintaining a clean exhaust system
improves operating efficiency and helps
minimize service calls, saving your money.
ENGLISH
Following are instructions for starting and using your new dryer. Please refer to specific sections of this manual for
more detailed information.
12
INSTALLATION INSTRUCTIONS
INSTALLATION INSTRUCTIONS
PREVIEW INSTALLATION ORDER
Checking and
choosing the proper
location
Leveling the dryer
Connecting the inlet hose
120V
Venting the dryer
Connecting gas
dryers
240V(USA)
230V(CANADA)
Press and hold
Plugging in the
power cord and
grounding
Installation test
(Refer to page 24.)
Test run
INSTALLATION INSTRUCTIONS
13
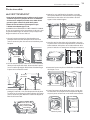
Installation Location Requirements
3FBEBMMJOTUBMMBUJPOJOTUSVDUJPOTDPNQMFUFMZCFGPSFJOTUBMMJOHBOEPQFSBUJOHZPVSESZFSIt is important that
you review this entire manual before installing and using your dryer. Detailed instructions concerning electrical
connections, gas connections, and exhaust requirements are provided on the following pages.
t"MPDBUJPOUIBUBMMPXTGPSQSPQFSFYIBVTUJOTUBMMBUJPO"
gas dryer must be exhausted to the outdoors.
See 7FOUJOHUIFESZFS
t"TUVSEZGMPPSUPTVQQPSUUIFUPUBMESZFSXFJHIUPG
MCTLH
5IFDPNCJOFEXFJHIUPGBDPNQBOJPO
appliance should also be considered.
t"HSPVOEFEFMFDUSJDBMPVUMFUMPDBUFEXJUIJOGU
DN
PGFJUIFSTJEFPGUIFESZFS4FF$POOFDUJOH
FMFDUSJDESZFST
tNo other fuel-burning appliance can be installed in the
same closet as a dryer.
%POPUPQFSBUFZPVSESZFSBUUFNQFSBUVSFTCFMPX¡'¡$
"UMPXFSUFNQFSBUVSFTUIFESZFSNJHIUOPUTIVUPGG
at the end of an automatic cycle. This can result in longer drying times. The dryer must not be installed or stored in
an area where it will be exposed to water and/or weather. Check code requirements. Some codes limit, or do not
permit, installation of the dryer in garages, closets, mobile homes or sleeping quarters. Contact your local building
inspector.
NOTE
t"MFWFMGMPPSXJUIBNBYJNVNTMPQFPGJODIDN
VOEFSFOUJSFESZFS*GTMPQFJTHSFBUFSUIBOJODIDN
JOTUBMMUIF&YUFOEFE%SZFS'FFU,JU$MPUIFTNBZOPUUVNCMFQSPQFSMZBOEBVUPNBUJDTFOTPSDZDMFTNBZOPU
operate correctly if dryer is not level.
t'PSBHBSBHFJOTUBMMBUJPOZPVXJMMOFFEUPQMBDFUIFESZFSBUMFBTUJODIFTDN
BCPWFUIFGMPPS*GVTJOHB
QFEFTUBMZPVXJMMOFFEJODIFTDN
UPUIFCPUUPNPGUIFESZFS
Clearances
(7.6 cm)
14" max.*
(35.6 cm)
21 1/4"
(54 cm)
40 3/16"
(102 cm)
28 15/16"
(73.4 cm)
5"**
(12.7 cm)
(2.54 cm)
50 1/4"
(127.5 cm)
(68.6 cm)
(2.54 cm)
Closet Door Vent
(7.6 cm) Requirements
INSTALLATION SPACING FOR RECESSED AREA OR CLOSET INSTALLATION
The following spacing dimensions are recommended for this dryer. This dryer has been tested for spacing of
JODIFTDN
DMFBSBODFPOUIFTJEFTBOESFBS3FDPNNFOEFETQBDJOHTIPVMECFDPOTJEFSFEGPSUIFGPMMPXJOH
reasons:
t"EEJUJPOBMTQBDJOHTIPVMECFDPOTJEFSFEGPSFBTFPG
installation and servicing.
t"EEJUJPOBMDMFBSBODFTNJHIUCFSFRVJSFEGPSXBMMEPPS
and floor moldings.
t"EEJUJPOBMTQBDJOHTIPVMECFDPOTJEFSFEPOBMMTJEFT
of the dryer to reduce noise transfer.
For closet installation, with a door, minimum
ventilation openings in the top and bottom of the
door are required. Louvered doors with equivalent
ventilation openings are acceptable.
t$PNQBOJPOBQQMJBODFTQBDJOHTIPVMEBMTPCF
considered.
NOTE
5IFSFTIPVMECFBUMFBTUBMJUUMFTQBDFBSPVOEUIFESZFSPSBOZPUIFSBQQMJBODF
UPFMJNJOBUFUIFUSBOTGFSPG
vibration from one to the other. Too much vibration, it could cause them to make noise or touch each other
causing paint damage and making even more noise.
ENGLISH
WWARNING
14
INSTALLATION INSTRUCTIONS
Clearances (cont.)
RECOMMENDED INSTALLATION SPACING FOR CABINET INSTALLATION
tFor cabinet installation with a door, minimum ventilation openings in the top of the cabinet are required.
7"* (17.8 cm)
*Required spacing
7"* (17.8 cm)
**For side or bottom venting,
JODIFTDN
TQBDJOHJTBMMPXFE
5"* 28
1"*
(12.7 cm) (73.4 cm) (2.5 cm)
1"
27 "
(2.54 cm) (68.6 cm)
1"
(2.54 cm)
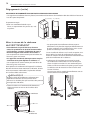
Leveling the Dryer
WWARNING
t5PSFEVDFUIFSJTLPGJOKVSZUPQFSTPOTBEIFSFUPBMM
JOEVTUSZSFDPNNFOEFETBGFUZQSPDFEVSFTJODMVEJOH
UIFVTFPGMPOHTMFFWFEHMPWFTBOETBGFUZHMBTTFT
Failure to follow this warning can cause serious injury
or death.
t5IFBQQMJBODFTBSFIFBWZ5XPPSNPSFQFPQMFBSF
SFRVJSFEXIFOJOTUBMMJOHUIFESZFSFailure to follow
this warning can cause serious injury or death.
To ensure that the dryer provides optimal drying
performance, it must be level. To minimize vibration,
noise, and unwanted movement, the floor must be a
perfectly level, solid surface.
NOTE
Adjust the leveling feet only as far as necessary to
level the dryer. Extending the leveling feet more than
necessary can cause the dryer to vibrate.
1PTJUJPOUIFESZFSJOUIFGJOBMMPDBUJPO1MBDFBMFWFM
across the top of the dryer.
Level
Leveling Feet
t"MMGPVSMFWFMJOHGFFUNVTUSFTUTPMJEMZPOUIFGMPPS
Gently push on the top corners of the dryer to make
sure that the dryer does not rock from corner to corner.
If you are installing the dryer on the optional pedestal,
you must use the leveling feet on the pedestal to
level the dryer. The dryer leveling feet should be fully
retracted.
6TFBOBEKVTUBCMFXSFODIUPUVSOUIFMFWFMJOHGFFU
Turn clockwise to raise the dryer or counterclockwise
to lower it. Raise or lower the leveling feet until dryer
is level from side to side and front to back.
.BLFTVSFUIBUBMMMFWFMJOHGFFUBSFJOGJSNDPOUBDUXJUI
the floor.
INSTALLATION INSTRUCTIONS
15
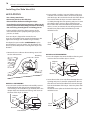
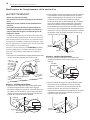
Reversing the Door
t5PBWPJEEBNBHFUPUIFESZFSPSUIFEPPSTVQQPSU
UIFEPPSXJUIBTUPPMPSCPYUIBUGJUTVOEFSUIF
EPPSPSIBWFBOBTTJTUBOUTVQQPSUUIFXFJHIUPGUIF
door.
3FNPWFUIFTDSFXTTFDVSJOHUIFIJOHFTUPUIFEPPS
frame. Remove the two plastic cover caps. Reinstall
the hinges and cover caps on the opposite sides from
which they were removed.
t"WPJEESPQQJOHUIFEPPSUPBWPJEEBNBHFUPUIF
EPPSPSUIFGMPPS
Hinge
assembly
THE DRYER DOOR IS VERY LARGE AND HEAVY. Failure
to follow the instructions below can result in damage to
the dryer, property damage or injury to persons.
Cover cap
0QFOUIFEPPSBOESFNPWFUIFUXPQMBTUJDIPMFDBQT
on the catch side by gently prying up with a flat blade
TDSFXESJWFS4BWFUIFTFGPSTUFQ
8JUIUIFIJOHFTBOEDPWFSDBQTJOUIFOFXMPDBUJPOT
remount the inner door frame onto the outer door
GSBNFXJUIUIFTDSFXTSFNPWFEJOTUFQBCPWF
Hole cap
8IJMFTVQQPSUJOHUIFEPPSSFNPWFUIFTDSFXTUXP
from each hinge. Set the door aside face down on a
protected surface to prevent damage to the door or
the work surface.
3FJOTUBMMUIFEPPSXJUIUIFTDSFXTGSPNTUFQT
Hinge screw
8JUIUIFEPPSPOBQSPUFDUFETVSGBDFSFNPWFUIF
screws on each side of the door and lift off the inner
door frame using a flat blade screwdriver. Remove the
latch hook and blank and move them to the opposite
side.
5FTUUIFTXJOHPGUIFEPPSUPNBLFTVSFUIFIJOHFT
and latch are properly aligned and that the door
closes and latches correctly.
Inner door
frame
Latch hook
Swing Door
ENGLISH
WWARNING
16
INSTALLATION INSTRUCTIONS
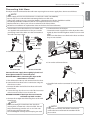
Installing the Side Vent Kit
WWARNING
t6TFBIFBWZNFUBMWFOU
t%POPUVTFQMBTUJDPSUIJOGPJMEVDU
t$MFBOPMEEVDUTCFGPSFJOTUBMMJOHUIJTESZFS
t5PSFEVDFUIFSJTLPGJOKVSZUPQFSTPOTBEIFSFUPBMM
JOEVTUSZSFDPNNFOEFETBGFUZQSPDFEVSFTJODMVEJOH
UIFVTFPGMPOHTMFFWFEHMPWFTBOETBGFUZHMBTTFT
t'BJMVSFUPGPMMPXBMMPGUIFTBGFUZXBSOJOHTJOUIJT
manual could result in property damage, injury to
persons, or death.
1SFBTTFNCMFBJODIFTDN
FMCPXUPUIFOFYU
JODIFTDN
EVDUTFDUJPOBOETFDVSFBMMKPJOUT
XJUIEVDUUBQF#FTVSFUIBUUIFNBMFFOEPGUIFFMCPX
faces AWAY from the dryer. Insert the elbow/duct
assembly through the side opening and press it onto
the adapter duct. Secure in place with duct tape.
#FTVSFUIBUUIFNBMFFOEPGUIFEVDUQSPUSVEFT
JODIFTDN
UPDPOOFDUUIFSFNBJOJOHEVDUXPSL
Attach cover plate to the back of the dryer with
included screw.
Your new dryer is shipped to vent to the rear.
It can also be configured to vent to the bottom or side
SJHIUTJEFWFOUJOHJTOPUBWBJMBCMFPOHBTNPEFMT
An adapter kit, part number &&-#, may be
purchased from your LG retailer. This kit contains the
necessary duct components to change the dryer vent
location.
3FNPWFUIFSFBSFYIBVTUEVDUSFUBJOJOHTDSFX1VMM
out the exhaust duct.
Retaining
Screw
Cover
Plate
Elbow
”
DN
OPTION 2: BOTTOM VENTING
1SFTTUIFBEBQUFSEVDUPOUPUIFCMPXFSIPVTJOHBOE
secure to the base of the dryer as shown.
Adapter
Duct
Rear
Exhaust Duct
OPTION 1: SIDE VENTING
1SFTTUIFUBCTPOUIFLOPDLPVUBOEDBSFGVMMZSFNPWF
UIFLOPDLPVUGPSUIFEFTJSFEWFOUPQFOJOHSJHIU
TJEFWFOUJOHJTOPUBWBJMBCMFPOHBTNPEFMT
1SFTTUIF
adapter duct onto the blower housing and secure to
the base of the dryer as shown.
#SBDLFU
*OTFSUUIFJODIFTDN
FMCPXUISPVHIUIFSFBS
PQFOJOHBOEQSFTTJUPOUPUIFBEBQUFSEVDU#FTVSF
that the male end of the elbow faces down through
hole in the bottom of the dryer. Secure in place with
duct tape.
Attach the cover plate to the back of the dryer with
included screw.
Adapter
Duct
Cover
Plate
#SBDLFU
Elbow
,OPDLPVU
INSTALLATION INSTRUCTIONS
17
Venting the Dryer
To reduce the risk of fire, electric shock, or injury to persons when using this appliance, follow basic precautions,
including the following:
t%POPUDSVTIPSDPMMBQTFEVDUXPSL Failure to follow
these instructions can result in fire or death.
t%POPUBMMPXEVDUXPSLUPSFTUPOPSDPOUBDUTIBSQ
PCKFDUT Failure to follow these instructions can result
in fire or death.
t*GDPOOFDUJOHUPFYJTUJOHEVDUXPSLNBLFTVSFJU
JTTVJUBCMFBOEDMFBOCFGPSFJOTUBMMJOHUIFESZFS
Failure to follow these instructions can result in fire or
death.
t7FOUJOHNVTUDPOGPSNUPMPDBMCVJMEJOHDPEFT
Failure to follow these instructions can result in fire or
death.
t(BTESZFST.645FYIBVTUUPUIFPVUEPPST
Failure to follow these instructions can result in fire or
death.
t6TFPOMZJODIDN
SJHJEPSGMFYJCMFNFUBM
EVDUXPSLJOTJEFUIFESZFSDBCJOFUBOEGPSWFOUJOH
outside. Failure to follow these instructions can result
in fire or death.
t5PSFEVDFUIFSJTLPGGJSFDPNCVTUJPOPS
BDDVNVMBUJPOPGDPNCVTUJCMFHBTFT%0/05
FYIBVTUESZFSBJSJOUPBOFODMPTFEBOEVOWFOUJMBUFE
BSFBTVDIBTBOBUUJDXBMMDFJMJOHDSBXMTQBDF
DIJNOFZHBTWFOUPSDPODFBMFETQBDFPGB
CVJMEJOH Failure to follow these instructions can result
in fire or death.
t5PSFEVDFUIFSJTLPGGJSF%0/05FYIBVTUUIFESZFS
XJUIQMBTUJDPSUIJOGPJMEVDUJOH
Failure to follow these instructions can result in fire or
death.
t5IFFYIBVTUEVDUNVTUCFJODIFTDN
JO
EJBNFUFSXJUIOPPCTUSVDUJPOT5IFFYIBVTUEVDU
TIPVMECFLFQUBTTIPSUBTQPTTJCMF.BLFTVSF
UPDMFBOBOZPMEEVDUTCFGPSFJOTUBMMJOHZPVSOFX
dryer. Failure to follow these instructions can result in
fire or death.
t3JHJEPSTFNJSJHJENFUBMEVDUJOHJTSFDPNNFOEFE
GPSVTFCFUXFFOUIFESZFSBOEUIFXBMM*OTQFDJBM
JOTUBMMBUJPOTXIFOJUJTJNQPTTJCMFUPNBLFB
DPOOFDUJPOXJUIUIFBCPWFSFDPNNFOEBUJPOTB
6-MJTUFEGMFYJCMFNFUBMUSBOTJUJPOEVDUNBZCFVTFE
CFUXFFOUIFESZFSBOEXBMMDPOOFDUJPOPOMZ5IF
VTFPGUIJTEVDUJOHXJMMBGGFDUESZJOHUJNF Failure to
follow these instructions can result in fire or death.
t%0/05VTFTIFFUNFUBMTDSFXTPSPUIFSGBTUFOFST
XIJDIFYUFOEJOUPUIFEVDUUIBUDPVMEDBUDIMJOUBOE
SFEVDFUIFFGGJDJFODZPGUIFFYIBVTUTZTUFN4FDVSF
BMMKPJOUTXJUIEVDUUBQF Failure to follow these
instructions can result in fire or death.
t5PNBYJNJ[FPQFSBUJOHSFTVMUTQMFBTFPCTFSWF
UIFEVDUMFOHUIMJNJUBUJPOTOPUFEJOUIFDIBSUOFYU
QBHF Failure to follow these instructions can result in
fire or death.
t%VDUXPSLJTOPUQSPWJEFEXJUIUIFESZFS:PV
TIPVMEPCUBJOUIFOFDFTTBSZEVDUXPSLMPDBMMZ5IF
FOEDBQTIPVMEIBWFIJOHFEEBNQFSTUPQSFWFOU
CBDLESBGUXIFOUIFESZFSJTOPUJOVTFFailure to
follow these instructions can result in fire or death.
t5IFUPUBMMFOHUIPGGMFYJCMFNFUBMEVDUTIBMMOPU
FYDFFEGUN
t*O$BOBEBUIBUPOMZUIPTFGPJMUZQFGMFYJCMFEVDUT
JGBOZTQFDJGJDBMMZJEFOUJGJFEGPSVTFXJUIUIF
BQQMJBODFCZUIFNBOVGBDUVSFSTIBMMCFVTFEIn the
United States, that only those foil-type flexible ducts,
if any, specifically identified for use with the appliance
by the manufacturer and that comply with the Outline
GPS$MPUIFT%SZFS5SBOTJUJPO%VDU4VCKFDU"TIBMM
be used.
ENGLISH
WWARNING
18
INSTALLATION INSTRUCTIONS
Venting the Dryer (cont.)
Ductwork
8"--$"15:1&
/6.#&30'
¡&-#084
."9*.6.-&/(5)0'
ű*/$)%*".&5&3
3*(*%.&5"-%6$5
Recommended
GUN
GUN
GUN
GUN
GUN
GUN
GUN
GUN
GUN
GUN
w
DN
w
DN
Use only for
short run
installations
/”
DN
NOTE
%FEVDUGUN
GPSFBDIBEEJUJPOBMFMCPX*UJTOPU
SFDPNNFOEFEUPVTFNPSFUIBOGPVS¡FMCPXT
Routing and Connecting Ductwork
NOTE
Follow the guidelines below to maximize drying
performance and reduce lint buildup and
condensation in the ductwork.
Ductwork and fittings are NOT included and must be
purchased separately.
t6TFJODIDN
EJBNFUFSSJHJEPSTFNJSJHJE
metal ductwork.
t5IFFYIBVTUEVDUSVOTIPVMECFBTTIPSUBTQPTTJCMF
t6TFBTGFXFMCPXKPJOUTBTQPTTJCMF
t5IFNBMFFOEPGFBDITFDUJPOPGFYIBVTUEVDUNVTU
point away from the dryer.
t6TFEVDUUBQFPOBMMEVDUKPJOUT
t*OTVMBUFEVDUXPSLUIBUSVOTUISPVHIVOIFBUFEBSFBT
in order to reduce condensation and lint buildup on
duct surfaces.
t*ODPSSFDUPSJOBEFRVBUFFYIBVTUTZTUFNTBSFOPU
covered by the dryer warranty. Failures or poor
performance caused by such exhaust systems will
not be covered by the dryer warranty.
$033&$57&/5*/(
*/$033&$57&/5*/(
INSTALLATION INSTRUCTIONS
19
Connecting Inlet Hose
NOTE
t8BUFSTVQQMZQSFTTVSFNVTUCFCFUXFFO14*BOE14*_L1B
t%POPUTUSJQPSDSPTTUISFBEXIFODPOOFDUJOHJOMFUIPTFUPUIFWBMWF
t*GUIFXBUFSTVQQMZQSFTTVSFJTNPSFUIBOL1BBEFDPNQSFTTJPOEFWJDFTIPVMECFJOTUBMMFE
t1FSJPEJDBMMZDIFDLUIFDPOEJUJPOPGUIFIPTFBOESFQMBDFUIFIPTFJGOFDFTTBSZ
t3FQMBDFJOMFUIPTFTBGUFSZFBSTPGVTFUPSFEVDFUIFSJTLPGIPTFGBJMVSF
t3FDPSEIPTFJOTUBMMBUJPOPSSFQMBDFNFOUEBUFTPOUIFIPTFTGPSGVUVSFSFGFSFODF
$IFDLSVCCFSTFBMJOUIFJOMFUIPTF5XPSVCCFSTFBMT
are supplied with each inlet hose. They are used for
preventing water leaks. Make sure the connection to
the cold water tap is tight.
Hose
connector
$POOFDUUIFIPTFUPUIFESZFS
t$POOFDUUIFXBUFSTVQQMZIPTFUPUIFESZFSJOMFUWBMWF
UJHIUMZCZIBOEBOEUIFOUJHIUFOBOPUIFSUVSOXJUI
pliers.
Make sure that there are no kinks in the hoses and that
they are not crushed.
Rubber
seal
Y connector
$IFDLUIFJOTUBMMBUJPOUZQF
Short
hose
Long
hose
5VSOPOUIFDPMEXBUFSGBVDFU
Y connector
WITH WASHER
WITHOUT WASHER
$POOFDUBMMXBUFSTVQQMZIPTFTUJHIUMZCZIBOEBOE
UIFOUJHIUFOBOPUIFSUVSOXJUIQMJFST
8*5)8"4)&38IFODPOOFDUJOHUIFESZFSUPUIF
TBNFGBVDFUBTBXBTIFS
a. Shut off the cold water tap and remove the washer hose.
b. Connect the short hose to the Y-connector using one
of the hose washers.
$IFDLGPSMFBLTBUUIF:DPOOFDUPSJGVTFE
BOEJOBMM
hoses.
c. Connect the other end of the short hose to the cold
water faucet.
d. Connect the long dryer hose to one side of theY-connector
and connect the washer hose to the other side.
8*5)0658"4)&3*GUIFESZFSEPFTOPUTIBSFUIF
DPMEXBUFSUBQXJUIBXBTIFS
a. Connect the straight end of the long hose to the cold
water faucet.
NOTE
t#FGPSFDPOOFDUJOHUIFXBUFSMJOFUPUIFESZFSøVTI
several gallons of water into a drain or bucket. This will
help prevent foreign particles such as sand and scale
from clogging the dryer inlet valve.
t%POPUPWFSUJHIUFO%BNBHFUPUIFDPVQMJOHDBOSFTVMU
NOTE
t*GBOZMFBLTBSFGPVOETIVUPòUIFXBUFSGBVDFU
remove the hose and check the condition of the
hose washer.
ENGLISH
The dryer must be connected to the cold water tap using the new water supply hose. Do not use old hoses
20
INSTALLATION INSTRUCTIONS
Connecting Gas Dryers
WWARNING
To reduce the risk of fire, electric shock, or injury to persons when using this appliance, follow basic precautions,
including the following:
t(BTTVQQMZSFRVJSFNFOUT
"TTIJQQFEGSPNUIFGBDUPSZUIJTESZFSJT
DPOGJHVSFEGPSVTFXJUIOBUVSBMHBT*UDBOCF
DPOWFSUFEGPSVTFXJUI-1-JRVFGJFE1SPQBOF
HBT
(BTQSFTTVSFNVTUOPUFYDFFEJODIFTPGXBUFS
DPMVNO
t"RVBMJGJFETFSWJDFPSHBTDPNQBOZUFDIOJDJBONVTU
DPOOFDUUIFESZFSUPUIFHBTTFSWJDF
Failure to do so can result in fire, explosion, or death.
t*TPMBUFUIFESZFSGSPNUIFHBTTVQQMZTZTUFNCZ
DMPTJOHJUTJOEJWJEVBMNBOVBMTIVUPGGWBMWFEVSJOH
BOZQSFTTVSFUFTUJOHPGUIFHBTTVQQMZ Failure to do
so can result in fire, explosion, or death.
t4VQQMZMJOFSFRVJSFNFOUT
:PVSMBVOESZSPPNNVTUIBWFBSJHJEHBT
TVQQMZMJOFUPZPVSESZFS*OUIF6OJUFE4UBUFT
BOJOEJWJEVBMNBOVBMTIVUPGGWBMWF.645CF
JOTUBMMFEXJUIJOBUMFBTUGUN
PGUIFESZFS
JOBDDPSEBODFXJUIUIF/BUJPOBM'VFM(BT$PEF
"/4*;PS$BOBEJBOHBTJOTUBMMBUJPODPEF$4"
#"1cľJODI/15QJQFQMVHNVTUCFJOTUBMMFE
Failure to do so can result in fire, explosion, or death.
t*GVTJOHBSJHJEQJQFUIFSJHJEQJQFTIPVMECF
JODI*14*GBDDFQUBCMFVOEFSMPDBMDPEFTBOE
PSEJOBODFTBOEXIFOBDDFQUBCMFUPZPVSHBT
TVQQMJFS3cľJODIBQQSPWFEUVCJOHNBZCFVTFE
XIFSFMFOHUITBSFMFTTUIBOGUN
-BSHFS
UVCJOHTIPVMECFVTFEGPSMFOHUITJOFYDFTTPGGU
N
Failure to do so can result in fire, explosion, or
death.
t$POOFDUUIFESZFSUPUIFUZQFPGHBTTIPXOPO
UIFOBNFQMBUFFailure to do so can result in fire,
explosion, or death.
t5PQSFWFOUDPOUBNJOBUJPOPGUIFHBTWBMWF
QVSHFUIFHBTTVQQMZPGBJSBOETFEJNFOUCFGPSF
DPOOFDUJOHUIFHBTTVQQMZUPUIFESZFS#FGPSF
UJHIUFOJOHUIFDPOOFDUJPOCFUXFFOUIFHBTTVQQMZ
BOEUIFESZFSQVSHFSFNBJOJOHBJSVOUJMUIFPEPS
PGHBTJTEFUFDUFE Failure to do so can result in fire,
explosion, or death.
t%0/05VTFBOPQFOGMBNFUPJOTQFDUGPSHBTMFBLT
6TFBOPODPSSPTJWFMFBLEFUFDUJPOGMVJE Failure to
do so can result in fire, explosion, or death.
t6TFPOMZBOFX"("PS$4"DFSUJGJFEHBTTVQQMZ
MJOFXJUIGMFYJCMFTUBJOMFTTTUFFMDPOOFDUPST Failure
to do so can result in fire, explosion, or death.
t4FDVSFMZUJHIUFOBMMHBTDPOOFDUJPOT Failure to do
so can result in fire, explosion, or death.
t%0/05BUUFNQUBOZEJTBTTFNCMZPGUIFESZFS
BOZEJTBTTFNCMZSFRVJSFTUIFBUUFOUJPOBOEUPPMT
PGBOBVUIPSJ[FEBOERVBMJGJFETFSWJDFQFSTPOPS
DPNQBOZ Failure to do so can result in fire, explosion,
or death.
t6TFBQJQFKPJOUDPNQPVOEUIBUJTJOTPMVCMFJO
-JRVFGJFE1FUSPMFVN-1
HBTPOBMMQJQFUISFBET
Failure to do so can result in fire, explosion, or death.
Electrical requirements for gas models only
WWARNING
To reduce the risk of fire, electric shock, or injury to persons when using this appliance, follow basic precautions,
including the following:
t5IJTESZFSNVTUCFQMVHHFEJOUPB)[7"$
t%POPUVOEFSBOZDJSDVNTUBODFTDVUPSSFNPWFUIF
HSPVOEFEPVUMFUQSPUFDUFECZBBNQFSFGVTF
UIJSEHSPVOE
QSPOHGSPNUIFQPXFSDPSEFailure
PSDJSDVJUCSFBLFS Failure to follow this warning can
to follow this warning can result in fire, explosion, or
result in fire, explosion, or death.
death.
t'PSQFSTPOBMTBGFUZUIJTESZFSNVTUCFQSPQFSMZ
HSPVOEFE Failure to follow this warning can result in
fire, explosion, or death.
t5IFQPXFSDPSEPGUIJTESZFSJTFRVJQQFEXJUI
BQSPOHHSPVOEJOH
QMVHXIJDINBUFTXJUI
BTUBOEBSEQSPOHHSPVOEJOH
XBMMPVUMFUUP
NJOJNJ[FUIFQPTTJCJMJUZPGFMFDUSJDTIPDLIB[BSE
GSPNUIJTBQQMJBODFFailure to follow this warning
can result in fire, explosion, or death.
t8IFSFBTUBOEBSEQSPOHXBMMPVUMFUJT
FODPVOUFSFEJUJTZPVSQFSTPOBMSFTQPOTJCJMJUZ
BOEPCMJHBUJPOUPIBWFJUSFQMBDFEXJUIBQSPQFSMZ
HSPVOEFEQSPOHXBMMPVUMFU Failure to follow this
warning can result in fire, explosion, or death.
INSTALLATION INSTRUCTIONS
21
Connecting Gas Dryers (cont.)
Connecting the gas supply
To reduce the risk of fire, electric shock, or injury
to persons when using this appliance, follow basic
precautions, including the following:
.BLFTVSFUIBUUIFHBTTVQQMZUPUIFMBVOESZSPPNJT
turned OFF. Confirm that the type of gas available in
your laundry room is appropriate for the dryer. The
dryer is prepared for Natural Gas with a ⁄8 - inch NPT
gas connection.
t*OTUBMMBUJPOBOETFSWJDFNVTUCFQFSGPSNFECZ
BRVBMJGJFEJOTUBMMFSTFSWJDFBHFODZPSUIFHBT
TVQQMJFS Failure to do so can result in fire, explosion,
or death.
t6TFPOMZBOFXTUBJOMFTTTUFFMGMFYJCMFDPOOFDUPS
BOEBOFX"("DFSUJGJFEDPOOFDUPS Failure to do so
can result in fire, explosion, or death.
t"HBTTIVUPGGWBMWFNVTUCFJOTUBMMFEXJUIJOGU
N
PGUIFESZFSFailure to do so can result in fire,
explosion, or death.
t5IFESZFSJTDPOGJHVSFEGPS/BUVSBM(BTXIFO
TIJQQFEGSPNUIFGBDUPSZ.BLFTVSFUIBUUIFESZFS
JTFRVJQQFEXJUIUIFDPSSFDUCVSOFSPSJGJDFGPSUIF
UZQFPGHBTCFJOHVTFE/BUVSBM(BTPS-JRVFGJFE
1FUSPMFVN
Failure to do so can result in fire,
explosion, or death.
3FNPWFUIFTIJQQJOHDBQGSPNUIFHBTDPOOFDUJPO
BUUIFCBDLPGUIFESZFS#FDBSFGVMOPUUPEBNBHF
the threads of the gas connector when removing the
shipping cap.
$POOFDUUIFESZFSUPZPVSMBVOESZSPPNTHBTTVQQMZ
using a new flexible stainless steel connector with a ⁄8
- inch NPT fitting.
4FDVSFMZUJHIUFOBMMDPOOFDUJPOTCFUXFFOUIF
dryer and your laundry room’s gas supply. Turn on
your laundry room’s gas supply and check all pipe
DPOOFDUJPOTCPUIJOUFSOBMBOEFYUFSOBM
GPSHBTMFBLT
with a noncorrosive leak-detection fluid.
Electrical connection
t*GOFDFTTBSZUIFDPSSFDUPSJGJDF'PSUIF-1PSJGJDF
LJUPSEFSQBSUOVNCFS&&-%
TIPVMECF
JOTUBMMFECZBRVBMJGJFEUFDIOJDJBOBOEUIFDIBOHF
TIPVMECFOPUFEPOUIFESZFS Failure to do so can
result in fire, explosion, or death.
Plug dryer into a 7"$
)[HSPVOEFEQSPOH
outlet.
t"MMDPOOFDUJPOTNVTUCFJOBDDPSEBODFXJUIMPDBM
DPEFTBOESFHVMBUJPOT. Failure to do so can result in
fire, explosion, or death.
t(BTESZFST.645FYIBVTUUPUIFPVUEPPST Failure to
do so can result in fire, explosion, or death.
w/15(BT
Connection
AGA/CSA-Certified
Stainless Steel Flexible
Connector
w/151JQF
Plug
Gas Supply
Shutoff Valve
High-altitude installations
5IF#56SBUJOHPGUIJTESZFSJT"("DFSUJGJFEGPS
FMFWBUJPOTCFMPXGFFU
If your gas dryer is being installed at an elevation above
GFFUJUNVTUCFEFSBUFECZBRVBMJGJFEUFDIOJDJBO
or gas supplier.
ENGLISH
WWARNING
22
INSTALLATION INSTRUCTIONS
Connecting Electric Dryers
WWARNING
WWARNING
To help prevent fire, electric shock, serious injury,
or death, the wiring and grounding must conform
to the latest edition of the National Electrical Code,
"/4*/'1"BOEBMMBQQMJDBCMFMPDBMSFHVMBUJPOT
Please contact a qualified electrician to check your
home’s wiring and fuses to ensure that your home has
adequate electrical power to operate the dryer.
To reduce the risk of fire, electric shock, or injury
to persons when using this appliance, follow basic
precautions, including the following:
Electrical requirements for electric models only
t*GJUEPFTOPUGJUUIFPVUMFUBQSPQFSPVUMFUXJMM
OFFEUPCFJOTUBMMFECZBRVBMJGJFEFMFDUSJDJBO
WWARNING
To reduce the risk of fire, electric shock, or injury
to persons when using this appliance, follow basic
precautions, including the following:
t5IJTESZFSNVTUCFDPOOFDUFEUPBHSPVOEFE
NFUBMQFSNBOFOUXJSJOHTZTUFNPSBOFRVJQNFOU
HSPVOEJOHDPOEVDUPSNVTUCFSVOXJUIUIFDJSDVJU
DPOEVDUPSTBOEDPOOFDUFEUPUIFFRVJQNFOU
HSPVOEJOHUFSNJOBMPSMFBEPOUIFESZFSFailure to
do so can result in fire, explosion, or death.
t5IFESZFSIBTJUTPXOUFSNJOBMCMPDLUIBUNVTU
CFDPOOFDUFEUPBTFQBSBUF7"$)FSU[
TJOHMFQIBTFDJSDVJUGVTFEBUBNQFSFTUIF
DJSDVJUNVTUCFGVTFEPOCPUITJEFTPGUIFMJOF
&-&$53*$"-4&37*$&'035)&%3:&34)06-%#&
0'5)&."9*.6.3"5&70-5"(&-*45&%0/5)&
/".&1-"5&%0/05$0//&$5%3:&350
0370-5$*3$6*5 Failure to follow these
instructions can result in fire, explosion, or death.
t*GCSBODIDJSDVJUUPESZFSJTGUN
PSMFTTJO
MFOHUIVTF6-6OEFSXSJUFST-BCPSBUPSJFT
MJTUFE
/P"8(XJSFDPQQFSXJSFPOMZ
PSBTSFRVJSFE
CZMPDBMDPEFT*GPWFSGUN
VTF6-MJTUFE
/P"8(XJSFDPQQFSXJSFPOMZ
PSBTSFRVJSFE
CZMPDBMDPEFT"MMPXTVGGJDJFOUTMBDLJOXJSJOH
TPESZFSDBOCFNPWFEGSPNJUTOPSNBMMPDBUJPO
XIFOOFDFTTBSZ Failure to do so can result in fire,
explosion, or death.
t5IFQPXFSDPSEQJHUBJM
DPOOFDUJPOCFUXFFO
XBMMSFDFQUBDMFBOEESZFSUFSNJOBMCMPDL*4/05
TVQQMJFEXJUIESZFS5ZQFPGQJHUBJMBOEHBVHF
PGXJSFNVTUDPOGPSNUPMPDBMDPEFTBOEXJUI
JOTUSVDUJPOTPOUIFGPMMPXJOHQBHFTFailure to
follow these instructions can result in fire, explosion,
or death.
t"XJSFDPOOFDUJPOJTSFRVJSFEGPSBMMNPCJMFBOE
NBOVGBDUVSFEIPNFJOTUBMMBUJPOTBTXFMMBTBMM
OFXDPOTUSVDUJPOBGUFS+BOVBSZ"XJSF
DPOOFDUJPONVTUCFVTFEXIFSFMPDBMDPEFTEPOPU
QFSNJUHSPVOEJOHUISPVHIUIFOFVUSBMXJSF Failure
to do so can result in fire, explosion, or death.
t%POPUNPEJGZUIFQMVHBOEJOUFSOBMXJSFQSPWJEFE
XJUIUIFESZFS
t5IFESZFSTIPVMECFDPOOFDUFEUPIPMFPVUMFU
WWARNING
To reduce the risk of fire, electric shock, or injury
to persons when using this appliance, follow basic
precautions, including the following:
t"OZJOTUBMMBUJPOJOBNBOVGBDUVSFEPSNPCJMF
IPNFNVTUDPNQMZXJUIUIF.BOVGBDUVSFE)PNF
$POTUSVDUJPOBOE4BGFUZ4UBOEBSET5JUMF$'3
1BSUPS4UBOEBSE$"/$4";.)BOE
MPDBMDPEFTBOEPSEJOBODFT
t"XJSFDPOOFDUJPOJTSFRVJSFEGPSBMMNPCJMFBOE
NBOVGBDUVSFEIPNFJOTUBMMBUJPOTBTXFMMBTBMM
OFXDPOTUSVDUJPOBGUFS+BOVBSZ Failure to
do so can result in fire, explosion, or death.
INSTALLATION INSTRUCTIONS
Any installation in a manufactured or mobile home must
comply with the Manufactured Home Construction and
4BGFUZ4UBOEBSET5JUMF$'31BSUPS4UBOEBSE
$"/$4";.)BOEMPDBMDPEFTBOEPSEJOBODFT*G
you are uncertain whether your proposed installation
will comply with these standards, please contact a
service and installation professional for assistance.
t"HBTESZFSNVTUCFQFSNBOFOUMZBUUBDIFEUPUIFGMPPS
t5IFFMFDUSJDBMDPOOFDUJPOGPSBOFMFDUSJDESZFSNVTU
CFBXJSFDPOOFDUJPO.PSFEFUBJMFEJOGPSNBUJPO
concerning the electrical connection is provided in the
section Connecting Electric Dryers.
t5PSFEVDFUIFSJTLPGDPNCVTUJPOBOEGJSFUIFESZFS
must be vented to the outside.
t%0/05WFOUUIFESZFSVOEFSBNBOVGBDUVSFEIPNFPS
mobile home.
t&MFDUSJDESZFSTNBZCFWFOUFEUPUIFPVUTJEFVTJOHUIF
back, left, right, or bottom panel.
t(BTESZFSTNBZCFWFOUFEUPUIFPVUTJEFVTJOHUIF
back, left, or bottom panel. Gas dryers may not be
vented to the outside using the right side panel
because of the burner housing.
t5IFESZFSFYIBVTUEVDUNVTUCFBGGJYFETFDVSFMZUP
the manufactured or mobile home structure, and the
exhaust duct must be made of a material that will resist
fire and combustion.
It is recommended that you use a rigid or flexible metal
duct.
t%0/05DPOOFDUUIFESZFSFYIBVTUEVDUUPBOZPUIFS
duct, vent, chimney, or other exhaust duct.
t.BLFTVSFUIFESZFSIBTBEFRVBUFBDDFTTUPPVUTJEF
fresh air to ensure proper operation. The opening for
PVUTJEFGSFTIBJSNVTUCFBUMFBTUJODN
t*UJTJNQPSUBOUUIBUUIFDMFBSBODFPGUIFEVDUGSPNBOZ
DPNCVTUJCMFDPOTUSVDUJPOCFBUMFBTUJODIFTDN
and when venting the dryer to the outdoors, the dryer
DBOCFJOTUBMMFEXJUIBDMFBSBODFPGJODIDN
BU
the sides and back of the dryer.
t1MFBTFCFBXBSFUIBUWFOUJOHNBUFSJBMTBSFOPUTVQQMJFE
with the dryer. You should obtain the venting materials
necessary for proper installation.
Final Installation Check
Once you have completed the installation of the dryer
and it is in its final location, confirm proper operation
XJUIUIFGPMMPXJOHUFTUTBOE*OTUBMMBUJPO5FTU%VDU
$IFDL
POUIFGPMMPXJOHQBHF
Testing dryer heating
("4.0%&-4
Close the dryer door, press the ON/OFF button to turn
the dryer on, and start the dryer on a heat setting.
When the dryer starts, the igniter should ignite the main
burner.
NOTE
If all air is not purged from the gas line, the gas igniter
may turn off before the main burner ignites. If this
happens, the igniter will reattempt gas ignition after
approximately two minutes.
&-&$53*$.0%&-4
Close the dryer door, press the ON/OFF button to turn
the dryer on, and start the dryer on a heat setting. The
exhaust air should be warm after the dryer has been
PQFSBUJOHGPSNJOVUFT
Checking airflow
Effective dryer operation requires proper airflow.
The adequacy of the airflow can be measured by
evaluating the static pressure. Static pressure in the
exhaust duct can be measured with a manometer,
QMBDFEPOUIFFYIBVTUEVDUBQQSPYJNBUFMZGUDN
from the dryer.
4UBUJDQSFTTVSFJOUIFFYIBVTUEVDUTIPVMEOPUFYDFFE
JODIFTDN
5IFESZFSTIPVMECFDIFDLFEXIJMFUIF
dryer is running with no load.
Checking levelness
Once the dryer is in its final location, recheck the dryer
to be sure it is level. Make sure it is level front to back
BOETJEFUPTJEFBOEUIBUBMMMFWFMJOHGFFUBSFGJSNMZPO
the floor.
ENGLISH
Special Requirements for
Manufactured or Mobile Homes
23
24
INSTALLATION INSTRUCTIONS
Installation Test (Duct check)
Once you have completed the installation of the dryer,
use this test to make sure the condition of the exhaust
system is adequate for proper operation of the dryer.
This test should be performed to alert you to any serious
problems in the exhaust system of your home.
t:PVSESZFSGFBUVSFT'MPX4FOTFBOJOOPWBUJWFTFOTJOH
system that automatically detects blockages and
SFTUSJDUJPOTJOESZFSEVDUXPSL,FFQJOHEVDUXPSLDMFBO
of lint buildup and free of restrictions allows clothes to
dry faster and reduces energy use.
$IFDLUIFEJTQMBZGPSSFTVMUT
During the three minute test cycle, monitor the
Flow Sense™ display on the control panel. If no bars
are displayed, when the cycle ends, the exhaust
system is adequate. If the exhaust system is severely
restricted, the display will show four bars. Other
problems may also be shown with error codes. Refer
to the next page for error code details and solutions.
NOTE
The dryer should be cool before starting this test. If
the dryer was warmed up during installation, run the
AIR DRY cycle for a few minutes to reduce the interior
temperature.
5PBDUJWBUFUIFJOTUBMMBUJPOUFTU
3FNPWFUIFMJUFSBUVSFBOEUIFODMPTFUIFEPPS.
Do not load anything in the drum for this test, as in
may affect the accuracy of the results.
1SFTTBOEIPMEUIF5FNQ$POUSPMBOE4JHOBM
CVUUPOTBOEUIFOQSFTTUIF108&3CVUUPO
This button sequence activates the installation test.
The code
will display if the activation is
successful.
1SFTT45"351"64&CVUUPO
The dryer will start the test, which will last about
two minutes. The heat will be turned on and the
temperatures in the drum will be measured.
/0#"34
0,
'063#"34
RESTRICTED
Four bars indicates that the exhaust system is severely
restricted. Have the system checked immediately, as
performance will be poor.
&OEPGDZDMF
At the end of the test cycle,
will display.
The test cycle will end and the dryer will shut off
automatically after a short delay.
INSTALLATION INSTRUCTIONS
25
Installation Test (Duct check) (cont.)
ENGLISH
t$IFDLUIFFSSPSDPEFCFGPSFZPVDBMMGPSTFSWJDF
Error Code
U& or U&
)4
Possible Causes
Solutions
t5FNQFSBUVSFTFOTPSGBJMVSF
t5VSOPòUIFESZFSBOEDBMMGPS
service.
t)VNJEJUZTFOTPSGBJMVSF
t5VSOPòUIFESZFSBOEDBMMGPS
service.
tCheck the power supply or the
connection of power cord to the
terminal block. Refer to the
$POOFDUJOHFMFDUSJDESZFST section of this manual
t)PVTFGVTFJTCMPXODJSDVJUCSFBLFSIBT for complete instructions.
tripped, or power outage has occurred. t3FTFUDJSDVJUCSFBLFSPSSFQMBDFGVTF%POPUJODSFBTF
the fuse capacity.
If the problem is a circuit overload, have it corrected
by a qualified electrician.
t&MFDUSJDESZFSQPXFSDPSEJTOPU
connected correctly, or house power
supply is incorrect.
14 or 1' or O1
3FTUSJDUFEPSCMPDLFEBJSGMPX
t$IFDLUIFEVDUDPOEJUJPO
If the test displays four bars, check the exhaust system
for restrictions and damage. Repair or replace the
exhaust system as needed.
Avoid long runs or runs with multiple elbows or
bends.
NOTE
When the dryer is first installed, this test should be
performed to alert you to any existing problems with
the exhaust duct in your home. However, since the
test performed during normal operation provides
more accurate information on the condition of the
exhaust duct than does the installation test, the
number of bars displayed during the two tests may
not be the same.
Excess or crushed
transition duct
Too many elbows or
exhaust too long
Check for blockages and lint buildup.
Do not interrupt the test cycle, as this could result in
the wrong results.
Even if no bars are displayed during the test cycle,
some restrictions may still be present in the exhaust
system. Refer to the 7FOUJOHUIF%SZFS section of
this manual for complete exhaust system and venting
requirements.
Your dryer features Flow Sense™, an innovative
sensing system that automatically detects blockages
BOESFTUSJDUJPOTJOESZFSEVDUXPSL,FFQJOHEVDUXPSL
clean of lint buildup and free of restrictions allows
clothes to dry faster and reduces energy use.
Lint buildup
or blockage
Make sure the ductwork is not crushed or restricted.
Crushed or
damaged
exhaust
26
HOW TO USE
HOW TO USE
Operating the Dryer
1
$MFBOUIF-JOU'JMUFS
If the lint filter has not already been cleaned, lift out the filter and remove the
lint from the last load. This will help ensure the fastest and most efficient drying
performance.
Lint
Filter
2
-PBEUIF%SZFS
Load the dryer with the wet laundry from the washer. If the load is extra large,
you may need to divide it into smaller loads for proper performance and fabric
care.
3
5VSO0OUIF%SZFS
Press the POWER button to turn on the dryer. The cycle LEDs will illuminate
BOEBTJHOBMXJMMTPVOEJGUVSOFEPO3FGFSUPQBHF
4
4FMFDUB$ZDMF
Press the Cycle buttons until the indicator for the desired cycle is lit.
The preset temperature, dry level, and option settings for that cycle will be
shown. Default settings for the selected cycle can now be changed if desired.
Refer to the Cycle Setting and Options page for details.
NOTE
Not all options or modifiers are available on all cycles. Refer to the Cycle
Guide page for default settings and allowable options. A different chime will
sound and the LED will not come on if the selection is not allowed.
5
#FHJOUIFDZDMF
Press the START/PAUSE button to begin the cycle. The cycle can be paused at
any time either by opening the door or by pressing the START/PAUSE button. If
UIFDZDMFJTOPUSFTUBSUFEXJUIJONJOVUFTUIFESZFSXJMMTIVUPGGBOEUIFDZDMF
settings will be lost.
6
&OEPG$ZDMF
When the cycle is finished, the chime will sound if it is set. Remove your
clothing from the dryer immediately to reduce wrinkling. If Wrinkle Care is
selected, the dryer will tumble briefly every few minutes to help prevent
wrinkles from setting in the clothes.
27
HOW TO USE
= default setting
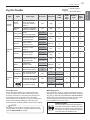
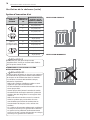
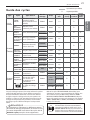
Cycle Guide
STEAM
CYCLE
$ZDMF
'BCSJD5ZQF
5FNQFSBUVSF
5JNF
JO.JO
8SJOLMF
Care
%BNQ
%SZ
4JHOBM
Steam
FreshTM
Comforter, Shirts,
5SPVTFSTFYDFQU
especially delicate
GBCSJDT
Off
High
Å
Wrinkle
Free
$PNGPSUFS#FEEJOH
Children’s clothing
Off
High
Å
High
Å
Å
Low
Å
Å
Medium
Å
Å
Low
Å
Å
Medium
High
Å
Å
High
Å
Medium
High
Heavy Duty Jeans,
heavyweight items
Normal Dry
Adjustable
Perm.Press
Permanent press,
synthetic items
Normal Dry
Normal
Work clothes,
corduroys, etc.
Normal Dry
Delicates
Lingerie, sheets,
blouses
Normal Dry
Towels
Denims, towels,
heavy cottons
Normal Dry
Only Normal &
Cotton/Towels Fabric
5ZQF.BYMC
Normal Dry
Small Load
#VMLZ
Comforters,
Pillows, shirts
Normal Dry
Anti
#BDUFSJBM
Do not use this cycle
with delicate fabrics.
Very
Dry
Speed Dry
For small loads with
short drying times
Off
Air Dry
For items that require
heat-free drying such
as plastics or rubber
Off
For loads that require
a specific dry time.
Off
SENSOR
DRY
MANUAL
DRY
%SZ-FWFM
= allowable option
.PSF
5JNF
-FTT
5JNF
Adjustable
Adjustable
Adjustable
Adjustable
Adjustable
Adjustable
To protect your garments not every dryness level,
temperature, or option is available with every cycle.
See the $ZDMF(VJEF for details.
Adjustable
Sensor dry cycles
Sensor dry cycles utilize LG’s unique dual sensor
system to detect and compare the moisture level
in clothes and in the air and adjust the drying time
as needed to ensure superior results. The dryer
automatically sets the dryness level and temperature
at the recommended setting for each cycle. The
estimated time remaining will be shown in the display.
NOTE
High
Adjustable
No Heat
Adjustable
High
Adjustable
Adjustable
Å
Å
Å
Å
Å
Å
Å
Manual dry cycles
Use manual dry cycles to select a specific amount of
drying time and a drying temperature. When a manual
dry cycle is selected, the ESTIMATED TIME REMAINING
display shows the actual time remaining in your cycle.
You can change the actual time in the cycle by
pressing More Time or Less Time.
$FSUJGJFECZ/4'
/4'*OUFSOBUJPOBMGPSNFSMZUIF/BUJPOBM
4BOJUBUJPO'PVOEBUJPO
DFSUJGJFTUIBU"OUJ
#BDUFSJBMDZDMFSFEVDFTPGCBDUFSJB
on laundry, and none of bacteria will carry
over onto the next laundry load.
ENGLISH
5ZQF
Å
28
HOW TO USE
Following are instructions for starting and using your new dryer. Please refer to specific sections of this manual for
more detailed information.
Sorting Load
Check the Lint Filter Before Every
Load
Fabric care labels
Most articles of clothing feature fabric care labels that
include instructions for proper care.
To clean, pull the lint filter straight up and roll any lint
off the filter with your fingers. Do not rinse or wash the
filter to remove lint. Push the lint filter firmly back into
place. See 3FHVMBS$MFBOJOH for more information.
Fabric care labels
Tumble
dry
Dry
Gentle/
delicate
Always make sure the lint filter is clean before starting a
new load; a clogged lint filter will increase drying times.
Normal
Always ensure the lint filter is properly installed before
running the dryer. Running the dryer with a loose or
missing lint filter will damage the dryer and articles in
the dryer.
Permanent Press/
wrinkle resistant
Do not dry
Do not tumble dry (used with
do not wash)
Heat
setting
High
Medium
Low
No heat/air
Grouping similar items
For best results, sort clothes into loads that can be dried
with the same drying cycle.
Different fabrics have different care requirements, and
some fabrics will dry more quickly than others.
Loading the Dryer
WWARNING
To reduce the risk of fire, electric shock, or injury
to persons when using this appliance, follow basic
precautions, including the following:
t$IFDLBMMQPDLFUTUPNBLFTVSFUIBUUIFZBSF
FNQUZ*UFNTTVDIBTDMJQTQFOTDPJOTBOELFZT
DBOEBNBHFCPUIZPVSESZFSBOEZPVSDMPUIFT
'MBNNBCMFPCKFDUTTVDIBTMJHIUFSTPSNBUDIFT
DPVMEJHOJUFDBVTJOHBGJSF Failure to do so can result
in fire, explosion, or death.
t/FWFSESZDMPUIFTUIBUIBWFCFFOFYQPTFEUPPJM
HBTPMJOFPSPUIFSGMBNNBCMFTVCTUBODFT8BTIJOH
DMPUIFTXJMMOPUDPNQMFUFMZSFNPWFPJMSFTJEVFT
Failure to obey this warning can result in fire, explosion,
or death.
NOTE
Loading tips
t$PNCJOFMBSHFBOETNBMMJUFNTJOBMPBE
t%BNQDMPUIFTXJMMFYQBOEBTUIFZESZ%POPU
overload the dryer; clothes require room to tumble
dry properly.
t$MPTF[JQQFSTIPPLTBOEESBXTUSJOHTUPQSFWFOU
these items from snagging or tangling on other
clothes.
Lint
Filter
HOW TO USE
29
Cycle Settings And Options
NOTE
To protect your garments, not every dryness level,
temperature, or option is available with every cycle.
See the $ZDMF(VJEF for details.
Dry Level
Selects the level of dryness for the cycle. Press the Dry
Level button repeatedly to scroll through available
settings.
t5IJTPQUJPOJTPOMZBWBJMBCMFXJUITFOTPSESZDZDMFT
t5IFESZFSXJMMBVUPNBUJDBMMZBEKVTUUIFDZDMFUJNF
Selecting More Dry or Very Dry will increase the cycle
time, while Less Dry or Damp Dry will decrease the
cycle time.
t6TFB-FTT%SZPS%BNQ%SZTFUUJOHGPSJUFNTUIBUZPV
wish to iron.
Temp.Control
Adjusts the temperature setting from Low to High. This
allows precise care of your fabrics and garments. Press
the Temp.Control button repeatedly to scroll through
available settings. Temp control is not adjustable in
Sensor dry cycles.
Your dryer features several additional cycle options to
customize cycles to meet your individual needs. Certain
PQUJPOCVUUPOTBMTPGFBUVSFBTQFDJBMGVODUJPOTFFUIF
GPMMPXJOHQBHFGPSEFUBJMT
UIBUDBOCFBDUJWBUFECZ
QSFTTJOHBOEIPMEJOHUIBUPQUJPOCVUUPOGPSTFDPOET
To Add Cycle Options to a Cycle:
5VSOPOUIFESZFSBOEQSFTTUIF$ZDMFCVUUPOTUP
select the desired cycle.
6TFUIFDZDMFTFUUJOHTCVUUPOTUPBEKVTUUIFTFUUJOHT
for that cycle.
1SFTTUIFDZDMFPQUJPOCVUUPOT
GPSUIFPQUJPOZPV
would like to add. A confirmation message will be
shown in the display.
1SFTTUIF45"351"64&CVUUPOUPTUBSUUIFDZDMF5IF
dryer will start automatically.
Rack Dry
Use Rack Dry with items, such as wool sweaters, silk, and
lingerie, that should dry flat. Rack Dry can also be used
with items that should not be tumbled dry, such as gym
shoes or stuffed animals.
NOTE
NEVER use the rack with a tumble dry cycle.
To install the drying rack:
8JUIUIFESZFSEPPSPQFOTMJEFUIFSBDLJOUPUIFESZFS
drum.
Time Dry
"MMPXTZPVUPNBOVBMMZTFMFDUUIFESZJOHUJNFGSPN
UPNJOVUFTJONJOVUFJODSFNFOUT6TFUIJTGPS
small loads or to remove wrinkles. Use the More Time/
Less Time buttons to add or reduce the drying time in
NJOVUFJODSFNFOUT
Signal
Adjusts the volume of the Signal or turns off the Signal.
Press the button repeatedly until the desired volume
setting is illuminated.
.BLFTVSFJUJTTFBUFEFWFOMZPOUIFFEHFPGUIFJOOFS
door rim and resting flat on the inside of the dryer.
NOTE
#FTVSFUPSFNPWFUIFESZJOHSBDLBGUFSVTJOHUIF3BDL
Dry cycle.
ENGLISH
Sensor dry cycles have preset settings that are selected
automatically. Manual dry cycles have default settings,
but you may also customize the settings using the cycle
setting buttons. Press the button for that option to view
and select other settings.
30
HOW TO USE
Cycle Settings And Options (cont.)
Damp Dry Signal
With this option, the dryer will signal when the load
JTBQQSPYJNBUFMZESZ5IJTBMMPXTZPVUPSFNPWF
faster- drying lightweight items or items that you would
like to iron or hang while still slightly damp. Press the
Damp Dry Signal button to activate or deactivate Damp
Dry Signal.
NOTE
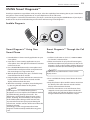
You may save only one custom program at a time.
Pressing and holding the Custom PGM button will
overwrite any previously saved custom program.
To Recall a Custom Program:
5VSOPOUIFESZFS
1SFTTUIF$VTUPN1(.CVUUPO
Wrinkle Care
Selecting this option will tumble the load periodically for
VQUPIPVSTBGUFSUIFTFMFDUFEDZDMFPSVOUJMUIFEPPSJT
opened. This is helpful in preventing wrinkles when you
are unable to remove items from the dryer immediately.
1SFTTUIF45"351"64&CVUUPOUPTUBSUUIFDZDMF
Special Functions
LG’s new steam technology allows you to inject fabrics
with a swirling jet of hot steam to refresh clothes, reduce
static, and make ironing easier.
Simply select the Steam Fresh™ cycle, or you can add a
steam option to selected cycles.
The option buttons also activate special functions,
including Child Lock,. Press and hold the Rack Dry
button marked with the special function.
* Child Lock
Use this option to prevent unwanted use of the dryer
or to keep cycle settings from being changed while the
dryer is operating. Press and hold the Rack Dry button
GPSTFDPOETUPBDUJWBUFPSEFBDUJWBUFUIF$IJME-PDL
function.
The Child Lock icon will be shown in the display, and all
controls are disabled except the POWER button.
NOTE
Once set, Child Lock remains active until it is manually
deactivated. Child Lock must be turned off to run
another cycle. To deactivate Child Lock, press and hold
the Rack Dry button for three seconds.
Custom Program
If you have a special combination of settings that you
use frequently, you can save these settings as a Custom
Program..
* To Save a Custom Program:
5VSOPOUIFESZFSBOEQSFTTUIF$ZDMF#VUUPOTUPTFMFDU
the desired cycle.
6TFUIFDZDMFTFUUJOHCVUUPOTUPBEKVTUUIFTFUUJOHTGPS
that cycle.
1SFTTUIFDZDMFPQUJPOCVUUPOT
GPSUIFPQUJPOZPV
would like to add.
1SFTTBOEIPMEUIF$VTUPN1(.CVUUPOGPSTFDPOET
Steam Functions
Using the Steam Fresh™ cycle
Steam Fresh™ uses the power of steam alone to quickly
reduce wrinkles and odor in fabrics. It brings new life to
wrinkled clothes that have been stored for an extended
time and makes heavily wrinkled clothes easier to iron.
Steam Fresh™ can also be used to help reduce odors in
fabrics.
Using the Wrinkle Free cycle
Use to remove wrinkles, including from loads left in the
dryer too long. This is helpful in preventing wrinkles
when you are unable to remove items from the dryer
immediately.
NOTE
t*GZPVXJMMCFPOWBDBUJPOPSOPUVTJOHZPVSESZFS
for an extended period of time, you should turn off
the water supply to the dryer. This helps to avoid
VOJOUFOEFEGMPPEJOHEVFUPBXBUFSQSFTTVSFTVSHF
while you are away.
MAINTENANCE
31
MAINTENANCE
Cleaning the lint filter
Always clean the lint from the filter after every cycle.
WWARNING
To reduce the risk of fire, electric shock, or injury
to persons when using this appliance, follow basic
precautions, including the following:
t6OQMVHUIFESZFSCFGPSFDMFBOJOHUPBWPJEUIFSJTL
PGFMFDUSJDTIPDL Failure to follow this warning can
cause serious injury, fire, electrical shock, or death.
t/FWFSVTFIBSTIDIFNJDBMTBCSBTJWFDMFBOFSTPS
TPMWFOUTUPDMFBOUIFXBTIFSThey will damage the
finish.
Cleaning the exterior
Proper care of your dryer can extend its life.
The outside of the machine can be cleaned with warm
water and a mild, nonabrasive household detergent.
Immediately wipe off any spills with a soft, damp cloth.
NOTE
Do not use methylated spirits, solvents, or similar
products.
Lint
Filter
To clean, open the dryer door and pull the lint filter
straight up. Then:
'PSFWFSZEBZDMFBOJOHSPMMBOZMJOUPGGUIFGJMUFSXJUI
your fingers, or
Never use steel wool or abrasive cleansers; they can
damage the surface.
Cleaning the interior
Wipe around the door opening and seal with a soft,
damp cloth to prevent lint and dust buildup that could
damage the door seal.
Clean the window with a soft cloth dampened with
warm water and a mild, nonabrasive household
detergent; then wipe dry.
The stainless steel drum can be cleaned with a
conventional stainless steel cleaner, used according to
the manufacturer’s specifications.
Never use steel wool or abrasive cleansers; they can
scratch or damage the surface.
Cleaning around and under the dryer
Vacuum lint and dust from around the dryer and
underneath it regularly. Vent ductwork should be
checked for lint buildup and cleaned at least once per
year. If any noticeable reduction in airflow or drying
performance occurs, immediately check ductwork for
obstructions and blockages.
Maintaining ductwork
Vent ductwork should be checked for lint buildup once
per month and cleaned at least once per year. If any
noticeable reduction in airflow or drying performance
occurs, immediately check ductwork for obstructions
and blockages. Contact a qualified technician or
service provider.
7BDVVNUIFMJOUGJMUFS
*GUIFMJOUGJMUFSIBTCFDPNFWFSZEJSUZPSDMPHHFE
with fabric softener, wash the lint filter in warm,
soapy water and allow to dry thoroughly before
reinstalling.
NOTE
NEVER operate the dryer without the lint filter in
place. NEVER operate the dryer with a wet lint filter.
ENGLISH
Regular Cleaning
32
TROUBLESHOOTING
TROUBLESHOOTING
Before Calling For Service
Your dryer is equipped with an automatic error-monitoring system to detect and diagnose problems at an early
stage. If your dryer does not function properly or does not function at all, check the following before you call for
service.
Problem
Possible Causes
Solutions
Dryer will not
turn on
t1PXFSDPSEJTOPUQSPQFSMZ
plugged in.
t)PVTFGVTFJTCMPXODJSDVJU
breaker has tripped, or power
outage has occurred.
t.BLFTVSFUIBUUIFQMVHJTQMVHHFETFDVSFMZJOUPB
grounded outlet matching the dryer’s rating plate.
t3FTFUDJSDVJUCSFBLFSPSSFQMBDFGVTF%POPUJODSFBTF
fuse capacity. If the problem is a circuit overload, have it
corrected by a qualified electrician.
Dryer does
not heat
t)PVTFGVTFJTCMPXODJSDVJU
breaker has tripped, or power
outage has occurred.
t(BTTVQQMZPSTFSWJDFUVSOFEPGG
(gas models only).
t3FTFUDJSDVJUCSFBLFSPSSFQMBDFGVTF%POPUJODSFBTF
fuse capacity. If the problem is a circuit overload, have it
corrected by a qualified electrician.
t$POGJSNUIBUUIFIPVTFHBTTIVUPGGBOEUIFESZFSHBT
shutoff are both fully open.
(SFBTZPSEJSUZ t'BCSJDTPGUFOFSVTFEJODPSSFDUMZ
t$MFBOBOEEJSUZDMPUIFTCFJOH
spots
dried together.
on clothes
t$POGJSNBOEGPMMPXUIFJOTUSVDUJPOTQSPWJEFEXJUIZPVS
fabric softener.
t.BLFTVSFUPVTFZPVSESZFSUPESZPOMZDMFBOJUFNT
because dirty items can soil clean clothes placed in the
same or subsequent loads.
t4UBJOTPOESJFEDMPUIFTBSFBDUVBMMZTUBJOTUIBUXFSFOPU
removed during the washing process.
.BLFTVSFUIBUDMPUIFTBSFCFJOHDPNQMFUFMZDMFBOFE
according to the instructions for your washer and
detergent.
Display shows
error
code tE1 or tE2
t5IFSNJTUPSJTNBMGVODUJPOJOH
Lint on clothes t-JOUGJMUFSOPUDMFBOFEQSPQFSMZ
t-BVOESZOPUTPSUFEQSPQFSMZ
t&YDFTTTUBUJDJODMPUIFT
t%SZFSJTPWFSMPBEFE
t5JTTVFQBQFSFUDMFGUJOQPDLFUT
&YDFTTTUBUJDJO
clothes after
drying
t'BCSJDTPGUFOFSOPUVTFEPSVTFE
incorrectly.
t$MPUIFTESJFEUPPMPOH
(overdried).
t%SZJOHTZOUIFUJDTQFSNBOFOU
press, or synthetic blends.
t5VSOPGGUIFESZFSBOEDBMMGPSTFSWJDF
t.BLFTVSFUIFMJOUGJMUFSJTDMFBOFECFGPSFFWFSZMPBE8JUI
some loads that produce high amounts of lint, it may be
necessary to clean the filter during the cycle.
t4PNFGBCSJDTBSFMJOUQSPEVDFSTJFBGV[[ZXIJUFDPUUPO
towel) and should be dried separately from clothes that
are lint trappers (i.e., a pair of black linen pants).
t4FFUIF&YDFTTTUBUJDJODMPUIFTBGUFSESZJOHTFDUJPOCFMPX
t%JWJEFMBSHFSMPBETJOUPTNBMMFSMPBETGPSESZJOH
t$IFDLQPDLFUTUIPSPVHIMZCFGPSFXBTIJOHBOEESZJOH
clothes.
t6TFBGBCSJDTPGUFOFSUPSFEVDFTUBUJDFMFDUSJDJUZDPSSFDUMZ
Do not use fabric softeners or products to eliminate static
unless recommended by the manufacturer of the fabric
softener or product.
t0WFSESZJOHBMPBEPGMBVOESZDBODBVTFBCVJMEVQPGTUBUJD
electricity. Adjust settings and use a shorter drying time,
PSVTF4&/403%3:DZDMFT
t5IFTFNBUFSJBMTDBODBVTFTUBUJDCVJMEVQ5SZVTJOHBGBCSJD
softener.
TROUBLESHOOTING
33
Before Calling For Service (cont.)
$MPUIFTBSF
wrinkled
Possible Causes
t$MPUIFTESJFEUPPMPOH
(overdried).
t$MPUIFTMFGUJOESZFSUPPMPOH
after cycle ends.
Solutions
t0WFSESZJOHBMPBEPGMBVOESZDBOMFBEUPXSJOLMFEDMPUIFT
5SZBTIPSUFSESZJOHUJNFBOESFNPWFJUFNTXIJMFUIFZ
still retain a slight amount of moisture.
t3FNPWFJUFNTGSPNUIFESZFSJNNFEJBUFMZBUUIFFOE
PGUIFDZDMF6TFUIF8SJOLMF$BSFPQUJPOUPDPOUJOVF
tumbling clothes at the end of the cycle, for up to 3 hours.
Drying time is
not consistent
t)FBUTFUUJOHTMPBETJ[FPS
dampness of clothing is not
consistent.
t5IFESZJOHUJNFGPSBMPBEXJMMWBSZEFQFOEJOHPOUIFIFBU
TFUUJOHUIFUZQFPGIFBUVTFEFMFDUSJDOBUVSBMHBTPS-1
HBT
UIFTJ[FPGUIFMPBEUIFUZQFPGGBCSJDTUIFXFUOFTT
PGUIFDMPUIFTBOEUIFDPOEJUJPOPGUIFFYIBVTUEVDUTBOE
lint filter.
$MPUIFTUBLF
too long to dry
t-PBEJTOPUQSPQFSMZTPSUFE
t4FQBSBUFIFBWZJUFNTGSPNMJHIUXFJHIUJUFNT-BSHFSBOE
heavier items take longer to dry.
t)FBWZGBCSJDTUBLFMPOHFSUPESZCFDBVTFUIFZUFOEUP
SFUBJONPSFNPJTUVSF5PIFMQSFEVDFBOENBJOUBJONPSF
consistent drying times for large and heavy fabrics,
separate these items into smaller loads of a consistent
TJ[F
t6TFUIFBQQSPQSJBUFDPOUSPMTFUUJOHTGPSUIFUZQFPGMPBE
you are drying.
t.BLFTVSFUIFMJOUGJMUFSJTDMFBOFECFGPSFFWFSZMPBE8JUI
some loads that produce high amounts of lint, it may be
necessary to clean the filter during the cycle.
t$POGJSNUIBUUIFFYIBVTUEVDUXPSLJTQSPQFSMZDPOGJHVSFE
BOEGSFFPGEFCSJTMJOUBOEPCTUSVDUJPOT.BLFTVSFUIBU
outside wall dampers can open properly and are not
blocked, jammed, or damaged.
t3FTFUDJSDVJUCSFBLFSPSSFQMBDFGVTF%POPUJODSFBTF
fuse capacity. If the problem is a circuit overload, have it
corrected by a qualified electrician.
t%JWJEFMBSHFSMPBETJOUPTNBMMFSMPBETGPSESZJOH
t*GZPVBSFESZJOHBWFSZTNBMMMPBEBEEBGFXFYUSBJUFNT
to ensure proper tumbling action.
t-BSHFMPBEPGIFBWZGBCSJDT
t%SZFSDPOUSPMTBSFOPUTFU
properly.
t-JOUGJMUFSOFFETUPCFDMFBOFE
t&YIBVTUEVDUTCMPDLFEEJSUZPS
duct run is too long.
t)PVTFGVTFJTCMPXODJSDVJU
breaker has tripped, or power
outage has occurred.
t%SZFSJTPWFSMPBEFE
t%SZFSJTVOEFSMPBEFE
$MPUIFTBSF
shrinking
t(BSNFOUDBSFJOTUSVDUJPOTBSF
not being followed.
t5PBWPJETISJOLBHFQMFBTFDBSFGVMMZGPMMPXUIFGBCSJD
care instructions for your garment, because some fabrics
XJMMOBUVSBMMZTISJOLXIFOXBTIFE0UIFSGBCSJDTDBOCF
XBTIFECVUXJMMTISJOLXIFOESJFEJOBESZFS6TFBMPXPS
no heat setting.
(BSNFOUTTUJMM
wrinkled after
4UFBN'SFTI
t5PPNBOZPSUPPEJGGFSFOUUZQFT
of garments in dryer.
t4NBMMMPBETPGUPJUFNTXPSLCFTU
t-PBEGFXFSHBSNFOUT-PBETJNJMBSUZQFHBSNFOUT
ENGLISH
Problem
34
SPECIFICATIONS
Before Calling For Service (cont.)
1SPCMFN
1PTTJCMF$BVTFT
4PMVUJPOT
There are no
creases left on
garment after
Steam Fresh™
t5IFGVODUJPOPGUIJTDZDMFJTUP
remove wrinkles from fabric.
t6TFBOJSPOUPNBLFDSFBTFT
Odors remain
in clothing after
Steam Fresh™
t4UFBN'SFTIEJEOPUSFNPWF
odor completely.
t'BCSJDTDPOUBJOJOHTUSPOHPEPSTTIPVMECFXBTIFEJOB
normal cycle.
Flow Sense™
indicator
shows four
bars during the
drying cycle
t%VDUXPSLJTUPPMPOHPSIBTUPP
many turns/restrictions.
t4JHOJGJDBOUCMPDLBHFPGUIF
ductwork due to lint buildup or
debris.
t5IFBQQMJBODFIBTEFUFDUFEB
restriction in the external dryer
venting.
t*OTUBMMBTIPSUFSPSTUSBJHIUFSEVDUSVO4FFUIF*OTUBMMBUJPO
Instructions.
The display
shows
iEwiEw
t5IFEVDUXPSLJTBCPVU t%POPUVTFUIFESZFSVOUJMUIFFYIBVTUTZTUFNIBTCFFO
blocked.
cleaned and/or repaired. Using the dryer with a severely
iEwPSiEwFSSPSDPEF
restricted exhaust is dangerous and could result in a fire
EJTQMBZFEIPVSTPOMZ
or other property damage.
t)PVTFFYIBVTUTZTUFNCMPDLFE
t$IFDLUIFPVUTJEFESZFSWFOUXIJMFUIFESZFSJTPQFSBUJOH
to make sure there is strong airflow.
t*GUIFFYIBVTUTZTUFNJTFYUSFNFMZMPOHIBWFJUSFQBJSFEPS
rerouted.
t,FFQUIFBSFBBSPVOEUIFESZFSDMFBOBOEGSFFPGDMVUUFS
t$IFDLWFOUIPPEGPSEBNBHFPSMJOUDMPHHJOH
t.BLFTVSFUIFBSFBBSPVOEUIFWFOUIPPEJTDMFBS
t%VDUXPSLTIPVMECFDIFDLFEDMFBOFETPPO
Dryer can be used in this condition, but drying times may
be longer.
t*GFYIBVTUSFTUSJDUJPOTBSFTFOTFECZUIF'MPX4FOTF
system, the indicator will remain on for two hours after
the end of the cycle. Opening the door or pressing the
POWER button will turn off the display.
SPECIFICATIONS
4UFBN%SZFS.PEFMT%-&:%-(:
Description
Steam Dryer
Electrical requirements
Please refer to the rating label regarding detailed information.
Gas requirements
/(JODIFT8$
-1oJODIFT8$(BT.PEFMTPOMZ
Max. water pressure
_QTJ_L1B
Dimensions
w8
9/w%
9/w)
/w%XJUIEPPSPQFO
DN8
9DN%
9DN)
DN%XJUIEPPSPQFO
Net weight
(BTESZFSMCTLH
&MFDUSJDESZFSMCTLH
Drying capacity
- Normal cycle
*&$DVGUMCLH
USING SMART DIAGNOSIS™
35
USING Smart Diagnosis™
Audible Diagnosis
Smart Diagnosis™ Using Your
Smart Phone
Smart Diagnosis™ Through the Call
Center
%PXOMPBEUIF-(4NBSU-BVOESZBQQMJDBUJPOPOZPVS
smart phone.
$BMMUIF-(DBMMDFOUFSBU-(64
-($BOBEB
0QFOUIF-(4NBSU-BVOESZBQQMJDBUJPOPOZPVS
smart phone. Press the right arrow button to advance
to the next screen.
8IFOJOTUSVDUFEUPEPTPCZUIFDBMMDFOUFSBHFOU
hold the mouthpiece of your phone over the Smart
Diagnosis™ logo on the machine. Hold the phone no
NPSFUIBOPOFJODICVUOPUUPVDIJOH
UIFNBDIJOF
1SFTTUIF3&$03%CVUUPOPOUIFTNBSUQIPOFBOE
then hold the mouth piece of the smart phone near
the Smart Diagnosis™ logo on the dryer.
8JUIUIFQIPOFIFMEJOQMBDFQSFTTBOEIPME5FNQ
Control button for three seconds.
,FFQUIFQIPOFJOQMBDFVOUJMUIFUPOFUSBOTNJTTJPO
IBTGJOJTIFE5IJTUBLFTBCPVUTFDPOETBOEUIF
display will count down the time.
8IFOUIFSFDPSEJOHJTDPNQMFUFWJFXUIFEJBHOPTJT
by pressing the Next button on the phone.
NOTE
Smart Diagnosis is a troubleshooting feature
designed to assist, not replace, the traditional method
of troubleshooting through service calls. The
effectiveness of this feature depends upon various
factors, including, but not limited to, the reception
of the cellular phone being used for transmission,
any external noise that may be present during the
transmission, and the acoustics of the room where the
machine is located.
Accordingly, LG does not guarantee that Smart
Diagnosis would accurately troubleshoot any given
issue.
NOTE
Do not touch any other buttons or icons on the
display screen.
1SFTTBOEIPMEUIF5FNQ$POUSPMCVUUPOGPSUISFF
seconds.
,FFQUIFQIPOFJOQMBDFVOUJMUIFUPOFUSBOTNJTTJPO
IBTGJOJTIFE5IJTUBLFTBCPVUTFDPOETBOEUIF
display will count down the time.
0ODFUIFDPVOUEPXOJTPWFSBOEUIFUPOFTIBWF
stopped, resume your conversation with the call
center agent, who will then be able to assist you in
using the information transmitted for analysis.
ENGLISH
Should you experience any problems with your dryer, it has the capability of transmitting data to your Smart Phone
using the LG Smart Laundry Application or via your telephone to the LG call center.
Smart Diagnosis™ cannot be activated unless your dryer is turned on by pressing the POWER button. If your dryer is
unable to turn on, then troubleshooting must be done without using Smart Diagnosis™.
36
WARRANTY
-(&-&$530/*$4$"/"%"*/$
-(%3:&3-*.*5&%8"33"/5:$BOBEB
WARRANTY:Ê-
Õ`ÊÞÕÀÊÊÀÞiÀʺ*À`ÕVÌ»®Êv>Ê`ÕiÊÌÊ>Ê`iviVÌÊÊ>ÌiÀ>ÊÀÊÜÀ>Ã
«ÊÕ`iÀÊÀ>Ê
iÊÕÃiÊ`ÕÀ}ÊÌ
iÊÜ>À
À>ÌÞÊ«iÀ`ÊÃiÌÊvÀÌ
ÊLiÜ]ÊÊ
>>`>ÊÜÊ>ÌÊÌÃÊ«ÌÊÀi«>ÀÊÀÊÀi«>ViÊÌ
iÊ*À`ÕVÌÊÕ«ÊÀiVi«ÌÊvÊ«ÀvÊvÊÀ}>ÊÀiÌ>Ê«ÕÀV
>Ãi°Ê
/
ÃÊÜ>ÀÀ>ÌÞÊÃÊÛ>`ÊÞÊÌÊÌ
iÊÀ}>ÊÀiÌ>Ê«ÕÀV
>ÃiÀÊvÊÌ
iÊ«À`ÕVÌÊ>`Ê>««iÃÊÞÊÌÊ>Ê*À`ÕVÌÊ`ÃÌÀLÕÌi`ÊÊ
>>`>ÊLÞÊÊ
>>`>ÊÀÊ>Ê>ÕÌ
Àâi`Ê
>>`>Ê`ÃÌÀLÕÌÀÊÌ
iÀiv°Ê/
iÊÜ>ÀÀ>ÌÞÊÞÊ>««iÃÊÌÊ*À`ÕVÌÃÊV>Ìi`Ê>`ÊÕÃi`ÊÜÌ
Ê
>>`>°
WARRANTY PERIOD: (Note: If the original date of purchase can not be verified, the warranty will
begin sixty (60) days from the date of manufacture).
Dryer
One (1) year from the date of original retail purchase
*>ÀÌÃÊ>`Ê>LÀÊÌiÀ>ÉvÕVÌ>Ê«>ÀÌÃÊÞ®
UÊÊ,i«>ViiÌÊ«À`ÕVÌÃÊ>`Ê«>ÀÌÃÊ>ÀiÊÜ>ÀÀ>Ìi`ÊvÀÊÌ
iÊÀi>}Ê«ÀÌÊvÊÌ
iÊÀ}>ÊÜ>ÀÀ>ÌÞÊ«iÀ`ÊÀÊiÌÞÊä®Ê`>ÞÃ]ÊÜ
V
iÛiÀÊ
ÃÊ}Ài>ÌiÀ°
UÊ,i«>ViiÌÊ«À`ÕVÌÃÊ>`Ê«>ÀÌÃÊ>ÞÊLiÊiÜÊÀÊÀi>Õv>VÌÕÀi`°
UÊÊÕÌ
Àâi`Ê-iÀÛViÊ
iÌiÀÊÜ>ÀÀ>ÌiÃÊÌ
iÀÊÀi«>ÀÊÜÀÊvÀÊÌ
ÀÌÞÊÎä®Ê`>Þð
LG CANADA’S SOLE LIABILITY IS LIMITED TO THE WARRANTY SET OUT ABOVE. EXCEPT AS EXPRESSLY PROVIDED ABOVE, LG CANADA
MAKES NO AND HEREBY DISCLAIMS ALL OTHER WARRANTIES AND CONDITIONS RESPECTING THE PRODUCT, WHETHER EXPRESS OR IMPLIED, INCLUDING, BUT NOT LIMITED TO, ANY IMPLIED WARRANTY OR CONDITION OF MERCHANTABILITY OR FITNESS FOR A PARTICULAR
PURPOSE, AND NO REPRESENTATIONS SHALL BE BINDING ON LG CANADA. LG CANADA DOES NOT AUTHORIZE ANY
PERSON TO CREATE OR ASSUME FOR IT ANY OTHER WARRANTY OBLIGATION OR LIABILITY IN CONNECTION WITH THE PRODUCT. TO THE
EXTENT THAT ANY WARRANTY OR CONDITION IS IMPLIED BY LAW, IT IS LIMITED TO THE EXPRESS WARRANTY PERIOD ABOVE.
LG CANADA, THE MANUFACTURER OR DISTRIBUTOR SHALL NOT BE LIABLE FOR ANY INCIDENTAL, CONSEQUENTIAL, SPECIAL, DIRECT OR
INDIRECT DAMAGES, LOSS OF GOODWILL, LOST PROFITS, PUNITIVE OR EXEMPLARY DAMAGES OR ANY OTHER DAMAGE, WHETHER ARISING DIRECTLY OR INDIRECTLY FROM ANY CONTRACTUAL BREACH, FUNDAMENTAL OR OTHERWISE, OR FROM ANY ACTS OR
OMISSIONS, TORT, OR OTHERWISE.
/
ÃÊÜ>ÀÀ>ÌÞÊ}ÛiÃÊÞÕÊëiVwVÊi}>ÊÀ}
ÌðÊ9ÕÊ>ÞÊ
>ÛiÊÌ
iÀÊÀ}
ÌÃÊÜ
V
Ê>ÞÊÛ>ÀÞÊvÀÊ«ÀÛViÊÌÊ«ÀÛViÊ`i«i`}ÊÊ>««V>LiÊ«ÀÛV>Ê
>ÜðÊÊÞÊÌiÀÊvÊÌ
ÃÊÜ>ÀÀ>ÌÞÊÌ
>ÌÊi}>ÌiÃÊÀÊÛ>ÀiÃÊ>ÞÊ«i`ÊV`ÌÊÀÊÜ>ÀÀ>ÌÞÊÕ`iÀÊ«ÀÛV>Ê>ÜÊÃÊÃiÛiÀ>LiÊÜ
iÀiÊÌÊVyVÌÃÊÜÌ
ÊÊ
«ÀÛV>Ê>ÜÊÜÌ
ÕÌÊ>vviVÌ}ÊÌ
iÊÀi>`iÀÊvÊÌ
ÃÊÜ>ÀÀ>ÌÞ½ÃÊÌiÀðÊ
THIS LIMITED WARRANTY DOES NOT COVER:
£°ÊÊ-iÀÛViÊÌÀ«ÃÊÌÊ`iÛiÀ]Ê«VÊÕ«]ÊÀÊÃÌ>ÊÌ
iÊ«À`ÕVÌÆÊÃÌÀÕVÌ}Ê>ÊVÕÃÌiÀÊÊ«iÀ>ÌÊvÊÌ
iÊ«À`ÕVÌÆÊÀi«>ÀÊÀÊÀi«>ViiÌÊvÊvÕÃiÃÊÀÊÊ
VÀÀiVÌÊvÊÜÀ}Ê]ÊÀÊVÀÀiVÌÊvÊÕ>ÕÌ
Àâi`ÊÀi«>ÀÃÉÃÌ>>Ì°
Ó°ÊÊ>ÕÀiÊvÊÌ
iÊ«À`ÕVÌÊÌÊ«iÀvÀÊ`ÕÀ}Ê«ÜiÀÊv>ÕÀiÃÊ>`ÊÌiÀÀÕ«ÌÃÊÀÊ>`iµÕ>ÌiÊiiVÌÀV>ÊÃiÀÛVi°
ΰÊÊ>>}iÊV>ÕÃi`ÊLÞÊi>ÞÊÀÊLÀiÊÜ>ÌiÀÊ««iÃ]ÊvÀâiÊÜ>ÌiÀÊ««iÃ]ÊÀiÃÌÀVÌi`Ê`À>ÊiÃ]Ê>`iµÕ>ÌiÊÀÊÌiÀÀÕ«Ìi`ÊÜ>ÌiÀÊÃÕ««ÞÊÀÊ>`iµÕ>ÌiÊÃÕ««ÞÊvÊ>À°
{°ÊÊ>>}iÊÀiÃÕÌ}ÊvÀÊ«iÀ>Ì}ÊÌ
iÊ*À`ÕVÌÊÊ>ÊVÀÀÃÛiÊ>Ìë
iÀiÊÀÊVÌÀ>ÀÞÊÌÊÌ
iÊÃÌÀÕVÌÃÊÕÌi`ÊÊÌ
iÊ*À`ÕVÌÊÜiÀ½ÃÊ>Õ>°
x°ÊÊ>>}iÊÌÊÌ
iÊ*À`ÕVÌÊV>ÕÃi`ÊLÞÊ>VV`iÌÃ]Ê«iÃÌÃÊ>`ÊÛiÀ]Ê}
Ì}]ÊÜ`]ÊwÀi]Êy`Ã]ÊÀÊ>VÌÃÊvÊ`°
È°ÊÊ>>}iÊÀiÃÕÌ}ÊvÀÊÌ
iÊÃÕÃi]Ê>LÕÃi]Ê«À«iÀÊÃÌ>>Ì]ÊÀi«>À]ÊÀÊ>Ìi>ViÊvÊÌ
iÊ*À`ÕVÌ°ÊÊ«À«iÀÊÀi«>ÀÊVÕ`iÃÊÕÃiÊvÊ«>ÀÌÃÊÌÊ>««ÀÛi`ÊÀÊ
ëiVwi`ÊLÞÊÊ
>>`>°
Ç°ÊÊ>>}iÊÀÊ«À`ÕVÌÊv>ÕÀiÊV>ÕÃi`ÊLÞÊÕ>ÕÌ
Àâi`Ê`wV>ÌÊÀÊ>ÌiÀ>Ì]ÊÀÊÕÃiÊvÀÊÌ
iÀÊÌ
>ÊÌÃÊÌi`i`Ê«ÕÀ«Ãi]ÊÀÊÀiÃÕÌ}ÊvÀÊ>ÞÊÜ>ÌiÀÊi>>}iÊ
`ÕiÊÌÊ«À«iÀÊÃÌ>>Ì°
n°ÊÊ>>}iÊÀÊ*À`ÕVÌÊv>ÕÀiÊV>ÕÃi`ÊLÞÊVÀÀiVÌÊiiVÌÀV>ÊVÕÀÀiÌ]ÊÛÌ>}i]ÊViÀV>ÊÀÊ`ÕÃÌÀ>ÊÕÃi]ÊÀÊÕÃiÊvÊ>VViÃÃÀiÃ]ÊV«iÌÃ]ÊÀÊVi>}Ê«À`
ÕVÌÃÊÌ
>ÌÊ>ÀiÊÌÊ>««ÀÛi`ÊLÞÊÊ
>>`>°
°ÊÊ>>}iÊV>ÕÃi`ÊLÞÊÌÀ>ëÀÌ>ÌÊ>`Ê
>`}]ÊVÕ`}ÊÃVÀ>ÌV
iÃ]Ê`iÌÃ]ÊV
«Ã]Ê>`ÉÀÊÌ
iÀÊ`>>}iÊÌÊÌ
iÊwÃ
ÊvÊÞÕÀÊ«À`ÕVÌ]ÊÕiÃÃÊÃÕV
Ê`>>}iÊ
ÀiÃÕÌÃÊvÀÊ`iviVÌÃÊÊ>ÌiÀ>ÃÊÀÊÜÀ>Ã
«Ê>`ÊÃÊÀi«ÀÌi`ÊÜÌ
ÊiÊ£®ÊÜiiÊvÊ`iÛiÀÞ°
£ä°ÊÊ>>}iÊÀÊÃÃ}ÊÌiÃÊÌÊ>ÞÊ`ë>Þ]Ê«iÊLÝ]Ê`ÃVÕÌi`]ÊÀÊÀivÕÀLÃ
i`Ê*À`ÕVÌ°
££°ÊÊ*À`ÕVÌÃÊÜÌ
ÊÀ}>ÊÃiÀ>ÊÕLiÀÃÊÌ
>ÌÊ
>ÛiÊLiiÊÀiÛi`]Ê>ÌiÀi`]ÊÀÊV>ÌÊLiÊÀi>`ÞÊ`iÌiÀi`°ÊÊ`iÊ>`Ê-iÀ>ÊÕLiÀÃ]Ê>}ÊÜÌ
ÊÀ}>ÊÀiÌ>Ê
Ã>iÃÊÀiVi«Ì]Ê>ÀiÊÊÀiµÕÀi`ÊvÀÊÜ>ÀÀ>ÌÞÊÛ>`>Ì°
£Ó°ÊÊÊVÀi>ÃiÃÊÊÕÌÌÞÊVÃÌÃÊ>`Ê>``Ì>ÊÕÌÌÞÊiÝ«iÃiðÊÊ,i«>ViiÌÊvÊ}
ÌÊLÕLÃ]ÊwÌiÀÃ]ÊÀÊ>ÞÊVÃÕ>LiÊ«>ÀÌðÊ,i«>ÀÃÊÜ
iÊÞÕÀÊ*À`ÕVÌÊÃÊÕÃi`ÊÊ
Ì
iÀÊÌ
>ÊÀ>Ê>`ÊÕÃÕ>Ê
ÕÃi
`ÊÕÃiÊVÕ`}]ÊÜÌ
ÕÌÊÌ>Ì]ÊViÀV>ÊÕÃi]ÊÊvwViÃÊÀÊÀiVÀi>Ì>Êv>VÌiîÊÀÊVÌÀ>ÀÞÊÌÊÌ
iÊÃÌÀÕVÌÃÊ
ÕÌi`ÊÊÌ
iÊ*À`ÕVÌÊÜiÀ½ÃÊ>Õ>°
£x°ÊÊ
ÃÌÃÊ>ÃÃV>Ìi`ÊÜÌ
ÊÀiÛ>ÊvÊÌ
iÊ*À`ÕVÌÊvÀÊÞÕÀÊ
iÊvÀÊÀi«>Àð
£È°Ê/
iÊÀiÛ>Ê>`ÊÀiÃÌ>>ÌÊvÊÌ
iÊ*À`ÕVÌÊvÊÌÊÃÊÃÌ>i`ÊÊ>Ê>VViÃÃLiÊV>ÌÊÀÊÃÊÌÊÃÌ>i`ÊÊ>VVÀ`>ViÊÜÌ
ÊÊ«ÕLÃ
i`ÊÃÌ>>ÌÊÃÌÀÕV
ÌÃ]ÊVÕ`}ÊÌ
iÊ*À`ÕVÌÊÜiÀ½ÃÊ>`ÊÃÌ>>ÌÊ>Õ>ðÊ
£Ç°ÊÊVViÃÃÀiÃÊÌÊÌ
iÊ*À`ÕVÌÊÃÕV
Ê>ÃÊ`ÀÊLÃ]Ê`À>ÜiÀÃ]Ê
>`iÃ]ÊÃ
iÛiÃ]ÊiÌV°°ÊÃÊiÝVÕ`i`Ê>ÀiÊ«>ÀÌÃÊLiÃ`iÃÊÌ
ÃiÊÌ
>ÌÊÜiÀiÊÀ}>ÞÊVÕ`i`ÊÜÌ
ÊÌ
iÊ
*À`ÕVÌ°
All costs associated with the above excluded circumstances shall be borne by the consumer.
Write your warranty information below:
For complete warranty details and customer
assistance, please call or visit our website:
Product Registration Information:
ÊÊÊÊÊÊ
>Ê£nnnx{ÓÓÈÓÎÊÓ{Ê
ÕÀÃÊ>Ê`>Þ]ÊÎÈxÊ`>ÞÃÊ
>ÊÞi>À®Ê>`ÊÃiiVÌÊÌ
iÊ>««À«À>ÌiÊ«ÌÊvÀÊ
Model:
Ì
iÊiÕ]ÊÀÊÛÃÌÊÕÀÊÜiLÃÌiÊ>ÌÊ
ÌÌ«\ÉÉÜÜÜ°
Serial Number:
}°V>
Date of Purchase:
FRANÇAIS
MODE D’EMPLOI
SÉCHEUSE
Veuillez lire attentivement ce mode d’emploi avant d’utiliser la sécheuse et
conservez-le à proximité pour référence future.
DLEY1701*
DLGY1702*
www.lg.com
2
TABLE DES MATIÈRES
TABLE DES MATIÈRES
3
IMPORTANTES INSTRUCTIONS DE
SÉCURITÉ
26
MODE D’EMPLOI
26
3
CE QU’IL FAUT FAIRE SI VOUS DÉTECTEZ
UNE ODEUR DE GAZ
PRÉCAUTIONS DE SÉCURITÉ DE BASE
INSTRUCTIONS DE MISE À LA TERRE
INSTRUCTIONS DE SÉCURITÉ POUR
L’INSTALLATION
INSTRUCTIONS DE SÉCURITÉ POUR LE
RACCORDEMENT À L’ÉLECTRICITÉ
27
28
28
28
29
30
30
30
Fonctionnement de la sécheuse
Guide des cycles
Triage des brassées
Chargement de la sécheuse
Vérification du filtre à charpie avant chaque
brassée
Paramètres et options du cycle
Fonctions spéciales
Programme personnalisé (Custom program)
Fonctions de vapeur
31
ENTRETIEN
4
5
5
7
8
CARACTÉRISTIQUES SPÉCIALES
9
PIÈCES ET CARACTÉRISTIQUES
31
Nettoyage régulier
9
9
10
11
Composants
Accessoires
Caractéristiques du panneau de commande
Afficheur
32
DÉPANNAGE
32
Avant d’appeler le service
12
INSTRUCTIONS D’INSTALLATION
34
CARACTÉRISTIQUES
12
13
Aperçu de l’ordre d’installation
Conditions requises pour l’emplacement
d’installation
Dégagements
Mise à niveau de la sécheuse
Porte réversible
Modification de l’emplacement de la sortie
d’air
Ventilation de la sécheuse
Raccordement du tuyau d’arrivée d’eau
Raccordement des sécheuses à gaz
Raccordement des sécheuses électriques
Exigences particulières pour les maisons
mobiles ou préfabriquées
Vérification finale de l’installation
Test d’installation (vérification du conduit)
35
UTILISATION DE SMART DIAGNOSISMC
36
GARANTIE
13
14
15
16
17
19
20
22
23
23
24
IMPORTANTES INSTRUCTIONS DE SÉCURITÉ
3
IMPORTANTES INSTRUCTIONS DE SÉCURITÉ
LISEZ TOUTES LES DIRECTIVES AVANT D’UTILISER L’APPAREIL
WAVERTISSEMENT
Votre sécurité et la sécurité des autres sont très importantes.
Ce manuel contient de nombreux messages relatifs à la sécurité et à votre appareil.
Lisez toujours et suivez toujours toutes les instructions relatives à votre sécurité.
W
C’est le symbole d’alerte à la sécurité. Ce symbole vous alerte des dangers potentiels qui peuvent tuer ou
blesser les autres personnes ou vous-même. Tous les messages relatifs à la sécurité suivent le symbole
d’alerte à la sécurité et le mot DANGER, AVERTISSEMENT ou ATTENTION.
Ces mots signifient :
WDANGER
Vous pouvez être tué ou grièvement blessé si vous ne suivez pas immédiatement les instructions.
WAVERTISSEMENT
Vous pouvez être tué ou grièvement blessé si vous ne suivez pas les instructions.
WATTENTION
Vous pouvez être blessé ou endommager le produit si vous ne suivez pas les instructions.
Tous les messages relatifs à la sécurité vous diront la nature du danger potentiel, comment réduire le risque de
blessure et ce qui peut se produire si vous ne suivez pas les instructions.
t/JOTUBMMF[QBTVOFTÏDIFVTFBWFDEFTNBUÏSJBVYEFWFOUJMBUJPOFOQMBTUJRVFGMFYJCMFT4JWPVTJOTUBMMF[
un conduit en métal flexible (de type feuille métallique), celui-ci doit être d’un type précis identifié par le
fabricant comme convenant à une utilisation avec une sécheuse. Les matériaux de ventilation flexibles sont
susceptibles de se déformer, d’être écrasés facilement et de retenir les charpies. Ces conditions peuvent
obstruer la circulation de l’air de la sécheuse et accroître le risque d’incendie.
t/FSBOHF[FUOVUJMJTF[QBTEFTTFODFPVEBVUSFTWBQFVSTFUMJRVJEFTJOGMBNNBCMFTQSÒTEFDFUBQQBSFJMPV
de tout autre appareil électroménager.
t-JOTUBMMBUJPOFUMFOUSFUJFOEPJWFOUÐUSFFGGFDUVÏTQBSVOJOTUBMMBUFVSRVBMJGJÏVOFBHFODFEFTFSWJDFPVMF
fournisseur de gaz.
t*OTUBMMF[MBTÏDIFVTFDPOGPSNÏNFOUBVYJOTUSVDUJPOTEVGBCSJDBOUFUËMBSÏHMFNFOUBUJPOMPDBMF
t$POTFSWF[DFTJOTUSVDUJPOT
$&26*-'"65'"*3&4*7064%²5&$5&;6/&0%&63%&(";
/FTTBZF[QBTEFHSBUUFSVOFBMMVNFUUFEBMMVNFSVOFDJHBSFUUFPVEFNFUUSFTPVTUFOTJPOVO
électroménager à gaz ou électrique.
/FUPVDIF[ËBVDVOJOUFSSVQUFVSÏMFDUSJRVF/VUJMJTF[BVDVOUÏMÏQIPOFEFWPUSFÏEJGJDF
²WBDVF[UPVUFQFSTPOOFQSÏTFOUFEBOTMBQJÒDFMÏEJGJDFPVMB[POFËQSPYJNJUÏ
"QQFMF[JNNÏEJBUFNFOUWPUSFGPVSOJTTFVSEFHB[BWFDMFUÏMÏQIPOFEVOWPJTJO4VJWF[BUUFOUJWFNFOUMFT
directives du fournisseur de gaz.
4JWPVTOFQPVWF[QBTSFKPJOESFWPUSFGPVSOJTTFVSEFHB[BQQFMF[MFTFSWJDFEJODFOEJF
WAVERTISSEMENT: Ce produit contient des produits chimiques reconnus par l’État de la Californie pour
provoquer des cancers et des malformations congénitales ou d’autres problèmes de reproduction. Lavez-vous les
mains après l’avoir manipulé.
FRANÇAIS
Pour votre sécurité, vous devez suivre l’information contenue dans ce manuel afin de réduire les risques
d’incendie et d’explosion, de choc électrique, ainsi que pour éviter les dommages matériels, les blessures
corporelles ou un décès.
4
IMPORTANTES INSTRUCTIONS DE SÉCURITÉ
IMPORTANTES INSTRUCTIONS DE SÉCURITÉ
LISEZ TOUTES LES DIRECTIVES AVANT D’UTILISER L’APPAREIL
WAVERTISSEMENT
Pour votre sécurité, vous devez suivre l’information contenue dans ce manuel afin de réduire les risques
d’incendie et d’explosion, de choc électrique, ainsi que pour éviter les dommages matériels, les blessures
corporelles ou un décès.
13²$"65*0/4%&4²$63*5²%&#"4&
WAVERTISSEMENT
Afin de réduire les risques d’incendie, de choc électrique, ou les blessures corporelles lorsque vous utilisez cet
électroménager, vous devez toujours suivre les précautions de base, y compris ce qui suit :
t-JTF[UPVUFTMFTJOTUSVDUJPOTBWBOUEVUJMJTFSWPUSF
sécheuse.
t"WBOUEFMVUJMJTFSMBTÏDIFVTFEPJUÐUSFJOTUBMMÏF
correctement conformément aux directives données
dans ce manuel.
t/FQMBDF[QBTEBSUJDMFTFYQPTÏTËEFTIVJMFTEF
DVJTTPOEBOTWPUSFTÏDIFVTF%FTWÐUFNFOUT
contaminés aux huiles de cuisson peuvent
entraîner une réaction chimique qui pourrait faire
enflammer une brassée.
t/FTÏDIF[BVDVOBSUJDMFRVJBVSBJUQSÏDÏEFNNFOUÏUÏ
nettoyé, lavé, ou trempé dans de l’essence, des solvants
pour nettoyage à sec, ou toute autre substance
inflammable ou explosive non plus que tout article
qui présenterait des taches de ces substances, car les
vapeurs qui s’en dégagent pourraient s’enflammer ou
exploser.
t6UJMJTF[MFTBTTPVQMJTTFVSTPVQSPEVJUTQPVSÏMJNJOFS
la statique uniquement tel que recommandé par le
fabricant.
t/VUJMJTF[QBTEFDZDMFBWFDDIBMFVSQPVSTÏDIFSEFT
articles qui comportent du caoutchouc mousse ou
toute autre matière similaire à du caoutchouc.
t$POTFSWF[MFTQBDFFOUPVSBOUMPVWFSUVSFEFTPSUJFFU
les espaces adjacents libres de toute accumulation de
charpie, de poussière, et de saleté.
t7PVTEFWF[GBJSFOFUUPZFSQÏSJPEJRVFNFOUMJOUÏSJFVS
de la sécheuse et du conduit de sortie par le personnel
de service qualifié.
t/JOTUBMMF[KBNBJTPVOFSBOHF[KBNBJTWPUSFTÏDIFVTF
dans un endroit exposé aux intempéries.
t7ÏSJGJF[UPVKPVSTMJOUÏSJFVSEFMBTÏDIFVTFQPVSZ
repérer tout corps étranger.
t/FNFUUF[KBNBJTWPUSFNBJOEBOTMBTÏDIFVTFTJMF
tambour ou les autres pièces sont en mouvement.
t/FUUPZF[MFGJMUSFËDIBSQJFBWBOUPVBQSÒTDIBRVF
brassée.
t/FSÏQBSF[KBNBJTPVOFSFNQMBDF[KBNBJTVOFQJÒDF
de la sécheuse ou n’essayez jamais de réparer votre
sécheuse, à moins que cet entretien soit précisément
recommandé dans ce Guide d’utilisation et d’entretien
ou dans des instructions de réparation par l’utilisateur
publiées que vous comprenez et que vous êtes
capable d’entreprendre.
t/FDPOTFSWF[QBTEPCKFUTFOQMBTUJRVFEFTQBQJFST
ou des vêtements susceptibles de s’enflammer ou
de fondre en haut de la sécheuse pendant qu’elle
est en marche.
t/FNPEJGJF[QBTMFTDPNNBOEFT
Avant d’inutiliser ou de mettre la sécheuse au rebut,
retirez-en la porte.
t/FMBJTTF[QBTMFTFOGBOUTKPVFSEBOTMBTÏDIFVTFPVTVS
celle-ci. Vous devez les superviser de près lorsque vous
utilisez la sécheuse à proximité.
IMPORTANTES INSTRUCTIONS DE SÉCURITÉ
5
IMPORTANTES INSTRUCTIONS DE SÉCURITÉ
LISEZ TOUTES LES DIRECTIVES AVANT D’UTILISER L’APPAREIL
WAVERTISSEMENT
*/4536$5*0/4%&.*4&®-"5&33&
Vous devez mettre à la terre cet appareil. En cas de panne ou
de défaillance, la mise à la terre réduit le risque d’électrocution
en offrant un chemin de moindre résistance au courant
électrique. Cet appareil doit être muni d’un cordon doté d’un
conducteur de mise à la terre et d’une fiche avec mise à la
terre. Vous devez brancher la fiche dans une prise appropriée
qui est bien installée et mise à la terre conformément à tous
les codes et les ordonnances locales.
Ne modifiez jamais la fiche fournie avec l’appareil. Si elle ne
correspond pas à la prise, faites installer une bonne prise par
un électricien qualifié.
Vous devez brancher cet appareil à un système de câblage
permanent, en métal, mis à la terre ou vous devez faire courir
un conducteur de mise à la terre avec les conducteurs du
circuit et le brancher à la broche ou au contact de mise à la
terre de l’appareil.
Si votre sécheuse n’est pas bien mise à la terre, cela peut
FOUSBÔOFSVOFÏMFDUSPDVUJPO
WAVERTISSEMENT
6ONBVWBJTCSBODIFNFOUEVDPOEVDUFVSEFNJTFËMBUFSSFQFVUFOUSBÔOFSVOSJTRVFEÏMFDUSPDVUJPO7ÏSJGJF[BVQSÒT
d’un électricien qualifié ou d’un technicien de service si vous doutez que l’appareil est bien mis à la terre.
*/4536$5*0/4%&4²$63*5²1063-*/45"--"5*0/
WAVERTISSEMENT
Afin de réduire les risques d’incendie, de choc électrique, ou les blessures corporelles lorsque vous utilisez des
électroménagers, vous devez toujours suivre les précautions de base, y compris ce qui suit :
générer de la fumée ou provoquer un incendie.
t 'BJUFTMBNJTFËMBUFSSFEFMBTÏDIFVTFDPOGPSNÏNFOU
ËUPVTMFTDPEFTFUPSEPOOBODFTFOWJHVFVS4VJWF[MFT
t /FQMBDF[QBTEFDIBOEFMMFTEFDJHBSFUUFTPVUPVUF
directives d’installation détaillées. Si votre sécheuse
autre matière inflammable sur le dessus du produit.
OFTUQBTCJFONJTFËMBUFSSFDFMBQFVUFOUSBÔOFSVOF
Le non-respect de cette instruction peut les faire fondre,
électrocution.
générer de la fumée ou provoquer un incendie.
t "WBOUEFMVUJMJTFSMBTÏDIFVTFEPJUÐUSFJOTUBMMÏF
correctement conformément aux directives données
dans ce manuel. Si votre sécheuse n’est pas bien mise à
MBUFSSFDFMBQFVUFOUSBÔOFSVOFÏMFDUSPDVUJPO
t *OTUBMMF[FUFOUSFQPTF[MBTÏDIFVTFËVOFOESPJUPá
elle ne sera pas exposée à des températures sous le
point de congélation ou exposée aux intempéries.
t 5PVUFTMFTSÏQBSBUJPOTFUMFOUSFUJFOEPJWFOUÐUSF
faits par un service d’entretien autorisé, à moins
qu’ils ne soient précisément recommandés dans ce
(VJEFEVUJMJTBUJPO6UJMJTF[TFVMFNFOUEFTQJÒDFT
recommandées par le fabricant. Tout non-respect de
DFUBWFSUJTTFNFOUQFVUFOUSBÔOFSEFTCMFTTVSFTHSBWFTVO
incendie, l’électrocution ou la mort.
t Pour réduire le risque d’électrocution, n’installez
KBNBJTMBTÏDIFVTFEBOTVOFTQBDFIVNJEF Tout nonSFTQFDUEFDFUBWFSUJTTFNFOUQFVUFOUSBÔOFSEFTCMFTTVSFT
graves, un incendie, l’électrocution ou la mort.
t /JOTUBMMF[QBTMBQQBSFJMËQSPYJNJUÏEVOBSUJDMF
chauffant, tel un poêle, four ou chauffage. Le nonrespect de cette instruction peut causer une défaillance,
t 3FUJSF[UPVUFMBQFMMJDVMFQSPUFDUSJDFFOWJOZMFEV
produit. Le non-respect de cette instruction peut la faire
fondre, générer de la fumée ou provoquer un incendie.
t 3FMJF[ËVODJSDVJUÏMFDUSJRVFQSPUÏHÏDPSSFDUFNFOU
dimensionné et à la bonne tension pour éviter toute
surcharge électrique.6ONBVWBJTDJSDVJUÏMFDUSJRVFQFVU
fondre, en créant un danger d’électrocution ou d’incendie.
t 3FUJSF[UPVUFTQJÒDFTEFNCBMMBHFFUÏMJNJOF[UPVTMFT
matériaux d’expédition correctement. Tout non-respect
EFDFTJOTUSVDUJPOTQFVUFOUSBÔOFSMBNPSUVOFFYQMPTJPO
un incendie ou des brûlures.
t Pour une installation dans un garage, installez la
sécheuse à au moins 18 po (46 cm) au-dessus du
plancher. Tout non-respect de ces instructions peut
FOUSBÔOFSMBNPSUVOFFYQMPTJPOVOJODFOEJFPVEFT
brûlures.
t Conservez les matériaux d’emballage hors de la
portée des enfants. Les matériaux d’emballage peuvent
être dangereux pour les enfants. Ils font courir un risque
de suffocation.
FRANÇAIS
Pour votre sécurité, vous devez suivre l’information contenue dans ce manuel afin de réduire les risques
d’incendie et d’explosion, de choc électrique, ainsi que pour éviter les dommages matériels, les blessures
corporelles ou un décès.
6
IMPORTANTES INSTRUCTIONS DE SÉCURITÉ
IMPORTANTES INSTRUCTIONS DE SÉCURITÉ
LISEZ TOUTES LES DIRECTIVES AVANT D’UTILISER L’APPAREIL
WAVERTISSEMENT
Pour votre sécurité, vous devez suivre l’information contenue dans ce manuel afin de réduire les risques
d’incendie et d’explosion, de choc électrique, ainsi que pour éviter les dommages matériels, les blessures
corporelles ou un décès.
*/4536$5*0/4%&4²$63*5²1063-*/45"--"5*0/
WAVERTISSEMENT
Afin de réduire les risques de blessures, veuillez suivre toutes les procédures de sécurité industrielle recommandées,
y compris le port de gants longs et de lunettes de sécurité. Le non-respect de toutes les consignes de sécurité
QSÏTFOUÏFTEBOTDFNBOVFMQFVUFOUSBÔOFSEFTEPNNBHFTNBUÏSJFMTEFTCMFTTVSFTPVMBNPSU
Système d’évacuation d’air/Conduit :
t-BJSEFTTÏDIFVTFTËHB[%0*5ÐUSFFWBDVÏË
l’extérieur. Tout non-respect de ces instructions peut
FOUSBÔOFSVOJODFOEJFPVMBNPSU
t*MGBVUÏWBDVFSÏHBMFNFOUMBJSEFTTÏDIFVTFTË
l’extérieur pour empêcher toute accumulation
de grande quantité d’humidité et de charpie à
l’intérieur de la pièce.6OFBDDVNVMBUJPOEFDIBSQJF
EBOTVOFQBSUJFEFMBNBJTPOQFVUFOUSBÔOFSVOEBOHFS
d’incendie et un risque pour la santé.
tUtilisez uniquement un conduit métallique
rigide ou flexible de 4 po (10,2 cm) de diamètre
à l’intérieur du placard de la sécheuse ou pour
l’évacuation de l’air vers l’extérieur. L’utilisation
des conduits en plastique ou d’autres conduits de
type combustible risque de provoquer un incendie.
6ODPOEVJUQFSGPSÏQFVUQSPWPRVFSVOJODFOEJF
s’il s’affaisse ou se bloque partiellement en cours
d’utilisation ou lors de l’installation.
tLes pièces pour monter le système de conduits ne
TPOUQBTGPVSOJFTBWFDMBTÏDIFVTF*MTFSBOÏDFTTBJSF
d’obtenir les pièces chez votre fournisseur local.
La sortie extérieure doit être munie de clapets à
charnière pour empêcher tout refoulement d’air
lorsque la sécheuse est hors tension. Tout nonSFTQFDUEFDFTJOTUSVDUJPOTQFVUFOUSBÔOFSVOJODFOEJF
ou la mort.
tLe conduit d’évacuation d’air doit mesurer 4 po
DN
EFEJBNÒUSFTBOTPCTUSVDUJPOT0OEPJUMF
NBJOUFOJSBVTTJDPVSURVFQPTTJCMF"TTVSF[WPVT
de nettoyer tout vieux conduit avant d’installer
votre nouvelle sécheuse. Tout non-respect de ces
JOTUSVDUJPOTQFVUFOUSBÔOFSVOJODFOEJFPVMBNPSU
t%FTDPOEVJUTNÏUBMMJRVFTSJHJEFTPVTFNJ
rigides sont recommandés entre le mur et la
TÏDIFVTF-PSTEVOFJOTUBMMBUJPOTQÏDJBMFPá
il est impossible d’effectuer le raccord avec les
matériaux recommandés, utilisez un conduit
métallique flexible de transition homologué UL
uniquement pour le raccord entre la sécheuse et le
mur. L’utilisation de ce type de conduit influencera
le temps de séchage. Tout non-respect de ces
JOTUSVDUJPOTQFVUFOUSBÔOFSVOJODFOEJFPVMBNPSU
t/VUJMJTF[1"4EFWJTËUÙMFPVEBVUSFTUZQFT
d’attaches qui pénètreraient dans le conduit et
pourraient retenir les charpies et réduire ainsi
MFGGJDBDJUÏEVTZTUÒNFEÏWBDVBUJPOEBJS'JYF[FU
scellez tous les raccords avec du ruban à conduit.
Pour de plus amples détails, suivez les instructions
d’installation. Tout non-respect de ces instructions
QFVUFOUSBÔOFSVOJODFOEJFPVMBNPSU
IMPORTANTES INSTRUCTIONS DE SÉCURITÉ
7
IMPORTANTES INSTRUCTIONS DE SÉCURITÉ
LISEZ TOUTES LES DIRECTIVES AVANT D’UTILISER L’APPAREIL
WAVERTISSEMENT
*/4536$5*0/4%&4²$63*5²1063-&3"$$03%&.&/5®-²-&$53*$*5²
WAVERTISSEMENT
Afin de réduire les risques d’incendie, de choc électrique, ou les blessures corporelles lorsque vous utilisez des
électroménagers, vous devez toujours suivre les précautions de base, y compris ce qui suit :
t/FDPVQF[FUOFSFUJSF[EBOTBVDVODBTMBCSPDIF
de mise à la terre du cordon d’alimentation.
Branchez le cordon d’alimentation électrique dans
une prise bien mise à la terre pour éviter des blessures
corporelles ou des dommages à la sécheuse.
tPour votre sécurité personnelle, cette sécheuse doit
être correctement mise à la terre. Tout non-respect
EFDFUBWFSUJTTFNFOUQFVUFOUSBÔOFSEFTCMFTTVSFTPV
l’électrocution.
t3FQPSUF[WPVTBVYEJSFDUJWFTEJOTUBMMBUJPOEFDF
manuel pour les exigences électriques propres à
votre modèle. Tout non-respect de ces instructions
QFVUFOUSBÔOFSVOFÏMFDUSPDVUJPOPVVOJODFOEJF
tCette sécheuse doit être branchée sur une prise
DPSSFDUFNFOUNJTFËMBUFSSF4JMBTÏDIFVTFOFTU
pas correctement mise à terre, cela peut entraîner
VOFÏMFDUSPDVUJPO'BJUFTWÏSJGJFSMBQSJTFNVSBMF
et le circuit électrique par un électricien qualifié
afin d’assurer leur mise à la terre correcte. Tout
OPOSFTQFDUEFDFTJOTUSVDUJPOTQFVUFOUSBÔOFSVOF
électrocution ou un incendie.
t-BTÏDIFVTFEPJUUPVKPVSTÐUSFCSBODIÏFTVSVOF
prise électrique distincte qui fournit une tension
nominale correspondant à celle inscrite sur la
plaque signalétique. Ce branchement permet de
fournir le meilleur rendement et permet aussi d’éviter
la surcharge du circuit électrique domestique, ce qui
QPVSSBJUFOUSBÔOFSVOSJTRVFEJODFOEJFFOSBJTPOEFMB
surchauffe des fils électriques.
t/FEÏCSBODIF[KBNBJTMBTÏDIFVTFFOUJSBOUTVSMF
DPSEPOEBMJNFOUBUJPO5FOF[UPVKPVSTGFSNFNFOU
la fiche électrique et retirez directement de la prise.
Le cordon d’alimentation peut être endommagé,
DFRVJQFVUFOUSBÔOFSVOEBOHFSEÏMFDUSPDVUJPOPV
d’incendie.
t3ÏQBSF[PVSFNQMBDF[JNNÏEJBUFNFOUUPVU
cordon d’alimentation effiloché ou endommagé
EFRVFMRVFNBOJÒSFRVFDFTPJU/VUJMJTF[QBT
de cordon d’alimentation qui affiche des traces
de fissures ou d’éraflures sur sa longueur ou aux
extrémités. Le cordon d’alimentation peut fondre,
DFRVJQFVUFOUSBÔOFSVOEBOHFSEÏMFDUSPDVUJPOPV
d’incendie.
tLors de l’installation ou du déplacement de la
sécheuse, attention de ne pas pincer, écraser
ou endommager le cordon d’alimentation.
Cela empêchera des blessures corporelles ou des
dommages à votre sécheuse, occasionnés par un
incendie ou une électrocution.
$0/4&37&;$&4%*3&$5*7&4
FRANÇAIS
Pour votre sécurité, vous devez suivre l’information contenue dans ce manuel afin de réduire les risques
d’incendie et d’explosion, de choc électrique, ainsi que pour éviter les dommages matériels, les blessures
corporelles ou un décès.
CARACTÉRISTIQUES SPÉCIALES
CARACTÉRISTIQUES SPÉCIALES
PANNEAU DE COMMANDE CONVIVIAL
L’utilisation de la sécheuse est facile grâce à tout un ensemble de fonctions conviviales.
PORTE RÉVERSIBLE À ACCÈS FACILE
6OFQPSUFËHSBOEFPVWFSUVSFGBDJMJUFMBDDÒTBVDIBSHFNFOUFUEÏDIBSHFNFOUEFMBQQBSFJM*MFTUQPTTJCMF
d’inverser l’ouverture de la porte en fonction de l’emplacement de l’appareil.
FONCTIONS DE VAPEUR
La technologie vapeur de LG permet de vaporiser sur les tissus des jets de vapeur chaude tourbillonnant pour
SBGSBÔDIJSMFTWÐUFNFOUTSÏEVJSFMÏMFDUSJDJUÏTUBUJRVFFUSFOESFMFSFQBTTBHFQMVTGBDJMF4ÏMFDUJPOOF[TJNQMFNFOU
le cycle STEAM FRESHMC. Vous pouvez également ajouter une option Vapeur aux cycles sélectionnés.
SYSTÈME DE DÉTECTION DES BLOCAGES DANS LE CONDUIT D’ÉVACUATION FLOW SENSEMC
Le système de détection des blocages de conduit FLOW SENSEMC détecte les blocages dans les conduits qui
réduisent le débit d’air dans la sécheuse et vous en avertit. Si vous constatez une alerte, nettoyez ou réparez les
conduits afin d’enlever les obstructions. La propreté des systèmes d’évacuation augmente l’efficacité et réduit
les temps de séchage.
SMARTDIAGNOSISMC
Si votre sécheuse présente des difficultés techniques, celle-ci a la capacité de transmettre des données par
téléphone au Centre d’information à la clientèle. Le centre d’appels enregistre les données transmises depuis
WPUSFNBDIJOFFUMFTVUJMJTFQPVSBOBMZTFSMJODJEFOUFUGPVSOJSVOEJBHOPTUJDSBQJEFFUFGGJDBDFWPJSQBHF
D
8
ES
C
ER
IGN
TIFIE
D
Protocole P154
Rendement en matière
d’assainissement des sécheuses
résidentielles
PIÈCES ET CARACTÉRISTIQUES
9
PIÈCES ET CARACTÉRISTIQUES
Composants
Filtre à
charpie
Pieds de
nivellement
Emplacement
du cordon
d’alimentation
(modèles à gaz)
Emplacement
du cordon
d’alimentation
(modèles
électriques)
Emplacement
du raccord à la
canalisation
de gaz
(modèles à
gaz)
Vanne
d’arrivée
d’eau
Sortie du
conduit
d’évacuation
d’air
Accessoires
Accessoires en option
Accessoires inclus
Raccord en Y
Tuyau flexible
Grille de séchage
Trousse d’aération latérale
(vendue séparément)
Référence :
383EEL9001B
REMARQUES
t$POUBDUF[MF4FSWJDFËMBDMJFOUÒMF-(BVBV$BOBEB
TJVOBDDFTTPJSFRVFMDPORVF
FTUNBORVBOU
t1PVSWPUSFTÏDVSJUÏFUQPVSMBMPOHÏWJUÏEVQSPEVJUVUJMJTF[VOJRVFNFOUEFTDPNQPTBOUTBVUPSJTÏT-FGBCSJDBOU
EÏDMJOFUPVUFSFTQPOTBCJMJUÏFODBTEFEZTGPODUJPOOFNFOUEVQSPEVJUPVEBDDJEFOUTDBVTÏTQBSMVUJMJTBUJPOEFT
DPNQPTBOUTPVQJÒDFTOPOBVUPSJTÏTFUBDIFUÏTEFGBÎPOJTPMÏF
t-FTJMMVTUSBUJPOTGPVSOJFTEBOTDFNBOVFMQFVWFOUÐUSFEJGGÏSFOUFTEFTDPNQPTBOUTFUBDDFTTPJSFTSÏFMTFUJMT
QFVWFOUÐUSFNPEJGJÏTTBOTQSÏBWJTQBSMFGBCSJDBOUEBOTMFCVUEBNÏMJPSFSMFQSPEVJU
FRANÇAIS
Porte
réversible
Panneau
de
commande
10
PIÈCES ET CARACTÉRISTIQUES
Caractéristiques du panneau de commande
Voici les instructions de mise en marche et d’utilisation de votre sécheuse. Veuillez consulter les sections
particulières de ce manuel pour de plus amples renseignements.
WAVERTISSEMENT
1PVSSÏEVJSFMFSJTRVFEJODFOEJFEÏMFDUSPDVUJPOPVEFCMFTTVSFMJTF[UPVUMFNBOVFMZDPNQSJTMFTJOTUSVDUJPOT
importantes de sécurité, avant de faire fonctionner cette sécheuse.
G
F
D
E
A #0650/"--6.&3²5&*/%3&
0/0''
"QQVZF[QPVS"--6.&30/
MBTÏDIFVTF
"QQVZF[EFOPVWFBVQPVS²5&*/%3&0''
MB
sécheuse.
REMARQUE
Le bouton ON/OFF permet d’annuler un cycle en
cours, et tous les paramètres de lavage seront perdus.
B #0650/4²-&$5&63%&$:$-&
Il suffit d’appuyer plusieurs fois sur le bouton
$:$-&4QPVSQBSDPVSJSMFTPQUJPOTFUTÏMFDUJPOOFS
le cycle désiré. Les paramètres normaux du cycle
TÏMFDUJPOOÏTBGGJDIFOUËMÏDSBO1PVSMFTDZDMFT
."/6"-%3:DFTQBSBNÒUSFTQFVWFOUÐUSF
modifiés à l’aide des boutons des paramètres de
cycle avant le début du cycle.
C #0650/%²."33&31"64&45"35
1"64&
"QQVZF[TVSDFCPVUPOQPVS%²."33&345"35
le cycle sélectionné. Si la sécheuse est en
GPODUJPOVUJMJTF[DFCPVUPOQPVSGBJSFVOF1"64&
dans le cycle sans perdre les paramètres actuels.
REMARQUE
Si vous n’appuyez pas de nouveau sur le bouton
%²."33&31"64&45"351"64&
QPVSQPVSTVJWSF
le cycle de séchage en moins de quatre minutes, la
sécheuse se mettra automatiquement hors tension.
A
H
B
C
D #0650/45&.145&.14.03&
5*.&-&445*.&
Ces boutons peuvent être utilisés pour régler
MBEVSÏFEFTÏDIBHFEFTDZDMFT5*.&%3:FU
."/6"-%3:-FCPVUPO.03&5*.&QFSNFU
d’ajouter une minute au cycle de séchage
manuel, et le bouton LESS TIME, de réduire la
durée du cycle d’une minute.
E #0650/4%&3²(-"(&%6$:$-&
Ces boutons permettent de choisir les
paramètres pour le cycle sélectionné. Les
paramètres sélectionnés sont affichés à
l’écran. Le bouton de cette option permet de
sélectionner d’autres paramètres.
F "''*$)&63%&5&.14&5%²5"5
L’afficheur illustre les réglages, le temps restant
estimé, les options et les messages d’état de
votre sécheuse.
G #0650/4%015*0/4
Les boutons d’options vous permettent
de sélectionner des options de cycle
supplémentaires. Certains boutons vous
permettent également d’actionner des
fonctions spéciales en appuyant et en
maintenant enfoncé le bouton pendant trois
secondes.
H '0/$5*0/4%&7"1&63
La technologie vapeur de LG permet de
vaporiser sur les tissus des jets de vapeur
DIBVEFUPVSCJMMPOOBOUTQPVSSBGSBÔDIJSMFT
vêtements, réduire l’électricité statique et
rendre le repassage plus facile. Sélectionnez
simplement le cycle STEAM FRESHMC ou
antifroissement.
PIÈCES ET CARACTÉRISTIQUES
11
Afficheur
L’afficheur ACL illustre les réglages, le temps restant estimé, les options et les messages d’état de votre sécheuse.
Lorsque la sécheuse est allumée, les lumières de l’écran s’illuminent..
WAVERTISSEMENT
F
D
B
C
E
A 5&.143&45"/5&45*.²
ŷ&45*."5&%5*.&3&."*/*/(Ÿ
Cet écran affiche le temps restant estimé pour
MFTDZDMFT4&/403%3:PVMFUFNQTSFTUBOUSÏFM
QPVSMFTDZDMFT5*.&%3:PV."/6"-%3:
REMARQUE
-FUFNQTEFTDZDMFT4²$)"(&®$"15&634&/403%3:
QPVSSBJUWBSJFS&OFGGFUMBTÏDIFVTF
recalcule le temps de séchage restant pour
optimiser les résultats.
B */%*$"5&63%&$:$-&5&3.*/²
"7&$3"11&-%&7²3*'*$"5*0/%6
'*-53&®$)"31*&
llustre la portion du cycle de séchage
actuellement en train d’être terminée
7²3*'*$"5*0/%6'*-53&®$)"31*&$-&"/
'*-5&3
4²$)"(&%3:*/(
3&'30*%*44&.&/5
$00-*/(
C */%*$"5&63%&7&3306*--"(&
1063&/'"/54ŷ$)*-%-0$,Ÿ
-PSTRVFMF7&3306*--"(&1063&/'"/54
$)*-%-0$,
FTUBDUJWÏMJOEJDBUFVSEF$IJME
-PDLBQQBSBÔUSBFUUPVTMFTCPVUPOTTFSPOU
EÏTBDUJWÏTËMFYDFQUJPOEVCPVUPO"--6.&3
²5&*/%3&0/0''
$FMBFNQÐDIFSBVOFOGBOU
de modifier les réglages alors que la sécheuse
est en fonction.
A
D 3"11&-%6/&550:"(&%6'*-53&
®$)"31*&ŷ$-&"/'*-5&3Ÿ
-BGGJDIFVSJOEJRVFSB7²3*'*$"5*0/%6'*-53&
®$)"31*&$-&"/'*-5&3
MPSTEFMBNJTFFO
marche de la sécheuse pour vous rappeler de
vérifier le filtre à charpie. Le message s’éteint
EÒTRVFMFCPVUPO"--6.&3²5&*/%3&FTU
enfoncé.
E 130(3"..&1&340//"-*4²
ŷ$6450.130(3".Ÿ
Si vous avez une combinaison particulière de
paramètres que vous utilisez fréquemment,
vous pouvez enregistrer ces paramètres dans
un programme personnalisé.
F 70:"/5%64:45µ.&%&
%²5&$5*0/%&4#-0$"(&4%"/4
-&$0/%6*5%²7"$6"5*0/'-08
4&/4&.$
Le système de détection des blocages de
conduit FLOW SENSEMC détecte les blocages
dans les conduits qui réduisent le débit
d’air dans la sécheuse et vous en avertit.
Maintenir propres les conduits du système
d’évacuation permet d’améliorer l’efficacité de
fonctionnement et aide à minimiser les appels
BVTFSWJDFEBTTJTUBODF7PVTÏDPOPNJTF[BJOTJ
EFMBSHFOU
FRANÇAIS
1PVSSÏEVJSFMFSJTRVFEJODFOEJFEÏMFDUSPDVUJPOPVEFCMFTTVSFMJTF[UPVUMFNBOVFMZDPNQSJTMFTJOTUSVDUJPOT
importantes de sécurité, avant de faire fonctionner cette sécheuse.
12
INSTRUCTIONS D’INSTALLATION
INSTRUCTIONS D’INSTALLATION
Aperçu de l’ordre d’installation
Vérification et sélection
de l’emplacement
approprié
Mise à niveau de la
sécheuse
Raccordement du tuyau
d’arrivée d’eau
120V
Ventilation de la
sécheuse
Raccordement des
sécheuses à gaz
240V(USA)
230V(CANADA)
Branchement du cordon
d’alimentation et mise à
la terre
Appuyez et maintenez
enfoncé les boutons
Test d’installation (Reportezvous à la page 24.)
Test de
fonctionnement
INSTRUCTIONS D’INSTALLATION
13
Conditions requises pour l’emplacement d’installation
WAVERTISSEMENT
t&NQMBDFNFOUQFSNFUUBOUVOFJOTUBMMBUJPOBQQSPQSJÏF
d’évacuation. L’évacuation d’une sécheuse à gaz doit
s’effectuer vers l’extérieur. Voir Ventilation de la
sécheuse.
t6OQMBODIFSSPCVTUFDBQBCMFEBDDFQUFSMFQPJETUPUBM
EFMBTÏDIFVTFTPJUMCLH
-FQPJETDPNCJOÏ
d’un appareil associé doit également être pris en
considération.
t6OFQSJTFÏMFDUSJRVFBWFDQSJTFEFUFSSFTJUVÏFËQJFET
DN
NBYJNVNTVSMFDÙUÏEFMBTÏDIFVTF7PJS
3BDDPSEFNFOUEFTTÏDIFVTFTÏMFDUSJRVFT
t"VDVOBVUSFBQQBSFJMËDPNCVTUJCMFOFQFVUÐUSF
installé dans le même placard que la sécheuse.
²WJUF[EFGBJSFGPODUJPOOFSWPUSFTÏDIFVTFTJMBUFNQÏSBUVSFQBTTFFOEFTTPVTEF¡'¡$
®EFTUFNQÏSBUVSFT
inférieures, la sécheuse peut ne pas s’arrêter à la fin d’un cycle automatique. Il peut en résulter des temps de séchage
prolongés. Vous ne devez pas installer ou stocker la sécheuse dans un endroit exposé aux intempéries ou inondations. Respectez les réglementations en vigueur. Certaines réglementations limitent, voire interdisent, l’installation
de sécheuse dans des garages, des placards, des maisons mobiles ou des pièces destinées au sommeil. Contactez le
responsable de votre bâtiment.
REMARQUES
t6OFJODMJOBJTPONBYJNBMFEVQMBODIFSEFQPVDFDN
TPVTMFOTFNCMFEFMBTÏDIFVTF1PVSVOFJODMJOBJTPO
TVQÏSJFVSFËQPVDFDN
JOTUBMMF[MBUSPVTTFEFYUFOTJPOEFQJFETEFTÏDIFVTF-FDVMCVUBHFEFTWÐUFNFOUT
peut ne pas s’effectuer de façon appropriée et des cycles de capteurs automatiques peuvent ne pas fonctionner
correctement si la sécheuse n’est pas de niveau.
t4JWPVTJOTUBMMF[MBTÏDIFVTFEBOTVOHBSBHFWPVTEFWF[MBQMBDFSËQPVDFTDN
NJOJNVNBVEFTTVTEVTPM
4JWPVTMBQPTF[TVSVOTPDMFTBIBVUFVSBVCBTEFMBTÏDIFVTFEPJUÐUSFEFQPVDFTDN
Dégagements
(7,6 cm)
14" max.*
(35,6 cm)
21 1/4"
(54 cm)
40 3/16"
(102 cm)
28 15/16"
(73,4 cm)
5"**
(12,7 cm)
(2,54 cm)
50 1/4"
(127,5 cm)
(68,6 cm)
(2,54 cm)
(7,6 cm)
ESPACE POUR UNE INSTALLATION EN ENCASTREMENT OU DANS UN PLACARD
Les dimensions d’espacement suivantes sont recommandées pour cette sécheuse. Nous avons testé cette sécheuse
QPVSVOFTQBDFNFOUVUJMFEFQPVDFDN
TVSMFTDÙUÏTFUËMBSSJÒSFEFMBQQBSFJM7PVTEFWF[UFOJSDPNQUF
d’un espacement pour les raisons suivantes :
t*MGBVUQSFOESFFODPNQUFVOFTQBDFNFOU
supplémentaire pour faciliter l’installation et pour
l’entretien de l’appareil.
t%FTEÏHBHFNFOUTTVQQMÏNFOUBJSFTTPOUËQSÏWPJS
pour les moulures au niveau des murs, des portes et
des planchers.
t*MGBVUBVTTJQSÏWPJSVOFTQBDFNFOUTVQQMÏNFOUBJSF
TVSUPVTMFTDÙUÏTEFMBTÏDIFVTFBGJOEFSÏEVJSFMB
propagation du bruit. S’il s’agit d’une installation dans
un placard, un minimum d’ouvertures de ventilation
doit être réalisé en haut et en bas de la porte du
placard. Des portes à persiennes dotées d’ouvertures
de ventilation équivalentes sont acceptables.
t*MGBVUDPOTJEÏSFSVOFTQBDFNFOUQPVSVOBQQBSFJM
associé.
REMARQUE
7PVTEFWF[NBJOUFOJSVOQFUJUFTQBDFBVUPVSEFMBTÏDIFVTFPVEFUPVUBVUSFBQQBSFJM
QPVSÏWJUFSMFUSBOTGFSUEF
vibrations d’un appareil à un autre. Si les vibrations sont trop fortes, elles pourraient générer du bruit ou conduire
les appareils à se toucher, endommageant leurs finitions et générant ainsi encore plus de bruit.
FRANÇAIS
Lire toutes les directives d’installation dans leur intégralité avant d’installer et d’utiliser votre sécheuse !
Il est important que vous lisiez ce manuel dans son intégralité avant d’installer et d’utiliser votre sécheuse. Vous
retrouverez dans les pages qui suivent des directives détaillées pour les raccords électriques et de gaz, ainsi que les
exigences en matière d’évacuation de l’air.
14
INSTRUCTIONS D’INSTALLATION
Dégagements (suite)
ESPACEMENT RECOMMANDÉ POUR UNE INSTALLATION DANS UN PLACARD
tS’il s’agit d’une installation dans un placard, un minimum d’ouvertures de ventilation doit être réalisé en haut et en
bas de la porte du placard.
7"* (17,8 cm)
7"* (17,8 cm)
*Espacement requis
1PVSVOFWFOUJMBUJPOMBUÏSBMFPVQBS
MFCBTVOFTQBDFNFOUEFQPVDFTDN
est permis.
5"* 28
1"*
(12,7 cm) (73,4 cm) (2,5 cm)
1"
27 "
(2,54 cm) (68,6 cm)
1"
(2,54 cm)
Mise à niveau de la sécheuse
WAVERTISSEMENT
tPour réduire le risque de blessure, observer
toutes les procédures de sécurité recommandées
par l’industrie, y compris l’utilisation de gants à
manches longues et de lunettes de sécurité. Le
OPOSFTQFDUEFDFUBWFSUJTTFNFOUQFVUFOUSBÔOFSEFT
blessures graves ou la mort.
t-FTBQQBSFJMTTPOUMPVSET%FVYQFSTPOOFTPVQMVT
sont nécessaires pour déplacer la sécheuse. Le
OPOSFTQFDUEFDFUBWFSUJTTFNFOUQFVUFOUSBÔOFSEFT
blessures graves ou la mort.
1PVSPQUJNJTFSMFSFOEFNFOUEFMBQQBSFJMMBTÏDIFVTF
EPJUÐUSFEFOJWFBV1PVSNJOJNJTFSMBWJCSBUJPOMFCSVJU
et les mouvements indésirables, le plancher doit être
une surface solide et de niveau.
REMARQUE
Réglez les pieds de nivellement seulement pour
répondre aux besoins de mise à niveau de la
sécheuse. Les étendre plus qu’il est nécessaire pourrait
provoquer des vibrations.
1MBDF[MBTÏDIFVTFËMFOESPJUPáFMMFEFNFVSFSB
1MBDF[VOOJWFBVFOUSBWFSTEFMBTVSGBDFEFMB
sécheuse.
Niveau
1JFETEF
nivellement
t-FTRVBUSFQJFETEFOJWFMMFNFOUEPJWFOUSFQPTFS
solidement sur le plancher. Appuyez délicatement sur
les coins supérieurs de la sécheuse pour vous assurer
qu’elle ne balance pas d’un coin à l’autre.
Si vous installez la sécheuse sur le socle en option, vous
devez utiliser les pieds de nivellement du socle pour
mettre la sécheuse de niveau. Rétractez entièrement les
pieds de nivellement de la sécheuse.
6UJMJTF[VOFDMÏËNPMFUUFQPVSUPVSOFSMFTQJFET
de nivellement. Tournez dans le sens horaire pour
élever la sécheuse ou dans le sens antihoraire pour
l’abaisser. Élevez ou abaissez les pieds jusqu’à ce que
MBTÏDIFVTFTPJUEFOJWFBVEVODÙUÏËMBVUSFFUEF
l’avant à l’arrière.
"TTVSF[WPVTRVFMFTQJFETEFOJWFMMFNFOUTPOUFO
contact ferme avec le plancher.
INSTRUCTIONS D’INSTALLATION
15
Porte réversible
WAVERTISSEMENT
t²WJUF[EFMBJTTFSUPNCFSMBQPSUFQPVSOFQBT
l’abîmer ou endommager le sol.
Ensemble
charnières
-"1035&%&-"4²$)&64&&4553µ4-"3(&&5-063%&
Si vous ne respectez pas les instructions ci-dessous, vous
risquez d’endommager la sécheuse, de provoquer des
dégâts matériels ou de vous blesser.
0VWSF[MBQPSUFFUSFUJSF[MFTEFVYCPVDIPOTFO
QMBTUJRVFTJUVÏTEVDÙUÏEVMPRVFUFOGBJTBOUMFWJFS
avec un tournevis plat. Conservez ces bouchons pour
MÏUBQF
Bouchons
6
OFGPJTRVFMFTDIBSOJÒSFTFUMFTCPVDIPOTTPOUNJT
en place à leurs nouveaux emplacements, remontez le
cadre intérieur de la porte sur le cadre extérieur de la
QPSUFËMBJEFEFTWJTSFUJSÏFTMPSTEFMÏUBQFDJDPOUSF
Bouchons en
plastique
5PVUFOUFOBOUMBQPSUFSFUJSF[MFTWJTEFTDIBSOJÒSFT
EFVYQPVSDIBRVFDIBSOJÒSF
1PTF[FOTVJUFMBQPSUF
sur une surface protégée afin d’éviter d’endommager
la porte et la surface de travail.
3FNFUUF[MBQPSUFFOQMBDFËMBJEFEFTWJTSFUJSÏFTMPST
EFTÏUBQFTFU
Vis de la
charnière
6OFGPJTRVFMBQPSUFFTUEÏQPTÏFTVSVOFTVSGBDF
QSPUÏHÏFSFUJSF[MFTWJTEFDIBRVFDÙUÏEFMBQPSUF
et retirez, en le soulevant, le cadre intérieur de la porte
avec un tournevis plat. Retirez le crochet du loquet et
GJYF[MFEFMBVUSFDÙUÏ
5FTUF[MPVWFSUVSFEFMBQPSUFQPVSWPVTBTTVSFSRVF
les charnières et le loquet sont correctement alignés
et que la porte se ferme et se verrouille correctement.
Cadre de la
porte intérieure
Crochet de
verrouillage
Ouvrir et
fermer la porte
FRANÇAIS
t1PVSÏWJUFSEFOEPNNBHFSMBTÏDIFVTFPVMBQPSUF
soutenez la porte en plaçant dessous un tabouret
ou une caisse adaptée, ou faites-vous aider d’une
personne pour soutenir le poids de la porte.
3FUJSF[MFTWJTRVJGJYFOUMFTDIBSOJÒSFTBVDBESF
de la porte. Retirez les deux bouchons en plastique.
3FNFUUF[MFTDIBSOJÒSFTFUMFTCPVDIPOTEVDÙUÏ
PQQPTÏËMFVSDÙUÏEPSJHJOF
16
INSTRUCTIONS D’INSTALLATION
Modification de l’emplacement de la sortie d’air
WAVERTISSEMENT
t Utiliser une sortie d’air en métal.
t/FQBTVUJMJTFSVODPOEVJUFOQMBTUJRVFPVFOBMVNJOJVN
mince.
t/FUUPZFSMFTBODJFOTDPOEVJUTBWBOUMJOTUBMMBUJPOEFMB
sécheuse.
t Pour réduire le risque de blessure, observer toutes les
procédures de sécurité recommandées par l’industrie, y
compris l’utilisation de gants à manches longues et de
lunettes de sécurité.
1SÏBTTFNCMF[VODPVEFEFQPDN
EFEJBNÒUSF
ËMBQSPDIBJOFTFDUJPOEFDPOEVJUEFQPDN
et fixez solidement tous les raccords avec du ruban
à conduit. Assurez-vous que l’extrémité mâle du
DPVEFFTUEJSJHÏEBOTMF4&/401104²EFMBTÏDIFVTF
Insérez l’ensemble coude/conduit dans l’ouverture
latérale et enfoncez-le dans le conduit adaptateur.
Fixez solidement en position avec du ruban à conduit.
Assurez-vous que l’extrémité mâle du conduit dépasse
EFOWJSPOQPDN
QPVSMFSBDDPSEFSBVTZTUÒNF
de conduits. Fixez la plaque protectrice au dos de la
sécheuse avec la vis fournie.
t Le défaut de respecter toutes les consignes de sécurité de ce
manuel peut causer des dommages, des blessures ou la mort.
Votre nouvelle sécheuse est livrée avec une sortie d’air arrière.
Il est possible d’en modifier la position pour obtenir une sortie
EBJSTPVTMBQQBSFJMPVTVSMFDÙUÏMBTPSUJFEBJSTVSMFDÙUÏESPJU
OFTUQBTPGGFSUFTVSMFTNPEÒMFTËHB[
6OFUSPVTTFEFDPOWFSTJPOQJÒDFOo &&-#, est offerte
chez votre détaillant LG. L’ensemble comprend les éléments
nécessaires pour modifier l’emplacement du conduit de la
sortie d’air.
%ÏWJTTF[MBWJTEFGJYBUJPOEVDPOEVJUEÏWBDVBUJPOEBJS
arrière. Tirez sur le conduit pour le faire sortir.
Vis de
fixation
1MBRVF
protectrice
Coude
”
DN
OPTION 2 : SORTIE D’AIR INFÉRIEURE
*OTÏSF[MFDPOEVJUBEBQUBUFVSEBOTMFCPÔUJFSEF
ventilateur et fixez-le à la base de la sécheuse comme
indiqué.
Conduit
adaptateur
Conduit d’évacuation
d’air arrière
OPTION 1 : SORTIE D’AIR LATÉRALE
"QQVZF[TVSMFTMBOHVFUUFTEFMBMWÏPMFEÏGPOÎBCMF
et retirez soigneusement la pièce pour dégager
MPVWFSUVSFWPVMVFMBTPSUJFEBJSTVSMFDÙUÏESPJUOFTU
QBTPGGFSUFTVSMFTNPEÒMFTËHB[
*OTÏSF[MFDPOEVJU
BEBQUBUFVSEBOTMFCPÔUJFSEFWFOUJMBUFVSFUGJYF[MFË
la base de la sécheuse comme indiqué.
Support
*OTÏSF[MFDPVEFEFQPDN
EFEJBNÒUSFEBOT
l’ouverture arrière et enfoncez-le dans le conduit
adaptateur. Assurez-vous que l’extrémité mâle du
coude soit face au bas par le trou au fond de la
sécheuse. Fixez solidement en position avec du ruban
à conduit. Fixez la plaque protectrice au dos de la
sécheuse avec la vis fournie.
Conduit
adaptateur
Support
Alvéole
défonçable
1MBRVF
protectrice
Coude
INSTRUCTIONS D’INSTALLATION
17
Ventilation de la sécheuse
WAVERTISSEMENT
Afin de réduire les risques d’incendie, de choc électrique, ou les blessures corporelles lorsque vous utilisez cet
électroménager, vous devez toujours suivre les précautions de base, y compris ce qui suit :
t/FMBJTTF[QBTMFTZTUÒNFEFDPOEVJUTSFQPTFS
contre ou UPVDIFSEFTPCKFUTUSBODIBOUT Tout nonrespect de ces JOTUSVDUJPOTQFVUFOUSBÔOFSVOJODFOEJF
ou la mort.
t%BOTMFDBTEVOSBDDPSEËVOTZTUÒNFEFDPOEVJUT
existant, assurez-vous qu’il convient à cet effet et
qu’il est propre avant d’installer la sécheuse. Tout
non-respect de ces instructions peut FOUSBÔOFSVO
incendie ou la mort.
tLe système d’évacuation d’air doit être conforme
aux codes du bâtiment locaux en vigueur. Tout nonrespect de ces instructions QFVUFOUSBÔOFSVOJODFOEJF
ou la mort.
t-BJSEFTTÏDIFVTFTËHB[%0*5ÐUSFÏWBDVÏË
l’extérieur. Tout non-respect de ces instructions peut
FOUSBÔOFSVOJODFOEJFPVMB mort.
tUtilisez uniquement des conduits métalliques
rigides ou flexibles de 4 po (10,2 cm) de diamètre
à l’intérieur du placard de la sécheuse et pour la
ventilation extérieure. Tout non-respect de ces
JOTUSVDUJPOTQFVUFOUSBÔOFSVOJODFOEJFPVMBNPSU
tPour réduire le risque d’incendie, de combustion,
ou d’accumulation de gaz combustibles,
/’"$)&.*/&;1"4MF conduit d’évacuation d’air de
la sécheuse dans un endroit clos sans ventilation
comme un grenier, un mur, un plafond, une galerie
technique, une cheminée, un conduit d’évacuation
de la combustion de gaz ou un espace dissimulé
d’un édifice. Tout non-respect de ces instructions
QFVUFOUSBÔOFSVOJODFOEJFPVMB mort.
t1PVSSÏEVJSFMFSJTRVFEJODFOEJF/ÏWBDVF[1"4
l’air de la sécheuse par un conduit de plastique
ou en aluminium mince. Tout non-respect de ces
JOTUSVDUJPOTQFVUFOUSBÔOFSVOJODFOEJF ou la mort.
tLe conduit d’évacuation d’air doit mesurer 4 po
(10,2 cm) de diamètreTBOTPCTUSVDUJPOT0OEPJUMF
maintenir aussi court RVFQPTTJCMF"TTVSF[WPVT
de nettoyer tout vieux conduit avant d’installer
votre nouvelle sécheuse. Tout non-respect de ces
JOTUSVDUJPOTQFVUFOUSBÔOFSVOJODFOEJFPVMBNPSU
t%FTDPOEVJUTNÏUBMMJRVFTSJHJEFTPVTFNJ
rigides sont recommandés entre le mur et la
sécheuse. Lors d’une JOTUBMMBUJPOTQÏDJBMFPáJM
est impossible d’effectuer le raccord avec les
matériaux recommandés, utilisez un conduit
métallique flexible de transition homologué UL
uniquement pour le raccord entre la sécheuse et le
mur. L’utilisation de ce type de conduit influencera
le temps de séchage. Tout non-respect de ces
JOTUSVDUJPOTQFVUFOUSBÔOFSVOJODFOEJFPVMBNPSU
t/’65*-*4&;1"4EFWJTËUÙMFPVEBVUSFTUZQFT
d’attaches qui pénètreraient dans le conduit et
pourraient retenir les charpies et réduire ainsi
l’efficacité du système d’évacuation EBJS'JYF[FU
scellez tous les raccords avec du ruban à conduit.
5PVUOPOSFTQFDUEFDFTJOTUSVDUJPOTQFVUFOUSBÔOFSVO
incendie ou la mort.
tPour optimiser les résultats de fonctionnement de
l’appareil, observez les restrictions de longueur de
conduit décrites dans le tableau à la page suivante.
Tout non-respect de ces instructions QFVUFOUSBÔOFSVO
incendie ou la mort.
tLes pièces pour monter le système de conduits
ne sont pas GPVSOJFTBWFDMBTÏDIFVTF*MTFSB
nécessaire d’obtenir les pièces chez un fournisseur
local. La sortie extérieure doit être munie de clapets
à charnière pour empêcher tout refoulement d’air
lorsque la sécheuse est hors tension. Tout nonrespect de ces JOTUSVDUJPOTQFVUFOUSBÔOFSVOJODFOEJF
ou la mort.
tLa longueur totale du conduit en métal flexible ne
doit pas dépasser 2,4 m (8 pi).
t"V$BOBEBFODBTEVUJMJTBUJPOEVODPOEVJU
flexible de type feuille métallique, celui-ci doit
être précisément identifié par le fabricant comme
convenant à une utilisation avec une sécheuse. Aux
²UBUT6OJTFODBTEVUJMJTBUJPOEVODPOEVJUGMFYJCMF de
type feuille métallique, celui-ci doit être précisément
identifié par le fabricant comme convenant à une
utilisation avec une sécheuse et doit être conforme à la
« Outline for Clothes Dryer 5SBOTJUJPO%VDUx%JSFDUJWF
pour les conduits de transition des TÏDIFVTFT
TVKFU
"
FRANÇAIS
t/ÏDSBTF[QBTFUOFMBJTTF[QBTMFTZTUÒNFEF
conduits s’affaisser. Tout non-respect de ces
JOTUSVDUJPOTQFVUFOUSBÔOFSVO incendie ou la mort.
18
INSTRUCTIONS D’INSTALLATION
Ventilation de la sécheuse (suite)
Système d’évacuation d’air
-0/(6&63."9%&
5:1&%&4035*& /0.#3&%&
10ŷcmŸ%&
$06%&4%&
.63"-&
%*".µ53&$0/%6*5
90°
&95&3/&
.²5"--*26&3*(*%&
Recommandé
QJN
w
DN
w
DN
6UJMJTF[
seulement pour
les trajets courts
/”
DN
QJN
QJN
QJN
QJN
QJN
QJN
QJN
QJN
QJN
REMARQUE
%ÏEVJTF[QJN
QPVSDIBRVFDPVEF
supplémentaire. Il n’est pas recommandé d’utiliser
QMVTEFRVBUSFDPVEFTEF¡
ACHEMINEMENT ET RACCORD DU SYSTÈME
D’ÉVACUATION D’AIR
REMARQUES
Suivez les lignes directrices ci-dessous pour optimiser
le rendement de l’appareil et réduire l’accumulation
de charpies et de condensation dans les conduits.
-FTDPOEVJUTFUSBDDPSET/&40/51"4DPNQSJT
achetez-les séparément.
t6UJMJTF[EFTDPOEVJUTNÏUBMMJRVFTSJHJEFTPVTFNJ
SJHJEFTEFQPDN
EFEJBNÒUSF
t0OEPJUNBJOUFOJSMFDPOEVJUEÏWBDVBUJPOEBJSBVTTJ
court que possible.
t"VUBOURVFQPTTJCMFMJNJUF[MFOPNCSFEFDPVEFT
t-FYUSÏNJUÏNÉMFEFDIBRVFTFDUJPOEVTZTUÒNFEF
conduits doit être dirigé dans le sens opposé de la
sécheuse.
t6UJMJTF[EVSVCBOËDPOEVJUTVSUPVTMFTSBDDPSET
t*TPMF[MFTDPOEVJUTRVJQBTTFOUEBOTEFTBJSFT
non chauffées pour réduire la condensation et
l’accumulation de charpies sur les surfaces des
conduits.
t-FTTZTUÒNFTEÏWBDVBUJPOFOEPNNBHÏTPVCMPRVÏT
ne sont pas couverts par la garantie de la sécheuse.
Les pannes ou les problèmes de fonctionnement
causés par de tels systèmes d’évacuation ne sont pas
couverts par la garantie de la sécheuse.
7&/5*-"5*0/$033&$5&
7&/5*-"5*0/*/$033&$5&
INSTRUCTIONS D’INSTALLATION
19
Raccordement du tuyau d’arrivée d’eau
La sécheuse doit être raccordée au robinet d’eau froide à l’aide d’un tuyau neuf. N’utilisez pas d’anciens tuyaux.
REMARQUES
7ÏSJGJFSTJMFKPJOUFODBPVUDIPVDEBOTMFUVZBV
d’alimentation est en bon état. Deux joints en caoutchouc
sont fournis pour chaque tuyau d’alimentation. Ils doivent
être utilisés pour prévenir les fuites d’eau. Il faut également
s’assurer que le raccord à l’eau froide est bien serré.
#SBODIFSMFUVZBVËMBTÏDIFVTF
t#SBODIFSMFUVZBVEBMJNFOUBUJPOFOFBVËMBWBMWF
d’alimentation de la sécheuse en le serrant à la main, puis
FOGBJTBOUEFUPVSTVQQMÏNFOUBJSFËMBJEFEVOFQJODF
S’assurer que les tuyaux ne sont pas tordus ni écrasés.
Raccord
du tuyau
Joint en
caoutchouc
3BDDPSEFO:
7ÏSJGJFSMFUZQFEJOTUBMMBUJPO
0VWSJSMFSPCJOFUEFBVGSPJEF
Tuyau
court
Tuyau
long
3BDDPSEFO:
"7&$-"7&64&
4"/4-"7&64&
#SBODIFSUPVTMFTUVZBVYEBMJNFOUBUJPOFOFBV
FOMFTTFSSBOUËMBNBJOQVJTFOGBJTBOUEFUPVS
supplémentaire à l’aide d’une pince.
"7&$-"7&64&#SBODIFNFOUEFMBTÏDIFVTFBVNÐNF
robinet qu’une laveuse.
a. Fermer le robinet d’eau froide et débrancher le tuyau de la
laveuse.
C#SBODIFSMFUVZBVDPVSUBVSBDDPSEFO:ËMBJEFEFMVOFEFT
rondelles du tuyau.
c. Brancher l’autre extrémité du tuyau court au robinet d’eau
froide.
d. Brancher le long tuyau de la sécheuse à un bout du raccord
FO:QVJTCSBODIFSMFUVZBVEFMBMBWFVTFËMBVUSFCPVU
4"/4-"7&64&4ÏDIFVTFOFQBSUBHFBOUQBTMFSPCJOFU
d’eau froide avec une laveuse.
a. Brancher l’extrémité simple du long tuyau au robinet d’eau
froide.
REMARQUES
t"WBOUEFCSBODIFSMBDPOEVJUFEFBVËMBTÏDIFVTF
évacuer plusieurs gallons d’eau dans un drain ou
un seau. Ceci aidera à empêcher que des particules
étrangères, comme du sable ou du tartre, ne
bouchent la valve d’alimentation de la sécheuse.
t/FQBTUSPQTFSSFS-FSBDDPSEQPVSSBJUTFOEPNNBHFS
$IFSDIFSUPVUFGVJUFÏWFOUVFMMFBVOJWFBVEVSBDDPSEFO:
MFDBTÏDIÏBOU
FUEFTUVZBVY
REMARQUE
t&ODBTEFGVJUFGFSNFSMFSPCJOFUEFBVEÏCSBODIFS
le tuyau et vérifier si la rondelle du tuyau est en bon
état.
FRANÇAIS
t-BQSFTTJPOEBSSJWÏFEFBVEPJUÐUSFDPNQSJTFFOUSFFUL1BËLHGDNħ
t/FEÏOVEF[QBTFUOFGBVTTF[QBTMFGJMFUBHFMPSTRVFWPVTSBDDPSEF[MFUVZBVEBSSJWÏFEFBVBVSPCJOFU
t4JMBQSFTTJPOEBSSJWÏFEFBVFTUTVQÏSJFVSFËL1BVOTZTUÒNFEFEÏDPNQSFTTJPOEPJUÐUSFJOTUBMMÏ
t7ÏSJGJF[SÏHVMJÒSFNFOUMÏUBUEVUVZBVFUSFNQMBDF[MFTJOÏDFTTBJSF
t3FNQMBDF[MFTUVZBVYBQSÒTDJORBOOÏFTEVUJMJTBUJPOQPVSSÏEVJSFMFTSJTRVFTEFSVQUVSF
t/PUF[MFTEBUFTEJOTUBMMBUJPOPVEFSFNQMBDFNFOUEFTUVZBVYQPVSWPVTZSÏGÏSFSVMUÏSJFVSFNFOU
20
INSTRUCTIONS D’INSTALLATION
Raccordement des sécheuses à gaz
WAVERTISSEMENT
Afin de réduire les risques d’incendie, de choc électrique, ou les blessures corporelles lorsque vous utilisez cet
électroménager, vous devez toujours suivre les précautions de base, y compris ce qui suit :
t"MJNFOUBUJPOFOHB[SFRVJTF
La sécheuse est expédiée de l’usine prête pour l’utilisation
avec du gaz naturel. Elle peut être convertie pour une
utilisation avec du gaz de PL (propane liquide). La
pression du gaz ne doit pas dépasser 13 po (33 cm) de
colonne d’eau.
tUn technicien de service qualifié ou du fournisseur de gaz
doit raccorder la sécheuse à l’alimentation de gaz. Tout
OPOSFTQFDUEFDFTJOTUSVDUJPOTQFVUFOUSBÔOFSVOJODFOEJF
une explosion ou la mort.
t*TPMF[MBTÏDIFVTFEVTZTUÒNFEBMJNFOUBUJPOFOHB[FO
fermant à la main la soupape de fermeture individuelle de
l’appareil lors de tout essai de pression de l’alimentation
en gaz.5PVUOPOSFTQFDUEFDFTJOTUSVDUJPOTQFVUFOUSBÔOFS
un incendie, une explosion ou la mort.
t$POEVJUEBMJNFOUBUJPOSFRVJTMBTBMMFEFMBWBHFEPJU
être munie d’un tuyau d’alimentation en gaz naturel
SJHJEFWFSTMBTÏDIFVTF"VY²UBUT6OJTVOFTPVQBQFEF
GFSNFUVSFNBOVFMMFJOEJWJEVFMMF%0*5ÐUSFJOTUBMMÏFËBV
moins 6 pi (1,8 m) de la sécheuse en conformité à la norme
"/4*;EVDPEFOBUJPOBMEFTHB[DPNCVTUJCMFTPVË
MBOPSNF$4"#EVDPEFDBOBEJFOQPVSMJOTUBMMBUJPO
EFHB[7FJMMF[ËJOTUBMMFSVOCPVDIPOEFDBOBMJTBUJPO/15
EFQPNN
Tout non-respect de ces instructions
QFVUFOUSBÔOFSVOJODFOEJFVOFFYQMPTJPOPVMBNPSU
t%BOTMFDBTEFMVUJMJTBUJPOEVOUVZBVSJHJEFMFSBDDPSE
EPJUÐUSFEFQPNN
*144JMFTDPEFTFU
règlements locaux l’autorisent et que le fournisseur de
HB[MBDDFQUFVUJMJTF[VOFUVCVMVSFEFQPNN
homologuée lorsque les distances sont de moins de 20 pi
(6,1 m). Une tubulure de plus grand diamètre devrait être
utilisée pour des longueurs dépassant 20 pi (6,1 m). Tout
OPOSFTQFDUEFDFTJOTUSVDUJPOTQFVUFOUSBÔOFSVOJODFOEJF
une explosion ou la mort.
t3BDDPSEF[MBTÏDIFVTFBVUZQFEFHB[JOEJRVÏTVSMB
plaque signalétique. Tout non-respect de ces instructions
QFVUFOUSBÔOFSVOJODFOEJFVOFFYQMPTJPOPVMBNPSU
tPour éviter toute contamination de la soupape de
fermeture de l’alimentation en gaz, purgez le tuyau
d’alimentation de tout air et sédiments avant de le
SBDDPSEFSËMBTÏDIFVTF"WBOUEFTFSSFSMFTSBDDPSETFOUSF
l’alimentation en gaz et la sécheuse, purgez l’air restant
KVTRVËDFRVFWPVTEÏDFMJF[VOFPEFVSEFHB[ Tout nonSFTQFDUEFDFTJOTUSVDUJPOTQFVUFOUSBÔOFSVOJODFOEJFVOF
explosion ou la mort.
t/VUJMJTF[1"4EFGMBNNFOVFQPVSSFDIFSDIFSUPVUF
trace de fuites. Utilisez un liquide de détection de fuites
à l’épreuve de la corrosion. Tout non-respect de ces
JOTUSVDUJPOTQFVUFOUSBÔOFSVOJODFOEJFVOFFYQMPTJPOPVMB
mort.
tUtilisez uniquement un nouveau tuyau d’alimentation en
HB[IPNPMPHVÏ"("PV$4"BWFDEFTSBDDPSETFOBDJFS
inoxydable flexible. Tout non-respect de ces instructions
QFVUFOUSBÔOFSVOJODFOEJFVOFFYQMPTJPOPVMBNPSU
t4FSSF[TPMJEFNFOUUPVTMFTSBDDPSETEFHB[ Tout nonSFTQFDUEFDFTJOTUSVDUJPOTQFVUFOUSBÔOFSVOJODFOEJFVOF
explosion ou la mort.
t/FTTBZF[1"4EFEÏNPOUFSMBTÏDIFVTF&OFGGFU
tout démontage exige l’attention et les outils d’un
technicien de service ou d’une entreprise qui possède les
compétences et les autorisations. Tout non-respect de ces
JOTUSVDUJPOTQFVUFOUSBÔOFSVOJODFOEJFVOFFYQMPTJPOPVMB
mort.
t"QQMJRVF[EFMBQÉUFQPVSKPJOUTJOTPMVCMFEBOTEVHB[
de pétrole liquéfié (PL) sur tous les filetages. Tout nonSFTQFDUEFDFTJOTUSVDUJPOTQFVUFOUSBÔOFSVOJODFOEJFVOF
explosion ou la mort.
Exigences électriques requises uniquement pour les modèles à gaz
WAVERTISSEMENT
Afin de réduire les risques d’incendie, de choc électrique ou les blessures corporelles lorsque vous utilisez cet
électroménager, vous devez toujours suivre les précautions de base, y compris ce qui suit :
tCette sécheuse doit être branchée dans une prise mise à la
t/FDPVQF[FUOFSFUJSF[EBOTBVDVODBTMBUSPJTJÒNFCSPDIFEF
UFSSFEFWPMUTDBË)[QSPUÏHÏFQBSVOGVTJCMFPVVO
mise à la terre du cordon d’alimentation. Tout non-respect de
EJTKPODUFVSEFBNQÒSFTTout non-respect de ces instructions
DFTJOTUSVDUJPOTQFVUFOUSBÔOFSVOJODFOEJFVOFFYQMPTJPOPVMB
QFVUFOUSBÔOFSVOJODFOEJFVOFFYQMPTJPOPVMBNPSU
mort.
tPour votre sécurité personnelle, cette sécheuse doit être
correctement mise à la terre. Tout non-respect de ces instructions
QFVUFOUSBÔOFSVOJODFOEJFVOFFYQMPTJPOPVMBNPSU
tCette sécheuse est munie d’un cordon d’alimentation doté
d’une fiche à prise de terre à trois broches qui se branche sur
une prise triphasée murale standard correspondante afin de
minimiser le risque de choc électrique. Tout non-respect de ces
JOTUSVDUJPOTQFVUFOUSBÔOFSVOJODFOEJFVOFFYQMPTJPOPVMBNPSU
t4JWPVTBWF[VOFQSJTFNVSBMFTUBOEBSEËEFVYGJDIFTJMFTUEF
votre responsabilité et obligation de la faire remplacer par une
prise murale triphasée. Tout non-respect de ces instructions peut
FOUSBÔOFSVOJODFOEJFVOFFYQMPTJPOPVMBNPSU
INSTRUCTIONS D’INSTALLATION
21
Raccordement des sécheuses à gaz (suite)
Raccordement de l’alimentation en gaz
Afin de réduire les risques d’incendie, de choc électrique
ou les blessures corporelles lorsque vous utilisez
cet, électroménager, vous devez toujours suivre les
précautions de base, y compris ce qui suit :
"TTVSF[WPVTRVFMBMJNFOUBUJPOFOHB[WFSTMBTBMMFEF
MBWBHFTPJUCJFO$061²&$POGJSNF[RVFMFUZQFEFHB[
acheminé vers votre salle de lavage soit adéquat pour la
sécheuse. L’appareil est prêt à fonctionner au gaz naturel
BWFDVOSBDDPSE/15EF⁄8QPNN
tL’installation et l’entretien doivent être effectués
par un installateur qualifié, une agence de service,
ou le fournisseur de gaz. Tout non-respect de ces
JOTUSVDUJPOTQFVUFOUSBÔOFSVOJODFOEJFVOFFYQMPTJPO
ou la mort.
3FUJSF[MFDBQVDIPOEFYQÏEJUJPOEVSBDDPSEEFHB[BV
dos de la sécheuse. Soyez prudent et n’endommagez pas
le filetage du raccord de gaz lors du retrait du capuchon.
tUtilisez uniquement un tuyau flexible neuf en acier
JOPYZEBCMFFUVOOPVWFBVSBDDPSEIPNPMPHVÏ"("
5PVUOPOSFTQFDUEFDFTJOTUSVDUJPOTQFVUFOUSBÔOFSVO
incendie, une explosion ou la mort.
3BDDPSEF[MBTÏDIFVTFBVTZTUÒNFEBMJNFOUBUJPOFOHB[
de la salle de lavage avec un nouveau tuyau flexible en
BDJFSJOPYZEBCMFBWFDSBDDPSE/15EF⁄8QPNN
EF
diamètre.
t*OTUBMMF[VOFTPVQBQFEFGFSNFUVSFEF
l’alimentation en gaz à moins de 6 pi (1,8 m) de la
sécheuse. Tout non-respect de ces instructions peut
FOUSBÔOFSVOJODFOEJFVOFFYQMPTJPOPVMBNPSU
4FSSF[TPMJEFNFOUUPVTMFTSBDDPSETFOUSFMBTÏDIFVTFFU
le système d’alimentation en gaz de la salle de lavage.
Ouvrez l’alimentation en gaz de la salle et vérifiez tous les
SBDDPSETEFMBUVZBVUFSJFBVUBOUJOUFSOFTRVFYUFSOFT
pour toute trace de fuite de gaz avec un liquide de
détection de fuites à l’épreuve de la corrosion.
tLa sécheuse est expédiée de l’usine prête pour
MVUJMJTBUJPOBWFDEVHB[OBUVSFM"TTVSF[WPVTRVF
la sécheuse est dotée de la buse de brûleur correcte
pour le type de gaz qui sera utilisé (gaz naturel ou
gaz de pétrole liquéfié). Tout non-respect de ces
JOTUSVDUJPOTQFVUFOUSBÔOFSVOJODFOEJFVOFFYQMPTJPO
ou la mort.
Branchement électrique
Branchez la sécheuse dans
une prise triphasée mise à la
terre de 120 volts c.a. à
)[
t4JOÏDFTTBJSFMBCVTFDPSSFDUFEFWSBÐUSFJOTUBMMÏF
par un technicien qualifié (pour la trousse de
conversion PL, commandez la pièce numéro
&&-%
FUMFDIBOHFNFOUEFWSBÐUSFJOEJRVÏ
sur la sécheuse. Tout non-respect de ces instructions
QFVUFOUSBÔOFSVOJODFOEJFVOFFYQMPTJPOPVMBNPSU
t5PVTMFTSBDDPSETEPJWFOUÐUSFFODPOGPSNJUÏBWFD
tous les codes et règlements locaux applicables.
5PVUOPOSFTQFDUEFDFTJOTUSVDUJPOTQFVUFOUSBÔOFSVO
incendie, une explosion ou la mort.
t-BJSEFTTÏDIFVTFTËHB[%0*5ÐUSFÏWBDVÏË
l’extérieur. Tout non-respect de ces instructions peut
FOUSBÔOFSVOJODFOEJFVOFFYQMPTJPOPVMBNPSU
3BDDPSEËHB[/15
QPNN
Tuyau flexible en acier
inoxydable homologué
AGA/CSA
Bouchon de
DBOBMJTBUJPO/15
QPNN
Soupape de
fermeture de
l’alimentation en
gaz
Installations en haute altitude
-F#56OPNJOBMEFDFUUFTÏDIFVTFFTUIPNPMPHVÏ"("
QPVSVOFBMUJUVEFTPVTMFTQJFETN
Dans le cas d’une installation de votre sécheuse à gaz à
VOFBMUJUVEFEFQMVTEFQJN
TBDBQBDJUÏ
doit être réduite par un technicien qualifié ou le
fournisseur de gaz.
FRANÇAIS
WAVERTISSEMENT
22
INSTRUCTIONS D’INSTALLATION
Raccordement des sécheuses électriques
WAVERTISSEMENT
1PVSBJEFSËFNQÐDIFSEFTJODFOEJFTEFT
électrocutions, des blessures graves, ou des
décès, le câblage et la mise à la terre doivent se
conformer à l’édition la plus récente du Code
OBUJPOBMEFMÏMFDUSJDJUÏ"/4*/'1"FUËUPVTMFT
règlements locaux en vigueur. Veuillez faire vérifier
par un technicien qualifié que votre maison a une
alimentation électrique suffisamment puissante pour
faire fonctionner une sécheuse.
Exigences électriques requises uniquement pour les
modèles électriques
WAVERTISSEMENT
Afin de réduire les risques d’incendie, de choc
électrique, ou les blessures corporelles lorsque vous
utilisez cet électroménager, vous devez toujours suivre
les précautions de base, y compris ce qui suit :
tCette sécheuse doit être reliée à un réseau de
câblage métallique permanent mis à la terre, ou
un conducteur de terre pour appareil doit passer
avec les conducteurs du circuit et être relié à
la borne ou au fil de terre sur la sécheuse. Tout
OPOSFTQFDUEFDFTJOTUSVDUJPOTQFVUFOUSBÔOFSVO
incendie, une explosion ou la mort.
t-BTÏDIFVTFDPNQPSUFTPOQSPQSFCMPDEFKPODUJPO
qui doit être relié à un circuit monophasé distinct
EFWPMUTDBË)[NVOJEVOGVTJCMF
de 30 ampères (le circuit doit comporter des
GVTJCMFTEFTEFVYDÙUÏTEVGJM
-"-*.&/5"5*0/
²-&$53*26&%&73"*5³53&®-"5&/4*0/
/0.*/"-&."9*."-&*/%*26²&463-"1-"26&
4*(/"-²5*26&%&-"4²$)&64&/&-"3&-*&;
1"4®6/$*3$6*5%&0670-54Tout
OPOSFTQFDUEFDFTJOTUSVDUJPOTQFVUFOUSBÔOFSVO
incendie, une explosion ou la mort.
t4JMFDJSDVJUEFEÏSJWBUJPOWFSTMBTÏDIFVTFFTUEF
15 pi (4,5 m) ou moins de longueur, utilisez un fil
no"8(VOJRVFNFOUFODVJWSF
IPNPMPHVÏ
UL (Underwriters Laboratories) conforme aux
FYJHFODFTEFTDPEFTMPDBVY4JMBMPOHVFVS
est de plus de 15 pi (4,5 m), utilisez un fil no 8
"8(VOJRVFNFOUFODVJWSF
IPNPMPHVÏ6-
(Underwriters Laboratories) ou conforme aux
exigences des codes locaux. Laissez suffisamment
EFKFVQPVSQFSNFUUSFEFEÏQMBDFSMBTÏDIFVTFBV
besoin. Tout non-respect de ces instructions peut
FOUSBÔOFSVOJODFOEJFVOFFYQMPTJPOPVMBNPSU
tLe cordon d’alimentation (en tire-bouchon) pour
la connexion entre le réceptacle mural et le bloc
EFKPODUJPOEFMBTÏDIFVTF/&451"4GPVSOJBWFD
l’appareil. Le type en tire-bouchon et le calibre
du fil doivent être conformes aux codes locaux
et avec les directives des pages suivantes. Tout
OPOSFTQFDUEFDFTJOTUSVDUJPOTQFVUFOUSBÔOFSVO
incendie, une explosion ou la mort.
tUne connexion à 4 fils est exigée pour toutes
installations dans les maisons mobiles ou
préfabriquées de même que pour toutes nouvelles
constructions après le 1erKBOWJFS%FQMVT
une connexion à 4 fils doit être utilisée dans les
SÏHJPOTPáMFTDPEFTMPDBVYJOUFSEJTFOUMBNJTFË
la terre par un fil neutre. Tout non-respect de ces
JOTUSVDUJPOTQFVUFOUSBÔOFSVOJODFOEJFVOFFYQMPTJPO
ou la mort.
WAVERTISSEMENT
Afin de réduire les risques d’incendie, de choc
électrique, ou les blessures corporelles lorsque vous
utilisez des électroménagers, vous devez toujours
suivre les précautions de base, y compris ce qui suit :
t/BQQPSUF[BVDVOFNPEJGJDBUJPOËMBGJDIFFUBV
câblage interne de la sécheuse.
t-BTÏDIFVTFEPJUÐUSFDPOOFDUÏFËVOFQSJTFË
RVBUSFQÙMFT
t4JMBGJDIFOFTBEBQUFQBTËMBQSJTFNVSBMFGBJUFT
installer une prise adaptée par un électricien
qualifié.
Exigences électriques particulières pour les maisons
mobiles ou préfabriquées
WAVERTISSEMENT
Afin de réduire les risques d’incendie, de choc
électrique, ou les blessures corporelles lorsque vous
utilisez cet électroménager, vous devez toujours suivre
les précautions de base, y compris ce qui suit :
t5PVUFJOTUBMMBUJPOEBOTVOFNBJTPONPCJMFPV
préfabriquée doit être conforme au chapitre 24 de
MB$'3QBSBHSBQIFTEFTOPSNFTBNÏSJDBJOFT
en matière de sécurité et de construction de
maisons préfabriquées ou à la norme canadienne
$"/$4";.)BJOTJRVBVYDPEFTFU
règlements locaux.
tUne connexion à quatre fils est exigée pour
toutes installations dans les maisons mobiles ou
préfabriquées de même que pour toutes nouvelles
constructions après le 1erKBOWJFS Tout nonSFTQFDUEFDFTJOTUSVDUJPOTQFVUFOUSBÔOFSVOJODFOEJF
une explosion ou la mort.
INSTRUCTIONS D’INSTALLATION
Exigences particulières pour les
maisons mobiles ou préfabriquées
t6OFTÏDIFVTFËHB[EPJUÐUSFGJYÏFEFGBÎPO
permanente au plancher.
t-BDPOOFYJPOÏMFDUSJRVFQPVSVOFTÏDIFVTFÏMFDUSJRVF
EPJUDPNQPSUFSVOFDPOOFYJPOËRVBUSFGJMT1PVS
des renseignements plus détaillés en matière de
connexions électriques, consultez la rubrique
Raccordement des sécheuses électriques.
t1PVSSÏEVJSFMFSJTRVFEFDPNCVTUJPOFUEJODFOEJFMB
sécheuse doit être ventilée vers l’extérieur.
t/&7&/5*-&;1"4MBTÏDIFVTFTPVTVOFNBJTPONPCJMF
ou préfabriquée.
t6UJMJTF[MFQBOOFBVBSSJÒSFESPJUHBVDIFPVJOGÏSJFVS
pour ventiler une sécheuse électrique vers l’extérieur.
t6UJMJTF[MFQBOOFBVBSSJÒSFHBVDIFPVJOGÏSJFVS
pour ventiler une sécheuse à gaz vers l’extérieur. Il
est impossible de ventiler une sécheuse à gaz vers
l’extérieur par le panneau droit en raison de la présence
du module du brûleur.
t-FDPOEVJUEÏWBDVBUJPOEBJSEFMBTÏDIFVTFEPJUÐUSF
solidement fixé à la structure de la maison mobile
ou préfabriquée. Il doit être fabriqué d’une matière
qui résistera aux flammes et à la combustion. Il est
recommandé d’installer un conduit métallique rigide
ou flexible.
t/&3&-*&;1"4MFDPOEVJUEÏWBDVBUJPOEBJSËUPVUBVUSF
conduit, système de ventilation, cheminée, ou autre
conduit d’évacuation d’air.
t"TTVSF[WPVTRVFMBTÏDIFVTFEJTQPTFEVOBDDÒT
adéquat à de l’air frais pour garantir un bon
fonctionnement. L’ouverture pour l’apport d’air frais
FYUÏSJFVSEPJUÐUSFEBVNPJOTQPDN
t*MFTUJNQPSUBOUEFNBJOUFOJSVOEÏHBHFNFOUEBV
NPJOTQPDN
EFNBUJÒSFTDPNCVTUJCMFTBVUPVS
du conduit d’évacuation d’air lors de la ventilation de
la sécheuse vers l’extérieur. De plus, la sécheuse doit
DPNQPSUFSVOEÏHBHFNFOUEFQPDN
TVSMFT
DÙUÏTFUBVEPTEFMBTÏDIFVTF
t4PVWFOF[WPVTRVFMFTÏMÏNFOUTEVTZTUÒNFEF
ventilation ne sont pas fournis avec la sécheuse.
Veillez à vous procurer les pièces nécessaires pour une
installation adéquate.
Vérification finale de l’installation
6OFGPJTRVFMJOTUBMMBUJPOEFMBTÏDIFVTFEBOTTB
position définitive est terminée, effectuez les essais
suivants et l’évaluation de l’état du conduit d’évacuation
sur la page suivante pour confirmer le fonctionnement
correct de l’appareil.
Essai du module de chauffage de la sécheuse
.0%µ-&4®(";
Fermez la porte de la sécheuse, appuyez sur le bouton
"--6.&3²5&*/%3&QPVSEÏNBSSFSMBQQBSFJMSÏHMÏË
un cycle de séchage à la chaleur. Au démarrage de la
sécheuse, le dispositif d’allumage devrait enflammer le
brûleur principal.
REMARQUE
Si de l’air est encore présent dans le tuyau
d’alimentation en gaz, il est possible que l’allumeur
s’éteigne avant que le brûleur principal ne s’enflamme.
Dans ce cas, le dispositif d’allumage effectuera une
seconde tentative après deux minutes.
.0%µ-&4²-&$53*26&4
Fermez la porte de la sécheuse, appuyez sur le bouton
"--6.&3²5&*/%3&0/0''
QPVSEÏNBSSFSMBQQBSFJM
réglé à un cycle de séchage à la chaleur. L’air évacué
devrait être chaud après un fonctionnement de trois
minutes.
Vérification du débit d’air
6OGPODUJPOOFNFOUFGGFDUJGEFMBTÏDIFVTFFYJHFVO
débit d’air adéquat. On peut mesurer l’efficacité du
débit d’air en évaluant la pression statique à l’aide
EVONBOPNÒUSF1MBDF[VONBOPNÒUSFTVSMFDPOEVJU
EÏWBDVBUJPOEBJSËFOWJSPOQJDN
EFMBTÏDIFVTF
La pression statique dans le conduit d’évacuation d’air
OFEFWSBJUQBTFYDÏEFSMFTQPDN
7ÏSJGJF[MF
fonctionnement de la sécheuse sans charge.
Vérification du niveau
6OFGPJTMBTÏDIFVTFJOTUBMMÏFEBOTTBQPTJUJPOEÏGJOJUJWF
revérifiez la mise au niveau de la sécheuse. Assurez-vous
que la sécheuse est de niveau de l’avant vers l’arrière et
EVODÙUÏËMBVUSFFURVFMFTRVBUSFQJFETEFOJWFMMFNFOU
sont fermement posés sur le plancher.
FRANÇAIS
Toute installation dans une maison mobile ou
QSÏGBCSJRVÏFEPJUÐUSFDPOGPSNFBVDIBQJUSFEFMB
$'3QBSBHSBQIFTEFTOPSNFTBNÏSJDBJOFTFO
matière de sécurité et de construction de maisons
préfabriquées ou à la norme canadienne CAN/
$4";.)BJOTJRVBVYDPEFTFUSÒHMFNFOUTMPDBVY
En cas de doutes relatifs à la conformité de l’installation
par rapport à ces normes, communiquez avec un
professionnel en service et installation pour du soutien
technique.
23
24
INSTRUCTIONS D’INSTALLATION
Test d’installation
(vérification du conduit)
Lorsque vous avez effectué l’installation de la sécheuse,
utilisez ce test pour vous assurer que les conditions du
système d’échappement sont adéquates à une utilisation
correcte de la sécheuse. Ce test doit être réalisé pour
vous signaler d’éventuels problèmes dans le système
d’échappement de votre environnement domestique.
t-BTÏDIFVTFQSÏTFOUFMBDBSBDUÏSJTUJRVFFLOW SENSEMC,
un système de détection innovateur qui détecte
automatiquement les blocages et les obstructions
du conduit de la sécheuse. Retirer les accumulations
de charpie et les obstructions du conduit permet aux
vêtements de sécher plus rapidement et réduit la
consommation d’énergie.
REMARQUE
La sécheuse doit être refroidie avant de commencer
MFUFTU%BOTMFDBTPáMBTÏDIFVTFBDIBVGGÏQFOEBOU
MJOTUBMMBUJPOMBODF[VODZDMF4²$)"(&®-"*3"*3
%3:
QFOEBOURVFMRVFTNJOVUFTQPVSSÏEVJSFMB
température intérieure.
1PVSBDUJWFSMFUFTUEJOTUBMMBUJPO
/FSJFONFUUSFEBOTMBTÏDIFVTFQFOEBOUDFUFTU
car cela pourrait affecter les résultats. Retirez la
documentation et fermez la porte.
.BJOUFOF[MFTCPVUPOT5&.1$0/530-FU4*(/"-
appuyés en même temps, puis appuyez sur le
CPVUPO"--6.&3²5&*/%3&108&3
Le sigle
s’affiche lorsque l’activation est réussie.
"QQVZF[TVS%²."33&31"64&45"351"64&
La sécheuse se mettra en marche pendant environ
deux minutes afin d’évaluer les températures à
l’intérieur.
Vérifiez les résultats qui s’affichent.
1FOEBOUMFDZDMFEFTTBJEFUSPJTNJOVUFTTVSWFJMMFS
l’écran FLOW SENSEMC du panneau de commande. Si
aucune barre ne s’affiche à la fin du cycle, le système
EÏDIBQQFNFOUFTUDPSSFDU%BOTMFDBTPáMFTZTUÒNF
d’échappement est sévèrement obstrué, le voyant
affiche quatre barres. D’autres problèmes peuvent
également être indiqués par des codes d’erreurs.
Reportez-vous à la page suivante pour les détails des
codes d’erreurs et les solutions.
1"4%&#"33&4 26"53&#"33&4
0,
0#4536$5*0/
L’affichage des quatre barres indique que le système
d’échappement est sévèrement obstrué. Faites
immédiatement vérifier le système, car la performance
sera faible.
'JOEFDZDMF
®MBGJOEVDZDMFEFUFTU
s’affiche. Le
cycle de test se termine et la sécheuse s’éteint
automatiquement après une courte période.
INSTRUCTIONS D’INSTALLATION
25
Test d’installation (vérification du conduit) (suite)
t7ÏSJöF[MFDPEFEFSSFVSBWBOUEFDPOUBDUFSMFTFSWJDFBQSÒTWFOUF
Code d’erreur
)4
14 ou 1' ou nP
Solutions
t%ZTGPODUJPOOFNFOUEVUIFSNPTUBU
tÉteignez la sécheuse et contactez le service
après-vente.
t%ZTGPODUJPOOFNFOUEVEÏUFDUFVS
d’humidité.
tÉteignez la sécheuse et contactez le service
après-vente
t-FDÉCMFEBMJNFOUBUJPOÏMFDUSJRVFEFMB t7ÏSJöF[MBMJNFOUBUJPOÏMFDUSJRVFPVMBDPOOFYJPOEV
câble d’alimentation au bloc du terminal. Reportezsécheuse n’est pas connecté correctevous à la section 3BDDPSEFNFOUEFTTÏDIFVTFT
ment, ou l’alimentation électrique est
électriques du présent manuel pour des instrucincorrecte.
tions complètes.
t6OGVTJCMFBTBVUÏMFEJTKPODUFVSEVDJScuit s’est déclenché ou il y a une panne t3ÏJOJUJBMJTF[MFEJTKPODUFVSEVDJSDVJUPVSFNQMBDF[
le fusible. Ne pas augmenter la puissance du fusible.
de courant.
Si le problème est une surcharge du circuit, faites-le
SÏQBSFSQBSVOÏMFDUSJDJFORVBMJöÏ
t7ÏSJöF[MBDPOEJUJPOEVDPOEVJU
Si le test affiche FLOW SENSEMCWÏSJöF[MFTPCTUSVDUJPOT
et dommages au système d’échappement. Réparez ou
remplacez le système d’échappement si nécessaire.
Circulation d’air bloquée
Éviter les longs tuyaux ou les tuyaux comportant
plusieurs coudes.
REMARQUES
Ce test devrait être réalisé lors de l’installation
de la sécheuse pour vous indiquer l’existence
d’un problème quelconque au niveau du conduit
d’évacuation de votre logement. Toutefois, puisque
le test fournit des indications plus fidèles sur l’état
du conduit d’évacuation lorsqu’il est réalisé dans
des conditions normales d’utilisation que lors du
test d’installation, il se peut que le nombre de barres
affichées du voyant FLOW SENSEMC dans les deux tests
diffère.
Excès ou conduit
de raccord obstrué
Trop de coudes ou
échappement trop long
Vérifier l’existence de blocages et
d’accumulation de charpie.
Ne pas interrompre le cycle de test, car cela peut avoir
une incidence sur l’exactitude des résultats.
Même si le voyant FLOW SENSEMC n’est pas affiché, au
cours du cycle de test, des obstructions peuvent être
présentes dans le système d’échappement. Reportezvous à la section Ventilation de la sécheuse du
présent manuel pour les conditions relatives au
système d’échappement et à la ventilation.
La sécheuse présente la fonction Flow SenseMC,
un système de détection innovateur qui détecte
automatiquement les blocages et les obstructions
du conduit de la sécheuse. Retirer les accumulations
de charpie et les obstructions du conduit permet aux
vêtements de sécher plus rapidement et réduit la
consommation d’énergie.
Accumulation
de charpie ou
blocages
S’assurer que le conduit d’évacuation n’est pas
écrasé ou restreint.
Échappement
obstrué ou
endommagé
FRANÇAIS
tE1 ou tE2
Cause éventuelles
26
MODE D’EMPLOI
MODE D’EMPLOI
Fonctionnement de la sécheuse
1
/&550:&3-&'*-53&®$)"31*&
Si le filtre à charpie n’a pas déjà été nettoyé, retirez-le et nettoyez la charpie
de la charge précédente. Cela permettra d’assurer un séchage plus rapide et
efficace.
Filtre à
charpie
2
$)"3(&3-"4²$)&64&
Chargez la sécheuse avec du linge mouillé provenant de la machine à laver. Si
la charge est très volumineuse, vous devrez peut-être la répartir en plusieurs
charges plus petites afin d’obtenir un meilleur séchage et de prendre soin des
vêtements.
3
"--6.&3-"4²$)&64&
"QQVZF[TVSMFCPVUPO"--6.&3²5&*/%3&108&3
QPVSNFUUSFMBTÏDIFVTF
sous tension. Les voyants des programmes s’allumeront et une sonnerie
SFUFOUJSBTJDFMMFDJFTUBDUJWÏF3FQPSUF[WPVTËMBQBHF
4
4²-&$5*0//&36/130(3"..&
"QQVZFSTVSMFCPVUPO$:$-&KVTRVËDFRVFMJOEJDBUFVSEVDZDMFEÏTJSÏ
s’allume. La température, le niveau de séchage et les options du cycle
s’afficheront. Les paramètres par défaut du cycle sélectionné peuvent alors être
modifiés au besoin. Consulter la page des paramètres et des options des cycles
pour de plus amples renseignements.
REMARQUE
Les options ou modificateurs ne sont pas tous disponibles pour tous les
cycles. Consulter la page de guide sur les cycles pour les paramètres par
EÏGBVUFUMFTPQUJPOTQPTTJCMFT6OFTPOOFSJFEJGGÏSFOUFFTUÏNJTFFUMF
voyant ne s’allume pas si la sélection n’est pas possible.
5
$0..&/$&3-&130(3"..&
"QQVZF[TVSMFCPVUPO%²."33&31"64&45"351"64&
QPVSDPNNFODFS
le programme. Celui-ci peut être interrompu à tout moment, en ouvrant
MBQPSUFPVFOBQQVZBOUTVSMFCPVUPO%²."33&31"64&45"351"64&
Si le programme n’est pas redémarré dans les quatre minutes qui suivent,
la sécheuse sera mise hors tension et les paramètres du programme seront
perdus.
6
'*/%6130(3"..&
Lorsque le programme est terminé, une sonnerie retentira si elle a été
activée. Retirez immédiatement les vêtements afin de limiter les faux plis. Si
"/5*'30*44&.&/583*/,-&$"3&
FTUTÏMFDUJPOOÏMFUBNCPVSEFMBTÏDIFVTF
fera quelques tours à quelques minutes d’intervalle pour éviter que les
vêtements ne se froissent.
MODE D’EMPLOI
= paramètres par défaut
Guide des cycles
5ZQF
STEAM
FRESHMC
ANTIFROISSEMENT
83*/,-&'3&&
GROSSE
CHARGE
)&"7:%65:
TEXTILES
INFROISSABLES
&54:/5)²5*26&4
1&3.13&44
NORMAL
SÉCHAGE
®
$"15&63
SÉCHAGE
."/6&-
Å
4POOFSJF
5FNQTFO EFUFNQT
"OUJ
de séchage
min.
- de temps froissement humide
5ZQFEFUJTTV
/JWEF
séchage
5FNQ
Édredons, chemises,
QBOUBMPOTTBVGMFT
tissus particulièrement
EÏMJDBUT
ÉTEINT
)"65
Å
Édredons, literie,
vêtements pour enfants
ÉTEINT
)"65
Å
)"65
Å
Å
FAIBLE
Å
Å
.0:&/
Å
Å
FAIBLE
Å
Å
.0:&/
)"65
Å
Å
)"65
Å
.0:&/
)"65
RÉGLABLE
NORMAL
Jeans, vêtements lourds
RÉGLABLE
NORMAL
1SFTTBHFQFSNBOFOU
tissus synthétiques
Vêtements de travail,
WFMPVSTDÙUFMÏFUD
RÉGLABLE
NORMAL
RÉGLABLE
NORMAL
RÉGLABLE
NORMAL
SERVIETTES Denims, serviettes,
508&-4
cotons lourds
RÉGLABLE
1&5*5&
6UJMJTF[OPSNBMDPUPO NORMAL
CHARGE
TFSWJFUUFTEFUJTTV.BY
RÉGLABLE
4."---0"%
MC
ARTICLES
NORMAL
oreillers,
ENCOMBRANTS Couvertures,
chemises
RÉGLABLE
#6-,:
ANTIBACTÉRIEN N’utilisez pas ce cycle
53µ4
"/5*#"$5&3*"-
avec les articles délicats.
DÉLICATS
%&-*$"5&4
= option possible
FRANÇAIS
$:$-&
7"1&63
Cycle
27
Lingerie, draps, blouses
4²$)"(&3"1*%& 1FUJUFTCSBTTÏFTEF
ŷ41&&%%3:Ÿ
courte durée
ÉTEINT
)"65
RÉGLABLE
1PVSMFTBSUJDMFTRVJ
doivent être séchés
4²$)"(&®
chaleur, tels
-"*3"*3%3:
sans
les plastiques ou les
caoutchoucs
ÉTEINT
Sans
chaleur
Charges nécessitant
un temps de séchage
précis
Å
Å
Å
Å
Å
Å
Å
ÉTEINT
CYCLES SÉCHAGE À CAPTEUR
-FTDZDMFT4ÏDIBHFËDBQUFVS4FOTPS%SZ
VUJMJTFOUMFTZTUÒNF
exclusif à double capteur de LG qui détecte et compare le
niveau d’humidité des vêtements et celui de l’air ambiant
et règle le temps de séchage au besoin pour optimiser les
résultats. La sécheuse règle automatiquement le niveau de
séchage et la température aux paramètres recommandés
pour chaque cycle. L’afficheur indiquera le temps restant
estimé.
REMARQUE
1PVSQSPUÏHFSWPTWÐUFNFOUTMFTEJGGÏSFOUFTPQUJPOT
de niveau de séchage, température, ou autres ne sont
pas toutes disponibles avec chacun des cycles. Voir le
(VJEFEFTDZDMFT pour plus de renseignements.
RÉGLABLE
)"65
RÉGLABLE
RÉGLABLE
CYCLES SÉCHAGE MANUEL
6UJMJTF[MFTDZDMFT4²$)"(&."/6&-.BOVBM%SZ
QPVS
sélectionner un temps et une température de séchage. Lors
EFMBTÏMFDUJPOEVODZDMF.BOVBM%SZMBGGJDIFVS5&.14
3&45"/5&45*.²&45*."5&%5*.&3&."*/*/(
JOEJRVFMF
temps réel restant pour votre cycle. Appuyez sur les boutons
5&.14.03&5*.&
PV5&.14-&445*.&
QPVSNPEJGJFS
le temps réel du cycle.
$FSUJGJÏQBS/4'
/4'*OUFSOBUJPOBMBODJFOOFNFOU/BUJPOBM
4BOJUBUJPO'PVOEBUJPO
DFSUJGJFRVFMFDZDMF
"/5*#"$5²3*&/SÏEVJUEFMBUFOFVSFO
bactéries de la lessive effectuée et qu’aucune
bactérie n’est transmise à la lessive suivante.
28
MODE D’EMPLOI
Voici les instructions de mise en marche et d’utilisation de votre nouvelle sécheuse. Veuillez consulter les sections
appropriées de ce manuel pour de plus amples renseignements.
Triage des brassées
Vérification du filtre à charpie
avant chaque brassée
Étiquettes d’entretien des tissus
La plupart des vêtements possèdent des étiquettes d’entretien
des tissus qui affichent les directives pour un soin approprié.
Étiquettes d’entretien
Séchage
par
culbutage
Sec
Cycle doux/
délicat
Réglage
de la
chaleur
Élevée
Normal
Tissus infroissables/
résistant au froissement
Ne pas sécher
Ne pas sécher (action mentionnée
par culbutage
conjointement avec
« ne pas laver »)
Moyenne
Faible
Sans chaleur/
séchage à l’air
Assurez-vous que le filtre à charpie est toujours propre
avant de sécher une nouvelle brassée. En effet, un filtre
obstrué par de la charpie augmentera le temps de
séchage.
1PVSMFOFUUPZFSUJSF[ESPJUWFSTMFIBVUTVSMFGJMUSFFU
faites une boule de charpie avec vos doigts. Ne pas
SJODFSOJMBWFSMFGJMUSFQPVSSFUJSFSMBDIBSQJF1PVTTF[
fermement sur le filtre à charpie pour le remettre en
QMBDF7PZF[MBTFDUJPO/&550:"(&3²(6-*&3QPVSQMVT
de détails.
Assurez-vous que le filtre à charpie soit toujours
DPSSFDUFNFOUJOTUBMMÏBWBOUEFEÏNBSSFSMBTÏDIFVTF6O
fonctionnement de la sécheuse avec un filtre lâche ou
manquant risquerait d’endommager la sécheuse et les
articles dans la sécheuse.
Grouper les articles similaires
1PVSEFNFJMMFVSTSÏTVMUBUTUSJF[MFTWÐUFNFOUTQPVSFOGBJSFEFT
brassées qui peuvent être séchées au même cycle de séchage.
Différents tissus exigent des soins particuliers et certains d’entre
eux sèchent plus rapidement que d’autres.
Chargement de la sécheuse
WAVERTISSEMENT
Afin de réduire les risques d’incendie, de choc
électrique, ou les blessures corporelles lorsque vous
utilisez cet électroménager, vous devez toujours suivre
les précautions de base, y compris ce qui suit :
tVérifiez toutes les poches pour vous assurer qu’elles sont
WJEFT%FTBSUJDMFTDPNNFEFTUSPNCPOFTEFTTUZMPT
de la monnaie, et des clés peuvent endommager votre
TÏDIFVTFFUWPTWÐUFNFOUT%FTPCKFUTJOGMBNNBCMFT
comme des briquets ou des allumettes risqueraient de
s’enflammer et de provoquer un incendie. Tout nonSFTQFDUEFDFTJOTUSVDUJPOTQFVUFOUSBÔOFSVOJODFOEJFVOF
explosion ou la mort.
t/FTÏDIF[KBNBJTEFTWÐUFNFOUTRVJPOUÏUÏFYQPTÏT
à de l’huile, de l’essence, ou d’autres substances
inflammables. Le lavage des vêtements n’enlèvera pas
complètement les résidus d’huile. Tout non-respect de
DFUBWFSUJTTFNFOUQFVUFOUSBÔOFSEFTCMFTTVSFTHSBWFTVO
incendie, l’électrocution ou la mort.
REMARQUES
Conseils de chargement
t$PNCJOF[MFTBSUJDMFTHSBOETFUQFUJUTEBOTVOFCSBTTÏF
t-FTWÐUFNFOUTNPVJMMÏTQSFOOFOUEVWPMVNFBVTÏDIBHF
Ne surchargez pas la sécheuse. Les vêtements ont besoin
d’espace pour culbuter et sécher correctement.
t'FSNF[MFTGFSNFUVSFTÏDMBJSMFTDSPDIFUTFUMFTDPSEPOT
pour les empêcher de s’accrocher ou de s’emmêler aux
autres vêtements.
Filtre à
charpie
MODE D’EMPLOI
29
Paramètres et options du cycle
REMARQUE
1PVSQSPUÏHFSWPTWÐUFNFOUTMFTEJGGÏSFOUFTPQUJPOT
de niveau de séchage, température, ou autres, ne sont
pas toutes disponibles avec chacun des cycles. Voir le
(VJEFEFTDZDMFT pour plus de renseignements.
NIVEAU DE SÉCHAGE (DRY LEVEL)
Sélectionne le niveau de séchage du cycle. Appuyez sur
MFCPVUPO/*7&"6%&4²$)"(&%3:-&7&-
ËSÏQÏUJUJPO
pour défiler à travers les paramètres disponibles.
t$FUUFPQUJPOFTUPGGFSUFVOJRVFNFOUBWFDMFTDZDMFT
4²$)"(&®$"15&634&/403%3:
t-BTÏDIFVTFBKVTUFSBBVUPNBUJRVFNFOUMFUFNQTEV
DZDMF-BTÏMFDUJPOEFMPQUJPO1-644&$.03&%3:
PV53µ44&$7&3:%3:
BVHNFOUFSBMFUFNQTEVDZDMF
BMPSTRVF4²$)"(&)6.*%&%".1%3:
PV.0*/4
4&$-&44%3:
MFEJNJOVFSB
t6UJMJTF[MFQBSBNÒUSF4²$)"(&)6.*%&%".1%3:
PV.0*/44&$-&44%3:
QPVSMFTBSUJDMFTRVFWPVT
désirez repasser.
CONTRÔLE DE TEMPÉRATURE (TEMP. CONTROL)
$FCPVUPOSÒHMFMFQBSBNÒUSFEFUFNQÏSBUVSFEF6-53"
'"*#-&6-53"-08
Ë)"65)*()
$FSÏHMBHFQFSNFU
un entretien précis de vos tissus et vêtements.
"QQVZF[TVSMFCPVUPO$0/53¼-&%&5&.1²3"563&
5&.1$0/530-
ËSÏQÏUJUJPOQPVSEÏGJMFSËUSBWFSTMFT
paramètres disponibles.
SÉCHAGE MINUTÉ (TIME DRY)
Ce bouton vous permet de sélectionner manuellement
MFUFNQTEFTÏDIBHFEFËNJOVUFTQBS
JODSÏNFOUTEFNJOVUFT6UJMJTF[DFUUFGPODUJPO
QPVSMFTQFUJUFTCSBTTÏFTPVQPVSEÏGSPJTTFS6UJMJTF[
MFTCPVUPOT5&.145&.14.03&5*.&-&445*.&
pour augmenter ou réduire le temps de séchage par
incrément d’une minute.
Votre sécheuse vous offre plusieurs options de cycle
supplémentaires pour personnaliser les cycles et ainsi
satisfaire vos besoins individuels. Certains boutons
d’options comportent également une fonction spéciale
DPOTVMUF[MBQBHFTVJWBOUFQPVSMFTEÏUBJMT
RVJQFVU
être actionnée en appuyant et en maintenant ce bouton
d’option pendant trois secondes.
SONNERIE (SIGNAL)
Réglez le volume du signal ou éteignez-le.
Appuyez à plusieurs reprises sur le bouton jusqu’à ce le
réglage de volume souhaité soit allumé.
Votre sécheuse vous offre plusieurs options de cycle
supplémentaires pour personnaliser les cycles et ainsi satisfaire
vos besoins individuels. Certains boutons d’options comportent
ÏHBMFNFOUVOFGPODUJPOTQÏDJBMFDPOTVMUF[MBQBHFTVJWBOUF
QPVSMFTEÏUBJMT
RVJQFVUÐUSFBDUJPOOÏFFOBQQVZBOUFUFO
maintenant ce bouton d’option pendant trois secondes.
Pour ajouter des options de cycles à un cycle :
.FUUF[FONBSDIFMBTÏDIFVTFFUBQQVZF[TVSMF
bouton sélecteur de cycle au cycle désiré.
6UJMJTF[MFTCPVUPOTEFSÏHMBHFEFDZDMFQPVSBKVTUFS
les paramètres de ce cycle.
"QQVZF[TVSMFPVMFTCPVUPOTEPQUJPOTEFDZDMFT
afin de sélectionner les paramètres que vous
aimeriez ajouter. L’afficheur montrera un message de
confirmation.
"QQVZF[TVSMFCPVUPO%²."33&31"64&45"35
1"64&
QPVSEÏNBSSFSMFDZDMF-BTÏDIFVTFEÏNBSSFSB
automatiquement.
* SÉCHAGE SUR GRILLE (RACK DRY)
6UJMJTF[MBGPODUJPO4²$)"(&463(3*--&3"$,%3:
avec des articles comme les gilets en laine, la soie, et la
MJOHFSJFRVJEPJWFOUTÏDIFSËQMBU6UJMJTF[ÏHBMFNFOUMF
4²$)"(&463(3*--&3"$,%3:
QPVSEFTBSUJDMFTRVJ
ne doivent pas être séchés par culbutage comme des
chaussures de tennis ou des animaux en peluche.
REMARQUE
N’utilisez JAMAIS la grille avec un cycle de séchage
par culbutage.
Installation de la grille de séchage
0VWSF[MBQPSUFEFMBTÏDIFVTFFUHMJTTF[MBHSJMMFEBOT
le tambour de la sécheuse.
"TTVSF[WPVTRVFMBHSJMMFFTUBQQVZÏFVOJGPSNÏNFOU
sur le bord de la jante interne de la porte et repose à
plat à l’intérieur de la sécheuse.
REMARQUE
Assurez-vous de retirer la grille une fois le cycle
4²$)"(&463(3*--&3"$,%3:
UFSNJOÏ
FRANÇAIS
-FTDZDMFT4²$)"(&®$"15&634&/403%3:
possèdent des réglages de cycles présélectionnés
automatiquement et ne peuvent être modifiés. Les
DZDMFT4²$)"(&."/6&-."/6"-%3:
DPNQPSUFOU
des paramètres par défaut, mais vous pouvez également
personnaliser les paramètres à l’aide des boutons de
réglage du cycle. Appuyez sur le bouton correspondant
à cette option pour voir et sélectionner d’autres
paramètres.
30
MODE D’EMPLOI
Paramètres et options du cycle (suite)
* SONNERIE SÉCHAGE HUMIDE (DAMP DRY SIGNAL)
Avec cette option, la sécheuse émettra une alarme sonore
MPSTRVFMBCSBTTÏFTFSBTÒDIFËFOWJSPO&MMFWPVTQFSNFU
de retirer les articles légers qui sèchent plus rapidement ou les
articles que vous désirez repasser ou suspendre encore un peu
IVNJEF"QQVZF[TVSMFCPVUPO40//&3*&4²$)"(&)6.*%&
%".1%3:4*(/"-
QPVSBDUJWFSPVEÏTBDUJWFSMBGPODUJPO
40//&3*&4²$)"(&)6.*%&%".1%3:4*(/"-
ANTIFROISSEMENT (WRINKLE CAR E)
Avec cette option, la sécheuse culbutera la brassée
régulièrement sur une période allant jusqu’à trois heures après
la fin d’un cycle ou jusqu’à l’ouverture de la porte. C’est une
fonction pratique qui aide à prévenir la formation de plis lorsque
vous êtes dans l’impossibilité de retirer immédiatement les
articles de la sécheuse.
Rappel d’un programme personnalisé :
Fonctions spéciales
Fonctions de vapeur
Les boutons d’options activent également des fonctions
TQÏDJBMFTDPNNF7&3306*--"(&1063&/'"/54$)*-%-0$,
Appuyez et maintenez enfoncé le bouton d’option marqué de la
fonction spéciale pendant trois secondes pour l’actionner.
La nouvelle technologie à vapeur de LG vous permet
d’envoyer un jet de vapeur tourbillonnante dans
MFTUJTTVTEBOTMFCVUEFSBGSBÔDIJSMFTWÐUFNFOUTEF
réduire l’électricité statique et de faciliter le repassage.
Sélectionnez simplement le cycle STEAM FRESHMC.
Vous pouvez également ajouter une option Vapeur aux
cycles sélectionnés.
* VERROUILLAGE POUR ENFANTS (CHILD LOCK)
6UJMJTF[DFUUFPQUJPOQPVSFNQÐDIFSVOFVUJMJTBUJPOOPO
désirée de la sécheuse ou pour empêcher toute modification
des paramètres de cycle lorsque la sécheuse est en fonction.
Appuyez et maintenez enfoncé le bouton pendant trois
TFDPOEFTQPVSBDUJWFSPVEÏTBDUJWFSMBGPODUJPO7&3306*--"(&
1063&/'"/54$)*-%-0$,
-PSTRVFMF7&3306*--"(&1063
&/'"/54$)*-%-0$,
FTUBDUJWÏMJOEJDBUFVSEF7&3306*--"(&
1063&/'"/54BQQBSBÔUSBFUUPVTMFTCPVUPOTTFSPOUEÏTBDUJWÏT
ËMFYDFQUJPOEVCPVUPO"--6.&3²5&*/%3&108&3
REMARQUE
*MGBVUEÏTBDUJWFSNBOVFMMFNFOUMF7&3306*--"(&1063
&/'"/54$)*-%-0$,
MPSTRVJMFTUBDUJWÏ-F7&3306*--"(&1063
&/'"/54$)*-%-0$,
EPJUÐUSFBSSÐUÏQPVSQPVWPJSMBODFSVO
autre cycle. Si vous souhaitez désactiver cette fonction, appuyez et
maintenez le bouton SIGNAL pendant trois secondes.
Programme personnalisé (Custom
program)
Si vous utilisez une combinaison particulière de paramètres que
vous utilisez fréquemment, il est possible de les sauvegarder en
UBOURVF130(3"..&1&340//"-*4²$6450.130(3".
* Sauvegarde d’un programme personnalisé
.FUUF[FONBSDIFMBTÏDIFVTFFUUPVSOF[MFCPVUPOTÏMFDUFVS
de cycle au cycle désiré.
6UJMJTF[MFTCPVUPOTEFSÏHMBHFEFDZDMFQPVSSÏHMFSMFT
paramètres de ce cycle.
"QQVZF[TVSMFPVMFTCPVUPOTEPQUJPOTEFDZDMFTBGJOEF
sélectionner les paramètres que vous aimeriez ajouter.
L’afficheur montrera un message de confirmation.
.BJOUFOF[FOGPODÏMFCPVUPO130(3"..&1&340//"-*4²
$6450.130(3".
QFOEBOUUSPJTTFDPOEFT
REMARQUE
Il n’est possible de sauvegarder qu’un programme
personnalisé. Tout autre programme préalablement
sauvegardé sera effacé dès que vous maintenez enfoncé
MFCPVUPO130(3"..&1&340//"-*4²$6450.
130(3".
.FUUF[MBTÏDIFVTFFONBSDIF
&OGPODF[MFCPVUPO130(3"..&1&340//"-*4²
$6450.130(3".
"QQVZF[TVSMFCPVUPO%²."33&31"64&45"35
1"64&
QPVSEÏNBSSFSMFDZDMF
Utilisation du cycle STEAM FRESHMC
(Pour défroisser à la vapeur)
Ce cycle utilise la puissance de la vapeur pour réduire
rapidement les plis et les odeurs dans les textiles. Il
redonne vie aux vêtements froissés qui sont restés au
placard pendant une période prolongée et peut faciliter
le repassage des vêtements très froissés. Le cycle STEAM
FRESHMC peut également être utilisé pour réduire les
odeurs dans les vêtements.
Utilisation du cycle antifroissement
Ce cycle permet d’éliminer les plis, notamment lorsque
le linge est resté trop longtemps dans la sécheuse.
Il est utile pour éviter que votre linge ne se froisse
lorsque vous ne pouvez pas le sortir de la sécheuse
immédiatement.
REMARQUE
Si vous prévoyez partir en vacances ou ne pas utiliser votre
sécheuse pendant une période prolongée, veillez à fermer
l’arrivée d’eau à la sécheuse. Vous éviterez ainsi toute
JOPOEBUJPOJOPQJOÏFDBVTÏFQBSVOFIBVTTFEFMBQSFTTJPO
EFMFBV
FOWPUSFBCTFODF
ENTRETIEN
31
ENTRETIEN
Nettoyage régulier
Nettoyage du filtre à charpie
Nettoyez toujours le filtre à charpie après chaque cycle.
WAVERTISSEMENT
REMARQUES
FRANÇAIS
Afin de réduire les risques d’incendie, de choc
électrique, ou les blessures corporelles lorsque vous
utilisez des électroménagers, vous devez toujours suivre
les précautions de base, y compris ce qui suit :
t%ÏCSBODIF[WPUSFTÏDIFVTFBWBOUEFMBOFUUPZFSQPVS
éviter le risque d’électrocution. Tout non-respect de ces
JOTUSVDUJPOTQFVUFOUSBÔOFSEFTCMFTTVSFTVOJODFOEJFVOF
électrocution ou la mort.
t/VUJMJTF[KBNBJTEFQSPEVJUTDIJNJRVFTQVJTTBOUTEF
nettoyants abrasifs ou de dissolvants pour nettoyer
votre sécheuse. Ils endommageront sa surface.
Nettoyage de l’extérieur
6OFOUSFUJFOBEÏRVBUEFWPUSFTÏDIFVTFQFVUQSPMPOHFSTB
durée de vie utile. L’extérieur de la machine peut être nettoyé
à l’eau chaude, avec un détergent ménager doux et non
abrasif.
Essuyez immédiatement tout déversement à l’aide d’un
chiffon doux et humide.
Filtre à
charpie
1PVSMFOFUUPZFSPVWSF[MBQPSUFEFMBTÏDIFVTFQVJT
UJSF[MFGJMUSFESPJUWFSTMFIBVU1VJT
1PVSVOOFUUPZBHFRVPUJEJFOGBJUFTSPVMFSMFTDIBSQJFT
du filtre avec vos doigts pour les enlever, ou
N’utilisez jamais d’alcool méthylé, de solvant, ou de
produits similaires.
N’utilisez jamais de laine d’acier ou de nettoyeurs
abrasifs; ils pourraient endommager la surface.
Nettoyage de l’intérieur
Essuyez autour de l’ouverture et du joint de la porte avec
un chiffon doux et humide pour prévenir l’accumulation de
charpie et de poussières qui pourraient endommager le joint
de porte.
Nettoyez la porte avec un chiffon doux humidifié avec de l’eau
chaude et un détergent ménager doux et non abrasif puis
essuyez pour sécher.
Il est possible de nettoyer le tambour en acier inoxydable
avec un nettoyeur pour acier inoxydable traditionnel
conformément aux directives du fabricant. N’utilisez jamais
de laine d’acier ou de nettoyeurs abrasifs; ils pourraient
égratigner ou endommager la surface.
Nettoyage autour et sous la sécheuse
Aspirez régulièrement la charpie et la poussière autour
et sous la sécheuse. Au moins une fois par année, vérifiez
le système de conduits, vérifiez toute accumulation de
charpie et nettoyez-les. Si vous remarquez une réduction
du débit d’air ou une chute du rendement de la sécheuse,
vérifiez immédiatement le système de conduits pour toute
obstruction et blocage.
Entretien du système de conduits
Au moins une fois par année, vérifiez le système de
conduits. Et une fois par mois, vérifiez toute accumulation
de charpie et nettoyez-les. Si vous remarquez une réduction
du débit d’air ou une chute du rendement de la sécheuse,
vérifiez immédiatement le système de conduits pour toute
obstruction et blocage. Communiquez avec un technicien ou
un fournisseur de service.
/FUUPZF[MFGJMUSFËDIBSQJFBWFDVOBTQJSBUFVSPV
4JMFGJMUSFËDIBSQJFFTUEFWFOVUSÒTTBMFPVFTUCPVDIÏ
avec l’assouplisseur de tissu, lavez-le dans l’eau
chaude et savonneuse et laissez sécher complètement
avant de le réinstaller.
REMARQUES
N’utilisez JAMAIS la sécheuse sans le filtre à charpie en
place.
NE JAMAIS faire fonctionner la sécheuse avec un filtre
à charpie humide.
32
DÉPANNAGE
DÉPANNAGE
Avant d’appeler le service
Votre sécheuse est dotée d’un système de contrôle des erreurs automatique qui détecte et diagnostique les
problèmes dès leur apparition. Si votre sécheuse ne fonctionne pas correctement ou ne fonctionne pas du tout,
vérifiez les éléments suivants avant d’appeler le service.
Problèmes
Causes possibles
La sécheuse
refuse de se
mettre en
marche
t-FDPSEPOÏMFDUSJRVFOFTUQBT
correctement branché.
Sécheuse ne
chauffe pas
t6OGVTJCMFEFNBJTPOBHSJMMÏVO
disjoncteur s’est déclenché, ou il
y a une panne de courant.
t6OGVTJCMFEFNBJTPOBHSJMMÏVO
disjoncteur s’est déclenché, ou il
y a une panne de courant.
t"MJNFOUBUJPOFOHB[GFSNÏFPV
service coupé (uniquement pour
les modèles à gaz).
Solutions
t"TTVSF[WPVTRVFMBGJDIFFTUCJFOCSBODIÏFEBOTVOFQSJTF
mise à la terre correspondante à la plaque signalétique de
la sécheuse.
t3ÏJOJUJBMJTF[MFEJTKPODUFVSPVSFNQMBDF[MFGVTJCMF
N’augmentez pas la capacité du fusible. Si le problème est
VODJSDVJUTVSDIBSHÏGBJUFTMFDPSSJHFSQBSVOÏMFDUSJDJFO
qualifié.
t3ÏJOJUJBMJTF[MFEJTKPODUFVSPVSFNQMBDF[MFGVTJCMF
N’augmentez pas la capacité du fusible. Si le problème est
VODJSDVJUTVSDIBSHÏGBJUFTMFDPSSJHFSQBSVOÏMFDUSJDJFO
qualifié.
t$POGJSNF[MPVWFSUVSFEFMBTPVQBQFEBMJNFOUBUJPOEFMB
maison et de la soupape de fermeture de l’alimentation
en gaz de l’appareil.
Taches
graisseuses ou
sales sur les
vêtements
t"TTPVQMJTTFVSNBMVUJMJTÏ
L’afficheur
montre le code
d’erreur tE1, tE2
t-BUIFSNJTUBODFFTUEÏGFDUVFVTF
t²UFJHOF[MBTÏDIFVTFFUBQQFMF[MFTFSWJDF
Présence de
charpie sur les
vêtements
t-FGJMUSFËDIBSQJFOFTUQBTCJFO
nettoyé.
t"TTVSF[WPVTRVFMFGJMUSFËDIBSQJFFTUQSPQSFBWBOU
DIBRVFCSBTTÏF"WFDDFSUBJOFTCSBTTÏFTRVJQSPEVJTFOU
VOFRVBOUJUÏÏMFWÏFEFDIBSQJFJMTFSBQFVUÐUSF
nécessaire de nettoyer le filtre en cours de cycle.
t$FSUBJOTUJTTVTQSPEVJTFOUEFMBDIBSQJFDPNNFVOF
serviette de coton blanche pelucheuse) et devraient être
séchés séparément des vêtements qui attirent la charpie
(comme un pantalon de lin noir).
t$POTVMUF[MBSVCSJRVF²MFDUSJDJUÏTUBUJRVFFYDFTTJWFEBOT
MFTWÐUFNFOUTBQSÒTEVTÏDIBHFDJCBT
t%JWJTF[MFTHSPTTFTCSBTTÏFTEFMFTTJWFFOCSBTTÏFTQMVT
modestes pour le séchage.
t7ÏSJGJF[TPJHOFVTFNFOUMFTQPDIFTBWBOUMBMFTTJWFFUMF
séchage des vêtements.
t4ÏDIBHFEFWÐUFNFOUTQSPQSFT
et souillés ensemble.
t5SJBHFJODPSSFDUEFTCSBTTÏFT
t&YDÒTEÏMFDUSJDJUÏTUBUJRVFEBOT
les vêtements.
t4ÏDIFVTFTVSDIBSHÏF
t1BQJFSNPVDIPJSQBQJFSFUD
présent dans les poches.
²MFDUSJDJUÏ
statique
FYDFTTJWFEBOT
les vêtements
après du
séchage
t"VDVOBTTPVQMJTTFVSVUJMJTÏ
ou assouplisseur utilisé
incorrectement.
t-FTWÐUFNFOUTPOUTÏDIÏUSPQ
MPOHUFNQTFYDÒTEFTÏDIBHF
t4ÏDIBHFEFUJTTVTTZOUIÏUJRVFT
infroissables, ou faits de
mélanges de fibres synthétiques.
t$POGJSNF[FUTVJWF[MFTEJSFDUJWFTGPVSOJFTQBSMFGBCSJDBOU
de l’assouplisseur.
t"TTVSF[WPVTEFOFTÏDIFSRVFEFTWÐUFNFOUTQSPQSFT
dans votre sécheuse. En effet, des articles sales peuvent
souiller les vêtements propres de la même brassée ou la
brassée subséquente.
t-FTUBDIFTTVSEFTWÐUFNFOUTTFDTTPOUFOSÏBMJUÏEFT
UBDIFTRVFMFMBWBHFOBQVSFUJSFSDPSSFDUFNFOU"TTVSF[
vous que les vêtements sont complètement propres en
conformité avec les directives de votre machine à laver et
de votre détergent.
t6UJMJTF[VOBTTPVQMJTTFVSQPVSSÏEVJSFMÏMFDUSJDJUÏTUBUJRVF
"TTVSF[WPVTEFTVJWSFMFTEJSFDUJWFTEFTÏUJRVFUUFTEF
lavage.
t-FTÏDIBHFFYDFTTJGEVOFCSBTTÏFEFMFTTJWFQFVU
QSPWPRVFSMBDDVNVMBUJPOEÏMFDUSJDJUÏTUBUJRVF3ÏHMF[MFT
paramètres et utilisez un temps de séchage plus court ou
VUJMJTF[MFTDZDMFT4²$)"(&®$"15&634&/403%3:
t$FTNBUJÒSFTQFVWFOUGBWPSJTFSMBDDVNVMBUJPOEÏMFDUSJDJUÏ
statique. Essayez d’utiliser un assouplisseur.
DÉPANNAGE
33
Avant d’appeler le service (suite)
Problèmes
Causes possibles
4PMVUJPOT
t-FTQBSBNÒUSFTEFTÏDIBHFMB
taille de la brassée, et le taux
d’humidité des vêtements ne
sont pas constants.
t-FUFNQTEFTÏDIBHFEVOFDIBSHFWBSJFTFMPOMF
QBSBNÒUSFEFDIBMFVSMFUZQFEFDIBMFVSVUJMJTÏÏMFDUSJRVF
ËHB[OBUVSFMPV1-
MBUBJMMFEFMBCSBTTÏFMFUZQFEF
tissus, le taux d’humidité des vêtements, et la condition
du système de conduits et du filtre à charpie.
Les vêtements
prennent trop
de temps à
sécher
t-BCSBTTÏFFTUNBMUSJÏF
t4ÏQBSF[MFTBSUJDMFTQMVTMPVSETEFTBSUJDMFTQMVTMÏHFST-FT
articles plus grands et lourds prennent plus de temps à
sécher.
t-FTUJTTVTMPVSETSFUJFOOFOUQMVTEIVNJEJUÏFUTÒDIFOU
EPODQMVTMFOUFNFOU1PVSBJEFSËSÏEVJSFFUËNBJOUFOJS
les temps de séchage plus constants, séparez les grands
articles et les tissus lourds en brassées plus petites de
taille semblable.
t6UJMJTF[MFTQBSBNÒUSFTBQQSPQSJÏTQPVSMFUZQFEFCSBTTÏF
que vous séchez.
t"TTVSF[WPVTRVFMFGJMUSFËDIBSQJFFTUQSPQSFBWBOU
chaque brassée. Avec certaines brassées qui produisent
une quantité élevée de charpie, il sera peutêtre nécessaire
de nettoyer le filtre en cours de cycle.
t$POGJSNF[MBCPOOFDPOGJHVSBUJPOEVTZTUÒNFEFDPOEVJUT
et qu’il est exempt de débris, de charpie et d’obstructions.
Assurez-vous que les clapets s’ouvrent correctement et
qu’ils ne sont pas bloqués, obstrués ou endommagés.
t3ÏJOJUJBMJTF[MFEJTKPODUFVSPVSFNQMBDF[MFGVTJCMF
N’augmentez pas la capacité du fusible. Si le problème est
un circuit surchargé, faites-le corriger par un électricien
qualifié.
t%JWJTF[MFTHSPTTFTCSBTTÏFTEFMFTTJWFFOCSBTTÏFTQMVT
modestes pour le séchage.
t4JWPVTTÏDIF[VOFUSÒTQFUJUFCSBTTÏFBKPVUF[RVFMRVFT
articles supplémentaires pour garantir un bon culbutage.
t#SBTTÏFJNQPSUBOUFEFUJTTVT
lourds.
t.BVWBJTSÏHMBHFEFT
commandes de séchage.
t-FGJMUSFËDIBSQJFEPJUÐUSF
nettoyé.
t$POEVJUTEÏWBDVBUJPOEBJS
bloqués, sales, ou le conduit est
trop long.
t6OGVTJCMFEFNBJTPOBHSJMMÏVO
disjoncteur s’est déclenché, ou il
y a une panne de courant.
t4ÏDIFVTFTVSDIBSHÏF
t4ÏDIFVTFBWFDDIBSHF
insuffisante.
Les vêtements
sont froissés
t-FTWÐUFNFOUTPOUTÏDIÏUSPQ
MPOHUFNQTFYDÒTEFTÏDIBHF
t-FTWÐUFNFOUTTPOUSFTUÏTUSPQ
longtemps dans la sécheuse à la
fin du cycle.
t6OTÏDIBHFFYDFTTJGEVOFCSBTTÏFQFVUQSPWPRVFSEFT
plis. Essayez un temps de séchage plus court et retirez les
articles alors qu’ils conservent encore un peu d’humidité.
t3FUJSF[MFTBSUJDMFTJNNÏEJBUFNFOUËMBGJOEVDZDMF
6UJMJTF[MPQUJPO"/5*'30*44&.&/583*/,-&$"3&
QPVS
poursuivre le culbutage des vêtements à la fin du cycle
pour une période pouvant aller jusqu’à trois heures.
Les vêtements
ont rétréci
t-FTEJSFDUJWFTEFTPJOEFT
vêtements n’ont pas été
respectées.
t1PVSÏWJUFSMFSÏUSÏDJTTFNFOUTVJWF[TPJHOFVTFNFOU
les directives d’entretien des tissus de votre vêtement,
car certains tissus rétréciront naturellement au lavage.
D’autres tissus peuvent se laver sans problème, mais
SÏUSÏDJSPOUTJTÏDIÏTEBOTVOFTÏDIFVTF6UJMJTF[MF
paramètre de chaleur basse ou séchage sans chaleur.
Les vêtements
sont encore
froissés après
le cycle STEAM
FRESHMC
t-FTWÐUFNFOUTTPOUFOUSPQ
grand nombre dans la sécheuse
ou bien ils sont trop différents
les uns des autres.
t-FTNFJMMFVSTSÏTVMUBUTTPOUPCUFOVTBWFDEFQFUJUFT
DIBSHFTEFËBSUJDMFT
t.FUUF[NPJOTEBSUJDMFTEBOTMBTÏDIFVTF
Mettez des vêtements similaires.
Les plis ne sont
plus visibles sur
les vêtements
après un cycle
de STEAM
FRESHMC
t$FDZDMFBQPVSCVUEÏMJNJOFS
les froissements du tissu.
t6UJMJTFSVOGFSËSFQBTTFSQPVSNBSRVFSMFTQMJT
FRANÇAIS
Le temps de
séchage n’est
pas constant
34
CARACTÉRISTIQUES
Avant d’appeler le service (suite)
Problèmes
4PMVUJPOT
Causes possibles
MC
Des odeurs
subsistent sur
les vêtements
après un
cycle STEAM
FRESHMC
t45&".'3&4) n’élimine pas
complètement les odeurs.
t-FTUJTTVTBZBOUVOFGPSUFPEFVSEPJWFOUÐUSFMBWÏTEBOT
un cycle normal.
Le voyant
FLOW
SENSEMCest
allumé
pendant
le cycle de
séchage
t-FDPOEVJUEÏWBDVBUJPOFTU
trop long ou comporte trop de
coudes/obstructions.
t-FDPOEVJUEÏWBDVBUJPOFTU
complètement bloqué par
l’accumulation de charpie ou de
débris.
t*OTUBMMFSVOUVZBVEÏWBDVBUJPOQMVTDPVSUPVQMVTESPJU
Voir les instructions d’installation.
t-BQQBSFJMBEÏUFDUÏVOF
obstruction dans le conduit
d’aération extérieur de la
sécheuse.
L’afficheur
indique
jExPV
jEx
t-FDPOEVJUFTUPCTUSVÏË
FOWJSPOPV-FDPEF
EFSSFVSjExPVjExSFTUF
affiché pendant deux heures
VOJRVFNFOU
t-FTZTUÒNFEÏWBDVBUJPOEV
domicile est obstrué.
t-FDPOEVJUEÏWBDVBUJPOEFWSBJUÐUSFWÏSJGJÏOFUUPZÏ
immédiatement. La sécheuse peut être utilisée, mais les
durées de séchage peuvent être plus longues.
t4JMFTZTUÒNF'-084&/4&MC détecte des obstructions
d’évacuation, le témoin restera allumé pendant deux
IFVSFTBQSÒTMBGJOEVDZDMF1PVSÏUFJOESFDFUBGGJDIBHF
PVWSF[MBQPSUFPVBQQVZF[TVSMFCPVUPO"--6.&3
²5&*/%3&108&3
t/VUJMJTF[QBTMBTÏDIFVTFUBOURVFMFTZTUÒNF
d’évacuation n’a pas été nettoyé ou réparé. Il est
dangereux d’utiliser la sécheuse lorsque l’évacuation
est fortement restreinte; vous risquez de provoquer un
incendie ou d’autres dégâts.
t7ÏSJGJF[MFDPOEVJUEBÏSBUJPOFYUÏSJFVSEFMBTÏDIFVTF
pendant que celle-ci fonctionne pour vous assurer qu’il y
a un fort débit d’air.
t4JMFTZTUÒNFEÏWBDVBUJPOFTUUSÒTMPOHGBJUFTMFSÏQBSFS
ou modifier.
t"TTVSF[WPVTRVFMFTQBDFBVUPVSEFMBTÏDIFVTFSFTUF
propre et dégagé.
t7ÏSJGJF[RVFMBIPUUFEBÏSBUJPOOFTUQBTFOEPNNBHÏFPV
obstruée par des charpies.
t"TTVSF[WPVTRVFMFTQBDFBVUPVSEFMBIPUUFEBÏSBUJPO
reste dégagé.
CARACTÉRISTIQUES
.PEÒMFTEFTÏDIFVTF45&".%3:&3.$ %-&:%-(:
Description
Sécheuse
Exigences électriques
Voyez la plaque signalétique pour les renseignements détaillés
Alimentation en gaz
/(oQP$&8$
1-oQP$&8$VOJRVFNFOUMFTNPEÒMFTËHB[
1SFTTJPOEFBVNBYJNBMF
_QTJ_L1B
Dimensions
QPMBSH
9/QPQSPG
9/QPIBVU
/QPQSPGBWFD
QPSUFPVWFSUF
DNMBSH
9DNQSPG
9DNIBVU
DNQSPGBWFDQPSUF
PVWFSUF
1PJETOFU
(B[MCTLH
²MFDUSJRVFMCTLH
Capacité de séchage
- Cycle normal
*&$QJMCLH
UTILISATION DE SMART DIAGNOSIS™
35
UTILISATION DE SMART DIAGNOSISMC
Diagnostic vocal
Fonction SMART DIAGNOSISMC
avec votre téléphone intelligent
SMART DIAGNOSISMC avec le
centre d’appels
5ÏMÏDIBSHF[MBQQMJDBUJPO-(4NBSU-BVOESZTVSWPUSF
téléphone intelligent.
$POUBDUF[MFDFOUSFEBQQFMT-(BV
-(²UBUT6OJT
PV-($BOBEB
0VWSF[MBQQMJDBUJPO-(4NBSU-BVOESZTVSWPUSF
téléphone intelligent. Appuyez sur la flèche droite
pour accéder à l’écran suivant.
-PSTRVFMBHFOUEVDFOUSFEBQQFMTWPVTMFEFNBOEF
maintenez le micro de votre téléphone près du logo
SMART DIAGNOSISMC sur la sécheuse. Maintenez le
UÏMÏQIPOFUPVUQSÒTEFMBTÏDIFVTFDNFOWJSPO
mais sans la toucher.
"QQVZF[TVSMFCPVUPOEFOSFHJTUSFNFOU3&$03%
sur votre téléphone intelligent et maintenez le micro
de votre téléphone intelligent près du logo SMART
DIAGNOSISMC sur la sécheuse.
5PVUFONBJOUFOBOUMFUÏMÏQIPOFFOQMBDFNBJOUFOF[
FOGPODÏFMBUPVDIF$POUSÙMFEFUFNQÏSBUVSF5&.1
$0/530-
QFOEBOUUSPJTTFDPOEFT
REMARQUE
/FUPVDIF[QBTEBVUSFTCPVUPOTPVJDÙOFTTVS
l’afficheur.
.BJOUFOF[MFUÏMÏQIPOFFOQMBDFKVTRVËMBGJOEF
la transmission sonore. Celle-ci dure environ six
secondes, et l’afficheur effectue le compte à rebours.
.BJOUFOF[FOGPODÏFMBUPVDIF$POUSÙMFEF
UFNQÏSBUVSF5&.1$0/530-
QFOEBOUUSPJT
secondes.
6OFGPJTMFOSFHJTUSFNFOUUFSNJOÏDPOTVMUF[MF
diagnostic en appuyant sur le bouton Suivant sur
votre téléphone.
.BJOUFOF[MFUÏMÏQIPOFFOQMBDFKVTRVËMBGJOEF
la transmission sonore. Celle-ci dure environ six
secondes, et l’afficheur effectue le compte à rebours.
REMARQUE
Smart Diagnosis est une fonction de dépannage
conçue pour faciliter, et non remplacer, la méthode
traditionnelle de dépannage par appel au service
après-vente. L’efficacité de cette fonction dépend de
plusieurs facteurs, notamment, mais sans s’y limiter,
la réception du téléphone cellulaire utilisé pour la
transmission, la présence de bruits extérieurs durant
MBUSBOTNJTTJPOFUMBDPVTUJRVFEFMBQJÒDFPáTFUSPVWF
la sécheuse.
En conséquence, LG ne garantit pas que la fonction
Smart Diagnosis pourra résoudre précisément un
problème donné.
6OFGPJTMFDPNQUFËSFCPVSTFUMBUSBOTNJTTJPO
sonore terminés, reprenez votre conversation avec
l’agent du centre d’appels qui pourra alors vous aider
à utiliser les renseignements fournis pour l’analyse.
FRANÇAIS
Si vous éprouvez un problème avec votre sécheuse, vous pouvez transmettre des renseignements sur votre téléphone
intelligent à l’aide de l’application LG Smart Laundry ou avec votre téléphone en contactant le centre d’appels LG.
La fonction SMART DIAGNOSISMC ne peut être activée que si vous mettez votre sécheuse en marche en appuyant sur
le bouton Marche/ Arrêt. S’il est impossible de mettre en marche votre sécheuse, le dépannage devra se faire sans la
fonction SMART DIAGNOSISMC.
36
GARANTIE
-(&-&$530/*$4$"/"%"*/$
("3"/5*&-*.*5²&%&-"4²$)&64&-($BOBEB
GARANTIE : Si votre sécheuse LG (le « produit ») s’avère défectueuse en raison d’un défaut de matériau ou de fabrication lors d’une utilisation normale,
pendant la période de garantie précisée ci-après, LG Canada réparera ou remplacera à sa discrétion le produit à la réception de la preuve d’achat originale
fournie par le détaillant. Cette garantie n’est offerte qu’à l’acheteur original du produit chez un détaillant et ne s’applique qu’à un produit distribué au
Canada par LG Canada ou par un distributeur canadien autorisé. La garantie ne s’applique qu’aux produits situés et utilisés au Canada.
PÉRIODE DE GARANTIE : (Remarque : Si la date d’achat originale ne peut être vérifiée, la garantie débutera soixante (60) jours suivant la date de fabrication.)
Sécheuse
Un (1) an à compter de la date d’achat initiale
Pièces et main-d’oeuvre (pièces internes fonctionnelles seulement)
U Les produits et pièces de remplacement sont garantis pour la portion restante de la période de garantie originale ou quatrevingt-dix (90) jours, selon la période la plus longue.
U Les produits et pièces de remplacement peuvent être neufs ou remanufacturés.
U Le centre de service autorisé LG garantit les réparations pendant trente (30) jours.
LA RESPONSABILITÉ DE LG CANADA SE LIMITE À LA GARANTIE CI-DESSUS. SAUF TEL QU’IL EST EXPLICITEMENT INDIQUÉ CI-DESSUS, LG
CANADA NE FOURNIT AUCUNE AUTRE GARANTIE ET REJETTE TOUTES LES AUTRES GARANTIES ET CONDITIONS EXPLICITES OU
IMPLICITES À L’ÉGARD DU PRODUIT, CE QUI INCLUT, SANS TOUTEFOIS S’Y LIMITER, TOUTE GARANTIE ET CONDITION IMPLICITE DE QUALITÉ
MARCHANDE OU DE CONVENANCE À UN USAGE PARTICULIER ET AUCUNE DÉCLARATION NE LIERA LG CANADA. LG CANADA N’AUTORISE
PERSONNE À CRÉER NI À ASSUMER AUCUNE AUTRE PROVISION POUR GARANTIES EN LIEN AVEC CE PRODUIT. SI UNE GARANTIE OU
CONDITION IMPLICITE EST REQUISE PAR LA LOI, SA PÉRIODE SE LIMITE À CELLE DE LA GARANTIE EXPLICITE SUSMENTIONNÉE. LG
CANADA, LE FABRICANT ET LE DISTRIBUTEUR NE POURRONT ÊTRE TENUS RESPONSABLES D’AUCUN DOMMAGE ACCESSOIRE,
CONSÉCUTIF, SPÉCIAL, DIRECT OU INDIRECT, D’AUCUNE PERTE D’ACHALANDAGE OU DE PROFITS, D’AUCUN DOMMAGE PUNITIF,
EXEMPLAIRE OU AUTRE, DIRECTEMENT OU INDIRECTEMENT ATTRIBUABLE À TOUTE VIOLATION CONTRACTUELLE, FONDAMENTALE OU
AUTRE, OU À UNE ACTION, UNE OMISSION, UN DÉLIT OU TOUTE AUTRE CHOSE.
La présente garantie vous confère des droits légaux précis. Vous pourriez disposer d’autres droits, suivant les lois provinciales applicables.
Toute clause de la présente garantie qui invalide ou modifie une condition ou garantie implicite aux termes d’une loi provinciale est
dissociable si elle entre en conflit avec la loi provinciale, et ce, sans affecter les autres clauses de la garantie.
LA PRÉSENTE GARANTIE LIMITÉE NE COUVRE PAS CE QUI SUIT :
1. Un appel de service pour livrer, ramasser ou installer le produit; renseigner un client sur le fonctionnement du produit; réparer ou remplacer des fusibles ou rectifier le
câblage ou la plomberie; ou corriger une réparation ou installation non autorisée.
2. La défaillance du produit durant une panne ou interruption de courant ou en raison d’un service électrique inadéquat.
3. Des dommages occasionnés par la fuite ou le bris de conduites d’eau, le gel de conduites d’eau, des tuyaux de drainage restreints, une alimentation en eau inadéquate
ou interrompue ou une alimentation en air inadéquate.
4. Des dommages attribuables à l’utilisation du produit dans une atmosphère corrosive ou contraire aux instructions précisées dans le manuel d’utilisation du produit.
5. Des dommages au produit causés par un accident, des animaux nuisibles ou des vermines, la foudre, le vent, un incendie, une inondation ou une catastrophe naturelle.
6. Les dommages attribuables à une mauvaise utilisation, une utilisation abusive ou à une installation, une réparation ou un entretien inapproprié du produit. Les
réparations inappropriées incluent l’utilisation de pièces ni approuvées ni recommandées par LG Canada.
7. La détérioration ou la défaillance du produit causée par une modification ou un changement non autorisé ou une utilisation autre que celle prévue, ou résultant d’une
fuite d’eau occasionnée par une mauvaise installation.
8. La détérioration ou la défaillance du produit causée par un courant ou un voltage électrique incorrect, la non-conformité aux codes de plomberie, une utilisation
commerciale ou industrielle, ou l’utilisation d’accessoires, d’éléments ou de produits nettoyants non approuvés par LG Canada.
9. Les dommages causés par le transport et la manipulation, notamment les égratignures, les bosses, les écaillures ou tout autre dommage à la finition du produit, à moins
que ces dommages ne soient attribuables à des défauts de matériaux ou de fabrication et qu’ils ne soient signalés dans un délai d’une (1) semaine de la livraison.
10. Des dommages ou des pièces manquantes à tout produit exposé, déballé, soldé ou remis à neuf.
11. Des produits dont le numéro de série original a été retiré, modifié ou ne peut être facilement déterminé. Le modèle et le numéro de série, ainsi que le reçu de vente
original du détaillant, sont requis pour valider la garantie.
12. L’augmentation des coûts et de la consommation des services publics.
13 . Le remplacement des ampoules électriques, des filtres et de toute pièce non durable.
14. Les réparations requises si le produit ne sert pas à une utilisation domestique normale et habituelle (y compris, sans toutefois s’y limiter, une utilisation commerciale,
dans un bureau ou un centre récréatif) ou est utilisé contrairement aux instructions précisées dans le manuel d’utilisation du produit.
15. Les coûts associés à l’enlèvement du produit de votre résidence aux fins de réparation.
16. L’enlèvement et la réinstallation du produit, s’il est installé à un endroit inaccessible ou contrairement aux instructions d’installation publiées, y compris dans le manuel
d’utilisation et le manuel d’installation du produit.
17. Les accessoires du produit, tels que balconnets, les tiroirs, les poignées, les tablettes, etc. Sont également exclues les pièces non incluses initialement avec le produit.
Tous les coûts associés aux circonstances exclues ci-dessus seront assumés par le consommateur.
Pour obtenir tous les détails sur la garantie et
Écrivez vos renseignements de garantie
ci-dessous :
accéder au service à la clientèle, appelez-nous
ou visitez notre site Web :
Renseignements sur l’enregistrement du produit :
Composez le 1-888-542-2623 (24 h sur 24, 365 jours par
Numéro de série :
année) et sélectionnez l’option de menu appropriée, ou
visitez notre site Web au http://www.lg.ca
Modèle :
Date d’achat :
37
FRANÇAIS
38
39
FRANÇAIS
Centre d’information à la clientèle LG
1-800-243-0000 ÉTATS-UNIS
1-888-542-2623 CANADA
Enregistrez votre produit en ligne!
www.lg.com