1
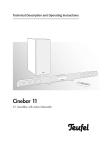
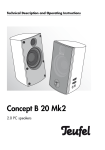
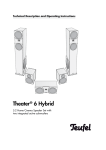
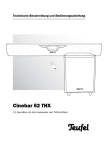
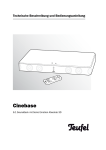
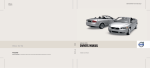
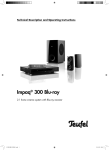
Technical Description and Operating Instructions
KB
22
RC
KB 22 CR
CD receiver for Kombo 22
Contents
General notes and information . . . . . . . . . . . . . . . . . . 3
For your information . .
Original packaging . .
Complaints . . . . . . . .
Contact . . . . . . . . . .
Proper use . . . . . . . . .
.
.
.
.
.
.
.
.
.
.
.
.
.
.
.
.
.
.
.
.
.
.
.
.
.
.
.
.
.
.
.
.
.
.
.
.
.
.
.
.
.
.
.
.
.
.
.
.
.
.
.
.
.
.
.
.
.
.
.
.
.
.
.
.
.
.
.
.
.
.
.
.
.
.
.
.
.
.
.
.
.
.
.
.
.
.
.
.
.
.
.
.
.
.
.
.
.
.
.
.
.
.
.
.
.
3
3
3
3
3
Safety notes . . . . . . . . . . . . . . . . . . . . . . . . . . . . . . . . 4
Overview . . . . . . . . . . . . . . . . . . . . . . . . . . . . . . . . . . 6
Control elements and connections . . . . . . . . . . . . . . . . 7
Setup and connection . . . . . . . . . . . . . . . . . . . . . . . . . 9
Location tips . . . . . . . . . . . . . .
Connecting the speakers . . . . . .
Antenna . . . . . . . . . . . . . . . . .
Audio input . . . . . . . . . . . . . . .
Connecting to a power supply . .
.
.
.
.
.
.
.
.
.
.
.
.
.
.
.
.
.
.
.
.
.
.
.
.
.
.
.
.
.
.
.
.
.
.
.
.
.
.
.
.
.
.
.
.
.
.
.
.
.
.
.
.
.
.
.
.
.
.
.
.
.
.
.
.
.
.
.
.
.
.
9
9
9
9
9
Remote control . . . . . . . . . . . . . . . . . . . . . . . . . . . . . 10
Changing the battery . . . . . . . . . . . . . . . . . . . . . 10
Functionality . . . . . . . . . . . . . . . . . . . . . . . . . . . 10
Basic functions . . . . . . . . . . . . . . . . . . . . . . . . . . . . . . . 11
Activating and deactivating . . . . .
Activating . . . . . . . . . . . . . . .
Switching to Standby . . . . . . .
EcoPower mode . . . . . . . . . . . . . .
Activating EcoPower mode . . . .
Deactivating EcoPower mode . .
Dimmer . . . . . . . . . . . . . . . . . . . .
Selecting a source . . . . . . . . . . . .
Adjusting the volume 12
Mute 12
Adjusting the sound . . . . . . . . . . .
Equalizer . . . . . . . . . . . . . . . .
Aurally compensated volume . .
Bass boost . . . . . . . . . . . . . . .
.
.
.
.
.
.
.
.
.
.
.
.
.
.
.
.
.
.
.
.
.
.
.
.
.
.
.
.
.
.
.
.
.
.
.
.
.
.
.
.
.
.
.
.
.
.
.
.
.
.
.
.
.
.
.
.
.
.
.
.
.
.
.
.
.
.
.
.
.
.
.
.
.
.
.
.
.
.
.
.
.
.
.
.
.
.
.
.
.
.
.
.
.
.
.
.
.
.
.
.
.
.
.
.
.
.
.
.
.
.
.
.
.
.
.
.
.
.
.
.
.
.
14
14
14
14
14
14
CD operation . . . . . . . . . . . . . . . . . . . . . . . . . . . . . . . 15
Suitable CDs . . . . . . .
About handling CDs . .
Inserting a CD . . . . . .
Ejecting a CD . . . . . .
.
.
.
.
.
.
.
.
.
.
.
.
.
.
.
.
.
.
.
.
.
.
.
.
.
.
.
.
.
.
.
.
.
.
.
.
.
.
.
.
.
.
.
.
.
.
.
.
.
.
.
.
.
.
.
.
.
.
.
.
.
.
.
.
.
.
.
.
.
.
.
.
.
.
.
.
.
.
.
.
15
15
15
15
USB mode . . . . . . . . . . . . . . . . . . . . . . . . . . . . . . . . . 16
Inserting a USB stick and playback . . . . . . . . . . . 16
Removing a USB stick . . . . . . . . . . . . . . . . . . . . . 16
AUX operation . . . . . . . . . . . . . . . . . . . . . . . . . . . . . 17
Analogue source device . . . . . . . . . . . . . . . . . . . 17
Bluetooth source device . . . . . . . . . . . . . . . . . . . 17
Playback functions (CD, MP3/WMA, USB) . . . . . . . . . . 18
Search by track number . .
Repeat function / Shuffle .
Repeating a section . .
Program playback . . . . . .
Creating a program . .
Playing a program . . .
Deleting a program . . .
.
.
.
.
.
.
.
.
.
.
.
.
.
.
.
.
.
.
.
.
.
.
.
.
.
.
.
.
.
.
.
.
.
.
.
.
.
.
.
.
.
.
.
.
.
.
.
.
.
.
.
.
.
.
.
.
.
.
.
.
.
.
.
.
.
.
.
.
.
.
.
.
.
.
.
.
.
.
.
.
.
.
.
.
.
.
.
.
.
.
.
.
.
.
.
.
.
.
.
.
.
.
.
.
.
.
.
.
.
.
.
.
.
.
.
.
.
.
.
18
19
19
19
19
20
20
Troubleshooting . . . . . . . . . . . . . . . . . . . . . . . . . . . . . 22
.
.
.
.
.
.
.
.
.
.
.
.
.
.
.
.
.
.
.
.
.
.
Clock . . . . . . . . . . . . . . . . . . . . . . . . . . . . . . . . . . . . 13
.
.
.
.
.
.
.
.
.
.
.
.
.
.
.
.
.
.
12
12
12
12
.
.
.
.
.
.
.
.
.
.
.
.
.
.
.
.
.
.
Sleep . . . . . . . . . . . . . . . . . . . . . . . . . . . . . . . . 20
Activating Sleep . . . . . . . . . . . . . . . . . . . . . . 20
Deactivating Sleep . . . . . . . . . . . . . . . . . . . . 20
Displaying the Sleep time remaining . . . . . . . . 20
Timer / alarm function . . . . . . . . . . . . . . . . . . . . 21
Switching the timer /alarm function on and off . 21
.
.
.
.
.
.
.
.
.
.
.
.
.
.
.
.
.
.
Timer functions . . . . . . . . . . . . . . . . . . . . . . . . . . . . . 20
.
.
.
.
.
.
.
.
.
.
.
.
Setting the radio stations . . . . . . . . . . . . . .
Manually . . . . . . . . . . . . . . . . . . . . . .
Station scanning . . . . . . . . . . . . . . . . .
Mono/stereo . . . . . . . . . . . . . . . . . . . . . .
Station memory . . . . . . . . . . . . . . . . . . . .
Saving stations . . . . . . . . . . . . . . . . . .
Selecting stations from the memory 14
11
11
11
11
11
11
11
12
Setting the time . . . . . . . . .
Automatically with RDS .
Manually . . . . . . . . . . .
Displaying the time . . . .
.
.
.
.
.
.
.
.
Radio playback . . . . . . . . . . . . . . . . . . . . . . . . . . . . . 14
.
.
.
.
.
.
.
.
13
13
13
13
Care and cleaning . . . . . . . . . . . . . . . . . . . . . . . . . . . 22
Protecting the environment . . . . . . . . . . . . . . . . . . . . 23
Technical data . . . . . . . . . . . . . . . . . . . . . . . . . . . . . . 23
2
• KB 22 CR
General notes and information
Notice
Contact
The information in this document may change without
prior notice and in no way constitutes any liability on the
part of Lautsprecher Teufel GmbH.
No part of these instructions may be reproduced in any
form or be broadcasted in any way electronically, mechanically, by photocopy or recording without the written
permission of Lautsprecher Teufel GmbH.
For questions, suggestions or any other issues please
contact our customer service department:
Lautsprecher Teufel GmbH
Gewerbehof Buelowbogen · Buelowstraße 66
10783 Berlin (Germany)
Phone: 00800 - 200 300 40 (toll-free)
Fax: +49 (0)30 / 300 930 930
E-mail: [email protected]
www.teufelaudio.com
© Lautsprecher Teufel GmbH
Version 1.0
July 2013
Original packaging
If you wish to exercise your eight-week right of return, we
ask that you be absolutely sure to hold onto the packaging. We can only accept the return of the speakers WITH
THE ORIGINAL PACKAGING.
Empty boxes are not available!
Complaints
In case of complaint we will need the following information to process your enquiry:
1. Invoice number
Can be found on the sales slip (enclosed with the
product) or on the order confirmation received as a PDF
document, e.g. 4322543
Proper use
Only use the unit as described in these operating instructions. Any other use will be deemed as not in accordance
with the instructions and may lead to damage of property
or even persons.
The manufacturer accepts no liability for damage caused
by use not in accordance with the instructions.
The unit is intended for private use.
Before operating the speakers please read the
safety notes and operating instructions carefully.
This is the only way to use all functions safely
and reliably.
Keep the operating instructions safe and pass them on to
anyone who may own the unit after you.
2. Serial number or batch number
Located on the back of the unit,
e.g. serial number: KB20240129A-123.
Many thanks for your support!
• KB 22 CR
3
Safety notes
Caution icons
You will find the following caution icons in these instructions:
Danger High risk!
Failure to observe the warning may result in
severe personal injury or death.
Attention Moderate risk!
Failure to observe the warning may result in
property damage.
Minor risk!
Points which should be observed when handling the unit.
Safety notes
Danger Risk of electric shock!
Faulty installation of electrical equipment or
mains voltage which is too high can cause
electric shocks.
• Only operate the unit with the mains adapter supplied
or with a mains adapter of identical construction.
• Disconnect the mains adapter immediately and do not
use the unit if its case or the mains adapter are defective or if there is other visible damage.
• If the unit emits smoke or smells of burning or other
unusual odours, disconnect it immediately from the
power supply and do not operate it.
• The standby button does not disconnect the unit from
the power supply. Therefore, place the unit so that the
mains adapter is easily accessible.
• Never open the case of the mains adapter or the unit.
Repairs may only be carried out by an authorised
specialist workshop. Only parts which conform with
the original unit specifications may be used in this
case. There are electrical and mechanical parts in this
unit which are necessary in order to avoid exposure to
sources of danger.
• Do not insert any objects through the vent slots in the
housing.
• Only use the unit in indoor areas.
• Do not operate the unit in damp areas and protect it
from drops of water or splash water.
Also take care not to stand vases or other containers
filled with liquid on or near the speaker in order to
avoid liquid getting into the case. If water or other
foreign objects should enter the unit, immediately
disconnect the mains plug. Then send the unit to our
service address.
• Never touch the mains adapter with wet hands.
• Check the unit regularly for damage.
4
• KB 22 CR
Danger Danger to children!
Children can become trapped in the packing
film when playing and suffocate.
• Do not allow children to play with the unit or the packing film. Danger of suffocation.
• Ensure that children do not remove small parts from
the unit or take them off of the unit (e.g. control knobs
or plug adapters). They could swallow the parts and
choke.
• Never allow children to operate electrical units unsupervised.
Danger to hearing!
Extended listening at high volumes may lead to
hearing loss.
Very high acoustic pressure can suddenly be created, especially if the unit is switched on when set at full volume.
This may have psychological consequences and also
cause physical injury. Children and pets are particularly
at risk.
• Set the volume control on your unit to a low level.
• When the volume is set to a high level, never place
your ear directly on the speaker.
• To avoid damage to health, avoid extended listening at
high volumes.
Danger Health hazard!
If the battery belonging to the product is swallowed, this may result in severe internal injuries
and even death.
• Keep both new and used button cell batteries so that
they are not accessible for children.
• If the battery compartment can no longer be closed
securely, do not use the product further and keep it so
that it is not accessible for children.
• If you suspect that a button cell battery has been swallowed or ingested in any other way, seek the immediate attention of a physician.
Danger Danger of chemical burns!
Leaking battery acid may lead to chemical
burns.
• Do not allow battery acid to come into contact with
skin, eyes or mucus membranes. In case of contact with
acid rinse the affected part immediately with plenty of
plain water and if necessary see a doctor.
Danger Danger of explosion!
Batteries (particularly lithium batteries) can
explode if used improperly.
• Never attempt to recharge batteries.
• Only use batteries of the same or equivalent type.
• Do not heat or short circuit batteries or rechargeable
batteries and do not dispose them in fire.
• Do not expose batteries and storage batteries to direct
sunlight.
Danger Danger of injury/damage!
Setting the unit up in an unsuitable location
may result in injury to persons and/or damage
to property.
• Never use the unit unmounted in vehicles, in unstable
locations, on wobbly tripods or furniture, on insufficiently dimensioned brackets etc. The unit could tip or
fall down and cause injury to persons or be damaged
itself.
• Set up the unit in such a way that you cannot accidentally knock it over and that the cables do not pose any
trip hazard.
• Do not place the unit near sources of heat (e.g. heaters, ovens, other heat generating equipment such as
amplifiers etc.).
Attention Risk of damage!
External influences may damage or destroy the
device.
• If the unit is to be left unsupervised for a long period
(e.g. during a holiday), or if a thunderstorm is forecast,
disconnect the power plug from the mains power supply. Otherwise, a sudden overvoltage may cause a
defect.
• Leaked batteries may damage the remote control.
In case of prolonged absence, remove any batteries
from the remote control.
• If the device is subjected to warm temperatures after
being cold (e.g. after transport), condensation may
occur inside of it.
In this case, wait at least 2 hours before you connect
and activate it.
Explanation of symbols
Safety category II
Dual insulation
May only be used indoors.
Polarity on the round connector:
outside (–), inside (+)
Danger Danger to eyes and skin!
Opening the disc compartment with the lock
deactivated will cause an invisible or visible
laser beam to be emitted.
• Do not look into the beam, even if you are using optical instruments.
Attention Fire hazard!
Improper use may lead to damage or fire.
• Do not place open flames such as burning
candles or similar on the unit.
• Do not place the unit in direct sunlight.
• Ensure sufficient ventilation.
• Do not cover the vents with curtains, blankets, newspapers or similar. Heat build-up inside the unit can
shorten its lifetime.
• KB 22 CR
5
Overview
Product contents
a 1 x CD receiver KB 22 CR
b 1 x remote control
a
c 1 x mains adapter
d 1 x throw-out aerial for VHF (FM)
e 2 x speaker cable
c
• Check that all items have been delivered and that nothing is damaged.
• If the delivery is incomplete or you find damage sustained in transit, do not operate the unit but contact our
service department (see page 3).
d
e
6
• KB 22 CR
RC
Checking the product contents
22
The speakers for this system are supplied in a separate
packaging. Please take note of the instructions supplied
with the speakers.
KB
b
Control elements and connections
Front side
1
2
3
4
15
5
6
14
7
13
8
12
9
11
Item Name
Description
Item Name
—
Control LED
—
Infrared receiver for remote
control
3
—
CD drawer
4
Opening / closing the CD drawer
5
Playback/pause
6
Stop button
MODE
Radio operation: Switch between
stereo/mono
USB and CD: Adjust repeat
8
Description
9
1
2
7
10
10
VOLUME
Radio operation: Select stored
station (down)
USB and CD: Previous track
Volume control
11
—
DISPLAY
USB connection
12
13
LOUDNESS
Switch aurally compensated
volume on / off
14
FUNCTION
Switch signal source
Switch unit on or to Standby /
EcoPower mode
15
Radio operation: Select stored
station (up)
USB and CD: Next track
Back side
16
17
18
19
CLASS 1 LASER
PRODUCT
DC
SPEAKER
POWER
Item Name
Description
16
SPEAKERS
Speaker connections
17
—
Mains adapter connection
18
AUX IN
External signal source connection
19
FM
FM / VHF antenna connection
15V/3A
AUX IN
ANTENNA
• KB 22 CR
7
Remote control
Item Name
20
21
AUX
Select external source device
(AUX / BT)
22
USB
USB input selection
23
DIM
Change the brightness of the
display
48
20
47
46
21
22
45
44
23
24
24
A–B
43
42
25
26
CD and USB only: Repeat a section
25
SLEEP
Switch-off function
41
27
26
S-BASS
Switch Super-Bass on / off
27
TIMER
Switch-on function
28
28
Radio operation: Select stored
programme (upwards)
CD and USB: Next track
29
29
Radio operation: Frequency up
40
39
30
38
CD and USB: Fast forward
30
Radio operation: Select stored
programme (downwards)
USB and CD: Previous track
31
31
37
36
/ PAIRING
32
Vol +/–
Volume adjust
33
MUTE
Mute speaker
33
34
1 ... 0
Number buttons
35
PROG
Radio operation: Store station
USB and CD: Set program playback
34
36
10+
Select track or stored station >10
37
ALB +/–
Radio operation: Next/previous
stored station
CD and USB operation: Select
next/previous album
38
Playback/pause
39
Radio operation: Frequency down
CD and USB: Rewind
40
DISPLAY
Radio operation: Show RDS info
USB and CD: Show track info
41
CLOCK
Show time
42
LOUDNESS
Switch aurally compensated
volume on/off
43
P-EQ
Adjust the sound
44
MODE
Radio operation: Switch between
stereo/mono
CD and USB: Set repeat /shuffle
mode
45
INTRO
CD and USB: Play track sample
46
CD
CD operation
47
FM
Radio operation
Switch unit on or to Standby /
EcoPower mode
48
• KB 22 CR
Stop button / disconnect bluetooth connection
32
35
KB 22 RC
8
Description
Open / close the CD drawer
Setup and connection
Location tips
• Select a stable, level base.
• Make sure that the environment is clean and free from
dust.
• Avoid placing the unit close to sources of heat or in
direct sunlight.
• Arrange the connector cables so that they do not pose
a trip hazard.
• Do not place heavy objects on the cables or unit.
Connecting the speakers
Use the speaker cables supplied to connect the speakers.
If you need longer cables you can order them from the
“Accessories” section of our online shop (www.teufel.de).
On the back side of the CD receiver are the “SPEAKER”
connecting terminals 16 for the right (“R”) and left (“L”)
speakers.
The terminals are each marked red (+) and black (–).
Make sure the polarity is correct!
Connect the like coloured terminals. Otherwise
the sound quality will suffer. The strands of the
speaker cables are marked with different colours or
shapes.
1.Split the wire down by
approx. 30 mm on both ends
and remove approx. 10 mm
of insulation each. Twist the
wire so that no strands are
protruding. Tin coating is not
necessary.
2.Flip the lever on the connecting
terminal up or down to open the
terminal.
Antenna
Danger Risk associated with lightning strike!
If you are using outdoor or roof antennas, be
absolutely sure that the antenna has lightning
protection.
To receive FM/VHF stations, connect the antenna to
the jack 19 “FM”. This may be a roof/outside antenna,
but also a cable television connection. You will need a
coaxial connector cable for this.
If there is no antenna connection available where the unit
is located you can use the throw-out
aerial d supplied. Push the aerial
plug into the jack 19 “FM” and adjust
the position of the throw-out aerial for
best reception. Now fixed the
antenna in place with tape.
Audio input
You can connect almost any audio source to the “AUX
IN” cinch jacks 18 on the back of the unit, i.e. computer,
Smartphone, MP3 player (with/without dock), games
console, television etc. The source device must have an
output with line level. This kind of output is either a stereo
cinch jack or a 3.5 mm jack plug. Connect these units to
the “AUX IN” connections 18 using appropriate cables.
Cables are available from our online shop (www.teufel.
de) in the “Accessories” section.
Connecting to a power supply
Connect the round plug on the mains adapter supplied to
connection 17 on the back of the unit. Connect the mains
adapter to a mains power socket.
16
3.Guide the exposed end of the
cable into the opening in the
terminal and close the lever
again. The cable has now been
clamped in place.
17
18
19
CLASS 1 LASER
PRODUCT
DC
SPEAKER
POWER
15V/3A
AUX IN
ANTENNA
• KB 22 CR
9
Remote control
A 3 Volt button battery CR2025 is required to operate
the remote control.
Changing the battery
The battery is already installed in the remote control unit
on shipping and is protected by a strip of plastic. You will
see this plastic strip on the back of the remote control.
Simply remove it with care. The remote control is now
ready for use.
Danger Health hazard!
If the battery belonging to the product is swallowed, this may result in severe internal injuries
and even death.
• Keep both new and used button cell batteries so that
they are not accessible for children.
• If the battery compartment can no longer be closed
securely, do not use the product further and keep it so
that it is not accessible for children.
• If you suspect that a button cell battery has been swallowed or ingested in any other way, seek the immediate attention of a physician.
Danger Danger of chemical burns!
Leaking battery acid may lead to chemical
burns.
• Do not allow battery acid to come into contact with
skin, eyes or mucus membranes. In case of contact with
acid rinse the affected part immediately with plenty of
plain water and if necessary see a doctor.
Danger Danger of explosion!
Batteries (particularly lithium batteries) can
explode if used improperly.
• Never attempt to recharge batteries.
• Only use batteries of the same or equivalent type.
• Do not heat or short circuit batteries or rechargeable
batteries and do not dispose them in fire.
• Do not expose batteries and storage batteries to direct
sunlight.
10
• KB 22 CR
1.Hold the remote control face down.
2.Unscrew the cross-headed screw using a screwdriver.
3.Pull the battery compartment out of the remote control.
4.Take out the old battery (see „Batteries and rechargeable batteries“ on page 23).
5.Place the new battery into the holder, making sure
that the “+” symbol is visible on the battery and on the
holder.
6.Replace holder and push the compartment back in until
it clicks.
7.Screw-tighten the cross-headed screw.
Functionality
The remote control relays the control signals by means of
infrared light. It is therefore important that you point the
remote control in the direction of the unit. Make sure that
the infrared light is not obstructed by objects.
Fluorescent or energy-saving light bulbs installed in the
facility of the unit may impair the function of the remote
control or even make it impossible.
Basic functions
Activating and deactivating
Activating
• Press button 15 or 48 “ ” or one of the function select
buttons 21 “FM”, 22 “CD”, 46 “USB” or 47 “AUX”.
The unit powers up, the display briefly shows “HELLO”.
15
10
Switching to standby
• During operation press button 15 or button 48 “ ”
briefly.
The unit will switch to Standby. The display briefly
shows “BYE BYE”, and then displays the time. After
a few minutes the time display disappears and the
display goes dark.
• In order to show the time again, press button 41
“CLOCK” briefly.
EcoPower mode
In EcoPower mode the unit uses a maximum of only 0.5
Watt.
48
21
22
23
47
46
Activating EcoPower mode
• Whilst in operation or when in standby, press and hold
button 15 or button 48 “ ” for approx. 3 seconds.
The display briefly shows “ECOPOWER”, then goes
dark.
EcoPower mode is now switched on and replaces
Standby mode. This means that pressing button 15 or
button 48 “ ” will no longer switch the unit to Standby
but to EcoPower mode.
41
Switching from EcoPower mode
• Whilst the unit is in EcoPower mode, press and hold
button 15 or button 48 “ ” for approx. 3 seconds.
The display shows the time, the unit is now back in
standby.
EcoPower mode is now switched off. This means that
pressing button 15 or button 48 “ ” will no longer
switch the unit to EcoPower mode but to standby.
Dimmer
• You 23 “DIM” to control the brightness of the display.
The display brightness is adjusted every time you push
the button: bright, medium, dim.
KB 22 RC
• KB 22 CR
11
Selecting a source
When the unit is switched on the recently selected audio
source is activated.
Use button 14 “FUNCTION” to change the source, or
select a source directly using the buttons
• 47 “FM” (Radio)
14
10
• 46 “CD” (CD player)
• 22 “USB” (USB storage)
• 21 “AUX”/“ ” (external signal source, line or Bluetooth)
The display will now show the selected source.
Adjusting the volume
• Use control 10 “VOLUME” or button 32 “Vol” to set the
desired volume level.
The display will show the volume level selected from
Min to Max.
Mute
47
46
21
22
23
43
42
26
• Use button 33 to mute the sound.
The display shows the flashing message “MUTING”.
• To turn the sound back on: Press button 33
adjust the volume.
again or
Adjusting the sound
Equalizer
32
Press button 43 “P-EQ” to sequence through the preset
sound patterns and select: FLAT (sound unchanged), POP,
JAZZ, CLASSIC and ROCK.
33
Aurally compensated volume
Pressing button 42 “LOUDNESS” switches the aurally
compensated volume control on and off. When this funcsymbol is shown in the distion is switched on, the
play and when playback is quiet the sound will be fuller.
Bass boost
Pressing button 26 “S-BASS” switches the bass boost
function on and off; this boosts the deeper tones and
slightly boosts the higher tones too. When the S-BASS
function is switched on the DBB symbol appears in the
display.
12
• KB 22 CR
KB 22 RC
Clock
The integrated clock shows the current time in the display.
The clock is set manually or by RDS when in radio mode.
There is also a sleep function (up to 90 minutes).
Setting the time
Automatically with RDS
Select a radio station with RDS signal (see „Setting
the radio stations“ on page 14). After a few minutes the
KB 22 CR will pick up the time signal from the radio station and set the clock accordingly.
15
Manually
If no RDS station is being received, you can also set the
clock manually:
1.Switch the unit to standby using button 15 or button 48
“ ”.
10
2.Press button 41 “CLOCK” briefly once. The display will
show the current time.
3.Press button 41 “CLOCK” and hold for 3 seconds. The
display will briefly show the message “CLOCK SET”
and then “CLOCK 24” or “CLOCK 12”.
4.Set the clock to 24 hour or 12 hour operation using
volume control 10 “VOLUME” or button 32 “Vol +/–”.
48
5.Press button 41 “CLOCK” briefly once. The display will
flash the hour.
6.Use volume control 10 “VOLUME” or button 32 “Vol
+/–” to set the hour.
7.Press button 41 “CLOCK” briefly once. The display will
now flash the minutes.
41
8.Use volume control 10 “VOLUME” or button 32 “Vol
+/–” to set the minutes.
9.Press button 41 “CLOCK” briefly once.
The time is now set.
Displaying the time
32
In order to show the time, press button 41 “CLOCK”
briefly. The display now shows the time for 3 or 90 seconds (in standby and in EcoPower mode).
KB 22 RC
• KB 22 CR
13
Radio playback
Use button 47 to select “Radio” as the source. Your
KB 22 CR can receive mono and stereo stations in the
range from 87.5 to 108 MHz.
For stations with RDS the name of the station is shown in
the display and you can use button 40 “Display” to call
up the programme type and the time (not all stations offer
this service).
7
8
9
Setting the radio stations
Use button 29 “
quency.
” or 39 “
” to set the tuning fre-
Manually
• Press the button briefly.
The frequency is increased or reduced by one step
(0.05 MHz).
Station scanning
• Press and hold the button for approx. 3 seconds.
The search begins and will stop at the first station
received with sufficient signal.
47
44
Mono/stereo
Poor signal quality may lead to sound distortion in stereo
operation. Use button 7 or 44 “Mode” to switch to mono
operation.
28
29
39
30
Station memory
Your radio can save 20 stations. You can then easily
select saved stations at the touch of a button.
Saving stations
32
1.Set the desired station as described above.
2.Press button 35 “PROG”. The display will flash
“PROG”.
3.Use button 28 “
” / 30 “
” to select the desired
slot number for the station,
or enter using the number buttons 34 “1...0”. Enter the
tens using button 36 “10+”.
4.Press button 35 “PROG”. The station has now been
stored.
Selecting stations from the memory
1.Increase or decrease the slot number using button
8/28 “
” or 9/30 “
”.
2.Enter the desired slot number using the number buttons
34 “1...0”. Enter the tens using button 36 “10+”.
14
• KB 22 CR
34
36
KB 22 RC
CD operation
Suitable CDs
• Use only ordinary CDs with a diameter of 120 or 80
mm bearing one of the symbols shown here.
• CDs containing MP3 and WMA files can also be read.
• CDs/CDRs, CDRWs burnt on a home system can
normally be read but high burn speed or “bad” blank
discs can cause problems. The only solution is trial and
error in this case.
• CDs produced for commercial purposes cannot always
be read.
About handling CDs
Every CD is covered by a resistant plastic layer which
protects it from outside influences. However, you must
always protect the disc against dirt and scratches.
CD players can compensate for minor damage to the CD.
Larger scratches or other damage may result in “hanging” or similar errors.
For more information about the correct handling of CDs
see the notes on the CD sleeve.
Inserting a CD
Attention Risk of damage!
Do not insert CDs on top of one another. Do
not insert anything other objects than CDs.
4
5
6
1.Select source “CD” (see page 11).
2.Press button 4 or 20 “ ”. The CD drawer will slide out
forwards.
3.Insert the CD carefully into the depression inside the
CD drawer with the printed side facing up.
4.Press button 4 or 20 “ ”, or button 5 or 38 “ ”. The
CD drawer will close and the unit will read the CD. The
display will show the message “READ” and after a few
seconds playback begins automatically.
The playback functions for CD and USB are identical
and are described in the section “Playback functions” on
page 16.
20
Ejecting a CD
• Stop playback by pressing button 6 or 31 “ ”.
• Press button 4 or 20 “ ”. The CD drawer will slide out
forwards.
• Take the CD out of the CD drawer and press button 4
or 20 “ ” to close the CD drawer.
38
31
• KB 22 CR
15
USB mode
Your new CD receiver can read USB storage devices of
the specification USB 1.0 and 2.0 containing up to 32
GB of information and playback music files stored on
them in MP3 and WMA formats.
Important
Do not use any storage devices with mechanical damage or which have fallen in liquid. Do
not expose such storage devices to direct sunlight. Improper handling may result in data loss! Make backup
copies of your music on your PC.
6
Inserting a USB stick and playback
• Use button 22 to select “USB” as the source.
The display will show the message “READ USB”.
• Insert the USB stick into the jack 12 “
only fits the jack in one position.
12
”. The plug
• If there are any music files on the stick playback will
start automatically.
• If no readable files are found on the stick the display
will remain dark.
The playback functions for CD and USB are identical
and are described in the section “Playback functions” on
page 16.
22
Removing a USB stick
Attention Risk of damage!
Never remove a USB storage device when your
KB 22 CR is still accessing its data, i.e. during
playback or pause! Stop playback using button 6 or
31 “ ” before removing the device.
31
• Simply pull the USB stick out.
KB 22 RC
16
• KB 22 CR
AUX operation
Analogue source device
You can connect a source device with analogue sound
output using the “AUX IN” cinch jacks 18 e.g. the earphone output of an MP3 player or Smartphone. To do this
you will need a stereo cinch cable.
18
• Press button 21 “AUX”.
The display will show “AUX” or “BT”. Press the button
again if required to switch between “AUX” and “BT”.
CLASS 1 LASER
PRODUCT
DC
Bluetooth source device
SPEAKER
15V/3A
POWER
AUX IN
ANTENNA
Using Bluetooth you can connect a compatible source
device to the KB 22 CR without any cables. The range is
approx. 10 m.
1.Select the source “BT” using button 21.
Press the button several times if required until “BT” appears in the display.
2.Switch on the Bluetooth function on your source device
(e.g. Smartphone) and have it search for Bluetooth
devices. You will find more information about this in
the operating instructions of your source device.
21
3.Once the search is complete the list of devices found
should include “Kombo 22”. Select this unit to establish
the connection.
4.If required, enter the password “0000”.
Your KB 22 CR is now paired and will work just like
Bluetooth headphones. All sounds normally reproduced by your source device will now be directed to
the KB 22 CR and played via this unit.
5.If the source device is a Smartphone, the Bluetooth
connection will be interrupted by any incoming calls
and you can use the phone as normal.
After finishing your phone call, the sounds will once
again be diverted and played back by your KB 22 CR.
31
6.To terminate the Bluetooth connection press button 31
“PAIRING” and hold down until the message “CLEAR”
appears in the display.
Alternatively you can switch off the Bluetooth function
on your source device.
KB 22 RC
• KB 22 CR
17
Playback functions (CD, MP3/WMA, USB)
During playback the display will show the album number
(file folder, only with MP3/WMA) with two digits, the
number of the current track and the playback time
elapsed.
Time elapsed (3:48)
Track number (002)
Album number (01)
(only with MP3/WMA)
Use button 40 “DISPLAY” to display more information
such as time remaining, track name, artist and album. A
lot of information however is only available with MP3/
WMA files or not at all.
• Pause playback: Press button 5 or 38 “
”
• Continue playback: Press button 5 or 38 “
• Play next track: Tap button 8 or 28 “
” again.
”.
• Play previous track: Tap button 9 or 30 “
” twice.
5
6
• Fast track playback: Press and hold button 39 “ ” or
29 “ ”
. Playback occurs without sound; you will see the
elapsed play time of the track in the display.
To resume normal playback release the button.
8
9
• Only with MP3/WMA:
– Select next album (next file folder): Tap the top “+”
of button 37 “ALB”.
– Jump to the start of the album or to the previous album: Tap the bottom “–” of button 37 “ALB” several
times if required.
• Press “INTRO” button 45 for the sample playback
function. Only the first 10 seconds of each track will be
played.
Switch function off: Press “INTRO” button 45 again.
45
• Stop playback: Press button 6 “ ” or 31 “ ”.
Search by track number
The KB 22 CR numbers each track of a CD or USB stick
sequentially even if they are saved in different folders.
Enter the desired number using the number buttons 34 “1
... 0” and, for the tens, using button 36 “10+”. Playback
will start.
Repeat function / Shuffle
Use button 7 or 44 “MODE” to switch between repeat
functions; you will see the function selected in the display:
• TRK REP (flashing) – repeat the current track.
28
39
29
30
38
31
37
• REP ALB (flashing, only with MP3/WMA) – repeat all
34
36
KB 22 RC
18
• KB 22 CR
tracks of the current album (file folder).
• REP ALL – play all tracks and then start again from the
beginning.
7
• SHUF (shuffle) – play all tracks in random order.
Repeating a section
This function allows you to define a section to be repeated.
1.Start playback.
2.At the start of the desired section press button 24
“A–B” briefly.
3.At the end of the desired section press button 24 “A–B”
briefly again.
The section will now be continuously repeated.
44
24
4.To resume normal playback press button 24 “A–B”
briefly again.
Program playback
You can program up to 20 tracks to be played in an order set by you. You can enter a title or titles several times
into the program if desired.
Creating a program
Do not press the stop button 6 “ ” or 31 “ ” whilst programming as this will delete the program.
1.Press button 35 “PROG”.
The number of the program slot (“P–00”) will appear on
the right of the display and the message “PROG” will
be flashing.
6
8
9
2.Set the first track number:
• Enter using button 36 “10+” for the tens and the
number buttons 34 “1 ... 0”, or
• Select the album using button 37 “ALB” (MP3/WMA
only)
and then select the track number using button 8 or
” and 9 or 30 “
”.
28 “
KB 22 RC
28
3.Press button 35 “PROG”.
The number of the next program slot (e.g. “P–01”) will
appear briefly on the left of the display.
30
4.Enter all desired tracks in the same way.
31
Playing a program
• After entering the last track start the program using
button 5 or 38 “ ”.
All programmed tracks will be played in the programmed order. The display will show “PROG”.
37
• To stop program playback press button 6 “ ” or 31 “
” once briefly – the program remains in the memory.
34
36
35
KB 22 RC
• KB 22 CR
19
Deleting a program
• Press button 6 “ ” or 31 “ ” twice during programmed playback or once in stop mode
.
The display will show the message “PROGRAM
CLEARED”.
5
6
38
31
Timer functions
Sleep
KB 22 RC
This function allows the KB 22 CR to switch itself off after
a preset period of time.
Activating Sleep
• During playback press button 25 “SLEEP”.
“SLEEP OFF” will appear in the display.
• Press button 25 “SLEEP” again to set the number of
minutes till switch-off: 120, 90, 60, 45, 30 or 15
minutes.
A short time after pressing the last button the original
display will reappear and the countdown begins.
25
Deactivating Sleep
• Press the “SLEEP” button 25 until the display shows
“SLEEP OFF”.
Displaying the Sleep time remaining
• To display the time remaining until the unit switches off
during the countdown, press button 25 “SLEEP” once
briefly.
20
• KB 22 CR
KB 22 RC
Timer / alarm function
This function allows you to program a time for the unit to
switch on. The clock must be set to the correct time (see
„Setting the time“ on page 13).
15
1.Switch the unit to standby using button 15 or button 48
“ ”. If the unit is in EcoPower mode, press button 42
“CLOCK” briefly to show the time.
10
2.Press and hold button 27 “TIMER” until the display
shows “TIMER SET” followed by the type of operation
(eg. “USB”).
3.Select the type of operation to be active when the unit
”/
switches on (e.g. “TUNER”) using buttons 28 “
” or the volume control 10 “VOLUME”.
30 “
4.Press button 27 “TIMER” once briefly. The display
shows the time when the unit will switch on, the hour
display is flashing.
5.Set the hour using buttons 28 “
volume control 10 “VOLUME”.
” / 30 “
48
” or
6.Press button 27 “TIMER” once briefly. The display will
flash the minutes.
7.Set the minutes using buttons 28 “
volume control 10 “VOLUME”.
” / 30 “
27
28
” or
8.Press button 27 “TIMER” once briefly. The display will
show the volume level when the unit switches on.
9.Set the desired volume using buttons 28 “
” or volume control 10 “VOLUME”.
30
” / 30 “
10.Press button 27 “TIMER” once briefly.
Programming is now complete.
The current time is now displayed once again. The
display shows the timer symbol which indicates that
this function is active.
The unit will switch itself on at the programmed time
with the selected type of operation and with the
selected volume level.
Switching the timer /alarm function on and off
KB 22 RC
1.Switch the unit to standby using button 15 or button 48
“ ”.
2.Press button 27 “TIMER” briefly to switch the timer function on and off.
• On: Timer symbol
is displayed
• Off: Timer symbol
is not displayed
• KB 22 CR
21
Troubleshooting
The following advice should help you to solve problems. If this doesn’t work, please contact our hotline (see page 3).
Take note of the warranty instructions.
Problem
The KB 22 CR is not working, the display does not
light up.
The KB 22 CR is not working, but the display does
light up.
No CD playback and/or
“NO DISC” displayed.
Possible cause
The KB 22 CR has no power.
Solution
Check the mains adapter and the socket.
The volume has been set too low.
Increase the volume with control 10 “VOLUME” or 32 “Vol +”.
Select the right source (see page 10).
Insert a CD.
Insert the disc with the labelled side facing
up.
Clean or change the disc.
Take out the disc and do not use the device
for one to two hours while activated.
Delete the incorrect files.
Wrong source selected.
No disc has been inserted.
Disc has been inserted upside down.
CD dirty or damaged.
Condensation in the device.
No or disrupted music
playback.
The remote control is not
working.
The sound is washed out
and muffled.
Files with a format other than MP3 or
WMA are located on the storage device.
File damaged.
No clear line of sight between the remote
control and the device.
Remote control not properly aligned.
Battery inserted in the remote control the
wrong way round.
Remote control battery exhausted.
Loudspeakers wrongly connected.
Delete or skip file.
Remove the obstacle.
Point the remote control towards the device.
Insert the battery the right way round (see
page 10).
Insert a new battery (see page 10).
Both loudspeakers must be connected in the
same way.
Care and cleaning
Clean the KB 22 CR and remote control regularly with a
soft, damp microfibre cloth. Please be absolutely sure to
observe the following notes in the process:
Danger Risk of electric shock!
In contact with live parts, water can lead to
electric shock or short circuit.
• Make sure that no liquid penetrates the unit.
• Disconnect the mains plug before cleaning.
Attention Risk of damage!
Using the wrong cleaning materials may damage the delicate surface of the case.
• If possible, only use plain water without any additives.
In case of stubborn marks, a mild soap solution may
be used.
• In no circumstances should caustic cleaning products,
white spirit, thinners, petrol or similar be used for
cleaning.
22
• KB 22 CR
How to clean your CDs
To clean your CDs use only cleaning
products approved for this purpose.
If necessary carefully wipe the disc
with a soft, lint free cloth from the centre to the rim. Hold the disc between
the index finger and thumb of the
other hand in the process.
Touching the playing side of the disc
with your hand can lead to problems
during playback.
Protecting the environment
Disposal of the unit
Batteries and rechargeable batteries
Used units must not be disposed of with household waste!
If the unit is no longer operational, every
consumer is required by law to dispose of used
devices separately from household waste,
e.g. at a collection point run by the communal authority borough. In this way it is ensured, that used units are
properly recycled and that negative consequences on the
environment are avoided.
For this reason, electrical equipment is labelled with the
displayed symbol.
Batteries and rechargeable batteries must
not be disposed of with household waste!
Every consumer is required by law to bring all
batteries and rechargeable batteries, whether
they contain harmful substances*) or not, to a collection
point run by the communal authority or borough or run
commercially, so that they can be disposed of in an environmentally friendly manner.
Please only hand in fully discharged batteries and rechargeable batteries!
*) labelled with: Cd = Cadmium, Hg = Mercury, Pb =
Lead
Technical data
Operating voltage:
Power consumption:
Dimensions (W x H x D):
Net weight:
230 V / 50 Hz
Operation: max. 60 watts
Standby: < 1 watt
EcoPower mode: ≤ 0.5 Watt
15.9 x 7.8 x 28 cm
1440 g
This product conforms with Council of the
European Union guidelines 2004/108/EC and
2006/95/EC.
Technical changes reserved!
• KB 22 CR
23
For questions, suggestions or any other issues please contact our customer service department:
Lautsprecher Teufel GmbH
Gewerbehof Buelowbogen - Aufgang D1
Buelowstr. 66, 10783 Berlin (Germany)
Phone: 00800 - 200 300 40
(toll-free)
Fax: +49 (0)30 / 300 930 930
www.teufelaudio.com
No responsibility is assumed for the
correctness of this information.
Technical changes, typographical
errors and other errors reserved.
Instruction No.
92404 GB 20130723