1
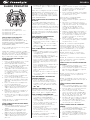
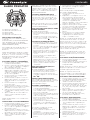
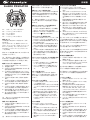
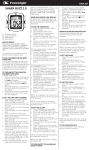
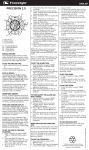
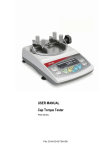
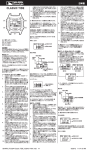
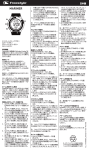
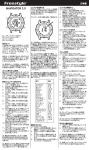
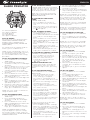
ENGLISH
SHARK PREDATOR
S4
S1
S3
S2
S5
S1. Start/stop Button
S2. Lap/reset Button
S3. Mode Button
S4. Light Button
S5. Lap/reset Button
DISPLAY MODES:
The watch has seven display modes:
HOME TIME, FOREIGN TIME (T2),
ALARM 1 (AL1), ALARM2 (AL2),
CHRONOGRAPH (CHR), PACER and
TIMER (TMR).
To change from one display mode to
another, press S3 button once.
NOTE: In any setting mode, if there is
no manipulation for around 2 minutes,
the watch will automatically save
the entered data and exit the setting
procedure.
TO SET THE TIME AND CALENDAR:
1. Press S3 button to select HOME TIME mode.
2. Press and hold S2 button for around 3 seconds, the second digits will blink.
3. Press S1 button to reset the second digits to 00. This will increase the time by 1 minute of the original setting is at 30 to 59 seconds.
4. Press S3 button, the minute digits will blink.
5. Press S1 button to set the minute digits. Holding down the button will speed up the process.
6. Press S3 button, the hour digits will blink.
7. Press S1 button to set the hour digits. Holding down the button will speed up the process.
8. Follow the same pattern to set day (of the week), year, month and date.
9. After finished making all the set-
tings, press S2 button to confirm.
TO SET THE HOUR FORMAT:
In HOME TIME mode, press S2 button
to toggle between 12-hour and 24-hour
format. The A.M. and P.M. indicators
will be displayed in 12-hour format.
NOTE: The chosen hour format will
apply to both HOME TIME mode and
FOREIGN TIME mode.
TO TURN ON/OFF THE HOURLY
CHIME:
In HOME TIME mode,
1. Press S1 button to activate or deactivate the hourly chime func-
tion.
2. When the hourly chime function is activated, the hourly chime indica-
tor will appear.
TO SET THE DAILY ALARMS:
1. Press S3 button to select ALARM1 or ALARM2 mode to set.
2. Press and hold S2 button for around 3 seconds, the minute digits will blink.
3. Press S1 button to set the minute digits. Holding down the button will speed up the process.
4. Press S3 button, the hour digits will blink.
5. Press S1 button to set the hour digits. Holding down the button will speed up the process.
6. After finished making all the set-
tings, press S2 button to confirm.
TO TURN ON/OFF THE DAILY ALARMS:
In ALARM1 or ALARM2 mode,
1. Press S1 button to activate or deactivate the alarm function.
2. While the alarm function is activated, the alarm indicator
/
will appear.
WHEN AN ALARM GOES OFF:
An alarm tune will be emitted at the
designated time when the alarm is
activated. To stop the tune, press any
button.
TO USE THE CHRONOGRAPH:
Press S3 button to select CHRONOGRAPH mode.
1. The chronograph will then be displayed in its current state – reset, running, or stopped.
2. To resume a counting, press S1 button to resume from where it left off.
3. To start a new counting, reset the stop watch to zero first.
4. Press S1 button to stop count-
ing, then press S2 button to reset the counter to zero.
For the measurement of elapsed time:
In CHRONOGRAPH mode,
1. Press S1 button to start counting.
To stop counting, press S1 button.
TO SET THE FOREIGN TIME:
2. Press S1 button again to resume 1. Press S3 button to select FOREIGN from where it left off.
TIME mode.
3. To reset to zero, press S1 button to 2. Press and hold S2 button for stop counting and then press S2 around 3 second. The hour digits button.
will blink.
3. Press S1 button to set the hour For the measurement of split time:
digits. Holding down the button will In CHRONOGRAPH mode,
speed up the process.
1. Press S1 button to start counting.
4. After finished making all the set-
2. While the chronograph is running, tings, press S2 button to confirm.
press S2/S5 button to register a lap. The chronograph is still running in NOTE: In FOREIGN TIME settings,
the background.
only hour digits are open to setting.
After around 8 seconds, the The minutes and seconds counts are
currently accumulated time will be synchronized between HOME TIME and displayed.
FOREIGN TIME mode.
3. Repeat the last step until all the laps have been registered.
NOTE: The year can be set within the
range of 2000 to 2099.
4.
5.
To stop counting, press S1 button. Press S1 button again to resume from where it left off.
To reset to zero, press S1 button to stop counting, then press S2 button to reset the counter to zero.
NOTE: The chronograph can record
up to a maximum of 10 laps. If you try
to record more than 10 laps, the lap
number will show a flashing “F” and
the extra laps will not be recorded.
NOTE: You can leave the chronograph
running while switching over to other
operating modes.
NOTE: The chronograph will count up
to 9 hours, 59 minutes and 59.99 seconds before starting from zero again.
TO USE THE RECALL FUNCTION:
1. Press S3 button to select RECALL mode.
2. Press S1 button to scroll through the recorded individual lap and split time.
NOTE: The recall function is available
only when there is lap record stored.
NOTE: The previous set of lap record
will automatically be replaced by the
next set of lap record.
TO USE THE PACER:
1. Press S3 button to select PACER mode.
2. The pacer frequency will be dis
played above the home time.
3. Press S2 button to cycle among the pre-set values 40, 45, 50, 55, 60, 65,
70, 75, 80, 85, 90, 95, 100, 110, 120, 130, 140, 150 and 160 beeps per minute.
4. After finished making all the settings, press S1 button to start the pacer.
5. To stop the pacer, press S1 button again.
TO SET THE TIMER:
1. Press S3 button to select TIMER mode.
2. Press and hold S2 button, the second digits will blink.
3. Press S1 button to set the second digits. Holding down the button will speed up the process.
4. Press S3 button, the minute digits will blink.
5. Press S1 button to set the minute digits. Holding down the button will speed up the process.
6. Press S3 button, the hour digits will blink.
7. Press S1 button to set the hour digits. Holding down the button will speed up the process.
8. After finished making all the set-
tings, press S2 button to confirm.
NOTE: The timer can be set up to a
maximum of 9 hours, 59 minutes and
59 seconds.
TO USE THE TIMER:
1. Press S3 button to select TIMER mode.
2. The timer will be displayed in its current state – reset, running, or stopped.
3. To resume a counting, press S1 button to resume from where it left off.
4. To start a new counting, reload the timer first.
Press S1 button to stop counting ENGLISH
5.
and then press S2 button.
After reaching zero in a countdown, a tune will be emitted. To stop the tune, press any button.
NOTE: You can leave the timer running
while switching over to other operating
modes.
NOTE: The timer will automatically
count up when the timer reaches zero
in a countdown.
To reduce carbon foot print, these
Freestyle instructions are printed with
soy inks on recycled paper.
FS0000-PREDATOR-0000-MR01
TO USE THE BACKLIGHT:
Press S4 button to turn on the backlight for around 3 seconds.
ESPAÑOL
SHARK PREDATOR
4. Después de hacer todos los ajustes contar.
necesarios, pulse el botón S2 para 2. Pulse el botón S1 para interrumpir confirmarlo.
la cuenta. Pulse el botón S1 otra vez para retomar la cuenta ahí NOTA: En la configuración de la HORA
donde se quedó.
EXTRANJERA, sólo podrá ajustar los
3. Pulse el botón S1 para interrumpir dígitos
de
la
hora.
El
cómputo
de
los
la cuenta y después pulse el botón S4
S1
segundos y los minutos está sincroni S2 para volver a cero.
zado entre la HORA EN CASA y HORA
EN EL EXTRANJERO.
Para medir el tiempo dividido,
En modo CRONÓMETRO,
CÓMO CONFIGURAR EL FORMATO DE
1. Pulse el botón S1 para empezar a LA
HORA:
contar.
S3
S2
En el modo HORA EN CASA, pulse
2. Mientras el cronómetro está en el botón S2 para cambiar entre los
marcha, pulse el botón S2/S5 para formatos de 12 horas y de 24 horas. Se registrar una vuelta. El cronómetro mostrará
el
indicador
de
am
y
pm
para
seguirá contando por detrás.
S5
señalar la hora en formato de 12 horas. Al cabo de 8 segundos, verá el tiempo acumulado hasta el mo-
S1. Botón para iniciar/parar
NOTA: El formato elegido para la hora
mento.
S2. Botón de vuelta/puesta a cero
se usará tanto para el modo de HORA
3. Repita el último paso hasta que se S3. Botón de modo
EN CASA como para el de HORA EN EL hayan guardado todas las vueltas.
S4. Botón de luz
EXTRANJERO.
4. Pulse el botón S1 para interrumpir S5. Botón de vuelta/puesta a cero
la cuenta. Pulse el botón S1 otra CÓMO APAGAR Y ENCENDER EL
vez para retomar la cuenta ahí MODOS DE VISUALIZACIÓN:
REPIQUE DE LA HORA:
donde se quedó.
El reloj tiene siete vistas:
En el modo de HORA EN CASA,
5. Pulse el botón S1 para interrumpir HORA EN CASA / HORA EN EL
1. Pulse el botón S1 para activar o la cuenta y después pulse el botón EXTRANJERO (T2), ALARMA 1 (AL1),
desactivar la función de repique en S2 para volver a cero.
ALARMA 2 (AL2), CRONÓMETRO
cada hora.
(CHR), MARCADOR DEL PASO, y TEM- 2. Cuando la función esté activada, NOTA: El cronómetro puede grabar
PORIZADOR (TMR).
aparecerá el indicador de repique hasta un máximo de 10 vueltas. Si
de la hora .
intentara grabar más de 10 vueltas,
Para cambiar de una vista a otra, pulse
en vez del número de vuelta saldrá
el botón S3 una vez.
CÓMO CONFIGURAR LAS ALARMAS
una “F” parpadeante, y las vueltas
DIARIAS:
adicionales no se grabarán.
NOTA: En cualquier vista de configu1. Pulse el botón S3 para seleccionar ración, si no se manipula ninguna tecla el modo de ALARMA1 ó ALARM2 y NOTA: Puede dejar el cronómetro
durante 2 minutos, el reloj guardará
configurarlos.
en marcha y cambiar a otros modos
automáticamente los datos introduci2. Mantenga pulsado el botón S2 operativos.
dos y saldrá del modo configuración.
durante 3 segundos. Los dígitos de los minutos parpadearán.
NOTA: El cronómetro contará hasta 9
CÓMO AJUSTAR LA HORA Y EL
3. Pulse el botón S1 para ajustar los horas, 59 minutos y 59.99 segundos
CALENDARIO:
dígitos de los minutos. Mantenga antes de volver a cero.
1. Pulse el botón S3 para seleccionar pulsado el botón para acelerar el el modo de HORA DE CASA.
proceso.
CÓMO USAR LA FUNCIÓN DE RECOR2. Mantenga pulsado el botón S2 4. Pulse el botón S3. Los dígitos de las DATORIO:
durante 3 segundos. Los dígitos de horas parpadearán.
1. Pulse el botón S3 para seleccionar los segundos parpadearán.
5. Pulse el botón S1 para ajustar los el modo de RECORDATORIO.
3. Pulse el botón S1 para poner los dígitos de la hora. Mantenga pul
2. Pulse el botón S1 para ver los tiem
segundos a 00. Así aumentará la sado el botón para acelerar el pos de vuelta individuales registra
hora en un minuto con respecto a proceso.
dos, el tiempo dividido.
la configuración inicial, siempre 6. Después de hacer todos los ajustes y cuando ésta estuviera entre 30 y necesarios, pulse el botón S2 para NOTA: La función de recordatorio sólo
59 segundos.
confirmarlo.
está disponible con un registro de
4. Pulse el botón S3. Los dígitos de vuelta grabado.
los minutos parpadearán.
CÓMO ENCENDER Y APAGAR LAS
5. Pulse el botón S1 para ajustar los ALARMAS DIARIAS:
NOTA: La tanda de vueltas anteriores
dígitos de los minutos. Mantenga En modo ALARMA 1 ó ALARMA 2,
se remplazará automáticamente por la
pulsado el botón para acelerar el 1. Pulse el botón S1 para activar o siguiente tanda.
proceso.
desactivar la función de alarma.
6. Pulse el botón S3. Los dígitos de 2. Cuando la función esté activada, CÓMO USAR EL MARCADOR DEL
las horas parpadearán.
aparecerá el indicador de alarma PASO:
7. Pulse el botón S1 para ajustar los /
.
1. Pulse el botón S3 para seleccionar dígitos de la hora. Mantenga pul
el modo de MARCADOR DEL PASO.
sado el botón para acelerar el CUANDO LA ALARMA SALTA:
2. El marcador se verá normalmente proceso.
Con la alarma activada, el sonido de
encima de la hora de casa.
8. Haga lo mismo para configurar el alarma saltará a la hora fijada. Para
3. Pulse el botón S2 para cambiar formato del día de la semana, el parar el tono, pulse cualquier botón.
entre los valores preconfigurados año, el mes, la fecha.
de 40, 45, 50, 55, 60, 65, 70, 75, 80, 9. Después de hacer todos los ajustes CÓMO USAR EL CRONÓMETRO:
85, 90, 95, 100, 110, 120, 130, 140, necesarios, pulse el botón S2 para 1. Pulse el botón S3 para seleccionar 150 y 160 pitidos por minuto.
confirmarlo.
el modo de CRONÓMETRO.
4. Después de hacer todos los ajustes 2. Aparecerá el cronómetro en el necesarios, pulse el botón S1 para NOTA: El año se configura dentro del
estado en que esté: en marcha, a iniciar el marcador del paso.
rango del 2000 al 2099.
cero o parado.
5. Para parar el marcador del paso, 3. Pulse el botón S1 para retomar la vuelva a pulsar el botón S1.
CÓMO CONFIGURAR LA HORA EN EL
cuenta ahí donde se quedó.
EXTRANJERO:
4. Para iniciar una cuenta nueva,
CÓMO CONFIGURAR EL TEMPORI1. Pulse el botón S3 para seleccionar primero hay que poner el ZADOR:
el modo HORA EN EL EXTRAN-
cronómetro a cero.
1. Pulse el botón S3 para seleccionar JERO.
Pulse el botón S1 para interrumpir el modo de TEMPORIZADOR.
2. Mantenga pulsado el botón S2 la cuenta y después pulse el botón 2. Pulse el botón S2. Los dígitos de durante unos 3 segundos. Los S2 para volver a cero.
los segundos parpadearán.
dígitos de la hora parpadearán.
3. Pulse el botón S1 para ajustar los 3. Pulse el botón S1 para ajustar los Para medir el tiempo transcurrido,
dígitos de los segundos. Mantenga dígitos de la hora. Mantenga pul
En modo CRONÓMETRO,
pulsado el botón para acelerar el sado el botón para acelerar el 1. Pulse el botón S1 para empezar a proceso.
proceso.
ESPAÑOL
4.
5.
6.
7.
8.
Pulse el botón S3. Los dígitos de los minutos parpadearán.
Pulse el botón S1 para ajustar los dígitos de los minutos. Mantenga pulsado el botón para acelerar el proceso.
Pulse el botón S3. Los dígitos de las horas parpadearán.
Pulse el botón S1 para ajustar los dígitos de la hora. Mantenga pul
sado el botón para acelerar el proceso.
Después de hacer todos los ajustes necesarios, pulse el botón S2 para confirmarlo.
NOTA: El temporizador se puede configurar hasta un máximo de 9 horas, 59
minutos y 59 segundos.
CÓMO USAR EL TEMPORIZADOR:
1. Pulse el botón S3 para seleccionar el modo de TEMPORIZADOR.
2. Aparecerá el temporizador en su estado actual: reseteado, en mar
cha o parado.
3. Pulse el botón S1 para retomar la cuenta ahí donde se quedó.
4. Para iniciar una cuenta nueva, primero hay que recargar el tempo
rizador.
Pulse el botón S1 una vez para interrumpir la cuenta. Ahora pulse el botón S2.
5. Después de haber llegado a cero en
la cuenta atrás, sonará un tono. Para parar el tono, pulse cualquier botón.
NOTA: Puede dejar el CRONÓMETRO
en marcha y cambiar a otros modos
operativos.
NOTA: El temporizador empezará a
contar hacia arriba automáticamente
cuando llegue a cero en una cuenta
atrás.
Para reducir la huella del carbono,
las instrucciones de Freestyle se han
imprimido con tinta de soja en papel
reciclado.
FS0000-PREDATOR-0000-MR01
CÓMO USAR LA LUZ DE FONDO:
Pulse el botón S4 para encender la luz
de fondo durante 3 segundos.
DEUTSCH
SHARK PREDATOR
4. Wenn Sie alle Einstellungen abge
Messung der abgelaufenen Zeit:
schlossen haben, drücken Sie Taste Im CHRONOGRAPHEN-Modus:
S2 zur Bestätigung.
1. Drücken Sie Taste S1 um die Zeit
messung zu starten.
HINWEIS : Im Modi zur Einstellung der 2. Drücken Sie S1 um die Zeitmes
FREMDZEIT können nur die Stunden
sung zu stoppen. Drücken Sie S1 eingestellt werden. Die Minuten und
noch einmal um ab der letzten S4
S1
Sekunden für die FREMDZEIT synchro- Messung weiter zu messen.
nisieren sich mit der ORTSZEIT.
3. Um die Stoppuhr zurückzusetzen, drücken Sie Taste S1 um die Zeit
STUNDENFORMAT EINSTELLEN:
messung zu stoppen und an
Im Modus ORTSZEIT drücken Sie
schließend S2.
Taste
S2
um
zwischen
12-Stunden
S3
S2
und 24-Stundenformat zu wählen. Die Messung der Zwischenzeit (Split Time):
Anzeige „A.M.“ (morgens) und „P.M“
Im CHRONOGRAPHEN-Modus:
(abends) wird im 12-Stundenformat
1. Drücken Sie Taste S1 um die Zeit
angezeigt.
messung zu starten.
S5
2. Während der Chronograph zählt, HINWEIS : Das gewählte Format wird
drücken Sie Taste S2/S5 einmal S1. Start/Stop-Taste
in beiden Modi für ORTSZEIT und
um die Rundenzeit aufzunehmen. S2. Taste Rundenzeit/Rücksetzen
FREMDZEIT angezeigt.
Der Chronograph zählt im Hintergr
S3. Taste „Modus“
und weiter.
S4. Taste für Beleuchtung
WECKFUNKTION UND STUNDENSIG Nach 8 Sekunden wird die aktuelle, S5. Taste Rundenzeit/Rücksetzen
NAL AN-/AUSSTELLEN:
kumulative Rundenzeit angezeigt.
Im Modus ORTSZEIT:
3. Wiederholen Sie den letzten Schritt ANZEIGEMODI:
1. Drücken Sie Taste S1 einmal um bis alle Runden gemessen wurden.
Die Armbanduhr hat sieben Anzei das Stundensignal zu aktivieren 4. Drücken Sie S1 um die Zeitmes
gemodi:
bzw. zu deaktivieren.
sung zu stoppen. Drücken Sie S1 ORTSZEIT, FREMDZEIT (T2), WECK2. Ein Signal wird stündlich ertönen noch einmal um ab der letzten FUNKTION 1 (AL1), WECKFUNKTION
wenn die Stundensignal-Funktion Messung weiter zu messen.
2 (AL2), CHRONOGRAPH (CHR),
aktiviert ist.
5. Drücken Sie Taste S1 um die Zeit
TAKTGEBER und TIMER (TMR).
messung zu stoppen und dann TÄGLICHE WECKFUNKTION EINSTEL- Taste S2 um den Zähler wieder auf Drücken Sie die Taste S3 einmal um
LEN:
„Null“ zurückzusetzen.
von einem Modus zum nächsten zu
1. Drücken Sie Taste S3 um den wechseln.
Modus WECKFUNKTION ALARM1 HINWEIS : Der Chronograph kann bis
oder ALARM2 zu wählen.
zu maximal 10 Runden messen. Falls
HINWEIS : Falls im Einstellungs2. Halten Sie Taste S2 etwa zwei Sie mehr als 10 Runden aufzeichnen
Modus 2 Minuten lang keine Tasten
Sekunden lang gedrückt. Die Mi
wollen, wird die Anzahl der Runden
gedrückt werden, wird die Uhr
nutenanzeige wird blinken.
ein blinkendes „F“ zeigen. Die übrigen
automatisch die eingegebenen Daten
3. Drücken Sie Taste S1 um die Mi
Runden werden nicht aufgezeichnet.
speichern und das Einstellungs-Menü
nuten einzustellen. Halten Sie verlassen.
die Taste gedrückt um die Anzeige HINWEIS : Sie können den Chronogra schneller vorzubewegen.
phen laufen lassen während Sie andere
ZEIT UND KALENDER EINSTELLEN:
4. Drücken Sie Taste S3. Die Stun
Modi benutzen.
1. Drücken Sie Taste S3 um den denanzeige wird blinken.
Modus ORTSZEIT zu wählen.
5. Drücken Sie Taste S1 um die Stun
HINWEIS : Der Chronograph wird bis
2. Halten Sie Taste S2 etwa 3 Sekun
den einzustellen. Halten Sie die zu 9 Stunden, 59 Minuten und 59.99
den lang gedrückt. Die Sekun
Taste gedrückt um die Anzeige Sekunden zählen und dann wieder bei
denanzeige wird blinken.
schneller vorzubewegen.
„Null“ beginnen.
3. Drücken Sie Taste S1 um die 6. Wenn Sie alle Einstellungen abge
Sekundenanzeige auf „00“ zurück
schlossen haben, drücken Sie Taste WIEDERAUFRUF-FUNKTION (RE zustellen. Dies wird die Zeit um S2 zur Bestätigung.
CALL):
jeweils 1 Minute erhöhen wenn die 1. Drücken Sie Taste S3 um den ursprüngliche Zeit zwischen 30 und TÄGLICHE WECKFUNKTION AN-/
RECALL-Modus zu wählen.
59 Sekunden ist.
AUSSTELLEN:
2. Drücken Sie Taste S1 um durch 4. Drücken Sie Taste S3. Die Minuten Im Modus ALARM1 oder ALARM2:
die aufgezeichneten, individuellen anzeige wird blinken.
1. Drücken Sie Taste S1 einmal um Runden- und Zwischenzeiten zu 5. Drücken Sie Taste S1 um die Mi
die Weckfunktion zu aktivieren bzw. blättern.
nuten einzustellen. Halten Sie zu deaktivieren.
die Taste gedrückt um die Anzeige 2. Wenn die Weckfunktion aktiviert ist, HINWEIS : Die Recall-Funktion steht
schneller vorzubewegen.
wird die Anzeige Weckfunktion
/ nur zur Auwahl wenn eine Runden6. Drücken Sie Taste S3. Die Stun
erscheinen.
messung gespeichert wurde.
denanzeige wird blinken.
7. Drücken Sie Taste S1 um die Stun
WENN WECKSIGNAL ERTÖNT:
HINWEIS : Die vorherige Messung der
den einzustellen. Halten Sie die Wenn die Weckfunktion aktiviert ist,
Rundenzeit wird automatisch von der
Taste gedrückt um die Anzeige wird zur vorbestimmten Zeit wird ein
jeweils nächsten Messung über schneller vorzubewegen.
Wecksignal ertönen. Drücken Sie
schrieben.
8. Folgen Sie den gleichen Schritten irgendeine Taste um den Signalton
um den Tag (Wochentag), das Jahr, abzustellen.
ZEITMESSUNG MIT DEM PACER:
den Monat sowie das Datum 1. Drücken Sie Taste S3 um den einzustellen.
ZEITMESSUNG MIT DEM CHRO PACER-Modus zu wählen.
9. Wenn Sie alle Einstellungen abge
NOGRAPHEN:
2. Die Pacer-Frequenz wird über der schlossen haben, drücken Sie Taste 1. Drücken Sie Taste S3 um den Ortszeit angezeigt.
S2 zur Bestätigung.
CHRONOGRAPHEN-Modus zu 3. Drücken Sie Taste S2 um den Timer wählen.
auf values 40, 45, 50, 55, 60, 65, 70, HINWEIS : Das Jahr kann vom Jahr
2. Der Chronograph wird dann im 75, 80, 85, 90, 95, 100, 110, 120, 130, 2000 bis 2099 eingestellt werden.
aktuellen Status - rücksetzen, 140, 150 und 160 Töne pro Minute zählend, gestoppt – angezeigt.
zu stellen.
FREMDZEIT EINSTELLEN:
3. Drücken Sie Taste S1 um die Zeit
4. Wenn Sie alle Einstellungen abge
1. Drücken Sie Taste S3 um den messung wieder aufzunehmen.
schlossen haben, drücken Sie Taste Modus FREMDZEIT zu wählen.
4. Um eine neue Zeitmessung zu S1 zur Bestätigung.
2. Halten Sie Taste S2 etwa 3 Sekunde starten, setzen Sie die Stoppuhr 5. Drücken Sie S1 um den Pacer zu lang gedrückt. Die Stundenanzeige zuerst wieder auf „Null“.
stoppen.
wird blinken.
Drücken Sie Taste S1 um die Zeit
3. Drücken Sie Taste S1 um die Stun
messung zu stoppen und dann TIMER EINSTELLEN:
den einzustellen. Halten Sie die Taste S2 um den Zähler wieder auf 1. Drücken Sie Taste S3 um den Taste gedrückt um die Anzeige „Null“ zurückzusetzen.
TIMER-Modus zu wählen
schneller vorzubewegen.
DEUTSCH
2.
3.
4.
5.
6.
7.
8.
Drücken Sie Taste S2. Die Sekun
denanzeige wird blinken.
Drücken Sie Taste S1 um die Sekunden einzustellen. Halten Sie die Taste gedrückt um die Anzeige schneller vorzubewegen.
Drücken Sie Taste S3. Die Minuten
anzeige wird blinken.
Drücken Sie Taste S1 um die Mi-
nuten einzustellen. Halten Sie die Taste gedrückt um die Anzeige schneller vorzubewegen.
Drücken Sie Taste S3. Die Stun
denanzeige wird blinken.
Drücken Sie Taste S1 um die Stun
den einzustellen. Halten Sie die Taste gedrückt um die Anzeige schneller vorzubewegen.
Wenn Sie alle Einstellungen abge
schlossen haben, drücken Sie Taste S2 zur Bestätigung.
HINWEIS : Der Timer wird bis zu 9
Stunden, 59 Minuten und 59 Sekunden
zählen.
TIMER BENUTZEN:
1. Drücken Sie Taste S3 um den TIMER-Modus zu wählen
2. Der Timer wird dann im aktuellen
Status - rücksetzen, zählend, gestoppt – angezeigt.
3. Drücken Sie Taste S1 um die Zeit-
messung wieder aufzunehmen.
4. Um eine neue Zeitmessung zu starten, setzen Sie den Timer zu-
erst wieder zurück.
Um den TIMER zurückzusetzen, drücken Sie Taste S1 um die Zeit messung zu stoppen und an
schließend Taste S2.
5. Wenn die Zeitmessung abgelaufen ist (Null), wird ein Signal ertönen. Drücken Sie irgendeine Taste um den Signalton abzustellen.
HINWEIS : Sie können den Timer
laufen lassen während Sie andere Modi
benutzen.
HINWEIS : Der Timer wird automatisch
aufwärts zählen wenn der Timer in
einer Messung „Null“ erreicht hat.
Diese Freestyle-Gebrauchsanweisung
wurde mit Tinte auf Sojabasis auf
Recycling-Papier gedruckt um den
Kohleausstoß zu reduzieren.
FS0000-PREDATOR-0000-MR01
HINTERGRUNDBELEUCHTUNG:
Drücken Sie Taste S4 um die
Hintergrundbeleuchtung für etwa 3
Sekunden anzuschalten.
FRANÇAIS
SHARK PREDATOR
S4
S1
S3
S2
S5
S1.Bouton Démarrer / Arrêter
S2.Bouton Temps intermédiaire / Réinitialiser
S3.Bouton Mode
S4.Bouton d’éclairage
S5.Bouton Temps intermédiaire / Réinitialiser
4.
gler les chiffres des heures. Main
tenez le bouton enfoncé pour ac
célérer la procédure.
Après avoir effectué tous les ré
glages, appuyez sur le bouton S2 pour confirmer.
REMARQUE: Dans le mode de réglage
de l’HEURE INTERNATIONALE, seuls
les chiffres des heures peuvent être
réglés. Les minutes et les secondes
sont synchronisées entre le mode
HEURE LOCALE et le mode HEURE
INTERNATIONALE.
REGLAGE DU FORMAT HORAIRE:
En mode HEURE LOCALE, appuyez
sur le bouton S2 pour permuter entre
le format 12 heures et 24 heures. Les
indicateurs A.M et P.M s’afficheront en
format 12 heures.
le chronomètre à zéro.
Appuyez sur le bouton S1 pour arrêter le compteur puis appuyez sur le bouton S2 pour réinitialiser le compteur à zéro.
Pour mesurer le temps écoulé,
En mode CHRONOGRAPHE,
1. Appuyez sur le bouton S1 pour démarrer le compteur.
2. Pour arrêter le compteur, appuyez sur le bouton S1. Appuyez de nou
veau sur le bouton S1 pour remettre le compteur en marche à partir du point où il a été arrêté.
3. Pour réinitialiser à zéro, appuyez sur le bouton S1 pour arrêter le compteur puis appuyez sur le
bouton S2.
Pour mesurer un temps intermédiaire,
En mode CHRONOGRAPHE,
1. Appuyez sur le bouton S1 pour démarrer le compteur.
2. Alors que le chronomètre est en cours, appuyez une fois sur les boutons S2/S5 pour enregistrer un MODES D’AFFICHAGE:
POUR ACTIVER / DESACTIVER LE
temps intermédiaire. Le compteur La montre offre sept modes
CARILLON HORAIRE:
du chronographe continue à tourn-
d’affichage: HEURE LOCALE / HEURE
En mode HEURE LOCALE,
er dans le fond.
INTERNATIONALE (T2), ALARME
1. Appuyez sur le bouton S1 pour Après environ 8 secondes, le temps 1 (AL1), ALARME 2 (AL2), CHRO active ou désactiver la fonction du accumulé s’affichera.
NOGRAPHE (CHR), COMPTEUR DE
carillon horaire.
3. Répétez la dernière étape jusqu’à PULSATIONS et MINUTEUR (TMR).
2. Lorsque la fonction du carillon hor ce que tous les temps intermédi-
aire est activée, l’indicateur du aires soient enregistrés.
Pour changer le mode d’affichage, ap- carillon horaire apparaîtra..
4. Pour arrêter le compteur, appuyez puyez une fois sur le bouton S3.
sur le bouton S1. Appuyez de nouREGLAGE DES ALARMES:
veau sur le bouton S1 pour REMARQUE: En mode de réglage, si
1. Appuyez sur le bouton S3 pour remettre le compteur en marche à aucune activité n’est détectée durant
sélectionner le mode ALARME 1 ou partir du point où il a été arrêté.
2 minutes, la montre sauvegardera
ALARME 2 à régler.
5. Pour réinitialiser le compteur à automatiquement les données entrées 2. Appuyez et maintenez le bouton S2 zéro, appuyez sur le bouton S1 pour et quittera la procédure de réglage.
durant 3 secondes et les chiffres arrêter le compteur puis appuyez des minutes clignoteront.
sur le bouton S2.
REGLAGE DE l’HEURE ET DU CALEN3. Appuyez sur le bouton S1 pour DRIER:
régler les chiffres des minutes. REMARQUE: Le chronographe peut
1. Appuyez sur le bouton S3 pour Maintenez le bouton enfoncé pour enregistrer un maximum de 10 temps
sélectionner le mode HEURE LO-
accélérer la procédure.
intermédiaires. Si vous essayez
CALE.
4. Appuyez sur le bouton S3 et les d’enregistrer plus de 10 temps inter2. Appuyez et maintenez le bouton S2 chiffres des heures clignoteront.
médiaires, le numéro du temps inter durant environ 3 secondes et les 5. Appuyez sur le bouton S1 pour ré
médiaire affichera un “F” clignotant et
chiffres des secondes clignoteront. gler les chiffres des heures. Main- le temps intermédiaire supplémentaire
3. Appuyez sur le bouton S1 pour tenez le bouton enfoncé pour ac
ne sera pas enregistré.
réinitialiser les chiffres des sec
célérer la procédure.
ondes à 00. Cela augmentera 6. Après avoir effectué tous les ré
REMARQUE: Vous pouvez laisser
l’heure d’une minute par rapport au glages, appuyez sur le bouton S2 le chronomètre en marche tout en
réglage original si celui-ci est entre pour confirmer.
permutant sur un autre mode.
30 et 59 secondes.
4. Appuyez sur le bouton S3 et les POUR ACTIVER / DESACTIVER LES
REMARQUE: Le chronographe compt chiffres des minutes clignoteront.
ALARMES:
era jusqu’à 9 heures, 59 minutes et
5. Appuyez sur le bouton S1 pour En mode d’ALARME 1 ou d’ALARME 2,
59.99 secondes avant de recommencer
régler les chiffres des minutes. 1. Appuyez sur le bouton S1 pour
à zéro de nouveau.
Maintenez le bouton enfoncé pour activer ou désactiver la fonction accélérer la procédure.
d’alarme.
UTILISATION DE LA FONCTION DE
6. Appuyez sur le bouton S3 et les 2. Lorsque la fonction d’alarme est RAPPEL:
chiffres des heures clignoteront.
active, l’indicateur de l’alarme
1. Appuyez sur le bouton S3 pour sé-
7. Appuyez sur le bouton S1 pour ré
/
apparaîtra.
lectionner le mode RECALL (RAP-
gler les chiffres des heures. Main-
PEL).
tenez le bouton enfoncé pour ac-
LORSQUE L’ALARME RETENTIT:
2. Appuyez sur le bouton S1 pour célérer la procédure.
Une sonnerie d’alarme retentira à
faire défiler les temps intermédi-
8. Suivez la même procédure pour
l’heure réglée si le mode d’alarme
aires et les temps de passage régler le jour (de la semaine), est activé. Pour arrêter la sonnerie
individuels sauvegardés.
l’année, le mois et la date.
d’alarme, appuyez sur n’importe quel
9. Après avoir effectué tous les ré
bouton.
REMARQUE: la fonction de rappel est
glages, appuyez sur le bouton S2 uniquement disponible lorsque des
pour confirmer.
UTILISATION DU CHRONOGRAPHE:
temps intermédiaires sont sauveg1. Appuyez sur le bouton S3 pour
ardés.
REMARQUE: L’année peut être réglée
sélectionner le mode CHRO
entre 2000 et 2099.
NOGRAPHE.
REMARQUE: Le set précédent de
2. Le chronographe affichera le statut temps de passage enregistré sera
REGLAGE DE l’HEURE INTERNA en cours – réinitialisé, compteur en automatiquement remplacé par le
TIONALE :
cours ou compteur arrêté.
set suivant enregistré de temps de
1. Appuyez sur le bouton S3 pour 3. Pour réactiver le compteur, appuyez passage.
sélectionner le mode HEURE IN-
sur le bouton S1 et le compteur se TERNATIONALE.
remettra en marche à partir du UTILISATION DU COMPTEUR DE
2. Appuyez et maintenez le bouton S2 point où il a été arrêté.
PULSATIONS:
durant environ 3 secondes et les 4. Pour démarrer de nouveau le 1. Appuyez sur le bouton S3 pour
chiffres des heures clignoteront.
compteur, réinitialisez tout d’abord sélectionner le mode PACER 3. Appuyez sur le bouton S1 pour ré
REMARQUE: Le format horaire choisi
s’appliquera dans les deux modes
de l’HEURE LOCALE et de l’HEURE
INTERNATIONALE.
FRANÇAIS
2.
3.
4.
5.
(COMPTEUR DE PULSATIONS).
La fréquence du compteur de pul-
sation s’affichera au-dessus de l’heure locale.
Appuyez sur le bouton S2 pour faire défiler les valeurs préréglées de 40, 45, 50, 55, 60, 65, 70, 75, 80, 85, 90, 95, 100, 110, 120, 130, 140, 150 et160 bips par minute.
Après avoir effectué tous les ré
glages, appuyez sur le bouton S1 pour démarrer le compteur de pulsations.
Pour arrêter le compteur de pulsations, appuyez de nouveau sur le bouton S1.
REGLAGE DU MINUTEUR:
1. Appuyez sur le bouton S3 pour
sélectionner le mode TIMER (MINUTEUR).
2. Appuyez et maintenez le bouton S2
et les chiffres des secondes clignoteront.
3. Appuyez sur le bouton S1 pour régler les chiffres des secondes. Maintenez le bouton enfoncé pour accélérer la procédure.
4. Appuyez sur le bouton S3 et les chiffres des minutes clignoteront.
5. Appuyez sur le bouton S1 pour régler les chiffres des minutes. Maintenez le bouton enfoncé pour accélérer la procédure.
6. Appuyez sur le bouton S3 et les chiffres des heures clignoteront.
7. Appuyez sur le bouton S1 pour ré
gler les chiffres des heures. Main-
tenez le bouton enfoncé pour ac-
célérer la procédure.
8. Après avoir effectué tous les ré-
glages, appuyez sur le bouton S2 pour confirmer.
REMARQUE: Le minuteur peut être réglé jusqu’à un maximum de 9 heures,
59 minutes et 59 secondes.
UTILISATION DU MINUTEUR:
1. Appuyez sur le bouton S3 pour
sélectionner le mode TIMER (MINUTEUR).
2. Le minuteur affichera le statut en cours – réinitialisé, compteur en cours ou compteur arrêté.
3. Pour réactiver le compteur, ap
puyez sur le bouton S1 et le compt-
eur se remettra en marche à partir du point où il a été arrêté.
4. Pour démarrer de nouveau le compteur, réinitialisez tout d’abord le minuteur à zéro.
Appuyez sur le bouton S1 pour arrêter le compteur puis appuyez et maintenez le bouton S2.
5. Lorsque le compte à rebours atteint zéro, une tonalité sonore sera émise. Pour arrêter la tonalité sonore, appuyez sur n’importe quel bouton.
REMARQUE: Le minuteur reprendra le
compte à l’endroit lorsque le compte à
rebours aura atteint zéro.
UTILISATION DU RETRO ECLAIRAGE :
Appuyez sur le bouton S4 pour activer
le rétro éclairage durant 3 secondes.
Pour réduire l’émission de carbone
dans l’atmosphère, ces instructions
Freestyle sont imprimées avec des
encres de soja sur du papier recyclé.
FS0000-PREDATOR-0000-MR01
REMARQUE: Vous pouvez laisser
le chronomètre en marche tout en
permutant sur un autre mode.
ITALIANO
SHARK PREDATOR
S4
S1
S3
S2
S5
S1.Tasto Start/stop
S2.Tasto Lap/reset
S3.Tasto Mode
S4.Tasto Light
S5.Tasto Lap/reset
MODALITA’ DI DISPLAY:
L’orologio ha sette modalità di display:
HOME TIME, FOREIGN TIME (T2),
ALARM 1 (ALLARME 1) (AL1), ALARM2
(ALLARME 2) (AL2), CHRONOGRAPH
(CRONOGRAFO) (CHR), PACER e
TIMER (TMR).
NOTA: Nelle impostazioni di FOREIGN
TIME, solo la cifra delle ore può essere
impostata. Il conteggio delle ore e dei
minuti è sincronizzato tra la modalità
HOME TIME e FOREIGN TIME.
3.
dove era stato interrotto.
Per azzerare, premere il tasto S1 per interrompere il conteggio quindi
premere il tasto S2.
Come misurare il tempo intermedio:
Nella modalità CHRONOGRAPH,
1. Premere il tasto S1 per iniziare il conteggio.
2. Mentre il tempo sul cronografo scorre, premere il tasto S2/S5 per
registrare un giro. Il tempo continuerà a scorrere sullo sfondo del cronografo.
NOTA: Il formato dell’ora prescelto
Dopo circa 8 secondi, il tempo verrà applicato sia nella modalità
attuale accumulato sarò mostrato HOME TIME che nella modalità FOR sul display.
EIGN TIME.
3. Ripetere l’ultimo passaggio fino a
che tutti i giri non sono stati regis-
COME ATTIVARE/DISATTIVARE LA
trati.
SUONERIA ORARIA:
4. Per interrompere il conteggio, Nella modalità HOME TIME,
premere il tasto S1. Premere di 1. Premere il tasto S1 per attivare nuovo il tasto S1 per riprendere da o disattivare la funzione di suoneria dove è stato interrotto.
oraria.
5. Per azzerare, premere il tasto S1 2. Quando la funzione di suoneria per interrompere il conteggio, oraria è attiva, l’indicatore di suon
quindi premere il tasto S2 per eria oraria apparirà.
azzerare il contatore.
COME IMPOSTARE IL FORMATO
DELL’ORA:
Nella modalità HOME TIME, premere
il tasto S2 per passare dal formato 12ore a quello 24-ore e viceversa. Gli indicatori di A.M. e P.M. saranno mostrati
sul display nel formato 12-ore.
COME IMPOSTARE GLI ALLARMI
GIORNALIERI:
1. Premere il tasto S3 per selezionare l’impostazione di modalità ALARM1 Per passare da una modalità di display o ALARM2 .
ad un’ altra, premere una volta il
2. Premere e tenere premuto il tasto tasto S3.
S2 per circa 3 secondi, il numero dei minuti lampeggerà.
NOTA: In qualsiasi modalità di
3. Premere il tasto S1 per impostare impostazione, se l’orologio non
la cifra dei minuti. Premere a lungo viene manipolato per circa 2 minuti,
il tasto farà avanzare la progres
l’orologio salverà automaticamente i
sione più velocemente.
dati immessi ed uscirà dalla procedura 4. Premere il tasto S3, il numero delle di impostazione.
ore lampeggerà.
5. Premere il tasto S1 per impostare COME IMPOSTARE ORA E DATA:
la cifra delle ore. Premere a lungo il 1. Premere il tasto S3 per selezionare tasto farà avanzare la progressione la modalità HOME TIME.
più velocemente.
2. Premere e tenere premuto il tasto 6. Dopo aver impostato, premere il S2 per circa 3 secondi, il numero tasto S2 per confermare.
dei secondi lampeggerà.
3. Premere il tasto S1 per azzerare PER ADDIVARE/DISATTIVARE GLI
la cifra dei secondi fino a 00. Questo ALLARMI GIORNALIERI:
aumenterà il tempo di 1 minuto se Nella modalità ALARM1 o ALARM2,
l’impostazione originale va da 30 a 1. Premere il tasto S1 per attivare o 59 secondi.
disattivare la funzione di allarme.
4. Premere il tasto S3, il numero dei 2. Quando la funzione di allarme è minuti lampeggerà.
attiva, l’indicatore di allarme
5. Premere il tasto S1 per impostare /
apparirà.
la cifra dei minuti. Premere a lungo il tasto farà avanzare la progres-
QUANDO UN ALLARME SI DISATTIVA:
sione più rapidamente.
Un suono di allarme sarà emesso
6. Premere il tasto S3, il numero delle all’ora prestabilita quando l’allarme
ore lampeggerà.
è stato attivato. Per interrompere il
7. Premere il tasto S1 per impostare suono, premere un tasto qualsiasi.
la cifra delle ore. Premere a lungo il tasto farà avanzare la progressione COME USARE IL CRONOGRAFO:
più rapidamente.
1. Premere il tasto S3 per selezionare 8. Seguire lo stesso procedimento per la modalità CHRONOGRAPH.
impostare il giorno (della set-
2. Il cronografo verrà mostrato nel suo timana), anno, mese e data.
stato attuale – azzerato, in funzione 9. Dopo aver impostato, premere il o fermo.
tasto S2 per confermare.
3. Per riprendere un conteggio, pre
mere il tasto S1 per riprendere da NOTA: L’anno dovrà essere compreso
dove era stato interrotto.
tra il 2000 e il 2099.
4. Per iniziare un nuovo conteggio,
bisogna prima azzerare il COME IMPOSTARE L’ORA ESTERA:
cronometro.
1. Premere il tasto S3 per selezionare Premere il tasto S1per interromp-
la modalità FOREIGN TIME.
ere il conteggio, poi premere il tasto 2. Premere e tenere premuto il tasto S2 per azzerare il contatore.
S2 per circa 3 secondi. Il numero delle ore lampeggerà.
Come misurare il tempo trascorso:
3. Premere il tasto S1 per impostare Nella modalità CHRONOGRAPH,
la cifra delle ore. Premere a lungo il 1. Premere il tasto S1 per iniziare il tasto farà avanzare la progressione conteggio.
più rapidamente.
2. Per interrompere il conteggio, 4. Dopo aver impostato, premere il premere il tasto S1. Premere di tasto S2 per confermare.
nuovo il tasto S1 per riprendere da NOTA: Il cronografo può memorizzare
fino ad un massimo di 10 giri. Se si
cerca di memorizzare più di 10 giri,
il numero dei giri mostrerà una “F”
lampeggiante e i giri successivi non
saranno registrati.
NOTA: Si può lasciare scorrere il tempo
sul cronografo mentre si passa ad altre
modalità operative
NOTA: Il cronografo può calcolare fino
ad un massimo di 9 ore, 59 minuti
e 59.99 secondi prima di riniziare il
conteggio da zero.
COME USARE LA FUNZIONE RICHIAMO:
1. Premere il tasto S3 per selezionare la modalità RECALL.
2. Premere il tasto S1 per scorrere
attraverso il tempo di giro indi
viduale e il tempo totale trascorso memorizzati.
NOTA: La funzione di richiamo è
disponibile solo quando almeno un giro
è stato memorizzato.
NOTA: La serie precedente di giri
memorizzati verrà sostituita automaticamente dalla serie successiva di giri
memorizzati.
COME USARE IL PACER:
1. Premere il tasto S3 per selezionare la modalità PACER.
2. La frequenza del pacer sarà mostrata sopra l’ora nazionale.
3. Premere il tasto S2 per scegliere tra i valori pre-impostati 40, 45, 50,
55, 60, 65, 70, 75, 80, 85, 90, 95, 100, 110, 120, 130, 140, 150 e 160 bip al minuto.
4. Dopo aver impostato, premere il tasto S1 per avviare il pacer.
5. Per fermare il pacer, premere di nuovo il tasto S1.
COME IMPOSTARE IL TIMER:
1. Premere il tasto S3 per selezionare la modalità TIMER.
2. Premere e tenere premuto il tasto S2, il numero dei secondi lampeg
gerà.
3. Premere il tasto S1 per impostare la cifra dei secondi. Premere a lungo il tasto farà avanzare la pro
gressione più velocemente.
ITALIANO
4.
5.
6.
7.
8.
Premere il tasto S3, il numero dei minuti lampeggerà.
Premere il tasto S1 per impostare la cifra dei minuti. Premere a lungo il tasto farà aumentare la progres-
sione più velocemente.
Premere il tasto S3, il numero delle ore lampeggerà.
Premere il tasto S1 per impostare la cifra delle ore. Premere a lungo il tasto farà avanzare la progressione più velocemente.
Dopo aver impostato premere, il tasto S2 per confermare.
NOTE: Il timer può essere impostato
fino ad un massimo di 9 ore, 59 minuti
and 59 secondi.
COME USARE IL TIMER:
1. Premere il tasto S3 per selezionare la modalità TIMER.
2. Il timer verrà visualizzato nello stato attuale – azzerato, in funzione o fermo.
3. Per riprendere un conteggio, pre-
mere il tasto S1 per riprendere da dove era stato interrotto.
4. Per iniziare un nuovo conteggio, ricaricare il timer innanzitutto.
Premere il tasto S1 per interromp-
ere il conteggio e poi premere il tasto S2.
5. Dopo aver raggiunto lo 00 in un conteggio alla rovescia, un suono verrà emesso. Per interrompere il suono, premere un tasto qualsiasi.
NOTA: Si può lasciare scorrere il tempo
sul timer mentre si passa ad altre
modalità operative.
NOTA: Il timer ricomincerà automaticamente il conteggio quando il timer
raggiunge lo 00 in un conteggio alla
rovescia.
Per ridurre l’impatto ambientale,
queste istruzioni Freestyle sono
stampate con inchiostri di soia su
carta riciclata .
FS0000-PREDATOR-0000-MR01
COME USARE LA RETROILLUMINAZIONE:
Premere il tasto S4 per accendere la
retroilluminazione per circa 3 secondi.
PORTUGUÊS
SHARK PREDATOR
S4
S1
S3
S2
S5
S1.Botão Iniciar/Parar
S2.Botão de Volta/Reiniciar
S3.Botão Modo
S4.Botão de Luz
S2.Botão de Volta/Reiniciar
MODOS DE VISUALIZAÇÃO:
O relógio tem sete modos de apresentação:
FUSO DO PAÍS, FUSO ESTRANGEIRO
(T2), ALARME 1 (AL1), ALARME 2
(AL2), CRONÓGRAFO (CHR), RITMO e
TEMPORIZADOR (TMR).
Para mudar de um modo de apresentação para outro, prima uma vez o
botão S3.
NOTA: Em qualquer modo de configuração, se não houver manuseamento
de botões cerca de 2 minutos, o relógio
guardará automaticamente os dados
introduzidos e sairá do modo de
configuração.
AJUSTAR A HORA E O CALENDÁRIO:
1. Prima o botão S3 para seleccionar o modo FUSO DO PAÍS.
2. Prima e mantenha premido o botão S2 cerca de 3 segundos, os dígitos dos segundos piscarão.
3. Prima o botão S1 para repor os dígitos dos segundos a 00. Isto aumentará o tempo em um minuto, sendo a configuração de origem é de 30 a 59 segundos.
4. Prima o botão S3, os dígitos dos minutos piscarão.
5. Prima o botão S1 para acertar os dígitos dos minutos. Se mantiver o
botão premido acelerará o pro
cesso.
6. Prima o botão S3, os dígitos das horas piscarão.
7. Prima o botão S1 para acertar os dígitos da hora. Se mantiver o botão premido acelerará o processo.
8. Siga os mesmos passos para acer-
tar o dia (da semana), o ano, o mês e a data.
9. Após acabar de efectuar todos os ajustes, prima o botão S2 para confirmar.
NOTA: Nas configurações de FUSO
ESTRANGEIRO, só é possível acertar
os dígitos da hora. As contagens dos
minutos e dos segundos são sincronizadas entre o modo FUSO DO PAÍS e
FUSO ESTRANGEIRO.
3. Para repor a zero, prima o botão S1
para parar a contagem e depois prima o botão S2.
LIGAR (ON)/ DESLIGAR (OFF) OS
ALARMES DIÁRIOS:
No modo ALARME1 ou ALARME2,
1. Prima o botão S1 para activar ou desactivar a função de alarme.
2. Quando a função de alarme for activada, surgirá o ícone de alarme /
.
NOTA: A função recuperar apenas está
disponível quando se encontra armazenada a gravação de voltas.
Para a medição do tempo dividido:
No modo CRONÓGRAFO,
1. Prima o botão S1 para iniciar a AJUSTAR O FORMATO DA HORA
contagem.
No FUSO DO PAÍS, prima o botão S2
2. Enquanto o cronógrafo estiver em
para alternar entre o formato de 12
funcionamento, prima o botão e 24 horas. Os indicadores AM. e PM
S2/S5 para registar uma volta. O serão visualizados no formato de 12
cronógrafo continua em funciona
horas.
mento em segundo plano.
Após 8 segundos, será visualizado o
NOTA: O formato de hora seleccionado tempo acumulado actual.
será aplicado no modo FUSO DO PAÍS
3. Repita o último passo até que todas e FUSO ESTRANGEIRO.
as voltas tenham sido registadas.
4. Para parar a contagem, prima o LIGAR (ON)/ DESLIGAR (OFF) O SINAL botão S1. Prima o botão S1 de novo
SONORO HORÁRIO:
para retomar a partir de onde No modo FUSO DO PAÍS,
parou.
1. Prima o botão S1 para activar ou 5. Para repor a zero, prima o botão desactivar a função de sinal sonoro S1 para parar a contagem, em horário.
seguida prima o botão S2 para 2. Quando a função de sinal sonoro repor o contador a zero.
horário for activada, o indicador de sinal sonoro horário .
NOTA: O cronógrafo pode gravar até
um máximo de 10 voltas. Se tentar
AJUSTAR OS ALARMES DIÁRIOS:
gravar mais de 10 voltas, o número de
1. Prima o botão S3 para seleccionar volta exibirá um “F” intermitente e as
o modo ALARME1 ou ALARME2 a voltas em excesso não serão gravadas.
acertar.
2. Prima e mantenha premido o botão NOTA: Pode deixar o cronógrafo em
S2 cerca de 3 segundos, os dígitos funcionamento enquanto muda para
dos minutos piscarão.
outros modos de operação.
3. Prima o botão S1 para acertar os dígitos dos minutos. Se mantiver o
NOTA: O cronógrafo pode contar até
botão premido acelerará o pro
um máximo de 9 horas, 59 minutos e
cesso.
59,99 segundos antes de recomeçar
4. Prima o botão S3, os dígitos das do zero.
horas piscarão.
5. Prima o botão S1 para acertar os UTILIZAR A FUNÇÃO RECUPERAR
dígitos da hora. Se mantiver o botão 1. Prima o botão S3 para seleccionar premido acelerará o processo.
o modo RECUPERAR.
6. Após acabar de efectuar todos os 2. Prima o botão S1 para visualizar os
ajustes, prima o botão S2 para tempos de volta individual e do confirmar.
tempo dividido.
NOTA: O conjunto anterior de
voltas gravadas será substituído pelo
seguinte conjunto de voltas gravadas.
UTILIZAR O INDICADOR DE RITMO:
1. Prima o botão S3 para seleccionar o modo INDICADOR DE RITMO.
2. A frequência de ritmo será visual
izada acima do fuso do país.
3. Prima o botão S2 para visualizar os
valores pré-definidos 40, 45, 50, UTILIZAR O CRONÓGRAFO:
55, 60, 65, 70, 75, 80, 85, 90, 95, 100, 1. Prima o botão S3 para seleccionar 110, 120, 130, 140, 150 e 160 bips o modo CRONÓGRAFO.
por minuto.
2. O cronógrafo será visualizado no 4. Após acabar de efectuar todos os seu estado actual – reajustar, a ajustes, prima o botão S1 para funcionar ou parado.
iniciar o indicador de ritmo.
3. Para retomar uma contagem, prima 5. Para parar o indicador de ritmo, o botão S1 para retomar a partir de prima de novo o botão S1.
onde tinha parado.
4. Para iniciar uma nova conta
UTILIZAR O TEMPORIZADOR:
NOTA: A data pode ser acertada entre
gem, em primeiro lugar reponha o 1. Prima o botão S3 para seleccionar 2000 e 2099.
cronómetro a zero.
o modo TEMPORIZADOR.
Prima o botão S1 para parar a 2. Prima e mantenha premido o botão
CONFIGURAR O FUSO ESTRANGEIRO: contagem e em seguida prima o S2, os dígitos dos segundos pis
1. Prima o botão S3 para seleccionar botão S2 para repor o contador a carão.
o modo FUSO ESTRANGEIRO.
zero.
3. Prima o botão S1 para acertar os 2. Prima e mantenha premido o botão dígitos dos segundos. Se mantiver S2 cerca de 3 segundos. Os dígitos Para medir o tempo decorrido:
o botão premido acelerará o pro
da hora piscarão.
No modo CRONÓGRAFO,
cesso.
3. Prima o botão S1 para acertar os 1. Prima o botão S1 para iniciar a 4. Prima o botão S3, os dígitos dos dígitos da hora. Se mantiver o botão contagem.
minutos piscarão.
premido acelerará o processo.
2. Para parar a contagem, prima o 5. Prima o botão S1 para acertar os 4. Após acabar de efectuar todos os botão S1. Prima o botão S1 de novo dígitos dos minutos. Se mantiver o
ajustes, prima o botão S2 para para retomar a partir de onde botão premido acelerará o pro-
confirmar.
parou.
cesso.
QUANDO UM ALARME DISPARA:
Será emitida uma melodia de alarme
na hora indicada aquando da activação
do alarme. Para parar a melodia,
prima qualquer botão.
PORTUGUÊS
6.
7.
8.
Prima o botão S3, os dígitos das horas piscarão.
Prima o botão S1 para acertar os dígitos da hora. Se mantiver o botão premido acelerará o processo.
Após acabar de efectuar todos os ajustes, prima o botão S2 para confirmar.
NOTA: O temporizador pode ser configurado até um máximo de 9 horas, 59
minutos e 59 segundos.
UTILIZAR O TEMPORIZADOR:
1. Prima o botão S3 para seleccionar o modo TEMPORIZADOR.
2. O temporizador será visualizado no seu estado actual – reajustar, a funcionar ou parado.
3. Para retomar uma contagem, prima o botão S1 para retomar a partir de onde parou.
4. Para iniciar uma nova contagem, carregue primeiro o temporizador.
Prima o botão S1 para parar a contagem e em seguida prima o botão S2.
5. Quando chegar a zero numa con
tagem regressiva, será emitida uma melodia. Para parar a melodia, prima qualquer botão.
NOTA: Pode deixar o temporizador em
funcionamento enquanto muda para
outros modos de operação.
NOTA: O temporizador fará a contagem
automaticamente quando este atingir o
zero numa contagem regressiva.
Para reduzir a emissão de carbono,
estas instruções Freestyle foram
impressas com tinta de soja em papel
reciclado.
FS0000-PREDATOR-0000-MR01
UTILIZAR A LUZ POSTERIOR:
Prima o botão S4 para ligar a luz
posterior cerca de 3 segundos.
日本語
設定が可能です。分と秒はホームタイムと スプリットタイムの測定
海外タイムモード間で共通です。
ストップウォッチモードにします。
1. S1ボタンを押すとカウントが始まり
時間フォーマットを設定する
ます。
ホームタイムモードでS2ボタンを押すと 2. ストップウォッチがカウントしている
12時間表示と24時間表示が切り替わ
間にS2 / S5 ボタンを押してラップ
S4
S1
ります。12時間表示のフォーマットでは
を登録します。
その間もストップウォッ
A.M.とP.M.が表示されます。
チは同時にカウントを継続していま
す。
注: 選択した時間フォーマットはホー
約8秒経過すると現在の累計タイム
ムタイ
ム、
海外タイ
ムの設定両方に適用
が表示されます。
S3
S2
されます。
3. 全てのラップの登録が終わるまで、最
後のステップを繰り返してください。
毎時チャイムのオン・オフを設定する
4. 測定をストップするにはS1ボタンを
S5
ホームタイムモードにします。
押します。
もう一度S1を押すと、
スト
1. S1ボタンを押すと毎時チャイム機能 ップした時点から再び測定が始まり
S1. スタート / ストップボタン
をオン・オフすることができます。
ます。
S2 . ラップ / リセットボタン
2. 毎時チャイムがオンの場合はチャイム 5. ゼロにリセットするには、S1ボタンを
S3 . モードボタン
のアイコン が表示されます。
押して測定をストップしてからS2ボタ
S4 . ライトボタン
ンを押してください。
S5 . ラップ / リセットボタン
デイリーアラームを設定する
1. S3ボタンを押してアラーム1モードま 注:ストップウォッチでは最大で10までラ
表示モード
たはアラーム2モードを選択します。 ップの登録が可能です。
ラップを10以上
この時計には次の7つの表示モードが
2. S2ボタンを約3秒間長押しすると、分 登録しようとするとFの文字がラップ番号
あります。
桁が点滅します。
に点滅します。
ラップは登録されません。
ホームタイムモード、海外タイムモード
3. S1ボタンを押して分刻を設定します。
(T2) 、
アラーム1モード(AL1)、
アラーム ボタンを長押しすると早く進みます。 注:ストップウォッチの計測中に他のモー
2モード (AL2)、ストップウォッチモー
4. S3ボタンを押します。時桁が点滅し
ドに切り替えることも可能です。
ド(CHR)、
ペイサーモード、
タイマーモ
ます。
ード(TMR)
5. S1ボタンを押して時刻を設定します。 注:ストップウォッチは9時間59分59.99
ボタンを長押しすると早く進みます。 秒まで測定できます。
その後は再び0から
表示モードを変換するには、S3ボタンを 6. 全ての設定が終わったらS2を押して スタートします。
1回押してください。
設定を終了します。
呼び出し機能を使う
注: 設定中に、約2分間キーの操作が行 デイリーアラームのオン・オフを設定する 1. S3ボタンを押して呼び出しモードを
われなかった場合には自動的に入力デー アラーム1モードまたはアラーム2モー
選択します。
タが保存され設定モードが終了します。 ドにします。
2. S1ボタンを押すと登録した各ラップ
1. S1ボタンを押すとアラーム機能をオ のラップタイムとスプリットタイムをス
時刻・カレンダーを合わせる
ン・オフすることができます。
クロールすることができます。
1. S3ボタンを押してホームタイムモー
2. アラーム機能がオンの場合はアラー
ド を選択します。
ムのアイコン /
が表示されま
注:呼び出し機能はラップ記録が保存さ
2. S2ボタンを約3秒間長押しすると、秒 す。
れている場合のみ使用可能です。
桁が点滅します。
3. S1を押して秒桁を00にリセットにし アラームが鳴ったら
注:前回のラップの記録のセットは次回の
ます。元の秒桁の設定が30から59秒 アラーム機能をオンにすると、指定の
ラップのセットに自動的に置き換えられ
の場合はこれによって1分時間が繰り 時間にアラーム音が鳴ります。音を止め
ます。
上がります。
たいときは、
いずれかのボタンを押して
4. S3ボタンを押します。分桁が点滅し
ください。
ペイサーを使う
ます。
1. S3ボタンを押してペイサーモードを
5. S1ボタンを押して分刻を設定します。 ストップウォッチを使う
選択します。
ボタンを長押しすると早く進みます。 1. S3ボタンを押してストップウォッチモ 2. ホームタイムの上部にペイサーの回
6. S3ボタンを押します。時桁が点滅し
ードを選択します。
数が表示されます。
ます。
2. その時点でのストップウォッチの状態 3. S2を押すとあらかじめ設定された
7. S1ボタンを押して時刻を設定します。 (リセット/測定中/停止)
が表示され 数値40、45、50、55、60、65、70
ボタンを長押しすると早く進みます。 ます。
、75、80、85、90、95、100、110
8. 同じ作業を、年・月・日・曜日について 3. ストップした時点から再びカウントを 、120、130、140、150 、160から1
それぞれ繰り返して行ってください。 開始するにはS1ボタンを押します。
分間に鳴る音の回数を選択すること
9. 全ての設定が終わったらS2を押して 4. 新しく測定を開始する場合は、
ストッ ができます。
設定を終了します。
プウォッチをゼロにリセットします。
4. 全ての設定が終わったらS1を押して
S1を押して測定をストップしてから
ペイサーを開始します。
注: 年については2000年から2099年 S2ボタンを押してゼロにリセットして 5. ペイサーを終了するにはS1ボタンを
までの設定が可能です。
ください。
押します。
SHARK PREDATOR
海外タイムを合わせる
1. S3ボタンを押して海外タイムモード
を選択します。
2. S2ボタンを約3秒間長押しします。時
桁が点滅します。
3. S1ボタンを押して時刻を設定します。
ボタンを長押しすると早く進みます。
4. 全ての設定が終わったらS2を押して
設定を終了します。
注: 海外タイムの設定では、時桁のみの
タイムの測定
ストップウォッチモードにします。
1. S1ボタンを押すとカウントが始まり
ます。
2. 測定をストップするにはS1ボタンを
押します。
もう一度S1を押すと、
ストッ
プした時点から再び測定が始まり
ます。
3. ゼロにリセットするには、S1を押して
測定をストップしてからS2を押し
ます。
タイマーを設定する
1. S3ボタンを押してタイマーモードを
選択します。
2. S2ボタンを長押しすると、秒桁が点
滅します。
3. S1ボタンを押して秒刻を設定します。
ボタンを長押しすると早く進みます。
4. S3ボタンを押します。分桁が点滅し
ます。
5. S1ボタンを押して分刻を設定します。
ボタンを長押しすると早く進みます。
日本語
6. S3ボタンを押します。時桁が点滅し
ます。
7. S1ボタンを押して時刻を設定します。
ボタンを長押しすると早く進みます。
8. 全ての設定が終わったらS2を押して
設定を終了します。
注: タイマーでは最大9時間59分59秒
まで設定することができます。
タイマーを使う
1. S3ボタンを押してタイマーモードを
選択します。
2. その時点でのタイマーの状態(リセッ
ト/カウント中/停止)
が表示されま
す。
3. ストップした時点から再びカウントを
開始するにはS1ボタンを押します。
4. 新しくカウントしなおす場合は、
タイ
マーをリロードしてください。
S1ボタンを押してカウントをストップ
してからS2ボタンを押します。
5. タイマーがゼロになるとお知らせ音
が鳴ります。音を止めたいときは、
いず
れかのボタンを押してください。
注:タイマーのカウント中に他のモードに
切り替えることができます。
注:タイマーはカウントダウンでゼロにな
った後は自動的にカウントアップを始め
ます。
カーボンフットプリントの減少を目的と
してFreestyleの取扱説明書は大豆イ
ンキとリサイクル紙を使用しています
FS0000-PREDATOR-0000-MR01
バックライトを使う
S4ボタンを押すとバックライトが約3秒
間点灯します。