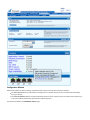
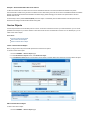
1
1. Barracuda Firewall - Overview . . . . . . . . . . . . . . . . . . . . . . . . . . . . . . . . . . . . . . . . . . . . . . . . . . . . . . . . . . . . . . . . . . . . . . . . . . . . . . . . . .
1.1 Barracuda Firewall Release Notes Version 6.1.4.005 . . . . . . . . . . . . . . . . . . . . . . . . . . . . . . . . . . . . . . . . . . . . . . . . . . . . . . . . . . .
1.1.1 Barracuda Firewall Release Notes Version 6.1.3.003 . . . . . . . . . . . . . . . . . . . . . . . . . . . . . . . . . . . . . . . . . . . . . . . . . . . . . . .
1.1.2 Barracuda Firewall Release Notes Version 6.1.2.002 . . . . . . . . . . . . . . . . . . . . . . . . . . . . . . . . . . . . . . . . . . . . . . . . . . . . . . .
1.1.3 Barracuda Firewall Release Notes Version 6.1.1.001 . . . . . . . . . . . . . . . . . . . . . . . . . . . . . . . . . . . . . . . . . . . . . . . . . . . . . . .
1.1.4 Barracuda Firewall Release Notes Version 6.1.0.016 . . . . . . . . . . . . . . . . . . . . . . . . . . . . . . . . . . . . . . . . . . . . . . . . . . . . . . .
1.1.5 Barracuda Firewall Release Notes Version 6.1.0.r189384 . . . . . . . . . . . . . . . . . . . . . . . . . . . . . . . . . . . . . . . . . . . . . . . . . . .
1.1.6 Barracuda Firewall Release Notes Version 6.0.4.001 . . . . . . . . . . . . . . . . . . . . . . . . . . . . . . . . . . . . . . . . . . . . . . . . . . . . . . .
1.1.7 Barracuda Firewall Release Notes Version 6.0.3.001 . . . . . . . . . . . . . . . . . . . . . . . . . . . . . . . . . . . . . . . . . . . . . . . . . . . . . . .
1.1.8 Barracuda Firewall Release Notes Version 6.0.2.001 . . . . . . . . . . . . . . . . . . . . . . . . . . . . . . . . . . . . . . . . . . . . . . . . . . . . . . .
1.1.9 Barracuda Firewall Release Notes Version 6.0.1.001 . . . . . . . . . . . . . . . . . . . . . . . . . . . . . . . . . . . . . . . . . . . . . . . . . . . . . . .
1.1.10 Barracuda Firewall Release Notes Version 6.0.0 . . . . . . . . . . . . . . . . . . . . . . . . . . . . . . . . . . . . . . . . . . . . . . . . . . . . . . . . .
1.2 Getting Started . . . . . . . . . . . . . . . . . . . . . . . . . . . . . . . . . . . . . . . . . . . . . . . . . . . . . . . . . . . . . . . . . . . . . . . . . . . . . . . . . . . . . . . . .
1.3 Networking . . . . . . . . . . . . . . . . . . . . . . . . . . . . . . . . . . . . . . . . . . . . . . . . . . . . . . . . . . . . . . . . . . . . . . . . . . . . . . . . . . . . . . . . . . . .
1.3.1 How to Configure WAN Interfaces . . . . . . . . . . . . . . . . . . . . . . . . . . . . . . . . . . . . . . . . . . . . . . . . . . . . . . . . . . . . . . . . . . . . .
1.3.1.1 Example - Configuring a Static WAN Connection . . . . . . . . . . . . . . . . . . . . . . . . . . . . . . . . . . . . . . . . . . . . . . . . . . . . .
1.3.1.2 How to Configure a PPPoE Connection . . . . . . . . . . . . . . . . . . . . . . . . . . . . . . . . . . . . . . . . . . . . . . . . . . . . . . . . . . . .
1.3.1.3 How to Configure a 3G Dial-In Connection . . . . . . . . . . . . . . . . . . . . . . . . . . . . . . . . . . . . . . . . . . . . . . . . . . . . . . . . . .
1.3.1.4 How to Configure a DHCP Connection . . . . . . . . . . . . . . . . . . . . . . . . . . . . . . . . . . . . . . . . . . . . . . . . . . . . . . . . . . . . .
1.3.2 How to Add a Static Network Interface . . . . . . . . . . . . . . . . . . . . . . . . . . . . . . . . . . . . . . . . . . . . . . . . . . . . . . . . . . . . . . . . . .
1.3.3 How to Configure Wi-Fi . . . . . . . . . . . . . . . . . . . . . . . . . . . . . . . . . . . . . . . . . . . . . . . . . . . . . . . . . . . . . . . . . . . . . . . . . . . . . .
1.3.4 How to Configure a VLAN . . . . . . . . . . . . . . . . . . . . . . . . . . . . . . . . . . . . . . . . . . . . . . . . . . . . . . . . . . . . . . . . . . . . . . . . . . . .
1.3.5 How to Add a Static Route . . . . . . . . . . . . . . . . . . . . . . . . . . . . . . . . . . . . . . . . . . . . . . . . . . . . . . . . . . . . . . . . . . . . . . . . . . .
1.3.6 How to Configure a Bridge . . . . . . . . . . . . . . . . . . . . . . . . . . . . . . . . . . . . . . . . . . . . . . . . . . . . . . . . . . . . . . . . . . . . . . . . . . .
1.3.7 How to Configure a DMZ . . . . . . . . . . . . . . . . . . . . . . . . . . . . . . . . . . . . . . . . . . . . . . . . . . . . . . . . . . . . . . . . . . . . . . . . . . . . .
1.3.8 How to Configure the DHCP Server . . . . . . . . . . . . . . . . . . . . . . . . . . . . . . . . . . . . . . . . . . . . . . . . . . . . . . . . . . . . . . . . . . . .
1.3.9 How to Configure a Forward Proxy . . . . . . . . . . . . . . . . . . . . . . . . . . . . . . . . . . . . . . . . . . . . . . . . . . . . . . . . . . . . . . . . . . . . .
1.3.10 How to Configure Authoritative DNS . . . . . . . . . . . . . . . . . . . . . . . . . . . . . . . . . . . . . . . . . . . . . . . . . . . . . . . . . . . . . . . . . . .
1.3.10.1 DNS Records . . . . . . . . . . . . . . . . . . . . . . . . . . . . . . . . . . . . . . . . . . . . . . . . . . . . . . . . . . . . . . . . . . . . . . . . . . . . . . . .
1.3.10.2 How to Configure an Authoritative DNS Host . . . . . . . . . . . . . . . . . . . . . . . . . . . . . . . . . . . . . . . . . . . . . . . . . . . . . . .
1.3.11 How to Change the Management IP Address and Network Interface of a Barracuda Firewall . . . . . . . . . . . . . . . . . . . . . . .
1.3.12 How to Configure and Use High Availability . . . . . . . . . . . . . . . . . . . . . . . . . . . . . . . . . . . . . . . . . . . . . . . . . . . . . . . . . . . . .
1.4 Firewall . . . . . . . . . . . . . . . . . . . . . . . . . . . . . . . . . . . . . . . . . . . . . . . . . . . . . . . . . . . . . . . . . . . . . . . . . . . . . . . . . . . . . . . . . . . . . . .
1.4.1 Firewall Rules . . . . . . . . . . . . . . . . . . . . . . . . . . . . . . . . . . . . . . . . . . . . . . . . . . . . . . . . . . . . . . . . . . . . . . . . . . . . . . . . . . . . .
1.4.2 Firewall Rules Order . . . . . . . . . . . . . . . . . . . . . . . . . . . . . . . . . . . . . . . . . . . . . . . . . . . . . . . . . . . . . . . . . . . . . . . . . . . . . . . .
1.4.3 Pre-Installed Firewall Rules . . . . . . . . . . . . . . . . . . . . . . . . . . . . . . . . . . . . . . . . . . . . . . . . . . . . . . . . . . . . . . . . . . . . . . . . . . .
1.4.4 Connection Objects . . . . . . . . . . . . . . . . . . . . . . . . . . . . . . . . . . . . . . . . . . . . . . . . . . . . . . . . . . . . . . . . . . . . . . . . . . . . . . . . .
1.4.5 Service Objects . . . . . . . . . . . . . . . . . . . . . . . . . . . . . . . . . . . . . . . . . . . . . . . . . . . . . . . . . . . . . . . . . . . . . . . . . . . . . . . . . . . .
1.4.6 Interface Groups . . . . . . . . . . . . . . . . . . . . . . . . . . . . . . . . . . . . . . . . . . . . . . . . . . . . . . . . . . . . . . . . . . . . . . . . . . . . . . . . . . .
1.4.7 Link Balancing . . . . . . . . . . . . . . . . . . . . . . . . . . . . . . . . . . . . . . . . . . . . . . . . . . . . . . . . . . . . . . . . . . . . . . . . . . . . . . . . . . . . .
1.4.8 Intrusion Prevention System or IPS . . . . . . . . . . . . . . . . . . . . . . . . . . . . . . . . . . . . . . . . . . . . . . . . . . . . . . . . . . . . . . . . . . . .
1.4.9 How to Control Traffic for Applications . . . . . . . . . . . . . . . . . . . . . . . . . . . . . . . . . . . . . . . . . . . . . . . . . . . . . . . . . . . . . . . . . .
1.4.10 How to Create User-Aware Firewall Rules . . . . . . . . . . . . . . . . . . . . . . . . . . . . . . . . . . . . . . . . . . . . . . . . . . . . . . . . . . . . . .
1.4.11 How to Configure Bandwidth Policies or QoS . . . . . . . . . . . . . . . . . . . . . . . . . . . . . . . . . . . . . . . . . . . . . . . . . . . . . . . . . . . .
1.4.12 How to Configure the Captive Portal . . . . . . . . . . . . . . . . . . . . . . . . . . . . . . . . . . . . . . . . . . . . . . . . . . . . . . . . . . . . . . . . . . .
1.4.13 Example - Allowing HTTP Traffic . . . . . . . . . . . . . . . . . . . . . . . . . . . . . . . . . . . . . . . . . . . . . . . . . . . . . . . . . . . . . . . . . . . . .
1.4.14 Example - Handling SMTP Traffic . . . . . . . . . . . . . . . . . . . . . . . . . . . . . . . . . . . . . . . . . . . . . . . . . . . . . . . . . . . . . . . . . . . . .
1.4.15 Example - Allowing SIP-based VoIP Traffic . . . . . . . . . . . . . . . . . . . . . . . . . . . . . . . . . . . . . . . . . . . . . . . . . . . . . . . . . . . . .
1.4.16 Example - Blocking FTP Traffic . . . . . . . . . . . . . . . . . . . . . . . . . . . . . . . . . . . . . . . . . . . . . . . . . . . . . . . . . . . . . . . . . . . . . . .
1.4.17 Example - Configuring a DNAT Firewall Rule . . . . . . . . . . . . . . . . . . . . . . . . . . . . . . . . . . . . . . . . . . . . . . . . . . . . . . . . . . . .
1.4.18 Example - Creating Time-Based Firewall Rules . . . . . . . . . . . . . . . . . . . . . . . . . . . . . . . . . . . . . . . . . . . . . . . . . . . . . . . . . .
1.4.19 Example - Limiting Traffic for Applications . . . . . . . . . . . . . . . . . . . . . . . . . . . . . . . . . . . . . . . . . . . . . . . . . . . . . . . . . . . . . .
1.4.20 Example - Creating Connection Objects for Failover and Link Balancing . . . . . . . . . . . . . . . . . . . . . . . . . . . . . . . . . . . . . . .
1.4.21 Example - Routing Traffic Over Two Different ISP Connections . . . . . . . . . . . . . . . . . . . . . . . . . . . . . . . . . . . . . . . . . . . . . .
1.4.22 Example - Configuring Dual ISPs with Automatic Failover . . . . . . . . . . . . . . . . . . . . . . . . . . . . . . . . . . . . . . . . . . . . . . . . . .
1.5 Managing Users and Groups . . . . . . . . . . . . . . . . . . . . . . . . . . . . . . . . . . . . . . . . . . . . . . . . . . . . . . . . . . . . . . . . . . . . . . . . . . . . . .
1.5.1 How to Configure Local Authentication . . . . . . . . . . . . . . . . . . . . . . . . . . . . . . . . . . . . . . . . . . . . . . . . . . . . . . . . . . . . . . . . . .
1.5.2 How to Integrate with an External Authentication Service . . . . . . . . . . . . . . . . . . . . . . . . . . . . . . . . . . . . . . . . . . . . . . . . . . . .
1.5.3 How to Join a Windows Domain . . . . . . . . . . . . . . . . . . . . . . . . . . . . . . . . . . . . . . . . . . . . . . . . . . . . . . . . . . . . . . . . . . . . . . .
1.5.4 How to Set Up a Guest Access Confirmation Page . . . . . . . . . . . . . . . . . . . . . . . . . . . . . . . . . . . . . . . . . . . . . . . . . . . . . . . .
1.5.5 How to Set Up Guest Access with Ticketing . . . . . . . . . . . . . . . . . . . . . . . . . . . . . . . . . . . . . . . . . . . . . . . . . . . . . . . . . . . . . .
3
3
4
5
6
7
17
20
21
21
22
22
28
31
32
33
34
34
36
37
37
39
40
40
41
43
44
45
46
47
49
49
51
52
54
55
56
58
59
59
60
61
63
64
65
67
67
70
73
74
75
76
79
79
81
81
82
82
85
85
87
1.5.6 How to Manage Guest Tickets - User's Guide . . . . . . . . . . . . . . . . . . . . . . . . . . . . . . . . . . . . . . . . . . . . . . . . . . . . . . . . . . . .
1.6 VPN . . . . . . . . . . . . . . . . . . . . . . . . . . . . . . . . . . . . . . . . . . . . . . . . . . . . . . . . . . . . . . . . . . . . . . . . . . . . . . . . . . . . . . . . . . . . . . . . . .
1.6.1 Client-to-Site VPN . . . . . . . . . . . . . . . . . . . . . . . . . . . . . . . . . . . . . . . . . . . . . . . . . . . . . . . . . . . . . . . . . . . . . . . . . . . . . . . . . .
1.6.1.1 How to Configure a Client-to-Site VPN with IPsec . . . . . . . . . . . . . . . . . . . . . . . . . . . . . . . . . . . . . . . . . . . . . . . . . . . .
1.6.1.2 How to Configure a Client-to-Site VPN with PPTP . . . . . . . . . . . . . . . . . . . . . . . . . . . . . . . . . . . . . . . . . . . . . . . . . . . .
1.6.1.3 How to Configure Apple iOS Devices for Client-to-Site VPN Connections . . . . . . . . . . . . . . . . . . . . . . . . . . . . . . . . . .
1.6.1.4 How to Configure TheGreenBow VPN Client . . . . . . . . . . . . . . . . . . . . . . . . . . . . . . . . . . . . . . . . . . . . . . . . . . . . . . . .
1.6.1.5 Troubleshooting Client-to-Site VPNs . . . . . . . . . . . . . . . . . . . . . . . . . . . . . . . . . . . . . . . . . . . . . . . . . . . . . . . . . . . . . . .
1.6.2 Site-to-Site VPN . . . . . . . . . . . . . . . . . . . . . . . . . . . . . . . . . . . . . . . . . . . . . . . . . . . . . . . . . . . . . . . . . . . . . . . . . . . . . . . . . . .
1.6.2.1 How to Configure a Site-to-Site VPN with IPsec . . . . . . . . . . . . . . . . . . . . . . . . . . . . . . . . . . . . . . . . . . . . . . . . . . . . . .
1.6.2.2 Example - Configuring a Site-to-Site IPsec VPN Tunnel . . . . . . . . . . . . . . . . . . . . . . . . . . . . . . . . . . . . . . . . . . . . . . . .
1.6.2.3 Troubleshooting Site-to-Site VPNs . . . . . . . . . . . . . . . . . . . . . . . . . . . . . . . . . . . . . . . . . . . . . . . . . . . . . . . . . . . . . . . .
1.6.3 SSL VPN for the Barracuda Firewall . . . . . . . . . . . . . . . . . . . . . . . . . . . . . . . . . . . . . . . . . . . . . . . . . . . . . . . . . . . . . . . . . . . .
1.6.3.1 How to Enable and Configure SSL VPN for the Barracuda Firewall . . . . . . . . . . . . . . . . . . . . . . . . . . . . . . . . . . . . . . .
1.6.3.2 How to Configure SSL VPN Resources for the Barracuda Firewall . . . . . . . . . . . . . . . . . . . . . . . . . . . . . . . . . . . . . . .
1.6.4 How to Allow VPN Access via a Dynamic WAN IP Address . . . . . . . . . . . . . . . . . . . . . . . . . . . . . . . . . . . . . . . . . . . . . . . . . .
1.7 Cloud Features . . . . . . . . . . . . . . . . . . . . . . . . . . . . . . . . . . . . . . . . . . . . . . . . . . . . . . . . . . . . . . . . . . . . . . . . . . . . . . . . . . . . . . . . .
1.7.1 How to Configure the Barracuda Web Security Service . . . . . . . . . . . . . . . . . . . . . . . . . . . . . . . . . . . . . . . . . . . . . . . . . . . . .
1.7.2 How to Configure Barracuda Cloud Control . . . . . . . . . . . . . . . . . . . . . . . . . . . . . . . . . . . . . . . . . . . . . . . . . . . . . . . . . . . . . .
1.8 Monitoring . . . . . . . . . . . . . . . . . . . . . . . . . . . . . . . . . . . . . . . . . . . . . . . . . . . . . . . . . . . . . . . . . . . . . . . . . . . . . . . . . . . . . . . . . . . . .
1.8.1 Monitoring Active and Recent Connections . . . . . . . . . . . . . . . . . . . . . . . . . . . . . . . . . . . . . . . . . . . . . . . . . . . . . . . . . . . . . .
1.8.2 Viewing Logs . . . . . . . . . . . . . . . . . . . . . . . . . . . . . . . . . . . . . . . . . . . . . . . . . . . . . . . . . . . . . . . . . . . . . . . . . . . . . . . . . . . . . .
1.8.3 Troubleshooting . . . . . . . . . . . . . . . . . . . . . . . . . . . . . . . . . . . . . . . . . . . . . . . . . . . . . . . . . . . . . . . . . . . . . . . . . . . . . . . . . . . .
1.8.4 How to Configure Log Streaming . . . . . . . . . . . . . . . . . . . . . . . . . . . . . . . . . . . . . . . . . . . . . . . . . . . . . . . . . . . . . . . . . . . . . .
1.9 Maintenance . . . . . . . . . . . . . . . . . . . . . . . . . . . . . . . . . . . . . . . . . . . . . . . . . . . . . . . . . . . . . . . . . . . . . . . . . . . . . . . . . . . . . . . . . . .
1.9.1 How to Save Configuration Backups . . . . . . . . . . . . . . . . . . . . . . . . . . . . . . . . . . . . . . . . . . . . . . . . . . . . . . . . . . . . . . . . . . . .
1.9.2 How to Update the Firmware on Your Barracuda Firewall . . . . . . . . . . . . . . . . . . . . . . . . . . . . . . . . . . . . . . . . . . . . . . . . . . .
1.9.3 How to Restore the Barracuda Firewall with a Saved Configuration Backup . . . . . . . . . . . . . . . . . . . . . . . . . . . . . . . . . . . . .
1.9.4 How to Recover the Barracuda Firewall . . . . . . . . . . . . . . . . . . . . . . . . . . . . . . . . . . . . . . . . . . . . . . . . . . . . . . . . . . . . . . . . .
1.10 Specifications of Hardware Models . . . . . . . . . . . . . . . . . . . . . . . . . . . . . . . . . . . . . . . . . . . . . . . . . . . . . . . . . . . . . . . . . . . . . . . . .
1.10.1 Hardware Compliance . . . . . . . . . . . . . . . . . . . . . . . . . . . . . . . . . . . . . . . . . . . . . . . . . . . . . . . . . . . . . . . . . . . . . . . . . . . . . .
1.11 Limited Warranty and License . . . . . . . . . . . . . . . . . . . . . . . . . . . . . . . . . . . . . . . . . . . . . . . . . . . . . . . . . . . . . . . . . . . . . . . . . . . . .
90
92
93
94
97
98
101
103
103
104
105
108
109
109
112
113
114
115
116
116
117
121
123
125
125
126
126
127
127
128
131
132
Barracuda Firewall - Overview
The Barracuda Firewall is an application-aware network firewall appliance that is designed for organizations without dedicated IT personnel to
manage firewalls. It leverages cloud resources to extend next-generation security and networking beyond the capabilities of typical security
gateways or legacy firewalls. The Barracuda Firewall delivers application control, user awareness, secure VPNs, link optimization, dynamic traffic
prioritization, and advanced malware protection. It combines application-control and network-security features with cloud technologies to provide
up-to-date and dynamically scalable malware protection and content filtering. With the Barracuda Cloud Control centralized management portal,
you can use a web browser or app to deploy, configure, and manage the Barracuda Firewall from any location.
Where to Start
For detailed instructions, start here:
Getting Started
Explore the Barracuda Firewall
You can also download the Barracuda Firewall Quick Start Guide:
Quick Start Guide for version 6.1: English | German | Japanese
Quick Start Guide for version 6.0: English
Key Features
Firewall – Provides powerful next generation capabilities. Layer 7 application visibility and user-identity awareness enable the
enforcement of granular access policies. You can define policies based on any combination of criteria, such as application, user, group
ID, and time.
Barracuda Web Security Service – Leverages cloud resources by offloading processor-intensive content filtering and malware protection
to the cloud.
VPN – Enables secure remote access for users and provides business continuity by securing site-to-site connectivity.
Barracuda Cloud Control – Lets you manage and configure multiple Barracuda Firewalls from a single management portal.
WAN Interfaces – Eliminate the need for costly high-capacity backup links by aggregating disparate links such as MPLS, T1, DSL, cable,
and 3G.
Bandwidth Policies (QoS) – Balance and shape traffic among links, according to policies based on applications, traffic loads, and link
status.
Barracuda Firewall Release Notes Version 6.1.4.005
Please Read Before Upgrading
Before installing the new firmware version, back up your configuration and read all of the release notes that apply to the versions that
are more current than the version that is running on your system.
Do not manually reboot your system at any time while the update is in process, unless otherwise instructed by Barracuda Networks
Technical Support. Depending on your current firmware version and other system factors, upgrading can take up to 10 minutes. If the
process takes longer, please contact Barracuda Networks Technical Support for further assistance.
What's New with Barracuda Firewall Version 6.1.4.005
This firmware version is a maintenance release only. No new functionality has been added.
Firmware Improvements
Web Interface
Adding source or destination networks, with netmasks higher than /24, to firewall rules now works as expected. (BNF-2869)
The smart pre-submission input validation now also works correctly with DNAT firewall rules.
It is now possible to access release notes for the latest general and early release through the ADVANCED > Firmware Updates page. (
BNF-2790)
Configuration wizards now successfully finish, even if the Barracuda Firewall receives wrong time information from an NTP
server. (BNF-2777)
Viewing product documentation within the user interface, now also works correctly when switching to a different language. (BNF-2672)
VPN
It is now possible to add IPsec VPN tunnel remote IP addresses containing .255 octets. (BNF-2913)
Firewall
The SIP proxy now works as expected with SIP providers outside of internal network segments. (BNF-2859, BNF-2879, BNF-2691)
Fixed a display issue in the Basic > Active Connections screen. (BNF-2887)
Networking
Dynamic interface control commands in Network > IP Configuration now work as expected with multiple configured dynamic network
interfaces. (BNF-2886)
High Availability
Static network interfaces introduced by a wizard are now correctly synchronized to the secondary Barracuda Firewall. (BNF-2797,
BNF-2796)
When enabling an HA cluster, the firmware now performs a validity check to ensure that the units' Management IP addresses reside
within the same network and subnet.
Administration & Reporting
The SNMP service now works as expected and occasional crashes no longer occur. (BNF-2775)
Known Issues and Limitations
When utilizing all three possible Wi-Fi Access Points, the Barracuda Firewall models X101 and X201 may freeze and/or crash under
certain circumstances.
Security
A potential internal resource exhaustion issue was fixed. (BNSEC-3144)
A potential nginx request line parsing vulnerability was fixed. (BNSEC-2865 / CVE-2013-4547)
Barracuda Firewall Release Notes Version 6.1.3.003
Please Read Before Upgrading
Before installing the new firmware version, back up your configuration and read all of the release notes that apply to the versions that
are more current than the version that is running on your system.
Do not manually reboot your system at any time while the update is in process, unless otherwise instructed by Barracuda Networks
Technical Support. Depending on your current firmware version and other system factors, upgrading can take up to 10 minutes. If the
process takes longer, please contact Barracuda Networks Technical Support for further assistance.
After installing release version 6.1.3.003 on your Barracuda Firewall, it is necessary to perform a configuration update to correctly apply
all improvements.
Open USERS > External Authentication > DC Agent and perform a temporary configuration change of one of the available
settings, and click Save Changes.
What's New with Barracuda Firewall Version 6.1.3.003
Web Interface
The Barracuda Firewall User Interface is now fully Japanese localized. Note that entering multi-byte characters is not yet supported.
Guest networks for Wi-Fi networks can now only be configured in USERS > Guest Access. (BNF-2650)
Barracuda Firewall OS
Improved stability due to kernel upgrade and various improvements: Updated underlying Linux kernel to 2.6.28.
Time zone upgrades for South Africa and Israel per new 2013 DST settings.
Firmware Improvements
Web Interface
The configuration progress spinner animation now loads correctly while saving configuration changes. (BNF-2350)
High Availability
Secondary Barracuda Firewall units now correctly synchronize configuration data after an outage. (BNF-2746)
Barracuda Firewalls with configured dynamic WAN interfaces can now be deployed in HA clusters as expected. (BNF-2685)
Various stability related firmware improvements. (BNF-2742, BNF-2740, BNF-2738, BNF-2703, BNF-2686)
VPN
A certificate upload issue in VPN > Certificates was fixed. (BNF-2699, BNSEC-2398)
The Barracuda Firewall now accepts all ASCII characters, except #, as Site-to-Site IPsec pre shared key. (BNF-2648)
SSL-VPN now also supports RDP for Microsoft Windows Server 2003 editions and higher. (BNF-2731)
Firewall
Manually overriding bandwidth policies is Basic > Active Connections is now correctly disabled, if QoS is disabled in the respective
firewall rule. (BNF-2443)
Enabling or disabling PAT in Connection Objects now works as expected. (BNF-2668)
The configured name of dynamic network interfaces is now correctly displayed in NETWORK > Routing. (BNF-2713)
Authentication Services
Received login information from the Barracuda DC Agent now expire after a certain period of time. (BNF-2434)
Known Issues and Limitations
When utilizing all three possible Wi-Fi Access Points, the Barracuda Firewall models X101 and X201 may freeze and/or crash under
certain circumstances.
Barracuda Firewall Release Notes Version 6.1.2.002
Please Read Before Upgrading
Before installing the new firmware version, back up your configuration and read all of the release notes that apply to the versions that
are more current than the version that is running on your system.
Do not manually reboot your system at any time while the update is in process, unless otherwise instructed by Barracuda Networks
Technical Support. Depending on your current firmware version and other system factors, upgrading can take up to 10 minutes. If the
process takes longer, please contact Barracuda Networks Technical Support for further assistance.
Important
Barracuda Firewall version 6.1.2.002 fixes a log rotation issue to prevent filling up the SSD. [BNF-2217]
Barracuda Networks strongly recommends updating to version 6.1.2.002 or contacting Barracuda Networks Technical Support for
assistance.
What's New with Barracuda Firewall Version 6.1.2.002
Access to the guest ticketing administration page is now possible from any network segment. A corresponding Redirect to Service targe
t was included. [BNF-2603]
Firmware Improvements
The Session Expiration Length in Advanced > Secure Administration cannot be set to 0 minutes (unlimited) any more. [BNF-2591]
Viewing DHCP settings through Barracuda Cloud Control now works as expected. [BNF-2589]
Disconnecting and reconnecting a Barracuda Firewall from Barracuda Cloud Control and Web Security Service now works as expected. [
BNF-2582]
Custom naming of connection objects now works as expected. [BNF-2280]
Connecting a Barracuda Firewall to Barracuda Cloud Control now works as expected. [BNF-2575]
Editing service objects containing port ranges now works as expected. [BNF-2542]
Using Client-to-Site VPNs with TCP port 443 now works as expected. [BNF-2541]
Timestamps of the Event Log in Basic > Alerts are now displayed correctly. [BNF-2539]
Exporting logs to CSV files now works as expected. [BNF-2538]
Adding multiple MX records in the Authoritative DNS now works as expected. [BNF-2533]
A NS record for DNS zones configured in the Authoritative DNS is now mandatory. [BNF-2497]
The firewall rule testing feature is now also removed from the Barracuda Cloud Control. [BNF-2529]
The shared secret string for IPsec VPN tunnels can now also contain underscores (_). [BNF-2500]
DHCP lease ranges of VLAN interfaces are now displayed correctly. [BNF-2386]
Uploading certificate files is now limited to certificate file types only. [BNF-2438]
Barracuda Firewall Release Notes Version 6.1.1.001
Please Read Before Upgrading
Before installing the new firmware version, back up your configuration and read all of the release notes that apply to the versions that
are more current than the version that is running on your system.
Do not manually reboot your system at any time while the update is in process, unless otherwise instructed by Barracuda Networks
Technical Support. Depending on your current firmware version and other system factors, upgrading could take up to 10 minutes. If the
process takes longer, please contact Barracuda Networks Technical Support for further assistance.
Whats New in Version 6.1.1.001
The Barracuda Firewall now offers an LDAP connection test feature in USERS > External Authentication.
Smart pre-submission input validation is now also available in the LOGS > Log Streaming page.
Firmware Improvements
Uploaded images on Users > Guest access are now displayed correctly. [BNF-2505]
Restoring configuration backups now works as expected. [BNF-2258, 2492, 2489]
DNAT firewall rules now correctly accept IP addresses in the Redirected To field. [BNF-2480]
Deleting NAT objects now works as expected. [BNF-2453]
The configuration dialogue for User objects was improved. [BNF-2435]
The hostname of the secondary unit is now correctly reverted after removing a unit from an HA cluster.
[BNF-2419]
The Barracuda Firewall's hostname cannot end with "-HA" anymore. [BNF-2417]
IP ranges for Wi-Fi networks in Users > Guest Access > Guest Networks are now preconfigured correctly.
[BNF-2412]
The initial HA clustering period was increased to avoid clustering issues. [BNF-2410]
The status of the secondary HA unit is now displayed correctly after HA failover. [BNF-2400,2401]
Wi-Fi SSIDs can now also contain “-“ characters. [BNF-2380]
Removing referenced Phase 2 settings of Client to Site connections now works as expected. [BNF-2276]
Some minor issues of the configuration wizards were removed. [BNF-2272]
Network names are now correctly displayed in FIREWALL > Captive Portal and USERS > Guest Access.
[BNF-2348]
Fixed an issue where under rare circumstances configuration updates failed and login was no longer possible. [BNF-2504]
Barracuda Firewall Release Notes Version 6.1.0.016
Please Read Before Upgrading
Before installing the new firmware version, back up your configuration and read all of the release notes that apply to the versions that
are more current than the version that is running on your system.
Do not manually reboot your system at any time while the update is in process, unless otherwise instructed by Barracuda Networks
Technical Support. Depending on your current firmware version and other system factors, upgrading could take up to 10 minutes. If the
process takes longer, please contact Barracuda Networks Technical Support for further assistance.
To apply new QoS settings of this firmware, execute the following steps after you install the firmware update:
1.
2.
3.
4.
Go to the FIREWALL > QoS page.
Change one of the values on the configuration page.
Click Save Changes.
If you want, change the respective field back to its old value and click Save Changes again.
Please Read Before Upgrading
What's New in the Barracuda Firewall Version 6.1.0
New Barracuda Firewalls X100 and X101
SSL VPN
High Availability
Smart Pre-Submission Input Validation
URL Filtering of HTTPS Websites and Web Security Service Exemptions
Guest Access for Non-Wi-Fi Models
Log Streaming
Usability Improvements
Quick Links to Service Configuration Pages
Quick Links to Barracuda Labs Reputation Search in Logs, Active Connections, and Recent Connections pages
Filtering for Active Connections and Recent Connections
Column Sorting for Active Connections
Double-Click Instant Editing of Firewall Rules
Service Details within Redirect to Service Rule
New NAT Objects Tab
Active Routes User Interface Improvement
QoS: Configurable Throughput of Rate Limiting Queues
Download Barracuda VPN Clients through UI
Minor UI brush-up with new Barracuda Networks Logos and Improved Graphics
Firmware Improvements
Known Issues
What's New in the Barracuda Firewall Version 6.1.0
New Barracuda Firewalls X100 and X101
At the lower end of the Barracuda Firewall range, the X100 and X101 with Wi-Fi desktop appliances with 4 x GbE copper ports are available at a
lower price point and also at a lower performance level. 800 Mbps firewall throughput, 100 Mbps VPN throughput, 100 Mbps IPS throughput
, 8,000 concurrent sessions and 2,000 new sessions per second. Both models support the complete feature set, except SSL VPN.
SSL VPN
For the Barracuda Firewall X200 and higher, SSL VPN is available to provide VPN capabilities that can be used with a web browser. Unlike
traditional client-to-site VPN, SSL VPN does not require the installation of client software on the end user's computer. Use SSL VPN to grant
remote users with access to web applications, client and server applications, as well as internal network resources like Outlook web Access, SMB
, RDP, Telnet, SSH, SMTP, POP3, VNC, IMAP4, webDAV, and HTTP and HTTPS web forwards.
SSL VPN is available at no additional cost for an unlimited amount of users. Depending on the performance level of the appliance model,
Barracuda Networks recommends the following maximum numbers of users:
Model
Recommended Max. Users
X100, X101
SSL VPN not available
X200, X201
25 users
X300
50 users
X400
100 users
X600
200 users
Depending on the Firewall and VPN usage of your Barracuda Firewall, the recommended number of maximum users may vary.
High Availability
All Barracuda Firewalls can now be deployed as part of a High Availability (HA) cluster. The primary unit handles all network traffic and security
functions, while the secondary unit waits in standby mode to take over if the partner unit fails. The secondary unit automatically inherits all
configuration changes from the primary unit.
You can only set up a HA cluster with two identical Barracuda Firewall models (e.g. two X101, two X200, or two X400) that run the
same firmware version. Both units must be licensed identically to prevent loss of security coverage in case of a failover. You can
configure HA on the ADVANCED > High Availability page.
Configuration Wizards
All Barracuda Firewalls now offer the following configuration wizards to guide you through initial setup and configuration:
The Test at my Desk wizard for initial activation and deployment in an evaluation and test scenario. This wizard starts automatically
during your first login.
The Protect my Network wizard for activating the Barracuda Firewall, as well as creating a primary and a failover Internet uplink and up
to two internal network segments with optional DHCP IP address assignment.
The wizards are available on the ADVANCED > Wizards page.
Smart Pre-Submission Input Validation
All Barracuda Firewalls now offer smart pre-submission input validation. This validation prevents configuration pop-ups from closing and losing
entered information before all required fields are filled.
URL Filtering of HTTPS Websites and Web Security Service Exemptions
All Barracuda Firewalls can now apply URL filtering provided by the Barracuda Web Security Subscription to websites accessed via HTTPS.
Additionally, you can exempt user-defined domains or IP addresses from being forwarded to the Barracuda Web Security Service for HTTP and
HTTPS.
Guest Access for Non-Wi-Fi Models
All Barracuda Firewalls now also support the guest access feature for wired network segments. Configure guest access on the USERS > Guest
Access page.
Log Streaming
All Barracuda Firewalls now support streaming log files to an external syslog server. You can activate syslog streaming per log file on the LOGS >
Log Streaming page.
Usability Improvements
Quick Links to Service Configuration Pages
On the BASIC > Status page, you can click the services listed in the Services section to open their configuration pages.
For certain services, additional information is displayed when you hover over the service.
Quick Links to Barracuda Labs Reputation Search in Logs, Active Connections, and Recent Connections pages
On the LOGS pages, BASIC > Active Connections page, and BASIC > Recent Connections page, you can view information from the
Barracuda Labs Reputation Search about an external IP address by clicking the address in the Destination IP column.
Filtering for Active Connections and Recent Connections
The Active Connections and Recent Connections list filters have been updated to apply contains or doesn’t contain as match criteria. You do
not have to type exact search phrases and can enter negative search criteria.
Column Sorting for Active Connections
On the BASIC > Active Connections page, you can sort entries by clicking the column header.
Double-Click Instant Editing of Firewall Rules
Firewall rules can now be edited by double-clicking anywhere (outside of Actions and Disable) in the corresponding line.
Service Details within Redirect to Service Rule
When you configure a Redirect to Service rule, a read-only Redirect to Service Details section replaces the Service section in the Add/Edit
Access Rule editor window.
New NAT Objects Tab
The NAT Objects section previously located on the FIREWALL > Connection Objects page has been moved to its own page under the FIREW
ALL tab.
Active Routes User Interface Improvement
The Active Routes tab previously located in BASIC has been moved to the Network Routes section on the NETWORK > Routing page. You
can now edit network routes directly on the page.
QoS: Configurable Throughput of Rate Limiting Queues
On the FIREWALL > QoS page, the diagram that explains QoS queues was updated to match other graphics in the 6.1 release. Additionally, you
can configure the throughput of the rate limiting queues.
Download Barracuda VPN Clients through UI
All currently available Barracuda VPN clients can now be downloaded from the Settings section of the VPN > Client-To-Site VPN page.
Minor UI brush-up with new Barracuda Networks Logos and Improved Graphics
The logos and login screen for Barracuda Firewalls have been updated to match the new Barracuda Networks corporate theme.
On the ADVANCED > Appearance page, the new Barracuda Firewall image can still be replaced.
Firmware Improvements
Using umlauts in PPTP user and group conditions now works as expected. [BNF-859]
The custom welcome image is now displayed correctly when connecting with VPN clients. [BNF-1404]
Local PPTP user names can now also begin with a brace. [BNF-1570]
Automatic DNS forwarding now also works for TCP port 53. [BNF-1590]
Terminating active user sessions now also works through Barracuda Cloud Control. [BNF-1666]
Secondary IP addresses can now also be added to static network interfaces. [BNF-1729]
Filter settings on the Active Connections page are now correctly displayed after a page refresh. [BNF-1734]
Network activation now also works if the Barracuda Firewall is not activated yet. [BNF-1823]
The description field of firewall rules now also accepts forward slashes (/). [BNF-1836]
The button to join a Windows domain is now located in USERS > External Authentication > NTLM. [BNF-1837]
It is now possible to manually restart a 3G network interface. [BNF-1865]
It is now possible to use the number sign (#) in Web Security Service passwords.[BNF-2110]
It is now possible to add different DNS records for the same IP address. [BNF-2179]
DHCP log file archiving now works as expected to prevent malfunction of the DHCP service. [BNF-2217]
Barracuda Firewalls can now be reloaded and rebooted if the unit is not activated yet. [BNF-2230]
Known Issues
High Availability: Manually triggering
an HA failover is only possible on the currently active Barracuda Firewall
unit. This issue does not affect automatic failover of HA clusters.
High Availability: Changing the management IP address/network on HA units may lead to firewall service
interruptions and loss of traffic flow. Barracuda Networks recommends that you change the management IP
address/network before you deploy an HA cluster.
Web Security Subscription: When blocking SSL encrypted web sites, the web site request times out instead
of displaying the Web Security Service's block page.
Wi-Fi: Channels 12,13, and 14 are currently not supported.
Configuration Backups: If the automated backups feature is not in use and you want to restore a
configuration backup from a file, first go to ADVANCED > Backups > Automated Backups and set Server
Type to Off.
High Availability: HA pairing might fail if the system clocks and time zones of the primary and the secondary
unit are not correctly set. Before initiating the pairing process, verify that the system clocks and time zones
are accurately set on both units.
Barracuda Firewall Release Notes Version 6.1.0.r189384
Version 6.1.0.r189384 is an alpha release for QA and demo purposes. This release is neither available through the early availability
(EA) program nor through the beta program. The beta release of Barracuda Firewall 6.1.0 is expected within a couple of weeks after
this alpha release. General availability is expected about four weeks after beta.
Release Highlights
New Barracuda Firewalls X100 and X101
SSL VPN
High Availability Support
Configuration Wizards
Guest Networking for Models without Wi-Fi
Log Streaming
Usability Improvements
Quick Links to Service Configuration Pages
Column Sorting for Active Connections
Quick Editing of Firewall Rules
NAT Objects Tab
Active Routes User Interface Improvement
Release Highlights
New Barracuda Firewalls X100 and X101
The Barracuda Firewall X100 and X101 (X101 comes with Wi-Fi) are available at a lower price point and also at a lower performance level. The
Barracuda Firewall X100 and X101 will be able to run all services, except for SSL VPN.
SSL VPN
All Barracuda Firewall models except X100 and X101 will provide SSL VPN. In contrast to the typically used IPsec based VPN technology, the
Barracuda Firewall SSL VPN technology does not require the installation of a dedicated VPN client at the end user's computer. Secure and
platform-independent access is granted through the web browser to corporate network resources. The following applications are supported and
easily configured:
OWA
SMB
RDP
Telnet
SSH
SMTP
POP3
VNC
IMAP4
WebDAV
Web forwards (HTTP/HTTPs)
All Barracuda Firewall models starting with X200 provide SSL VPN at no additional cost for an unlimited amount of users. Depending on the
performance level of the Barracuda Firewall model, Barracuda Networks recommends the following maximum numbers of users per model:
Model
Recommended Maximum Users
X100 & X101
SSL VPN not available
X200 & X201
25 users
X300
50 users
X400
100 users
X600
200 user
Depending on the Firewall and VPN utilization of your Barracuda Firewall, the recommended maximum user may vary.
High Availability Support
All Barracuda Firewall models support high availability clustering of two units. The primary unit handles all network traffic and security functions
while the secondary unit operates in standby mode, taking over all functions when the primary unit fails or is being maintained.
Please note that HA clustering requires two identical Barracuda Firewalls models (e.g. two X101, two X200, or two X400) with identical license
subscriptions.
Configuration Wizards
All Barracuda Firewalls offer configuration wizards to facilitate easy initial setup and configuration. Initially, two wizards will are available:
Test at my Desk – The wizard for initial activation and deployment in an evaluation and test scenario. This wizard is provided during the
initial login to a Barracuda Firewall.
Protect my Network – The wizard to easily activate the Barracuda Firewall, creating redundant Internet connections with two Internet
Service Providers and up to two internal network segments with optional DHCP IP address assignment.
Guest Networking for Models without Wi-Fi
All Barracuda Firewalls support the guest networking feature, even units without the integrated Wi-Fi option.
Log Streaming
All Barracuda Firewalls support log file streaming to an external Syslog server. Log streaming can be activated for each log file type. However,
there can only be one destination server.
Usability Improvements
The following sections describe the usability improvements that are available as of firmware release 6.1.0.
Quick Links to Service Configuration Pages
On the Status page, links in the Services section are now available to provide quick access to the configuration pages of all available services.
Column Sorting for Active Connections
Entries on the BASIC > Active Connection page are now sortable by column.
Quick Editing of Firewall Rules
Firewall rule entries can quickly be edited after their firewall rule entries are double-clicked.
NAT Objects Tab
NAT objects are more intuitively integrated into the user interface and can now be found in a dedicated tab.
Active Routes User Interface Improvement
The Active Routes window is now consolidated with the network routes configuration window. Network routes are now directly editable.
Barracuda Firewall Release Notes Version 6.0.4.001
After installing release version 6.0.4.001 on your Barracuda Firewall, it is necessary to perform a configuration update to correctly apply
all improvements.
Open Firewall > QoS and perform a temporary configuration change of one of the available settings, and click Save Changes.
Please Read Before Updating
Before installing any firmware version, make a backup of your configuration and read all of the release notes that apply to the versions
that are more current than the version that is running on your system.
Do not manually reboot your system at any time during an upgrade, unless otherwise instructed by Barracuda Networks Technical
Support. Depending on your current firmware version and other system factors, upgrading could take up to 10 minutes. If the process
takes longer, please contact Barracuda Networks Technical Support for further assistance.
Firmware Improvements
Enhancement:The DHCP TFTP Host Name field now also accepts IP address and host name combinations. [BNF-2121]
Fix: The internal interface assignment of the QoS bandwidth policy Internet now works as expected. [BNF-2072]
Fix: Phase 2 settings of IPsec Site-to-Site VPN tunnels are now loaded correctly. [BNF-2098]
Fix: The Barracuda Firewall can now be connected to Web Security Service accounts containing a hash (#) in the password. [BNF-2098]
Fix: A potential shell command injection issue has been removed. [BNSEC-1422]
Fix: A potential minor security issue related to local file permissions has been fixed. [BNSEC-1646]
Fix: A potential minor security issue related to support connections has been fixed. [BNF-2084]
Barracuda Firewall Release Notes Version 6.0.3.001
Please Read Before Updating
Before installing any firmware version, make a backup of your configuration and read all of the release notes that apply to the versions
that are more current than the version that is running on your system.
Do not manually reboot your system at any time during an upgrade, unless otherwise instructed by Barracuda Networks Technical
Support. Depending on your current firmware version and other system factors, upgrading could take up to 10 minutes. If the process
takes longer, please contact Barracuda Networks Technical Support for further assistance.
Firmware Improvements
Enhancement: It is now possible to disable the SIP Proxy. [BNF-1900]
Enhancement: To simplify the firewall rule tester, time settings are no longer available. [BNF-1872]
Enhancement: To simplify the user interface, the Memory Utilization indicator (Basic > Status > Performance Statistics) was
removed. [BNF-2017]
Enhancement: The Active Connections screen now allows performing a Barracuda Labs reputation search for globally routable IP
addresses. [BNF-1800]
Enhancement: The product documentation has been updated and improved to reflect the latest firmware changes. [BNF-1801 - 1802], [B
NF-1804 - 1813]
Fix: The DHCP server now consumes a lower amount of available memory. [BNF-1896]
Fix: The Weight setting of Connection Objects is now saved correctly. [BNF-1870]
Fix: PPPoE connections now accept usernames not containing the @ symbol. [BNF-1846]
Fix: ICMP reply packets from already terminated sessions are not leading to orphaned sessions any more. [BNF-1833]
Fix: Network activations are now possible in any configuration tab, even if the product is not yet activated. [BNF-1824]
Fix: An authentication bypass issue in proxied environments has been removed. [BNSEC-1226]
Fix: Introducing multiple Wireless Access Points does now work as expected. [BNF-1893], [BNF-1997]
Barracuda Firewall Release Notes Version 6.0.2.001
Please Read Before Updating
Before installing any firmware version, make a backup of your configuration and read all of the release notes that apply to the versions
that are more current than the version that is running on your system.
Do not manually reboot your system at any time during an upgrade, unless otherwise instructed by Barracuda Networks Technical
Support. Depending on your current firmware version and other system factors, upgrading could take up to 10 minutes. If the process
takes longer, please contact Barracuda Networks Technical Support for further assistance.
Firmware Improvements
Enhancement: It is now possible to disable the SIP Proxy. [BNF-1900]
Enhancement: To simplify the firewall rule tester, time settings are no longer available. [BNF-1872]
Enhancement: The Active Connections screen now allows performing a Barracuda Labs reputation search for globally routable IP
addresses. [BNF-1800]
Enhancement: The product documentation has been updated and improved to reflect the latest firmware changes. [BNF-1801 - 1802], [B
NF-1804 - 1813]
Fix: The DHCP server now consumes a lower amount of available memory. [BNF-1896]
Fix: The Weight setting of Connection Objects is now saved correctly. [BNF-1870]
Fix: PPPoE connections now accept usernames not containing the @ symbol. [BNF-1846]
Fix: ICMP reply packets from already terminated sessions are not leading to orphaned sessions any more. [BNF-1833]
Fix: Network activations are now possible in any configuration tab, even if the product is not yet activated. [BNF-1824]
Fix: An authentication bypass issue in proxied environments has been removed. [BNSEC-1226]
Barracuda Firewall Release Notes Version 6.0.1.001
Please Read Before Updating
Before installing any firmware version, make a backup of your configuration and read all of the release notes that apply to the versions
that are more current than the version that is running on your system.
Do not manually reboot your system at any time during an upgrade, unless otherwise instructed by Barracuda Networks Technical
Support. Depending on your current firmware version and other system factors, upgrading could take up to 10 minutes. If the process
takes longer, please contact Barracuda Networks Technical Support for further assistance.
Firmware Improvements
Enhancement: The DHCP service is now automatically restarted if a network activation occurs. [BNF-1591]
Enhancement: NAT Objects are now able to introduce Proxy ARPs. [BNF-1705]
Enhancement: Secondary IP addresses are now also available through the default network bridge P1-P3. [BNF-1668]
Enhancement: The DHCP server is now able to assign DHCP options 66 (TFTP server name), 67 (Bootfile name) and 150 (TFTP server
address) to clients. [BNF-1761]
Fix: The Include User Information checkbox was permanently visible, although not available when using proxy forwarding. [BNF-1609]
Fix: Moving a Barracuda Firewall to another Barracuda Cloud Control account did not work correctly. [BNF-1709]
Fix: Source based routing in certain multi ISP configurationsnow works as expected [BNF-1630]
Fix: IP addresses are now saved correctly when adding IPS Exceptions. [BNF-1602]
Barracuda Firewall Release Notes Version 6.0.0
Please Read Before Updating
Before installing any firmware version, make a backup of your configuration and read all of the release notes that apply to the versions
that are more current than the version that is running on your system.
Do not manually reboot your system at any time during an upgrade, unless otherwise instructed by Barracuda Networks Technical
Support. Depending on your current firmware version and other system factors, upgrading could take up to 10 minutes. If the process
takes longer, please contact Barracuda Networks Technical Support for further assistance.
Firmware Improvements
Click here to expand...
The following firmware improvements and updates have been implemented since the Early Availability release of the Barracuda Firewall.
If the Barracuda Firewall was not able to contact the Barracuda Networks firmware update servers, the Status page of the unit could not
be loaded correctly. [BNF-1623]
Applying source IP address filters on the Active Connections page could lead to a high OS load, if the unit is currently forwarding a high
amount of network sessions. [BNF-1623]
DNAT firewall rules can now also be used to perform port address translation (PAT). In the Redirect To field, append the desired port to
the IP address. E.g.: 192.168.100.20:8080 [BNF-1582]
The default firewall rule LOCALDNSCACHE now also includes TCP port 53 network traffic. [BNF-1584]
Applying filters in the VPN > Active Clients page did not work correctly. [BNF-1576]
The health status of units connected to Barracuda Cloud Control was not displayed correctly. [BNF-1574]
Removing of network interfaces now needs to be confirmed by the user. [BNF-1568]
The help bubble in the DNS record configuration window was updated. [BNF-1558]
The security definition update page (ADVANCED > Energize Updates) did not render correctly. [BNF-1505]
The Application Detection pattern database was updated. [BNF-1479]
The input assistant for CIDR IPv4 addresses was improved. [BNF-1594]
The secondary IP address of a static network interface was not loaded if the interface name contained an upper case character. [BNF-158
3]
The hyperlink to the latest Energize Updates release notes was wrong. [BNF-1578]
PPPoE sub ID was added. [BNF-1564]
The unit's management IP address was not restored after restoring the unit with a configuration backup. [BNF-1563]
Local PPTP user passwords could not begin with a hash tag (#). [BNF-1559]
"Session Creation Load Exceeded" message was not correctly displayed on the recent connections page. [BNF1557]
Shutting down the unit was not possible. [BNF-1554]
The web proxy feature was always displayed as disabled on the status page. [BNF-1550]
The input assistent routine for some configuration did not work correctly. [BNF-1548, BNF-1547, BNF-1544, BNF-1542, BNF-1538]
It was not possible to remove already configured Active Directory services. [BNF-1541]
Ampersands "&" were not allowed in Barracuda Web Security Service and Barracuda Cloud Control account passwords. [BNF-1536]
DNS resolving of IP addresses in the recent connections page did not work. [BNF-1535]
Pre-shared keys for Wi-Fi security could not begin with a hash tag (#). [BNF-1533]
The idle time of sessions was not displayed correctly. [BNF-1528]
The IP address of active DHCP leases was not displayed. [BNF-1526]
It was not possible to re-introduce removed Wi-Fi interfaces. [BNF-1524]
After updating units to firmware 6.0.0.001, some services did not start as expected. [BNF-1523]
The ticketing welcome screen erroneously displayed the background image of the Barracuda NG Firewall. [BNF-1522]
The message of the day release notes reminder could not be closed. [BNF-1520]
It was not possible to enter the user credentials when configuring a Dyn.com account on dynamic network interfaces. [BTN-1515]
The configuration dialog for adding connection objects was too small. [BTN-1513]
It was not possible to edit existing user objects. [BTN-1512]
The user interface could not be loaded when restoring a configuration backup including a certificate for secure administration. [BTN-1511]
The Energize Update and Premium Support subscription status was not displayed correctly if the unit was not connected to the Barracuda
Cloud Control. [BTN-1510]
User interface rendering of the recent connection page was slow with huge amount of connection entries. [BTN-1492]
The firewall log time filter user interface of the Barracuda Cloud Control was not displayed correctly. [BTN-1462]
User objects were not saved correctly. [BTN-1447]
A permission denied warning was displayed when creating Barracuda Cloud Control Account. [BTN-1264]
Automatic warning pop-ups upon wrong configurations in the Barracuda Cloud Control were not displayed correctly. [BTN-1096]
User interface speed was improved. [BNF-1279]
Saving of firewall rules was very slow. [BNF-609]
Users were required to re-login after changing management IP before network activation. [BNF-648]
Help and preferences were missing in the HTTP log page. [BNF-1004]
Time filter in alerts did not work. [BNF-1010]
It was not possible to enter "-" in the Client to Site VPN policy. [BNF-1026]
Rendering of BCC's summary page did not work correctly. [BNF-1028]
Saving configuration backups to SMB shares was not working correctly. [BNF-1059]
Internet Explorer reloaded page if bandwidth policy dropdown was opened. [BNF-1072]
IPS pattern download did not work correctly. [BNF-1074]
"Add Access Policy" window did not open in the proper size. [BNF-1174]
Wrong axis labeling of transferred data graph on status page. [BNF-1202]
It was not possible to import and select certificates for secure administration. [BNF-1211]
Site to Site VPN with dynamic WAN IPs was not working correctly. [BNF-1215]
Some host interfaces were not listed within virtual network configuration. [BNF-1219]
Dynamic network interfaces configured to start manually, erroneously started automatically. [BNF-1236]
Internet Explorer was not able to display the firewall rule set in BCC. [BNF-1241]
It was not possible to remove health check target within the dynamic network interface configuration. [BNF-1242]
Firewall status was missing on the BCC's status page. [BNF-1245]
"Permission Denied" warning was displayed when creating a BCC account through the Barracuda Firewall. [BNF-1248]
Barracuda Firewall displayed the wrong error message when disconnected from BCC. [BNF-1249]
It was not possible to import and select certificate for secure administration. [BNF-1253]
Active Client to Site VPN users were not displayed correctly. [BNF-1255]
Firmware updates occasionally lead to the "Temporarily Unavailable" page. [BNF-1267]
DHCP server subnets were not displayed in the DCHP server configuration. [BNF-1284]
Editing of service objects was not working correctly. [BNF-1326]
3G SIM PIN was a mandatory field. [BNF-1327]
It was not possible to add a default route without explicit metric. [BNF-1346]
CPU, Mainboard temperature, and fan speeds were not displayed correctly. [BNF-1347]
Internet Explorer did not display active connections correctly. [BNF-1364]
Log filter for service logs did not work correctly. [BNF-1366]
Filtering log files occasionally caused a temporary unavailable message. [BNF-1374]
IPsec VPN tunnel status was not displayed correctly. [BNF-1387]
Captive Portal was not able to use uploaded certificates. [BNF-1389]
Filtering options in recent connections did not work correctly. [BNF-1393]
Enabling/Disabling the captive portal did not work correctly. [BNF-1400]
The Wi-Fi interface for ticketing administration was occasionally unreachable. [BNF-1402]
Filtering VPN log for severities did not work correctly. [BNF-1430]
Alert log entries were not ordered correctly. [BNF-1431]
Saving configuration changes of two records at the same time did not work correctly. [BNF-1434]
UserID was not displayed not filtered in the active connection page. [BNF-1442]
It was not possible to initiate or reset Site to Site VPN tunnels through BCC. [BNF-1445]
It was not possible to reset Client to Site connections through BCC. [BNF-1446]
Firewall user objects were not saved correctly. [BNF-1447]
It was not possible to edit DHCP subnets through BCC. [BNF-1449]
Editing custom network objects was not working correctly. [BNF-1451]
Editing interface MTU and link speed was not possible through BCC. [BNF-1455]
Footer of the Interface Groups page was not displayed correctly. [BNF-1459]
Including ARPs on the recent connection page was not possible through BCC. [BNF-1469]
Flushing entries on the recent connection page was not possible through BCC. [BNF-1470]
Adding time objects through BCC did not work correctly. [BNF-1476]
Editing network objects occasionally opened the wrong page. [BNF-1478]
Custom user objects were erroneously listed as predefined user object. [BNF-1481]
Editing time settings in time objects did not work correctly. [BNF-1487]
Updating recent connection was very slow. [BNF-1492]
It was not possible to filter for source or destination NAT in the firewall log viewer. [BNF-1495]
Security definition update page was not displayed correctly. [BNF-1505]
Editing user objects was not possible. [BNF-1512]
Add connection object page was not displayed correctly. [BNF-1513]
The unit for firewall statistics on Basic > Status page was missing. [BNF-1120]
BASIC > Alerts: Filtering for time was not possible. [BNF-1263]
Barracuda Firewall Technology
The Barracuda Firewall is an application-aware network firewall appliance that leverages cloud resources to extend next-generation security and
networking beyond the capabilities of typical security gateways or legacy firewalls. Barracuda Firewall offers enterprise-grade security
technology—including application control, user awareness, secure VPNs, link optimization, and advanced malware protection—but is designed for
unsurpassed ease of use, and priced competitively. The Barracuda Cloud Control centralized management portal makes it easy and intuitive to
deploy, configure, and manage the Barracuda Firewall from any location, and is included at no extra cost.
Complete Next-Generation Network Security
With integrated application and user visibility, along with support for multiple authentication methods and an optional local user database, the
Barracuda Firewall enables highly granular policies defined by port, protocol, application, user, and time/date. For example, you might allow
Skype chat at all times for everybody, but only allow Skype video at a certain time or for a certain user group. In addition, all models of the
Barracuda Firewall protect unlimited IP addresses, and include an advanced intrusion prevention engine (IPS), as well as unlimited
site-to-site and client-to-site secure VPN licenses.
Web Security in the Cloud
By moving CPU-intensive malware scanning and URL filtering tasks to the Barracuda Web Security cloud infrastructure, the Barracuda Firewall
extends the capacity of on-premises computer resources. In addition, cloud integration ensures that signature libraries and threat definitions are
always up-to-date. Even as whole new threat categories emerge, your protection continues without interruption — unlike that provided by legacy
UTMs, which must be replaced each time they need to defend against a new kind of threat.
Link Optimization Technology
The Barracuda Firewall includes advanced link balancing and traffic shaping capabilities to optimize business continuity and to prioritize
business-critical applications while throttling or blocking unproductive ones. Automatic link failover ensures uninterrupted connectivity even
when a primary link fails—and with the optional Barracuda UMTS 3G modem, you’ll stay connected even if a disaster cuts all the landlines.
Future-Proof Investment Protection
By leveraging effectively limitless cloud resources for content filtering and malware protection, even smaller Barracuda Firewall units are able to
scale easily as traffic and user numbers increase. The Energize Updates subscription service ensures that definitions and signature libraries are
always up to date, and cloud-delivered firmware updates deliver new capabilities as required to address a constantly evolving threat
landscape—no matter when you purchase your Barracuda Firewall, you’ll always have the latest version.
Simple Pricing with No Surprises
Every Barracuda Firewall unit is delivered with all features and capabilities fully enabled. Content filtering and advanced malware protection in the
cloud is offered as an affordable per-box subscription. Neither the Barracuda Firewall nor the Web Security Service have any associated per-user
license fees—once you purchase the box and the service, you can scale up to the appliance’s maximum capacity at no further cost. And the
simple, intuitive Barracuda Cloud Control management portal is included free of charge.
ADVANCED NETWORK SECURITY
In today’s world of omnipresent botnets and other advanced threats, one of the main tasks of perimeter protection is to ensure ongoing availability
of the network for legitimate requests and to filter out malicious denial of service (DoS) attacks. Barracuda Firewall achieves this via a series of
advanced techniques:
Barracuda Firewall DoS protection uses generic TCP proxy forwarding so that only legitimate TCP traffic gets into the network.
Rate limits are applied to limit the number of sessions per source handled by the firewall. Packets arriving too quickly will simply be
dropped.
To prevent IP spoofing, the reverse routing path (RRP) to the packet’s source IP address is checked. If the check uncovers a mismatch
between incoming and reply interface, the packet is dropped.
APPLICATION CONTROL
Barracuda Firewall can identify and enforce policy on sophisticated applications that hide their traffic inside otherwise “safe” port/protocols such as
HTTP or HTTPS.
For example, Skype and peer-to-peer (P2P) applications are particularly evasive, requiring advanced application control for policy enforcement.
Barracuda Firewall enforces policies based on application, user, location, and time/date. Actions include blocking, allowing, throttling, or even
enabling or disabling specific application features.
Application control is built into the kernel of the Barracuda Firewall, using a combination of deep packet inspection and behavioral analysis to
reliably detect more than 900 applications.
IDENTITY AWARENESS
Within any organization, different individuals or groups require access to different resources and applications. For example, marketers may need
to use Facebook for their work, while for other groups it will only waste time and bandwidth.
To enforce policies that control access to resources and allocation of bandwidth, Barracuda Firewall identifies users based on IP address
mapping. Role assignments based on identity and device posture checks can be used within the firewall to facilitate role-based access control
(RBAC).
Barracuda Firewall supports authentication of users and enforcement of user-aware firewall rules, content inspection, and application control
using Active Directory, NTLM, MS CHAP, RADIUS, LDAP/LDAPS as well as authentication with x.509 certificates.
INTRUSION PREVENTION SYSTEM (IPS)
The Barracuda Firewall IPS is tightly integrated in the firewall architecture. It enhances network security by providing comprehensive real-time
network protection against a broad range of network threats, vulnerabilities, exploits and exposures. It also keeps spyware and worms out of the
corporate network in order to prevent fraud and to maintain strict privacy.
When an attack is detected, the Barracuda Firewall either drops the offending packets and sessions (while still allowing all other traffic to pass) or
just logs the intrusion attempt. As part of the Energize Update subscription, signature updates are delivered in near real time as new exploits are
identified, to ensure the Barracuda Firewall is constantly up-to-date and aware of the latest threats and vulnerabilities.
BARRACUDA WEB SECURITY SERVICE
By moving CPU-intensive malware scanning and URL filtering tasks to the Barracuda Web Security cloud infrastructure, the Barracuda Firewall
extends the capacity of onpremises compute resources. With virtually unlimited cloud resources, the Barracuda Firewall has the elasticity to scale
dynamically as security needs change. Reporting is also handled in the cloud, further improving resource efficiency.
In addition, cloud integration ensures that signature libraries and threat definitions are always up to date - even as whole new threat categories
emerge, your protection continues without interruption, unlike that provided by legacy firewalls, which must be replaced each time they need to
defend against a new kind of threat.
LINK OPTIMIZATION TECHNOLOGY
To ensure the best and most cost efficient connectivity, the Barracuda Firewall provides a wide range of built-in uplink options such as unlimited
leased lines, up to six DHCP, up to four xDSL, and up to two ISDN and UMTS connections.
By eliminating the need to purchase additional devices for uplink balancing, security conscious customers will have access to a WAN connection
that never goes down, even if one or two of the existing WAN uplinks are severed.
Automatic failover ensures the next best uplink is activated on the fly, and all traffic is rerouted to make full use of the remaining links. Predefined
load balancing policies make it particularly easy to share the bandwidth of multiple uplinks, and can prioritize specific application traffic or assign it
to a specific link.
CENTRALIZED MANAGEMENT VIA THE CLOUD
Every Barracuda Firewall is integrated with Barracuda Cloud Control (BCC), which allows organizations to manage all their Barracuda Firewalls
(along with most other Barracuda Networks solutions) through a single, consistent interface. This gives administrators a global view of all of their
devices and ensures they are provisioned with the latest firmware, definitions, and security policies.
Combined with the configuration of Barracuda Web Security settings and reporting, this allows effectively all security settings to be centrally
managed via one interface available on every Internet-connected device. BCC is included at no charge with every Barracuda Firewall unit. Users
may also choose to manage each device directly through its own interface.
Underlying Technology
Hardened Operating System
Security devices protecting the network at the perimeter need to be invulnerable to attacks. Barracuda Firewall is built on a hardened Linux
operating system developed and optimized over the course of more than ten years. A customized infrastructure layer provides the basic gateway
properties and routing capabilities already in the Linux kernel. The system is protected against attacks on the system itself as well as all
application functions hosted by the system via the integration of a separate Barracuda Firewall-based host firewall, inspecting all incoming and
outgoing local traffic from and to the system.
phion Core
Unlike other firewall products that simply enhance or augment standard Linux firewall packages, the core of every Barracuda Firewall is
a specially developed application-controlled packet-forwarding firewall called the phion core. It is based on a combination of stateful
packet forwarding, TCP stream forwarding, and application-layer gateways, enhanced by custom application plug-ins that handle complex
protocols involving dynamic address or port negotiations.
The phion core technology delivers a best-of-both-worlds hybrid technology firewall that uses stateful packet forwarding as well as transparent
circuit-level application proxying, and that provides generic interfaces for content scanning, bandwidth management, and VPN tunnel selection.
Getting Started
These instructions are an expanded version of the Barracuda Firewall Quick Start Guide that was shipped with your appliance. If you
have already completed the steps in the Quick Start Guide to set up the Barracuda Firewall with a wizard, go to Explore the Barracuda
Firewall.
In this article:
Step 1. Unpack the Barracuda Firewall
Step 2. Set Up the Barracuda Firewall
Test and Configure at my Desk Wizard
Protect my Network Wizard
Without a Wizard
Step 3. Explore the Barracuda Firewall
Next Steps
Step 1. Unpack the Barracuda Firewall
Unpack the Barracuda Firewall and verify that you have all of the following accessories:
Barracuda Firewall (verify that you have received the correct model)
AC power cord
Power supply (X100/X101/X200/X201 only)
Wi-Fi antenna (X101/X201 only)
Mounting brackets (X300 and above)
Ethernet cable
If any items are missing or damaged, contact your Barracuda sales representative.
Step 2. Set Up the Barracuda Firewall
After you unpack the Barracuda Firewall, you can choose to set it up with or without a wizard:
Test and Configure at my Desk Wizard – (Recommended) Evaluate and configure the Barracuda Firewall before production deployment
with the Test at my desk wizard.
Protect my Network Wizard – Immediately replace an existing firewall or build a new network with the Protect my network wizard.
Without a Wizard – If you want to build your own setup or need a very specific configuration, you can also configure the Barracuda
Firewall without a wizard.
Test and Configure at my Desk Wizard
To set up the Barracuda Firewall with the Test at my desk wizard for evaluation:
1. Set up the unit between the management PC and the network.
2. Connect the LAN to port 1 and the management PC to port 3. The management PC can configure the Barracuda Firewall while still being
connected to the LAN through the transparent port 1—port 3 bridge.
3. Go to https://192.168.200.200.
4. Continue at the certificate warning and log into the Barracuda Firewall (default username: admin, default password: admin).
5. Follow the instructions in the Test at my desk wizard.
Protect my Network Wizard
To deploy the Barracuda Firewall with the Protect my network wizard:
1.
2.
3.
4.
Connect the management PC to port 3.
Connect your ISP modems and LANs to the other available interfaces.
Go to https://192.168.200.200.
Continue at the certificate warning and log into the Barracuda Firewall (default username: admin, default password: admin).
5. Follow the instructions in the Protect my network wizard. The wizard helps you configure up to two ISPs and two LAN networks.
Without a Wizard
If you do not want to set up the Barracuda Firewall with a wizard, use the web interface. By default, the ports on the Barracuda Firewall are
configured as follows:
Port 1: LAN
Port 2: DHCP client
Port 3: Management port
Port 1 – Port 3 Bridge: Transparent network access for the management PC
Step 3. Explore the Barracuda Firewall
After setting up the Barracuda Firewall, explore the following areas to learn where to get necessary information for working with your firewall and
its services:
Area
Description
Subscription Status
To verify the status of your licenses, go to the BASIC > Status page
and view the Subscription Status section. The status for all
purchased licenses displays as Current. While the Barracuda
Firewall is connected to the Internet, it automatically downloads
licenses.
If the Barracuda Firewall cannot be activated, please contact Barracu
da Technical Support.
Firmware Update
To verify that the Barracuda Firewall is using the latest available
firmware, go to the ADVANCED > Firmware Update page.
For production, use the latest general release firmware version.
Before updating the appliance, read the release notes for information
on new features and bug fixes.
Network
To view the status of the following:
Network Routes and Interfaces – Go to the NETWORK >
Routing page.
Network Interface Links – Go to the BASIC > Status page and
mouse over the ports displayed in the Link Status section.
To view the configurations of the following:
Network Interfaces – Go to the NETWORK > IP Configuration p
age and view the Network Interface Configuration section.
Bridges – Go to the NETWORK > Bridging page. Before you
deploy the Barracuda Firewall for production use, delete the port
1—port 3 bridge.
For more information on networking, see Networking.
WAN Connectivity
Barracuda Firewall supports both static and dynamic WAN
connections. If you completed the Protect my network wizard, you
have at least one WAN connection configured.
For more information, see How to Configure WAN Interfaces.
Firewall
To view firewall rules, go to the FIREWALL > Firewall Rules page.
By default, the Barracuda Firewall includes preconfigured firewall
rules that allow the following traffic:
All traffic from the management port (port 3) over the port
1—port 3 bridge.
All traffic from trusted LAN networks to the Internet.
Any disabled firewall rules are displayed in gray.
To monitor currently active and recently completed connections, go to
the following pages:
BASIC > Active Connections
BASIC > Recent Connections
For more information on the firewall and firewall rules, see Firewall.
Next Steps
After setting up and exploring the Barracuda Firewall, you can complete the following tasks:
Task
Instructions
Connect the Barracuda Firewall to your existing authentication
service or create a built-in database for user information.
Managing Users and Groups
If supported by your Barracuda Firewall (models X101 and X201),
configure Wi-Fi.
How to Configure Wi-Fi
Configure a site-to-site VPN.
Site-to-Site VPN
Configure client-to-site VPN access.
Client-to-Site VPN
Link the Barracuda Firewall with your Barracuda Cloud Control
account for central management and configuration.
How to Configure Barracuda Cloud Control
Configure the Barracuda Web Security Service, a cloud-based web
filtering and security service.
How to Configure the Barracuda Web Security Service
Set up an authoritative DNS.
How to Configure Authoritative DNS
Configure a DMZ.
How to Configure a DMZ
Networking
From the NETWORK tab, you can view and configure the following basic network, connectivity, and service settings:
Management IP Address, DNS, Static and Dynamic Interfaces, and Wi-Fi
Network Routes
Interface Groups
Bridges
DHCP Server
Authoritative DNS
Proxy
Management IP Address, DNS, Static and Dynamic Interfaces, and Wi-Fi
On the NETWORK > IP Configuration page, you can view a list of each network interface (static, dynamic, and virtual) that has been configured
for the Barracuda Firewall. You can also configure the following basic network configurations:
IP Configuration
Description
Article
Management IP Address
The management IP address is used to
administer and configure the Barracuda
Firewall from a web browser.
Getting Started with the Barracuda Firewall
DNS Servers
The primary and secondary DNS server. You
can also cache the DNS responses to speed
up DNS queries.
Getting Started with the Barracuda Firewall
Static Interface
Static interfaces for static IP addresses and
ranges.
How to Add a Static Network Interface
Dynamic Interface
Dynamic interfaces for DSL, DHCP, or 3G.
How to Configure WAN Interfaces
Virtual Interface
Virtual interfaces for VLANs. You must use
properly configured 802.1q capable switches.
How to Configure a VLAN
Wi-Fi Link
If available for your Barracuda Firewall
model, you can create up to three different
Wi-Fi networks.
How to Configure Wi-Fi
3G Network Interface
With a Barracuda M10 3G/UMTS USB
modem, you can configure 3G connectivity.
How to Configure a 3G Dial-In Connection
Network Routes
On the NETWORK > Routing page, you can add static routes. For more information, see How to Add a Static Route.
On the Routing page, you can also view the following tables for a list of network routes and network interfaces for the Barracuda Firewall:
Table
Description
Network Routes
This table contains all the routing information sorted by routing table.
Routing information is processed from top to bottom.
Network Interfaces
This table contains all interfaces, their current state visualized by a
graphical icon, and the IP addresses assigned to the interface.
Interface Groups
On the NETWORK > Interface Groups page, you can organize multiple interfaces belonging to the same network in interface groups. In firewall
rules, the interface group specifies the source address that the interface is allowed to use.
For more information on interface groups, see Interface Groups.
Bridges
To transparently connect two networks, you can configure a bridge. For more information, see How to Configure a Bridge.
DHCP Server
Every Barracuda Firewall can act as a DHCP server. You can configure DHCP servers on a per-network basis. For more information, see How to
Configure the DHCP Server.
Authoritative DNS
You can configure a split level and authoritative DNS server. For more information, see How to Configure an Authoritative DNS.
Proxy
To free the local firewall capabilities of the Barracuda Firewall, you can use the cloud resources of the Barracuda Web Security Service to
intercept and scan all HTTP and HTTPS traffic for malware. To use this service, you must have an additional Barracuda Web Security
subscription. You must also be connected to the Barracuda Cloud Control.
If you already have an ICP-enabled proxy server running in your network, see How to Configure a Forward Proxy.
How to Configure WAN Interfaces
By default, ports p2 and p3 are preconfigured. If you want to configure a WAN interface
for either of these ports, you might need to remove the default configurations:
Port p2 – Initially, the network interface for port p2 is configured as a dynamic
network interface named DHCP. If you want to configure either a static or other
dynamic connection besides DHCP (PPTP or PPPoE) on port p2, delete the
default DHCP interface.
Port p3 – Initially, port p3 is bridged to port p1. Both interfaces are also
configured as management ports in the LAN. To use port p3 for another
connection, delete the P1-P3 bridge. However you might lose connectivity to
the network from your administrative PC.
After removing the default configurations for ports p2 and p3, you can reconfigure them
as WAN interfaces. For any other ports, just begin configuring the WAN interface. You
can configure the WAN interface with either static or dynamic IP address assignment.
Be sure to add the gateway to create the default route over the WAN interface, either
when you add or edit a static network interface, or on the NETWORK > Routing page.
Related Articles
For examples on how to create more
specific types of WAN interfaces, see the
following articles:
How to Configure a DHCP
Connection
How to Configure a PPPoE
Connection
Example - Configuring a Static
WAN Connection
How to Configure a 3G Dial-In
Connection
Example - Configuring a DMZ
How to Configure Wi-Fi
Remove the Default Configurations for Port p2 and Port p3
If you want to use port p2 or p3, first remove their default configurations.
1. If you want to use port p2:
a. Go to the NETWORK > IP Configuration page.
b. Delete the default DHCP interface from the Dynamic Interface Configuration section.
2. If you want to use port p3:
a. Go the NETWORK > Bridging page and delete the P1-P3 bridge.
b. Go the the FIREWALL > Firewall Rules page. Delete the P1-P3-BRIDGE firewall rule.
Configure a WAN Interface
To configure a WAN interface:
1. Go to the NETWORK > IP Configuration page.
2. If your WAN interface has a static IP address:
a. In the Static Interface Configuration section, click Add Static Network Interface.
b. Configure the static interface settings, including the gateway address.
c. Click Add.
3. If you have a dynamic connection such as PPTP or PPPoE:
a. In the Dynamic Interface Configuration section, click Add Dynamic Network Interface.
b. Configure the dynamic interface settings.
c. Click Add.
4. At the top of the page, click on the warning message to execute the new network configuration.
Example - Configuring a Static WAN Connection
This article provides example settings to configure an interface for an ISP that statically assigns an IP address for a WAN uplink. For instructions
on how to configure a static network interface, see How to Add a Static Network Interface.
The static WAN interface and ISP gateway for this example are shown in the following figure:
The interface must be configured on port p4 with an IP address of 69.122.23.58 and a netmask of 255.255.255.0 (or /24). The default gateway of
the ISP is 69.122.23.254.
Configure the static network interface with the following settings:
Setting
Value
Network Interface
Select p4.
IP Address
Enter 69.122.23.58.
Netmask
Enter 255.255.255.0.
Classification
Click WAN.
Gateway
Enter 69.122.23.254.
How to Configure a PPPoE Connection
Follow these instructions if your WAN interface is provided using PPPoE. This protocol is typically used by ISPs that offer DSL. If your ISP
provides a modem, connect the Ethernet port of the modem to a free network interface of your Barracuda Firewall. Use the Ethernet cable that is
delivered with the modem. If a cable was not delivered with the modem, please clarify if the modem must be connected to another device with a
standard Ethernet cable or a crossover cable.
1.
2.
3.
4.
5.
Go to the NETWORK > IP Configuration page.
In the Dynamic Interface Configuration section, click Add Dynamic Network Interface.
From the Network Interface list, select the network interface that the ISP modem is connected to on the Barracuda Firewall.
Enter a name for the new connection.
Select the following settings:
Network Protocol: PPPoE
Classification: WAN
6. Configure the remaining settings for your network requirements.
If your dial-in connection requires Synchronous PPP mode, select the check box. If you are not sure which mode to use,
contact your ISP.
For the initial configuration, keep the default Metric value of 100. In a multiprovider configuration, the Barracuda Firewall
chooses the interface with the lowest metric for outgoing traffic.
You can make the Barracuda Firewall reachable with a unique identifier (DNS-resolvable name). For Use Dynamic DNS, select
Yes and enter your DynDNS credentials. For more information on the DynDNS service, see http://dyn.com/dns/.
You can manually start and stop the link. For Connection Start Method, select Manual. To control the link, go to the Dynamic
Network Interfaces section of the NETWORK > Interfaces page.
To monitor the Internet connection, select a type of Health Check to perform. Most ISPs support LCP to continuously monitor
successful data transmission. However, you can use ICMP requests for monitoring the Internet connection. If you use ICMP for
link monitoring, add a target IP address to the Health Check Target list.
7. Click Add.
8. At the top of the page, click on the warning message to execute the new network configuration.
9. After committing your changes, log back into the Barracuda Firewall.
How to Configure a 3G Dial-In Connection
To establish wireless Internet connections, you can install the external Barracuda M10 USB modem on the Barracuda Firewall. 3G connections
are ideal for backup lines and for use in mobile offices or locations without terrestrial Internet links.
After you connect the Barracuda M10 USB modem to the Barracuda Firewall, configure the provider settings. Then verify that the default network
route and network interface of the 3G WAN link have been successfully introduced and are available.
In this article:
Step 1. Connect the Barracuda M10 Modem
Step 2. Configure the Provider Settings
Step 3. Verify the Uplink and Default Network Route
Step 1. Connect the Barracuda M10 Modem
To connect the Barracuda M10 modem:
1.
2.
3.
4.
Follow the steps in the Barracuda M10 3G Modem Quick Start Guide to insert the SIM card into the Barracuda M10 USB modem.
Connect the Barracuda M10 modem to an empty USB port of the Barracuda Firewall.
Connect the antenna to the Barracuda M10 modem and place it in a stable location.
Restart your Barracuda Firewall so that it recognizes the Barracuda M10 modem.
a. Go to the BASIC > Administration page.
b. In the System Reload/Shutdown section, click Restart.
Step 2. Configure the Provider Settings
1. Go to the NETWORK > IP Configuration page.
2. In the 3G Network Interface section, select the following settings:
Enable 3G Network Interface: Yes
Classification: WAN
3. Configure the remaining 3G Network Interface settings for your network requirements.
You can configure the Barracuda M10 modem to automatically choose the transmission standard with the best transmission
performance. For Radio Preference, click Auto.
For the initial configuration, keep the default Metric value of 400. In a multiprovider configuration, the Barracuda Firewall
chooses the interface with the lowest metric for outgoing traffic.
If authentication is required, enter the username and password for establishing a connection to your ISP. If authentication is not
required, select the No Auth check box.
If a pin number is required to unlock your SIM card, enter it in the SIM PIN field.
To use the DNS server that is assigned by your ISP, set Use Assigned DNS to Yes. The Barracuda Firewall then uses the DNS
servers of the ISP for DNS requests.
To make the Barracuda Firewall reachable with a unique identifier (DNS-resolvable name), set Use Assigned DNS to Yes and
enter your DynDNS credentials.
For more information on the DynDNS service, see http://dyn.com/dns/.
4.
5.
6.
7.
To start the link automatically, set Connection Start Method to Automatic.
To manually start and stop the link , set Connection Start Method to Manual. To control the link, go to the Dynamic Network
Interfaces section of the NETWORK > Interfaces page.
To monitor the 3G Internet connection, select a test type from the Health Check list. Most ISPs support LCP to continuously
monitor successful data transmission. However, you can use ICMP requests for monitoring the Internet connection. If you use
ICMP for link monitoring, add a target IP address to the Health Check Target list.
Click Save Changes.
At the top of the page, click on the warning message to execute the new network configuration.
After committing your changes, log back into the Barracuda Firewall.
To verify that the Barracuda M10 modem can establish a connection to your ISP, check its status LED lights. For information on the
meaning of the LED lights, see the Barracuda M10 USB Modem Quick Start Guide.
Step 3. Verify the Uplink and Default Network Route
Verify that the Barracuda Firewall can establish an Internet connection and that the default network route was introduced.
1. Go to the BASIC > Active Routes page.
2. In the Network Routes section, verify that a default network route for the 3G WAN link was introduced.
3. In the Network Interfaces section, verify that the network interface of the 3G WAN link is available.
How to Configure a DHCP Connection
If the IP address is dynamically assigned by your ISP, follow the instructions in this article to configure the interface.
Before You Begin
If your ISP provides a modem, connect the Ethernet port of the modem to a free network interface on the back of your Barracuda Firewall. Use
the Ethernet cable that is delivered with the modem. If a cable was not delivered with the modem, determine if the modem must be connected to
another device with a standard Ethernet cable or a crossover cable.
Configure the WAN Interface
1.
2.
3.
4.
5.
6.
7.
Go to the NETWORK > IP Configuration page.
In the Dynamic Interface Configuration section, click Add Dynamic Network Interface.
Enter a name for the new connection.
Set Network Protocol to DHCP.
From the Network Interface list, select the network interface that the ISP modem is connected to on the Barracuda Firewall.
Set Classification to WAN.
Configure the remaining settings for your network requirements.
In the MTU field, enter the MTU size. If the MTU size is too large, network packets passing the ISP line are fragmented and
might decrease the performance of your network performance. For the correct MTU size, contact your ISP.
To automatically introduce a network route for this Internet connection, set Create Default Route to Yes.
For the initial configuration, keep the default Metric value of 100. In a multiprovider configuration, the Barracuda Firewall
chooses the interface with the lowest metric for outgoing traffic.
To use the DNS server that is assigned by your ISP, set Use Assigned DNS to Yes. The Barracuda Firewall then uses the DNS
servers of the ISP for DNS requests.
To make the Barracuda Firewall reachable with a unique identifier (DNS-resolvable name), set Use Dynamic DNS to Yes and
enter your DynDNS credentials.
For more information about the DynDNS service, visit http://dyn.com/dns/.
Specify the Connection Timeout for this link. The connection timeout specifies the time in seconds that the Barracuda Firewall
waits for an IP address to be assigned. If the defined limit is exceeded, the link is marked as unreachable.
To start the link automatically, set Connection Start Method to Automatic.
T o manually start and stop the link, set Connection Start Method to Manual. To control the link, go to the Dynamic Network
Interfaces section of the NETWORK > Interfaces page.
To add IP addresses to monitor the Internet connection beyond the gateway, add a target IP address to the Health Check
Target list.
8. Click Add.
9. At the top of the page, click on the warning message to execute the new network configuration.
10.
10. After committing your changes, log back into the Barracuda Firewall.
How to Add a Static Network Interface
Follow the instructions in this article to configure a static network interface. You can
add a subnet to a free physical or virtual interface.
Related Article
How to Configure a VLAN
To configure a static network interface:
1. Go to the NETWORK > IP Configuration page.
2. In the Static Interface Configuration section, click Add Static Network Interface.
3. In the Add Static Network Interface window, configure the settings for the network interface.
From the Classification list, you can select the following options to specify if the network is added to a network object:
Unclassified – The network is not added to any network objects.
Trusted – The network is added to the Trusted LAN network object.
DMZ – The network is added to the DMZ Networks network object.
WAN – The network is added to the Internet network object.
If you do not enter a Gateway, the default gateway (0.0.0.0) is used.
4. Click Add.
5. At the top of the page, click on the warning message to execute the new network configuration.
How to Configure Wi-Fi
The Barracuda Firewall X101 and X201 are equipped with a Wi-Fi network module supporting IEEE 802.11 b/g/n with a maximum transmission
rate of 54 Mbps and 108 Mbps in SuperG mode for compatible client devices. Using WPA and WPA2 with a RADIUS authentication server, you
can encrypt wireless networks. The Barracuda Firewall can serve up to three independent Wi-Fi networks with different SSIDs. You can configure
each Wi-Fi network with a landing page serving either a confirmation message or a ticketing system for guest network access.
In this article:
Step 1. Configure the Wi-Fi Interface
Step 2. Configure the Wi-Fi Settings
Configure the Radio
Configure a Wi-Fi Access Point
Step 3. Enable the DHCP Server
Step 4. Configure the Firewall Rule for Wi-Fi
Step 5. Verify the Order of the Rules in the Rule Set
Step 1. Configure the Wi-Fi Interface
To configure basic network settings for the Wi-Fi module:
1. Go to the NETWORK > IP Configuration page.
2. In the Static Interface Configuration section, edit one of the available Wi-Fi interfaces (ath0, ath2, ath3) if you want to change the IP
address configuration.
3. Click Save.
Step 2. Configure the Wi-Fi Settings
When the static Wi-Fi network interface is available, Wi-Fi can be activated. The SSID, wireless security, and authentication can also be adjusted.
1.
1.
2.
3.
4.
Go to the NETWORK > IP Configuration page.
In the Wi-Fi Link Configuration section, select the Activate WiFi check box to enable Wi-Fi.
From the Location list, select the country that your Barracuda Firewall is located in.
Click Save Changes.
Configure the Radio
To configure the radio channel and transmission rate:
1. Click Configure Radio and edit the radio settings.
For more transmission power and a bigger range of radio reception, select a higher mW value from the Power list.
For higher data throughput, select a higher Mbps value from the Bitrate list.
To bond two channels for a transmission rate of up to 108 Mbps, set SuperG to Yes. When you enable this setting, verify that all
clients connecting to this access point support SuperG mode.
2. Click Save Changes.
3. At the top of the page, click the warning message to execute the new network configuration.
4. Log into the Barracuda Firewall again.
Configure a Wi-Fi Access Point
To edit a Wi-Fi access point:
1. Click Edit for the access point you want to enable (WIFI, WIFI2, WIFI3).
2. In the SSID field, enter the Service Set IDentifier (SSID). This name is displayed to Wi-Fi clients that search for available Wi-Fi signals.
3. From the Security Level list, select one of the following options:
High – WPA2 (Recommended).
Medium – WPA.
None – No encryption.
4. From the Authentication list, select one of the following options:
WPA-PSK – Use this option when key management should be done locally on the Barracuda Firewall. Then define a preshared
key.
WPA-RADIUS/EAP – Use this option when key management is done by a RADIUS server. Then enter the RADIUS server
information into the RADIUS Configuration section.
5. To forward clients to a landing page that displays a Confirmation Message or serves a Ticketing system, enable the feature. To give
clients direct access to the Wi-Fi network, select None.
6. Click Save.
With firmware version 6.1.0 and above, you can edit the landing page and ticketing settings, as well as add or remove guest networks.
To configure these settings, go to the USERS > Guest Access page.
Step 3. Enable the DHCP Server
To assign IP addresses to clients that are connected to the Wi-Fi network, enable the DHCP server of the Barracuda Firewall.
1.
2.
3.
4.
Go to the NETWORK > DHCP Server page. Clients with an active lease are listed in the Active Leases section.
In the DHCP Server section, set Enable DHCP Server to Yes.
If you change the network configuration of the default wifi and wifi2 interfaces, modify the available subnets or create a new one.
Click Save Changes.
Step 4. Configure the Firewall Rule for Wi-Fi
There is a predefined firewall rule named WIFI-2-INTERNET that only applies to the first Wi-Fi network (ath0). To allow other networks, you can
either edit a copy of the rule for the other networks or edit the rule directly to include all subnets.
1. Go to the FIREWALL > Firewall Rules page.
2. To edit a copy of the WIFI-2-INTERNET rule:
a. Copy the WIFI-2-INTERNET rule. The rule copy is created at the bottom of the rule set.
b. Edit the WIFI-2-INTERNET-COPY rule.
c. Click the Advanced tab and change Interface Group to WIFI2 or WIFI3.
3. To directly edit the the WIFI-2-INTERNET rule to include all subnets:
a. Edit the WIFI-2-INTERNET rule.
b. Click the Advanced tab and select Matching from the Interface Group list.
c.
3.
c. Click the General tab and change Source to specify the Wi-Fi subnets.
4. At the top of the rule editor window, click Save.
Step 5. Verify the Order of the Rules in the Rule Set
Because rules are processed from top to bottom in the rule set, arrange your rules in the correct order. Also verify that your rules are placed
above the BLOCKALL rule; otherwise, the rules are blocked.
After adjusting the order of rules in the rule set, click Save Changes.
How to Configure a VLAN
You must have a properly configured 802.1q-capable switch to support VLANs.
You can use VLANs to simulate several LANs on one physical network interface (but only one MAC address). The physical interface behaves as
if it were several interfaces, and the switch behaves as if it were multiple switches. VLANs let multiple virtual networks share switches, cables, and
routers. All VLANs created on a host interface share the bandwidth of the physical interface. However, you can configure bandwidth policies
(QoS) to specify how much bandwidth an interface can use.
In this article:
Create a Virtual Interface
Next Steps
Create a Virtual Interface
To add a VLAN:
1. Go to the NETWORK > IP Configuration page.
2. In the Virtual Interface Configuration section, add an entry for the VLAN. In the VLAN configuration, you can only select a host
interface that is capable of supporting VLANs and connected to a correctly configured VLAN switch.
3. Click Save Changes.
4. At the top of the page, click on the warning message to execute the new network configuration. It can take up to two minutes for the
settings to be applied.
The VLAN interface then appears in the Network Interface Configuration section. VLAN interface names are displayed in this format:
p<port number>.<vlan id>
Next Steps
After adding the virtual interface, you can use it in your network configurations as if it were a physical interface. Continue with any of the following
network configuration articles:
How to Add a Static Network Interface
How to Add a Static Route
How to Configure a Bridge
How to Configure Bandwidth Policies or QoS
How to Add a Static Route
Static routes are used to specify a gateway for an unassociated network so that the return traffic can take the correct path. In general, you must
add a static route when you want to reach networks that are not directly attached to the Barracuda Firewall or the default gateway.
To add a static route:
1.
2.
3.
4.
Go to the NETWORK > Routing page.
Enter the settings for your static route.
Click Add.
At the top of the page, click on the warning message to execute the new network configuration.
For more information on the static route settings, click Help on the page.
How to Configure a Bridge
To transparently connect two networks, you can configure Layer 2 bridging on the Barracuda Firewall. For example:
You can bridge a wireless network with one of your local networks.
If you have servers with external IP addresses, you can bridge that traffic with the ISP gateway.
After configuring your bridge, create a firewall rule to allow traffic between both networks.
To help you configure the bridge, you can use the pre-installed bridge between ports p1 and p3 and the predefined firewall rule for the bridge.
In this article:
Step 1. Configure the Bridge
Step 2. Create a Firewall Rule for the Bridge
Port p1—Port p3 Bridge
Step 1. Configure the Bridge
Before you begin:
Verify that least one interface has a static route configured.
To configure the bridge:
1.
2.
3.
4.
Go to the NETWORK > Bridging page.
Click Add Bridged Group.
Enter a name for the bridge and add the interfaces to be bridged.
Commit this change.
Step 2. Create a Firewall Rule for the Bridge
To create the firewall rule:
1. Go to FIREWALL > Firewall Rules page.
2. Create a firewall rule to allow the traffic between the bridged networks. For example, if you are bridging servers with external IP
addresses with the ISP gateway, create a rule that only allows traffic on port 443 and port 80 to pass.
3. Verify the order of the firewall rules. Because rules are processed from top to bottom in the rule set, ensure that you arrange your rules in
the correct order. You must especially ensure that your rules are placed above the BLOCKALL rule; otherwise, the rules are blocked.
After adjusting the order of rules in the rule set, click Save Changes.
Port p1—Port p3 Bridge
To aid you in evaluation and initial setup, the Barracuda Firewall has a pre-installed bridge between ports p1 and p3. You can see the bridge on
the NETWORK > Bridging page. The firewall rule that allows all traffic to pass between ports P1 and P3 is called P1-P3-BRIDGE. That rule has
the following settings:
Action
Source
Destination
Service
Bi-directional
Interface Group
Connection
Allow
Port-p1
Port-p3
Any
Yes
Matching
(matches all
interfaces)
No SNAT
(original source
IP address is
used)
How to Configure a DMZ
In some cases, you might want to redirect network traffic from the Internet to a network host residing in a network segment protected by the
Barracuda Firewall. For example, you have a web server hosting a website that is reachable through the Internet. For additional security, you can
put the web server in the DMZ segment to logically separate hosts in the DMZ from other hosts in different network segments.
With a DMZ configuration, you have full control over network traffic from the Internet to the web server, as well as traffic from other network
segments to the web server. This configuration might be necessary if hosts from other network segments must access the same web server.
If your web server listens on TCP port 8080 instead of 80 and you do not want to change the listening socket of your web server, you can use the
Port Address Translation (PAT) feature of the DNAT rule to modify the destination port of IP packets passing the Barracuda Firewall. In the Redir
ect To field of the rule settings, append the port to be translated to the IP address field (e.g., 172.16.10.1:8080).
In this article:
Step 1. Configure the Interface
Step 2. Configure the Firewall Rule
Step 3. Verify the Order of the Firewall Rules
Step 1. Configure the Interface
Create a network segment (e.g., 172.16.10.0/24 on port 3).
1.
2.
3.
4.
Go to the NETWORK > IP Configuration page.
In the Static Interface Configuration section, click Add Static Network Interface.
Enter a name into the Name field.
Specify the following settings:
Network Interface – Select the interface connected to the DMZ (e.g., p3).
IP Address – Enter the interface IP address for the DMZ (e.g., 172.16.10.1). This IP address represents the default gateway
for clients within this network segment.
Netmask – Enter the netmask (e.g., 255.255.255.0).
Classification – Select DMZ.
5. Click Save Changes.
6. At the top of the page, click on the warning message to execute the new network configuration.
Step 2. Configure the Firewall Rule
Create a firewall rule that allows HTTP traffic from the Internet to the web server residing in the DMZ.
1.
2.
3.
4.
Go to the FIREWALL > Firewall Rules page.
Click Add Access Rule to create a new firewall rule.
In the Add Access Rule window, enter a name and description for the rule.
Specify the following settings:
Action – Click DNAT.
Connection – Select Default (SNAT).
Service – Add the service objects to redirect (e.g., HTTP).
Source – Click Network Objects and add Internet.
Destination – Click IP Address field and enter the WAN address (e.g., 80.90.100.200).
Redirected To – Enter the IP address and port number of the DMZ server (e.g., 172.16.10.10:8080).
5. At the top of the Add Access Rule window, click Add.
Step 3. Verify the Order of the Firewall Rules
New rules are created at the bottom of the firewall rule set. Because rules are processed from top to bottom in the rule set, you must arrange your
rules in the correct order. Ensure that your rules are placed above the BLOCKALL rule; otherwise, the rules are blocked.
After adjusting the order of rules in the rule set, click Save Changes.
How to Configure the DHCP Server
If enabled, the Barracuda Firewall DHCP server automatically assigns IP addresses to clients that reside in a defined subnet. This article provides
an example of how to configure a DHCP server on the Barracuda Firewall.
In this article:
Step 1. Enable the DHCP Server
Step 2. Configure the DHCP Server Subnet
Step 3. Configure the Client
Step 4. (Optional) Assign Static IP Addresses
Monitoring Active Leases
Step 1. Enable the DHCP Server
To enable the DHCP server:
1. Go to the NETWORK > DHCP Server page.
2. In the DHCP Server section, select Yes to enable the DHCP server.
3. Click Save Changes.
To use the DHCP server within the management network, go to the NETWORK > IP Configuration page and add a secondary IP
address in the Management IP Configuration section.
Step 2. Configure the DHCP Server Subnet
This example configures a DHCP server subnet named LAN that uses an IP range from 192.168.200.150 to 192.168.200.160, subnet mask of
255.255.255.0, and an NTP server at ntp.barracudacentral.com.
1. In the Add DHCP Server Subnet section, specify the following settings:
Name: LAN
Beginning IP Address: 192.168.200.150
Ending IP Address: 192.168.200.160
Subnet Mask: 255.255.255.0
Gateway: 192.168.200.200
DNS Server 1 : Enter your DNS server.
NTP Server 1: ntp.barracudacentral.com
2. If required, specify the Default Lease Time and Maximum Lease Time.
3. If you use WINS servers in your network, enter their IP addresses in the WINS Server 1 and WINS Server 2 fields.
4. Click Add Subnet.
Step 3. Configure the Client
The DHCP server is now ready to assign DHCP leases to connected clients. For clients that currently have manually assigned IP addresses,
reconfigure them to receive IP addresses from the DHCP server.
Step 4. (Optional) Assign Static IP Addresses
After enabling and configuring the DHCP server, you can also assign static or fixed IP addresses to designated hosts (such as servers in your
network).
To assign a static IP address to a system:
1. In the DHCP Server Subnets section, click Edit under the Action tab.
2. In the Static Leases section, edit the following settings:
Hostname: Enter a name for the system to be assigned a static address. For example, Workstation.
MAC Address: Enter the MAC address of the selected system. You can also copy the MAC address from the Active Leases se
ction.
IP Address: Enter the IP address that you want to assign to the system. Click the plus sign (+) next to the address line to assign
the address to the system.
3. Click Save Subnet.
In the Active Leases sectionof the DHCP Server window, the IP address lease is displayed as Static.
Monitoring Active Leases
In the Active Leases section, you can monitor active DHCP leases. The information for each lease is displayed in the following columns:
Column
Description
Range
The IP range of the subnet.
Hostname
The hostname of the Windows client.
IP Address
The percentage of actively used IP addresses from the range.
State
The current state of the lease pool and the number of addresses that
are in use.
Start
The start lease time of the IP address range.
End
The end lease time of the IP address range.
MAC Address
The MAC address of the Windows client.
Type
The type of the IP address. The IP address can be either Static or Dy
namic.
How to Configure a Forward Proxy
If your network has a proxy or you want to use an ISP proxy, you can configure a forward proxy.
This article provides steps and example settings to configure a forward proxy for the setup that is illustrated in the following figure:
Configure a Forward Proxy
1. Go to the NETWORK > Proxy page.
2.
2. Configure the following settings:
Web Security: Select Proxy Forwarding.
Proxy Forwarding: Enter the IP address of the forward proxy.
Port: Enter the port of the forward proxy. Default values are 3128 or 8080.
For example, if you are configuring a forward proxy for the setup in the figure above:
3. Click Save Changes.
How to Configure Authoritative DNS
The Barracuda Firewall can act as an authoritative DNS server, returning definitive
answers to DNS queries about domain names installed in its configuration. With DNS,
you can use the the same namespace internally and externally. You can direct external
clients to use one IP address, and internal clients to use an internal path to the same
hostname. This feature is also called Split DNS.
In this article:
Split DNS
Configuring Authoritative DNS
How Authoritative DNS Works
DNS Zone Transfer Blocking
Add a WAN Interface After the Domains are Created
Zones and Domains
Related Articles
DNS Records
How to Configure an Authoritative
DNS Host
Split DNS
The Barracuda Firewall supports a split DNS infrastructure. If the same hostname is used for a resource that is both internally and externally
accessible, internal network clients receive the internal IP address and external clients receive the external IP address when they ask for the
address of that hostname. Specifically, the A record for the hostname includes two views: one with the internal IP address and one with the
external IP address. Clients only see the address that they should use. For more details on how to configure split DNS, see "Step 3: Set up DNS
for Internal Clients" in How to Configure an Authoritative DNS Host.
If local clients use external IP addresses to access internal servers, the Barracuda Firewall translates the address and forwards those requests to
internal servers.
Configuring Authoritative DNS
For an overview of the steps required to make the Barracuda Firewall an authoritative DNS host, see How to Configure an Authoritative DNS Host
.
How Authoritative DNS Works
By configuring the Barracuda Firewall as the authoritative DNS server for the domains that are behind it, you increase the availability of your
hosted servers. When asked for the IP address of a hostname, the Barracuda Firewall returns a DNS A record that contains the IP address of one
of your WAN interfaces.
Every DNS record has a Time to Live (TTL) value, which is the length of time that the DNS record can be cached. For most DNS records, two
days is a typical and acceptable value. However, A records should have a very short TTL, such as 30 seconds. If a WAN interface fails, its
address is no longer returned. The inbound traffic to this host will not be disrupted because the cached address for the failed interface will time out
quickly. Specifying a short TTL for A records also assists in link balancing. Because the address for a host that is returned varies among the
available links, the short TTL guarantees that the interface used for incoming traffic directed to that host also varies frequently.
When asked for the A record, the Barracuda Firewall rotates through the list of IP addresses, varying which IP address appears first in the
returned list according to the inbound link balancing algorithm. That address can be cached by clients for no longer than the value specified in
TTL.
DNS Zone Transfer Blocking
The Barracuda Firewall can be configured to block zone transfers on some or all of the domains that it hosts. An AXFR/IXFR query that is sent
from another DNS server to the Barracuda Firewall (to request a copy of the DNS records) is rejected if zone transfers are disabled for that
domain. By default, zone transfers are enabled for all domains created.
Add a WAN Interface After the Domains are Created
After creating your domains, you can add new WAN interfaces for DNS queries (static interfaces only) and inbound link balancing. To add such an
interface:
1. Go to the NETWORK > IP Configuration page and add the interface with the DNS Server service enabled (if you want it to be used to
respond to DNS queries).
2. Go to the NETWORK > Authoritative DNS page.
3. If this is a static interface and you want it to be used to respond to DNS queries:
For each domain that is already defined, add a new NS record and a new A record to each domain for the new interface.
4. Edit the A records for your servers to enable inbound traffic to be received on the new interface for the corresponding internal servers.
When you edit the A record, you can select the new WAN interface from the Links list and add it to the A record.
Zones and Domains
A domain name server stores information about part of the domain name space called a zone. All names in a given zone share the same domain
suffix. For example, if barracuda.com is the domain suffix, mail.barracuda.com and eng.barracuda.com are possible subdomains. These can
be all served by one domain name server or some of the subdomains can be delegated to other domain name servers. Every domain or
subdomain is in exactly one zone. Rather than make a distinction between a zone and a domain, the web interface of the Barracuda Firewall
simply asks you to create a domain.
DNS Records
In this article:
DNS Records Generated when Creating a Domain
Additional DNS Records
DNS Records Generated when Creating a Domain
When you create a domain on the Barracuda Firewall, the following records are automatically generated:
Record
Description
Start of Authority (SOA)
The SOA record defines the global settings for the hosted domain or
zone. Only one SOA record is allowed per hosted domain or zone.
Name Server (NS)
NS records specify the authoritative name servers for this domain.
One NS record for each name server in the DNS Servers table is
generated.
Address (A)
A records map a hostname to an IP address. Each host inside the
domain should be represented by an A record. One A record is
created for each name server in the DNS Servers table. An A record
is also created for each matching domain name found in 1:1 NAT and
Port Forwarding rules.
Additional DNS Records
After a zone has been created, you can edit its records or add NS records, A records, and any of the following records to the zone:
Record
Description
Mail Exchanger (MX)
MX records point to the email servers that are responsible for
handling email for a given domain. There should be an MX record for
each email server, including any backup email servers. If an email
server lies within the domain, it requires an A record for each name
server. If the email server is outside the domain, specify the FQDN of
the server, ending with a dot.
Example: mail.my-isp.net
Text (TXT)
Text records allow text to be associated with a name. This can be
used to specify Sender Policy Framework (SPF) or DomainKeys
records for the domain.
Canonical Name (CNAME)
A CNAME record provides a mapping between this alias and the true,
or canonical, hostname of the computer. It is commonly used to hide
changes to the internal DNS structure. External users can use an
unchanging alias while the internal names are updated. If the real
server is outside the domain, specify the FQDN of the server, ending
with a dot.
Example: server1.my-isp.net
If a domain name has a CNAME record associated with it, then it
cannot have any other record types. Do not use CNAME defined
hostnames in MX records.
Service (SRV)
Service records are used to store the location of newer protocols,
such as SIP, LDAP, IMAP, and HTTP.
Pointer (PTR)
PTR records point to a canonical name. The most common use is to
provide a way to associate a domain name with an IP address.
Other (OTHER)
Use an OTHER record to add a type of DNS record that is not
supported, such as NAPTR.
More information about these records and their attributes can be found in the online help.
Back to How to Configure Authoritative DNS.
How to Configure an Authoritative DNS Host
To make the Barracuda Firewall an authoritative DNS host, complete the following steps:
Step
Explanation
Step 1. Enable Authoritative DNS on the Barracuda Firewall
Enable the DNS Server service on the links and the service on the
Barracuda Firewall.
Step 2. Create One or More Domains
Define one or more domains on the Barracuda Firewall.
Step 3. Set up DNS for Internal Clients (Split DNS)
Make your internal DNS server forward queries to the Barracuda
Firewall. Configure split DNS.
Step 4. Add More DNS Records
Add more DNS records for web servers and email servers.
Step 5. Update Your Domain Registrar
Tell the Internet that your domain exists or has changed.
Step 6. Test
Test external access.
Step 1. Enable Authoritative DNS on the Barracuda Firewall
Go to the NETWORK > Authoritative DNS page and enable Authoritative DNS. In the DNS Servers table, you can view a list of the links that
are configured with the DNS Server service on the NETWORK > IP Configuration page.
Step 2. Create One or More Domains
To define a domain:
1. On the NETWORK > Authoritative DNS page, click Add New Domain.
2. Enter the domain name, and define TTL and zone transfer settings.
3. Click Create.
The following records are created:
Start of Authority (SOA) – Only one SOA record is allowed per hosted domain or zone.
Name Server (NS) – One NS record for each name server in the DNS Servers table is generated.
Address (A) – One A record is created for each name server in the DNS Servers table.
The DNS records are created with typical default values. To view and edit all of the values for each record, click Edit next to the record in the DN
S Records section.
To configure more than one external IP address for a domain:
On the NETWORK > Authoritative DNS page, edit the A record for the hostname. On the dialog that appears, in the IP Addresses table, specify
the IP addresses to be used in response to external DNS queries.
The IP Addresses table is the list of IP addresses which can be used to reach this host name. When asked for the A record, the Barracuda
Firewall rotates through this list of IP addresses, varying which IP address appears first in the returned list in round robin fashion. If an interface is
not available, its IP address is not returned in the list.
Add multiple IP addresses to achieve inbound link balancing and failover. Enter Local Network IP addresses, if they exist, for internal DNS
queries (more about this in Step 3).
For each external IP address, in the Links column, select the WAN link from the drop-down list. Enter the address in the WAN IP Address field.
Click the plus sign (+) to add the entry. Save your changes when complete.
Step 3. Set up DNS for Internal Clients (Split DNS)
The Barracuda Firewall supports a split DNS infrastructure. If you are using the same domain name for internally and externally accessible
resources, internal (trusted) network clients receive the internal IP address of the resource and external clients receive the external address. To
direct internal and external requests to different IP addresses for the same namespace:
1. On the NETWORK > IP Configuration page, add (or verify that you have added) a static trusted interface with the DNS Server service.
2. For each hostname that is used both internally and externally, add one or more internal addresses:
a. On the NETWORK > Authoritative DNS page, edit the A record for the hostname.
b. On the dialog that appears, in the IP Addresses table, specify the local IP addresses to be used in response to internal DNS
queries. For each local address:
i. In the Links column, select INTERNAL ONLY to use a local IP address for this host name.
ii. In the Local Network column, type the local IP address for this host name.
iii. Save your changes when complete.
3. If you have an internal DNS server, configure it to forward queries to the interface in step 1.
4. Using an internal network client, try to access each hostname and verify that you are directed to the correct site.
Step 4. Add More DNS Records
Add more DNS records to your domains to match your configuration. For example, each email server needs an MX record and a corresponding A
record. Each web server needs an A record.
If you have externally reachable IP addresses that are not tied to any interface, such as ARIN networks, create an A record for each one. In the Li
nks list, select ANY.
Step 5. Update Your Domain Registrar
If you have not registered your domain name, register it with a domain name registrar like GoDaddy.com or register.com. Make the NS records of
the domain point to your static WAN IP addresses. If your domain name is already registered, contact your registrar to update the NS records of
the domain to point to your static WAN IP addresses. Remove records that reference any domains that are now delegated to the Barracuda
Firewall.
Hosting a Subdomain
If your domain is hosted at your ISP or elsewhere and you want to delegate a subdomain to be resolved by the Barracuda Firewall, add some
records to the zone file of the domain where it is stored at the registrar. If the domain is example.com, and you want to host my.example.com an
d you have two name servers named ns1 and ns2, add these lines, using the actual IP addresses of your name servers:
my
my
ns1
ns2
IN
IN
IN
IN
NS
NS
A
A
ns1
ns2
216.101.241.181
192.0.2.2
Step 6. Test
From a host on the Internet, run nslookup on your domain names and verify that the expected IP addresses are returned. Depending on the
change and how long the various resolvers cache DNS responses, it might take some time for your changes to be noted throughout the Internet.
For example, it might take a day before a new domain name is accessible via the Internet. If a domain name was previously registered and the
DNS record is modified, any server on the Internet that has the previous information will not get the update until the TTL of the original record has
passed.
Back to How to Configure Authoritative DNS.
How to Change the Management IP Address and Network Interface of a
Barracuda Firewall
Use the management IP address to configure and administer your Barracuda Firewall from a web browser. As part of the configuration steps
detailed in the Barracuda Firewall Quick Start Guide (available for download on the Barracuda Firewall - Overview page), you should have set the
management IP address to its initial value, using network interface p1.
To change the management IP address and interface:
1. In a web browser, go to https://<current management IP address>.
2.
3.
4.
5.
6.
7.
8.
Log into the web interface with the username and password that you have configured.
Go to the NETWORK > IP Configuration page.
In the Management IP Configuration section, select a new Management Interface.
Enter the new Management IP Address and Management Netmask.
Select the Ping and/or NTP check boxes if you also want this interface to respond to those requests.
Click Save Changes.
At the top of the page, click on the warning message to execute the new network configuration. It may take up to two minutes for the
settings to be applied.
Use the new management IP address when you log into the web interface:
https://<new management IP address>
How to Configure and Use High Availability
Version Info
This feature is available in firmware version 6.1.0 and later.
For redundancy and reliability, you can set up two Barracuda Firewalls in a high availability (HA) cluster. During normal operations, the primary
unit is active while the secondary unit waits in standby mode. The secondary unit has the same configurations as the primary unit, and it only
becomes available when the primary unit is down. The failover is reversed when the primary unit can resume operations.
To execute a failover when a unit or networking component becomes unavailable, you can configure the monitoring of additional IP addresses
and interfaces. You can also manually execute a failover.
When installing two Barracuda Firewalls in a high availability cluster, ensure that the cabling is done exactly the same on both units. The
management IP addresses must also be configured on the same ports. For example, if port 3 on the primary box is connected to ISP 1, the
secondary box must also connect port 3 with ISP 1. If you install cabling incorrectly, HA failover does not work properly. For an example of correct
cabling, see the following diagram:
In this article:
Enable High Availability
Configure Monitoring
Verify the HA Status
Manually Execute an HA Failover
Enable High Availability
Before you set up two Barracuda Firewalls in an HA cluster, ensure that both units fulfill the following prerequisites:
Both Barracuda Firewalls must be the same model type and revision. They must also run the same firmware version.
The management IP addresses of both units must be in the same network and subnet.
System clocks and timezones must be accurately set on both units. If they are not, HA pairing can fail.
To enable the HA cluster:
1.
2.
3.
4.
Log into the secondary unit.
Go to the ADVANCED > High Availability page.
In the Setup section, click Enable High Availability.
In the Enable High Availability window, enter the management IP address, serial number, and administrator password for the primary
unit.
5. Click Enable. The HA pairing process can take several minutes. During this process, do not reload the configuration page or configure
any other settings.
After the HA pairing is successful, the Disable High Availability option appears in place of the Enable High Availability option. The IP
addresses and serial numbers of both HA units are also displayed.
Additionally, this warning message is displayed on every configuration page of the secondary unit:
While the secondary unit is part of the HA cluster, you can only configure the following settings:
ADVANCED > High Availability
NETWORK > IP Configuration > Management IP Configuration
NETWORK > IP Configuration > Dynamic Interface Configuration
(If 3G is available) NETWORK > IP Configuration > 3G Network Interface
Configure Monitoring
You can configure the monitoring of additional IP addresses and interfaces. If these IP addresses and interfaces become unreachable, a failover
is executed.
On the ADVANCED > High Availability page, in the Monitoring section, add the Reachable IPs and Reachable Interfaces.
Verify the HA Status
To verify the HA status of the Barracuda Firewall, go to the ADVANCED > High Availability page and see the Status section. This section
indicates if the appliance is active, standby, primary, or secondary. If the appliance is not part of an HA cluster, this section indicates that it is Stan
d-Alone.
This figure shows an example of the status for a primary unit in standby mode:
This figure shows an example of the status for a secondary unit that is currently active:
On the BASIC > Status page, you can also view the current HA status in the Services section. To see the status details, hover over Hi
gh Availability.
Note that the secondary Barracuda Firewall is not visible in Barracuda Cloud Control.
Manually Execute an HA Failover
On the ADVANCED > High Availability page, you can manually execute an HA failover by clicking Manual Failover in the Status section.
If the Barracuda Firewall is not part of an HA cluster, the Manual Failover option is disabled.
Firewall
You can manage network traffic between untrusted and trusted network segments using object-based firewall rules. Even as your network grows,
firewall objects make it easy to manage services, hosts, and network segments. The firewall rules are processed from top to bottom to see if the
network traffic matches the criteria specified in them. The first matching rule is executed. Criteria for matching are one or more of:
Source IP address or network
Destination IP address or network
Service (protocol, port/range)
Application
Users
Time
Interface
Additionally, Intrusion Prevention, SYN flood protection, and a limit on the number of sessions per source IP address can be enforced.
To create, edit, or change the order of firewall rules, go to the FIREWALL > Firewall Rules page. For
more about matching criteria and
possible firewall rule actions, see Firewall Rules . If you are new to the Barracuda Firewall, see Pre-Installed Firewall Rules t
o review the rules that are already set up in the appliance. You can use these preinstalled rules as a starting point
for your own rules.
In this Section
Firewall Rules
Firewall Rules Order
Pre-Installed Firewall Rules
Connection Objects
Service Objects
Interface Groups
Link Balancing
Intrusion Prevention System or IPS
How to Control Traffic for Applications
How to Create User-Aware Firewall Rules
How to Configure Bandwidth Policies or QoS
How to Configure the Captive Portal
Example - Allowing HTTP Traffic
Example - Handling SMTP Traffic
Example - Allowing SIP-based VoIP Traffic
Example - Blocking FTP Traffic
Example - Configuring a DNAT Firewall Rule
Example - Creating Time-Based Firewall Rules
Example - Limiting Traffic for Applications
Example - Creating Connection Objects for Failover and Link Balancing
Example - Routing Traffic Over Two Different ISP Connections
Example - Configuring Dual ISPs with Automatic Failover
Firewall Rules
This article provides an overview of the parameters that you can define for firewall rules.
In this article:
About Firewall Rule Objects
Attributes of Firewall Rules
Applications/Bandwidth
Users/Time
Advanced
About Firewall Rule Objects
In the Barracuda Firewall, a firewall object is a named collection that represents specific networks, services, or connections. Using firewall objects
gives you the following advantages:
Each object has a unique name that is more easily referenced than an IP address or a network range.
Maintenance of the firewall rules is simplified. When you update a firewall object, the change is automatically updated in every rule that
uses the object.
Attributes of Firewall Rules
Each firewall rule has the following attributes:
Name – The name of the firewall rule. This name is displayed on the BASIC > Active Connections, BASIC > Recent Connections, an
d BASIC > IPS Events pages.
Description – An additional description field for the firewall rule.
Action – Specifies how the Barracuda Firewall handles network traffic that matches the criteria of the rule. The following table gives you
a detailed overview of each available action:
Action
Description
Allow
The Barracuda Firewall passes all network traffic that matches
the firewall rule.
Block
The Barracuda Firewall ignores all network traffic that matches
the firewall rule and does not answer to any packet from this
particular network session.
Reset
The Barracuda Firewall dismisses all network traffic that matches
the firewall rule. Matching network sessions are terminated by
replying TCP-RST for TCP requests, ICMP Port Unreachable fo
r UDP requests, and ICMP Denied by Filter for other IP
protocols.
DNAT
The Barracuda Firewall rewrites the destination IP address,
network or port to a predefined network address.
Redirect to Service
The Barracuda Firewall redirects the traffic locally to one of the
following services that are running on the Barracuda Firewall:
Caching DNS, SIP Proxy, HTTP Proxy, VPN, or NTP.
Connection – Defines the egress interface and source (NAT) IP address for traffic matching the firewall rule.
If a source IP address is specified, the appropriate link is selected from the routing table. If an interface is
specified, the appropriate source IP address is selected from the routing table. You can also create
connection objects, as described in How to Create a Connection Object . For example, multiple source IP
addresses and interfaces can be specified in the same connection object. This allows failover or
session-based balancing between up to four links. Balancing can be achieved using either a round robin or
weighted random algorithm. The following table lists the predefined connection objects:
Predefined Connection Object
Description
Default (SNAT)
Change the source IP address of network packets to the IP
address of the interface with the lowest metric according to the
routing table.
No SNAT
Connection is established using the original source IP address.
Use if simple routing with NAT is desired.
SNAT with DSL IP
Source NAT with the IP address of the DSL uplink.
SNAT with 3G IP
Source NAT with the IP address of the 3G uplink.
SNAT with DHCP IP
Source NAT with the IP address of the DHCP uplink.
Service – Describes the protocol and protocol/port range of the matching traffic. You can define one or more services for the firewall
rule. You can select a predefined service object or create your own service objects on the FIREWALL > Service Objects page.
Source – The source IP address/netmask of the connection that is affected by the rule. You can select a network object or explicitly enter
a specific IP address/netmask. You can create network objects on the FIREWALL > Network Objects page.
Destination – The destination IP address/netmask of the connection that is affected by the rule. You can select a network object or
explicitly enter a specific IP address/netmask.
Applications/Bandwidth
You can also configure bandwidth and application policies.
Bandwidth policies protect the available overall bandwidth of an ISP uplink line. Network traffic can be classified and throttled within each
firewall rule. To adjust the overall bandwidth of each network interface, go to the NETWORK > IP Configuration page. There are eight
predefined bandwidth policies. For additional information, see How to Configure Bandwidth Policies or QoS.
Application policies regulate how this session is treated by the Barracuda Firewall if certain network traffic is detected by the application
filter. Traffic can be reported, dropped, or throttled.
The application filter identifies the type of traffic that you want to limit or control. The application-aware filter detects peer-to-peer client
applications (such as IM, peer-to-peer based file sharing, and Skype) that usually cannot be detected by pattern-based
intrusion prevention mechanisms.
Users/Time
For more granular control, you can configure firewall rules that are only applied to specific users or during specific times.
Users can be used as a criteria for the rule. Users can be managed locally at the Barracuda Firewall or through several external
authentication services like MS Active Directory, NTLM, LDAP, RADIUS, OCSP, or the Barracuda DC Agent. To create users objects, go
to the FIREWALL > User Objects page.
Administrators can create firewall rules that are only active for specific times or dates. For example, you can create a time object that
includes Mondays and the hours of 8:00 am to 9:00 am. You can apply this time object to a rule so that traffic is only passed during these
times. You can also create a time object that includes the lunch hour and apply it to a firewall rule that allows web browsing with a higher
bandwidth policy. To create new time objects, go to the FIREWALL > Time Objects page.
Advanced
You can also configure the following advanced firewall settings:
Interface Group – For each rule, an interface can be assigned to the origin of the connection request. The interface group specifies the
interface that the source address is allowed to use. The following table describes each available interface group:
Interface Group
Description
Matching
Ensures that arriving packets are processed through the same
interface, which forwards the corresponding reply packets.
Source and destination addresses are thus only reversed. This
method helps prevent a network attack in which an attacker
might try using internal addresses from outside the internal
network (IP spoofing).
Any
Uses the first interface matching the request, in accordance with
the routing configuration. The packet source is not verified. Reply
packets might be forwarded through another interface, if multiple
interfaces capable of doing so are available. In very special
configurations, checking the physical source of packets cannot
be required.
DSL/DHCP
Explicitly restricts rule processing to the specified dynamic
network interface (if installed and configured).
WIFI/WIFI2/WIFI3
Explicitly restricts rule processing to the specified Wi-Fi network
interface (if installed and configured).
VPNClients
Explicitly restricts rule processing to the specified virtual network
interface of a VPN client (if installed and configured).
3G
Explicitly restricts rule processing to the specified 3G network
interface (if installed and configured).
SYN Flood Protection – SYN flood protection protects from a popular kind of DoS attack against computer systems. The Barracuda
Firewall can eliminate SYN flooding attacks for inbound or outbound attacks. The firewall completes the handshake and only
then performs a handshake with the actual target. This helps to protect the target from SYN flood attacks. Disabling SYN flood protection
can cause an overhead in packet transmission but can speed up interactive protocols like SSH.
Firewall Rules Order
You can view the firewall rules on the FIREWALL > Firewall Rules page. The firewall rules are processed from top to bottom to determine if the
traffic matches the criteria. Because the first matching rule is executed to handle the network traffic, ensure that you arrange your rules in the
correct order.
To change the order of the firewall rules:
1. Go to the FIREWALL > Firewall Rules page.
2. Drag rules up or down in the table. If you want a rule to be executed, drag it above the BLOCKALL rule.
3. After you finish adjusting the order of the firewall rules, click Save Changes. Otherwise, your changes will not take effect.
Pre-Installed Firewall Rules
The Barracuda Firewall comes with a set of pre-installed firewall rules. Initially, you can use the appliance without any changes to these rules.
Eventually, you might want to customize the rules or enable the pre-installed rules that are disabled initially. Understanding the pre-installed rules
can help you create your own rules.
On the FIREWALL > Firewall Rules page, you can view the following pre-installed firewall rules:
P1-P3-BRIDGE
LAN-2-BARRACUDA-SERVERS
LOCALDNSCACHE-WIFI
LOCALDNSCACHE
TRANSPARENT-PROXY-WIFI
TRANSPARENT-PROXY
LAN-2-INTERNET-SIP
INTERNET-2-LAN-SIP
LAN-2-INTERNET
WIFI-2-INTERNET
LAN-2-LAN
VPNCLIENTS-2-LAN
WIFI-2-LAN
BLOCKALL
P1-P3-BRIDGE
This rule creates a bridge between port p1 and port p3. All traffic passes between the two ports. The rule is useful when you first get the
Barracuda Firewall and want to evaluate the appliance at your desk. Follow the instructions in the Barracuda Firewall Quick Start Guide to
connect port p1 to the LAN and port p3 to your PC. This configuration gives the Barracuda Firewall access to the Internet, lets you look at traffic,
and lets you continue to use your PC for other purposes during the evaluation period.
When you are finished with your evaluation and move the Barracuda Firewall into production, you can delete this rule.
LAN-2-BARRACUDA-SERVERS
This rule allows the traffic from the trusted LAN to reach the Barracuda Networks update servers. The rule is required for initial activation as well
as ongoing firmware and security updates.
LOCALDNSCACHE-WIFI
This rule automatically redirects all DNS requests from a separate Wi-Fi network on interface ath0 to the local caching DNS service of the
Barracuda Firewall. The rule is useful for reducing the amount of DNS traffic over the WAN connection and improving DNS resolution speed as
well as security.
If you configure a DNS server in your local network, create a firewall rule that allows TCP and UDP traffic on port 53 from the IP addresses of your
local DNS servers to the Internet. Place this rule above the LOCALDNSCACHE and LOCALDNSCACHE-WIFI rules.
LOCALDNSCACHE
This rule automatically redirects all DNS requests from the trusted LAN to the local caching DNS service of the Barracuda Firewall. The rule is
useful for reducing the amount of DNS traffic over the WAN connection and improving DNS resolution speed as well as security.
If you configure a DNS server in your local network, create a firewall rule that allows TCP and UDP traffic on port 53 from the IP addresses of
your local DNS servers to the Internet. You should place this rule above the LOCALDNSCACHE and LOCALDNSCACHE-WIFI rules.
TRANSPARENT-PROXY-WIFI
If enabled, this rule automatically redirects all HTTP requests on TCP port 80 from a separate Wi-Fi network on interface ath0 to the local proxy
of the Barracuda Firewall. Depending on the proxy configuration (NETWORK > Proxy), web traffic is either scanned by Barracuda Web Security
Flex or forwarded to a different proxy service.
TRANSPARENT-PROXY
If enabled, this rule automatically redirects all HTTP requests on TCP port 80 to the local proxy of the Barracuda Firewall. Depending on the proxy
configuration (NETWORK > Proxy), web traffic is either scanned by Barracuda Web Security Flex or forwarded to a different proxy service.
LAN-2-INTERNET-SIP
If enabled, this rule automatically redirects all SIP requests from the trusted LAN to the local SIP proxy. It allows SIP communication through the
Barracuda Firewall.
INTERNET-2-LAN-SIP
If enabled, this rule automatically redirects all SIP requests from any IP address to the local SIP proxy. It allows SIP communication from the
Internet through the Barracuda Firewall.
LAN-2-INTERNET
This rule allows network traffic for all types of data from the trusted LAN to the Internet. It allows unrestricted access to the Internet for all hosts
within the trusted LAN segment.
WIFI-2-INTERNET
This rule allows traffic from the Wi-Fi network coming in through interface ath0 unrestricted access to the Internet.
LAN-2-LAN
This rule allows network traffic for all types of data from one trusted LAN to another. It allows unrestricted network traffic between hosts residing in
different LAN segments that are classified as trusted.
VPNCLIENTS-2-LAN
This rule allows unrestricted access for VPN clients coming in through interface pvpn0 to the trusted LAN. This includes PPTP-based access.
WIFI-2-LAN
This rule allows unrestricted access from the Wi-Fi network coming in through interface ath0 to the trusted LAN.
BLOCKALL
This rule blocks all incoming and outgoing network traffic that is not handled by the firewall rules that are placed above it in the rule set.
Connection Objects
The connection object defines the egress interface and source (NAT) IP address for traffic matching the firewall rule. If a source IP address is
specified, the appropriate link will be used based on the routing table. If an interface is specified, the appropriate source IP address will be used
based on the routing table.
You can use the predefined connection objects or you can create connection objects.
In this article:
Define a Connection Object
Predefined Connection Objects
Failover and Link Load Balancing
Example – HTTP and HTTPS Traffic to the Internet
Define a Connection Object
To add or edit new connection objects, go to the FIREWALL > Connection Objects page. Connection objects include the following settings:
Setting
Description
Connection Timeout
The time in seconds to allow before a failing connection skips to the
next fallback level. For a faster failover, enter lower values. For
congested connections, enter longer values. Default: 30.
NAT Type
The type of NAT to use. The availability of the following settings
depends on the NAT type that you select. This setting lets you specify
which source IP address and interface are to be used in case of
fallback. This is especially important if you are using multiple ISPs.
Connecting via the backup provider using the wrong source IP
address causes the return traffic routing to fail.
Select one of these options:
Dynamic Source NAT – The firewall uses the routing table to
find a suitable interface for routing the packet and uses the IP
address of the relevant interface as the new source IP address.
No Source NAT – The original source IP address of the packet
is not changed.
From Interface – Source NAT using the first IP address on the
interface that is selected from the Interface list.
Explicit – Uses the IP address that is entered in the Explicit IP
Address field.
Proxy ARP
If the explicitly defined IP address does not exist locally, select this
check box to create an appropriate Proxy ARP entry. This option is
only available if Explicit has been chosen as NAT Type.
Proxy ARP makes it possible for ARP requests to be answered for IP
addresses that are not implemented in the Barracuda Firewall.
PAT
Uses Port Address Translation (PAT). PAT is also known as NAT
overloading. PAT extends NAT so that port numbers are also
translated. Use it to pool several private IP addresses to one public IP
address. PAT can be enabled or disabled if you select either From
Interface or Explicit from the NAT Type list. It is always enabled for
Dynamic Source NAT and it is always disabled for No Source NAT.
Weight
Assigns a weight number to this interface. This is only used if the Mul
tilink Policy selected in the Failover and Load Balancing section is
Weighted Round Robin. Specify the value relative to the weights
assigned to the other interfaces. A higher value means that this
interface is used proportionally more.
Predefined Connection Objects
Name
Description
Default (SNAT)
Source NAT using the local IP address obtained from a routing
lookup to the destination.
No SNAT
Connection is established using the original source IP address.
SNAT with DSL IP
Source NAT using the first IP address found on DSL interface ppp1.
SNAT with 3G IP
Source NAT using the first IP address found on 3G interface ppp5.
SNAT with DHCP IP
Source NAT using the first IP address found on interface dhcp.
Failover and Link Load Balancing
Multiple source IP addresses and interfaces can be specified in the same connection object. This allows failover or session-based balancing
between up to four links. Balancing can be achieved using either a round robin or weighted random algorithm. For more information, see Exampl
e - Creating Connection Objects for Failover and Link Balancing.
Example – HTTP and HTTPS Traffic to the Internet
To allow HTTP and HTTPS connections from the local 192.168.200.0/24 network to the Internet, the Barracuda Firewall must perform
source-based NAT. Instead of using the source IP address from the client residing in the LAN, the connection is established between the WAN IP
address of the Barracuda Firewall and the destination IP address. Reply packets belonging to this session are replaced with the client's IP
address within the LAN.
For this example, use the predefined Default (SNAT) connection object. It automatically uses the WAN IP address of the ISP uplink with the
lowest metric according to the Barracuda Firewall's routing table.
Service Objects
A service object contains a list of TCP/UDP ports for a service. To reference network services when you create firewall rules, you can use the
predefined service objects. If you want to reference custom services that are not in the default list or services on a non-standard port, you can
create custom service objects.
In this article:
Create a Custom Service Object
Edit a Custom Service Object
Delete a Custom Service Object
Create a Custom Service Object
Before you begin, list the TCP ports and UDP ports that the custom service requires.
To create a custom service object:
1. Go to the FIREWALL > Service Objects page.
2. In the Custom Service Objects section, click Add Service Object.
3. In the Add Service Object window, include existing service objects or explicitly define each service that you want to add to the object.
4. Click Add. The custom service object is then listed in the Custom Service Objects section.
Edit a Custom Service Object
To edit a custom service object:
1. Go to the FIREWALL > Service Objects page.
2.
2. In the Custom Service Objects section, click the edit symbol (
) for the custom service object that you want to edit.
3. In the Edit Service Object window, edit the services for the object.
4. Click Save.
Delete a Custom Service Object
To delete a custom service object:
1. Go to the FIREWALL > Service Objects page.
2. In the Custom Service Objects section, click the trash can icon (
) for the custom service object that you want to delete.
3. When a window opens to ask if you want to delete the service object, click OK.
Interface Groups
In a firewall rule, the interface group specifies the interface that the source address is allowed to use. The following
table describes the predefined interface groups:
Interface Group
Description
Matching
Ensures that arriving packets are processed through the same
interface that is used to forward the corresponding reply packets. The
source and destination addresses are the same. This method helps
prevent a network attack in which an attacker might try using internal
addresses from outside the internal network (IP spoofing).
Any
Uses the first interface matching the request, according to the routing
table. The packet source is not verified. Reply packets might be
forwarded through another interface, if another interface that is
capable of doing so is available. In very special configurations,
checking the physical source of packets cannot be required. For
security reasons, this option should only be used in very limited
situations.
DSL/DHCP
Explicitly restricts rule processing to the specified dynamic network
interface (if installed and configured).
WIFI/WIFI2/WIFI3
Explicitly restricts rule processing to the specified Wi-Fi network
interface (if installed and configured).
VPNClients
Explicitly restricts rule processing to the specified virtual network
interface of a VPN client (if installed and configured).
3G
Explicitly restricts rule processing to the specified 3G network
interface (if installed and configured).
On the NETWORK > Interface Groups page, you can see the existing interface groups and create new groups.
Link Balancing
On the Barracuda Firewall, you can configure inbound link balancing, outbound link balancing, and inbound load balancing. Link balancing is also
sometimes called "link aggregation."
In this article:
Inbound Link Balancing
Outbound Link Balancing
Inbound Load Balancing
Inbound Link Balancing
You can use DNS to balance inbound traffic among multiple links. You can associate your domain name (or names) with multiple IP addresses,
each of which represents an external interface. When the DNS request for the domain name is resolved, all of these IP addresses are included in
the answer. The resolver can vary the order of the addresses, and the requester uses the first entry in the list to access your site.
You can either register your domain name with an independent entity or configure the Barracuda Firewall as the authoritative DNS resolver for the
domain name. To learn more about authoritative DNS on the Barracuda Firewall, see How to Configure Authoritative DNS.
Outbound Link Balancing
To achieve outbound link load balancing, create a connection object that balances the traffic among multiple links. Then use this connection
object in the firewall rules that direct outgoing traffic.
The connection object specifies what happens if multiple links are configured. Options include:
If one interface becomes unavailable, then the traffic fails over to the next available link in the sequence.
Use a set of interfaces in weighted-round robin fashion. You can specify the weights for each interface in the connection object.
Randomly choose one of a list of interfaces.
For more information about configuring connection objects, see Example - Creating Connection Objects for Failover and Link Balancing.
Inbound Load Balancing
To configure inbound load balancing (for example, where traffic is distributed to one of many servers), you can create a DNAT firewall rule that
redirects traffic that was sent to a specific IP address to a load balancer.
Intrusion Prevention System or IPS
To report and instantly block suspicious network traffic from passing the Barracuda Firewall, the Intrusion Prevention System (IPS) actively scans
forwarded network traffic for malicious activities and known attack patterns. The IPS engine analyzes network traffic and continuously compares
the bitstream with its internal signature database for known attack patterns. To increase security, the IPS system offers TCP stream reassembly
to prevent IP datagram fragmentation before packets are scanned for vulnerabilities. The IPS engine can also inspect HTML requests passing the
firewall.
IPS must be globally enabled on a Barracuda Firewall. However, you can enable or disable IPS for each firewall rule. Enabling IPS on a per-rule
basis lets you select which network traffic is scanned for threats. For example, you can choose to enable IPS scanning only for network traffic that
travels from and to the DMZ. When IPS is enabled in a firewall rule, the default IPS policy of Report Mode or Enforce Mode is used. In Report
Mode, the Barracuda Firewall reports detected attacks instead of immediately blocking network traffic. This mode is recommended after the initial
deployment of IPS to prevent traffic from being incorrectly blocked. However, you can prevent false positives when the IPS engine operates in
Enforce Mode by creating IPS exceptions.
In this article:
Enable and Configure IPS
Step 1. Enable IPS
Step 2. Adjust the Event Policy
Step 3. Configure IPS in Firewall Rules
Configure IPS Exceptions
Enable and Configure IPS
To enable and configure IPS, complete the following steps:
Step 1. Enable IPS
To enable IPS on the Barracuda Firewall:
1.
2.
3.
4.
Go to the FIREWALL > Intrusion Prevention page.
In the Intrusion Prevention section, set Enable Intrusion Prevention System to Yes.
Configure the Enable and Default IPS Policy settings.
Click Save Changes.
Step 2. Adjust the Event Policy
On the FIREWALL > Intrusion Prevention page, in the Event Policy section, define the actions to be taken when the IPS engine detects
suspicious network traffic with the following threat levels: Critical, High, Medium, Low, and Information. When the Barracuda Firewall operates
in Report Mode, you can only adjust the Log settings. When the firewall operates in Enforce Mode, you can also modify the Action for each
severity.
Available Action settings include:
Drop – Blocks network traffic where malicious activities were detected.
Log Only – Reports network traffic where malicious activities were detected.
None – No action is taken.
Available Log settings include:
Alert
Warn
Notice
You can view detected threats on the BASIC > IPS Events page.
Step 3. Configure IPS in Firewall Rules
To configure IPS in a firewall rule:
1.
2.
3.
4.
Go to the FIREWALL > Firewall Rules page.
Open an existing rule or create a new one.
In the Add/Edit Access Rule window, click the Advanced tab.
Next to Intrusion Prevention, select an option to disable or enable IPS:
Default (Report Mode or Enforce Mode) – Applies the default IPS policy to the rule.
Disabled – Disables IPS scanning for the rule.
5. Click Save.
Configure IPS Exceptions
If you must allow network traffic that the Barracuda Firewall has detected as a threat, you can create an IPS exception.
Before you create the IPS exception, get the description or CVE-ID of the threat:
1. Go to the BASIC > IPS Events page.
2. Browse through the list of detected threats or apply filters to locate specific entries.
3. Get the attack description text in the Info column, or, if available, the CVE-ID of the detected threat.
To create the IPS exception:
1. Go to the ADVANCED > IPS Exceptions page.
2. Click Add IPS Exception.
3. In the IPS Exceptions window, specify the traffic to be handled and the action to be performed by the exception.
4.
Click Add.
How to Control Traffic for Applications
To block, allow, report, or throttle network traffic for specific application types, enable Application Control. It uses Layer 7 deep packet inspection
to detect and prioritize traffic for services like instant messaging, social networking, or video streaming. It can even detect applications that try to
evade pattern-based detection mechanisms by port-hopping, protocol obfuscation, or traffic encryption.
You can select the following policies to control traffic:
Application Detection Policy
Description
Limit Bandwidth
Limits the bandwidth of traffic. Depending on the QoS band that you
select, traffic is either slowed down or choked. Choking traffic assigns
0.1% of the available bandwidth to the application, making it unusably
slow without sending connection error messages to users.
For more information on QoS, see How to Configure Bandwidth
Policies or QoS.
Drop
Drops the connection and displays an error message stating that the
connection is not possible or has been denied.
Report All
Lists detected applications on the BASIC > Recent Connections pa
ge.
Follow the instructions in this article to enable Application Control and then configure it in firewall rules.
In this article:
Step 1. Enable Application Control
Step 2. Configure the Firewall Rule
Step 3. Verify the Order of the Firewall Rules
Monitoring Traffic for Controlled Applications
Step 1. Enable Application Control
To block application traffic, you must first enable Application Control and define the default policy.
1. Go to the FIREWALL > Settings page.
2. Select the following settings in the Firewall Policy Settings section:
Enable Application Detection: Yes
Default Application Detection Policy: Drop | Report All | Limit Bandwidth
3. Click Save Changes.
Step 2. Configure the Firewall Rule
After you enable Application Control, configure firewall rules with the filter patterns for the applications that you want to limit or block. The
pre-installed LAN-2-INTERNET firewall rule allows network traffic for all types of data from the trusted LAN to the Internet. You can edit
the LAN-2-INTERNET rule or create a new firewall rule if required.
Because Application Control can impact the performance of the Barracuda Firewall, be as specific as possible with firewall rule settings.
To edit the LAN-2-INTERNET rule:
1. Go to the FIREWALL > Firewall Rules page.
2. Edit the LAN-2-INTERNET firewall rule.
LAN-2-INTERNET Default Settings
Action
Source
Destination
Service
Interface Group
Connection
Allow
Trusted LAN
Internet
Any
Matching (matches
all interfaces)
SNAT (Source NAT
using local IP
address obtained
from a routing
lookup to the
destination)
3. In the Edit Access Rule window, click the Applications/Bandwidth tab and configure the following settings:
3.
Applications Policy – Select one of the following policies:
Default (Default Application Detection Policy)
Report All – Report on the BASIC > IPS Events page.
Limit Bandwidth (Default Bandwidth Policy) – The Default Bandwidth Policy can be changed using the FIREWALL >
Settings page. By default, this is set to Choke, i.e., to give the unwanted applications just enough bandwidth that they
will not seek another way to send traffic.
Drop – Do not pass the traffic.
Application Filter – Add the applications that you want to apply the rule to.
To create a rule for video streams, such as YouTube videos, add STREAM-FLASH.
To create a rule for Facebook, add STD-FACEBOOK.
4.
To create a rule for Skype, add IM-SKYPE_AUDIO , IM-SKYPE_OUT , and P2P-SKYPE.
Click Save . A "Configuration updated" message displays at the top of the Firewall Rules page.
Step 3. Verify the Order of the Firewall Rules
Because rules are processed from top to bottom, arrange your rules in the correct order. You must especially ensure that your rules are placed
above the BLOCKALL rule; otherwise, the rules are blocked. After adjusting the order of the rules, click Save Changes.
Monitoring Traffic for Controlled Applications
To view blocked or throttled connections, go to the BASIC > Recent Connections page. In the Service column for each connection, the
controlled application is listed. To view specific connections, you can filter the list of recent connections.
How to Create User-Aware Firewall Rules
To control traffic for certain users, you can configure a user-aware firewall rule. First, create a user object that includes the users whose traffic you
want to control. Because users are included by their login names or authentication groups, ensure that you have set up your external or local
authentication method. After creating the user object, apply it to the firewall rule.
In this article:
Step 1. Create a User Object
Step 2. Apply the User Object to a Firewall Rule
Step 3. Verify the Order of the Firewall Rules
Step 1. Create a User Object
Before you begin:
Because users are included by their login names or authentication groups, verify that you have set up authentication. For more information, see:
How to Integrate with an External Authentication Service
How to Configure Local Authentication
To create a user object:
1.
2.
3.
4.
5.
6.
7.
Go to the FIREWALL > User Objects page.
Click Create User Object.
Enter a name for the user object.
(Optional) Enter a description for the user object.
To include an existing user object, click the User tab.
To include users by login name or group, click the Group tab.
At the bottom of the window, click Add.
Step 2. Apply the User Object to a Firewall Rule
To apply the user object to a firewall rule:
1.
2.
3.
4.
Go to the FIREWALL > Firewall Rules page.
Create or edit a firewall rule.
In the rule editor window, click the Users/Time tab.
In the Users section, add the user objects that include the users whose traffic should be handled by the rule.
4.
5. At the top of the rule editor window, click Add or Save.
Step 3. Verify the Order of the Firewall Rules
Because rules are processed from top to bottom, ensure that you arrange your rules in the correct order. You must especially ensure that your
rules are placed above the BLOCKALL rule; otherwise, the rules are blocked.
After adjusting the order of rules in the rule set, click Save Changes.
How to Configure Bandwidth Policies or QoS
Limited network resources make bandwidth prioritization necessary. To ensure that important business critical applications are given enough
bandwidth, the Barracuda Firewall provides traffic shaping (also known as "packet shaping" and "Quality of Service") methods to let you prioritize
network resources according to factors such as the time of day, application type, and user identity. You can identify the traffic and assign its
priority using firewall rules.
In this article:
Bandwidth Policies
Queues and Rate Limits
Customize the Class Weights and Rate Limits
Assign a Bandwidth Policy to a Firewall Rule
Monitor Bandwidth Policy Assignment
Bandwidth Policies
There are eight different bandwidth policies. They are listed in the following table, in order of decreasing priority:
Bandwidth Policy
Description
VoIP
Highest priority before all other bandwidth policies. Traffic is sent with
no delay.
Interactive
Highest priority.
Business
Very high priority.
Internet
Medium priority. If more than 10 MB of data is transferred in one
session, then the priority of the traffic in that session drops to the
same as Background.
Background
Next lower priority.
Low
Low priority. Low and Lowest Priority are limited to 5% of the
available bandwidth.
Lowest Priority
Lowest priority. Low and Lowest Priority are limited to 5% of the
available bandwidth.
Choke
Applications assigned this are unusable but will not seek another way
to send traffic. For example, if you wish to block Skype traffic, assign
this policy to the Skype application.
Queues and Rate Limits
The following diagram shows how the eight bandwidth policies are divided into queues:
The Priority Queues always take precedence.
The Regular Queues can use unlimited bandwidth.
The Rate Limiting Queues are collectively limited to 5% of the maximum link bandwidth.
The rate limits always apply, so even if there is no other traffic, the traffic in the Rate Limiting Queues never uses more than 5% of the bandwidth.
The classes within the Regular and Rate Limiting queues are weighted relative to the other classes in the same
queue. Class weights are enforced only when the link is saturated.
Customize the Class Weights and Rate Limits
On the FIREWALL > QoS page, you can set the weight ratios for the classes within the same queue and modify some of the rate limits.
Assign a Bandwidth Policy to a Firewall Rule
Before you begin, verify that you specified a bandwidth for each interface on which you want to enable QoS:
1. Go to the NETWORK > IP Configuration page.
2. In the Network Interface Configuration section, select the interface and click the No/Yes link in the Use QoS column.
3. Enter the bandwidth assigned by your ISP for outbound and inbound connections.
To assign a bandwidth policy to a firewall rule:
1. Go to FIREWALL > Firewall Rules and edit the rule.
2. Click the Applications/Bandwidth tab.
3. From the Bandwidth Policy list, select the bandwidth policy.
Monitor Bandwidth Policy Assignment
To monitor which bandwidth policy is assigned to active network sessions, go to the BASIC > Active Connections page. The assigned policy of
a network session is displayed in the Bandwidth Policy column. You can also manually override the assigned bandwidth policy by using the
drop-down menu in the Bandwidth Policy column.
How to Configure the Captive Portal
With the captive portal, you can control access to the Internet or other networks. Unauthenticated users from specific network segments or
network interfaces must log in before they are granted access. Users who have already been authenticated or have been identified by the
Barracuda DC Agent are not prompted to log in.
In this article:
Configure the Captive Portal
Upload a Certificate
Monitoring and Managing Authentication Users
Configure the Captive Portal
Before you begin:
Verify that the confirmation message and ticketing features are disabled. Go to the NETWORK > IP Configuration page, and edit the
relevant Wi-Fi interface to specify that there is no Landing Page.
Before configuring the captive portal for use with Wi-Fi, see How to Configure Wi-Fi to verify that you have correctly configured Wi-Fi.
Also ensure that users are connected to the Wi-Fi network of the Barracuda Firewall.
To configure the captive portal:
1. Go to the FIREWALL > Captive Portal page.
2. In the Basic Configuration section, enable the captive portal, specify the networks from which unauthenticated users are redirected to
the captive portal, select the method of authenticating users, and edit the user access policies.
3. If you are using local authentication, go to the USERS > Local Authentication page to create your list of allowed users and groups.
4. On the FIREWALL > Firewall Rules page, set up a firewall rule (plus one for Wi-Fi, if applicable) to allow traffic for authenticated users.
For example, you can create a firewall rule with the following settings to allow successfully authenticated users from a Wi-Fi network at
192.168.201.0/24 to access the Internet. When using the default firewall rules of a Barracuda Firewall, no additional rule is necessary
because the LAN-2-Internet rule allows Internet access from the trusted LAN.
General tab
Action: Allow
Connection: Dynamic SNAT
Service: HTTP+S
Source: 192.168.201.0/24
Destination: Internet (Network Object)
Users/Time tab
Add All Authenticated Users.
5. Add a firewall rule that blocks unauthenticated users on the captive portal network. Place this rule under your custom rule or below the L
AN-2-Internet rule.
General tab
Action: Block
Service: Any
Source: 192.168.201.0/24
Destination: Any (Network Object)
Users/Time tab
Authenticated Users must be empty.
Barracuda Networks recommends that you select Unclassified for the Classification of the network interface that serves the captive
portal.
Upload a Certificate
To avoid browser warnings because of a self-signed certificate offered by the authentication page of the captive portal, you can upload your own
trusted server certificate to the Barracuda Firewall. Install either the trusted server certificate (self-signed) or the issuer certificate (CA-signed) on
redirected clients to let browsers verify the identity of the captive portal page.
To upload a certificate to the Barracuda Firewall:
1. Go to the VPN > Certificates page.
2. In the Upload Certificate section, click Browse, select the certificate (either in PKCS12 or PEM format), and click Upload Now.
Ensure that the Common Name field of the certificate contains a DNS-resolvable hostname or an IP address that is reachable
via the Barracuda Firewall.
3. Go to the FIREWALL > Captive Portal page, select the newly-installed certificate from the Signed Certificate list, and click Save
Changes.
Monitoring and Managing Authentication Users
On the BASIC > User Activity page, you can view currently authenticated users. You can also disconnect specific users.
Example - Allowing HTTP Traffic
When you configure firewall rules to allow network traffic, you can choose to allow traffic only for certain types of traffic that are passing to and
from specific networks. You might want to create rules that allow wanted traffic to pass, and then use the BLOCKALL rule to block all other types
of traffic.
This article provides an example of how to configure a firewall rule that only allows HTTP and HTTPS connections from the local
192.168.200.0/24 network to the Internet.
In this article:
Step 1. Create the Firewall Rule to Allow Traffic
Step 2. Verify the Order of the Firewall Rules
Step 1. Create the Firewall Rule to Allow Traffic
To create the firewall rule:
1.
2.
3.
4.
Go to the FIREWALL > Firewall Rules page.
Click Add Access Rule to create a new firewall rule.
In the Add Access Rule window, enter a name and description for the rule.
Specify the following settings:
Action
Connection
Service
Source
Destination
Allow
Default (SNAT)
HTTP+S
192.168.200.0/24
Internet
To allow HTTP and HTTPS connections from the local 192.168.200.0/24 network (class C) to the Internet, the Barracuda Firewall must
perform source-based NAT. The source IP address of outgoing packets is changed from that of the client residing in the LAN to the WAN
IP address of the Barracuda Firewall, so the connection is established between the WAN IP address and destination IP address. The
destination address of reply packets belonging to this session is rewritten with the client's IP address.
5. At the top of the Add Access Rule window, click Add.
Step 2. Verify the Order of the Firewall Rules
New rules are created at the bottom of the firewall rule set. Because rules are processed from top to bottom in the rule set, arrange your rules in
the correct order. You must especially ensure that your rules are placed above the BLOCKALL rule; otherwise, the rules are blocked.
After adjusting the order of rules in the rule set, click Save Changes.
Example - Handling SMTP Traffic
You must configure at least one firewall rule to control mail traffic. Direct SMTP traffic to your Barracuda Spam & Virus Firewall or your mail
server. If your mail server supports POP/IMAP access, configure a rule that allows this access. If you have more than one external IP address,
configure a firewall rule to ensure that outgoing traffic uses the correct IP address.
In this article:
Incoming Traffic
Case 1 – Barracuda Spam & Virus Firewall
Case 2 – Barracuda Spam & Virus Firewall and a POP/IMAP Mail Server
Case 3 – Mail Server Only
Verify Firewall Rule Order
Outgoing Traffic
Case 1 – Mail Server Not on Trusted LAN
Case 2 – Multiple Public IP Addresses
Verify Firewall Rule Order
Incoming Traffic
If your mail server or Barracuda Spam & Virus Firewall is on the public network, you might want to allow your Barracuda Firewall to provide
protection and move your mail system onto the internal network. The mail traffic passes through the Barracuda Firewall in both directions.
If the advertised method of receiving email is a dynamically -assigned IP address, use a service such as DynDNS to make a permanent identifier
for your mail server or Barracuda Spam & Virus Firewall. For more information on the DynDNS service, see http://dyn.com/dns/.
As you can see on the FIREWALL > Service Objects page, the Any-EMAIL service object contains the following email protocols: POP2, POP3S,
POP3, IMAP, IMAPS, and SMTP. You can use this object or just the protocols that you want to support. The rules below specify the protocols
explicitly. Configure the firewall rules for the cases that match your scenario, and then verify your firewall rule order.
Case 1 – Barracuda Spam & Virus Firewall
Configure a rule to redirect incoming mail traffic for the Barracuda Spam & Virus Firewall. If you have a Barracuda Spam & Virus Firewall and your
mail server does not support POP or IMAP, this is the only rule that you will need for incoming email traffic.
Go to the FIREWALL > Firewall Rules page and configure the following rule to redirect the incoming mail traffic:
SMTP-2-SPAMFW Values:
Action
Source
Destination
Service
Connection
Redirected To
DNAT
Either the Internet n
etwork object or a
specific public IP
address. For
example, the IP
address of the
hosting provider.
The destination
depends on the
advertised method of
receiving email.
SMTP
No SNAT (the
original source IP
address is used)
The internal static IP
address of the
Barracuda Spam &
Virus Firewall.
If it is one or
more external
static IP
addresses,
enter those
addresses (a
CIDR
summarization
of addresses
can also be
used).
If it is a domain
name which
maps to a
dynamically-ass
igned IP
address, select
the network
object named A
ny .
Case 2 – Barracuda Spam & Virus Firewall and a POP/IMAP Mail Server
If you have a Barracuda Spam & Virus Firewall and you also want to support POP/IMAP traffic from your mail server, then you must add this rule
in addition to the above rule for the Barracuda Spam & Virus Firewall.
Go to the FIREWALL > Firewall Rules page and configure the following rule to redirect the incoming POP/IMAP traffic only to the mail server:
POP-2-INTERNAL Values:
Action
Source
Destination
Service (select
relevant ones)
Connection
Redirected To
DNAT
Either the Internet n
etwork object or a
specific public IP
address. For
example, the IP
address of the
hosting provider.
The destination
depends on the
advertised method of
receiving email.
If it is one or
more external
static IP
addresses,
enter those
addresses (a
CIDR
summarization
of addresses
can also be
used).
If it is a domain
name which
maps to a
dynamically
assigned IP
address, select
the network
object named A
ny.
POP2
POP3
POP3S
IMAP
IMAPS
No SNAT (the
original source IP
address is used)
The internal static IP
address of the mail
server.
Case 3 – Mail Server Only
If you do not have a Barracuda Spam & Virus Firewall, you can redirect the incoming traffic to the mail server that is on your internal network.
Go to the FIREWALL > Firewall Rules page and configure the following rule to redirect the incoming mail traffic:
EMAIL-2-MAIL-SERVER Values:
Action
Source
Destination
Service (select
relevant ones)
Connection
Redirected To
DNAT
Either the Internet n
etwork object or a
specific public IP
address. For
example, the IP
address of the
hosting provider.
The destination
depends on the
advertised method of
receiving email.
SMTP
POP2
POP3
POP3S
IMAP
IMAPS
No SNAT (the
original source IP
address is used)
The internal static IP
address of the mail
If it is one or
more external
static IP
addresses, ente
r those
addresses (a
CIDR
summarization
of addresses
can also be
used).
If it is a domain
name which
maps to a
dynamically
assigned IP
address, select
the network
object named A
ny.
server.
Verify Firewall Rule Order
Verify the order of the firewall rule(s) that you created. New rules are created at the bottom of the firewall rule set. Because rules are processed
from top to bottom in the rule set, arrange your rules in the correct order. You must especially ensure that your rules are placed above
the BLOCKALL rule; otherwise, the rules are blocked. After adjusting the order of rules in the rule set, click Save Changes.
Outgoing Traffic
Outgoing SMTP traffic (for outgoing email) must also be allowed to pass. Depending on the location of your mail server, this traffic might already
be allowed by the pre-installed LAN-2-INTERNET rule. If it is not, or if you want to make an explicit rule anyway, you must add a rule.
Configure the firewall rules for the case that matches your scenario. If you have multiple public IP addresses, follow the instructions in Case 2 Multiple Public IP Addresses to ensure that the traffic leaves on the same IP address that the public MX record points to. If you do not have
multiple IP addresses, follow the instructions in Case 1 - Mail Server Not on Trusted LAN. After configuring the required firewall rule, verify your
firewall rule order.
Case 1 – Mail Server Not on Trusted LAN
Go to the FIREWALL > Firewall Rules page and configure the following rule to allow outgoing SMTP traffic:
SMTP-2-INTERNET Values:
Action
Source
Destination
Service (select relevant
ones)
Connection
Allow
The internal IP address of
the mail server
Internet
SMTP
Default (SNAT)
Case 2 – Multiple Public IP Addresses
If you have multiple external IP addresses and want to force outbound SMTP traffic to use a specific IP address :
1.
2.
Go to the FIREWALL > Connection Objects page and create a connection object that specifies the IP
address that is in the MX record.
Go to the FIREWALL > Firewall Rules page and add the following rule to direct the outgoing mail traffic:
SMTP-2-INTERNET Values:
Action
Source
Destination
Service
Connection
Allow
The internal IP address of
the mail server
Internet
SMTP
A connection object with
the IP address used for
email.
Verify Firewall Rule Order
Move the firewall rule above the pre-installed LAN-2-INTERNET rule. If this rule is under the LAN-2-INTERNET rule,
traffic goes out on the primary IP address, which might not be the correct path. After adjusting the order of rules in
the rule set, click Save Changes .
Example - Allowing SIP-based VoIP Traffic
For SIP-based VoIP traffic, create a forwarding firewall rule that redirects traffic to the internal SIP proxy of the Barracuda Firewall. The SIP proxy
dynamically opens all necessary RTP ports for successful SIP communication through the Barracuda Firewall. You must also create a separate
firewall rule to allow traffic from the Internet to the SIP proxy.
This article provides an example of how to configure firewall rules for VoIP phones that use the same network subnet as the internal SIP server.
The VoIP phones and SIP server are located in the the 192.168.200.0/24 network.
In this article:
Step 1. Configure a Firewall Rule for the Connection from the SIP Server to Internet
Step 2. Configure a Firewall Rule for the Connection from the Internet to the SIP Server
Step 3. Verify the Order of the Rules in the Rule Set
Step 1. Configure a Firewall Rule for the Connection from the SIP Server to Internet
To let SIP-based VoIP communication pass the firewall, configure a forwarding firewall rule that redirects traffic to the SIP proxy. You can create a
new firewall rule or edit an existing rule. This example edits the LAN-2-INTERNET-SIP rule.
1. Go to the FIREWALL > Firewall Rules page.
2. Edit the LAN-2-INTERNET-SIP rule. Ensure that it is enabled. Specify the following settings:
Action
Source
Destination
Redirected To
Redirect to Service
192.168.200.0/24
Internet
SIP
In this example, the Source includes the SIP server and the phones. The Destination specifies the destination of the SIP network traffic
that is allowed. Usually, the destination is the public IP address of your SIP provider. Here, Destination is the predefined Internet networ
k object, but you can also enter the network address of your SIP provider.
3. At the top of the Edit Access Rule window, click Save.
Step 2. Configure a Firewall Rule for the Connection from the Internet to the SIP Server
Configure a separate forwarding firewall rule to allow connections from the Internet to the SIP server. You can create a new firewall rule or edit an
existing rule. This example edits the INTERNET-2-LAN-SIP rule.
1. Go to the FIREWALL > Firewall Rules page.
2. Edit the INTERNET-2-LAN-SIP rule. Ensure that it is enabled. Specify the following settings:
Action
Source
Destination
Redirected To
Redirect to Service
Internet
DHCP1 Local IP
SIP
The Source section specifies the origin of the network traffic that should be allowed. This example uses the predefined Internet network
object, but you can also enter the IP address of your SIP provider.
The Destination section specifies the public IP address that is allowed to receive SIP traffic. This example
uses the predefined DHCP1 Local IP network object, but you can also enter the public IP address.
3. At the top of the Edit Access Rule window, click Add.
Step 3. Verify the Order of the Rules in the Rule Set
Because rules are processed from top to bottom in the rule set, arrange your rules in the correct order. You must especially ensure that your rules
are placed above the BLOCKALL rule; otherwise, the rules are blocked.
After adjusting the order of rules in the rule set, click Save Changes.
Example - Blocking FTP Traffic
If you use the default rules, all traffic is allowed from the LAN to the Internet. If you keep the rules that include Service set to Any , you might
want to add rules that block traffic with specific profiles. For example, you can block certain types of traffic or traffic from certain users.
This article provides an example of how to configure a firewall rule that blocks all FTP traffic from the local LAN to
the Internet.
In this article:
Step 1. Create the Firewall Rule to Block FTP Traffic
Step 2. Verify the Order of the Firewall Rules
Step 1. Create the Firewall Rule to Block FTP Traffic
To create the firewall rule:
1.
2.
3.
4.
Go to the FIREWALL > Firewall Rules page.
Click Add Access Rule to create a new firewall rule.
In the Add Access Rule window, enter a name and description for the rule.
Specify the following settings:
Action
Service
Source
Destination
Block
FTP
Trusted LAN Networks
Internet
5. At the top of the Add Access Rule window, click Add.
Step 2. Verify the Order of the Firewall Rules
New rules are created at the bottom of the firewall rule set. Because rules are processed from top to bottom in the rule set, arrange your rules in
the correct order. In this case, place this rule above the LAN-2-INTERNET rule that allows all traffic from the LAN to the Internet.
After adjusting the order of rules in the rule set, click Save Changes.
Example - Configuring a DNAT Firewall Rule
To reach services running on servers in the DMZ behind the firewall, configure a Destination NAT (DNAT) rule to forward the traffic arriving on
the WAN port to the correct server and port in the DMZ.
This article provides instructions on how to configure a firewall rule for the setup that is displayed in the following figure:
In this article:
Step 1. Configure a DNAT Firewall Rule
Step 2. Verify the Order of the Firewall Rules
Step 1. Configure a DNAT Firewall Rule
This example creates a DNAT firewall rule that allows HTTP traffic from the Internet to the web server residing in the DMZ.
1.
2.
3.
4.
Go to the FIREWALL > Firewall Rules page.
Click Add Access Rule to create a new firewall rule.
In the Add Access Rule window, enter a name and description for the rule.
Specify the following settings:
Action
Connection
Service
Source
Destination
Redirected To
DNAT
Default (SNAT)
HTTP
Internet
80.90.100.200
172.16.10.10:8
080
5. At the top of the Add Access Rule window, click Add.
Step 2. Verify the Order of the Firewall Rules
New rules are created at the bottom of the firewall rule set. Because rules are processed from top to bottom in the rule set, arrange your rules in
the correct order. You must especially ensure that your rules are placed above the BLOCKALL rule; otherwise, the rules are blocked.
After adjusting the order of rules in the rule set, click Save Changes.
Example - Creating Time-Based Firewall Rules
With the Barracuda Firewall, you can configure firewall rules that are only active for specific times or dates. Create a time object for the times that
the firewall rule should be active. Then apply this time object to the firewall rule.
This article provides an example of how to configure a firewall rule that blocks Internet (HTTP and HTTPS) access for two trainees from Monday
to Friday, except during the hours of 11:00 AM to 01:00 PM. The two trainees reside in the 192.168.200.0/24 network segment and use
computers with the 192.168.200.100 and 192.168.200.101 IP addresses.
In this article:
Step 1. Create a Time Object
Step 2. Create the Firewall Rule with the Time Object
Step 3. Verify the Order of the Firewall Rules
Step 1. Create a Time Object
This example configures a time object named Lunch Time that includes all office hours except 11am to 1pm.
1. Go to the FIREWALL > Time Objects page.
2. In the Time Objects section, click Add Time Object.
3. In the Name field, enter Lunch Time.
4. To terminate existing sessions when the firewall rule is applied, set Terminate Existing Sessions to Yes.
5. To define a date range for this time object, select the Use Date Range check box.
6. In the time table of the configuration window, select all days and times when the firewall rule should be active.
7. Click Add to create the time object.
Step 2. Create the Firewall Rule with the Time Object
This example configures a firewall rule named Block-HTTPs-for-trainees that blocks HTTP and HTTPS network traffic from the 192.168.200.100
and 192.168.200.101 IP addresses.
1.
2.
3.
4.
Go to the FIREWALL > Firewall Rules page.
Click Add Access Rule to create a new firewall rule. The Add Access Rule window opens.
Enter a name and description for the rule.
Specify the following settings:
Name
Action
Connection
Service
Block-HTTPS-fo
r-Trainees
Block
Default (SNAT)
HTTP+S
Source
192.168.200
.100
192.168.200
.101
Destination
Internet
Because all other clients in the 192.168.200.0/24 network should not be affected by this rule, the source network is limited to the
192.168.200.100 and 192.168.200.101 IP addresses.
5. Click the Users/Time tab.
6. From the Time Object list, select the time object that you created. For this example, select the Lunch Time object.
7. At the top of the window, click Add.
Step 3. Verify the Order of the Firewall Rules
Because rules are processed from top to bottom in the rule set, arrange your rules in the correct order. For this example, place your time-based
Block rule before any rule that allows Internet access. After adjusting the order of rules in the rule set, click Save Changes.
Example - Limiting Traffic for Applications
With Application Control, you can choose to limit traffic for certain applications. This article provides an example of how to configure the
default Application Control policy and a firewall rule to slow all connections to Facebook.
In this article:
Step 1. Enable Application Control
Step 2. Create a Firewall Rule to Choke Facebook Traffic
Step 3. Verify the Order of the Firewall Rules
Monitoring Traffic for Detected Applications
Step 1. Enable Application Control
Enable Application Control and select the Choke policy.
1. Go to the FIREWALL > Settings page.
2. Next to Enable Application Detection, click Yes.
3. Select the following settings:
Default Application Detection Policy: Limit Bandwidth
Default Bandwidth Policy: Choke
4. Click Save Changes.
Step 2. Create a Firewall Rule to Choke Facebook Traffic
Because Application Control can impact the performance of the Barracuda Firewall, be as specific as possible with firewall rule settings.
The following steps create an example firewall rule named BlockFacebook that chokes traffic for Facebook:
1. Go to the FIREWALL > Firewall Rules page.
2. Click Add Access Rule.
3. In the Add Access Rule window, click the General tab and then specify the following settings:
Name: BlockFacebook
Action: Allow
Service: HTTP+S (Change the Service setting if you want to block or throttle applications that are not HTTP- or HTTPS-based.)
Source: Trusted LAN Networks
Destination: Internet
4. Click the Applications/Bandwidth tab and then specify the following settings:
Applications Policy: Limit Bandwidth (Choke)
Application Filter: STD-FACEBOOK
5. At the top of the Add Access Rule window, click Add.
Step 3. Verify the Order of the Firewall Rules
Because rules are processed from top to bottom, arrange your rules in the correct order. You must especially ensure that your rules are placed
above the BLOCKALL rule; otherwise, the rules are blocked.
After adjusting the order of the rules, click Save Changes.
For more information, see Firewall Rules Order.
Monitoring Traffic for Detected Applications
To view blocked or throttled connections, go to the BASIC > IPS Events page. In the Service column for each connection, the detected
application is listed. To view specific connections, you can filter the list of recent connections.
Example - Creating Connection Objects for Failover and Link Balancing
To balance traffic among multiple links, create a firewall rule that uses a connection object that you configure. This
connection object references all of the links and configures how to balance the traffic among them. You can also
specify one link that is used for all the traffic matching the firewall rule, as long as it is available. If that link fails, then
the next link is used in its place.
To create the connection object:
1. Go to the FIREWALL > Connection Objects page.
2. Click Add Connection Object.
3. From the NAT Type list in the Add Connection Object window, select either Explicit (to use the IP address that you specify) or From In
terface (to use the IP address of the link).
4. In the Failover and Load Balancing section, configure the following settings:
Multilink Policy – Defines what happens if multiple links are configured. Available policies are:
None – No fallback or source address cycling. This is not what you want for this object.
Failover – Falls back to the first alternate addresses and interface, called Alternate 1. If Alternate 1 fails, fail over to
Alternate 2 and so on. When the original link (the one configured in the top section) becomes available, the Barracuda
Firewall automatically resumes directing traffic to that interface.
Weighted Round Robin – Uses the IP addresses and interfaces configured as Alternate 1, 2, and 3, along with this
interface, in weighted-round robin fashion.
Random – Randomly uses one of the available IP addresses and interfaces specified in this object.
Specify the following for each of the alternate links:
NAT Type – Select one of these options:
From Interface – Source NAT using the first IP address on the interface selected from the Interface list.
Explicit – Uses the IP address in the IP address field.
Weight – Only used for the weighted round robin policy. The weight numbers represent the traffic balancing ratio of the
available links. The higher the relative number, the more the link is used. For example, if four links are configured in this
object, weight values of 6, 2, 1, and 1 mean that traffic is balanced over the configured interfaces in a ratio of 6:2:1:1. As
a result, 60% percent of the traffic passes over Link #1, 20% of the traffic passes over Alternate 1, 10% of the traffic is
directed to Alternate 2, and 10% to Alternate 3.
5. Click Add.
After you have successfully created this connection object, you can go to the FIREWALL > Firewall Rules page and apply it to a rule that directs
outgoing traffic.
Example - Routing Traffic Over Two Different ISP Connections
The Barracuda Firewall can classify and identify traffic to be routed via specific links.
There are predefined connection objects for a number of ISP uplink types. In addition,
you can create your own connection objects. The connection object defines the egress
interface and source (NAT) IP address for traffic matching the firewall rule.
To route traffic over different ISP connections, you must configure a firewall rule for
each connection type.
This article provides an example of how to configure firewall rules to route HTTP traffic
through a primary ISP connection and FTP traffic through a secondary ISP connection.
The following settings are used for the example scenario:
ISP
Type
Service
Metric
Primary ISP (80
Mbit)
Static IP
assignment
HTTP
100
Secondary ISP (4
0 Mbit)
Dynamic
assignment
FTP
200
In this article:
Step 1. Create a Firewall Rule for HTTP Traffic
Step 2. Create a Firewall Rule for FTP Traffic
Step 3. Verify the Order of the Firewall Rules
Step 4. Verify the Routing Configuration
Related Articles
Connection Objects
Example - Creating Connection
Objects for Failover and Link
Balancing
Step 1. Create a Firewall Rule for HTTP Traffic
This example creates a firewall rule named LAN-2-INTERNET-HTTP that passes HTTP traffic from the 10.0.10.0/24 network to the Internet.
1. Go to the FIREWALL > Firewall Rules page.
2. Click Add Access Rule to create a new firewall rule.
3. Specify the following settings:
Name
Action
Connection
Service
Source
Destination
LAN-2-INTERNET
-HTTP
Allow
Default (SNAT)
HTTP
10.0.10.0/24
Internet
The Default (SNAT) connection object makes the Barracuda Firewall perform source NAT with the IP address of the interface with the
lowest metric (as determined by a routing table lookup). If the primary link is unavailable, HTTP traffic is directed to the secondary link.
4. At the top of the Add Access Rule window, click Add.
Step 2. Create a Firewall Rule for FTP Traffic
This example creates a firewall rule named LAN-2-INTERNET-FTP that passes FTP traffic from the 10.0.10.0/24 network to the Internet.
1. Go to the FIREWALL > Firewall Rules page.
2. Click Add Access Rule to create a new firewall rule.
3. Specify the following settings:
Name
Action
Connection
LAN-2-INTERNET
-FTP
Allow
SNAT with DHCP
IP
Service
FTP
Source
Destination
10.0.10.0/24
Internet
The SNAT with DHCP IP connection object makes the Barracuda Firewall perform source NAT with the first IP address of the DHCP
interface. If this link becomes unavailable, the traffic is dropped. No failover to another link will occur. If you want failover to occur, you
can create a new connection object that includes both links and specifies which one is used as the failover link. For more information,
see Example - Creating Connection Objects for Failover and Link Balancing.
4. At the top of the Add Access Rule window, click Add.
Step 3. Verify the Order of the Firewall Rules
New rules are created at the bottom of the firewall rule set. Because rules are processed from top to bottom, arrange your rules in the correct
order. You must especially ensure that your rules are placed above the BLOCKALL rule; otherwise, the rules are blocked.
After adjusting the order of rules in the rule set, click Save Changes.
Step 4. Verify the Routing Configuration
To verify that traffic is routed correctly according to your firewall rules:
1. Go to the BASIC > Active Routes page and check the routing table.
By default, routing always prioritizes the interface with the lowest metric configured in the firewall routing settings.
2. Go to the BASIC > Recent Connections page and filter the entries for your service types.
Example - Configuring Dual ISPs with Automatic Failover
On the Barracuda Firewall, you can configure redundant ISPs with automatic failover.
The primary uplink can be a 3G, DHCP, or WAN connection with static or dynamic IP
address assignment.
This article provides an example of how to configure two redundant ISPs.
In this article:
Configure Dual ISP Routing
Verify Your Configuration
Configuring a Firewall Rule for Failover
Related Articles
Connection Objects
How to Create Connection Objects
for Failover and Link Balancing
Configure Dual ISP Routing
Before you begin:
Configure two ISPs as described in How to Configure WAN Interfaces.
To configure dual ISP routing:
1. Go to the NETWORK > IP Configuration page.
2. In the configurations for the primary and secondary interfaces, edit the Metric setting to specify the route priority. In a multiprovider config
uration, the Barracuda Firewall selects the interface with the lowest metric value for outgoing traffic, assuming that it is available. Specify
a higher metric value for the secondary or backup ISP uplink. For example, use the following values for your primary and secondary
interfaces:
Primary ISP Metric: 100
Secondary ISP Metric: 200
3. Click Save Changes.
4. At the top of the page, click on the warning message to execute the new network configuration.
Verify Your Configuration
To verify your routing configurations, go to the following pages:
BASIC > Active Routes
BASIC > Active Connections
Configuring a Firewall Rule for Failover
To automatically failover from the primary to the secondary ISP, use the Default (SNAT) connection object in the firewall rule. The Default (SNAT)
connection object makes the Barracuda Firewall perform a source NAT using the local IP address obtained from a routing lookup to the
destination.
Managing Users and Groups
For user and group authentication, you can either administer users locally on the Barracuda Firewall or integrate the Barracuda Firewall with an
external authentication server. You can use the information from these authentication services when you configure VPNs, user-aware firewall
rules, and the captive portal.
To manage guest access to the network, you can use a confirmation page or a guest ticketing system.
Local Authentication
If no external authentication servers are available, you can administer users with the local authentication service.
For instructions on how to set up local authentication, see How to Configure Local Authentication.
External Authentication Servers
The following external authentication servers are supported:
Microsoft Active Directory
Barracuda DC Agent
NTLM
MS-CHAPv2
LDAP
RADIUS
OCSP
For instructions on how to integrate the Barracuda Firewall with these servers, see How to Integrate with an External Authentication Service.
Guest Access
To grant guest access to the network, you can use the following:
Confirmation Page – Prompts guests to agree to Terms of Service before they can access the network. For more information, see How
to Set Up a Guest Access Confirmation Page.
Guest Ticketing – Assigns guests with tickets that give them credentials to temporarily access the network. For more information, see H
ow to Set Up Guest Access with Ticketing and How to Manage Guest Tickets - User's Guide.
How to Configure Local Authentication
If you do not have an external authentication service available, you can create and maintain a list of local users and groups on the Barracuda
Firewall. These users and groups can be used when creating firewall rules, VPNs, or captive portals.
To set up local authentication, go to the USERS > Local Authentication page. In the Local Users and Groups table, add users and groups.
Ensure that you enter the correct group names. If you misspell a group name (e.g., tst instead of test), a new group is created and
permissions are not applied correctly to the group.
For more information on the local authentication settings, click Help on the page.
How to Integrate with an External Authentication Service
By integrating the Barracuda Firewall with your existing authentication server, you can configure firewall rules that apply to specific users and
groups without having to create local user accounts on the Barracuda Firewall.
Go to the USERS > External Authentication page to integrate the Barracuda Firewall with your existing authentication system and select the
type of authentication service to configure:
Barracuda DC Agent
Active Directory
NTLM
LDAP
RADIUS
OCSP
Group Filter Patterns
Barracuda DC Agent
The Barracuda DC Agent runs on either the domain controller or a dedicated Windows PC on the office network. To record authenticated users, it
periodically checks the domain controller for login events. The IP addresses of authenticated users are mapped to their username and group
context. The list of authenticated users is provided to the Barracuda Firewall, allowing true single sign-on capabilities. For more information about
the Barracuda DC Agent, see Barracuda DC Agent for User Authentication. You can download the Barracuda DC Agent from your Barracuda
Cloud Control Account.
DC Agent Settings
If your domain controller runs Windows Server 2003 with Service Pack 2 (SP2) or Windows Server 2008, you can install the Barracuda DC Agent
on it to monitor user authentications. Then you can configure the Barracuda Firewall to query the Barracuda DC Agent so that it can recognize
your authenticated users and provide single sign-on.
Do not install the Barracuda DC Agent on your NTLM domain controller.
The Barracuda DC Agent enables the Barracuda Firewall to transparently track user login activity in your Windows domains. You must configure
the following software components:
Domain controller audit policies – Configure local audit policies to generate an account logon event whenever a domain user account
is authenticated on the domain controller.
Barracuda DC Agent – Install and configure the DC Agent on each domain controller. Specify which Barracuda Firewalls that the
DC Agent must communicate with. Each instance of this service maintains a record of all the users that have been authenticated by the
domain controller. You only need to create one authentication service per domain controller.
Barracuda Firewall – Enable single sign-on for your authenticated LDAP domain users, and specify the domain controllers where the
Barracuda DC Agent is installed. The Barracuda Firewall periodically polls each domain controller to obtain information about
authenticated LDAP users.
Install the Barracuda DC Agent
1. As admin, install, configure, and test the Barracuda DC Agent on your domain controllers or dedicated Windows PC. Follow the
instructions in How to Get and Configure the Barracuda DC Agent. Configuration instructions are also provided in the Barracuda DC
Agent administrative interface.
2. When you configure the DC Agent, you can also configure the domain controller to audit user logon and logoff activity and to generate an
account logon event whenever a user is authenticated.
3. Go to the USERS > External Authentication page and configure the Barracuda Firewall to communicate with the DC Agent.
a. Click the DC Agent tab.
b. Set Enable Single Sign-On to Yes.
c. Specify the following information about each DC Agent and then click Add:
Domain Controller IP – The IP address of the domain controller running the DC Agent. The Barracuda Firewall polls
the DC Agent to obtain the list of users authenticated against this domain controller.
DC Agent Listening Port – The port used by the DC Agent to communicate with the Barracuda Firewall. The default
port number is 5049.
Synchronization Interval – The interval (in seconds) in which the Barracuda Firewall polls the DC Agent for the list of
authenticated users. The recommended value is 15 seconds.
4. (Optional)Exempt specific LDAP domain users.
a. In the Exempt User Name field, enter the account username. You can use Perl-compatible regular expression (PCRE)
pattern-matching notation to specify the account username (such as \w for any alphanumeric character or \W for any
non-alphanumeric character).
b. Click Add.
Active Directory
Microsoft Active Directory (MSAD) is a directory service that allows authentication and authorization of users in a network. It has been included
with all Windows Server operating systems since Windows 2000 Server. MSAD is used for single sign-on for many services. Permissions are
managed by group. Users inherit the permissions of all the groups that they are members of. Backward-compatibility for older services is provided
by NTLM/MS-CHAP options that you can activate and configure on the MSAD server. All information is kept in a single directory information tree.
To configure Active Directory:
1.
2.
3.
4.
Go to the USERS > External Authentication page.
Click the Active Directory tab.
In the Basic table, edit or add an Active Directory authentication configuration for one or more domain controllers.
In the Patterns table, you can create or delete group filter patterns. For more information, see Group Filter Patterns.
NTLM
If your network uses an NT LAN Manager (NTLM) authentication server, your NTLM domain users are transparently authenticated using their
Microsoft Windows credentials. This single sign-on method of access control is provided by transparent proxy authentication against the your
NTLM server. To enable transparent proxy authentication against your NTLM server, you must join the Barracuda Firewall to the NTLM domain as
an authorized host.
To enable NTLM user authentication:
1. Go to the USERS > External Authentication page.
2. Click the NTLM tab.
3. Enter the settings for your NTLM server and then click Save.
LDAP
Lightweight Directory Access Protocol (LDAP) is used for storing and managing distributed information services in a network. LDAP is mainly
used to provide a single sign-on solution. It follows the same X.500 directory structure as MSAD.
To configure LDAP:
1.
2.
3.
4.
Go to the USERS > External Authentication page.
Click the LDAP tab.
In the Basic table, edit or add LDAP authentication configurations for one or more domain controllers.
In the Patterns table, you can create or delete group filter patterns. For more information, see Group Filter Patterns.
RADIUS
Remote Access Dial In User Service (RADIUS) is a networking protocol providing authentication, authorization, and accounting. The Barracuda
Firewall uses RADIUS authentication for the IPsec, client-to-site, and SSL VPN.
To enable integration with RADIUS:
1. Go to the USERS > External Authentication page.
2. Click the RADIUS tab.
3. Enter the settings for your RADIUS server and then click Save.
OCSP
Online Certificate Status Protocol (OCSP) is a protocol used to verify if X.509 certificates have been revoked by their respective CAs. The
Barracuda Firewall can use the information provided by an OCSP server to verify the authenticity of a certificate.
For integration with OCSP-based online digital certification verification:
1. Go to the USERS > External Authentication page.
2. Click the OCSP tab.
3. Enter the settings for your OCSP server and then click Save.
Group Filter Patterns
For Active Directory and LDAP, you can use group filter patterns. These patterns are typically used in large environments to filter unwanted group
membership information and are not affected by authentication against the Active Directory or LDAP. You can use wildcard characters in the
patterns.
For example, if you use the following group filter pattern:
*SSL*
And the following group membership strings are used:
User01 group membership string: CN=xyz, OU=sales, DC=mycompany, DC=com
User02 group membership string: CN=SSL VPN, DC=mycompany, DC=com
Then only User02 will match.
How to Join a Windows Domain
To successfully join the Barracuda Firewall to a Windows domain, you must first configure DNS, Active Directory authentication, and NTLM
authentication. Joining a domain is required for NTLM or MS-CHAP authentication requests to be accepted by the domain controller. This is
important for client-to-site VPN access and user-based firewall rules.
In this article:
Step 1. Configure DNS
Step 2. Configure Active Directory Authentication
Step 3. Configure NTLM Authentication
Step 4. Join the Domain
Step 1. Configure DNS
Because many of the requests for a domain join and subsequent authentication must query the domain controller directly, you must specify your
domain controllers in the DNS configuration.
1.
2.
3.
4.
Go to the NETWORK > IP Configuration page.
In the DNS Configuration section, enter the IP addresses of your first and second domain controllers.
Click Save Changes.
Verify that the Barracuda Firewall has a host entry in your Active Directory. By default, the hostname is the product model name. For
example, the hostname for a Barracuda Firewall X200 is X200.
Step 2. Configure Active Directory Authentication
To configure Active Directory authentication:
1. Go to the USERS > External Authentication page.
2. Click the Active Directory tab.
3. Add the information for your primary domain controller. It is critical that your settings are correct and match the domain.
If you want to use group selection with MS-CHAP authentication, enable Cache MSAD Groups.
For the domain join, you do not need to configure the settings in the Extended section.
For more details about the settings, click Help on the page.
4. Click Save Changes.
Step 3. Configure NTLM Authentication
To configure NTLM authentication:
1. Go to the USERS > External Authentication page.
2. Click the NTLM tab.
3. Configure and save the NTLM settings.
It is not necessary to have WINS running on your domain, but you must configure the WINS Servers setting.
4. Click Save Changes.
Step 4. Join the Domain
To join the domain:
1. Go to the BASIC > Administration page.
2. In the Domain Configuration section, verify that your hostname and domain are entered in the Default Host Name and Default
Domain fields. If not, enter and save the correct settings.
3. In the Windows Domain Username and Windows Domain Password fields, enter the credentials for a user account with permissions
to join the domain (such as an administrator). These user credentials are not saved and are only used once during the join attempt.
4. Click Join Domain.
5. To verify that the join was successful, click Registration Status.
How to Set Up a Guest Access Confirmation Page
When setting up a guest network, you can configure the Barracuda Firewall to use a confirmation
page that prompts guests to agree to Terms of Service before they can access the network. A
confirmation page is typically used to grant network access to anonymous users.
Related Articles
How to Configure
Wi-Fi
How to Configure the
DHCP Server
In this article:
Before You Begin
Step 1. Set up the Guest Network Interface
On a Wi-Fi Interface
On a Wired Interface
Step 2. Enable the DHCP Server for the Guest Network
Step 3. (Wired Networks Only) Set up Guest Network
Step 4. (Optional) Configure the Login Page
Before You Begin
Ensure that the Barracuda Firewall has one unused network interface (Wi-Fi, Ethernet, or virtual, e.g., ath3, p3, or p3.100).
Identify the guest network that you want to use (e.g., 192.168.225.0/24).
Step 1. Set up the Guest Network Interface
You can use Wi-Fi or a wired network for guest access.
On a Wi-Fi Interface
If Wi-Fi is available for your Barracuda Firewall model, you can configure a Wi-Fi network for guest access.
In the Static Interface Configuration section, ensure that you specify the following settings:
Network – The guest network (e.g., 192.168.225.0/24).
Services to Allow – Select DNS Server.
Classification – Click Trusted.
In the Wi-Fi Link Configuration section, select Confirmation Message from the Landing Page list.
On a Wired Interface
Configure a static network interface. In the Static Interface Configuration, ensure that you specify the following settings:
Network -– The guest network (e.g., 192.168.225.0/24).
Services to Allow – Select DNS Server.
Classification – Click Trusted.
Step 2. Enable the DHCP Server for the Guest Network
To automatically assign IP addresses for guests, enable a DHCP server for the guest network.
1. Go to the NETWORK > DHCP Server page.
2. In the DHCP Server section, enable the DHCP server.
3. In the Add DHCP Server Subnet section, configure the DHCP subnet. Ensure that you specify the following settings:
Beginning IP Address and Ending IP Address – The range of IP addresses to be assigned to clients. For example, if your
guest network is 192.168.225.0/24, the Beginning IP Address is 192.168.225.10 and the Ending IP Address is 192.168.2
25.250.
DNS Server – The IP address of the DNS server.
4. Click Save Subnet. The guest network subnet appears in the DHCP Server Subnets section.
For more information on setting up a DHCP server, see How to Configure the DHCP Server.
Step 3. (Wired Networks Only) Set up Guest Network
If you configured the guest network on a wired interface, specify that the network uses the confirmation page for guest access.
1. Go to the USERS > Guest Access page.
2. In the Guest Networks section, select your guest network (e.g., 192.168.225.1/24) from the Network column.
3. From the Type column, select Confirmation Message.
4. Click Add.
5. Click Save Changes. The network then appears in the second Network table.
Step 4. (Optional) Configure the Login Page
On the USERS > Guest Access page, you can configure the page that is displayed to guests when they log into the network.
In the Login Page Options section, edit the Welcome Message and upload a Welcome Image. The image cannot be larger than 1 MB and
must be in JPG, GIF, or PNG format. The suggested image size is 170 x 40 pixels.
How to Set Up Guest Access with Ticketing
Required Version
The Barracuda Firewall version 6.1.2 or newer is required.
When you configure a guest network, you can set up a login or ticketing system to
temporarily grant access to guests. Before guests can access the network, they must
enter a username and password from tickets that are assigned to them. The tickets
expire after a set period of time.
Before tickets can be created, you must configure the ticketing system and set up ticket
administrators. Follow the instructions in this article to set up a guest network with
ticketing.
Related Articles
How to Configure Wi-Fi
How to Configure the DHCP Server
How to Manage Guest Tickets User's Guide
In this article:
Before You Begin
Step 1. Set up the Guest Network Interface
On a Wi-Fi Interface
On a Wired Interface
Step 2. Enable the DHCP Server for Guest Network
Step 3. Set Up the Ticket Administrators
Step 4. Set Up the Guest Network
Step 5. Add a Redirect Firewall Rule
Step 6. (Optional) Configure the Login Page
Next Step
Before You Begin
Ensure that the Barracuda Firewall has one unused network interface (Wi-Fi, Ethernet, or virtual, e.g., ath3, p3, or p3.100).
Identify the guest network that you want to use (e.g., 192.168.223.0/24).
Step 1. Set up the Guest Network Interface
You can use Wi-Fi or a wired network for guest access.
On a Wi-Fi Interface
If Wi-Fi is available for your Barracuda Firewall model, you can configure a Wi-Fi network for guest access.
In the Static Interface Configuration section, ensure that you specify the following settings:
Network -– The guest network (e.g., 192.168.223.0/24).
Services to Allow – Select DNS Server.
Classification – Click Trusted.
On a Wired Interface
Configure a static network interface. In the Static Interface Configuration, ensure that you specify the following settings:
Network -– The guest network (e.g., 192.168.223.0/24).
Services to Allow – Select DNS Server.
Classification – Click Trusted.
Step 2. Enable the DHCP Server for Guest Network
To automatically assign IP addresses for guests, enable a DHCP server for the guest network.
1. Go to the NETWORK > DHCP Server page.
2. In the DHCP Server section, enable the DHCP server.
3. In the Add DHCP Server Subnet section, configure the DHCP subnet. Ensure that you specify the following settings:
Beginning IP Address and Ending IP Address – The range of IP addresses to be assigned to clients. For example, if your
guest network is 192.168.223.0/24, the Beginning IP Address is 192.168.223.10 and the Ending IP Address is 192.168.2
23.250.
DNS Server – The IP address of the DNS server.
4. Click Save Subnet. The guest network subnet appears in the DHCP Server Subnets section.
For more information on setting up a DHCP server, see How to Configure the DHCP Server.
Step 3. Set Up the Ticket Administrators
Ticket administrators can log into the ticketing system to create guest tickets but cannot log into the management interface of the Barracuda
Firewall.
Specify the login credentials for the ticketing system and then give ticket administrators all of the information that they require to create tickets.
1. Specify the ticketing system login credentials.
a. Go to the USERS > Guest Access page.
b. In the Ticketing Administrator section, enter the username and password for logging into the ticketing system.
c. Click Save Changes.
2. Ensure that ticket administrators have the following information:
The IP address of the ticketing web interface:http://secondary IP address/lp/cgi-bin/ticketing
The How to Manage Guest Tickets - User's Guide on how to create guest tickets.
Step 4. Set Up the Guest Network
If you configured the guest network on a wired interface, specify that the network uses ticketing for guest access.
1. Go to the USERS > Guest Access page.
2. In the Guest Networks section, select your guest network (e.g., 192.168.223.1/24) from the Network column.
3. From the Type column, select Ticketing.
4. For wired interfaces, click Add.
5. Click Save Changes. The network appears in the second Network table.
Step 5. Add a Redirect Firewall Rule
Add a Redirect to Service firewall rule with the following settings:
Action
Source
Destination
Redirected To
Redirect to Service
Local Networks
SecondaryIP
Guest Ticketing
Do not use the management IP
address for the ticketing web
interface.
Step 6. (Optional) Configure the Login Page
On the USERS > Guest Access page, you can configure the page that is displayed to guests when they log into the network.
In the Login Page Options section, edit the Welcome Message and upload a Welcome Image. The image cannot be larger than 1 MB and
must be in JPG, GIF, or PNG format. The suggested image size is 170 x 40 pixels.
Next Step
For instructions on how to create tickets for guests, see How to Manage Guest Tickets - User's Guide.
How to Manage Guest Tickets - User's Guide
If you are a ticketing administrator, you can create tickets in the Barracuda Firewall ticketing web interface to let guests temporarily access your
network.
Tickets assign guests with a username and password that expire after a preset amount of time. After tickets expire, they are automatically
deleted.
In this article:
Before You Begin
Create a Ticket
Delete a Guest Ticket
Print Ticket Information for Guests
Before You Begin
Get the following information from the Barracuda Firewall administrator:
The IP address of the ticketing web interface (e.g., 192.168.223.1)
The username and password for the ticket administrator
(Wi-Fi only) The SSID and passphrase for the Wi-Fi network
Create a Ticket
To create a guest ticket:
1. In a browser, go to: http://IP address for the ticketing web interface/lp/cgi-bin/ticketing
2. Log in with the username and password for the ticketing administrator.
3. Click the plus sign (+).
4. Enter the following information for the guest user:
Username – A descriptive username (e.g., BobSmith).
Password – A password.
Days and Hours – The number of days and hours that the ticket stays valid.
5. Click Save Changes.
Delete a Guest Ticket
To delete a guest ticket before it expires:
1. In a browser, go to: http://IP address for ticketing web interface/lp/cgi-bin/ticketing
2. Next to the ticket that you want to delete, click the X symbol.
Print Ticket Information for Guests
To give guests their username and password for accessing the network, you can print their ticket information. The printed information also
specifies when the ticket expires.
To print the information for a guest ticket, click the printer symbol next to it.
If your guests are accessing a Wi-Fi network, you must also give them the SSID and passphrase for the network.
VPN
VPNs are a secure, efficient, and economical alternative to dedicated lines or dial-up RAS. With the Barracuda Firewall, you can configure the
following types of VPNs:
Site-to-Site VPN – Securely and transparently connects remote locations with your network.
Client-to-Sit e VPN – Lets remote users access the corporate network with VPN clients and mobile devices.
SSL VPN – Lets remote users access corporate resources over a secure and configurable web interface.
In this Section
Client-to-Site VPN
Site-to-Site VPN
SSL VPN for the Barracuda Firewall
How to Allow VPN Access via a Dynamic WAN IP Address
Client-to-Site VPN
To let remote users access corporate information resources, you can set up a client-to-site VPN. For various VPN client platforms, Barracuda
Firewall provides client-to-site IPsec, PPTP, and SSL VPNs.
Supported VPN Clients
Configuring Client-to-Site VPNs
Supported VPN Clients
The following table lists the VPN types and clients that can be used with various client platforms:
Client Platform
Windows
VPN Types
IPsec
PPTP
SSL VPN
VPN Clients
Barracuda VPN Connector
Native Windows PPTP client
Third-party IPsec clients
Mac OS X
IPsec
PPTP
SSL VPN
Barracuda VPN Client
Native OS X PPTP client
Third-party IPsec clients
Linux
IPsec
PPTP
SSL VPN (browser only)
Barracuda VPN Client
Native Linux PPTP client
Third-party IPsec clients
Apple iOS
IPsec
PPTP
Built-in iOS VPN client
Additional Requirement for iOS
Version 5.1 and Above
For iOS version 5.1 and above,
you must configure additional
certificates. For more information,
see How to Configure Apple iOS D
evices for Client-to-Site VPN
Connections.
Android
IPsec (Android Version > 4.0)
PPTP (Android Version > 2.2)
Built-in Android VPN client
Configuring Client-to-Site VPNs
For instructions on setting up client-to-site VPNs and supported VPN clients, see the following articles:
How to Configure a Client-to-Site VPN with IPsec
How to Configure a Client-to-Site VPN with PPTP
How to Configure Apple iOS Devices for Client-to-Site VPN Connections
How to Configure TheGreenBow VPN Client
Troubleshooting Client-to-Site VPNs
How to Enable and Configure SSL VPN for the Barracuda Firewall
How to Configure SSL VPN Resources for the Barracuda Firewall
How to Configure a Client-to-Site VPN with IPsec
Using VPNs, mobile workers can securely access corporate information and resources. The Barracuda Firewall allows the following types of
clients to connect via a client-to-site VPN:
Laptops and desktops running Windows, Mac OS X, or Linux.
Apple iPhone 4 and above running iOS version 5.1 and above, including the newest version iOS 7.0.
Mobile phones running Android version 4.0 and above.
Follow the steps in this article to configure a client-to-site IPsec VPN.
In this article:
Step 1. Identify the User Authentication Mechanism
Step 2. Configure the Barracuda Firewall VPN Server and Firewall Rule
Static WAN IP Address
Dynamic WAN IP Address
Step 3. Configure the VPN Server Certificates
Create a Self-Signed Certificate on the Barracuda Firewall
Import External Certificates
Certificates for iOS Clients
Step 4. Configure VPN Access Policy
Step 5. Configure the Client
Step 1. Identify the User Authentication Mechanism
If you want to limit access to specific users and groups:
Using an external authentication method such as a Microsoft Active Directory, RADIUS, or LDAP server, go to the USERS > External Au
thentication page. Use these services to authenticate VPN users. You can control access to the VPN by only allowing specific users or
groups. For more information on how to set up an external authentication method, see How to Integrate with an External Authentication
Service.
Using local authentication, go to the USERS > Local Authentication page. In the Local Users and Groups table, add users and
groups.
Step 2. Configure the Barracuda Firewall VPN Server and Firewall Rule
The VPN service that runs on the Barracuda Firewall must listen on an external IP interface (WAN). You must configure the WAN interface and
create a firewall rule to grant access to the VPN. Depending on whether VPN connections to the Barracuda Firewall are made to a static or
dynamically-assigned WAN IP address, complete the steps in either the following Static WAN IP Address or Dynamic WAN IP Address section.
Static WAN IP Address
To allow VPN connections using a static WAN IP address on the Barracuda FirewallI :
1. Go to the NETWORK > IP Configuration page.
2. In the Static Interface Configuration section, or on any Secondary IP Address of the management IP address, verify that the VPN
Server check box for the interface is selected.
3. Go to the FIREWALL > Firewall Rules page and verify that the pre-installed VPNCLIENTS-2-LAN rule is enabled. You do not have to
create a new rule. If VPN access is provided with a static WAN IP address, VPN client traffic is allowed by the VPNCLIENTS-2-LAN rule.
This rule allows unrestricted access for VPN clients coming in through interface pvpn0 to the trusted LAN.
VPNCLIENTS-2-LAN Values:
Action
Source
Destination
Service
Interface Group
Connection
Allow
Any
Trusted LAN
Any
VPNClients
No SNAT (the
original source IP
address is used)
Dynamic WAN IP Address
To allow VPN connections using a dynamically assigned WAN IP address on the Barracuda Firewall, follow the steps in How to Allow VPN
Access via a Dynamic WAN IP Address.
Step 3. Configure the VPN Server Certificates
For the VPN server to authenticate with the VPN client, either create self-signed certificates on the Barracuda Firewall or import certificates signed
by an external Certificate Authority (CA or PKI). If you have iOS clients, configure additional XAUTH certificates.
Create a Self-Signed Certificate on the Barracuda Firewall
To create self-signed certificates on the Barracuda Firewall:
1. Go to the VPN > Certificates page.
2.
2. In the Certificate Generation section, click Create Certificate.
3. In the Create Certificate window, fill in the certificate details and then click Create.
Import External Certificates
If you created the certificate with an external CA, verify that you have the following files:
Certificate authority certificate in PEM format.
Certificate that is signed by the CA in PKCS12 or PEM format.
To import these external certificates:
1. Go to the VPN > Certificates page.
2. In the Upload Trusted Certificate section, configure the CA certificate settings, select the CA certificate file (e.g., ca - cert -filename. pe
m ), and then click Upload Now. The uploaded CA certificate appears in the Default Certificate section at the top of the page.
3. In the Upload Certificate section, configure the certificate file settings, select the certificate file (e.g., certificate-filename. pem ), and then
click Upload Now. The uploaded certificate appears in the Saved Certificate section.
Certificates for iOS Clients
Additional XAUTH certificates are required by iOS clients. Usually, the default certificate is sufficient for providing identity information from the
Barracuda Firewall to the client. However, there are special requirements for iOS clients. For instructions on how to configure and import the
XAUTH certificates, see How to Configure Apple iOS Devices for Client-to-Site VPN Connections.
Step 4. Configure VPN Access Policy
Configure a VPN policy to specify which clients are allowed to connect. If there is no policy that matches a client or the policy allowing the client is
disabled, the client connection is rejected.
To configure the VPN access policy:
1. Go to the VPN > Client-To-Site VPN page.
2. Configure the Settings section. If you are using iOS devices, select the server certificate from the Local Certificate list. Optionally, you
can enter a message and select an image to be displayed when the client connects.
3. In the IPsec Settings section, configure the IPsec Phase 1 and Phase 2 settings. The Phase 1 encryption settings are global for all
clients that want to connect. Phase 2 is chosen when you create the access policy; ensure that you configure the Phase 2 settings.
4. In the VPN Access Policies section, add a policy that defines the network settings. To connect to the VPN service, users and user
groups must be included in an access policy. In the policy settings, Allowed Peers defines the type of VPN clients that are allowed to
connect to the Barracuda Firewall. This can either be the Barracuda Network Access Client or any third-party client that uses default
IPsec.
If you set the Allowed Groups when using local authentication, a "Certificate did not match any group" error occurs.
5. Click Save Changes.
For additional assistance, click Help on the Client-To-Site VPN page.
Step 5. Configure the Client
On the IPsec client system, you must enter the following key parameters to establish a connection to the Barracuda Firewall:
Key Parameter
Description
VPN Server
The external IP address or DNS hostname of your Barracuda
Firewall.
Encryption
Verifies that the client-side VPN configuration matches the IPsec
Phase 1 and Phase 2 settings on the Barracuda Firewall. If the
incorrect encryption, hash, or DH group are selected , the client can
still reach the VPN server but is unable to communicate. Also, the
tunnel cannot be established. Verify that the lifetimes are identical; a
mismatch can lead to brief tunnel terminations whenever one side
reaches its lifetime. When the lifetimes are correctly configured,
renegotiation occurs transparently.
Authentication
The username is case-insensitive, but the password is
case-sensitive. If the client cannot connect because of authentication
problems, verify that you entered the correct password.
How to Configure a Client-to-Site VPN with PPTP
Using VPNs, mobile workers can securely access corporate information and resources. The Barracuda Firewall allows remote clients running iOS
, Android, Windows, Mac OS X, and Linux operating systems to connect via a client-to-site VPN.
Follow the steps in this article to configure a client-to-site VPN using PPTP.
In this article:
Step 1. Configure the Barracuda Firewall VPN Server
Static WAN IP Address
Dynamic WAN IP Address
Step 2. Configure the PPTP Settings on the Barracuda Firewall
Step 3. Configure User Authentication
Local Authentication
MS-CHAPv2/NTLM
Step 4. Add the Firewall Rule to Allow Traffic Between VPN Clients and LAN
Step 5. Verify the Order of the Firewall Rules
Step 1. Configure the Barracuda Firewall VPN Server
The VPN server that runs on the Barracuda Firewall must listen on the appropriate IP address for the clients. Depending on whether the
Barracuda Firewall is connected to the Internet through an ISP that statically or dynamically assigns the WAN IP address, complete the steps in
the Static WAN IP Address or Dynamic WAN IP Address section.
Static WAN IP Address
If the Barracuda Firewall is connected to the Internet through an ISP that statically assigns the WAN IP address:
1. Go to the NETWORK > IP Configuration page.
2. In the Static Interface Configuration section, or on any Secondary IP Address of the management IP address, verify that the VPN
Server check box for the interface is selected.
Dynamic WAN IP Address
To allow VPN connections using a dynamically assigned WAN IP address on the Barracuda Firewall, follow the steps in How to Allow VPN
Access via a Dynamic WAN IP Address.
Step 2. Configure the PPTP Settings on the Barracuda Firewall
Configure PPTP to let remote devices access the Barracuda Firewall VPN.
1. Go to the VPN > PPTP page.
2. In the PPTP Settings section, enable and configure PPTP.
3. On the same page, configure the user authentication method:
For local authentication, configure the settings in the Local PPTP Users section.
For MS-CHAPv2 and NTLM authentication, configure the settings in the User and Group Conditions (MS-CHAPv2/NTLM) sect
ion.
For more information on the PPTP and authentication settings, click Help on the VPN > PPTP page.
Step 3. Configure User Authentication
For user authentication, you can use local authentication or MS-CHAPv2/NTLM.
Local Authentication
To configure user access permissions with Local Authentication:
1. Go to the VPN > PPTP page.
2. In the Local PPTP User section, add the username and password for each user who is allowed to connect to the VPN. If required,
2.
specify a static IP address for the user.
3. Click Save Changes.
MS-CHAPv2/NTLM
With MS-CHAPv2/NTLM, you can allow access on a per-user or per-group basis.
1. Go to the VPN > PPTP page.
2. In the User and Group Conditions (MS-CHAPv2/NTLM) section, add the users and groups who are allowed to connect to the
client-to-site VPN.
3. Click Save Changes.
Step 4. Add the Firewall Rule to Allow Traffic Between VPN Clients and LAN
Create a new firewall rule to let PPTP traffic in the VPN tunnel pass between the VPN clients and the trusted LAN. The pre-installed
VPNCLIENTS-2-LAN firewall rule does not match PPTP connections because they do not use the pvpn0 virtual interface. As a result, PPTP traffic
is blocked by default.
Create a new firewall rule that lets VPN traffic from the PPTP clients access the Trusted LAN:
1. Go to the FIREWALL > Firewall Rules page and add this rule:
Action
Source
Destination
Service
Connection
Allow
The network range
assigned to the PPTP
clients (configured in V
PN > PPTP > Client IP
Pool Begin/Client IP
Pool Size)
Trusted LAN
Any (or the
allowed/required
services)
No SNAT (the original
source IP address is
used)
2. At the top of the Add Access Rule window, click Add.
Step 5. Verify the Order of the Firewall Rules
New rules are created at the bottom of the firewall rule set. Because rules are processed from top to bottom in the rule set, arrange your rules in
the correct order. You must especially ensure that your rules are placed above the BLOCKALL rule; otherwise, the rules are blocked.
After adjusting the order of rules in the rule set, click Save Changes.
How to Configure Apple iOS Devices for Client-to-Site VPN Connections
Recommended iOS Version Upgrade
Because certificates longer than 512-bit do not work for iOS VPN clients with iOS version 6.0, it is recommended that you update to the
latest version of iOS.
For iOS client devices such as an iPhone or an iPad, you must configure additional certificates. Due to restrictions of iOS, you must use a
certificate and XAUTH. After creating the required certificates, import them onto the Barracuda Firewall and iOS device. You must also add the
VPN connection on the iOS device. Any iOS device with version 5.2.3 and above (including iOS 7.0) is supported.
In this article:
Certificate Requirements
Step 1. Create the Required Certificates
Example iOS Certificate Settings
Root Certificate
Server Certificate
Client Certificate
Step 2. Import Certificates into the Barracuda Firewall
Step 3. Add the VPN Connection on the iOS Device
Next Step
Certificate Requirements
Because certificate-based authentication is required, you must have three types of X.509 certificates that come with a valid chain of trust. The
following table lists the required X.509 certificates, their settings, and where they must be installed:
X.509 Certificate Type
Where to Install
File Type
Chain of Trust
X.509 Extensions and
Values
Root Certificate
Barracuda Firewall
& Apple iOS Device
PEM
Trust Anchor
Mandatory option for key
usage: Certificate sign;
CRL sign.
Server Certificate
Barracuda Firewall
PKCS12
End Instance
Key Usage – Include the
"Digital Signature" flag.
Subject Alternative
Name – DNS hostname.
Examples: DNS:vpn.yo
urdomain.com
Note: The hostname
must be DNS resolvable.
Client Certificate
Apple iOS Device
PKCS12
End Instance
Key Usage – Include the
"Digital Signature" flag.
If CA-signed X.509 certificates are not available, you can use self-signed certificates instead. These certificates must also have a valid chain of
trust. Typically, X.509 certificates are created through a Public Key Infrastructure (PKI) that allows creating, signing, or revoking certificates.
Examples include Microsoft's PKI with Active Directory, and XCA - X Certificate and key management.
Step 1. Create the Required Certificates
Create the required certificates. If you want to create the certificates with XCA, see How to Create Certificates with XCA.
If you have problems with your certificates, compare your settings with those of the following example certificate settings. Especially verify the X50
9 Basic Constraints and X509v3 Key Usage settings.
Example iOS Certificate Settings
Click here to expand...
Root Certificate
Tab
Setting
Value
Status
Signature Algorithm
sha1WithRSAEncryption
Subject
RFC 2253
[email protected],O
U=documentation,O=Barracuda
Networks,L=Innsbruck,ST=Tirol,C=AT
Hash
7b6d2374
X509v3 Basic Constraints
CA:TRUE
X509v3 Key Usage
Digital Signature, Key Agreement,
Certificate Sign
Extensions
Server Certificate
Tab
Setting
Value
Status
Signature Algorithm
sha1WithRSAEncryption
Subject
RFC 2253
[email protected],O
U=docu,O=Barracuda Network
AG,L=Innsbruck,ST=Tyrol,C=AT
Hash
cc0460b5
RFC 2253
[email protected],O
U=documentation,O=Barracuda
Networks,L=Innsbruck,ST=Tirol,C=AT
Hash
7b6d2374
X509v3 Key Usage
Digital Signature, Key Agreement,
Certificate Sign
X509v3 Subject Alternative Name:
DNS:vpnserver.yourdomain.com
Tab
Setting
Value
Status
Signature Algorithm
sha1WithRSAEncryption
Subject
RFC 2253
[email protected],O
U=documentation,O=Barracuda
Networks,L=Innsbruck,ST=Tyrol,C=AT
Hash
c2b06d20
RFC 2253
[email protected],O
U=documentation,O=Barracuda
Networks,L=Innsbruck,ST=Tirol,C=AT
Hash
7b6d2374
X509v3 Key Usage
Digital Signature
Issuer
Extensions
Client Certificate
Issuer
Extensions
Step 2. Import Certificates into the Barracuda Firewall
Import the required certificates into the Barracuda Firewall.
1.
2.
3.
4.
Go to the VPN > Certificates page.
In the Upload Certificate section, upload the root and server certificates. Ensure that they have unique names.
If needed, upload intermediary certificates.
Configure the remaining settings.
Step 3. Add the VPN Connection on the iOS Device
On the iOS device, import the root and client certificates. You can import the certificate via email or by downloading it from a web server.
To create a new VPN connection on the iOS device:
1. On the iOS device, tap Settings > General > VPN > Add VPN Configuration.
2. On the Add VPN Configuration screen, tap the IPsec tab.
3. Specify the following settings:
Server – The Subject Alternative Name used in your certificates.
Account and Password – The XAUTH username and password.
Use Certificate – Enable this setting.
Certificate – The X.509 client certificate.
Next Step
If you are configuring a client-to-site VPN with IPsec, see How to Configure a Client-to-Site VPN with IPsec.
How to Configure TheGreenBow VPN Client
For client-to-site VPN connections with the Barracuda NG Firewall and the Barracuda
Firewall, you can use TheGreenBow VPN client for Windows. Follow the steps in this
article to configure TheGreenBow client for use with the Barracuda Firewall.
In this article:
Before You Begin
Step 1. Configure Phase 1
Step 2. Configure Phase 2
Step 3. Disable Mode Config
External Resource
TheGreenBow homepage at www.thegreen
bow.com.
Alternative VPN Clients Offered by Barracuda Networks
If simple IPsec tunneling as offered by TheGreenBow is not sufficient for your needs, consider the Barracuda VPN and Network Access
Clients. Different Barracuda Networks clients are available for Windows, Mac OS X, and Linux. Suitable server-side functionality is
included with the Barracuda Firewall and Barracuda NG Firewall , which also offers Access Control.
The Barracuda VPN and Network Access Clients offer numerous authentication methods, remote deployment and administration, quick
restoration of VPN tunnels after dropped connections, 'Always On' VPN connections for PCs, support for redundant VPN gateways,
selective routing of network traffic through the tunnel, automatic selection of the optimal VPN gateway based on the client's location,
and much more. When you use a Barracuda NG Firewall as the VPN gateway, you can also centrally deploy and manage the Windows
clients.
For more information, see Barracuda VPN / Network Access Clients - Overview.
Before You Begin
On the Barracuda NG Firewall or Barracuda Firewall, verify that the VPN service for standard IPsec client-to-site connections has been properly
configured. You will use the encryption and authentication settings of the VPN server to configure the TheGreenBow client.
For more information on configuring the VPN service for the Barracuda Firewall, see How to Configure a Client-to-Site VPN with IPsec.
It is assumed that you are using the default settings for TheGreenBow VPN client. If you have already modified any settings for the client, either
restore the default settings or uninstall and then reinstall the client before completing the following steps.
Step 1. Configure Phase 1
To configure Phase 1:
1. From the left menu of TheGreenBow client, right-click VPN Configuration and select New Phase 1.
2. If you want to rename the Gateway entry that was created, right-click it and select Rename. For example, you can rename the entry as P
hase 1.
3.
4.
5.
6.
7.
Click the Gateway entry and then click the Authentication tab.
In the Addresses section, type the server IP address of the VPN service into the Remote Gateway field.
In the Authentication section, define a Preshared Key or a Certificate as required.
If applicable, import or select a certificate from the Certificate tab. Then click the Advanced tab and enter the necessary settings.
In the IKE section, adjust the settings as required. These settings must match the settings that are used by the VPN service.
Step 2. Configure Phase 2
To configure Phase 2:
1. In the left menu, right-click the Gateway entry (that you might have renamed to e.g. Phase 1) and select New Phase 2.
2. If you want to rename the Tunnel entry that was created as a child of the Gateway entry, right-click it and select Rename. For example,
you can rename it as Phase 2.
3.
4.
5.
6.
Click the Tunnel entry and then click the IPSec tab.
In the Addresses section, select Subnet address as the Address type.
In the remaining fields of the Addresses section, enter the network settings that were configured for the VPN service.
In the ESP section, select the settings that are used by the VPN service.
Step 3. Disable Mode Config
To disable the Mode Config:
1. Go to Gateway > Advanced tab > Advanced features, and verify that that the Mode Config check box is cleared. Mode Config is a
feature of certain routers to remotely configure the client's IP addressing, which is not required in this setup.
You can now initiate a connection by navigating to Tools > Connection Panel. For more information, see TheGreenBow's help system.
Troubleshooting Client-to-Site VPNs
If your client-to-site VPN is not working as expected, try the solutions that are provided
in this article for the following scenarios:
You Receive a Timeout Error on the Client
You Receive an Authentication Error on the Client
You are Able to Connect but Cannot Reach the Published Networks
Related Articles
How to Configure a Client-to-Site
VPN with IPsec
How to Configure a Client-to-Site
VPN with PPTP
You Receive a Timeout Error on the Client
The client might not be able to reach the public listen IP address of the Barracuda Firewall. Try to ping the public listen IP address of the
appliance from the client.
Go to the VPN > Client-to-Site VPN page and verify that the tunnel is configured correctly.
You Receive an Authentication Error on the Client
Go to the VPN > Client-to-Site VPN page and verify that the correct user authentication method is selected.
Go to the Users > External Services page and verify that the external authentication method is correctly configured.
Ensure that the correct username and password are being used to log in.
Verify that special characters are not being used in the password. If there are any special characters, change
the password and then try to connect.
You are Able to Connect but Cannot Reach the Published Networks
On the client, see if traffic is being sent into the tunnel. You can either check the routing table of the client machine or use the tracert a
nd traceroute command-line utilities.
Go to the VPN > Client-to-Site VPN page and verify that the VPN Access Policies are configured correctly.
Ensure that the firewall rule for the VPN is allowing the traffic into the networks.
Site-to-Site VPN
Site-to-site VPNs let offices in multiple locations establish secure connections with each other over a public network such as the Internet. A
site-to-site VPN extends the company´s network, making resources available to remote employees. The Barracuda Firewall establishes strongly
encrypted IPsec VPN tunnels, using DES, 3DES, AES-128, AES-256, etc. It supports active and passive tunnel initiation and provides maximum
flexibility.
Configuring Site-to-Site VPNs
For instructions on setting up site-to-site VPNs, see the following articles:
How to Configure a Site-to-Site VPN with IPsec
Example - Configuring a Site-to-Site IPsec VPN Tunnel
Troubleshooting Site-to-Site VPNs
How to Configure a Site-to-Site VPN with IPsec
The Barracuda Firewall can establish IPsec VPN tunnels to any other appliance
supporting the IPsec VPN protocol, including another Barracuda Firewall. To set up the
IPsec VPN tunnel, you must create it on the Barracuda Firewall and its remote
appliance. For a successful IPsec tunnel, configure identical Phase 1 and Phase 2
settings on both VPN gateways. The Barracuda Firewall supports authentication with a
shared passphrase as well as X.509 certificate-based (CA-signed as well as
self-signed) authentication. You must also configure a firewall rule to allow traffic
between both networks.
In this article:
Step 1. Create the IPsec Tunnel on the Barracuda Firewall and on the Remote
appliance
Step 2. Configure the Barracuda Firewall VPN Server
Static WAN IP Address
Dynamic WAN IP Address
Step 3. Create the Firewall Rule for VPN Traffic
Step 4. Verify the Order of the Firewall Rules
Step 5. Verify Successful VPN Tunnel Initiation and Traffic Flow
Related Article
Example - Configuring a
Site-to-Site IPsec VPN Tunnel
Step 1. Create the IPsec Tunnel on the Barracuda Firewall and on the Remote appliance
To create the IPsec tunnel on the Barracuda Firewall:
1. Go to the VPN > Site-to-Site Tunnels page.
2.
In the Site-to-Site IPSec Tunnels section, click Add .
3. On the Add Site-to-Site IPsec Tunnel page, configure the settings. The
both VPN gateways.
4. After configuring the tunnel settings, click Save.
5. Configure the IPsec tunnel on the remote appliance.
Step 2. Configure the Barracuda Firewall VPN Server
Phase 1 and Phase 2 settings must be identical on
The VPN server that runs on the Barracuda Firewall must listen on the appropriate IP address for its peer. Depending on whether the Barracuda
Firewall is connected to the Internet through an ISP that statically or dynamically assigns the WAN IP address, complete the steps in the
following Static WAN IP Address or Dynamic WAN IP Address section.
Static WAN IP Address
If the Barracuda Firewall is connected to the Internet through an ISP that statically assigns the WAN IP address:
1. Go to the NETWORK > IP Configuration page.
2. In the Static Interface Configuration section, verify that the VPN Server check box is selected for the interface or for any Secondary IP
Address of the management IP address.
Dynamic WAN IP Address
If your Barracuda Firewall is connected to the Internet through an ISP that dynamically assigns the WAN IP address, see How to Allow VPN
Access via a Dynamic WAN IP Address.
Step 3. Create the Firewall Rule for VPN Traffic
Create a firewall rule to allow network traffic between the two networks. If the tunnel is to be established between two Barracuda Firewalls, create
the same rule on both appliances.
1. Go to the FIREWALL > Firewall Rules page.
2. Add a firewall rule with the following settings:
Action
Connection
Bi-directional
Service
Source
Destination
Allow
No SNAT (the
original source IP
address is used)
Select the Bi-direc
tional check box.
Any
The LAN 1
address.
The LAN 2
address.
3. At the top of the Add Access Rule window, click Add.
Step 4. Verify the Order of the Firewall Rules
New rules are created at the bottom of the firewall rule set. Because rules are processed from top to bottom in the rule set, ensure that you
arrange your rules in the correct order. You must especially ensure that your rules are placed above the BLOCKALL rule; otherwise, the rules are
blocked. If you are configuring a tunnel between two Barracuda Firewalls, verify the order of the firewall rules in the rule sets for both appliances.
After adjusting the order of rules in the rule set, click Save Changes.
Step 5. Verify Successful VPN Tunnel Initiation and Traffic Flow
To verify that the VPN tunnel was initiated successfully and traffic is flowing, go to the VPN > Site-to-Site Tunnels page. Verify that green check
marks are displayed in the Status column of the VPN tunnel.
Use ping to verify that network traffic is passing the VPN tunnel. Open the console of your operating system and ping a host within the remote
network. If no host is available, you can ping the management IP address of the remote Barracuda Firewall. Go to the NETWORK > IP
Configuration page and ensure that Services to Allow: Ping is enabled for the management IP address of the remote firewall.
If network traffic is not passing the VPN tunnel, go to the BASIC > Recent Connections page and ensure that network traffic is not blocked by
any other firewall rule.
Example - Configuring a Site-to-Site IPsec VPN Tunnel
This article provides an example of how to configure an IPsec VPN tunnel between two Barracuda Firewalls with shared passphrase authenticatio
n. The example uses the following networks and default VPN tunnel settings:
IP Addresses
Location 1
Location 2
Tunnel Settings
Location 1
Location 2
Local Networks
10.10.10.0/24
10.10.20.0/24
Tunnel initiation
Active
Passive
Local Address
212.86.0.253
213.47.0.253
Encryption Phase
1&2
AES256
Hash Method
Phase 1 & 2
MD5
DH Group Phase 1
&2
Group 1
Lifetime Phase 1
28800
Lifetime Phase 2
3600
Authentication
Shared Passphrase
In this article:
Step 1. Create the IPsec Tunnel on the Barracuda Firewall at Location 1
Step 2. Create the IPsec Tunnel on the Barracuda Firewall at Location 2
Step 3. Configure the Firewall Rule for VPN Traffic
Step 4. Verify the Order of the Firewall Rules
Step 5. Verify Successful VPN Tunnel Initiation and Traffic Flow
Step 1. Create the IPsec Tunnel on the Barracuda Firewall at Location 1
To create the IPsec tunnel:
1.
2.
3.
4.
5.
Log into the Barracuda Firewall at Location 1.
Go to the VPN > Site-to-Site Tunnels page.
In the Site-to-Site IPSec Tunnels section, click Add .
Enter a Name for the new VPN tunnel.
In the Phase 1 and Phase 2 sections, specify these settings:
Setting
Value
Encryption Phase 1 & 2
Select AES256.
Hash Method Phase 1 & 2
Select MD5.
DH Group Phase 1 & 2
Select Group 1.
Lifetime Phase 1
Enter 28800.
Lifetime Phase 2
Enter 3600.
6. Specify these network settings:
Setting
Value
Local End
Select Active.
Local Address
Select one of the available IP addresses. If you have dynamic
ISPs configured, select Dynamic.
Local Networks
Enter 10.10.10.0/24.
The network address for the locally configured LAN.
Remote Address
Enter 213.47.0.253.
The WAN IP address of location 2.
Remote Networks
Enter 10.10.20.0/24.
The remote LAN.
7. Specify these authentication settings:
Setting
Value
Authentication
Select Shared Passphrase.
Passphrase
Enter the shared secret.
8. Click Add.
Step 2. Create the IPsec Tunnel on the Barracuda Firewall at Location 2
To create the IPsec tunnel:
1.
2.
3.
4.
5.
Log into the Barracuda Firewall at Location 2.
Go to the VPN > Site-to-Site Tunnels page.
In the Site-to-Site IPSec Tunnels section, click Add .
Enter a Name for the new VPN tunnel.
In the Phase 1 and Phase 2 sections, specify these settings:
Setting
Value
Encryption Phase 1 & 2
Select AES256.
Hash Method Phase 1 & 2
Select MD5.
DH Group Phase 1 & 2
Select Group 1.
Lifetime Phase 1
Enter 28800.
Lifetime Phase 2
Enter 3600.
6. Specify these network settings:
Setting
Value
Local End
Select Passive.
Local Address
Select one of the available IP addresses. If you have dynamic
ISPs configured, select Dynamic.
Local Networks
Enter 10.20.10.0/24.
The network address for the locally configured LAN.
Remote Address
Enter 213.47.0.253.
The WAN IP address of location 1.
Remote Networks
Enter 10.10.10.0/24.
The remote LAN.
7. Specify these authentication settings:
Setting
Value
Authentication
Select Shared Passphrase.
Passphrase
Enter the shared secret.
8. Click Add.
Step 3. Configure the Firewall Rule for VPN Traffic
To allow network traffic between both networks, create a firewall rule. You must create the same rule on both Barracuda Firewalls.
This example configures a firewall rule to allow traffic between the 10.0.10.0/24 and 10.0.20.0/24 networks.
1. Log into the Barracuda Firewall at Location 1.
2. Go to FIREWALL > Firewall Rules page.
3. Add a firewall rule with the following settings:
Action
Connection
Bi-directional
Service
Source
Destination
Allow
No SNAT
Select the Bi-direc
tional check box.
Any
10.0.10.0/24
10.0.20.0/24
With the Any service object, all types of network traffic are allowed between the remote and local network. For VPN tunnels, you must
select the No SNAT connection object.
4. At the top of the Add Access Rule window, click Add.
5. Log into the Barracuda Firewall at Location 2 and repeat steps 2 to 4.
Step 4. Verify the Order of the Firewall Rules
New rules are created at the bottom of the firewall rule set. Because rules are processed from top to bottom in the rule set, ensure that you
arrange your rules in the correct order. You must especially ensure that your rules are placed above the BLOCKALL rule; otherwise, the rules are
blocked. Check the order of the firewall rules in the rule sets for both Barracuda Firewalls.
After adjusting the order of rules in the rule set, click Save Changes.
Step 5. Verify Successful VPN Tunnel Initiation and Traffic Flow
To verify that the VPN tunnel was initiated successfully and traffic is flowing, go to the VPN > Site-to-Site Tunnels page. Verify that green check
marks are displayed in the Status column of the VPN tunnel.
Use ping to verify that network traffic is passing the VPN tunnel. Open the console of your operating system and ping a host within the remote
network. If no host is available, you can ping the management IP address of the remote Barracuda Firewall. Go to the NETWORK > IP
Configuration page and ensure that Services to Allow: Ping is enabled for the management IP address of the remote firewall.
If network traffic is not passing the VPN tunnel, go to the BASIC > Recent Connections page and ensure that network traffic is not blocked by
any other firewall rule.
Troubleshooting Site-to-Site VPNs
If your site-to-site VPN is not working correctly, try the solutions that are listed in this
article.
Related Articles
How to Configure a Site-to-Site
VPN with IPsec
Example - Configuring a
Site-to-Site IPsec VPN Tunnel
Ensure that the Internet connection for both systems is active.
To verify that the VPN tunnel was initiated successfully and traffic is flowing, go to the VPN > Site-to-Site Tunnels page. Verify that
green check marks are displayed in the Status column of the VPN tunnel.
Double-check the VPN configuration for both systems (Lifetime, Enycrption, Hash-Method, DH-Group, Local and Remote Networks,
Local and Remote Address, and Passphrase). Go to the VPN > Site-to-Site Tunnels page and verify the tunnel settings. The
configurations of the peers must match or the tunnel cannot be established.
Go to the LOGS > VPN Log page. Search the log for any failures and errors. Often, the problem is caused by
Phase 1 and Phase 2 issues.
From a client in the local network, ping a host in the remote network. If no host is available, try to ping the management IP address of the
remote Barracuda Firewall. If that does not succeed, go to the NETWORK > IP Configuration page on the remote Barracuda Firewall
and ensure that Services to Allow: Ping is enabled for the management IP address.
View the the BASIC > Recent Connections page to verify that the correct firewall rule matches the traffic.
Using the tracert and traceroute command-line utilities, determine where traffic is being sent. You can begin a traceroute from the
Network Connectivity Tests section on the ADVANCED > Troubleshooting page. If traffic is being sent to the remote network but you
are not getting a reply, verify that the gateway of the remote network is the IP address of the remote Barracuda Firewall.
SSL VPN for the Barracuda Firewall
Version Info
This feature is available on the Barracuda Firewall X200 and above, with version 6.1.0 and higher.
With the SSL VPN for the Barracuda Firewall, you can grant users with secure SSL/TLS-encrypted access to internal corporate resources and
applications through a customizable web interface.
Client Requirements
Configuring SSL VPNs
Client Requirements
To access the VPN via the SSL VPN portal, users' workstations must fulfill the following requirements:
Java Runtime version 1.6 and above must be installed. This is required to run the browser-based Java applet, generic tunneling, and the
Barracuda NG SSL VPN client.
Supported web browsers are Microsoft Internet Explorer version 6 or above, and Firefox version 2 or above.
Configuring SSL VPNs
For instructions on setting up SSL VPNs, see the following articles:
How to Enable and Configure SSL VPN for the Barracuda Firewall
How to Configure SSL VPN Resources for the Barracuda Firewall
How to Enable and Configure SSL VPN for the Barracuda Firewall
Before your end users can access the SSL VPN, you must enable and configure it. To establish the SSL VPN portal as trustworthy, it is
recommended that you install a CA-trusted root certificate on the Barracuda Firewall. For transparent access, you can enable the SSL VPN client.
Disable Use TCP Port 443 for the VPN service to use both SSL VPN and VPN service on the same IP address.
In this article:
Step 1. Enable the SSL VPN
Static IP Address
Secondary IP Address
Dynamic Network Interface
Step 2. Configure User Authentication
Step 3. Configure the SSL VPN Portal
Step 4. Upload a Certificate
Step 5. Enable the SSL VPN Client
Next Steps
Step 1. Enable the SSL VPN
When you enable the SSL VPN portal, determine if you are using a static, dynamic, or secondary IP address for the portal. Typically, the SSL
VPN portal is deployed on a static WAN IP address that faces the Internet with a respective DNS A resource record. The portal can also use a
secondary IP address of the Barracuda Firewall for internal access.
Static IP Address
If you are using a static IP address:
1. Go to the Network > IP Configuration page.
2. In the Static Interface Configuration section, select the SSL VPN check box for the required interface.
3. Click Save Changes.
Secondary IP Address
Typically, a secondary IP address is used to provide the SSL VPN portal on internal network segments.
If you are using a secondary IP address:
1. Go to the Network > IP Configuration page.
2. In the Management IP Configuration section, select the SSL VPN check box next to the required IP address in the Secondary IP
Addresses table.
3. Click Save Changes.
Dynamic Network Interface
To serve the SSL VPN portal on a dynamic interface instead of a static IP address, also complete the following steps:
1. Go to the FIREWALL > Firewall Rules page.
2. Add a redirect firewall rule with the following settings:
Name: Enter a name for the firewall rule. E.g., Redirect-to-SSL-VPN
2.
Action: Select Redirect to Service.
Source: Click on Network Object and select Internet from the list.
Destination: Select the network object representing your incoming internet connection.
Redirected To: Select SSL VPN.
3. To enable access to the SSL VPN portal via a hostname instead of only via the IP address (because the latter may change), you use the
third-party DynDNS service.
a. Go to the NETWORK > IP Configuration page.
b. In the Dynamic Interface Configuration, enable Use Dynamic DNS for the required interface.
4. Click Save Changes.
Step 2. Configure User Authentication
End users must authenticate themselves before they can access internal resources and applications with the SSL VPN. You can manage user
authentication either locally on the Barracuda Firewall or externally with MS Active Directory, LDAP, or RADIUS. For
configure local or external user authentication on the Barracuda Firewall, see
instructions on how to
Managing Users and Groups .
To specify how users are authenticated for the SSL VPN, go to the VPN > SSL VPN > Authentication page and select the method from the User
Authentication list.
Step 3. Configure the SSL VPN Portal
After you enable SSL VPN and specify the authentication method, configure general and appearance settings:
1. Go to the VPN > SSL VPN page and click the Server Settings tab.
2. In the General Settings section, specify the basic settings for the SSL VPN.
For increased security, Barracuda Networks recommends that you enable Enforce Strong Ciphers.
By default, the SSL VPN portal does not accept SSLv2 connections because SSLv2 is considered unsafe. If you must allow
SSLv2 connections for compatibility reasons, enable Allow SSLv2.
To prevent browsers from saving SSL VPN session information and cookies, disable Allow Autocomplete.
3. In the Appearance section, customize the look of the SSL VPN portal.
3.
In the Welcome Message and Help Text fields, only ASCII characters are allowed. For an overview of ASCII characters see
the Wikipedia page.
Step 4. Upload a Certificate
It is recommended that you install a CA-trusted root certificate on the Barracuda Firewall, so that web browsers trust the SSL VPN portal and do
not issue a warning to end users when they access the portal. If a certificate is not installed, the SSL VPN portal page delivers the default
self-signed certificate.
To upload a certificate, go to the VPN > Certificates page. You can upload a new certificate or select one that has already been uploaded from
the Certificate list.
Step 5. Enable the SSL VPN Client
For transparent VPN access, end users can launch the SSL VPN client by clicking the My Network link in the upper right of the SSL VPN portal.
After users are authenticated, they are given access to the target network.
To enable the SSL VPN client:
1. Go to the VPN > SSL VPN page and click the Client Settings tab.
2. In the SSL VPN Client Settings section, set Enabled to Yes.
3. Configure the remaining settings.
Next Steps
After you enable and configure the SSL VPN, end users can access the portal in their web browsers. If an A resource record for the WAN IP
address of your Barracuda Firewall is assigned, end users can access the portal page by opening https://example.com .
To add resources for your end users to the SSL VPN portal, see How to Configure SSL VPN Resources for the Barracuda Firewall.
The login page for the portal displays as follows:
How to Configure SSL VPN Resources for the Barracuda Firewall
After you enable and configure the SSL VPN, you can add Outlook Web Access (OWA), WebDAV shares, applications, and Intranet resources to
the SSL VPN portal.
In this article:
Configure Outlook Web Access / Outlook Web App
Add an Application
Add a WebDAV Share
Add an Intranet Resource
Configure Outlook Web Access / Outlook Web App
To give your end users direct access to the corporate email resources, configure an Outlook Web Access / Outlook Web App (OWA) resource.
The OWA applet also supports single sign-on so that end users do not need to repeatedly re-authenticate themselves.
To configure OWA:
1. Go to the VPN > SSL VPN page and click the Portal Settings tab.
2. In the Outlook Web Access section, set Enabled to Yes.
3. Configure the remaining settings in the Outlook Web Access section.
Add an Application
The Barracuda Firewall's SSL VPN supports the following application protocols:
SMB
RDP
Telnet
SSH
SMTP
POP3
VNC
IMAP4
To add an application:
1. Go to the VPN > SSL VPN page and click the Portal Settings tab.
2. In the Applications section, click Add Application.
3. In the Edit Application window, configure access to the application.
Add a WebDAV Share
To give direct access to WebDAV share, add a network place:
1. Go to the VPN > SSL VPN page and click the Portal Settings tab.
2. In the Network Places section, click Add Network Place.
3. In the Edit Network Place window, configure access to the network share.
Add an Intranet Resource
To give direct access to an Intranet resource, add a web forward:
1. Go to the VPN > SSL VPN page and click the Portal Settings tab.
2. In the Web Forwards section, click Add Web Forward.
3. In the Edit Web Forward window, configure access to the Intranet resource.
How to Allow VPN Access via a Dynamic WAN IP Address
You can configure VPN connections to use a dynamically assigned WAN IP address on
the Barracuda Firewall. In the VPN settings, enable use of dynamic IP addresses. Then
configure a firewall rule that redirects VPN traffic to the VPN server.
In this article:
Step 1. Configure VPN Access via a Dynamic WAN IP Address
Step 2. Verify the Order of the Firewall Rules
Related Articles
How to Configure a Client-to-Site
VPN with PPTP
How to Configure a Site-to-Site
VPN with IPsec
How to Configure a Client-to-Site
VPN with IPsec
Step 1. Configure VPN Access via a Dynamic WAN IP Address
To allow VPN access via a dynamic WAN IP address:
1. On the VPN > Site-to-Site Settings page, in the IKE (Key Exchange) section, verify that Use Dynamic IPs is set to Yes.
2.
If you want to make your VPN available through a DNS hostname, you can register the hostname
with http://dyn.
com/dns. For more information, see How to Configure a DHCP Connection.
3. Create a new firewall rule that redirects the VPN traffic to the VPN server to establish the tunnel:
a. Go to the FIREWALL > Firewall Rules page.
Create a firewall rule that redirects incoming VPN connections on the dynamic interface to the VPN server listening on the local
IP address. Choose the Network Object corresponding to your internet connection type (DHCP, 3G or DSL) as the Destination:
b. At the top of the Add Access Rule window, click Add .
Step 2. Verify the Order of the Firewall Rules
New rules are created at the bottom of the firewall rule set. Because rules are processed from top to bottom in the rule set, arrange your rules in
the correct order. You must especially ensure that your rules are placed above the BLOCKALL rule; otherwise, the rules are blocked.
After adjusting the order of rules in the rule set, click Save Changes.
Cloud Features
Barracuda offers two cloud services to centrally manage multiple Barracuda Firewalls and offload processor-intensive tasks:
Barracuda Cloud Control
Barracuda Web Security Service
Barracuda Cloud Control
Barracuda Cloud Control is a comprehensive cloud-based service that lets you monitor and configure multiple Barracuda products from a single
console. When your Barracuda Firewall is linked to Barracuda Cloud Control, it continuously synchronizes its configuration settings with the
service.
For more information on Barracuda Cloud Control, see Barracuda Cloud Control and How to Configure Barracuda Cloud Control.
Barracuda Web Security Service
Barracuda Web Security Service is a cloud-based web filtering and security service. It helps conserve bandwidth by enforcing web policies in the
cloud before forwarding traffic to the Barracuda Firewall.
For more information on the Barracuda Web Security Service, see Barracuda Web Security Service and How to Configure the Barracuda Web
Security Service.
How to Configure the Barracuda Web Security Service
You can configure the Barracuda Firewall to act as a transparent proxy. If you enable the proxy feature, outgoing HTTP traffic is intercepted and
redirected to either the Barracuda Web Security Service or to an upstream proxy (the latter option is rarely used).
Before you begin:
The Barracuda Web Security Service requires a paid subscription. To verify that your subscription is active:
1. Log into your Barracuda Cloud Control Account.
2. Go to the Account > Users page.
3. Verify that Product Entitlements: Web Security is selected. If not, contact your reseller or Barracuda Networks representative.
To configure the Barracuda Web Security Service on the Barracuda Firewall:
1. On the NETWORK > Proxy page, select Use Barracuda Web Security Service if connected (recommended).
2. To include the user and domain name if available, select the Include User Information check box.
For local users, this information is retrieved from the Barracuda DC agent. For information on how to get, install, and configure
the Barracuda DC Agent, see About the Barracuda DC Agent.
For VPN users, the information comes from whatever authentication method is used.
To change this selection later, you must disable and then re-enable the Barracuda Web Security Service so that it registers your
change.
3. To redirect HTTP traffic to the Barracuda Web Security Service, create the required firewall rules.
a. Go to the FIREWALL > Firewall Rules page.
b. Edit and enable the pre-installed TRANSPARENT-PROXY and TRANSPARENT-PROXY-WIFI (if using Wi-Fi) firewall rules to all
ow traffic to pass to the Barracuda Web Security Service.
4. Complete the connection from the Barracuda Firewall to the Barracuda Web Security Service.
a. Go to the BASIC > Cloud Control page.
b. Verify that your customer account information is entered.
c. Enable Connect to Barracuda Cloud Control and save your changes. After a successful connection, a "Connected" status is
displayed.
5. Log into your Barracuda Cloud Control account again.
6. Click the Web Security tab and refresh the display. Some network activity appears.
How to Configure Barracuda Cloud Control
With the Barracuda Cloud Control service, you can centrally configure and manage multiple Barracuda Firewalls. When a Barracuda Firewall is
linked to Barracuda Cloud Control, it continuously synchronizes its configuration settings with the service.
To connect a Barracuda Firewall to Barracuda Cloud Control:
1. Go to the BASIC > Cloud Control page and verify that your customer account information is already entered.
2. Enable Connect to Barracuda Cloud Control and click Save Changes. After a successful connection, a "Connected" status appears,
indicating that this Barracuda Firewall can be centrally managed using Barracuda Cloud Control.
You do not have to edit any firewall rules.
For more information on Barracuda Cloud Control, see Barracuda Cloud Control.
Monitoring
The Barracuda Firewall incorporates hardware and software fail-safe mechanisms that are indicated via system alerts and logs. You can inspect
the logs to see what is happening with traffic. SNMP monitoring and traps are supported.
These articles describe the tools and monitoring tasks that you can use to track connections and system performance.
In this Section
Monitoring Active and Recent Connections
Viewing Logs
Troubleshooting
How to Configure Log Streaming
Monitoring Active and Recent Connections
To monitor network sessions or connections, view the following pages from the BASIC tab:
Active Connections – Lists all of the open and established sessions on the appliance.
Recent Connections – Lists all of the connections that were established on the Barracuda Firewall or that were trying to access the
Barracuda Firewall.
You can find the information that you are interested in by filtering the lists. For a description of the displayed fields and information on how to add
filters, click Help on the product page.
In this article:
Active Connections
Recent Connections
Status Code Overview
Active Connections
The BASIC > Active Connections page lists all of the open and established sessions on the appliance. You can terminate any session
by
clicking on the red x ( ). If QoS is enabled for a connection, you can manually override the bandwidth policy for the
connection by clicking on the arrow next to it and selecting a different policy from the drop-down menu.
In the State column, the following arrows tell you if the connection is established or closing:
Arrow
Status
One-way traffic.
Connection established (TCP). Two-way traffic (all other).
Connection could not be established.
Closing connection.
To view the status of a connection, hover over the arrow for a status code. For more information about these status codes, see the Status Code
Overview.
Recent Connections
The BASIC > Recent Connections page lists all of the connections that were established on the Barracuda Firewall or that were trying to access
the Barracuda Firewall. Use the information on this page for troubleshooting.
In the Action column, the following graphics tell you what action was performed for each connection:
Graphic
Action
IPS Rule Applied
Allowed
Terminated
Failed
Blocked
Dropped
To see if there is still incoming or outgoing traffic for a specific session, click Refresh and then look at its Last or Co
unt value.
Sometimes, you might need to view ARP-Update traffic to troubleshoot in more detail. To display ARP-Update info, select the Include ARPs chec
k box.
To delete the whole history, click Flush Entries.
Status Code Overview
The following table provides more details on the status codes that you might see on the BASIC > Active Connections page.
Status Code
Origin
Description
FWD-NEW
TCP Packet Forwarding Outbound
Session is validated by the firewall rule set,
no traffic was forwarded so far.
FWD-FSYN-RCV
TCP Packet Forwarding Outbound
The initial SYN packet received from the
session source was forwarded.
FWD-RSYN-RSV
TCP Packet Forwarding Outbound
The session destination answered the SYN
with a SYN/ACK packet.
FWD-EST
TCP Packet Forwarding Outbound
The SYN/ACK packet was acknowledge by
the session source. The TCP session is
established.
FWD-RET
TCP Packet Forwarding Outbound
Either source or destination are
retransmitting packets. The connection might
be dysfunctional.
FWD-FFIN-RCV
TCP Packet Forwarding Outbound
The session source sent a FIN datagram
indicating to terminate the session.
FWD-RLACK
TCP Packet Forwarding Outbound
The session destination answered the FIN
packet with a FIN reply and awaits the last
acknowledgement for this packet.
FWD-RFIN-RCV
TCP Packet Forwarding Outbound
The session destination sent a FIN datagram
indicating to terminate the session.
FWD-FLACK
TCP Packet Forwarding Outbound
The session source answered the FIN packet
with a FIN reply and awaits the last
acknowledgement for this packet.
FWD-WAIT
TCP Packet Forwarding Outbound
The session was reset by one of the two
participants by sending a RST packet. A wait
period of 5 seconds will silently discard all
packet belonging to that session.
FWD-TERM
TCP Packet Forwarding Outbound
The session is terminated and will shortly be
removed from the session list.
IFWD-NEW
TCP Packet Forwarding Inbound
Session is validated by the firewall rule set,
no traffic was forwarded so.
IFWD-SYN-SND
TCP Packet Forwarding Inbound
A SYN packet was sent to the destination
initiating the session (Note that the session
with the source is already established).
IFWD-EST
TCP Packet Forwarding Inbound
The destination replied the SYN with a
SYN/ACK. The session is established.
IFWD-RET
TCP Packet Forwarding Inbound
Either source or destination are re
transmitting packets. The connection might
be dysfunctional.
IFWD-FFIN-RCV
TCP Packet Forwarding Inbound
The session source sent a FIN datagram
indicating to terminate the session.
IFWD-RLACK
TCP Packet Forwarding Inbound
The session destination answered the FIN
packet with a FIN reply and awaits the last
acknowledgement for this packet.
IFWD-RFIN-RCV
TCP Packet Forwarding Inbound
The session destination sent a FIN datagram
indicating to terminate the session.
IFWD-FLACK
TCP Packet Forwarding Inbound
The session source answered the FIN packet
with a FIN reply and awaits the last
acknowledgement for this packet.
IFWD-WAIT
TCP Packet Forwarding Inbound
The session was reset by one of the two
participants by sending a RST packet. A wait
period of 5 seconds will silently discard all
packet belonging to that session.
IFWD-TERM
TCP Packet Forwarding Inbound
The session is terminated and will shortly be
removed from the session list.
PXY-NEW
TCP Stream Forwarding Outbound
Session is validated by the firewall rule set,
no traffic was forwarded so far.
PXY-CONN
TCP Stream Forwarding Outbound
A socket connection to the destination is in
progress of being established.
PXY-ACC
TCP Stream Forwarding Outbound
A socket connection to the source is in
progress of being accepted.
PXY-EST
TCP Stream Forwarding Outbound
Two established TCP socket connection to
the source and destination exist.
PXY-SRC-CLO
TCP Stream Forwarding Outbound
The socket to the source is closed or is in the
closing process.
PXY-DST-CLO
TCP Stream Forwarding Outbound
The socket to the destination is closed or is
in the closing process.
PXY-SD-CLO
TCP Stream Forwarding Outbound
The source and the destination socket are
closed or in the closing process.
PXY-TERM
TCP Stream Forwarding Outbound
The session is terminated and will shortly be
removed from the session list.
IPXY-NEW
TCP Stream Forwarding Inbound
Session is validated by the firewall rule set,
no traffic was forwarded so far.
IPXY-ACC
TCP Stream Forwarding Inbound
A socket connection to the source is in
progress of being accepted.
IPXY-CONN
TCP Stream Forwarding Inbound
A socket connection to the destination is in
progress of being established.
IPXY-EST
TCP Stream Forwarding Inbound
Two established TCP socket connection to
the source and destination exist.
IPXY-SRC-CLO
TCP Stream Forwarding Inbound
The socket to the source is closed or is in the
closing process.
IPXY-DST-CLO
TCP Stream Forwarding Inbound
The socket to the destination is closed or is
in the closing process.
IPXY-SD-CLO
TCP Stream Forwarding Inbound
The source and the destination socket are
closed or in the closing process
IPXY-TERM
TCP Stream Forwarding Inbound
The session is terminated and will shortly be
removed from the session list.
UDP-NEW
UDP Forwarding
Session is validated by the firewall rule set,
no traffic was forwarded so far.
UDP-RECV
UDP Forwarding
Traffic has been received from the source
and was forwarded to the destination.
UDP-REPL
UDP Forwarding
The destination replied to the traffic sent by
the source.
UDP-SENT
UDP Forwarding
The source transmitted further traffic after
having received a reply from the destination.
UDP-FAIL
UDP Forwarding
The destination or a network component on
the path to the destination sent an ICMP
indicating that the request cannot be
serviced.
ECHO-NEW
ECHO Forwarding
Session is validated by the firewall rule set,
no traffic was forwarded so far.
ECHO-RECV
ECHO Forwarding
Traffic has been received from the source
and was forwarded to the destination.
ECHO-REPL
ECHO Forwarding
The destination replied to the traffic sent by
the source.
ECHO-SENT
ECHO Forwarding
The source sent more traffic after racing a
reply from the destination.
ECHO-FAIL
ECHO Forwarding
The destination or a network component on
the path to the destination sent an ICMP
indicating that the request cannot be
serviced.
OTHER-NEW
OTHER Protocols Forwarding
Session is validated by the firewall rule set.
No traffic was forwarded so far.
OTHER-RECV
OTHER Protocols Forwarding
Traffic has been received from the source
and was forwarded to the destination.
OTHER-REPL
OTHER Protocols Forwarding
The destination replied to the traffic sent by
the source.
OTHER-SENT
OTHER Protocols Forwarding
The source sent more traffic after receiving a
reply from the destination.
OTHER-FAIL
OTHER Protocols Forwarding
The destination or a network component on
the path to the destination sent an ICMP
indicating that the request cannot be
serviced.
LOC-NEW
Local TCP Traffic
A local TCP session was granted by the local
rule set.
LOC-EST
Local TCP Traffic
The local TCP session is fully established.
LOC-SYN-SND
Local TCP Traffic
A Local-Out TCP session is initiated by
sending a SYN packet.
LOC-SYN-RCV
Local TCP Traffic
A Local-In TCP session is initiated by
receiving a SYN packet.
LOC-FIN-WAIT1
Local TCP Traffic
An established local TCP session started the
close process by sending a FIN packet.
LOC-FIN-WAIT2
Local TCP Traffic
A local TCP session in the FIN-WAIT1 state
received an ACK for the FIN packet.
LOC-TIME-WAIT
Local TCP Traffic
A local TCP session in the FIN-WAIT1 or in
the FIN-WAIT2 state received a FIN packet.
LOC-CLOSE
Local TCP Traffic
An established local TCP session is closed.
LOC-CLOSE-WAIT
Local TCP Traffic
An established local TCP session received a
FIN packet.
LOC-LAST-ACK
Local TCP Traffic
Application holding an established TCP
socket responded to a received FIN by
closing the socket. A FIN is sent in return.
LOC-LISTEN
Local TCP Traffic
A local socket awaits connection request
(SYN packets).
LOC-CLOSING
Local TCP Traffic
A local socket in the FIN_WAIT1 state
received a FIN packet.
LOC-FINISH
Local TCP Traffic
A local TCP socket was removed from the
internal socket list.
Viewing Logs
From the LOGS tab, there are a number of log files that you can view to monitor and troubleshoot the Barracuda Firewall:
Firewall Log
HTTP Log
Network Log
VPN Log
Service Log
Authentication Log
HTTP Log Codes Overview
TCP Codes
ERR Codes
For all of these logs, click Help for a description of the information on the page.
Firewall Log
The Firewall Log displays firewall activity such as rules that have been executed and traffic that has been dropped. It lists all connections on the
Barracuda Firewall. You can filter the log by criteria such as a source IP address or network, or the time that the connections occurred.
HTTP Log
The HTTP Log displays the activities of the Barracuda Firewall's HTTP proxy. There are several codes in the log. For details on these codes, see
the HTTP Log Codes Overview section.
Network Log
Use the Network Log to investigate why network configuration changes are not working properly or cannot be activated.
The messages in the Network Log might explain the problem. If not, check the network configuration again for any problems or conflicts.
VPN Log
The VPN Log displays information for all client-to-site and site-to-site VPN tunnels. Use this log to investigate why VPN tunnels and PPTP
connections are disconnecting or not being established.
To see the messages for specific VPN connections, you can also filter the log by IP addresses.
Service Log
The Service Log lists specific errors and warnings for services that are not configured properly or are encountering problems. To restart these
services and debug any problems, you might need to contact Barracuda Networks Technical Support for assistance.
Authentication Log
The Authentication Log displays messages from the authentication service. This includes logins for the web interface and messages from the
various authentication methods.
For example, if a client is not able to access a service, the unsuccessful authentications are written into the log. Successful authentications are
also recorded.
HTTP Log Codes Overview
The following tables provide details on the codes that you might see on the LOGS > HTTP Log page.
TCP Codes
TCP_" refers to requests on the HTTP port (3128)
Code
Description
TCP_HIT
A valid copy of the requested object was in the cache.
TCP_MISS
The requested object was not in the cache.
TCP_REFRESH_HIT
An expired copy of the requested object was in the cache. Squid
made an If-Modified-Since request and the response was "Not
Modified."
TCP_REFRESH_FAIL_HIT
An expired copy of the requested object was in the cache. Squid
attempted to make an If-Modified-Since request, but it failed. The old
(stale) object was delivered to the client.
TCP_REFRESH_MISS
An expired copy of the requested object was in the cache. Squid
made an If-Modified-Since request and received a new object.
TCP_CLIENT_REFRESH
The client issued a request with the "no-cache" pragma. ("reload" handled as MISS)
TCP_IMS_HIT
An If-Modified-Since GET request was received from the client. A
valid copy of the object was in the cache (fresh).
TCP_IMS_MISS
An If-Modified-Since GET request was received from the client. The
requested object was not in the cache (stale).
TCP_SWAPFAIL
The object was believed to be in the cache, but could not be
accessed.
TCP_DENIED
Access was denied for this request.
ERR Codes
Error
Description
ERR_READ_TIMEOUT
The remote site or network is unreachable; it may be down.
ERR_LIFETIME_EXP
The remote site or network may be too slow or down.
ERR_NO_CLIENTS_BIG_OBJ
All clients went away before transmission completed and the object is
too big to cache.
ERR_READ_ERROR
The remote site or network may be down.
ERR_CLIENT_ABORT
Client dropped connection before transmission completed. Squid
fetches the Object according to its settings for `quick_abort'.
ERR_CONNECT_FAIL
The remote site or server may be down.
ERR_INVALID_REQ
Invalid HTTP request.
ERR_UNSUP_REQ
Unsupported request.
ERR_INVALID_URL
Invalid URL syntax.
ERR_NO_FDS
Out of file descriptors.
ERR_DNS_FAIL
DNS name lookup failure.
ERR_NOT_IMPLEMENTED
Protocol not supported.
ERR_CANNOT_FETCH
The requested URL cannot currently be retrieved.
ERR_NO_RELAY
There is no WAIS relay host defined for this cache.
ERR_DISK_IO
The system disk is out of space or failing.
ERR_ZERO_SIZE_OBJECT
The remote server closed the connection before sending any data.
ERR_FTP_DISABLED
This cache is not configured to retrieve FTP objects.
ERR_PROXY_DENIED
Access denied. Users must be authenticated before accessing this
cache.
Troubleshooting
The following diagnostic tools should help you troubleshoot most problems. Please read this article before contacting Barracuda Networks
Technical Support.
In this article:
Basic Troubleshooting Tools
Connect to Barracuda Support Servers
Rebooting the System in Recovery Mode
Reboot Options
Barracuda Instant Replacement Service
Basic Troubleshooting Tools
The ADVANCED > Troubleshooting page provides a suite of tools to help you troubleshoot network connectivity issues that might be impacting
the performance of your Barracuda Firewall.
For example, you can test your Barracuda Firewall’s connection to the Barracuda Networks update servers to verify that it can successfully
download the latest Energize Update definitions. You can also ping or telnet to other devices from the Barracuda Firewall, perform dig/NS-lookup,
TCP dump, and perform a trace route from the Barracuda Firewall to any another system.
Connect to Barracuda Support Servers
To let technical support engineers troubleshoot your system, you can initiate a connection between your Barracuda Firewall and the Barracuda
Networks Technical Support Center. On the ADVANCED > Troubleshooting page, in the Support Connection section, click Establish
Connection to Barracuda Support Center.
Rebooting the System in Recovery Mode
If your Barracuda Firewall experiences a serious issue that impacts its core functionality, you can use diagnostic and recovery tools that are
available from the reboot menu to return your system to an operational state. Before
you use the diagnostic and recovery tools:
Use the built-in troubleshooting tools on the ADVANCED > Troubleshooting page to help diagnose the problem.
Perform a system restore from the last known good backup file.
Contact Barracuda Networks Technical Support for additional troubleshooting tips.
As a last resort, you can reboot your Barracuda Firewall and run a memory test or perform a complete system recovery, as described below.
To perform a system recovery or hardware test:
1. Connect a monitor and keyboard directly to your Barracuda Firewall.
2. Reboot the system by doing one of the following:
In the web interface: Go to the BASIC > Administration page, navigate to the System Reload/Shutdown section, and click Re
start.
At the front panel of the Barracuda Firewall: Press the Power button on the front panel to turn off the system, and then press the
Power button again to turn the system on.
The splash screen displays with the following three boot options:
Barracuda
Recovery
Hardware_Test
3. Use your keyboard to select a boot option, and then press the Enter key. You must select the boot option within three seconds after the
splash screen appears. If you do not select an option within three seconds, the Barracuda Firewall starts up in Normal mode (first
option). For a description of each boot option, refer to the Reboot Options below.
To stop a hardware test, reboot your Barracuda Firewall by pressing Ctrl+Alt+Del.
Reboot Options
The table below describes the options available at the reboot menu.
Reboot Options
Description
Barracuda
Starts the Barracuda Firewall in the normal (default) mode. This
option is automatically selected if no other option is specified within
the first three seconds of the splash screen appearing.
Recovery
Displays the Recovery Console, where you can select the following
options:
Barracuda Repair (no data loss) – Repairs the file system on
the Barracuda Firewall.
Full Barracuda Recovery (all data lost) – Restores the factory
settings on your Barracuda Firewall and clears out the
configuration information.
Enable remote administration (reverse runnel) – Turns on the
reverse tunnel that lets Barracuda Networks Technical Support
access the system. You can also enable remote administration
by going to the ADVANCED >Troubleshooting page and
clicking Establish Connection to Barracuda Support Center.
Diagnostic memory test – Runs a diagnostic memory test from
the operating system. If problems are reported when running this
option, we recommend running the Hardware_Test option next.
Hardware_Test
Performs a thorough memory test that shows most memory-related
errors within a two-hour time period. The memory test is performed
outside of the operating system and can take a long time to complete.
To stop the hardware test, reboot your Barracuda Firewall.
Replacing a Failed System
Before you replace your Barracuda Firewall, use the tools provided on the ADVANCED > Troubleshooting page to try to resolve the problem, or
call Barracuda Networks Technical Support.
Barracuda Instant Replacement Service
If you purchased the Instant Replacement service and the Barracuda Firewall fails, you can call Barracuda Networks Technical Support and
arrange for a new unit to be shipped out within 24 hours.
After receiving the new system, ship the old Barracuda Firewall back to Barracuda Networks at the address below, with an RMA number marked
clearly on the package. Barracuda Networks Technical Support can provide details on the best way to return the unit.
Barracuda Networks
3175 S. Winchester Blvd
Campbell, CA 95008
attn: RMA # <your RMA number>
To set up the new Barracuda Firewall so that it has the same configuration as your old failed system, first manually configure the new
system’s IP information on the BASIC > IP Configuration page, and then restore the backup file from the old system onto the new
system. For information on restoring data, see How to Save Configuration Backups and How to Restore the Barracuda Firewall with a
Saved Configuration Backup .
How to Configure Log Streaming
Version Info
This feature is available for the Barracuda Firewall version 6.1.0 and above.
With the Barracuda Firewall, you can choose to stream the following logs to a syslog server:
Firewall Log
HTTP Log
Network Log
VPN Log
Service Log
Authentication Log
Configure Syslog Streaming
Before you begin:
Verify that the syslog server supports the protocol that you want to use. All syslog servers support UDP, but not all support TCP.
To configure log streaming:
1.
2.
3.
4.
5.
Go to the LOGS > Log Streaming page.
In the Stream target field, type the hostname or IP address of your syslog server. You can define only one target.
Select the Protocol and Port. The default port for UDP is 514. If you select TCP, you must choose a different port.
Choose which log streams to enable.
Click Save Changes.
To verify that the connection to the syslog server can be established, go to the BASIC > Recent Connections page. Filter the list of
connections for the Protocol, Service, and Destination IP of the syslog server.
Maintenance
In this Section
How to Save Configuration Backups
How to Update the Firmware on Your Barracuda Firewall
How to Restore the Barracuda Firewall with a Saved Configuration Backup
How to Recover the Barracuda Firewall
How to Save Configuration Backups
Barracuda Networks recommends that you regularly back up the latest working configuration, in case you need to restore this information on a
replacement Barracuda Firewall or the current system data becomes corrupt. It is also very important to back up your configuration before
updating your Barracuda Firewall to the latest available firmware.
You can back up your current Barracuda Firewall configuration into a single file. After a misconfiguration or hardware failure, you can import this
backup file (*.bak) to the Barracuda Firewall to restore the saved configuration. You have two options for saving configuration backups:
For manual backups, on the local file system of a computer that manages the Barracuda Firewall.
For automated backups, remotely on an FTP server as well as on a Windows network share (SMB).
The following information is not included in the backup file:
System password
System management IP address
DNS information
In this article:
Manually Back Up the Barracuda Firewall
Automatically Back Up the Barracuda Firewall
Restoring the Barracuda Firewall with a Configuration Backup
Manually Back Up the Barracuda Firewall
To manually save a configuration backup of a Barracuda Firewall and store it locally:
1. Go to the ADVANCED > Backups page.
2. In the Configuration Backup section, select the System Configuration check box and click Backups. Your web browser offers a file
that contains the current configuration of your Barracuda Firewall for download.
3. Choose a destination on your local file system and accept the download.
Automatically Back Up the Barracuda Firewall
To automatically back up your configurations and store them on either an FTP server or a Windows network share:
1.
2.
3.
4.
5.
6.
Go to the ADVANCED > Backups page.
In the Automated Backups section, select either FTP or SMB (Windows Shared) from the Server Type list.
Enter the settings for the server on which the backup file will be stored.
To test the connection to the server, click Test Backup Server.
Configure and schedule the automated backups.
Click Save Changes.
Restoring the Barracuda Firewall with a Configuration Backup
For information on how to restore a saved configuration backup, see How to Restore the Barracuda Firewall with a Saved Configuration Backup.
How to Update the Firmware on Your Barracuda Firewall
Before you begin:
Back up your current Barracuda Firewall configuration. For more information, see How to Save Configuration Backups.
To manually update the firmware version of the Barracuda Firewall:
1. Go to the ADVANCED > Firmware Update page.
2. If you have the latest firmware version already installed, you can click Download Now.
Applying the update might take several minutes to complete. The Barracuda Firewall automatically reboots after the update is applied.
How to Restore the Barracuda Firewall with a Saved Configuration Backup
To back up and restore the configuration of your Barracuda Firewall, go to the ADVANCED > Backups page. You can restore your Barracuda
Firewall from either locally saved backups or backups stored on a remote server.
Regularly back up your appliance, in case you need to restore this information on a replacement Barracuda Firewall or the current system data
becomes corrupt. For more information about backing up and restoring your appliance, click Help on the ADVANCED > Backups page.
The following information is not included in the backup file:
System password: After the appliance is restored, the password is reset to the default password (admin).
DNS information
How to Recover the Barracuda Firewall
To recover the Barracuda Firewall, you can use the Recovery Console with one of the following recovery options:
Barracuda Repair – Retains your settings and data during system recovery.
Full Barracuda Repair – Reinstalls the Barracuda Firewall with factory default settings. With this option, all your settings and data will be
lost. If you are unsure of which recovery option to use, first run the Barracuda Repair. If problems persist, run a Full Barracuda Repair.
Do not manually reboot your system at any time during recovery or repair, unless otherwise instructed by Barracuda Networks
Technical Support. Depending on your current firmware version and other system factors, this process can take up to 15 minutes. If it
takes longer, please contact Barracuda Networks Technical Support for further assistance.
In this article:
Before You Begin
Recover the Barracuda Firewall
Before You Begin
Before you recover the Barracuda Firewall, ensure that you have physical access to the system. You must also have the following equipment:
Monitor with a VGA cable
USB keyboard
Recover the Barracuda Firewall
To recover the Barracuda Firewall:
1.
2.
3.
4.
5.
Ensure that the Barracuda Firewall is turned off and the ports in the back of the appliance are accessible.
Connect the monitor to the VGA port.
Connect the keyboard to one of the USB ports.
Turn on the Barracuda Firewall by plugging the power cord in.
When the bootloader menu displays, use your keyboard to select Recovery. After two to three minutes, the system boots into the
Recovery Console menu:
Recovery Console
BARRACUDA NETWORKS RECOVERY CONSOLE
Please make a selection
(1) Barracuda Repair (no data loss)
(2) Full Barracuda Recovery (all data lost)
(3) Enable remote administration (reverse tunnel)
(5) EXIT
6. Select a recovery option:
If you want to retain all of your data and settings during the repair, enter 1 to select the Barracuda Repair (no data loss) option.
If you want to restore the Barracuda Firewall with the default factory settings, enter 2 to select the Full Barracuda Recovery (all
data lost) option. With this option, you will lose all of your current data and settings. When you are prompted by the on-screen
instructions, confirm that you want to continue with the recovery.
7. After you receive the message stating that the recovery process is complete, enter 5 to exit the Recovery Console. The Barracuda
Firewall then reboots.
If problems persist after the reboot, please contact Barracuda Networks Technical Support for further assistance.
Specifications of Hardware Models
Warranty and Safety Instructions
Unless you are instructed to do so by Barracuda Networks Technical Support, you will void your warranty and hardware support if you
open your Barracuda Networks appliance or remove its warranty label.
Barracuda Networks Appliance Safety Instructions Hardware Compliance
In this article:
Technical Specifications of the Barracuda Firewall
Security Features
Central Management
Security Options
Support Options
Hardware Specifications of the Various Barracuda Firewall Models
X100 / X101
X200 / X201
X300
X400
X600
Technical Specifications of the Barracuda Firewall
Security Features
Central Management
Security Options
Support Options
Firewall
Barracuda Control Center
(BCC)
Barracuda Web Security
Energize Updates
Stateful packet forwarding
Intrusion Prevention System
(IPS)
Application enforcement
(including subtypes)
Denial of Service (DOS) /
Distributed DoS (DDoS)
protection
NAT (src,dst,nets), NAPT,
PAT
Object-oriented rule sets
Dynamic rules / timer
triggers
User/group based firewall
rules
ARP security
Bridging
Virtual rule test environment
Jumbo frame support
Infrastructure Services
DHCP server
HTTP proxy
SIP proxy
DNS cache, Authoritative
DNS server
Authentication—Supports
x.509, NTLM, RADIUS,
LDAP/LDAPS, Active
Directory, and local
authentication
Authentication via captive
portal
Windows Active Directory
agent for transparent
user-to-IP mapping
SNMP support
Traffic Optimization
Uplink monitoring and
aggregation
Policy routing
Traffic shaping and QoS
Seven predefined shaping
bands
Wi-Fi (on selected models)
Access to BCC included
with every Barracuda
Firewall unit
Central management via the
BCC cloud portal
Optional security
subscription for 1, 3, or 5
years
Includes web filter
Includes malware protection
Scanning in the cloud
Firmware updates
IPS signature updates
Application control updates
Basic support
Instant Replacement Service
Replacement unit shipped
next business day
24x7 technical support
Wi-Fi (802.11n) access
point
Up to three wireless
networks
Click-through Wi-Fi Portal
webpage for guest access
User/pass webpage for
Wi-Fi guest access
VPN
Unlimited Site-to-Site VPN
Unlimited Client-to-Site VPN
SSL VPN
VPNC certified (basic
interop)
IPsec, PPTP
Supports
AES-128/256, 3DES, DES,
Null ciphers
IPsec VPN clients for
Windows, Mac, Linux
iOS and Android mobile
device VPN support
Hardware Specifications of the Various Barracuda Firewall Models
The hardware configuration list in this table was valid at the time this content was created. The listed components are subject to change
at any time, as Barracuda Networks may change hardware components due to technological progress. Therefore, the list may not
reflect the current hardware configuration of the Barracuda Firewall.
Barracuda Firewall Model
Capacity
X100 / X101
X200 / X201
X300
X400
X600
Form factor
Desktop
Desktop
1U rack mount
1U rack mount
1U rack mount
Dimensions (mm)
272 x 195 x 44
272 x 195 x 44
426 x 238 x 44
427 x 405 x 44
427 x 405 x 44
Dimensions (inch)
10.7 x 7.7 x 1.7
10.7 x 7.7 x 1.7
16.8 x 9.4 x 1.7
16.8 x 15.9 x 1.7
16.8 x 15.9 x 1.7
Weight (kg / lb)
2.3 / 5.1
2.3 / 5.1
3.4 / 7.5
5.1 / 11.3
5.1 / 11.3
Ports
4 x GbE copper
4 x GbE copper
6 x GbE copper
8 x GbE copper
8 x GbE copper
Power supply
Single external
Single external
Single internal
Single internal
Single internal
Integrated Wi-Fi
access point
Yes, model X101
only
specs below
Yes, model X201
only
specs below
No
No
No
3G USB modem
Optional
Optional
Optional
Optional
Optional
Hardware
Features
Firewall
Yes
Yes
Yes
Yes
Yes
IPsec VPN
(client-to-site)
Yes
Yes
Yes
Yes
Yes
IPsec VPN
(site-to-site)
Yes
Yes
Yes
Yes
Yes
SSL VPN
No
Yes
Yes
Yes
Yes
Application control
Yes
Yes
Yes
Yes
Yes
Intrusion prevention
(IPS)
Yes
Yes
Yes
Yes
Yes
DHCP server
Yes
Yes
Yes
Yes
Yes
DNS cache
Yes
Yes
Yes
Yes
Yes
DNS server
(authoritative)
Yes
Yes
Yes
Yes
Yes
SIP proxy
Yes
Yes
Yes
Yes
Yes
Automatic uplink
failover
Yes
Yes
Yes
Yes
Yes
Uplink balancing
Yes
Yes
Yes
Yes
Yes
Traffic shaping
Yes
Yes
Yes
Yes
Yes
Web security (URL,
AV)
Optional, UL per unit
Optional, UL per unit
Optional, UL per unit
Optional, UL per unit
Optional, UL per unit
Centrally
manageable
Yes, cloud-based
Yes, cloud-based
Yes, cloud-based
Yes, cloud-based
Yes, cloud-based
Integrated Wi-Fi Access Point Specifications (Model X101/X201)
Standards
IEEE 802.11b/g/n, CSMA/CA with ACK
Frequency
2.4-2.4835 GHz
Signal rate
11n: Up to 150Mbps, 11g: Up to 54Mbps, 11b: Up to 11Mbps
EIRP
20 dBm (MAX)
Radio receive sensitivity
130Mbps: -68 dBm @10% PER
108Mbps: -68 dBm @10% PER
54Mbps: -68 dBm @10% PER
11Mbps: -85 dBm @8% PER
6Mbps: -88 dBm @10% PER
1Mbps: -90 dBm @8% PER
Wireless security
64/128 bits WEP
WPA/WPA2, WPA-PSK/WPA2-PSK (TKIP/AES)
Hardware Compliance
This section contains compliance information for the appliance.
Notice for the USA
Compliance Information Statement (Declaration of Conformity Procedure) DoC FCC Part 15: This device complies with part 15 of the FCC Rules.
Operation is subject to the following conditions:
1. This device may not cause harmful interference, and
2. This device must accept any interference received including interference that may cause undesired operation. If this equipment does
cause harmful interference to radio or television reception, which can be determined by turning the equipment off and on, the user in
encouraged to try one or more of the following measures:
Reorient or relocate the receiving antenna.
Increase the separation between the equipment and the receiver.
Plug the equipment into an outlet on a circuit different from that of the receiver.
Consult the dealer on an experienced radio/ television technician for help.
Notice for Canada
This apparatus complies with the Class B limits for radio interference as specified in the Canadian Department of Communication Radio
Interference Regulations.
Notice for Europe (CE Mark)
This product is in conformity with the Council Directive 89/336/EEC, 92/31/EEC (EMC).
Power Requirements
AC input voltage 100-240 volts; frequency 50/60 Hz.
Limited Warranty and License
Limited Warranty
Barracuda Networks, Inc., or the Barracuda Networks, Inc. subsidiary or authorized Distributor selling the Barracuda Networks product, if sale is
not directly by Barracuda Networks, Inc., (“Barracuda Networks”) warrants that commencing from the date of delivery to Customer (but in case of
resale by a Barracuda Networks reseller, commencing not more than sixty (60) days after original shipment by Barracuda Networks, Inc.), and
continuing for a period of one (1) year: (a) its products (excluding any software) will be free from material defects in materials and workmanship
under normal use; and (b) the software provided in connection with its products, including any software contained or embedded in such products
will substantially conform to Barracuda Networks published specifications in effect as of the date of manufacture. Except for the foregoing, the
software is provided as is. In no event does Barracuda Networks warrant that the software is error free or that Customer will be able to operate
the software without problems or interruptions. In addition, due to the continual development of new techniques for intruding upon and attacking
networks, Barracuda Networks does not warrant that the software or any equipment, system or network on which the software is used will be free
of vulnerability to intrusion or attack. The limited warranty extends only to you the original buyer of the Barracuda Networks product and is
non-transferable.
Exclusive Remedy
Your sole and exclusive remedy and the entire liability of Barracuda Networks under this limited warranty shall be, at Barracuda Networks or its
service centers option and expense, the repair, replacement or refund of the purchase price of any products sold which do not comply with this
warranty. Hardware replaced under the terms of this limited warranty may be refurbished or new equipment substituted at Barracuda Networks
option. Barracuda Networks obligations hereunder are conditioned upon the return of affected articles in accordance with Barracuda Networks
then-current Return Material Authorization (“RMA”) procedures. All parts will be new or refurbished, at Barracuda Networks discretion, and shall
be furnished on an exchange basis. All parts removed for replacement will become the property of the Barracuda Networks. In connection with
warranty services hereunder, Barracuda Networks may at its discretion modify the hardware of the product at no cost to you to improve its
reliability or performance. The warranty period is not extended if Barracuda Networks repairs or replaces a warranted product or any parts.
Barracuda Networks may change the availability of limited warranties, at its discretion, but any changes will not be retroactive. IN NO EVENT
SHALL BARRACUDA NETWORKS LIABILITY EXCEED THE PRICE PAID FOR THE PRODUCT FROM DIRECT, INDIRECT, SPECIAL,
INCIDENTAL, OR CONSEQUENTIAL DAMAGES RESULTING FROM THE USE OF THE PRODUCT, ITS ACCOMPANYING SOFTWARE, OR
ITS DOCUMENTATION.
Exclusions and Restrictions
This limited warranty does not apply to Barracuda Networks products that are or have been (a) marked or identified as “sample” or “beta,” (b)
loaned or provided to you at no cost, (c) sold “as is,” (d) repaired, altered or modified except by Barracuda Networks, (e) not installed, operated or
maintained in accordance with instructions supplied by Barracuda Networks, or (f) subjected to abnormal physical or electrical stress, misuse,
negligence or to an accident.
EXCEPT FOR THE ABOVE WARRANTY, BARRACUDA NETWORKS MAKES NO OTHER WARRANTY, EXPRESS, IMPLIED OR
STATUTORY, WITH RESPECT TO BARRACUDA NETWORKS PRODUCTS, INCLUDING WITHOUT LIMITATION ANY IMPLIED WARRANTY
OF TITLE, AVAILABILITY, RELIABILITY, USEFULNESS, MERCHANTABILITY, FITNESS FOR A PARTICULAR PURPOSE,
NONINFRINGEMENT, OR ARISING FROM COURSE OF PERFORMANCE, DEALING, USAGE OR TRADE. EXCEPT FOR THE ABOVE
WARRANTY, BARRACUDA NETWORKS PRODUCTS AND THE SOFTWARE IS PROVIDED “AS IS” AND BARRACUDA NETWORKS DOES
NOT WARRANT THAT ITS PRODUCTS WILL MEET YOUR REQUIREMENTS OR BE UNINTERRUPTED, TIMELY, AVAILABLE, SECURE OR
ERROR-FREE, OR THAT ANY ERRORS IN ITS PRODUCTS OR THE SOFTWARE WILL BE CORRECTED. FURTHERMORE, BARRACUDA
NETWORKS DOES NOT WARRANT THAT BARRACUDA NETWORKS PRODUCTS, THE SOFTWARE OR ANY EQUIPMENT, SYSTEM OR
NETWORK ON WHICH BARRACUDA NETWORKS PRODUCTS WILL BE USED WILL BE FREE OF VULNERABILITY TO INTRUSION OR
ATTACK.
Software License
PLEASE READ THIS SOFTWARE LICENSE AGREEMENT (“AGREEMENT”) CAREFULLY BEFORE USING THE BARRACUDA SOFTWARE.
BY USING THE BARRACUDA SOFTWARE YOU ARE AGREEING TO BE BOUND BY THE TERMS OF THIS LICENSE. IF YOU DO NOT
AGREE TO THE TERMS OF THIS LICENSE DO NOT USE THE SOFTWARE. IF YOU DO NOT AGREE TO THE TERMS OF THIS LICENSE
YOU MAY RETURN THE SOFTWARE OR HARDWARE CONTAINING THE SOFTWARE FOR A FULL REFUND TO YOUR PLACE OF
PURCHASE.
1. The software, documentation, whether on disk, in read only memory, or on any other media or in any other form (collectively “Barracuda
Software”) is licensed, not sold, to you by Barracuda Networks, Inc. (“Barracuda”) for use only under the terms of this License and Barracuda
reserves all rights not expressly granted to you. The rights granted are limited to Barracuda's intellectual property rights in the Barracuda Software
and do not include any other patent or intellectual property rights. You own the media on which the Barracuda Software is recorded but Barracuda
retains ownership of the Barracuda Software itself.
2. Permitted License Uses and Restrictions. This License allows you to use the Software only on the single Barracuda labeled hardware device
on which the software was delivered. You may not make copies of the Software and you may not make the Software available over a network
where it could be utilized by multiple devices or copied. You may not make a backup copy of the Software. You may not modify or create
derivative works of the Software except as provided by the Open Source Licenses included below. The BARRACUDA SOFTWARE IS NOT
INTENDED FOR USE IN THE OPERATION OF NUCLEAR FACILITIES, AIRCRAFT NAVIGATION OR COMMUNICATION SYSTEMS, LIFE
SUPPORT MACHINES, OR OTHER EQUIPEMENT IN WHICH FAILURE COULD LEAD TO DEATH, PERSONAL INJURY, OR
ENVIRONMENTAL DAMAGE.
3. You may not transfer, rent, lease, lend, or sublicense the Barracuda Software.
4. This License is effective until terminated. This License is automatically terminated without notice if you fail to comply with any term of the
License. Upon termination you must destroy or return all copies of the Barracuda Software.
5. YOU EXPRESSLY ACKNOWLEDGE AND AGREE THAT THE USE OF THE BARRACUDA SOFTWARE IS AT YOUR OWN RISK AND THAT
THE ENTIRE RISK AS TO SATISFACTION, QUALITY, PERFORMANCE, AND ACCURACY IS WITH YOU. THE BARRACUDA SOFTWARE IS
PROVIDED “AS IS” WITH ALL FAULTS AND WITHOUT WARRANTY OF ANY KIND, AND BARRACUDA HEREBY DISCLAIMS ALL
WARRANTIES AND CONDITIONS WITH RESPECT TO THE BARRACUDA SOFTWARE, EITHER EXPRESSED OR IMPLIED OR
STATUTORY, INCLUDING, BUT NOT LIMITED TO, THE IMPLIED WARRANTIES AND/OR CONDITIONS OF MERCHANTIBILITY, OF
SATISFACTORY QUALITY, OF FITNESS FOR ANY APPLICATION, OF ACCURACY, AND OF NON-INFRINGEMENT OF THIRD PARTY
RIGHTS. BARRACUDA DOES NOT WARRANT THE CONTINUED OPERATION OF THE SOFTWARE, THAT THE PERFORMANCE WILL
MEET YOUR EXPECTATIONS, THAT THE FUNCTIONS WILL MEET YOUR REQUIREMENTS, THAT THE OPERATION WILL BE ERROR
FREE OR CONTINUOUS, OR THAT DEFECTS WILL BE CORRECTED. NO ORAL OR WRITTEN INFORMATION GIVEN BY BARRACUDA OR
AUTHORIZED BARRACUDA REPRESENTATIVE SHALL CREATE A WARRANTY. SHOULD THE BARRACUDA SOFTWARE PROVE
DEFECTIVE, YOU ASSUME THE ENTIRE COST OF ALL NECESSARY SERVICING, REPAIR, OR CORRECTION.
6. License. YOU EXPRESSLY ACKNOWLEDGE AND AGREE THAT YOU WILL PROVIDE AN UNLIMITED ZERO COST LICENSE TO
BARRACUDA FOR ANY PATENTS OR OTHER INTELLECTUAL PROPERTY RIGHTS UTILIZED IN THE BARRACUDA SOFTWARE WHICH
YOU EITHER OWN OR CONTROL.
7. Limitation of Liability. TO THE EXTENT NOT PROHIBITED BY LAW, IN NO EVENT SHALL BARRACUDA BE LIABLE FOR PERSONAL
INJURY OR ANY INCIDENTAL SPECIAL, INDIRECT, OR CONSEQUENTIAL DAMAGES WHATSOEVER, INCLUDING, WITHOUT
LIMITATION, DAMAGES FOR LOSS OF PROFITS, LOSS OF DATA, BUSINESS INTERRUPTION, OR ANY OTHER COMMERCIAL DAMAGES
OR LOSSES, ARISING OUT OF OR RELATED TO YOUR ABILITY TO USE OR INABILITY TO USE THE BARRACUDA SOFTWARE
HOWEVER CAUSED, REGARDLESS OF THE THEORY OF LIABILITY AND EVEN IF BARRACUDA HAS BEEN ADVISED OF THE
POSSIBILITY OF DAMAGES. In no event shall Barracuda's total liability to you for all damages exceed the amount of one hundred dollars.
8. Export Control. You may not use or otherwise export or re-export Barracuda Software except as authorized by the United States law and the
laws of the jurisdiction where the Barracuda Software was obtained.
Energize Update Software License
PLEASE READ THIS ENERGIZE UPDATE SOFTWARE LICENSE CAREFULLY BEFORE DOWNLOADING, INSTALLING OR USING
BARRACUDA NETWORKS OR BARRACUDA NETWORKS-SUPPLIED ENERGIZE UPDATE SOFTWARE.
BY DOWNLOADING OR INSTALLING THE ENERGIZE UPDATE SOFTWARE, OR USING THE EQUIPMENT THAT CONTAINS THIS
SOFTWARE, YOU ARE CONSENTING TO BE BOUND BY THIS LICENSE. IF YOU DO NOT AGREE TO ALL OF THE TERMS OF THIS
LICENSE, THEN (A) DO NOT DOWNLOAD, INSTALL OR USE THE SOFTWARE, AND (B) YOU MAY RETURN THE SOFTWARE FOR A FULL
REFUND, OR, IF THE SOFTWARE IS SUPPLIED AS PART OF ANOTHER PRODUCT, YOU MAY RETURN THE ENTIRE PRODUCT FOR A
FULL REFUND. YOUR RIGHT TO RETURN AND REFUND EXPIRES 30 DAYS AFTER PURCHASE FROM BARRACUDA NETWORKS OR AN
AUTHORIZED BARRACUDA NETWORKS RESELLER, AND APPLIES ONLY IF YOU ARE THE ORIGINAL PURCHASER.
The following terms govern your use of the Energize Update Software except to the extent a particular program (a) is the subject of a separate
written agreement with Barracuda Networks or (b) includes a separate “click-on” license agreement as part of the installation and/or download
process. To the extent of a conflict between the provisions of the foregoing documents, the order of precedence shall be (1) the written
agreement, (2) the click-on agreement, and (3) this Energize Update Software License.
License. Subject to the terms and conditions of and except as otherwise provided in this Agreement, Barracuda Networks, Inc., or a Barracuda
Networks, Inc. subsidiary (collectively “Barracuda Networks”), grants to the end-user (“Customer”) a nonexclusive and nontransferable license to
use the Barracuda Networks Energize Update program modules and data files for which Customer has paid the required license fees (the
“Energize Update Software”). In addition, the foregoing license shall also be subject to the following limitations, as applicable:
Unless otherwise expressly provided in the documentation, Customer shall use the Energize Update Software solely as embedded in, for
execution on, or (where the applicable documentation permits installation on non-Barracuda Networks equipment) for communication with
Barracuda Networks equipment owned or leased by Customer; Customer's use of the Energize Update Software shall be limited to use on a
single hardware chassis, on a single central processing unit, as applicable, or use on such greater number of chassis or central processing units
as Customer may have paid Barracuda Networks the required license fee; and Customer's use of the Energize Update Software shall also be
limited, as applicable and set forth in Customer's purchase order or in Barracuda Networks' product catalog, user documentation, or web site, to a
maximum number of (a) seats (i.e. users with access to the installed Energize Update Software), (b) concurrent users, sessions, ports, and/or
issued and outstanding IP addresses, and/or (c) central processing unit cycles or instructions per second. Customer's use of the Energize Update
Software shall also be limited by any other restrictions set forth in Customer's purchase order or in Barracuda Networks' product catalog, user
documentation or web site for the Energize Update Software.
General Limitations. Except as otherwise expressly provided under this Agreement, Customer shall have no right, and Customer specifically
agrees not to:
i. transfer, assign or sublicense its license rights to any other person, or use the Energize Update Software on
unauthorized or secondhand Barracuda Networks equipment, and any such attempted transfer, assignment or
sublicense shall be void;
ii. make error corrections to or otherwise modify or adapt the Energize Update Software or create derivative works based
upon the Energize Update Software, or to permit third parties to do the same; or
iii. decompile, decrypt, reverse engineer, disassemble or otherwise reduce the Energize Update Software to
human-readable form to gain access to trade secrets or confidential information in the Energize Update Software.
Upgrades and Additional Copies. For purposes of this Agreement, “Energize Update Software” shall include (and the terms and conditions of this
Agreement shall apply to) any Energize Update upgrades, updates, bug fixes or modified versions (collectively, “Upgrades”) or backup copies of
the Energize Update Software licensed or provided to Customer by Barracuda Networks or an authorized distributor/reseller for which Customer
has paid the applicable license fees. NOTWITHSTANDING ANY OTHER PROVISION OF THIS AGREEMENT: (1) CUSTOMER HAS NO
LICENSE OR RIGHT TO USE ANY SUCH ADDITIONAL COPIES OR UPGRADES UNLESS CUSTOMER, AT THE TIME OF ACQUIRING
SUCH COPY OR UPGRADE, ALREADY HOLDS A VALID LICENSE TO THE ORIGINAL ENERGIZE UPDATE SOFTWARE AND HAS PAID
THE APPLICABLE FEE FOR THE UPGRADE; (2) USE OF UPGRADES IS LIMITED TO BARRACUDA NETWORKS EQUIPMENT FOR WHICH
CUSTOMER IS THE ORIGINAL END USER PURCHASER OR LESSEE OR WHO OTHERWISE HOLDS A VALID LICENSE TO USE THE
ENERGIZE UPDATE SOFTWARE WHICH IS BEING UPGRADED; AND (3) USE OF ADDITIONAL COPIES IS LIMITED TO BACKUP
PURPOSES ONLY.
Energize Update Changes. Barracuda Networks reserves the right at any time not to release or to discontinue release of any Energize Update
Software and to alter prices, features, specifications, capabilities, functions, licensing terms, release dates, general availability or other
characteristics of any future releases of the Energize Update Software.
Proprietary Notices. Customer agrees to maintain and reproduce all copyright and other proprietary notices on all copies, in any form, of the
Energize Update Software in the same form and manner that such copyright and other proprietary notices are included on the Energize Update
Software. Except as expressly authorized in this Agreement, Customer shall not make any copies or duplicates of any Energize Update Software
without the prior written permission of Barracuda Networks. Customer may make such backup copies of the Energize Update Software as may be
necessary for Customer's lawful use, provided Customer affixes to such copies all copyright, confidentiality, and proprietary notices that appear on
the original.
Protection of Information. Customer agrees that aspects of the Energize Update Software and associated documentation, including the specific
design and structure of individual programs, constitute trade secrets and/or copyrighted material of Barracuda Networks. Customer shall not
disclose, provide, or otherwise make available such trade secrets or copyrighted material in any form to any third party without the prior written
consent of Barracuda Networks. Customer shall implement reasonable security measures to protect and maintain the confidentiality of such trade
secrets and copyrighted material. Title to Energize Update Software and documentation shall remain solely with Barracuda Networks.
Indemnity. Customer agrees to indemnify, hold harmless and defend Barracuda Networks and its affiliates, subsidiaries, officers, directors,
employees and agents at Customers expense, against any and all third-party claims, actions, proceedings, and suits and all related liabilities,
damages, settlements, penalties, fines, costs and expenses (including, without limitation, reasonable attorneys fees and other dispute resolution
expenses) incurred by Barracuda Networks arising out of or relating to Customers (a) violation or breach of any term of this Agreement or any
policy or guidelines referenced herein, or (b) use or misuse of the Barracuda Networks Energize Update Software.
Term and Termination. This License is effective upon date of delivery to Customer of the initial Energize Update Software (but in case of resale by
a Barracuda Networks distributor or reseller, commencing not more than sixty (60) days after original Energize Update Software purchase from
Barracuda Networks) and continues for the period for which Customer has paid the required license fees. Customer may terminate this License at
any time by notifying Barracuda Networks and ceasing all use of the Energize Update Software. By terminating this License, Customer forfeits
any refund of license fees paid and is responsible for paying any and all outstanding invoices. Customer's rights under this License will terminate
immediately without notice from Barracuda Networks if Customer fails to comply with any provision of this License. Upon termination, Customer
must cease use of all copies of Energize Update Software in its possession or control.
Export. Software, including technical data, may be subject to U.S. export control laws, including the U.S. Export Administration Act and its
associated regulations, and may be subject to export or import regulations in other countries. Customer agrees to comply strictly with all such
regulations and acknowledges that it has the responsibility to obtain licenses to export, re-export, or import Energize Update Software.
Restricted Rights. Barracuda Networks' commercial software and commercial computer software documentation is provided to United States
Government agencies in accordance with the terms of this Agreement, and per subparagraph “(c)” of the “Commercial Computer Software Restricted Rights” clause at FAR 52.227-19 (June 1987). For DOD agencies, the restrictions set forth in the “Technical Data-Commercial Items”
clause at DFARS 252.227-7015 (Nov 1995) shall also apply.
No Warranty. The Energize Update Software is provided AS IS. Customer's sole and exclusive remedy and the entire liability of Barracuda
Networks under this Energize Update Software License Agreement will be, at Barracuda Networks option, repair, replacement, or refund of the
Energize Update Software.
Renewal. At the end of the Energize Update Service Period, Customer may have the option to renew the Energize Update Service at the current
list price, provided such Energize Update Service is available. All initial subscriptions commence at the time of sale of the unit and all renewals
commence at the expiration of the previous valid subscription.
In no event does Barracuda Networks warrant that the Energize Update Software is error free or that Customer will be able to operate the
Energize Update Software without problems or interruptions. In addition, due to the continual development of new techniques for intruding upon
and attacking networks, Barracuda Networks does not warrant that the Energize Update Software or any equipment, system or network on which
the Energize Update Software is used will be free of vulnerability to intrusion or attack.
DISCLAIMER OF WARRANTY. ALL EXPRESS OR IMPLIED CONDITIONS, REPRESENTATIONS, AND WARRANTIES INCLUDING,
WITHOUT LIMITATION, ANY IMPLIED WARRANTY OR CONDITION OF MERCHANTABILITY, FITNESS FOR A PARTICULAR PURPOSE,
NONINFRINGEMENT, SATISFACTORY QUALITY OR ARISING FROM A COURSE OF DEALING, LAW, USAGE, OR TRADE PRACTICE, ARE
HEREBY EXCLUDED TO THE EXTENT ALLOWED BY APPLICABLE LAW. TO THE EXTENT AN IMPLIED WARRANTY CANNOT BE
EXCLUDED, SUCH WARRANTY IS LIMITED IN DURATION TO THE WARRANTY PERIOD. BECAUSE SOME STATES OR JURISDICTIONS
DO NOT ALLOW LIMITATIONS ON HOW LONG AN IMPLIED WARRANTY LASTS, THE ABOVE LIMITATION MAY NOT APPLY TO YOU.
THIS WARRANTY GIVES YOU SPECIFIC LEGAL RIGHTS, AND YOU MAY ALSO HAVE OTHER RIGHTS WHICH VARY FROM
JURISDICTION TO JURISDICTION.
General Terms Applicable to the Energize Update Software License Disclaimer of Liabilities. IN NO EVENT WILL BARRACUDA NETWORKS BE
LIABLE FOR ANY LOST REVENUE, PROFIT, OR DATA, OR FOR SPECIAL, INDIRECT, CONSEQUENTIAL, INCIDENTAL, OR PUNITIVE
DAMAGES HOWEVER CAUSED AND REGARDLESS OF THE THEORY OF LIABILITY ARISING OUT OF THE USE OF OR INABILITY TO
USE THE ENERGIZE UPDATE SOFTWARE EVEN IF BARRACUDA NETWORKS OR ITS SUPPLIERS HAVE BEEN ADVISED OF THE
POSSIBILITY OF SUCH DAMAGES. In no event shall Barracuda Networks' liability to Customer, whether in contract, tort (including negligence),
or otherwise, exceed the price paid by Customer. BECAUSE SOME STATES OR JURISDICTIONS DO NOT ALLOW LIMITATION OR
EXCLUSION OF CONSEQUENTIAL OR INCIDENTAL DAMAGES, THE ABOVE LIMITATION MAY NOT APPLY TO YOU.
This Energize Update Software License shall be governed by and construed in accordance with the laws of the State of California, without
reference to principles of conflict of laws, provided that for Customers located in a member state of the European Union, Norway or Switzerland,
English law shall apply. The United Nations Convention on the International Sale of Goods shall not apply. If any portion hereof is found to be void
or unenforceable, the remaining provisions of the Energize Update Software License shall remain in full force and effect. Except as expressly
provided herein, the Energize Update Software License constitutes the entire agreement between the parties with respect to the license of the
Energize Update Software and supersedes any conflicting or additional terms contained in the purchase order.
Open Source Licensing
Barracuda products may include programs that are covered by the GNU General Public License (GPL) or other “open source” license
agreements. The GNU license is re-printed below for you reference. These programs are copyrighted by their authors or other parties, and the
authors and copyright holders disclaim any warranty for such programs. Other programs are copyright by Barracuda Networks.
GNU GENERAL PUBLIC LICENSE, (GPL) Version 2, June 1991
Copyright (C) 1989, 1991 Free Software Foundation, Inc. 51 Franklin St, Fifth Floor, Boston, MA 02110-1301 USA
Everyone is permitted to copy and distribute verbatim copies of this license document, but changing it is not allowed.
Preamble
The licenses for most software are designed to take away your freedom to share and change it. By contrast, the GNU General Public
License is intended to guarantee your freedom to share and change free software--to make sure the software is free for all its users. This General
Public License applies to most of the Free Software Foundation's software and to any other program whose authors commit to using it. (Some
other Free Software Foundation software is covered by the GNU Library General Public License instead.) You can apply it to your programs, too.
When we speak of free software, we are referring to freedom, not price. Our General Public Licenses are designed to make sure that you have
the freedom to distribute copies of free software (and charge for this service if you wish), that you receive source code or can get it if you want it,
that you can change the software or use pieces of it in new free programs; and that you know you can do these things.
To protect your rights, we need to make restrictions that forbid anyone to deny you these rights or to ask you to surrender the rights. These
restrictions translate to certain responsibilities for you if you distribute copies of the software, or if you modify it.
For example, if you distribute copies of such a program, whethergratis or for a fee, you must give the recipients all the rights that you have. You
must make sure that they, too, receive or can get the source code. And you must show them these terms so they know their rights.
We protect your rights with two steps: (1) copyright the software, and (2) offer you this license which gives you legal permission to copy, distribute
and/or modify the software.
Also, for each author's protection and ours, we want to make certain that everyone understands that there is no warranty for this free software. If
the software is modified by someone else and passed on, we want its recipients to know that what they have is not the original, so that any
problems introduced by others will not reflect on the original authors' reputations.
Finally, any free program is threatened constantly by software patents. We wish to avoid the danger that redistributors of a free program will
individually obtain patent licenses, in effect making the program proprietary. To prevent this, we have made it clear that any patent must be
licensed for everyone's free use or not licensed at all.
The precise terms and conditions for copying, distribution and modification follow.
GNU GENERAL PUBLIC LICENSE TERMS AND CONDITIONS FOR COPYING, DISTRIBUTION AND MODIFICATION
0. This License applies to any program or other work which contains a notice placed by the copyright holder saying it may be distributed under the
terms of this General Public License. The "Program", below, refers to any such program or work, and a "work based on the Program" means
either the Program or any derivative work under copyright law: that is to say, a work containing the Program or a portion of it, either verbatim or
with modifications and/or translated into another language. (Hereinafter, translation is included without limitation in the term "modification".) Each
licensee is addressed as "you".
Activities other than copying, distribution and modification are not covered by this License; they are outside its scope. The act of running the
Program is not restricted, and the output from the Program is covered only if its contents constitute a work based on the Program (independent of
having been made by running the Program). Whether that is true depends on what the Program does.
1. You may copy and distribute verbatim copies of the Program's source code as you receive it, in any medium, provided that you conspicuously
and appropriately publish on each copy an appropriate copyright notice and disclaimer of warranty; keep intact all the notices that refer to this
License and to the absence of any warranty; and give any other recipients of the Program a copy of this License along with the Program.
You may charge a fee for the physical act of transferring a copy, and you may at your option offer warranty protection in exchange for a fee.
2. You may modify your copy or copies of the Program or any portion of it, thus forming a work based on the Program, and copy and distribute
such modifications or work under the terms of Section 1 above, provided that you also meet all of these conditions:
a) You must cause the modified files to carry prominent notices stating that you changed the files and the date of any change.
b) You must cause any work that you distribute or publish, that in whole or in part contains or is derived from the Program or any part
thereof, to be licensed as a whole at no charge to all third parties under the terms of this License.
c) If the modified program normally reads commands interactively when run, you must cause it, when started running for such interactive
use in the most ordinary way, to print or display an announcement including an appropriate copyright notice and a notice that there is no
warranty (or else, saying that you provide a warranty) and that users may redistribute the program under these conditions, and telling the
user how to view a copy of this License. (Exception: if the Program itself is interactive but does not normally print such an announcement,
your work based on the Program is not required to print an announcement.)
These requirements apply to the modified work as a whole. If identifiable sections of that work are not derived from the Program, and can be
reasonably considered independent and separate works in themselves, then this License, and its terms, do not apply to those sections when you
distribute them as separate works. But when you distribute the same sections as part of a whole which is a work based on the Program, the
distribution of the whole must be on the terms of this License, whose permissions for other licensees extend to the entire whole, and thus to each
and every part regardless of who wrote it.
Thus, it is not the intent of this section to claim rights or contest your rights to work written entirely by you; rather, the intent is to exercise the right
to control the distribution of derivative or collective works based on the Program.
In addition, mere aggregation of another work not based on the Program with the Program (or with a work based on the Program) on a volume of
a storage or distribution medium does not bring the other work under the scope of this License.
3. You may copy and distribute the Program (or a work based on it, under Section 2) in object code or executable form under the terms of
Sections 1 and 2 above provided that you also do one of the following:
a) Accompany it with the complete corresponding machine-readable source code, which must be distributed under the terms of Sections 1
and 2 above on a medium customarily used for software interchange; or,
b) Accompany it with a written offer, valid for at least three years, to give any third party, for a charge no more than your cost of physically
performing source distribution, a complete machine-readable copy of the corresponding source code, to be distributed under the terms of
Sections 1 and 2 above on a medium customarily used for software interchange; or,
c) Accompany it with the information you received as to the offer to distribute corresponding source code. (This alternative is allowed only
for noncommercial distribution and only if you received the program in object code or executable form with such an offer, in accord with
Subsection b above.)
The source code for a work means the preferred form of the work for making modifications to it. For an executable work, complete source code
means all the source code for all modules it contains, plus any associated interface definition files, plus the scripts used to control compilation and
installation of the executable. However, as a special exception, the source code distributed need not include anything that is normally distributed
(in either source or binary form) with the major components (compiler, kernel, and so on) of the operating system on which the executable runs,
unless that component itself accompanies the executable.
If distribution of executable or object code is made by offering access to copy from a designated place, then offering equivalent access to copy the
source code from the same place counts as distribution of the source code, even though third parties are not compelled to copy the source along
with the object code.
4. You may not copy, modify, sublicense, or distribute the Program except as expressly provided under this License. Any attempt otherwise to
copy, modify, sublicense or distribute the Program is void, and will automatically terminate your rights under this License. However, parties who
have received copies, or rights, from you under this License will not have their licenses terminated so long as such parties remain in full
compliance.
5. You are not required to accept this License, since you have not signed it. However, nothing else grants you permission to modify or distribute
the Program or its derivative works. These actions are prohibited by law if you do not accept this License. Therefore, by modifying or distributing
the Program (or any work based on the Program), you indicate your acceptance of this License to do so, and all its terms and conditions for
copying, distributing or modifying the Program or works based on it.
6. Each time you redistribute the Program (or any work based on the Program), the recipient automatically receives a license from the original
licensor to copy, distribute or modify the Program subject to these terms and conditions. You may not impose any further restrictions on the
recipients' exercise of the rights granted herein. You are not responsible for enforcing compliance by third parties to this License.
7. If, as a consequence of a court judgment or allegation of patent infringement or for any other reason (not limited to patent issues), conditions
are imposed on you (whether by court order, agreement or otherwise) that contradict the conditions of this License, they do not excuse you from
the conditions of this License. If you cannot distribute so as to satisfy simultaneously your obligations under this License and any other pertinent
obligations, then as a consequence you may not distribute the Program at all. For example, if a patent license would not permit royalty-free
redistribution of the Program by all those who receive copies directly or indirectly through you, then the only way you could satisfy both it and this
License would be to refrain entirely from distribution of the Program.
If any portion of this section is held invalid or unenforceable under any particular circumstance, the balance of the section is intended to apply and
the section as a whole is intended to apply in other circumstances.
It is not the purpose of this section to induce you to infringe any patents or other property right claims or to contest validity of any such claims; this
section has the sole purpose of protecting the integrity of the free software distribution system, which is implemented by public license practices.
Many people have made generous contributions to the wide range of software distributed through that system in reliance on consistent application
of that system; it is up to the author/donor to decide if he or she is willing to distribute software through any other system and a licensee cannot
impose that choice.
This section is intended to make thoroughly clear what is believed to be a consequence of the rest of this License.
8. If the distribution and/or use of the Program is restricted in certain countries either by patents or by copyrighted interfaces, the original copyright
holder who places the Program under this License may add an explicit geographical distribution limitation excluding those countries, so that
distribution is permitted only in or among countries not thus excluded. In such case, this License incorporates the limitation as if written in the
body of this License.
9. The Free Software Foundation may publish revised and/or new versions of the General Public License from time to time. Such new versions
will be similar in spirit to the present version, but may differ in detail to address new problems or concerns.
Each version is given a distinguishing version number. If the Program specifies a version number of this License which applies to it and "any later
version", you have the option of following the terms and conditions either of that version or of any later version published by the Free Software
Foundation. If the Program does not specify a version number of this License, you may choose any version ever published by the Free Software
Foundation.
10. If you wish to incorporate parts of the Program into other free programs whose distribution conditions are different, write to the author to ask
for permission. For software which is copyrighted by the Free Software Foundation, write to the Free Software Foundation; we sometimes make
exceptions for this. Our decision will be guided by the two goals of preserving the free status of all derivatives of our free software and of
promoting the sharing and reuse of software generally.
NO WARRANTY
11. BECAUSE THE PROGRAM IS LICENSED FREE OF CHARGE, THERE IS NO WARRANTY FOR THE PROGRAM, TO THE EXTENT
PERMITTED BY APPLICABLE LAW. EXCEPT WHEN OTHERWISE STATED IN WRITING THE COPYRIGHT HOLDERS AND/OR OTHER
PARTIES PROVIDE THE PROGRAM "AS IS" WITHOUT WARRANTY OF ANY KIND, EITHER EXPRESSED OR IMPLIED, INCLUDING, BUT
NOT LIMITED TO, THE IMPLIED WARRANTIES OF MERCHANTABILITY AND FITNESS FOR A PARTICULAR PURPOSE. THE ENTIRE RISK
AS TO THE QUALITY AND PERFORMANCE OF THE PROGRAM IS WITH YOU. SHOULD THE PROGRAM PROVE DEFECTIVE, YOU
ASSUME THE COST OF ALL NECESSARY SERVICING, REPAIR OR CORRECTION.
12. IN NO EVENT UNLESS REQUIRED BY APPLICABLE LAW OR AGREED TO IN WRITING WILL ANY COPYRIGHT HOLDER, OR ANY
OTHER PARTY WHO MAY MODIFY AND/OR REDISTRIBUTE THE PROGRAM AS PERMITTED ABOVE, BE LIABLE TO YOU FOR
DAMAGES, INCLUDING ANY GENERAL, SPECIAL, INCIDENTAL OR CONSEQUENTIAL DAMAGES ARISING OUT OF THE USE OR
INABILITY TO USE THE PROGRAM (INCLUDING BUT NOT LIMITED TO LOSS OF DATA OR DATA BEING RENDERED INACCURATE OR
LOSSES SUSTAINED BY YOU OR THIRD PARTIES OR A FAILURE OF THE PROGRAM TO OPERATE WITH ANY OTHER PROGRAMS),
EVEN IF SUCH HOLDER OR OTHER PARTY HAS BEEN ADVISED OF THE POSSIBILITY OF SUCH DAMAGES.
END OF TERMS AND CONDITIONS
How to Apply These Terms to Your New Programs
If you develop a new program, and you want it to be of the greatest possible use to the public, the best way to achieve this is to make it free
software which everyone can redistribute and change under these terms.
To do so, attach the following notices to the program. It is safest to attach them to the start of each source file to most effectively convey the
exclusion of warranty; and each file should have at least the "copyright" line and a pointer to where the full notice is found.
one line to give the program's name and an idea of what it does.
Copyright (C) yyyy name of author
This program is free software; you can redistribute it and/or modify it under the terms of the GNU General Public License as published by the Free
Software Foundation; either version 2 of the License, or (at your option) any later version.
This program is distributed in the hope that it will be useful, but WITHOUT ANY WARRANTY; without even the implied warranty of
MERCHANTABILITY or FITNESS FOR A PARTICULAR PURPOSE. See the GNU General Public License for more details.
You should have received a copy of the GNU General Public License along with this program; if not, write to the Free Software Foundation, Inc.,
59 Temple Place - Suite 330, Boston, MA 02111-1307, USA.
Also add information on how to contact you by electronic and paper mail.
If the program is interactive, make it output a short notice like this when it starts in an interactive mode:
Gnomovision version 69, Copyright (C) 19yy name of author Gnomovision comes with ABSOLUTELY NO WARRANTY; for details type `show w'.
This is free software, and you are welcome to redistribute it under certain conditions; type `show c' for details.
The hypothetical commands `show w' and `show c' should show the appropriate parts of the General Public License. Of course, the commands
you use may be called something other than `show w' and `show c'; they could even be mouse-clicks or menu items--whatever suits your
program.
You should also get your employer (if you work as a programmer) or your school, if any, to sign a "copyright disclaimer" for the program, if
necessary. Here is a sample; alter the names:
Yoyodyne, Inc., hereby disclaims all copyright interest in the program `Gnomovision' (which makes passes at compilers) written by James Hacker.
signature of Ty Coon, 1 April 1989
Ty Coon, President of Vice
This General Public License does not permit incorporating your program into proprietary programs. If your program is a subroutine library, you
may consider it more useful to permit linking proprietary applications with the library. If this is what you want to do, use the GNU Library General
Public License instead of this License.
Barracuda Products may contain programs that are copyright (c)1995-2005 International Business Machines Corporation and others. All rights
reserved. These programs are covered by the following License:
"Permission is hereby granted, free of charge, to any person obtaining a copy of this software and associated documentation files (the
"Software"), to deal in the Software without restriction, including without limitation the rights to use, copy, modify, merge, publish, distribute, and/or
sell copies of the Software, and to permit persons to whom the Software is furnished to do so, provided that the above copyright notice(s) and this
permission notice appear in all copies of the Software and that both the above copyright notice(s) and this permission notice appear in supporting
documentation."
Barracuda Products may include programs that are covered by the BSD License: "Redistribution and use in source and binary forms, with or
without modification, are permitted provided that the following conditions are met:
Redistributions of source code must retain the above copyright notice, this list of conditions and the following disclaimer.
Redistributions in binary form must reproduce the above copyright notice, this list of conditions and the following disclaimer in the documentation
and/or other materials provided with the distribution.
The names of the authors may not be used to endorse or promote products derived from this software without specific prior written permission.
THIS SOFTWARE IS PROVIDED ``AS IS'' AND WITHOUT ANY EXPRESS OR IMPLIED WARRANTIES, INCLUDING, WITHOUT LIMITATION,
THE IMPLIED WARRANTIES OF MERCHANTABILITY AND FITNESS FOR A PARTICULAR PURPOSE."
Barracuda Products may include the libspf library which is Copyright (c) 2004 James Couzens & Sean Comeau All rights reserved. It is covered
by the following agreement: Redistribution and use in source and binary forms, with or without modification, are permitted provided that the
following conditions are met: 1. Redistributions of source code must retain the above copyright notice, this list of conditions and the following
disclaimer. 2. Redistributions in binary form must reproduce the above copyright notice, this list of conditions and the following disclaimer in the
documentation and/or other materials provided with the distribution. THIS SOFTWARE IS PROVIDED ``AS IS'' AND ANY EXPRESSED OR
IMPLIED WARRANTIES, INCLUDING, BUT NOT LIMITED TO, THE IMPLIED WARRANTIES OF MERCHANTABILITY AND FITNESS FOR A
PARTICULAR PURPOSE ARE DISCLAIMED. IN NO EVENT SHALL THE AUTHORS MAKING USE OF THIS LICENSE OR ITS
CONTRIBUTORS BE LIABLE FOR ANY DIRECT, INDIRECT, INCIDENTAL, SPECIAL, EXEMPLARY, OR CONSEQUENTIAL DAMAGES
(INCLUDING, BUT NOT LIMITED TO, PROCUREMENT OF SUBSTITUTE GOODS OR SERVICES; LOSS OF USE, DATA, OR PROFITS; OR
BUSINESS INTERRUPTION) HOWEVER CAUSED AND ON ANY THEORY OF LIABILITY, WHETHER IN CONTRACT, STRICT LIABILITY, OR
TORT (INCLUDING NEGLIGENCE OR OTHERWISE) ARISING IN ANY WAY OUT OF THE USE OF THIS SOFTWARE, EVEN IF ADVISED OF
THE POSSIBILITY OF SUCH DAMAGE.
Barracuda Products may contain programs that are Copyright (c) 1998-2003 Carnegie Mellon University. All rights reserved. Redistribution and
use in source and binary forms, with or without modification, are permitted provided that the following conditions are met: 1. Redistributions of
source code must retain the above copyright notice, this list of conditions and the following disclaimer. 2. Redistributions in binary form must
reproduce the above copyright notice, this list of conditions and the following disclaimer in the documentation and/or other materials provided with
the distribution. The name "Carnegie Mellon University" must not be used to endorse or promote products derived from this software without prior
written permission. For permission or any other legal details, please contact Office of Technology Transfer Carnegie Mellon University 5000
Forbes Avenue Pittsburgh, PA 15213-3890 (412) 268-4387, fax: (412) 268-7395 [email protected] .Redistributions of any form
whatsoever must retain the following acknowledgment: "This product includes software developed by Computing Services at Carnegie Mellon
University (http://www.cmu.edu/computing/)." CARNEGIE MELLON UNIVERSITY DISCLAIMS ALL WARRANTIES WITH REGARD TO THIS
SOFTWARE, INCLUDING ALL IMPLIED WARRANTIES OF MERCHANTABILITY AND FITNESS, IN NO EVENT SHALL CARNEGIE MELLON
UNIVERSITY BE LIABLE FOR ANY SPECIAL, INDIRECT OR CONSEQUENTIAL DAMAGES OR ANY DAMAGES WHATSOEVER RESULTING
FROM LOSS OF USE, DATA OR PROFITS, WHETHER IN AN ACTION OF CONTRACT, NEGLIGENCE OR OTHER TORTIOUS ACTION,
ARISING OUT OF OR IN CONNECTION WITH THE USE OR PERFORMANCE OF THIS SOFTWARE.
Barracuda products may include programs that are covered by the Apache License or other Open Source license agreements. The Apache
license is re-printed below for you reference. These programs are copyrighted by their authors or other parties, and the authors and copyright
holders disclaim any warranty for such programs. Other programs are copyright by Barracuda Networks.
Apache License
Version 2.0, January 2004
http://www.apache.org/licenses/
TERMS AND CONDITIONS FOR USE, REPRODUCTION, AND DISTRIBUTION
1. Definitions.
"License" shall mean the terms and conditions for use, reproduction, and distribution as defined by Sections 1 through 9 of this document.
"Licensor" shall mean the copyright owner or entity authorized by the copyright owner that is granting the License.
"Legal Entity" shall mean the union of the acting entity and all other entities that control, are controlled by, or are under common control with that
entity. For the purposes of this definition, "control" means (i) the power, direct or indirect, to cause the direction or management of such entity,
whether by contract or otherwise, or (ii) ownership of fifty percent (50%) or more of the outstanding shares, or (iii) beneficial ownership of such
entity.
"You" (or "Your") shall mean an individual or Legal Entity exercising permissions granted by this License.
"Source" form shall mean the preferred form for making modifications, including but not limited to software source code, documentation source,
and configuration files.
"Object" form shall mean any form resulting from mechanical transformation or translation of a Source form, including but not limited to compiled
object code, generated documentation, and conversions to other media types.
"Work" shall mean the work of authorship, whether in Source or Object form, made available under the License, as indicated by a copyright notice
that is included in or attached to the work (an example is provided in the Appendix below).
"Derivative Works" shall mean any work, whether in Source or Object form, that is based on (or derived from) the Work and for which the editorial
revisions, annotations, elaborations, or other modifications represent, as a whole, an original work of authorship. For the purposes of this License,
Derivative Works shall not include works that remain separable from, or merely link (or bind by name) to the interfaces of, the Work and Derivative
Works thereof.
"Contribution" shall mean any work of authorship, including the original version of the Work and any modifications or additions to that Work or
Derivative Works thereof, that is intentionally submitted to Licensor for inclusion in the Work by the copyright owner or by an individual or Legal
Entity authorized to submit on behalf of the copyright owner. For the purposes of this definition, "submitted" means any form of electronic, verbal,
or written communication sent to the Licensor or its representatives, including but not limited to communication on electronic mailing lists, source
code control systems, and issue tracking systems that are managed by, or on behalf of, the Licensor for the purpose of discussing and improving
the Work, but excluding communication that is conspicuously marked or otherwise designated in writing by the copyright owner as "Not a
Contribution."
"Contributor" shall mean Licensor and any individual or Legal Entity on behalf of whom a Contribution has been received by Licensor and
subsequently incorporated within the Work.
2. Grant of Copyright License. Subject to the terms and conditions of this License, each Contributor hereby grants to You a perpetual, worldwide,
non-exclusive, no-charge, royalty-free, irrevocable copyright license to reproduce, prepare Derivative Works of, publicly display, publicly perform,
sublicense, and distribute the Work and such Derivative Works in Source or Object form.
3. Grant of Patent License. Subject to the terms and conditions of this License, each Contributor hereby grants to You a perpetual, worldwide,
non-exclusive, no-charge, royalty-free, irrevocable (except as stated in this section) patent license to make, have made, use, offer to sell, sell,
import, and otherwise transfer the Work, where such license applies only to those patent claims licensable by such Contributor that are
necessarily infringed by their Contribution(s) alone or by combination of their Contribution(s) with the Work to which such Contribution(s) was
submitted. If You institute patent litigation against any entity (including a cross-claim or counterclaim in a lawsuit) alleging that the Work or a
Contribution incorporated within the Work constitutes direct or contributory patent infringement, then any patent licenses granted to You under this
License for that Work shall terminate as of the date such litigation is filed.
4. Redistribution. You may reproduce and distribute copies of the Work or Derivative Works thereof in any medium, with or without modifications,
and in Source or Object form, provided that You meet the following conditions:
(a) You must give any other recipients of the Work or Derivative Works a copy of this License; and
(b) You must cause any modified files to carry prominent notices stating that You changed the files; and
(c) You must retain, in the Source form of any Derivative Works that You distribute, all copyright, patent, trademark, and attribution notices from
the Source form of the Work, excluding those notices that do not pertain to any part of the Derivative Works; and
(d) If the Work includes a "NOTICE" text file as part of its distribution, then any Derivative Works that You distribute must include a readable copy
of the attribution notices contained within such NOTICE file, excluding those notices that do not pertain to any part of the Derivative Works, in at
least one of the following places: within a NOTICE text file distributed as part of the Derivative Works; within the Source form or documentation, if
provided along with the Derivative Works; or, within a display generated by the Derivative Works, if and wherever such third-party notices
normally appear. The contents of the NOTICE file are for informational purposes only and do not modify the License.
You may add Your own attribution notices within Derivative Works that You distribute, alongside or as an addendum to the NOTICE text from the
Work, provided that such additional attribution notices cannot be construed as modifying the License.
You may add Your own copyright statement to Your modifications and may provide additional or different license terms and conditions for use,
reproduction, or distribution of Your modifications, or for any such Derivative Works as a whole, provided Your use, reproduction, and distribution
of the Work otherwise complies with the conditions stated in this License.
5. Submission of Contributions. Unless You explicitly state otherwise, any Contribution intentionally submitted for inclusion in the Work by You to
the Licensor shall be under the terms and conditions of this License, without any additional terms or conditions. Notwithstanding the above,
nothing herein shall supersede or modify the terms of any separate license agreement you may have executed with Licensor regarding such
Contributions.
6. Trademarks. This License does not grant permission to use the trade names, trademarks, service marks, or product names of the Licensor,
except as required for reasonable and customary use in describing the origin of the Work and reproducing the content of the NOTICE file.
7. Disclaimer of Warranty. Unless required by applicable law or agreed to in writing, Licensor provides the Work (and each Contributor provides its
Contributions) on an "AS IS" BASIS, WITHOUT WARRANTIES OR CONDITIONS OF ANY KIND, either express or implied, including, without
limitation, any warranties or conditions of TITLE, NON-INFRINGEMENT, MERCHANTABILITY, or FITNESS FOR A PARTICULAR PURPOSE.
You are solely responsible for determining the appropriateness of using or redistributing the Work and assume any risks associated with Your
exercise of permissions under this License.
8. Limitation of Liability. In no event and under no legal theory, whether in tort (including negligence), contract, or otherwise, unless required by
applicable law (such as deliberate and grossly negligent acts) or agreed to in writing, shall any Contributor be liable to You for damages, including
any direct, indirect, special, incidental, or consequential damages of any character arising as a result of this License or out of the use or inability to
use the Work (including but not limited to damages for loss of goodwill, work stoppage, computer failure or malfunction, or any and all other
commercial damages or losses), even if such Contributor has been advised of the possibility of such damages.
9. Accepting Warranty or Additional Liability. While redistributing the Work or Derivative Works thereof, You may choose to offer, and charge a fee
for, acceptance of support, warranty, indemnity, or other liability obligations and/or rights consistent with this License. However, in accepting such
obligations, You may act only on Your own behalf and on Your sole responsibility, not on behalf of any other Contributor, and only if You agree to
indemnify, defend, and hold each Contributor harmless for any liability incurred by, or claims asserted against, such Contributor by reason of your
accepting any such warranty or additional liability.
END OF TERMS AND CONDITIONS
APPENDIX: How to apply the Apache License to your work.
To apply the Apache License to your work, attach the following boilerplate notice, with the fields enclosed by brackets "[]" replaced with your own
identifying information. (Don't include the brackets!) The text should be enclosed in the appropriate comment syntax for the file format. We also
recommend that a file or class name and description of purpose be included on the same "printed page" as the copyright notice for easier
identification within third-party archives.
Copyright [yyyy] [name of copyright owner]
Licensed under the Apache License, Version 2.0 (the "License"); you may not use this file except in compliance with the License. You may obtain
a copy of the License at
http://www.apache.org/licenses/LICENSE-2.0
Unless required by applicable law or agreed to in writing, software distributed under the License is distributed on an "AS IS" BASIS, WITHOUT
WARRANTIES OR CONDITIONS OF ANY KIND, either express or implied. See the License for the specific language governing permissions and
limitations under the License.
Source Code Availability
Per the GPL and other “open source” license agreements the complete machine readable source code for programs covered by the GPL or other
“open source” license agreements is available from Barracuda Networks at no charge. If you would like a copy of the source code or the changes
to a particular program we will gladly provide them, on a CD, for a fee of $100.00. This fee is to pay for the time for a Barracuda Networks
engineer to assemble the changes and source code, create the media, package the media, and mail the media. Please send a check payable in
USA funds and include the program name. We mail the packaged source code for any program covered under the GPL or other "open source"
license.