1
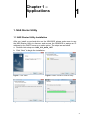
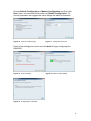
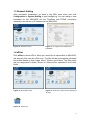
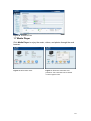
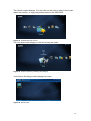
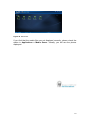
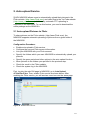
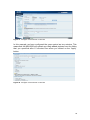
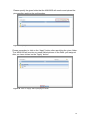
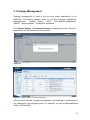
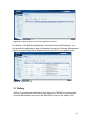
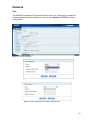
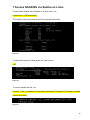
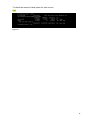
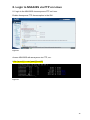
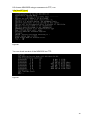
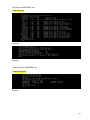
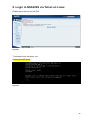
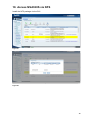
NSA320S Support Notes Version 1.00 Dec, 2013 1 Contents Chapter 1 Applications..............................................................................................................4 1. NAS Starter Utility................................................................................................................4 1.1 NAS Starter Utility Installation.....................................................................................4 1.2 NSA320S Initialization..............................................................................................5 1.3 Network setting...........................................................................................................7 1.4 zPilot...........................................................................................................................7 1.5 Directory......................................................................................................................8 1.6 Device Management...................................................................................................9 1.7 Media Player............................................................................................................ 10 2. Auto Upload Service......................................................................................................... 13 2.1 Auto-upload pictures to Flickr...................................................................................13 3. Package Management.......................................................................................................19 3.1 Gallery......................................................................................................................20 4. Dropbox............................................................................................................................23 4.1 zDownload...............................................................................................................26 5. SmartPhone.....................................................................................................................27 5.1 File Browser.............................................................................................................28 6. Network IPv6....................................................................................................................29 7 Access NSA320S via samba on Linux............................................................................30 8. Log in NSA320S via ftp on Linux....................................................................................32 8.1 log in NSA320S via anonymous ftp on Linux.........................................................32 8.2 Access NSA320S with user name via ftp...............................................................33 9. Log in NSA320S via telnet on Linux...............................................................................36 10. Access NSA320S via NFS...........................................................................................38 Chapter 2 FAQ.......................................................................................................................44 1. What is RAID? ..................................................................................................................44 2. What kind of RAID is supported in NSA320S? ..............................................................44 3. What is the file system supported in NSA320S? ............................................................44 4. Which kind of the media server does NSA320S apply? .................................................44 5. Does NSA320S support DLNA media server? ...............................................................44 2 6. What is the feature “Wake On LAN”? ...............................................................................44 7. Which kind of video file formats are supported by NSA320S? .......................................45 8. Which kind of audio file formats are supported by NSA320S? ......................................45 9. Which kind of image file formats are supported by NSA320S? .....................................45 10. Which kind of web browsers are supported by NSA320S? ..........................................45 3 Chapter 1 – Applications 1 1. NAS Starter Utility 1.1 NAS Starter Utility Installation After you install a new hard drive on the NSA320S, please make sure to use the NAS Starter Utility to discover and access the NSA320S to assign an IP address by the DHCP server or a static option. The steps are as below. a. Double-click setup.exe. NSU_2.10_build_1057 b. Click “Next” to begin the installation. Figure 1. Click “Next”. Figure 2. Select a folder to install the utility. Figure 3. Click “Install”. Figure 4. NSU Installation is processing. 4 Figure 5. Installation is finished. 1.2 NSA320S Initialization After a successful installation, click on the “NAS Starter Utility”. The first screen of the NSU will try to discover the NSA devices. Click on “NAS Seeker”, and then choose the devices that you want to connect. Figure 6. NAS Discovery. Figure 7. NAS Seeker. Then click Run the Initialization Wizard to setup the NSA320S, and enter the username and password to start the initialization. The default username is admin and the password is 1234. These two words are case sensitive. Figure 8. Run Initialization. Figure 9. Enter username and password. 5 Choose Default Configuration or Manual Configuration and then click Next. Here, we recommend that users use Default Configuration. For security purposes, we suggest the users change the admin’s password. Figure 10. Choose a wizard type. Figure 11. Change the password. Check if the settings are correct and click Next to begin configuring the NSA320S. Figure 12. Confirm settings. Figure 13. NAS is under setting. Figure 13. Configuration is finished. 6 1.3 Network Setting After successful initialization, go back to the NSU main menu and click Configuration > System Setting to start configuring. You can assign a new hostname for this NSA320S, set the TimeZone and PPPoE connection information as well as an IP address for the NSA320S. Figure 14. NSU main menu. Figure 15. Configure an IP address for NSA320S. 1.4 zPilot Click zPilot to launch zPilot. When you would like to upload files to NSA320S, just drag the files onto the zPilot icon. The files will be automatically uploaded and sorted based on their types: Music, Photos and Videos. The files which are not categorized in Music, Photos or Videos will be uploaded to the Public folder. Figure 16. NSU main menu. Figure 17. Enter the username and password to login. Figure 18. zPilot icon 7 When users double-click on the zPilot icon, the detail status of zPilot will be shown as follows. Click Clean Completed to clear the finished tasks. Figure 19. The zPilot is transferring files to NSA320S. 1.5 Directory Click Network Drive and enter your username and password. Then the directory of NSA320S will appear. You will see the files that you uploaded through zPilot automatically categorized by their types. Figure 20. NSU main menu. Figure 21. Enter the username and password to login. Figure 22.Select the NAS folder for directly on the PC Figure 23. Directory of NSA320S. 8 Figure 24. Use Guest to login. Figure 25. You are able to select that NSA has shared public folder for directly on the PC. Figure 26. Directory of NSA320S. 1.6 Device Management Click Configuration > Administrator and enter the admin’s username and password to access the NSA320S’s GUI. Then the administrator can manage the device and change the configurations. Figure 27. NSU main menu. Figure 28. Enter admin’s username and password to login to the GUI. 9 Figure 29. NSA320S’s GUI 1.7 Media Player Click Media Player to enjoy the music, videos, and photos through the web browser. Figure 30. NSU main menu. Figure 31. Enter the username and password. The username can be admin or other regular users. 10 The Home screen displays. You can click on the icon to listen to the music, watch the movies, or enjoy the photos stored in the NSA320S. Figure 32. NSA320S Home Screen. You can select one category in the list to play the music. Figure 33. Play the music by selecting the category. Just click on the song to start playing the music. Figure 34. Music folder. 11 Figure 35. Music files. If you find that the media files are not displayed correctly, please check the status in Applications > Media Server. Usually, you will see the photos displayed. 12 2. Auto-upload Service ZyXEL NSA320S allows users to automatically upload their pictures to the Flickr website ( http://www.Flickr.com) and video files to the YouTube website ( http://www.youtube.com). Additionally, automatic FTP uploading is supported in the NSA320S. To use this feature, you need to download the same package as the NSA210’s. 2.1 Auto-upload Pictures to Flickr To share pictures on the Flickr website (http://www.Flickr.com), the NSA320S supports automatic uploading of pictures from a given folder of the NSA320S. Configuration Procedure: Enable auto-upload in Flickr service. Configure the account Flickr account information. Link your NSA320S with your Flickr account. Specify the folders which you want NSA320S to automatically upload your pictures. Specify the grace period and other options in the auto-upload function. Move pictures to the folders you specified in the previous step. Check the result in the Flickr website. Check the system log in the NSA320S. First, log into the web GUI page in NSA320S, go to Auto Upload >Flickr/YouTube. Then, enable Flickr service as shown below. After enabling the Flickr service, you will see two more icons on the same page. Figure 36. Enable Flickr service. 13 Click on the “config” icon to set a more detailed configuration. There will be several system Notifications to warn you that you are going to link to the Flickr website. Meanwhile, please make sure that you have the Flickr account information. After configuring the account information, the system will inform you about the connection to Flickr. In the following pop-up browser, you need to authorize the connection between your account and your NSA320S. Figure 37. Authorization between your account and NSA320S. The following figure shows that you can agree to this link after clicking on “OK” button. Figure 38. Successful authorization. 14 After allowing the agreement in the Flickr page, please also click on the “Get ready” button in the NSA320S. Figure 39. Click on “Get Ready”. You can check the service status in the NSA320S under Auto Upload > Flickr/YouTube. In this case, we can see the storage status in your Fickr account. Figure 40. Monitor the service status. Afterwards, users need to set which folder(s) of the NSA320S will be monitored and uploaded to the Flickr website. In this example, we are going to set the folder named as ““ under the public folder to be monitored and upload all the pictures to the Flickr website. 15 Figure 41. Configure “Grace Period” in the GUI. In this example, we have configured the grace period as two minutes. This means that the NSA320S will upload any newly added pictures from the folder that you specified after 15 minutes from when you clicked on the “Apply” button. Figure 42. Configure “Grace Period” in the GUI. 16 Please specify the given folder that the NSA320S will monitor and upload the pictures after applying the configuration. Figure 43. Specify the folder. Please remember to click on the “Apply” button after specifying the given folder. The NSA320S will monitor any need added pictures in the folder you assigned after you have clicked on the “Apply” button. Figure 44. Click on “Apply” after specifying the folder. 17 After 15 minutes, the NSA320S will upload the newly added photos to the Flickr website. In this example, we can see that one picture has been uploaded. website. Figure 45. Uploaded photo. 18 3. Package Management Package management is used to set up more useful applications in the NSA320S. This feature enables users to use the following applications: BackupPlanner, DyDNS, Gallery, NFS, PHP-MySQL-phpMyAdmin, SMART, SqueezeCenter, Wordpress and eMule. Click System Setting > Firmware/Packages to display the screen. Then the applications are will be listed as shown below. Figure 46. Figure 47. System setting - Firmware/Packages After you have finished installing an application and enabling it, additional links are displayed in the navigation panel. For example, you can see BackupPlanner, Gallery, PHP-MySQL. 19 Figure 48. Original navigation panel before applications installed. For Gallery, PHP-MySQL-phpMyAdmin, SqueezeCenter and Wordpress, you can access the applications’ web configurators through the Package Management screen or by specifying the IP address shown in the GUI in your web browser. Figure 49. Applications’ link. 3.1 Gallery Gallery is a web-based application that allows the NSA320S to host photos. You can upload photos from the local computers or stored in the NSA320S. Use the administrator account of the NSA320S to login to the Gallery GUI. 20 Figure 50. Enter Gallery GUI. Figure 51. Use Admin account to login. Figure 52. Upload photos from NSA320S. 21 Figure 53. Add selected files. Then you can view the uploaded photos and edit photos in the screen. Figure 54. Uploaded photos. 22 4. Dropbox Dropbox provides a files backup service. You create an account for Dropbox (https://www.dropbox.com), Dropbox will give you 2GB of storage for your files backup. The NSA320S will automatically download the files from the Dropbox server. Configuration Procedure: Enter the username and password Enable Dropbox service. Configure the Dropbox account information. Link your NSA320S with your Dropbox account. On the NSU main page, login to the Dropbox service for NSA320S, go to Applications > Dropbox. Then, enable the Dropbox service. Figure 55 NSU main menu. Figure 56. Enter the username and password. After you enable the Dropbox service, the browser is going to link to the Dropbox website. Meanwhile, please make sure that you have the Dropbox account information. After configuring the account information, the system will notify you about the connection to Dropbox. In the following popup browser, you need to authorize the connection between your account and your NSA320S. Figure 57. Login to Dropbox. Figure 58. Authorization between your account and NSA320S. 23 After allowing the agreement in the Dropbox page, please also click on the “Get ready” button in the NSA320S. Figure 59. Click on “Get Ready”. You can check the service status in the NSA320S under Applications > Dropbox. In this case, we can see the storage status in your Dropbox account. Figure 60. Monitor the service status. 24 The NSA connects to Dropbox and copies files in the Drop2NAS folder to the NSA’s admin\Dropbox\FromDropbox folder, and then empties the Drop2NAS folder. The NSA initiates connections to the Dropbox server so you do not need to configure rules on a firewall in front of the NSA to allow access to the NSA. When your PC has installed Dropbox, you can upload files to the Drop2NAS folder, and then NSA will get files from the Dropbox server. Note: Do not delete the NAS token file as it is needed for your NSA to work with the Dropbox Account. Figure 61. Upload files to folder. Figure 62. Check files from website. Figure 63. NSA get files from Dropbox server. Figure 64. Check files on NSA. 25 4.1 Using the zDownload Folder The NSA copies *.torrent files in the zDownload folder to the NSA’s admin\download \torrents folder and automatically starts download them. Figure 65. Upload torrent files to zDownload folder. Figure 66. NSA get files and download automatically. 26 5. Smartphone APP Use ZyXEL’s zMedia app to play files and manage the NSA from iOS version 3 or later device or Android version 2.1 or later smartphone. Install ZyXEL’s zMedia app from the Apple App Store, Android Market, or www.zyxel.com to play files and manage the NSA from your iOS device or Android smartphone. Login to zMedia 1. Click on the zMedia icon to open the app and automatically search for NSAs on your network. Figure 67. zMedia App Icon. 2. Select an NSA if you have more than one. Figure 68 zMedia Automatic Discovery. 3. Use the admin username and password to login. Figure 69. zMedia Login. 27 5.1 File Browser Click on the File Browser to look through and play files on the NSA. Figure 70. zMedia File Browser Click on a share to view its contents. 28 Network IPv6 The NSA320S supports IPv6 (Internet Protocol version 6), designed to increase IP address space and enhance features. You can click Network > TCP/IP for further configuration. Figure 71. Click IPv6 Settings. Figure 72. You can select Disable / Auto / Static. Figure 73. Auto will get IPv6 IP address automatically. 29 7 Access NSA320S via Samba on Linux To see which shares are available on a given host, run: # smbclient -L //[IP|hostname] The output of this command should look something like this: Figure 74 To check the amount of disk space for each mount: # df Figure 75 To mount samba via cifs, run: # mount -t cifs -o username="Username",password="Password" //IP/share /mnt/smb umount /mnt/smb Figure 76 30 To check the amount of disk space for each mount: # df Figure 77 31 8. Login to NSA320S via FTP on Linux 8.1 login to the NSA320S via anonymous FTP on Linux. Enable Anonymous FTP Access option in the GUI. Figure 78 Access NSA320S with anonymous via FTP, run: # lftp [-p port] [-u user[,pass]] [host|IP] Figure 79 32 8.2 Access NSA320S using a username via FTP, run: # ftp [host|IP] [port] Figure 80 You can check content of the NSA320S via FTP. Figure 81 33 Get file from NSA320S, run: # get filename Figure 82 Figure 83 Delete file from NSA320S, run: # delete filename Figure 84 34 Create folder in NSA320S, run: # mkdir foldername Figure 85 Remove folder from NSA320S, run: # rm foldername Figure 86 To exit NSA320S via FTP, run: # bye Figure 87 35 9. Login to NSA320S via Telnet on Linux Enable telnet service via the GUI. Figure 88 To access a host via telnet, run: # telnet [host|IP [port]] Figure 89 36 To exit NSA320S via telnet, run: # exit Figure 90 37 10. Access NSA320S via NFS Install the NFS package via the GUI. Figure 91 Figure 92 38 Figure 93 Figure 94 39 Add the NFS Share. Figure 95 Edit the NFS Share. Figure 96 40 The NFS editing is complete. Figure 97 Enable the NFS service on Linux # /etc/init.d/rpcbind start # /etc/init.d/nfslock start Figure 98 Verify that the NFS server has exported the directory: # showmount -e ServerName Figure 99 41 Create a mount point for the remote resource using the mkdir command: # mkdir –p /local/directory Figure 100 Establish the local mount point using the mkdir command. Mount share of NSA320S: # mount –t nfs ServerName:/remote/directory /local/directory Figure 101 where ServerName is the name of the NFS server, /remote/directory is the directory on the NFS server you want to mount, and /local/directory is the mount point on the NFS client. To check the amount of disk space for each mount you have: Figure 102 42 To check IP address of Linux. Figure 103 NSA320S shows the NFS session in detail. Figure 104 43 Chapter 2 – FAQ 2 1. What is RAID? RAID stands for Redundant Array of Inexpensive Disks. It takes two or more hard disks achieve greater levels of performance, reliability and/or larger volume of data size. 2. What kind of RAID is supported by the NSA320S? NSA320S supports Raid 1, JBOD, or RAID0. 3. What is the file system supported by the NSA320S? Internal file system: XFS (or EXT4). External file system: FAT32, FAT16, EXT2, EXT3 and Reiser FS. 4. Which kind of multimedia server does the NSA320S support? NSA320S supports Squeeze Center, DLNA server, UPnP AV Server, and iTunes Server. 5. Does the NSA320S support a DLNA media server? Yes. The NSA320S supports a DLNA 1.5 compliant media server. 6. What is the feature “Wake On LAN”? You can turn on the NSA320S through its wired Ethernet connection after enabling Wake On LAN. To use Wake On LAN from a computer on your LAN, install a program such as Wake On LAN EX or other Wake On LAN programs that supports sending magic packets. You can also use Wake On LAN from a remote location if the router in front of the NSA320S that supports sending magic packets. 44 7. Which types of video file formats are supported by the NSA320S? NSA320S supports the following video formats: MPEG-1/MPEG-2, MPEG-4, AVI, DivX, Motion JPEG, Quick Time Video, RealMedia, Ogg, Matroska, ASF, Windows Media Video and ISO. Subtitles are also supported by the NSA320S. 8. Which types of audio file formats are supported by the NSA320S? NSA320S supports the following audio formats: MP3, Ogg Vorbis, RealMedia, WAVE, Windows Media Audio, Matroska, Monkeys Audio, MP1, MP4, PCM, LPCM, DTS, AC3, Free Lossless Audio Codec, Au, AAC, 3GPP, AIFF, RIFFbased MIDI and Playlist. 9. Which types of image file formats are supported by the NSA320S? NSA320S supports bitmap, JPEG, and PNG. 10. Which types of web browsers are supported by the NSA320S? NSA320S supports Internet Explorer 6.0 and later versions, and Firefox 2.00 and later versions. Currently, NSA320S does not support the Safari web browser. 45