1
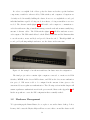
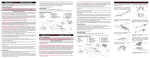
Building and Improving a Linux Cluster
by
Matthew Brownell
A senior thesis submitted to the faculty of
Brigham Young University - Idaho
in partial fulfillment of the requirements for the degree of
Bachelor of Science
Department of Physics
Brigham Young University - Idaho
April, 2015
BRIGHAM YOUNG UNIVERSITY - IDAHO
DEPARTMENT APPROVAL
of a senior thesis submitted by
Matthew Brownell
This thesis has been reviewed by the research committee, senior thesis coordinator, and
department chair and has been found to be satisfactory.
Date
Todd Lines, Advisor
Date
David Oliphant, Committee Member
Date
Kevin Kelley, Committee Member
Date
Stephen McNeil, Department Chair
ABSTRACT
Building and Improving a Linux Cluster
Matthew Brownell
Department of Physics
Bachelor of Science
When creating, compiling and modeling physical situations and phenomena, the time needed
to run a program increases dramatically as the problem grows more realistic and includes
more variables. The computational time needed to run realistic problems or generate detailed graphics can easily reach over 1,000 hours of machine time. Linking multiple computers through a Network File System (NFS) and installing Message-Passing Interface (MPI)
software allows the computers to run code in parallel processes on each machine quicker
and more efficiently. The BYU-Idaho Linux Cluster was created and completed in August
of 2014 using Dynamic IP Addresses assigned from BYU-Idaho Internet Service Provider
(ISP). To create a faster cluster the network configuration was changed to a Local Area
Network and Static IP Addresses were assigned. Now that benchmarking and testing has
been completed, results show an increase in power and speed for the new 2015 BYU-Idaho
Linux Cluster.
Acknowledgements
A special thanks to my family for the support and encouragement you have given me,
especially my wife Lacey. Without her I would be nothing. The faculty at BYU-Idaho also
deserves a special recognition, especially Todd Lines, for the time and dedication put into
helping me, accomplish this research. Lastly, Jimmy, James and Forrest, thank you for
keeping me sane in the difficult world of upper-division physics classes.
Contents
1 A Brief Introduction to Computational Physics
1.1 The Need for Computational Physics . . . . . . . . . . . . . . . . . . . . . .
1.2 Computer Clusters . . . . . . . . . . . . . . . . . . . . . . . . . . . . . . . .
1.3 How a Beowulf Cluster Works . . . . . . . . . . . . . . . . . . . . . . . . . .
1
1
3
3
2 Cluster Preparations: Understanding the
2.1 Operating Systems . . . . . . . . . . . . .
2.2 Parallel Processing . . . . . . . . . . . . .
2.3 Administration . . . . . . . . . . . . . . .
2.4 User Authentication . . . . . . . . . . . .
Design Before Building
. . . . . . . . . . . . . . . .
. . . . . . . . . . . . . . . .
. . . . . . . . . . . . . . . .
. . . . . . . . . . . . . . . .
.
.
.
.
.
.
.
.
.
.
.
.
5
5
6
7
8
.
.
.
.
.
.
.
.
.
.
.
.
.
.
.
.
.
.
.
.
.
.
.
.
.
.
.
.
.
.
.
.
.
.
.
.
.
.
.
.
.
.
.
.
.
11
11
12
14
15
15
16
17
18
19
20
21
22
23
25
27
4 Results and Analysis
4.1 Presentation of Results and Explanation of Tests . . . . . . . . . . . . . . .
4.2 Comparison of Results . . . . . . . . . . . . . . . . . . . . . . . . . . . . . .
4.3 Comparison of Cluster Builds . . . . . . . . . . . . . . . . . . . . . . . . . .
29
29
32
33
5 Conclusion
5.1 Summary of Setup . . . . . . . . . . . . . . . . . . . . . . . . . . . . . . . .
5.2 Interpretation of Tests . . . . . . . . . . . . . . . . . . . . . . . . . . . . . .
5.3 Future Research . . . . . . . . . . . . . . . . . . . . . . . . . . . . . . . . .
35
35
36
37
3 Procedures
3.1 Blueprints . . . . . . . . . . . . . . . . . . . . . . . .
3.2 Hardware Management . . . . . . . . . . . . . . . . .
3.3 Creating a Live USB . . . . . . . . . . . . . . . . . .
3.3.1 Windows . . . . . . . . . . . . . . . . . . . .
3.3.2 Mac OS . . . . . . . . . . . . . . . . . . . . .
3.3.3 Linux . . . . . . . . . . . . . . . . . . . . . .
3.4 Installing CentOS . . . . . . . . . . . . . . . . . . . .
3.5 Setting up Static IP Addresses . . . . . . . . . . . .
3.6 Setting up Secure Shell and a Hosts Table . . . . . .
3.7 ClusterSSH . . . . . . . . . . . . . . . . . . . . . . .
3.8 Updating and Installing Necessary Packages . . . . .
3.9 Passwordless SSH . . . . . . . . . . . . . . . . . . . .
3.10 Installing Message Passing Interface . . . . . . . . .
3.11 Network File System . . . . . . . . . . . . . . . . . .
3.12 Running a Parallel Computing Processes in MPICH
vii
.
.
.
.
.
.
.
.
.
.
.
.
.
.
.
.
.
.
.
.
.
.
.
.
.
.
.
.
.
.
.
.
.
.
.
.
.
.
.
.
.
.
.
.
.
.
.
.
.
.
.
.
.
.
.
.
.
.
.
.
.
.
.
.
.
.
.
.
.
.
.
.
.
.
.
.
.
.
.
.
.
.
.
.
.
.
.
.
.
.
.
.
.
.
.
.
.
.
.
.
.
.
.
.
.
.
.
.
.
.
.
.
.
.
.
.
.
.
.
.
.
.
.
.
.
.
.
.
.
.
.
.
.
.
.
.
.
.
.
.
.
.
.
.
.
.
.
.
.
.
A Benchmark Graphs and Results
41
B Setting up NIS User Authentication
47
C A Collection of Script Files
49
List of Figures
1.1
Computers at the Manhattan Project . . . . . . . . . . . . . . . . . . . . .
2
3.1
3.2
3.3
Ethernet Switch . . . . . . . . . . . . . . . . . . . . . . . . . . . . . . . . .
VGA Switch . . . . . . . . . . . . . . . . . . . . . . . . . . . . . . . . . . . .
BYU-Idaho Node . . . . . . . . . . . . . . . . . . . . . . . . . . . . . . . . .
12
13
13
4.1
4.2
4.3
4.4
4.5
4.6
4.7
4.8
4.9
Benchmark Definitions . . . . . . . . . . . .
Block Tridiagonal Benchmark Results . . .
Embarrassingly Parallel Benchmark Results
Integer Sort Benchmark Results . . . . . . .
Multigrid Benchmark Results . . . . . . . .
Conjugate Gradient Benchmark Results . .
Fast Fourier Transform Benchmark Results
Lower-Upper Diagonal Benchmark Results .
Scalar Pentadiagonal Benchmark Results . .
.
.
.
.
.
.
.
.
.
30
31
31
31
31
32
32
32
32
5.1
Parallel Computation of Pi . . . . . . . . . . . . . . . . . . . . . . . . . . .
36
A.1 BT Benchmark Graph
A.2 CG Benchmark Graph
A.3 EP Benchmark Graph
A.4 FT Benchmark Graph
A.5 IS Benchmark Graph .
A.6 LU Benchmark Graph
A.7 MG Benchmark Graph
A.8 SP Benchmark Graph
A.9 MOPS/sec1 . . . . . .
A.10 MOPS/sec2 . . . . . .
.
.
.
.
.
.
.
.
.
.
.
.
.
.
.
.
.
.
.
.
.
.
.
.
.
.
.
.
.
.
.
.
.
.
.
.
.
.
.
.
.
.
.
.
.
.
.
.
.
.
.
.
.
.
.
.
.
.
.
.
.
.
.
.
.
.
.
.
.
.
.
.
.
.
.
.
.
.
.
.
ix
.
.
.
.
.
.
.
.
.
.
.
.
.
.
.
.
.
.
.
.
.
.
.
.
.
.
.
.
.
.
.
.
.
.
.
.
.
.
.
.
.
.
.
.
.
.
.
.
.
.
.
.
.
.
.
.
.
.
.
.
.
.
.
.
.
.
.
.
.
.
.
.
.
.
.
.
.
.
.
.
.
.
.
.
.
.
.
.
.
.
.
.
.
.
.
.
.
.
.
.
.
.
.
.
.
.
.
.
.
.
.
.
.
.
.
.
.
.
.
.
.
.
.
.
.
.
.
.
.
.
.
.
.
.
.
.
.
.
.
.
.
.
.
.
.
.
.
.
.
.
.
.
.
.
.
.
.
.
.
.
.
.
.
.
.
.
.
.
.
.
.
.
.
.
.
.
.
.
.
.
.
.
.
.
.
.
.
.
.
.
.
.
.
.
.
.
.
.
.
.
.
.
.
.
.
.
.
.
.
.
.
.
.
.
.
.
.
.
.
.
.
.
.
.
.
.
.
.
.
.
.
.
.
.
.
.
.
.
.
.
.
.
.
.
.
.
.
.
.
.
.
.
.
.
.
.
.
.
.
.
.
.
.
.
.
.
.
.
.
.
.
.
.
.
.
.
.
.
.
.
.
.
.
.
.
.
.
.
.
.
.
.
.
.
.
.
.
.
.
.
.
.
.
.
.
.
.
.
.
.
.
.
.
.
.
.
.
.
.
.
.
.
.
.
.
.
.
.
.
.
.
.
.
.
.
.
.
.
.
.
.
.
.
.
.
.
.
.
.
.
.
.
.
.
.
.
.
.
.
.
.
.
.
.
.
.
.
.
.
.
.
.
.
41
42
42
43
43
44
44
45
45
46
x
Chapter 1
A Brief Introduction to
Computational Physics
1.1
The Need for Computational Physics
The word computer did not always refer to the machine you use to surf the web. The first
computers were actually people, not machines. Computers, the people, literally only did
mathematical calculations. The first large scale group of computers was formed to compute
a table of trigonometric values used for navigating in the open seas. These computers were
stationed in Great Britain and were first gathered in 1766.[1]
Fast forward a couple hundred years, mechanical computers had already been invented,
however their nature was far different than what is seen today. The computers were punched
card based computers, and required massive machines and thousands of punched cards to
run a single program. Each punched card was able to describe one instruction. The larger
the program, the larger the number of cards would be needed.[2]
In the year 1943, a group of computers (people) were hired to solve simple problems
given to them by a group of scientists in the Manhattan project. These people consisted
of the scientist’s wives who were working on the Manhattan project. Richard Feynman
thought of a creative way to do the calculations that would increase productivity. The
computers were broken up into teams of three, an adder, a multiplier, and a cuber. These
people would add, multiply, or cube the numbers given to them, depending on the job they
were assigned.
Later, the Manhattan project invested in a couple of punched card computers and
1
Feynman wanted to run tests to see which was more efficient, the machine or the people.
The women were able to calculate answers just as fast as the computer, however, because
the women got tired, needed sleep, and food, the computer was faster in the long run than
the human computers.[3]
Figure 1.1: Photograph of punched card computers at the Manhattan Project[4]
Once the machines proved themselves worthy of the scientists time, Feynman discovered
a way he could decrease the time necessary to wait on the computers by running a parallel
process. Feynman explained the process of using the computers in parallel to solve their
physics problems, ”The problems consisted of a bunch of cards that had to go through a
cycle. First add, then multiply, and so it went through the cycle of machines in this room
- slowly - as it went around and around. So we figured a way to put a different colored set
of cards through a cycle too, but out of phase. We’d do two or three problems at a time.”
Feynman and his colleges were able to decrease the time they waited for a problem to be
computed from three months to three to four weeks.[3]
Much like the Manhattan project, more complex problems call for better calculators.
The faster the computer, the less time is spent waiting for numbers to crunch. Better technology leads to better computers, so as time goes on, what currently is available inevitably
becomes outdated. Computers may seem to be fast enough right now, but no one will want
to wait three months on a problem that could be solved in three weeks. Computer clusters
were created for the simple purpose of decreasing wasted time.
2
1.2
Computer Clusters
Every current computer has a processor, and each processor has multiple cores. Each core
can run multiple threads, which can handle a process. Some computational programs such
as Matlab and Mathematica can take advantage of multiple cores and run many processes
on different threads. The idea behind a computer cluster is to stack multiple computers
together just like computers stack together multiple cores inside one computer. The idea
is the more cores, the more programs can run simultaneously. In a cluster’s case, the more
computers the faster the program can be executed by passing processes that need to be run
to other nodes of the cluster.
Most computer clusters today run off of a Linux Operating System, however there have
been computer clusters built from Windows and Macintosh computers as well. Macintosh
computers are often too expensive for a cluster because the price of each machine is over
$1,000. Windows computers are often too slow and have a larger operating system than is
desirable for a cluster setup. Linux is the most popular operating system, in part because
it can revive an old machine that most people do not want anymore. Linux also is a free
operating system, unlike both Mac OS and Windows, which makes installing Linux on each
machine in a cluster extremely cheap.
A Beowulf cluster is a group of computers built from Linux machines and a message
passing interface. A Beowulf cluster consists of a master computer and many nodes, or slave
computers. A master computer dictates what processes will be done on which computers.
Slave computers receive instructions from the master computer, execute the instructions,
and return answers.
1.3
How a Beowulf Cluster Works
The master computer and each of the slave nodes needs to have the ability to communicate
to each other. In a Beowulf cluster, the user writes a program, and executes it on the master
computer. Using Message Passing Interface software (OpenMPI or MPICH), the master
computer delegates specific processes to each node. The difficulty setting up a cluster lies
in network configuration and installation of the MPI software.
3
The two networking configurations that people are most familiar with are wireless and
wired. Wireless networking is not as desirable because it is slower than a wired connection.
There are two ways to connect the wired connection, the easiest is by purchasing an ethernet
switch (see figure 3.1) and connecting an ethernet cable from each computer to the switch.
The ethernet switch allows a connection from the master computer to each slave without
installing extra ports in each computer. The second way to create a wired network is
by installing multiple network cards in each computer and connecting them together with
ethernet cables. This can be expensive and the number of cables gets burdensome. The
best network configuration is a wired network using a switch.
Once the network is setup, the MPI software needs to be installed. MPICH and OpenMPI are both programs that will accomplish the task. Both are free and come with installation instructions for the operating systems they are available for. The MPI software requires
the master computer to be able to communicate with the other nodes without requiring
a password. Secure Shell allows a user to access one computer via another computer. To
setup passwordless login, SSH-keys will need to be created. Once SSH Keys have been
installed and the MPI software has been installed, the cluster setup will be finished.
4
Chapter 2
Cluster Preparations:
Understanding the Design Before
Building
2.1
Operating Systems
While a beowulf cluster is most often created using a Linux operating system, there are
also programs written to turn a Windows computer as well as a Macintosh computer into
a parallel computing cluster. For a Windows machine, there is a software program that
can be purchased and downloaded to machines called Windows HPC Server. HPC Stands
for High Performance Computing, and was made in 2008. This software currently sells
on Amazon for $474.42. On the other hand, creating a parallel computing cluster from
Macintosh machines is free. However the price of a Macintosh computer brand new is more
expensive than the software for a Windows cluster!
A Linux operating system is the most frequently used operating system because of its
customizability as well as the small partition size in comparison to Windows and Mac OS.
Linux also can be run on any computer, allowing for cheap machines, and high performance
without paying for any software. Linux is the operating system currently used on the BYUIdaho Cluster, but choosing the correct distribution of Linux could difficult for people new
5
to Linux.
There are two categories of Linux distributions, the most popularly used by the public
are called Leading Edge, or often referred to as ”Bleeding Edge”. These operating systems
are cutting edge and always up to date with the software and packages they offer with their
OS. The benefits of these operating systems are a slick look and easy user interface, as well as
many tutorials for different customizations for these distributions. Disadvantages of bleeding
edge distributions include, that they often time have more bugs in their configuration files
because they are released to the public before all the bugs can be tested, found and killed.
Bleeding edge distributions include Fedora, Ubuntu, and OpenSUSE to name a few.
The second category is a stable distribution. These distributions are not released to
the public before taking a more extensive look into the debugging of the operating system.
Because a Stable distribution has been debugged more thoroughly, it may lack the luster of
the bleeding edge distributions, but is often time easier to setup as networking computers
and research computers. Reliability is more important than looks to scientists, so the
industry standard is a stable operating system, and sometimes even an outdated operating
system. Stable distributions include Debian, CentOS, and MEPIS.
2.2
Parallel Processing
MPICH is the software used to pass processes from the master computer to the slaves.
MPICH stands for Message Passing Interface Chameleon. ”The CH comes from Chameleon,
the portability layer used in the original MPICH to provide portability to the existing
message-passing systems”[5]. The second possible MPI software is OpenMPI. OpenMPI
and MPICH do the same thing with slightly different variations in implementation. The
most popular MPI software is MPICH on a Linux Cluster.
Both MPICH and OpenMPI are able to send parallel processes using Object C, C++,
and Fortran. In order to run programs built in different languages, different MPI software
would be required. Python code can be compiled and run in parallel using pump, mpi4py,
MYMPI, or ScientificPython. Java code can not be run on a cluster unless the java code is
turned into C++ code. Java Native Interface will compile java code into C++.[5] Matlab
6
and Mathematica also have the ability to be run on a cluster, or in multiple threads. Extra
software is not needed to run Matlab or Mathematica code, however this paper does not
address how to do that. For more information on parallel processing and multithread
computing for Mathematica and Matlab, see the respective user manual.
To be better prepared to setup a Linux Cluster, understanding what languages you will
need to run is important to know before attempting to setup the cluster. If you attempt
to setup MPICH for example, before install C++, C, and Fortran, the setup will not
complete, or will return an error. By installing all the language libraries and compilers for
the languages you want to run before installing the parallel processing software, you will
save time troubleshooting errors that will arise.
2.3
Administration
Administrating a Linux Cluster is no easy job. It is necessary to know who will be managing
the cluster and how much time and effort they are going to want to put into the upkeep.
The battle for administrators comes down to deciding wither to make an easy setup thats
difficult to manage, or a difficult setup thats easy to manage. Most of the administrators
headaches come from node failure and user authentication.
A Beowulf Cluster is traditionally built using old, outdated computers. Because the
computers are outdated, the hardware is not always reliable. For instance, while building
the Linux Cluster, I came upon a few computers with multiple video cards in them. The
multiple video cards caused a failure in the Linux distribution which made the user interface
fail and the computer was unable to be used in the cluster. While building a cluster, it is
important to remember that the nodes in the cluster might fail. Backup files and anticipate
failure the first time you setup a cluster.
The number of people using the cluster will also affect how administration may work.
If there will only be a single user, the setup and administration is easy, because all users
know exactly how the cluster works! If many people wish to access the cluster and program
on it, but do not understand how the cluster is built, it may be wise to create separate user
accounts for each individual, or a separate user account for users and one for administrators.
7
It is easier to manage the fewest number of user accounts possible. The more accounts
created, the more administration work needs to happen. In the BYU-Idaho Linux Cluster,
it was necessary to be able to monitor what each individual was doing on the internet. Doing
this required a separate user account for each individual who wishes to use the cluster. This
was tedious to learn and difficult to manage, it would be simpler to create a user account
for each research team, or just one account for all students.
Planning before setting up the Linux Cluster will better prepare you for creating the
proper administration files. Knowing the number of accounts that will ultimately be added
to the cluster will help you decide how to setup configuration files. Knowing that each
machine will require slightly different setup will enable you to alter any directions here to
fit your specific cluster build.
2.4
User Authentication
User authentication is the most complicated part of the BYU-Idaho Cluster build. There
are three different types of user authentication that can be used in a Linux Cluster. The
easiest to setup is regular user authentication, a more sophisticated and difficult method is
a Network Information Service (NIS), and the latest, most up-to-date, and most difficult
user authentication method is a Lightweight Directory Access Protocol (LDAP).
Regular user authentication comes standard on every computer. When the operating
system is installed, an administrator account must be created. Once the administrator
account is created, this user can create other users on the machine. While this method is
most familiar to the general public. It is difficult to setup networking files, as well as MPICH
configuration files for the cluster. Cluster administrators following this thesis will need to
repeat most of chapter 3 for every user on the cluster if this method is chosen. It would be
best to choose a method of authentication more easily manageable by the administrator,
however regular authentication works when a small number of people will ever need to be on
the cluster. The BYU-Idaho Cluster is currently setup using this method of authentication.
Network Information Service, or NIS, is a user authentication service that is specially
suited for user authentication on a cluster. Using NIS, the master computer would contain
8
all the accounts and passwords for each user. The files containing the account names, group
names, passwords and home directories of each user is then mounted to each computer
in the cluster using NIS. The NIS method allows for the administrator to create one user
account on the master, and mount it using NIS to the other nodes. This allows users to
access their information on every computer node, as well as use MPICH which requires that
type of consistency throughout the cluster.
The last authentication method is Lightweight Directory Access Protocol, or LDAP.
After the industry standard NIS was used for many years, a bug was found in the system.
Users could access the passwords folder on a cluster using NIS, by copying previous command history into a terminal window. This would allow anyone who is logging into the
computer (users, administrators, and hackers) to access any account and any file on the
machine. LDAP was created as the alternative to NIS. LDAP uses a Data Interchange File
(LDIF) to create and maintain user authentication. The LDIF file is shared throughout the
network and mounted similarly to NIS, but without sacrificing the security of the network.
The BYU-Idaho Cluster was designed so many students could access and use the cluster.
Each node in the cluster was designed to act as a single computer by itself as well. Because
of the large number of students who where anticipated to use the cluster, NIS authentication
was setup. Shortly after NIS was up and running, an error occurred and NIS is no longer
running properly. The Cluster currently runs regular authentication, however script files
have been written to help administrators setup and maintain the cluster status.
9
10
Chapter 3
Procedures
The procedures for building a Linux Cluster vary greatly due to the many customizations
that can be made on a linux machine. The following chapter will explain and demonstrate
how to build the BYU-Idaho Linux Cluster. In the following chapter, any inputed text that
begins with $ is to be ignored, and is shown to symbolize the code is to be inputed as a
terminal command.
3.1
Blueprints
This chapter is designed as a walk through, as well as a report on the procedures taken
while creating the Linux Cluster. Before building, one must understand the design of the
cluster, and why it is designed the way it is. The first step of design is to understand the
purpose of the cluster, next, the hardware needed, and finally the specific software choices.
The purpose of the Linux Cluster is two fold:
1. The first objective was to create a parallel computing linux cluster, capable of running
a parallel process which would decrease computation time when running computational physics problems.
2. The second objective was to allow access to Linux machines to give students the
experience of using an industry standard operating system and design.
11
In order to accomplish both of these goals, the cluster needs three specific hardware
components, a switch for ethernet cables, VGA switches, and computers. Computers are
obviously needed in actually building the cluster, however to accomplish the second goal,
individual machines capable of being a node in a cluster, or being a standalone tower were
needed. The ethernet switch (figure 3.1) will enable each computer to communicate to
each other without needing to install and manage network cards and an unnecessarily large
amount of ethernet cables. The VGA switches (figure 3.2) will allow students access to
each computer. The VGA switch allows both the Windows machine and the Linux machine
to use the monitor, mouse and keyboard provided from the school. This helps fulfill our
second goal by allowing multiple students to use the cluster at the same time.
Figure 3.1: An example of an ethernet switch used in cluster network configuration.
The final project vision contains eight computers connected to monitors via VGA
Switches, MPICH as the chosen MPI software, and NIS as the chosen user authentication protocol. NIS was not able to be configured in the amount of time given, so the
current model uses regular user authentication. The following sections in this chapter will
assume regular user authentication as it is the proven method that works. Appendix B will
list the steps taken to create the NIS configuration that eventually crashed.
3.2
Hardware Management
To begin setting up the Linux Cluster, choose a place to use as the cluster desktop. I chose
Romney 129 because the Physics Majors all have access to this room and the cluster would
12
Figure 3.2: The VGA Switch
used to connect the Linux machine and Windows machine to
the same mouse, keyboard, and
monitor.[6]
Figure 3.3: A single cluster station showing the mouse,
keyboard, monitor, and two computer towers connected with a VGA switch. The BYU-Idaho Cluster
is composed of eight different node stations. The machines that belong to the Linux cluster have blue sticky
notes on them as shown above.
13
be more useful in this room than any other. The cluster sits on a shelf with each computer
connected to a mouse, keyboard, monitor and another Windows machine via VGA switch
(see figure 3.2 and 3.3).
Once all the computers in the cluster have been placed in their new home, plug them
all into an outlet, mouse, keyboard, and monitor1 . This may require some power strips if
the placement of the cluster computer is far from outlets. It is wise at this time to also
plug the computers into each other using the ethernet switch. The ethernet switch routes
all traffic to the correct IP address so all machines can talk to each other. The order the
ethernet cables are plugged into the switch does not matter, however it is nice to keep them
in order for easy trouble shooting.
One special note about hardware management is that with more computers in a smaller
space, the warmer the computers will become, as well as the room they are in. If you plan
on fitting 100 computers into a closet, it may be necessary to install a cooling system in
the closet. Because the BYU-Idaho cluster is setup using already assembled machines, each
computer has a fan and cooling was not a problem with our design.
3.3
Creating a Live USB
Now that the computer cluster is plugged in, its time to give each machine a new operating
system. For my build I will be using CentOS 6. You can download CentOS, or any other
distribution of Linux by searching Google for the name of the distribution you wish to
install. To download the operating system, you will want to find an .iso file, often referred
to as an image. Once the image is downloaded on your computer, mount it to a USB and
create a Live USB.
1
BYU-Idaho owns a special switch purchased for Linux clusters that allows multiple computers to use
one monitor, mouse and keyboard. This may also be of use if your design is slightly different than the one
I am building in this paper.
14
3.3.1
Windows
You can mount the downloaded image to a USB using a Windows computer using the
following steps[7].
1. Choose a USB stick that does not contain any data you need, and connect it to the
computer.
2. Download and run SUSE Studio ImageWriter or Rawrite32
3. Choose the CentOS image as the Image (SUSE Studio) or Filesystem image (Rawrite32).
If the image file is not shown, you may have to change the file selector options or change
the image’s extension
4. Choose the USB stick in the drop-down box by the Copy button (SUSE Studio) or as
the Target (Rawrite32)
5. Double-check you are sure you do not need any of the data on the USB stick!
6. Click Copy (SUSE Studio) or Write to disk (Rawrite32).
7. Wait for the operation to complete, then your USB stick is ready to be used.
3.3.2
Mac OS
Creating a Live USB on a Mac operating system requires a little more know-how, but you
do not have to download any new programs. You can can mount the downloaded image to
a USB using a Mac OS using the following steps[7].
1. Download a CentOS image. Choose a USB stick that does not contain any data you
need, and plug it into the USB slot.
2. Open a terminal
3. Type in the terminal, diskutil list. This will list all disks connected to the system,
as /dev/disk1, /dev/disk2 and so on. Identify - very carefully! - which one corresponds
to the USB stick you wish to use. Hereafter, this paper will assume it was /dev/disk2
- modify the commands as appropriate for your stick.
15
4. Run the code: $ diskutil unmountDisk \dev\disk2
5. Type $ sudo dd if=, then drag and drop the CentOS image file to the terminal
window. This should result in its filesystem location being appended to the command.
Now complete the command with of=/dev/disk2 bs=1m. The final text of the code
should look something like this:
sudo dd if=/Volumes/Images/CentOS-Live-Desktop-x86-64-20-1.iso
of=/dev/disk2 bs=1m
6. Double-check everything looks correct, especially that the line of code is on one line,
not two.
7. Hit Enter and wait for a long time. When you USB stick is ready to use, the terminal
will become active again.
3.3.3
Linux
Because there are so many different linux operating systems, instructions for creating a live
USB and mounting images can be found in various spots on the internet. For this section,
the following procedures are listed to create a live USB for any linux distribution using
GNOME Disk Utility.[7]
1. Download a CentOS image, choose a USB stick that does not contain any data you
need, and connect it
2. Run Nautilus (Files) - for instance, open the Overview by pressing the Start/Super
key, and type Files, then hit enter
3. Find the downloaded image, right-click on it, go to Open With, and click Disk Image
Writer
4. Double-check you are sure you do not need any of the data on the USB stick!
5. Select your USB stick as the Destination, and click Start Restoring...
16
3.4
Installing CentOS
Installing CentOS6 is a fairly easy assignment. Plug the USB with the CentOS image into
the computer. Restart the computer and press the Boot From Menu key. This is oftentimes
F2 or F8, each computer is different and you may need to watch the startup screen for the
correct key. Once you are in the boot menu, select the ”boot from USB”. An image of the
CentOS logo should appear and take you through the installation process.
Follow the instructions the computer gives you until you are asked what devices your
installation will involve. Select Basic Storage Device. This will ensure you get CentOS
as the default operating system. Next you will be warned about the device you selected
containing data. Click Yes to discard any data. This will wipe all memory from your
computer.
The next screen you will be asked to setup a hostname for a computer. Make sure you
name the computer something other than localhost.localhost. The computer name should
be unique, but easy to remember. For the Master computer in the BYU-Idaho Cluster, I
named the computer ”master”. This way whenever I was setting up configuration files, I
remembered which computer I was logged into. The first node in the computer I named
”node01”.
Continue setup as instructed by the computer. Eventually, there will be a screen which
prompts you for a root password. This root password is the most important password the
computer has. Make this password secure and write it down so you can not forget it. If
a user loses their password, as long as the administrator has the root password, they can
recover any user password on the computer, as well as edit any file in the computer.
Once every section of the setup is finished, the computer will install all necessary files.
This may take a while. When the setup is complete, reboot the computer and remove the
USB stick. The computer is now ready to use as part of the Linux cluster. This section
will need to be repeated for every machine that that will be added into the cluster.
17
3.5
Setting up Static IP Addresses
In order to create an identical cluster to the BYU-Idaho cluster, static IP addresses must
be setup for each node in the cluster. To setup static IP address, edit the configure file by
typing:
vi /etc/sysconfig/network-scripts/ifcfg-eth0
Once you open this file, make sure it looks similar to the following:
TYPE=Ethernet
BOOTPROTO=none
IPADDR=192.168.1.1
# Change depending on each machine
NETMASK=255.255.255.0
IPV4_FAILURE_FATAL=yes
IPV6INIT=no
NAME=Cluster
ONBOOT=yes
HWADDR=00:0A:5E:05:AB:CF
PREFIX=24
DEFROUTE=yes
UUID=9c92fad9-6ecb-3e6c-eb4d-8a47c6f50c04
LAST_CONNECT=1418066448
Change the IPADDR to the IP address you want to assign for each machine. In the BYUIdaho cluster, the master computer’s IP address is 192.168.1.1, but the nodes addresses are
all 192.168.1.1XX, where XX is replaced with the node number.
If for some reason you do not want to assign static IP addresses, the cluster will still
work, however you will need to know the IP address of each machine. To find out the IP
address of a computer, type into the terminal:
$ ifconfig
Find the line that starts with: inet XXX.XXX.XXX.XXX. These numbers are your IP
address. Often times, the IP address may look something like this, 192.168.0.215. Make
sure you know the IP Address of each machine, write them down so you can refer to them
later.
18
3.6
Setting up Secure Shell and a Hosts Table
Once CentOS is installed, and static IP addresses are setup, the next step is making sure
that each machine can communicate to each other. They can do this by using Secure Shell
(SSH). To enable SSH, type into the terminal of every computer:
$ /sbin/service sshd start
Next, go into the computers firewall and allow for ssh connections. You can access the firewall graphical user interface by accessing System/Administration/Services. Find the SSH
box and check it. This should allow each computer to use SSH commands. Test that SSH
is functioning by typing:
$ ssh username@ipaddress
The word ”username” should be replaced by the username you want to log into, and ”ipaddress” should be replaced by the IP address of the computer you want to log into.
Once SSH is turned on, it is convenient to create a hosts table. A hosts table keeps track
of the IP address of each computer and gives them a nickname. This allows the user to
forget the IP address of the computers, and just use the hostnames of the computers instead.
If you have not written down the IP addresses, or do not know what the IP address is for
every computer, return to section 3.5 before continuing. Create a hosts table by access the
file in \etc\hosts. Edit this file so it has the IP address and nickname for each computer.
Open the hosts table by typing:
vi /etc/hosts
The hosts table should look like the following:
master 192.168.0.1
node01 192.168.0.101
node02 192.168.0.102
node03 192.168.0.103
Of course, make sure that the IP addresses are correct for the hostnames of the computers
you are using.
Finally, SSH should be setup. This is a very important part of configuration, so make
sure the hosts table now works by accessing any computer using the following command:
$ ssh username@node01
19
Again, replace ”username” with the username you want to log into, and ”node01” with the
nickname you provided for one of your computers.2
3.7
ClusterSSH
ClusterSSH is a program written for managing Linux clusters. ClusterSSH (CSSH) acts
just like Secure Shell (SSH) except that it allows one computer to SSH into multiple other
computers and type the exact same words into each terminal. This will be an extremely
useful tool while trying to configure the slave nodes, as they need to be configured identically
to one another.
1. Visit this website to download the clusterSSH packages pkgs.org/centos-6/atrmpsi386/clusterssh-3.21-4.el6.i686.rpm.html. This website has instructions to install cluster ssh.
2. Download the latest atrpms-repo rpm from:
http://dl.atrpms.net/el6-i386/atrpms/stable/
3. You will be take to a website with a lot of links to different rpm files. Scroll down the
screen until you find atmprms-repo-******. Whatever the latest file is that begins
with atrpms-repo will work for the cluster. The specific file I downloaded was atrpmsrepo-6-7.el6.i686.rpm.
4. Click the file and save it to your downloads folder.
5. Next open a terminal and run the following command: $ rpm -Uvh atrpms-repo*rpm.
Replace the asterisk with the full filename of the file you just downlaoded. For example, I downloaded atrpms-repo-6-7.el6.i686.rpm, so my above command will say
$ rpm -Uvh atrpms-repo-6-7.el6.i686.rpm
2
If the username for each computer is identical to each other (which it should be) then you do not need
to type the ”username” and instead can simply type ”ssh node01”.
20
6. Next we need to install the rpm package. Type into the terminal:
$ sudo yum install clusterssh
To use ClusterSSH, use it similar to SSH. Type into a terminal:
$ cssh username@IPaddress1 username@IPaddress2 username@IPaddress3
This will open a terminal to the three computers you type in. There is no limit for the
number of computers that can be accessed through cssh.
3.8
Updating and Installing Necessary Packages
Now that each computer is able to ssh into the master, and the master is able to ssh into
each computer, we will need to update the system and install C++ and Fortran compilers
so the machines can run MPICH. Use ClusterSSH to access all machines by typing
$ cssh master node01 node02 node03
To allow MPICH to run properly, each computer will need C++ and Fortran compilers.
The minimum package requirements for C++ are gcc, and gcc-c++. The minimum package
requirements for Fortran are gcc-gfortran. There are two more packages that need to be
installed, gpp and nfs-utils. The gpp package is also a C++ compiler. The nfs-utils package
is necessary for setting up the Network File System, referred to in section 3.11. To install
every package the cluster needs to run, type into the terminal:
$ sudo yum -y install gcc gpp gcc-gfortran gcc-c++ nfs-utils
Once the downloads are complete, it is smart to update the operating system. This
allows administrators to have confidence that all computers are exactly identical. To update
the system, type into the terminal:
$ sudo yum -y update
The computer will take a while to update. Once it is complete, the computers are ready to
install MPICH. The next steps in setting up a cluster will not use cash, so type ”exit” into
the terminal and the cssh windows should close after a few seconds.
21
3.9
Passwordless SSH
SSH stands for Secure Shell. Using SSH allows one computer to connect to another computer
anywhere in the world as long as they are connected. This connection can be through the
internet or an ethernet cable. One of the requirements for running MPICH is being able to
access each node from the master without typing in a password and vice versa. To setup
passwordless SSH, the computers first must be able to SSH into each other. By this point
in time, each machine should have a hosts table that was created in section 3.6.
Passwordless SSH login is similar to the set of keys you carry around every day. Each
computer is like a house, they each have a door. Currently, the doors are all locked, and
no one has the key to these doors. The following steps will create keys for each computer.
These keys are unique, the key to your car will not unlock the door to your home. This
is the same for the computers, the keys created by node01 will be different than the keys
for node02. When setting up these SSH keys, a computer first ”creates a lock”, then the
computer can ”distribute the key”. The following steps creates keys for each computer in
the cluster, then gives one copy of the key to the master computer. This allows the master
computer to then copy all keys given to it, and distribute them to all the computers in the
cluster.
To setup passwordless SSH login, follow these steps:
1. Open a CSSH window to every computer in the cluster: $ cssh master node01
node02 node03. This will open a window for each computer in the cluster.
2. Type: $ ssh-keygen -t rsa. This will bring up an interactive text interface.
3. Press enter to chose the default installation directory.
4. You will be prompted for a password, choose one you will remember because you will
need to enter this password to unlock these keys once they are created.
5. Now that the ”lock” has been created, we need to give the keys to the master computer.
Type: $ ssh master mkdir -p ssh. You will be prompted for the user password for
the master computer. Enter it.
22
6. Next type: $ cat .ssh/id rsa.pub | ssh master cat << .ssh/authorized keys.
This code copies the keys from all the computers to the master computer.
7. Open up a new terminal on the master computer. Type into the terminal on the master
computer: $ chmod 700 .ssh; chmod 640 .ssh/authorized_keys. This command
allows the computer to use the keys we just put into the master computer.
8. Now the master computer has all the keys for each computer in your cluster. The
master computer now needs to copy the keys and send them all to all the other computers. Return to the cluster window and type into the terminal:
$ scp master:/home/USERNAME/.ssh/authorized_keys /home/USERNAME/.ssh/authorized_keys
This command will copy the authorized keys from the master computer to all the other
computers in the cluster. A password may be required.
9. The last thing we need to do is allow all other computers to access the keys that they
were just given. Type into the cluster window:
$ chmod 700 .ssh; chmod 640 .ssh/authorized_keys
Passwordless SSH keys should now be setup. Test to make sure this is true by using SSH
to access any machine from any other.
3.10
Installing Message Passing Interface
Download the version of MPICH that the cluster is going to use. The BYU-Idaho cluster
currently runs mpich-3.0.4. Download this version from www.mpich.org/downloads. This
webpage will show you all the versions of MPICH that can be used. For the rest of this
paper, I will refer to mpich-3.0.4.
Once MPICH has been downloaded, it will need to be installed on the master computer,
and only on the master computer. The first step in installation process is to unpack the
file:
$ tar xzf mpich-3.0.4.tar.gz
23
The packages will be unpacked and put into the folder the mpich tar file was placed in.
Next, make the directory for the mpich files. The MPICH directory needs to be on the
same place for each computer, so placing it in a users directory would be bad. A good place
to put the directory is in the /usr/local folder. I chose to place the MPICH directory in a
new folder I made: /usr/local/mpich-3.0.4.
Create the directory by typing: mkdir /usr/local/mpich-3.0.4. Now that the directory is made, the MPICH files can be built and placed into the directory. Enter the
mpich-3.0.4 directory and build the files by typing:
$ cd mpich-3.0.4
Next, configure the MPICH packages by typing the following commands:
$ ./configure --prefix=/usr/local/mpich-3.0.4 2>&1 | tee c.txt
$ make 2>&1 | tee m.txt
If, for any reason the above make command did not work, or reported an error, try the next
command. It should clean up any errors and try again:
$ make clean
$ make V=1 2>&1 | tee m.txt
Now the MPICH packages have been installed and configured, we actually need to install MPICH. To install MPICH software, type the following command:
$ make install 2>&1 | tee mi.txt
Finally, MPICH should be good to go. The last thing that needs to happen is to tell the
computer that MPICH is installed, and where to locate the files. Type into the terminal:
$ PATH=/usr/local/mpich-3.0.4/bin:$PATH ; export PATH
Often times, the above command does not stay when the computer reboots. To make sure
a user can use the MPICH software, enter the .bashrc file in the users home directory. For
example, if the user’s home directory is ”mbrownell”, to add MPICH path to their .bashrc
file, type:
$ cd /home/mbrownell
$ vi .bashrc
Once in this file, add the line:
PATH=/usr/local/mpich-3.0.4/bin:$PATH ; export PATH
24
MPICH has now been installed, configured, and is ready for a process. The cluster is
not ready for a parallel process, but you can run a ”fake parallel process”, or a parallel
process only using one computer (the master). To learn more about how to use MPICH
see Section 3.12, or see the MPICH User’s Guide[8]. For now, test that MPICH is installed
correctly by typing:
$ which mpicc
$ which mpiexec
If the computer returns a pathway (/usr/local/mpich-3.0.4/bin), then everything is configured correctly. To learn more about how to configure MPICH with different settings to
increase speed, or efficiency, see the MPICH Installer’s Guide[9].
3.11
Network File System
Before we can run a true parallel process, we need to setup a Network File System (NFS)
between the master computer and the rest of the nodes in the cluster. There are at least
two files that need to be shared on the cluster, the first is the MPICH directory, the second
is the directory that the user will use to execute their programs. Begin by configuring the
master computer to share the MPICH directory. The NFS configuration file is the first file
that must be altered. To edit the NFS configuration file, type into the terminal:
vi /etc/idmapd.conf
This file should read as follows:
[General] Verbosity = 1
Pipefs-Directory = /var/lib/nfs/rpc pipefs
Domain = physics.cluster
[Mapping]
Nobody-User = nobody
Nobody-Group = nobody
Save and exit the file by pressing escape and typing :x!.
25
Next, we need the computer to allow other computers to access the MPI directory. Configure the exports file in the computer by typing into the terminal:
vi /etc/exports
In the exports file, we need to make sure the computer knows which directory to export.
Make sure this file has the line:
/usr/local/mpich-3.0.4 *(rw,sync)
Then save and exit. The above line of code tells the master computer that the /usr/local/mpich3.0.4 directory will be shared. The * is the symbol for any computer, allowing any computer
to mount the MPICH directory. If you enter the IP address of the computer you wish to
install the mpich-3.0.4 files onto, you can have a more secure network. I leave it open so I
can add or subtract computers from the cluster without needing to change the export file
again on the master computer, I will simply need to mount the files to all of the nodes.
Next, check that the export file was saved correctly, and restart it. Do this by typing
in the terminal:
$ showmount -e
A list of files exported from the master computer should appear. If not, close the terminal,
open a new one, and retype the above command. If the directory did not show up before,
it should now.3
Now that the master computer is setup to share the MPICH directory, the Firewall
needs to be configured to allow NFS access. It is easiest to access the firewall through the
tabs at the top left of the screen. Click the System/Administration/Firewall tab. Once
the firewall is open, it will prompt for the root password. Enter the password, and scroll
down until you see NFS, or NFS4. Click this check box, and the firewall should be ready.
If in further sections, if computers are unable to run a parallel process, come back to this
firewall, and turn off the firewall for each computer. Disabling the firewall is generally not
wise, however, because the BYU-Idaho campus internet is very secure, we are able to disable
the firewall without worrying about being hacked.4
3
The steps in this section should be repeated for every directory that needs to be shared from the master
computer. It is wise to create a Shared folder for every user so they can run MPI processes and save files
across the cluster.
4
It is possible to configure the firewall settings to allow MPI processes and random port access by the
MPI software, however this was not done for the BYU-Idaho cluster. It would be wise to setup the firewall
26
3.12
Running a Parallel Computing Processes in MPICH
Before a parallel process can be run, MPICH must be installed on the master computer,
NFS must be working for the directory you installed MPICH on, and SSH must be enabled
and passwordless login working. Once all these requirements are met, you can finally run
and test MPICH. MPICH comes with example programs that can be tested immediately
after installation, to double check that the MPICH software was installed correctly. To run
one of these tests using MPICH, enter the directory the test is found in. There should be
an examples folder in the installation directory where you downloaded the MPICH files.
Enter this folder and find an example program. One of the example programs that came
with MPICH was cpi. This program will compute the value of Pi using a Monte Carlo type
simulation. To run cpi, type into the terminal:
$ mpiexec -n 20 -f machinefile ./examples/cpi
There are two components of the above code that need to be discussed. The -n in the
options list tells MPICH the number of iterations to run. The above code will run the cpi
program for 20 iterations, and average the answers. The -f option lists the machine file you
want to use. The machine file is a list of computers that your cluster will run the program
on. This file will need to be created by the user.
5
The machine file is simply a list of computers to run the program on. In the machine
file, the IP address or the name of the computers are used to reference the machines. The
following is the BYU-Idaho cluster machine file:
to allow these processes
5
If the user has not specified a machine file, but tells mpiexec to use a machine file, the program will
not run. If the user does not specify a machine file, the program will only run on one computer, and not in
parallel.
27
# Machinefile
master:1
node01:1
node02:1
node03:1
node04:1
node05:1
node06:1
node07:1
The # symbol tells the computer that this line of text is a comment, and thus Machinefile
is the name of the file. The other lines are the names of the machines the program will be
executed on, separated by the number of processes to be run on the machine. If no number
is specified after the computer name in the machine file, MPICH assumes it should treat
all machines equally and each machine will get the same number of process.
Once you have a machine file, the number of iterations, and the program to run, test
your cluster by running the command:
$ mpiexec -n 20 -f machinefile ./examples/cpi
MPICH is setup and working if this executes with no errors. To learn more about different
options the MPICH software can offer, or to learn more about how to use the software, see
the MPICH User’s Guide[8].
28
Chapter 4
Results and Analysis
4.1
Presentation of Results and Explanation of Tests
The Numerical Aerodynamic Simulation (NAS) Program was developed by NASA to test
and benchmark high performance super computers. There are five benchmarks to test
kernels, and three benchmarks that run computational fluid dynamics applications. While
the five kernel benchmarks are easily ready to be employed, the three applications take more
time to configure and setup, but give a more accurate representation of what to expect when
running your own code.
There are eight classes which the benchmarks can be compiled into. The classes are
lettered ”A” through ”F”. Each class, starting from ”A” and ending at ”F”, is built for
more iterations and more powerful computers. By compiling the NAS benchmarks into
different classes, a supercomputer can be tested for its maximum performance capabilities.
For example, the Embarrassingly Parallel (EP) benchmark can be compiled to run
for any of the classes. Once compiled, the benchmark can then be executed. With eight
benchmarks and eight different classes each benchmark can be compiled into, a paper quickly
runs out of room to be able to comment on each benchmark. The C class benchmark is
four times larger than B which is four times larger than A. The same is true for D, E and F
except each is a sixteen times size increase. S is for a small cluster, and W is for workstation.
Due to the size of the BYU-Idaho cluster and the amount of tests we can run, I ran
each benchmark using the A class. Even though these were the smaller tests, they still
29
Block Tridiagonal Solver
(BT)
Embarrassingly
(EP)
Parallel
NAS Benchmarks Definitions
The Block Tridiagonal Solver benchmark solves a tridiagonal matrix. This is also a good benchmark for testing real life problems.
The Embarrassingly Parallel benchmark tests the maximum computational power of the cluster. This test
uses the minimum interprocessor communication possible, and is therefore a great benchmark to test the
maximum ability of the cluster.
Integer Sort (IS)
The Integer Sort benchmark tests computational speed
and communication performance.
Multi-Grid (MG)
The Multi-Grid benchmark tests both long and short
term communication. This benchmark will test how
well the hardware of the cluster can communicate with
each other node. This is a very important test for larger
clusters where communication between nodes can take
up a lot of time.
Conjugate Gradient (CG)
The Conjugate Gradient benchmark is best explained
by NASA themselves, ”A conjugate gradient method
is used to compute an approximation to the smallest
eigenvalue of a large sparse symmetric positive definite
matrix”[10]. This benchmark is a great gauge for knowing how a realistic computational physics code would
run.
Discrete 3D Fast Fourier
Transform (FT)
The Fast Fourier Transform benchmark solves a 3D
partial differential equation. This benchmark is another realistic computational physics problem and will
help administrators understand the clusters capabilities.
Lower-Upper Gauss-Seidel
Solver (LU)
The Lower-Upper benchmark solves a computational
fluid dynamics problem.
Scalar
Pentadigaonal
Solver (SP)
The Scalar Pentadiagonal benchmark is a computational fluid dynamics code built to test the overall capabilities of a cluster.
Figure 4.1: A list of all the NAS benchmarks and what they test
accurately reflect the power of the cluster. Table 4.1 contains a list of all the benchmarks
and a short definition of what each benchmark tests. The pages following are tables of data
30
taken on the BYU-Idaho cluster from 2014, and 2015. For comparing purposes, the Kronos
2005 computer was included to see how the BYU-Idaho cluster matches agains computers
of similar strength. The word ”MOPs” stands for millions of processes which is what the
benchmarks measured results in.
MOPs Total
MOPs/Process
Time (seconds)
MOPs/Sec
Block Tridiagonal (BT)
Kronos (2005) BYU-I Cluster (2014)
2607.32
795.01
651.83
198.75
221.68
64.54
11.76
12.32
BYU-I Cluster (2015)
2380.17
297.52
70.70
33.67
Figure 4.2: Results of the Block Tridiagonal benchmark on the Kronos and
two BYU-Idaho cluster builds
MOPs Total
MOPs/Process
Time (seconds)
MOPs/Sec
Embarrassingly Parallel (EP)
Kronos (2005) BYU-I Cluster (2014)
66.17
31.47
16.54
7.87
17.06
8.11
3.88
3.88
BYU-I Cluster (2015)
127.48
15.94
4.21
30.28
Figure 4.3: Results of the Embarrassingly Parallel benchmark on the Kronos
and two BYU-Idaho cluster builds
MOPs Total
MOPs/Process
Time (seconds)
MOPs/Sec
Integer Sort (IS)
Kronos (2005) BYU-I Cluster (2014)
12.61
13.67
3.15
3.42
6.13
6.65
2.06
2.06
BYU-I Cluster (2015)
14.75
1.84
5.69
2.59
Figure 4.4: Results of the Integer Sort benchmark on the Kronos and two
BYU-Idaho cluster builds
MOPs Total
MOPs/Process
Time (seconds)
MOPs/Sec
Kronos (2005)
1223.29
305.82
6.05
202.20
Multigrid (MG)
BYU-I Cluster (2014)
643.21
160.80
3.18
202.27
BYU-I Cluster (2015)
1136.3
142.04
3.43
331.28
Figure 4.5: Results of the Multigrid benchmark on the Kronos and two BYUIdaho cluster builds
31
MOPs Total
MOPs/Process
Time (seconds)
MOPs/Sec
Conjugate Gradient (CG)
Kronos (2005) BYU-I Cluster (2014)
313.58
319.15
78.39
79.79
4.69
4.77
66.86
66.91
BYU-I Cluster (2015)
376.58
47.07
3.97
94.86
Figure 4.6: Results of the Conjugate Gradient benchmark on the Kronos and
two BYU-Idaho cluster builds
MOPs Total
MOPs/Process
Time (seconds)
MOPs/Sec
3-d Fast Fourier Transform PDE (FT)
Kronos (2005) BYU-I Cluster (2014) BYU-I
256.15
475.29
64.04
118.82
15.02
27.86
17.05
17.06
Cluster (2015)
295.77
49.47
18.03
21.95
Figure 4.7: Results of the 3-D Fast Fourier Transform benchmark on the
Kronos and two BYU-Idaho cluster builds
MOPs Total
MOPs/Process
Time (seconds)
MOPs/Sec
Lower-Upper Diagonal (LU)
Kronos (2005) BYU-I Cluster (2014)
2810.3
897.72
702.58
224.43
132.89
42.45
21.15
21.15
BYU-I Cluster (2015)
3233.89
429.24
34.74
93.09
Figure 4.8: Results of the Lower-Upper Diagonal benchmark on the Kronos
and two BYU-Idaho cluster builds
MOPs Total
MOPs/Process
Time (seconds)
MOPs/Sec
Scalar Pentadiagonal (SP)
Kronos (2005) BYU-I Cluster (2014)
934.06
558.10
233.52
139.52
152.32
91.01
6.13
6.13
BYU-I Cluster (2015)
798.03
119.51
106.52
7.49
Figure 4.9: Results of the Scalar Pentadiagonal benchmark on the Kronos and
two BYU-Idaho cluster builds
4.2
Comparison of Results
Benchmarking the BYU-Idaho supercomputer shows that while the equipment used to create the cluster is somewhat out of date, it still is able to compete against computers of
similar strength and age. The Kronos cluster was a high performance cluster created in
32
2005 in a similar way the BYU-I cluster is currently setup. The Kronos had eight computer
boxes linked up using MPI software. Both the Kronos and BYU-Idaho cluster ran the
same NAS benchmarks and the BYU-I cluster ran most benchmarks faster than the Kronos
cluster.
Because the point of creating a computing cluster is to decrease the amount of computational time, the results in the above graphs can be somewhat misleading. Take for example
the Scalar Pentadiagonal benchmark in figure 4.9. Notice that the Kronos computer ran
over 934 millions of processes total, and the BYU-Idaho (2014) build ran 558 millions of
processes. This would make one think that the Kronos computer is far better than the
BYU-Idaho build, however, the BYU-Idaho cluster finished the benchmark in 91 seconds,
while the Kronos computer took 152. When comparing the benchmarks, it is best to look at
the millions of processes per second. This number will give an idea of how fast the computer
will be able to run a program. The BYU-Idaho (2014) cluster ran the exact same number of
processes per second as the Kronos computer, we can thus conclude that the computers are
equally matched in the Scalar Pentadiagonal benchmark, which test for overall capabilities
as a computing cluster.
The benchmark that saw the greatest improvement between the Kronos computer and
the BYU-I Cluster built in 2015 was the Embarrassingly Parallel benchmark. The Kronos
computer performed 66.17 millions of processes and the BYU-I cluster ran over 127 million
processes, almost double what the Kronos computer did. The impressive part is that the
BYU-I cluster ran these processes just under a second faster than the Kronos computer.
This implies that the BYU-Idaho cluster may be faster, and more powerful than the Kronos
computer. With 3.88 million processes per second, the Kronos computer does not come close
the BYU-Idaho’s cluster running 30.28 million processes per second.
4.3
Comparison of Cluster Builds
Up until now I have only mentioned the second build of the BYU-Idaho Linux Cluster.
Before the current build, another cluster was built using Fedora20 as the operating system,
and a slightly different network configuration. The current configuration uses an ethernet
33
switch and static IP address so the master computer can connect to each computer using a
hosts table, however the previous setup is slightly different.
The previous cluster setup used an ethernet switch to connect each computer to the
BYU-Idaho campus internet server. Each computer node would receive an IP addresses
from the BYU-Idaho server. In order for the master computer to communicate with the
node computers in the previous build, the master computer needed to ask the BYU-Idaho
server where to find the IP addresses of each node. Because the master computer needed
to contact the BYU-Idaho server before contacting each machine, this theoretically should
have increased the amount of time spent in-between processes, thus slowing down the overall
process time.
The difference between the two BYU-Idaho cluster configurations can be seen in the
following graph. Notice particularly the difference in the Embarrassingly Parallel (EP) test
as this test should be the best measurement of overall computational ability, as well as
the Integer Sort (IS) benchmark as it should give the best understanding of the increased
efficiency the new setup offers. Not only was the 2015 build faster, and more powerful than
the 2014 build, it actually out performed the 2014 build in the number of processes per
second in every category, including the three computational fluid dynamics problems BT,
SP, and LU.
34
Chapter 5
Conclusion
5.1
Summary of Setup
In conclusion and summary of the BYU-Idaho Cluster Research, passwordless SSH keys
have been enabled and allow users to login to all computers. This is necessary to run
MPICH and connect the computers into a cluster. SSH keys still need to be enabled for
each user account created, but a script file has been written to help administrators setup
SSH keys.
MPICH was successfully installed and benchmarks were successfully run. A hosts table
was created to allow easy access to the cluster nodes using the computer names instead
of IP addresses. A machine file was created to run parallel processes on every machine to
enable full use of the linux cluster. The MPICH directory was mounted using NFS to the
/usr/local/mpich-3.0.4 directory so each user can have access to all the MPICH files.
Regular user authentication was setup and maintained. To help administrators do their
job more successfully, and with less effort, scripts were written to delete, and add users to
every machine as well as configure NFS directories, and add MPICH path to their .bashrc
file.
35
5.2
Interpretation of Tests
The most apparent proof that the cluster is functioning properly is the graphical representation of the improvement of the calculation time for the program cpi. The cpi program
calculates the number of Pi, and was run on each computer. The program was first run
on the master computer, not in parallel, and then using parallel processing, adding one
node at a time, until the entire cluster was used. The results show clearly that the more
computers connected with the cluster the faster the computation time is. We can conclude
that the BYU-Idaho Linux Cluster will decrease computational waiting time of a process if
it is written in parallel.
Figure 5.1: Graph of time to calculate pi, vs number of nodes used in the process. It is
easy to see that as more computers are added into the cluster, the faster the computation
will go. The more computers added into the cluster will also increase the amount of time
it will take to pass information from computer to computer. There is a small raise in time
when node06 was added into the process, this may be because the individual machine has
malfunction parts and is inherently slower than the other machines in the cluster.
When comparing the data from the BYU-Idaho Cluster built in 2014 and the Kronos
cluster, it is interesting to note the time differences between tests. The BYU-Idaho Cluster
ran EP, MG, and CG faster than the Kronos cluster. This would suggest that the BYU36
Idaho cluster is more powerful computationally than the Kronos cluster. However, the
Kronos cluster ran the FT, and IS benchmarks faster than the BYU-Idaho Cluster. These
tests suggest that the way the BYU-Idaho 2014 cluster was setup creates a decrease in
computational speed due to a decrease in communication performance.
When comparing the benchmark data from the BYU-Idaho Cluster built in 2014 and
the cluster built in 2015, the results show that the newer cluster build using static IP
addresses and a Local Area Network create an overall better performance. The 2015 BYUIdaho cluster outperformed the Kronos computer in the number of processes per second in
every category. The Integer Sort benchmark came the closest with the difference between
MOPs/Sec between the two computers. The Integer Sort benchmark tests for communication abilities in the cluster. It is possible that the BYU-Idaho Cluster can be improved
upon by decreasing the length of the Ethernet cables, as well as tweaking with the network
configurations that may result in better performance.
In conclusion, the BYU-Idaho Linux Cluster runs programs faster than a single machine
could run them. The older cluster lacked in its ability for quick communication between
computers due to network configuration, however this problem has been solved and the
new cluster performs even faster than could be desired. The cluster is efficient when each
individual machine runs an extensive process on its own where little communication is
needed, and is also capable of much greater processing speeds than the Kronos cluster of
similar caliber.
5.3
Future Research
Due to the fact that the Linux Cluster was built by students, it will be maintained by
students, and students will use it. There are two branches of research that can come from
having a linux cluster, the first is administration and configuration research, the second
is actual programming, computation physics research. Both are equally as valuable to a
researchers resume and education as a physicist.
For administration research, the biggest obstacle the current cluster has is user administration. Configuring each user to be able to use passwordless ssh keys which are required
37
for MPICH is time consuming and often rather difficult. If the cluster used a more sophisticated form of user authentication, such as NIS or LDAP, this portion of adding new users
to the cluster could be greatly improved.
Each linux computer was originally intended to give students the experience of using a
linux machine. Because not all machines have internet access, students do not use the linux
machines as often as they use the windows machines. Finding out a way to get internet to
all nodes in the cluster, using DNS port forwarding, would increase the number of people
who receive exposure to the cluster. This is a rather sophisticated process and would require
a good understanding of computer networking.
Any computational physics problem can be solved using the BYU-Idaho Linux Cluster.
Monte Carlo simulations would be great for this computer as they can run similar to the
NAS benchmark Embarrassingly Parallel. Currently, there are a handful of students who
are in the process of using the cluster for their research in Optics, Chemistry, and Nuclear
physics. The future research done on the cluster is limited only by the curiosity of the
student body.
38
Bibliography
[1] Martin Campbell-Kelly and William Aspray. Computer. Westview Press, 2009.
[2] Dale Fisk. Programming with punched cards. 2005.
[3] The Manhattan Project Heritage Preservation Association Inc. Evolving from Calculators to Computers kernel description, 2004. URL http://www.mphpa.org/classic/
HISTORY/H-06c18.htm.
[4] Ed Westcott. Calutron Operators kernel description, 1945. URL http://smithdray1.
net/angeltowns/or/go.htm.
[5] Argonne National Laboratory. Frequently Asked Questions kernel description, 2014.
URL https://wiki.mpich.org/mpich/index.php/Frequently_Asked_Questions.
[6] Amazon Inc.
IOGEAR 2-Port USB KVM Switch with Cables and Remote GCS22U kernel description, 2015.
URL http://www.amazon.com/
IOGEAR-2-Port-Switch-Cables-GCS22U/dp/B001D1UTC4/ref=sr_1_7?ie=UTF8&
qid=1428102768&sr=8-7&keywords=vga+switch.
[7] Red Hat Inc. How to Create and Use Live USB kernel description, 2015. URL https:
//fedoraproject.org/wiki/How_to_create_and_use_Live_USB.
[8] Pavan Balaji, Wesley Bland, William Gropp, Rob Latham, Huiwei Lu, Antonio J Pena,
Ken Raffenetti, Sangmin Seo, Rajeev Thakur, and Junchao Zhang. Mpich user’s guide.
2014.
[9] Pavan Balaji, Wesley Bland, William Gropp, Rob Latham, Huiwei Lu, Antonio J Pena,
Ken Raffenetti, Sangmin Seo, Rajeev Thakur, and Junchao Zhang. Mpich installer’s
guide. 2013.
[10] David H Bailey, Eric Barszcz, John T Barton, David S Browning, Russell L Carter,
Leonardo Dagum, Rod A Fatoohi, Paul O Frederickson, Thomas A Lasinski, Rob S
Schreiber, et al. The nas parallel benchmarks. International Journal of High Performance Computing Applications, 5(3):63–73, 1991.
39
40
Appendix A
Benchmark Graphs and Results
Figure A.1: Block Tridiagonal Benchmark comparison
41
Figure A.2: Conjugate Gradient Benchmark comparison
Figure A.3: Embarrassingly Parallel Benchmark comparison
42
Figure A.4: Fast Fourier Transform Benchmark comparison
Figure A.5: Integer Sort Benchmark comparison
43
Figure A.6: Lower-Upper Benchmark comparison
Figure A.7: MultiGrid Benchmark comparison
44
Figure A.8: Scalar Pentadiagonal Benchmark comparison
Figure A.9: MOPS/sec Benchmark comparison
45
Figure A.10: MOPS/sec Benchmark comparison
46
Appendix B
Setting up NIS User
Authentication
The following is the list of steps used to successfully configure NIS. Shortly after the configuration of NIS, while trying to add a new user, the NIS crashed and has not been reconfigured
properly yet.
$ yum -y install ypserv rpcbind
$ ypdomainname physics.cluster
$ vi /etc/sysconfig/network
# Next, add this line to the end of the network file
NISDOMAIN=physics.cluster
$ vi /var/yp/Makefile
# line 42: change to
MERGE_PASSWD=false
# line 46: change to
MERGE_GROUP=false
# line 117: add
all: passwd shadow group hosts rpc services netid protocols
$ vi /var/yp/securenets
# The above command creates a new file.
# Enter the IP Addresses of the computers you are sharing to
255.0.0.0
192.168.0.0
47
$ vi /etc/hosts
# add own IP for NIS database
192.168.1.1
master.physics.cluster master
$
$
$
$
$
$
$
$
/etc/rc.d/init.d/rpcbind start
/etc/rc.d/init.d/ypserv start
/etc/rc.d/init.d/ypxfrd start
/etc/rc.d/init.d/yppasswdd start
chkconfig rpcbind on
chkconfig ypserv on
chkconfig ypxfrd on
chkconfig yppasswdd on
# Next, update NIS database.
$ /usr/lib64/yp/ypinit -m
#list, type a <control D>.
next host to add: master
next host to add:# Ctrl + D key
#
#
$
$
It’s necessary to update NIS database with following way if
a new user is added again
cd /var/yp
make
48
Appendix C
A Collection of Script Files
The following pages are a few scripts that were written to help administrators manage the
cluster in its current setup.
Stop NFS:
#Stop nfs service
/etc/rc.d/init.d/rpcbind stop
/etc/rc.d/init.d/nfslock stop
/etc/rc.d/init.d/nfs stop
# Make sure everything worked properly
chkconfig rpcbind off
chkconfig nfslock off
chkconfig nfs off
CSSH into all machines in the cluster:
if [ $# -lt 1 ]; then
cssh node01 node02 node03 node04 node05 node06 node07
else
USR="$1"
cssh $USR@node01 $USR@node02 $USR@node03 $USR@node04 $USR@node05
$USR@node06 $USR@node07
fi
49
Add User:
#!/bin/bash
#-----------------------------------------# Create the User
#-----------------------------------------if [ $# -lt 2 ]; then
echo "No user specified."
echo "Type the directory name after the filename"
echo "Type the user’s fullname after the directory name"
exit 1
fi
USR="$1"
name="$2"
echo "Is this user an administrator?"
read answer
if [ $answer == y ]; then
# Add an administrator
sudo useradd $USR -c "$name" -d /home/$USR -G wheel
sudo passwd $USR
else
# Add a user
sudo useradd $USR -c "$name" -d /home/$USR
sudo passwd $USR
fi
#--------------------------------------------# Mount all folders necessary for user to user
#---------------------------------------------# Make the Share directory for the new user
mkdir /home/$USR/Share
# Mount the Share directory
mount -t nfs master:/home/$USR/Share /home/$USR/Share
# Restart nfs service
/etc/rc.d/init.d/rpcbind restart
/etc/rc.d/init.d/nfslock restart
/etc/rc.d/init.d/nfs restart
50
Add User on Slave Computers:
#!/bin/bash
#-----------------------------------------# Create the User
#-----------------------------------------if [ $# -lt 2 ]; then
echo "No user specified."
echo "Type the directory name after the filename"
echo "Type the user’s fullname after the directory name"
exit 1
fi
USR="$1"
name="$2"
echo "Is this user an administrator?"
read answer
if [ $answer == y ]; then
# Add an administrator
sudo useradd $USR -c "$name" -d /home/$USR -G wheel
sudo passwd $USR
else
# Add a user
sudo useradd $USR -c "$name" -d /home/$USR
sudo passwd $USR
fi
#---------------------------------------# Create SSH Keys
#---------------------------------------# Enter the usr’s home directory we just created
cd $USR
# Create ssh keys
ssh-keygen -t rsa
# Copy the keys into the master computers authorized keys file
echo .ssh/id_rsa.pub >> .ssh/authorized_keys
#-----------------------------------------# Configure MPICH
#------------------------------------------# Add path of MPICH into user’s directory
echo "PATH=/usr/local/mpich-3.0.4/bin:$PATH ; export PATH"
>> /home/$USR/.bashrc
51
#--------------------------------------------# Mount all folders necessary for user to user
#---------------------------------------------# Make the Share directory for the new user
mkdir /home/$USR/Share
# Mount the Share directory
mount -t nfs master:/home/$USR/Share /home/$USR/Share
# Restart nfs service
/etc/rc.d/init.d/rpcbind restart
/etc/rc.d/init.d/nfslock restart
/etc/rc.d/init.d/nfs restart
#-----------------------------------------------# Sync ssh keys
#-----------------------------------------------# Send the master computer this computers ssh keys
scp /home/$USR/.ssh/id_rsa.pub master:/home/$USR/.ssh/authorized_keys
# Assuming this file is being run on all machines at the same time,
# now copy the authorized keys file from the master to each node
scp master:/home/$USR/.ssh/authorized_keys
/home/$USR/.ssh/authorized_keys
#-------------------------------------------# Final Message
#-------------------------------------------echo
echo
echo "Report:"
echo "Your new user should be ready to go. Check that the user can ssh
into the master and each node by testing a few. Make sure that
mpich was mounted correctly by running the command
’which mpiexec’"
52
Remove User:
#!/bin/bash
# Check to make sure the user specified a user to delete
if [ $# -lt 1 ]; then
echo "No user specified. Type the username after the execution
of this file."
exit 1
fi
USR="$1"
# Make sure the user we’re going to delete is the correct user
echo "Delete $USR?(y/n)"
read answer
# Delete user on master
if [ $answer == y ]; then
sudo userdel $USR
sudo rm -fr /home/$USR
sudo rm /var/spool/mail/$USR
else
echo "User $USR will not be deleted at this moment"
fi
53