1
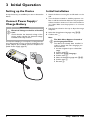
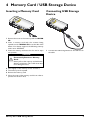
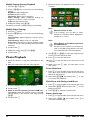
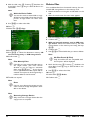
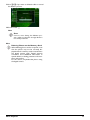
3 Initial Operation
Setting up the Device
Initial Installation
A tripod accessory is available if you want to elevate the
device.
1 Switch the device on using the on/off switch on the
side.
2 Turn the device towards a suitable projection surface or wall. Note that the distance to the projection
surface must be a minimum of 1 foot and a maximum
of 6.9 feet. Make sure the projector is in a secure
position.
3 Use the focus wheel on the top to adjust the image
sharpness.
4 Select the desired menu language using ¡/¢.
5 Confirm with à.
Connect Power Supply /
Charge Battery
CAUTION!
Electrical Voltage at the Site of Installation!
Check whether the electrical voltage of the
power supply matches the electrical voltage
available at the setup location.
Connect the USB plug to a computer, to charge the battery. Alternatively you may connect the USB plug to the
power adapter (not included) (see also chapter Compatible Power Supply, page 23).
8
Note
The Main Menu Appears Instead of
the Language Selection
The device has already been installed. In
order to change the menu language, proceed as follows:
1 Use the navigation keys to select Settings.
2 Confirm with à.
3 Select with ¡/¢ Language.
4 Confirm with à.
5 Select the desired language with ¡/¢.
6 Confirm with à.
7 Exit with ¿.
Philips · PPX2330 · 2340