1
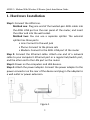
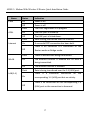
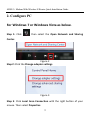
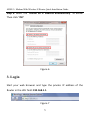
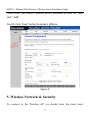
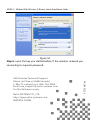
ADSL2+ Modem With
Wireless-N Router
ADSL2+ Modem With Wireless-N Router Quick Installation Guide
1. Hardware Installation
Step 1: Connect the ADSL Line.
Method one: Plug one end of the twisted-pair ADSL cable into
the ADSL LINE port on the rear panel of the router, and insert
the other end into the wall socket.
Method two: You can use a separate splitter. The external
splitter has three ports:
• Line: Connect to the wall jack
• Phone: Connect to the phone sets
• Modem: Connect to the ADSL LINE port of the router
Step 2: Connect the Ethernet cable. Attach one end of a network
cable to your computer's Ethernet port or a regular hub/switch port,
and the other end to the LAN port on the router.
Step 3: Power on the computers and LAN devices.
Step 4: Attach the power adapter. Connect the power adapter to the
power connector on the rear of the device and plug in the adapter to
a wall outlet or power extension.
Figure 1
1
ADSL2+ Modem With Wireless-N Router Quick Installation Guide
Name
PWR
ADSL
Internet
Status
Indication
On
Power is on
Off
Power is off
Flash
The ADSL negotiation is in progress
On
The LINE port is linked up.
Off
The LINE port is linked down.
Flash
Data is being transferred over the Internet.
On
A successful PPP connection has been built.
There is no successful PPP connection or the
WLAN
Off
Router works on Bridge mode.
Flash
There is wireless data being transmitted.
On
The wireless function is enabled but no data is
being transmitted.
Off
The wireless function is disabled.
Flash
Data is being transferred over the 1-4 (LAN) port.
LAN(1-4)
There is
a successful connection on the
On
corresponding 1-4 (LAN) port but no activity.
Off
(LAN) port or the connection is abnormal.
There is no connection on the corresponding 1-4
2
ADSL2+ Modem With Wireless-N Router Quick Installation Guide
2. Configure PC
For Windows 7 or Windows Vista as below.
Step 1: Click
, then select the Open Network and Sharing
Center.
Figure 2
Step 2: Click the Change adapter settings.
Figure 3
Step 3: Click Local Area Connection with the right button of your
mouse. Then select Properties.
3
ADSL2+ Modem With Wireless-N Router Quick Installation Guide
Figure 4
Step 4: Double click the “Internet Protocol Version 4(TCP/IPv4)”.
Figure 5
4
ADSL2+ Modem With Wireless-N Router Quick Installation Guide
Step 5: Select the “Obtain an IP address automatically” as below.
Then click “OK”.
Figure 6
3. Login
Start your web browser and type the private IP address of the
Router in the URL field: 192.168.1.1.
Figure 7
5
ADSL2+ Modem With Wireless-N Router Quick Installation Guide
Then,enter the default User Name admin and the default Password
admin
Figure 8
And then click OK to access to the Wireless Modem Management
Panel screen.
4. Modem Management
This webpage provides you the convenient and simplest way to
configure your Modem to access the internet.
Firstly. Click and go to “Setup”->”WAN” , Page is showing below:
(we are taking PPPoE for example)
Secondly. Enter the VPI and VCI provided by your ISP and select the
Channel mode as PPPoE
6
ADSL2+ Modem With Wireless-N Router Quick Installation Guide
Third: Enter the Fixed IP address which provided by your ISP then
click “ Add”
Fourth: Click “Save” botton to make it effetive.
Figure 9
5. Wireless Network & Security
To connect to the Wireless AP, we should have the most basic
7
ADSL2+ Modem With Wireless-N Router Quick Installation Guide
configuration of the router at first. In this section, you can set the
wireless network parameters required to access the AP of your WLAN
interface.
Go to Setup->WLAN->Basic page, you can configure the wireless
parameters.
Here you may enable or disable the wireless function. You can also
change the wireless parameters, such as Band, SSID, Channel Width,
Control Sideband, Channel Number and Radio Power.
Figure 10
Step 2: Go to Setup->WLAN-> Security page, you can configure the
wireless security parameters.
8
ADSL2+ Modem With Wireless-N Router Quick Installation Guide
Here you can choose the encryption method to prevent any
unauthorized access to your wireless network.
There are three most commonly used encryption method (a total of six
encryption support), including the WEP encryption, WPA-Personal,
WPA2-Personal, etc.
Click “Apply Changes” to make it effective
Figure 11
Step 3: Click “My Network Places” with the right button of your
mouse. Then select “Properties”.
9
ADSL2+ Modem With Wireless-N Router Quick Installation Guide
Figure 12
Step 4: Click “Wireless Network Connection” with the right button
of your mouse. Then select “View Available Wireless Networks”.
Figure 13
Step 5: Double click the wireless network your product provided.
10
ADSL2+ Modem With Wireless-N Router Quick Installation Guide
Figure 14
Step 6: Input the key you stetted before if the wireless network you
connecting to requests password.
Netis SYSTEMS CO., LTD
http://www.netis-systems.com
MADE IN CHINA
PKUM01239
USA/Canada Technical Support:
Phone (toll free in USA& Canada):
1-866-71-network or 1-866-716-3896
Email: usa_support@ netis-systems.com
For North America only