1
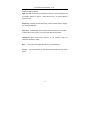
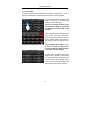
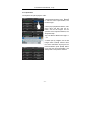
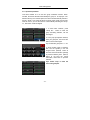
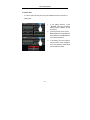
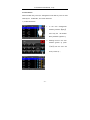
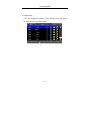
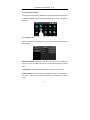
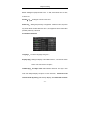
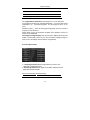
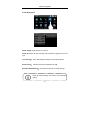
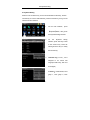
iFace Series User Manual
Version:1.0
Date:Sep 2009
Introduction:
This document mainly introduces the windows and operations of face
identification products. The product installation, please refer to <<Installation
Guide of Face Identification Serial Products>>.
Content
- II -
Important Claim
Firstly thank you for purchasing this face and fingerprint hybrid terminal,
before use, please read this manual carefully to avoid the unnecessary
damage! The company reminds you that the proper user will improve the use
affect and authentication speed.
No written consent by ZKSoftware Inc., any unit or individual isn’t allowed to
excerpt, copy the content of this manual in part or in full, also spread in any
form.
The product described in the manual maybe includes the software which
copyrights are shared by the licensors including ZKSoftware Inc. Except for
the permission of the relevant holder, any person can’t copy, distribute, revise,
modify, extract, decompile, disassemble, decrypt, reverse engineering,
leasing, transfer, sub-license the software, other acts of copyright
infringement, but the limitations applied to the law is excluded.
Due to the constant renewal of products, the company can
not undertake the actual product in consistence with the
information in the document, also any dispute caused by the
difference between the actual technical parameters and the
information in this document. Please forgive any change
without notice.
iFace Series User Manual(V1.0)
Content
1 Operating instruction .................................................................................. 1
1.1 The Distance,Facial Expression and Stand Pose ......................... 1
1.2 Enrollment Pose.............................................................................. 2
1.3 How to place the finger ................................................................... 3
1.4 Touch screen operation .................................................................. 4
1.5 Touch keypad operation .................................................................. 5
1.6 Initial Interface ................................................................................ 6
1.7 Verification methods........................................................................ 7
1.7.1 Fingerprint verification ......................................................... 7
1.7.2 Face Verification .................................................................. 9
1.7.3 Password Verification ........................................................ 12
2 Main Menu ............................................................................................... 13
3 User Management.................................................................................... 16
3.1 Add user ....................................................................................... 17
3.1.1 Input ID NO........................................................................ 18
3.1.2 Input name......................................................................... 19
3.1.3 Enroll fingerprint ................................................................ 20
3.1.4 Enroll face.......................................................................... 21
3.1.5 Enroll Password................................................................. 22
3.1.6 Revise User’s privilege ...................................................... 23
3.1.7 Input Group Number .......................................................... 24
3.2 Edit User ....................................................................................... 25
3.3 Delete User ................................................................................... 26
3.4 User Search .................................................................................. 27
4 Communication setting ............................................................................. 29
4.1 Configure networks ....................................................................... 29
4.2 Configure serial port...................................................................... 30
I
Content
5 System setting.......................................................................................... 31
5.1 Basic Parameter ........................................................................... 31
5.2 Interface Parameter ...................................................................... 32
5.3 Fingerprint Parameter ................................................................... 33
5.4 Facial Specification ....................................................................... 34
5.5 Attendace(Time attendance Setting)............................................. 35
5.6 Firmware update ........................................................................... 37
6 Date Management.................................................................................... 38
7 USB Drive Management .......................................................................... 40
8 Keyboard Setting...................................................................................... 42
9 Auto-Test .................................................................................................. 43
10 Touch-screen Calibration........................................................................ 44
11 Scheduled Bell setting ............................................................................ 45
12 Access control setting ............................................................................ 46
13 System Information ................................................................................ 47
13.1 Record Capacity ......................................................................... 47
13.2 Device Information ...................................................................... 47
Appendix ..................................................................................................... 49
Appendix I. Instruction of Text Input .................................................... 49
Appendix II. Rule explanation of uploading publicity photos. .............. 51
Appendix III. About the human rights privacy statement ..................... 52
AppendixIV. Environmental protection ................................................ 54
- II -
iFace Series User Manual(V1.0)
1 Operating instruction
1.1 The Distance,Facial Expression and Stand Pose
1)The recommended distance:
The recommended distance between person and
device is 0.5m (applied to height range
1.5~1.85m). According to the obtained face image
from device to adjust, when the face image is
comparatively bright, please move backwards
appropriately; when the face image is
comparatively dark, please move forwards
appropriately.
2)The recommended facial expression and several poor-effect facial
expressions:
3 )The recommded stand pose and several poor-effect stand poses:
Note: During the enrollment and verification, please remain the normal
facial expression and stand pose.
-1-
1 Operating instruction
1.2 Enrollment Pose
During the enrollment, display the face in the centre of screen as possible.
According to the device’s voice prompts, do some small-scope head actions
such as turn left, turn right, rise, bow and so on to ensure that the different
parts of face are inputted into system to improve the verification accuration.
The enrollment poses are as follows:
Look ahead
(rise)
Focus on
the screen
Focus on
the camera
(bow)
-2-
Turn left
slightly
Turn right
slightly
iFace Series User Manual(V1.0)
1.3 How to place the finger
Make sure the fingerprint image captured is of a core of presented finger, a
fingerprint is point to locate within innermost recurring ridge of any give finger.
To obtain a higher success rate, enroll same finger 3times in a slightly adjust
angle, one to the center, one incline slightly to the left. The third incline
slightly to the right. You follow the following place procedure; the success rate
will increase dramatically.
The correct way is:
Place a finger flatware on the sensor surface
Place it to the center of the sensor surface
The wrong way is:
Notice: Please adopt the correct way to place the finger; Our Company
is not liable for any damages and troubles whatsoever arising out of
from improper pressing manners.
-3-
1 Operating Instruction
1.4 Touch screen operation
Too large touch area of using finger nail parts or fingertips is possible to affect
the use of touch-screen, as the below demo.
When the touch-screen is not sensitive, please enter the menu for a screen
calibration. On the screen, press 【Menu】 key —>【screen calibrated】
appeared a Cross Graphic, Please use your finger to click the cross center
points, after five consecutive right click, it will automatically return to the main
menu, Then click 【Back】 key to return to the initial interface . The detail
introduction on ‘10 screen calibration’ is in the manual for you reference.
Dirt or dust on the touch screen may affect the operation of
touch-screen,please pay attention to maintaining touch-screen
-4-
iFace Series User Manual(V1.0)
1.5 Touch keypad operation
1) Enter a number. Click 【ID No】, the system will automatically pop-up digital
input interface. After entering the figures, click 【OK】to save and return to the
previous one interface.
2) Input characters. Click 【Name】 button, the system will automatically
pop-up text entry interface, after entering the text, press【X】 key to save and
return to the previous one interface.
3) Modified parameters. Click t the default parameters from the system, it will
automatically switch other parameters.
-5-
1 Operating Instruction
1.6 Initial Interface
① Date
② Time
③ 1:1/1:G function key
Menu key
Verification switch key
Group number
Fingerprint /Face
Screen shortcut key
F1
F2
F3
F4
F5
Keypad shortcut key
F6
(1) Screen shortcut key and
Keypad shortcut key are one to
one correspondence。Users can customize the shortcut keys for
each function , , the specific operation method refers to the
introduction on ‘8 keyboard definition’.。
(2)
showing Facial picture,it means the current device on facial
-6-
iFace Series User Manual(V1.0)
1.7 Verification methods
1.7.1 Fingerprint verification
(1)1:N fingerprint verification
Under the fingerprint authentication mode, the fingerprint that press to the
reader will compared to the fingerprint data in the device.
1: To inter the fingerprint authentication
mode by the below three ways (as
show left):
1 ) Press the 【 Fingerprint/Face
identification switch】
2 ) Click the 【 fingerprint/Facial 】
short cut key on the screen
3 ) Click the 【 fingerprint/Facial 】
short cut key on the screen
2. The detail information of the right
methods to press fingerprint on the
reader
is
on“1.3
Fingerprint
enrollment”
3. Successful verification, see the
interface on left picture 2
- 7 -4. Failure verification, see the interface
on left picture 3
1 Operating Instruction
(2)1:1 fingerprint verification
The fingerprint that press to the reader will be compared to the fingerprint
which related to user number in the device .This method is used when the
user's fingerprint identification is difficult to process.
1.There are thress ways to inter the
fingerprint authentication mode (as show
left) :
1)Click the 【1:1/1:G】on the screen.
2)Click the 【1:1/1:G】screen
short
cut key
3)Click
the
shortcut
key
corresponding to the key board.
Note: The later two kinds of methods
could be available after the "1:1 / 1: G"
was set to shortcut keys. See the
introduction
to
‘8.
Keyboard
Definition’
2.In the pop-up keyboard interface,
enter the user ID, and then click the
"fingerprint" icon (left 2), enter the 1:1
fingerprint patterns. If prompted to
"non-registered users!" Indicating the
number does not exist or the number of
employees is not registered fingerprint
-8-
iFace Series User Manual(V1.0)
1.
进入 1:1 识别模式共有三种方
1.7.2 Face Verification
(1)1:G facial verification
Face recognition interface displays the current group number; the current
group of users can make directly face comparison. When making user
authentication of other groups, It must enter the group number or use the
shortcut keys to select the group number, and then to make comparison with
human faces, the system is set to sync the group as the current group.
The three ways to inter the 1 :G
authentication mode (as show left) :
1) Click the 【1:1/1:G】bottom on the
screen (left 1)
2) Click the 【1:1/1:G】shortcut key on
the screen
3) Click the shortcut key which
corresponding to the keyboard
Note : The latter two kinds of methods
could be available after the "1:1 / 1: G"
was set to as shortcut keys. See the
introduction to ‘8. Keyboard Definition’
1.
2.In the pop-up keyboard interface, enter the
group number, and then click the "1: G" icon
(left 2), enter the 1: G fingerprint patterns
(Left 2)
3.Please adopt the right pose to make facial
verification. see the introduction on ‘1.1
standing situation ,standing position and
countenance’ (left 3)
4: Successful identification (left 4)。
-9-
1 Operating Instruction
(2)1 : 1 Facial Verification
The face templates that captured by the device will be compared to
the face templates which related to user number in the device .This method is
used when the user's facial identification is difficult to process.
1.
The three ways for 1:1 identifcation:
1)Click the【1:1/1:G】bottom on the
screen (left 1)
2)Click the 【1:1/1:G】shortcut key
one the screen
3)Click the shortcut key from the
keyboard
Note : The latter two kinds of methods
could be available after the "1:1 / 1: G"
was set to shortcut keys. See the
introduction to ‘8. Keyboard Definition’
2: In the pop-up keyboard interface, enter
the “1:1 face” icon to enter 1:1 facial
verification model (left 2) If prompted to
"non-registered users!" Indicating the
number does not exist or the number of
mployees is not registered fingerprint
3:Please adopt the right pose to make
facial verification. see the introduction on
‘1.1 standing situation ,standing position
and countenance’ (left 3)
4: If the verification is successful ,
Interface will be as show as left 4 . If
has continuous 20-second
- 10there
authentication not passed, equipment
will return to the main interface.
iFace Series User Manual(V1.0)
- 11 -
1 Operating Instruction
1.7.3 Password Verification
The input password should be compared to the related user number .
1.
There are 3 ways to inter the
password verification mode
1) Click the【1:1/1:G】bottom on the
screen (left 1)
2) Click the【1:1/1:G】bottom on the
screen (left 1)
3)Click the shortcut key from the
keyboard。
Note : The latter two kinds of
methods could be available after
the "1:1 / 1: G" was set to shortcut
keys. See the introduction to ‘8.
Keyboard Definition’
2: In the pop-up keyboard interface, input
the user number and click the “key”
icon to enter password verification
model (left 2) If prompted to
"non-registered users!" Indicating the
number does not exist or the number
of employees is not registered
fingerprint
3: In the pop-up keyboard interface , input
the password and press the “OK” icon to
make the password comparison
4:Successful verification interface ,see left
4.
- 12 -
iFace Series User Manual(V1.0)
2 Main Menu
Staff has two kinds of privileges: users and administrators. users can only
use face, fingerprint or password authentication; administrator can enter the
main manu to operate all kinds of settings together with the “User” functions.
In the initial interface, you can press 【MENU】 key to enter the main menu,
as shown below:
If the device does not have administrator, any person presses
【MENU】 key to be able to enter the menu operation; if set up
administrator, it will need administrator confirmation to enter
the menu. For the safety sake, it is recommended enrolling
administrator for the first time of using. For Details, please
- 13 -
2 Main Menu
Main menu has 10 sub-menus and three shortcut keys in total, as shown
below:
①B
k t I iti l i t f
②Add User
③Setting Time& Date
④System info
User: View personnel information, including ID No., name, fingerprint, face,
cards, passwords, privilege and group of the unit and so on. Increase, edit or
delete operation the basic information
Connection: Set up communication parameters between the equipment and
the PC, including IP address, gateway, subnet mask, baud rate, device
number, communications password etc.
System: Set the system parameters, including basic parameters, interface
parameters, fingerprints, face and attendance parameters, to maximize meet
user’s needs in the functional, display and other areas.
Data: manage the data in the device, such as delete attendance records,
delete all the data, clear administer privilege, clear publicity pictures and
- 14 -
iFace Series User Manual(V1.0)
restore the factory settings.
USB : By USB, the user info and attendance data etc. can be imported to the
accordingly software to deal or import the user info. To other fingerprint
devices to use.
Keyboard : customize the 6 shortcut keys; press the status button to display
the corresponding state.
Auto Test: automatically test the function of each module if it is workable,
including the screen, sensor, voice, face, keyboard and clock tests.
Calibration: When touch-screen response is not sensitive, enter the
calibration interface to adjust.
Bell :
Set the time and ringing duration of the scheduled bell.
Access :
set the parameters of locks controlled and related access control
device.
- 15 -
2 Main Menu
3 User Management
Browse personnel information, including ID No., name, fingerprint, face,
cards, passwords, privilege and group of the unit and so on. Increase, edit or
delete the basic information
In the main menu interface, press 【User Management】 to enter the user
management interface.
①Back to Menu
②Query User
③Add User
④Scroll
⑤User Info List
⑥Choose the letters
Administrator
Fingerprint enrolled
Face enrolled
ID card enrolled
Password enrolled
In the user list area, select some user to enter the
user editing interface.
In the editing interface, edit or delete information
etc.
- 16 -
iFace Series User Manual(V1.0)
3.1 Add user
In the user management interface, press 【Add】 button to enter add user
Interface as shown below:
ID No: Input employee’s ID No. The default digit is 1~ 8.
Name: Enter employee's name. The default is 12 digits.
Fingerprint: Enroll employee’s fingerprint and show the number of enrolled
fingerprint. 10 fingerprints can be enrolled at most.
Face: Enroll the employee’s face.
ID cards: Enroll ID card.
Password: Enroll user's password, the default digit is 1 ~ 8.
Users: Users could be changed to administrators by User Privilege.
Group Code: Set the staff’s group, effective group number is 1 ~ 24.
ID card function is not a standard one. If needed, pls contact our
Business Representative or technical support.
- 17 -
3 User Management
3.1.1 Input ID NO.
The device allocate ID No automatically to employee, started from 1. If use
the device automatically allocation ID No, this section could be skipped.
1.In Add Users interface,press【ID No.:1】
button to enter the w ID No Setting
interface, see the left Image 1:
Tips: You can modify the ID No. at the
first enrollment. When the enrollment
is completed, the ID No. could not be
modified.
2.In the pop-up keyboard interface, Input
user’s ID No., then click "OK" button,
see the left Image If you are prompted to
"ID No. already exists!" means the No.
are already in use, then input the other
no.
Tips: The default ID No. digit is 1 to 9.
If need to extend the digit, please
contact our Business Representative
or pre-sales technical support.
3. ID No. input is completed, see the left
Image 3. Press 【Save】 button to save
the current information and back to the
previous interface; press 【User】 button
not to save the current information, and
directly back to the previous interface.
- 18 -
iFace Series User Manual(V1.0)
3.1.2 Input name
Use keyboard to input employee’s name.
1:In Add Users interface, press 【Name】
to enter the name input interface, see
the left Image 1.
2.In the pop-up keyboard interface, enter
user’s name and then click the "X"
button, see the left Image2. For the
operation of the keyboard interface, see
"Keyboard Help".
Tips: The Device default name digit is 1
~ 12.
3. Name input is complete, see the left
Image3. Press 【Save】 button to save
the current information and back to the
previous interface; press 【User】 button
not to save the current information, and
directly back to the previous interface.
- 19 -
3 User Management
3.1.3 Enroll fingerprint
1:In Add Users interface, press
【Fingerprint】button to enter the
interface , see the left Image 1:
1) In the pop-up fingerprint
Enrollment interface (see left
Image
2),according to the screen tips,
press finger on the sensor in
the right way. See "How to press
finger".
Press one finger 3 times in the
proper way. If successes, the
screen tips will show up(see the
left Image 3)and will automatically
back
to
the
Add
Users
interface( see the left Image 4). If
fail, the screen tips will show up
and back to fingerprint Enrollment
interface and re-do the step 2.
1. Press 【Fingerprint】 to use
other fingers to backup and
10 fingerprints can be
enrolled at most.
2. Press 【Save】 to save the
info and back to the previous
interface, or press 【User】
not to save and back to the
previous interface.
- 20 -
iFace Series User Manual(V1.0)
3.1.4 Enroll face
1:In Add Users interface, Press
【Face】 button to enter the face
Enrollment interface, see the left
Image 1:
2. In the pop-up Face Enrollment
interface
(see
left
Image2),
according to the voice tips to a small
range around rotor, the rise , bow
and other actions aimed at the
different parts of the face all entrying
into the system, to make verification
more
accurate.
See
the
introduction
of
"Verification
posture" .
3. After enrolling successfully, screen
tips will show up, and automatically
back to the Add Users interface
(see left Image 3).
4.Press 【Save】 button to save the
current information and back to the
previous interface; press 【User】
button not to save the current
information, and directly back to the
previous interface.
- 21 -
3 User Management
3.1.5 Enroll Password
1.
In Add User interface, Press
【 Password 】 button to enter the
password settings interface, see the
left Image 1.
2:In the pop-up keyboard interface, input
your password, then click "OK" button,
see the left Image 2. According to the
screen tips to input your password
again, and then click "OK" button to
save.
Tip: device default password digits is 1
--8.
3. Password input is completed, see the
interface at left Image3. Press 【Save】
button to save the current information
and back to the previous interface;
press 【User】 button not to save the
current information, and directly back to
the previous interface.
- 22 -
iFace Series User Manual(V1.0)
3.1.6 Revise User’s privilege
1. In Add Users interface, press
【User】 button, you can change
the user privilege to Administrators,
see the left Image1.
Note: Staff has two kinds of
privileges:users and administrators.
Users can only use face, fingerprint
or
password
authentication;
administrator, owning the Users’
function and can also enter the main
menu to operate all kinds of the
settings.
2. After completion of editing, see the
left image two. Press 【 Save 】
button to save the current
information and back to the
previous interface; press 【User】
button not to save the current
information, and directly back to
the previous interface.
- 23 -
3 User Management
3.1.7 Input Group Number
This device default is to run the face group verification function. When
enrolled, the device allocates automatically the group no. to employee. The
default is Group 1; the number expires, the device will automatically extend to
Group 2. Group 1 can enroll 100 faces; the other groups could only enroll 50
faces at most. If you use the function of automatically allocating the Group
no., this section could be skipped.
1. In Add Users interface, press
“Group No.” button to enter the
group No.setting interface, see the
left Image.1.
2. In the pop-up keyboard interface,
enter your group No., then click "OK"
button, see the left Image2.
Tip: The effective group No. is 1 ~ 24.
3. Group number input is complete,
then see the interface in the left
Image3. Press 【Save】 button to
save the current information and back
to previous interface; press 【User】
button to not save the current
information, direct back to previous
interface.
Tips: Please keep in mind the
user's own group No.
- 24 -
iFace Series User Manual(V1.0)
3.2 Edit User
Please select any user from the user list, then enter the interface of editing
user .
The ID Number is not promised to modified ,and other operation the same as
the progress of register user .It is Ok to reenroll the fingerprint ,face ,
password ,also modified the administration authority and the Group Number
- 25 -
3 User Management
3.3 Delete User
It is Ok to delete all and part of the user database from the interface of
editing user
1.
In the editing interface , Press
【Delete】,than entry the Setting
Group Number interface as the
first picture.
2. From the second picture ,Press
【Delete】,the user information has
been all delete; Press【back】,then
return the last interface
3.
- 26 -
In the editing the user interface,
the press of the name, fingerprint,
face, and password could delete
the information as need.
iFace Series User Manual(V1.0)
3.4 User Search
While enrolled many users ,the management could find any user as need
faster by the
“ID Number” ,and “name” searches
1)ID Number Search
1.
In
the
user
management
interface, press the【query】,
then entry the
ID Number
Query interface a( picture 1)。
2.
Entering the ID in the new
interface (picture 2), press
【 OK 】 ,then the user will
show(Picture 3)。
- 27 -
3 User Management
2)Name Search
In the user management interface, press first letter of the user name in
the “letter list area “as the below picture.
- 28 -
iFace Series User Manual(V1.0)
4 Communication setting
The setting of communication between the PC and equipment is including the
IP address , gateway, subnet mask, baud rate, device number , signal code,
and so on
4.1 Configure networks
When the equipment connecting with PC by TCP/IP, please kindly check the
below setting :
Machine IP address: Default IP is 192.168.1.201, and it is ok to modified as
need ; Do not set IP address as same IP from PC that the device connected
with.
Subnet mask: Default mask 255.255.255.0, it is Ok to modify as need.
Gateway address: the Default gateway address is 0.0.0.0, if the equipment
and PC is not in the identical network segment, set up the gateway address
firstly.
- 29 -
4 Communication setting
4.2 Configure serial port
When the equipment connecting with the PC by RS232/485,please kindly
check the below setting :
RS232: Whether using RS232 communication or not, if the RS232 will be
used, then this choice is "ON";
RS485: Whether using RS485 communication or not, if the RS485 will be
used, then this choice is "ON”.
Baud rate: the rate at which fingerprint machine communicate with the PC ,
there are five kinds of options 9600, 19,200, 38,400, 57,600, 1.15200 bit/sec,
the high speed communication is faster ,and recommend by
the
RS232communication ; The low speed communication is stable, and
recommended by the RS485 communication;
Connection password: To ensure the security of time and attendance
databases , you could set the connection password . The system default
password is 0(namely the password does not exist), it is allowed to set it as
other values, after setting up, be sure to input this password before the
software communicate with the equipment , otherwise you will fail to create
connection between the fingerprint machine and PC software. The
connection password length is 1 ~ 6.
- 30 -
iFace Series User Manual(V1.0)
5 System setting
To satisfy the customer requirement of the device like the function , and
display, the system could be set by the user including the basic ,interface
parameter, fingerprint ,also the face ,the time and attendance parameter, and
so on .
5.1 Basic Parameter
Date/Time :
Date Format:
Setting the data and time of the equipment.
Setting the data format in the original interface
Keyboard Beep :Setting the voice of keyboard. If “ON”, there will be beep .If
“OFF, It will be not
- 31 -
5 System setting
Voice : Setting the equipment with voice :If “ON”, there will be voice .If “OFF,
It will be not
Volume(%):Setting the volume of the voice
Power key: Setting the power key of equipment . While the “ON”, the power
key will be will be invalid. While the “OFF”, the equipment will be closed after
pressed power key 3 seconds
5.2 Interface Parameter
Language :To set the language using now 。
Display Style:Setting the display of the Initial Interface 。Two moulds “Clock
screen” and “Full screen” as option 。
Toolbar Style:The Style of the Initial Interface shortcuts. Two style :”Auto
hide” and “Always Display” as option .For the “Auto hide”,status bar could
show and hide by setting ; For “Always Display”, the status bar will show
- 32 -
iFace Series User Manual(V1.0)
in the Initial Interface forever.
Default Verify Mode:Two Default Verify Mode to be set as “Fingerprint” and
“Face” as option
Pictures Delay:Setting a period about the
change of the picture.
(supporting 3~999 seconds)
Sleep Time:While the device has been the time stetted and without any
operation ,it will be to status of Sleeping .For any press key and
fingerprint ,it will be end.
5.3 Fingerprint Parameter
1: 1 matching threshold: While reorganization by user ID+ fingerprint,
Threshold a predefined number。
1: N matching threshold: the degree of correlation matches with the
registration template.
Recommend matching threshold setting:
Matching threshold
FRR
FER
1:N
1:1
- 33 -
5 System setting
High
Low
45
25
Middle Middle
35
15
Low
25
10
High
1:1 reorganization repeat times: while adopt the 1:1 or the Password,
The equipment will be Ok to repeated identification for the user after failed
identification .eg: Unenrolled fingerprint ,and the fingerprint touch is not
good.
Algorithm Version: There are tow fingerprint algorithm version 9.0 and10.0
as option for the customers 。
Please kindly notice: the fingerprint templates from algorithm version 9.0
and10.0 is incompatiable.
The fingerprint image display: there are tow option: Display forever and No
display , Please kindly choose as you need so that the fingerprint image to
show or not in the display while enrolled or reorganization
5.4 Facial Specification
1: 1 matching threshold: While reorganization by user ID+ face,
Threshold a predefined number
1: N matching threshold: the degree of correlation matches with the
Registration Facial template.
Recommend matching threshold setting::
Matching threshold
- 34 -
iFace Series User Manual(V1.0)
FRR
FER
1:N
1:1
High
Low
90
80
Middle Middle
80
70
Low
High
75
65
Enroll Mode:Setting user enroll mode.There are two mode, combined Enroll
and face. If you choice “combined enroll” ,after you enroll face, you must
enroll fingerprint or password. If you choice “face”,you only need enroll
face .this option is invalid for admin. The terminal set “combined enroll” to
admin.
Enroll way : The way of registration of the new user by face .
Exposure:set the value of Exposure.
Gain:set the value of Gain.
Quality:set the value for matching facial module。
曝光、增益和质量参数调节不当将严重影响设备的使用效
果
如您确需调节曝光参数
请在我司售后服务人员的指导下
5.5 Attendace(Time attendance Setting)
Log Alert: When the remaining log is less than the number setting, the device
will alert automatically( Valid setting:1-99).
ReCheck Time(M): Within the time setting(Unit: Minute), if there is already a
Card Only: “Yes” means only card authentication is OK. “NO” means after
card authentication, the user should make fingerprint authentication.
- 35 -
5 System setting
- 36 -
iFace Series User Manual(V1.0)
5.6 Firmware update
Using this function to update the firmware from USB drive.
If you need to update the firmware, please contact technical
support. Usually, we don’t recommend to update the firmware.
- 37 -
6 Data management
6 Date Management
Delete Alllog:Delete all logs in the device.
Delete All: Delete all date, including user information, fingerprints, face and
logs.
Clear Privilege:Clear Administrator privilege of all the admininistrator.
Delete Picture: Delete all the picture uploaded from USB.
Reset All Default Settings:Reset all the Parameter to default settings.
Reset All Default Settings won’t delete user information
and log.
- 38 -
iFace Series User Manual(V1.0)
- 39 -
6 Data management
7 USB Drive Management
Download Alllog:Download all log in the device to the USB drive。
Download User:Download all user information, fingerprint templates and
Facial templates to the USB drive。
Upload User: Upload all user information, fingerprint templates and Facial
templates from USB drive to the device。
Upload Photo:Upload the JPG file named by user ID from USB drive to the
device. When the user identify successfully, the picture appears.
- 40 -
iFace Series User Manual(V1.0)
Upload Picture: Upload the JPG file which the name start with “ad_” from
USB drive to the device. These picture will appear on the initial
interface.(JPG file format setting, please check Appendix No.2)
- 41 -
8 Keyboard Setting
8 Keyboard Setting
Define F1-F6 as shortcut key, such as Time attendance status key, function
shortcut key etc. On the initial interface, press the shortcut key, then go to the
selected function interface.
1.
On the main interface , press
【keyboard】button,then go into
the keyboard setting interface.
2.
On
the
keyboard
setting
interface, press “add” key to add
a new shortcut key. Press the
existing shortcut entry to modify
the shortcut key。
3.
Shortcut key:F1-F5。(F6 is
assigned
to
be
Facial
and
Fingerprint switch key, and can’t
be changed)
Function:Include status, Face
group 1, Face group 2, Face
- 42 -
iFace Series User Manual(V1.0)
9 Auto-Test
Auto-Test function can test each module in the device automatically,
including Touch-screen, Fingerprint sensor, speaker, Facial authentication
camera, keyboard, and RTC.
- 43 -
10 Touch-screen Calibration
10 Touch-screen Calibration
If the touch-screen is not sensitive, use the calibration function to adjust
the screen.
1.
Press【Menu】key,go into
main interface。
2. Press【Calibration】button,
go
into
touch-screen
calibration interface。
3. Follow the prompt on the
screen and click the centre
of the mark on the screen.
4. If calibrating successfully,
then the system go back to
the
main
interface
automatically. Or calibrate
- 44 -
iFace Series User Manual(V1.0)
11 Scheduled Bell setting
1.
On the main interface , press
【bell】button,go into scheduled
bell setting interface:
2.
On the scheduled bell setting
interface, press the entry, then
start to modify。
3.
Modify
the
scheduled
bell
setting:
Time:the time when the bell
ring。
Ring:choose the sound which
- 45 -
11 Access control setting
12 Access control setting
Lock Delay(S):Time duration of lock drive(Valid setting:1~10)
DoorSensor Delay(S):Some segment time which begin after open door
just begin alarm(Valid setting:1~99)
DoorSensor Mode:there are three option that is none( NONE),
normal open (NO), normal close(NC) .the none means the
door Sensor doesn’t apply, Normal Open is defined that Thee
door can be set to a Passage Mode in the normal condition,
Normal Close means that the door is close in the normal work
condition.
Alarm Delay(S):The time after the device find the current DoorSensor mode
is different from the Setting, then begin alarm(Valid setting:1~99)
- 46 -
iFace Series User Manual(V1.0)
13 System Information
System Information enables user to view the memory status and the
edition information of the device.
13.1 Record Capacity
“Records” shows the number of registered users, administrators and
passwords of the device. The capacities of fingerprint, registered fingerprints,
attendance log, and existed records will be displayed with figures as below:
13.2 Device Information
Users can examine terminal name, serial number, edition info, vendor, and
- 47 -
11 Access control setting
manufacture time of the device in Device Information.
- 48 -
iFace Series User Manual(V1.0)
Appendix
Appendix I. Instruction of Text Input
This device supports Chinese , English, number and symbolic inputs. A text
input interface will pop automatically after click the places which need to input
text, such as “Name” button.
as below:
①
②T
di
l
③
④
⑤D l
⑥E
⑦S
⑧CN/EN S i h
- 49 -
⑨C
⑩
/
/S
S
C
S
Appendix
Complete process of name input:
1.To click “Name” button in the
“Add” interface.
2.To click keypad to input the text,
the interrelated words will be listed
in the word list.
3.Directly select the words while
the vocabulary what you need
occurs in the word list. The
selected words will be displayed
on
the
“Name”
button
synchronously. Please view the left
3rd picture. Repeat the 2nd step
to input next text.
4.After inputting name,
click
“Exit” button to turn off the keypad
interface, and return to superior
menu
- 50 -
iFace Series User Manual(V1.0)
Appendix II. Rule explanation of uploading publicity photos.
1. The format of photos should be JPG format. Other formats are not
supported.
2. The file name of the publicity photos should be ad_0~ad_9. For
example, ad_1.JPG is valid .
3. The file name will not be changed after be uploaded to the device. If user
would like to change the photo, just upload the new photo with same file
name to cover the former one.
4. Each photo can’t be over 20 K. Or it can’t be uploaded.
5. The photo’s resolution should be not bigger or smaller than
320(W)*210(H),
6. Publicity photos are max 10 pis.
- 51 -
Appendix
Appendix III. About the human rights privacy statement
Dear customer:
First thank you for using Multi-biometric identification product we design and
produce. As one of the global famous fingerprint identification core
technology provider, we are nceasingly carrying on the development and
research, also we believe such action is necessary to: (a) comply with the law
or legal process served on Our company; (b) protect and defend the rights or
property of Our company (including the enforcement of our agreements); or
(c) be governed by related law or legal that involve to the human rights and
the privacy in each country.
We are committed to protecting your privacy.
We state as follows:
1. Our civil fingerprints identification equipment merely captures fingerprint
features point, but not the fingerprint image, does not involve and retain
privacy.
2. The fingerprint features points are not to be recovered the primitive
fingerprint image, will not involve the privacy.
3. We took an equipment provider, in no event shall we are liable for any
direct or the indirect against legal behavior arising out of use or inability use
our equipment.
4. If you have the different dispute for close the human rights or the privacy
- 52 -
iFace Series User Manual(V1.0)
arising out of using our equipment, please directly contacts with your
employer. Our other the police fingerprint equipment or the development kit
provide with the function that ability to capture citizen's fingerprint primitive
image, as for whether will constitute the right infringement to you, please
contact with the local government or the equipment final
provider as the equipment original producer, we have not any legal liability for
any damage it cause.
Note: There are limited rights to privacy and human rights in the Chinese
Constitution.
The personal dignity of citizens of the People's Republic of China is inviolable
and further, that insult, libel, false accusation or false incrimination directed
against citizens by any means is prohibited, the protection of freedom of the
person and the residence .The Constitution provides for the freedom and
privacy of correspondence of the citizen.
Finally we hereby stressed that once again, as one kind of advanced
identification technology the fingerprint identification will apply to electronic
commerce, bank, insurance, law service industry in the future,every year, all
world cause from the lack of security password , the humanity are suffering
the heavy loss. In under high safe and secure
environment the fingerprint identification protect your status from damage in
fact.
- 53 -
Appendix
AppendixIV. Environmental protection
The environmental protection use period marked on our products is
the safety period of our products used under the conditions specified
by this manual without toxic and harmful substances leaking
happened
The environmental protection use period marked on our products
does not include the easy wear and tear components required to be
replaced regularly such
as the battery etc. The battery’s
environmental protection use period is 5 years.
The toxic and harmful substances or element names
and the content table
The toxic and harmful substances or elements
Part name
Lea
Mer
Cadm
Hexavalen
Polybromi
Polybromin
d
cur
ium
t
nated
ated
(Pb
y
(Cd)
Chromium
biphenyls
diphenyl
)
(Hg
(Cr6 +)
(PBB)
ethers
(PBDE)
)
SMD
×
○
○
○
○
○
×
○
○
○
○
○
×
○
○
○
○
○
SMD diode
×
○
○
○
○
○
ESD
×
○
○
○
○
○
resistor
SMD
capacitor
SMD
inductance
component
s
- 54 -
iFace Series User Manual(V1.0)
Buzzer
×
○
○
○
○
○
Adapter
×
○
○
○
○
○
Screw
○
○
○
×
○
○
○:Indicate that the content of the toxic and harmful substance contained in all
homogeneous materials of this part is in the limitation requirement stipulated
in SJ / T 11363-2006.
×:Indicate the content of the toxic and harmful substance contained in at
least one homogeneous material of this part is beyond the limitation
requirement stipulated in SJ / T 11363-2006.
Note: The 80% product has adopted the manufacture with non-toxic and
harmless environmental protection materials, the non-toxic and harmless
substances or elements instead of the toxic and harmful substances or
elements contained can not be achieved because of the current technology
and economic constraints.
- 55 -