1
MODELS
MODEL
// E3D320VX
// E3D420VX
// E3D470VX
VAP430
USER
GUIDE
INSTALLING THE CO-STAR
GETTING TO KNOW THE CO-STAR
WATCHING TV ON THE CO-STAR
BROWSING THE WEB
USING THE ON-SCREEN MENU
TROUBLESHOOTING & SUPPORT
SPECIFICATIONS, SAFETY & LEGAL
This product qualifies for ENERGY STAR in the “factory
default” setting and this is the setting in which power
savings will be achieved. Changing the factory default
picture settings or enabling other features will increase
power consumption that could exceed the limits
necessary to qualify for ENERGY STAR rating.
®
HDMI, the HDMI logo and High-Definition
Multimedia Interface are trademarks or
registered trademarks of HDMI Licensing
LLC.
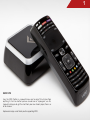
Welcome
THANK YOU FOR CHOOSING VIZIO
And congratulations on your new VIZIO Co-Star.
To get the most out of your new VIZIO product, read these
instructions before using your product and retain them for future
reference. Be sure to inspect the package contents to ensure
there are no missing or damaged parts.
PRODUCT REGISTRATION
To purchase or inquire about accessories and installation services
for your VIZIO product, visit our website at www.VIZIO.com or call
toll free at (877) 878-4946.
We recommend that you either:
• Register your VIZIO product at www.VIZIO.com
• Complete the on-screen registration
Extended Warranties
For peace of mind, and to protect your investment beyond the
standard warranty, VIZIO offers on-site extended warranty service
plans. These plans provide additional coverage during the
standard warranty period. To purchase an extended warranty
service plan, visit www.VIZIO.com.
WHEN READING THIS MANUAL
When you see this symbol, please read the
accompanying important warning or notice. It is
intended to alert you to the presence of important
operating instructions.
When you see this symbol, please read the
accompanying helpful tip.
Important Safety Warnings
Your Stream Player is designed and manufactured to operate
within defined design limits. Misuse may result in electric shock
or fire. To prevent your Stream Player from being damaged, the
following instructions should be observed for the installation,
use, and maintenance of your Stream Player. Read the following
safety instructions before operating your Stream Player. Keep
these instructions in a safe place for future reference.
Servicing is required when the apparatus has been
damaged in any way, such as when the power-supply
cord or plug is damaged, liquid has been spilled or
objects have fallen into the apparatus, the apparatus
has been exposed to rain or moisture, does not operate
normally or has been dropped.
• Unplug the power cord before cleaning your Stream
Player.
To reduce the risk of electric shock or component damage,
switch off the power before connecting other components to
your Stream Player.
• When moving your Stream Player from an area of
low temperature to an area of high temperature,
condensation may form in the housing. Wait before
turning on your Stream Player to avoid causing fire,
electric shock, or component damage.
• Read these instructions.
• Keep these instructions.
• Heed all warnings.
• A distance of at least three feet should be maintained
between your Stream Player and any heat source, such
as a radiator, heater, oven, amplifier etc. Do not install
your Stream Player close to smoke. Operating your
Stream Player close to smoke or moisture may cause fire
or electric shock.
• Follow all instructions.
• Do not use this apparatus near water.
• Clean only with a dry cloth.
• Do not block any ventilation openings. Install in
accordance with the manufacturer’s instructions.
• Slots and openings in the back and bottom of the
cabinet are provided for ventilation. To ensure reliable
operation of your Stream Player and to protect it from
overheating, be sure these openings are not blocked or
covered. Do not place your Stream Player in a bookcase
or cabinet unless proper ventilation is provided.
• Do not install near any heat sources such as radiators,
heat registers, stoves, or other apparatus (including
amplifiers) that produce heat.
• Protect the power cord from being walked on or
pinched, particularly at plugs, convenience receptacles,
and the point where they exit from the apparatus.
• Never push any object into the slots and openings on
your Stream Player cabinet. Do not place any objects on
the top of your Stream Player. Doing so could short circuit
parts causing a fire or electric shock. Never spill liquids
on your Stream Player.
• Only use attachments/accessories specified by the
manufacturer.
• Use only with the cart, stand, tripod, bracket,
or table specified by the manufacturer, or sold
with the apparatus. When a cart is used, use
caution when moving the cart/apparatus
combination to avoid injury from tip-over.
• Your Stream Player should be operated only from the type
of power source indicated on the label. If you are not
sure of the type of power supplied to your home, consult
your dealer or local power company.
• Unplug this apparatus during lightning storms or when
unused for long periods of time.
• Refer all servicing to qualified service personnel.
4
Important Safety Warnings
• WARNING: Keep your Stream Player away from moisture.
Do not expose your Stream Player to rain or moisture.
If water penetrates into your Stream Player, unplug the
power cord and contact your dealer. Continuous use in
this case may result in fire or electric shock.
• Do not apply pressure or throw objects at your Stream
Player. This may compromise the integrity of the display.
The manufacturer’s warranty does not cover user abuse
or improper installations.
• The power cord must be replaced when using different
voltage than the voltage specified. For more information,
contact your dealer.
• Do not use your Stream Player if any abnormality occurs.
If any smoke or odor becomes apparent, unplug the
power cord and contact your dealer immediately. Do
not try to repair your Stream Player yourself.
• When connected to a power outlet, power is always
flowing into your Stream Player. To totally disconnect
power, unplug the power cord.
• Avoid using dropped or damaged appliances. If your
Stream Player is dropped and the housing is damaged,
the internal components may function abnormally.
Unplug the power cord immediately and contact your
dealer for repair. Continued use of your Stream Player
may cause fire or electric shock.
• The lightning flash with arrowhead symbol within an
equilateral triangle is intended to alert the user to the
presence of un-isolated, dangerous voltage within the
inside of your Stream Player that may be of sufficient
magnitude to constitute a risk of electric shock to
persons.
• Do not install your Stream Player in an area with heavy
dust or high humidity. Operating your Stream Player in
environments with heavy dust or high humidity may
cause fire or electric shock.
• Do not overload power strips and extension cords.
Overloading can result in fire or electric shock.
• The wall socket should be installed near your Stream
Player and easily accessible.
• Follow instructions for moving your Stream Player.
Ensure that the power cord and any other cables are
unplugged before moving your Stream Player.
• Only power of the marked voltage can be used for
your Stream Player. Any other voltage than the specified
voltage may cause fire or electric shock.
• When unplugging your Stream Player, hold the AC/DC
power adapter, not the cord. Pulling on the power cord
may damage the wires inside the cord and cause fire or
electric shock. When your Stream Player will not be used
for an extended period of time, unplug the power cord.
• Do not touch the power cord during lightning. To avoid
electric shock, avoid handling the power cord during
electrical storms.
• Unplug your Stream Player during a lightning storm or
when it will not be used for long period of time. This will
protect your Stream Player from damage due to power
surges.
• To reduce risk of electric shock, do not touch the
connector with wet hands.
• Insert batteries in accordance with instructions.
Incorrect polarities may cause the batteries to leak
which can damage the remote control or injure the
operator. Do not expose batteries to excessive heat
such as sunshine, fire or the like.
• Do not attempt to repair or service your Stream Player
yourself. Opening or removing the back cover may
expose you to high voltages, electric shock, and other
hazards. If repair is required, contact your dealer and
refer all servicing to qualified service personnel.
5
Important Safety Warnings
• If any of the following occurs, contact the dealer:
- The power cord fails or frays.
- Liquid sprays or any object drops into your Stream
Player.
- Your Stream Player is exposed to rain or other moisture.
- Your Stream Player is dropped or damaged in any way.
- The performance of your Stream Player changes
substantially.
• This apparatus shall not be exposed to dripping or
splashing and no objects filled with liquids, such as vases,
shall be placed on the apparatus.
• The mains plug or appliance coupler is used as the
disconnect device, the disconnect device shall remain
readily operable.
• CAUTION - These servicing instructions are for use by
qualified service personnel only. To reduce the risk of
electric shock, do not perform any servicing other than
that contained in the operating instructions unless you
are qualified to do so.
h
The lightning flash with arrowhead symbol within an
equilateral triangle is intended to alert the user to
the presence of uninsulated DANGEROUS VOLTAGE
within the product’s enclosure that may be of
sufficient magnitude to constitute a risk of electrical
shock to persons.
The exclamation point within an equilateral triangle
is intended to alert the user to the presence of
important operating and maintenance (servicing)
instructions in the literature accompanying the
product.
6
Table of Contents
What is the Co-Star?...........................................9
Adding and Removing Apps............................................ 34
A New Kind of Television experience................................... 9
Managing Favorite Apps.................................................. 35
Watch This!........................................................................... 10
Creating a Custom Category........................................... 36
Explore & Discover............................................................... 11
Removing Apps from a Custom Category....................... 36
What Sets the Co-Star Apart................................................ 12
Deleting a Custom Category........................................... 36
Have Fun!............................................................................. 13
Using the Settings Menus.................................................... 37
Using the Guided Setup................................................... 37
Installing the Co-Star ........................................ 14
Adjusting Video Settings................................................... 38
Inspecting the Package Contents...................................... 14
Adjusting Basic Video Settings......................................... 38
First time setup .................................................................... 15
Adjusting Advanced Video Settings ................................ 39
Connecting the Co-Star to Your Home Audio System......... 19
Adjusting Audio Settings................................................... 39
Using Guided Setup............................................................ 21
Setting up Devices............................................................... 40
Getting to Know the Co-Star............................. 22
Adding/Removing Video and Audio Devices.................. 40
Co-Star (Rear)..................................................................... 22
Adding/Removing a TV (HDMI Out device)..................... 40
Resetting the Co-Star........................................................ 23
Adding/Removing a Bluetooth Device............................ 41
Remote Control................................................................... 25
Managing Pointer Devices............................................... 42
Remote Control (Continued).............................................. 26
Enabling/Disabling HDMI CEC......................................... 42
Using the Remote................................................................ 27
Restoring the Co-Star to Factory Default Settings ........... 43
Replacing the Batteries.................................................... 27
Application Settings............................................................ 43
Using the Trackpad........................................................... 28
Search Bar Settings........................................................... 43
Getting to know the On-Screen Menu................................ 29
Managing Privacy and Safety.......................................... 44
Connecting Additional Accessories................................... 30
Managing Accounts......................................................... 45
Connecting USB Devices.................................................. 31
Managing Applications.................................................... 46
Managing Services........................................................... 46
Using the On-Screen Menu............................... 32
Accessing Development Tools.......................................... 47
Navigating the On-Screen Menu........................................ 32
Reset Applications to Factory Default Settings................. 47
Google TV™ & Featured Apps............................................. 32
Network Settings.................................................................. 48
Notifications......................................................................... 33
Manual Ethernet Setup..................................................... 48
Accessing and Managing Notifications.......................... 33
Wi-Fi Setup......................................................................... 49
Managing Apps.................................................................. 34
7
Manual Wi-Fi Network Setup............................................. 49
System Settings.................................................................... 50
Adjusting the Time and Local Settings............................. 50
Using Chrome with the Co-Star......................... 51
Web Browsing with the Co-Star............................................ 51
Navigating the Web............................................................ 52
Using Bookmarks................................................................. 52
Deleting Browser History...................................................... 52
Sharing Web Pages............................................................. 53
Managing Privacy and Safety............................................. 53
Troubleshooting................................................ 54
Limited Warranty................................................ 58
Legal and Compliance..................................... 59
8
1
What is the Co-Star?
A NEW KIND OF TELEVISION EXPERIENCE
The VIZIO Co-Star merges live TV and streaming entertainment into
one experience, bringing apps and full-screen Web browsing to
your existing HDTV, all without interrupting what you’re watching.
9
1
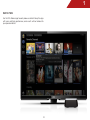
WATCH THIS!
Use the TV & Movies app to easily browse content. Setup the app
with your watching preferences, and results will be tailored to
your personal tastes.
10
1
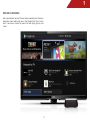
EXPLORE & DISCOVER
We’ve pre-loaded some of the best apps available, but there are
thousands more waiting for you in the Google Play store. Check
out its easy-to-use menus to search for new apps, games, and
more!
11
1
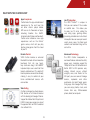
WHAT SETS THE CO-STAR APART
Apps Everywhere
Co-Star takes the app entertainment
experience to the next level like
no other stream player before.
With access to thousands of apps,
including favorites like Netflix®,
Amazon Instant Video, and Pandora®.
Co-Star also introduces new app
experiences such as the OnLive®
game service, which lets you play
top-tier video games from the cloud
to your TV.
Live TV Integration
The VIZIO Co-Star™ is unique in
that you can connect it to a cable
or satellite box. This allows you
to enjoy live TV while surfing the
web, using apps, gaming online,
streaming entertainment—all without
interruption. You can even pull search
results across apps, the Web, local
content and television listings at the
same time.
Remote Control
VIZIO Co-Star includes a universal
Bluetooth® remote with an innovative
touchpad that lets you touch,
tap, scroll and drag. A full QWERTY
keyboard helps users search for their
favorite entertainment. The built-in IR
blaster provides universal functionally,
making it easy to control all your
home entertainment devices with
one remote.
Advanced Technology
The VIZIO Co-Star incorporates a
number of features intended to satisfy
power users, including support for
1080p Full HD and 3D entertainment.
Built-in 802.11n Wi-Fi provides easy
wireless Internet access without
unsightly wires, and thanks to the
USB port, you can connect storage
devices, keyboards
and
other
peripherals. And don’t forget, geeks:
Using apps from Google Play Store,
you can enjoy photos, music, and
movies from any DLNA-enabled
phone, tablet, or computer.
Web Surfing
Co-Star is among a few stream players
that feature a full Internet browser
with the blazing fast Google Chrome.
Support for Adobe Flash Player® and
HTML 5 means you can access any of
the popular Flash or HTML 5 enabled
sites without limits.
12
1
HAVE FUN!
Sure, the VIZIO Co-Star is a powerful new way to enjoy TV, but more than
anything, it’s fun! So whether you’re a casual user or “super-geek,” use this
manual to help you to get the most from your new stream player; there is a
lot to discover.
Explore and enjoy—and thank you for supporting VIZIO.
13
2
Installing the Co-Star
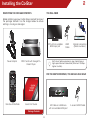
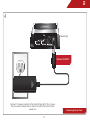
INSPECTING THE PACKAGE CONTENTS
YOU WILL NEED
Before installing your new Co-Star take a moment to inspect
the package contents. Use the images below to ensure
nothing is missing or damaged.
HDTV with an available
HDMI input port
Power Adapter
HDMI
Cable
Internet connection
(Wired or wireless)
For the best online experience, you should have a
high-speed internet connection (Minimum 10 Mbpshigher is better).
VIZIO Co-Star with Google TV ™
Stream Player
FOR THE BEST EXPERIENCE, YOU SHOULD ALSO HAVE
Remote with Batteries
Quick Start Guide
HD Cable or satellite box
with an available HDMI port
Package Contents
14
A second HDMI Cable
2
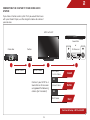
FIRST TIME SETUP
After removing the Co-Star from the box and inspecting
the package contents you can begin installing the Co-Star.
Before you begin, make sure your TV has an available HDMI
port and that all devices are powered off.
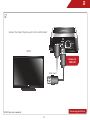
1
Connect your cable or satellite box to the Stream Player
with an HDMI cable.*
The Stream Player can be used without an HD Cable/
Satellite Box, but you will not be able to enjoy the TV
search, picture-in-picture, and other great features.
Connect to
HDMI IN
HD Cable/Satellite Box
HDMI Cable*
Connecting the Co-Star
*HDMI Cable sold separately.
15
2
2
Connect the Stream Player to your TV with an HDMI cable.*
HDTV
Connect to
HDMI OUT
HDMI Cable*
Connecting the Co-Star
*HDMI Cable sold separately.
16
2
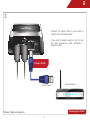
3
Connect the Stream Player to your router or
modem with an Ethernet cable.*
If you want to connect wirelessly, skip this step.
[For best experience, wired connection is
recommended.]
Connect to LAN
Ethernet Cable*
Router or Modem
Connecting the Co-Star
*Ethernet Cable sold separately.
17
2
4
Power Light
Connect to DC IN
Connect the power adapter to the Stream Player to DC IN as shown.
Plug the power adapter into an electrical outlet. The Stream Player
powers on.
18
Connecting Power Cord
2
CONNECTING THE CO-STAR TO YOUR HOME AUDIO
SYSTEM
If you have a home audio system that you would like to use
with your Stream Player, use the diagrams below to connect
your devices.
HDTV with ARC
Sound Bar
or
Cable Box
Co-Star
HDMI Cable
AV Receiver
HDMI Cable
RCA Cable
3.5 mm Cable
Good
OR
Connect your HDTV to a
Sound Bar or AV receiver
using one of the following
cables (not included).
Optical Cable
Better
OR
HDMI Cable
Best
Co-Star AV Setup - HDTV with ARC
19
2
If you have a VIZIO Sound Bar, or an A/V receiver with HDMI
pass-through capability, you can use this setup. Check
the User’s Guide that came with your audio system to
determine if your device has this capability.
Sound Bar
HDTV
or
AV Receiver
Cable Box
with HDMI
pass-through
Co-Star
Cable Box
HDMI Cable
HDMI Cable
HDMI Cable
Co-Star AV Setup - HDMI with pass-through
20
2
USING GUIDED SETUP
The first time you turn on your Co-Star, it will take you through
an on-screen configuration process. Follow the on-screen
directions to complete setup. For more information, see
“Using the Guided Setup” on page 37.
Guided Setup
21
3
Getting to Know the Co-Star
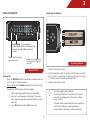
CO-STAR (REAR)
Power Light
Lights up when the Stream
Player is powered on; flashes
when in Standby.
HDMI Out
Connect to TV.
USB
Connect USB device.
DC In
Connect power cord.
Ethernet (LAN)
Connect router or modem.
HDMI In
Connect HDMI device.
Rear View
22
3
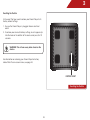
Resetting the Co-Star
In the event that you need to restore your Stream Player to its
factory default settings:
1. Be sure the Stream Player is plugged into an electrical
outlet.
2. To restore your device to factory settings, insert a paper clip
into the hole on the bottom of the device and press for 10
seconds.
WARNING: This will erase any data stored on the
device.
For information on restoring your Stream Player to factory
default from the on-screen menu, see page 43.
FACTORY RESET
Resetting the Co-Star
23
3
REMOTE CONTROL
The remote is Bluetooth enabled. If you complete device setup,
the remote will be paired to the Stream Player. When paired, you
do not need to point the remote at the Stream Player.
IMPORTANT: When controlling your cable/satellite box or TV, the
remote uses an IR (infrared) signal, so you must point it directly
at the cable/satellite box or TV when pressing a button.
24
3
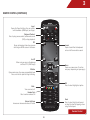
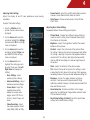
REMOTE CONTROL
TV Power
Press to turn on your TV. You must complete
device setup for this function.
Power/Standby
Press to turn Player on or off.
App Shortcuts
Press to quickly open the app featured on the key.
Info
Opens info window for Player or TV
(HDMI input).
List
Opens your list of recorded DVR programs.
(Used only with connected DVR.)
Trackpad
Slide finger along trackpad to move on-screen
cursor
Guide
Open guide for TV (HDMI input).
Back
Go to previous screen or menu. (Function
may vary depending on open app.)
Arrows
Use to navigate on-screen menu.
Channel Up/Down
Change channel. (In some apps,
Page Up/Down and Chapter Skip.)
Volume Up/Down
Increase or decrease loudness of audio.
Last
Go to previous channel. Used only
when TV (HDMI input) is connected.
Color Shortcuts
Depending on your device or app, used to
open menus, close apps, etc.
Quick
Opens options for screen format, bookmarks,
and notifications.
Remote Control
25
3
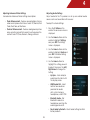
REMOTE CONTROL (CONTINUED)
Input
Opens Fast App Switching. You can quickly
switch between (HDMI input) and apps.
Playback Controls
Press to play, pause, rewind, fast-forward, record
(DVR),or stop playback.
PIP
Opens picture-in-picture when you are
watching an HDMI source in fullscreen.
Search
Opens Search Bar. Use keyboard
on back of the remote to search.
Live TV
When using an app or the browser,
switches to TV (HDMI input).
Menu
Open on-screen menu. (Function
may vary depending on open app.)
V Button
Open main menu. Your apps are available here.
Press and hold to open Fast App Switching
OK
Press to select highlighted option.
Mute
Turn sound on/off.
Number Pad
Press to enter numbers 0-9.
Dash
Press to select digital subchannel
or select (instead of tapping) when
using the trackpad.
Volume Up/Down
Increase or decrease loudness of audio.
Remote Control
26
3
USING THE REMOTE
Replacing the Batteries
BATTERY
|
{
Fn
}
ESC
`
Fn (Function) - Use to enter blue
characters or numbers on keyboard. For
example, press Fn + W to enter the @
symbol.
Arrow - Use to navigate
on-screen menus.
CTRL
Action - Use buttons when
playing games or for app
shortcuts.
Replacing Batteries
|
Remote Buttons
{
Remote Tips:
Fn
}
ESC
`
CTRL
• Press the RECORD button to bookmark a favorite website
while using the Chrome browser.
1. Remove the battery cover.
2. Insert two batteries into the remote control. Make sure that
the (+) and (-) symbols on the batteries match the (+) and
(-) symbols inside the battery compartment.
3. Replace the battery cover.
• Press and hold the V Button to open Fast App Switching.
• To watch an HDMI source while using apps:
• Use only good quality batteries.
1. While watching your HDMI source, press PIP.
• Inserting the batteries incorrectly may result in
cracking or leakage that may cause a fire or
result in injury.
2. Your last-used app opens fullscreen. If you were
not using any app, you can select from the menu
normally.
• Dispose of old or dead batteries in accordance
with local hazardous waste regulations.
3. Press PIP again to watch HDMI fullscreen.
• Keep batteries away from children and pets.
27
3
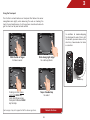
Using the Trackpad
The Co-Star’s remote features a trackpad that allows for easier
navigation and agility when browsing the web or making the
most of your favorite apps. Use the gestures described below to
get the most out of your remote control.
In addition to double-tapping
the trackpad to select items with
the remote, you can also use the
dash key shown below to make
a selection.
Slide thumb or finger
to move cursor.
Slide along right edge
to scroll up/down.
DASH key
To drag an item, press
and hold DASH key
and slide finger across
trackpad. Release DASH
key to drop.
Tap or Double-Tap
to select.
Remote Gestures
Some apps may not support all of the above gestures.
28
3
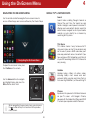
GETTING TO KNOW THE ON-SCREEN MENU
Network Status
Notifications
If the Stream Player is connected
to a wireless network or Ethernet,
the signal strength will be
displayed here.
Select the
icon to display
notifications. The number next to
the
indicates the number of
notifications there are. For more
information, see page 33.
*
For information about
connecting wirelessly,
see page 49.
*
Category Selector
Select this drop-down arrow to select
which app category is displayed.
Create your own, or choose from
Favorite Apps, Games or Movies & TV.
For more information, see page 36.
Favorite Apps
Add or remove your favorite
applications from this list for easy
access. For more information, see
page 36.
Bookmarks
Access your Chrome bookmarks
from this icon. For more
information on managing
bookmarks, see page 52.
All Apps
Every app that is loaded on the
Co-Star will be displayed in this
category. For information on
managing apps, see page 34.
Google Play
Purchase and download
apps from the Google
Play store to optimize the
entertainment potential
of your Co-Star. For more
information, see page 34.
Google Chrome
Browsing the internet on your
TV is a cinch with the Google
Chrome browser for Google TV.
For more information, page 51.
Settings
Use the Settings menu to configure your
Co-Star, manage applications or view
network information.
User’s Guide
Tip: Add Settings to the Favorite Apps
menu for easy access.
Access the Co-Star’s User’s Guide
by selecting this icon.
For more information on Settings, see
page 50.
29
3
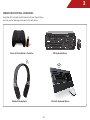
CONNECTING ADDITIONAL ACCESSORIES
In addition to the remote control included with your Stream Player,
you can use the following accessories with your device:
Universal OnLive Wireless Controller
USB Keyboard/Mouse
Bluetooth Headphones
Bluetooth Keyboard/Mouse
30
3
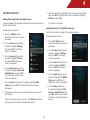
Connecting USB Devices
Using Bluetooth Accessories with the Co-Star
To use a USB accessory with your Stream Player, connect it to the
USB port on the back of the device.
To use a Bluetooth accessory with your Stream Player, you need
to pair it with the Stream Player.
Removing a USB Storage Device
To pair your accessory:
When removing a USB storage device, it is important to unmount/
eject the drive to prevent damage and/or data loss.
1. Make sure your accessory is in “discoverable” mode.
To unmount/eject your USB storage device:
2. Press the V Button on the remote.
3. Select Devices and use the remote to navigate to Bluetooth.
1. Press the V Button on the remote.
*
2. Use the Arrow buttons or the Trackpad to select the
icon
at the top right-hand corner of the on-screen menu, then
press OK.
If the notifications are not displayed, select Ongoing to open
the notification list.
3. Use the Arrow buttons to highlight the name of your USB
storage device and press OK.
4. Select Pair device. The Stream Player will scan for your
accessory.
5. Select your device from the list to pair it with the Stream
Player.
If you are listening to bluetooth headphones and
there is no sound, press the V Button and navigate
to Settings > Audio and change the HDMI Out
setting to PCM.
Your device is ejected. It is safe to disconnect the device.
To disconnect your Bluetooth accessory,
1. Press the V Button on the remote.
2. Select Devices and use the remote to navigate to Bluetooth.
3. Select your device from the list of paired accessories and
use the remote to switch the device pairing to Off.
You may need to re-pair your bluetooth device after
a period of non-use or once it has been powered off.
31
4
Using the On-Screen Menu
NAVIGATING THE ON-SCREEN MENU
GOOGLE TV™ & FEATURED APPS
Use the remote control to navigate the on-screen menu to
access different apps and services offered by the Stream Player.
Search
Search makes scrolling through channels a
thing of the past. Press the Search key and
harness Google’s search power to discover TV
offerings and web content. Quickly search for
online videos, navigate to all of your favorite
websites or jump directly to a channel by
searching for it by name.
TV & Movies
TV & Movies makes it easy to browse for TV
show and movies on live TV, on-demand and
on the web. If you’re a Netflix subscriber, you’ll
also enjoy automatic access to content. If you
have enhanced DVR integration, you’ll find all
of your DVR recordings listed in TV & Movies for
easy viewing.
Navigating the On-Screen Menu
To open the on-screen menu, press
the V button on the remote.
YouTube
YouTube brings millions of online videos,
including today’s most viewed and bestreviewed, letting you play and share them in
full-screen high definition - just like watching TV.
Use the Arrow buttons to navigate
and highlight apps, and press the
OK button to select them.
Chrome
Experience the power of a full Internet browser
on your TV screen with Google’s Chrome,
powered with the Adobe Flash Player and HTML
5 to make your experience better than ever.
While navigating the on-screen menu, you can press
the
button at any time to return to the previous
menu screen.
32
4
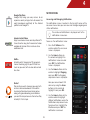
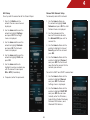
NOTIFICATIONS
Google Play Store
Google Play brings you easy access to an
expansive variety of apps from all around the
world developed specifically of the Android
platform and Google TV.
Accessing and Managing Notifications
The notifications menu is located in the top right corner of the
on-screen menu. Here you can view and manage ongoing and
status notifications.
The number of notifications is displayed next to the
notifications menu icon.
Amazon Instant Video
Enjoy new release movies and day-after-air TV
shows to rent or buy, plus thousands of videos
available to Amazon Prime members at no
additional cost.
To access the notifications menu:
1. Press the V Button on the
remote control. The on-screen
menu is displayed.
2. Use the Arrow buttons on
the remote to highlight the
notifications menu icon and
press OK. The Notifications
menu is displayed.
Netflix®
Instantly watch thousands of TV episodes &
movies streaming right to your TV. Watch as
much as you want, with no due dates or late
fees. Ever.
3. Use the Arrow buttons on the
remote to highlight Ongoing
and press OK. The Ongoing
drop down menu is displayed.
Here you can unmount USB
devices by using the Arrow
buttons on the remote to
highlight it and press OK.
OnLive®
Play what you want, whenever you want, with
no discs and no downloads. OnLive offers
hundreds of blockbuster and indie games,
along with groundbreaking social features
you won’t find anywhere else. Demo free. Play
instantly. It’s that simple.
4. Use the Arrow buttons on the
remote control to highlight
different notifications under the
Notifications drop down menu.
To remove them, highlight the
X button and press OK. The
notification is removed.
33
4
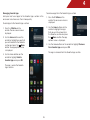
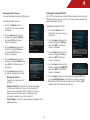
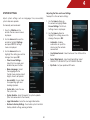
MANAGING APPS
To remove apps:
Adding and Removing Apps
1. Press the V Button on the
remote. The on-screen menu is
displayed.
In addition to the pre-installed apps, you can browse through the
Google Play Store for a wide selection of apps.
To download additional apps:
1. Press the V Button on the
remote. The on-screen menu is
displayed.
2. Use the Arrow buttons on the
remote to highlight the app
you wish to remove and press
the
Menu button. The app
options menu is displayed.
3. Use the Arrow buttons on the
remote to highlight Delete
Application and press OK.
Then highlight Yes and press
OK.
2. Use the Arrow buttons on the
remote to highlight the Google
Play Store icon and press
OK. The Google Play Store is
displayed.
The app is removed.
3. Use the Arrow buttons on the
remote to highlight your app of
choice and press OK. The app
information page is displayed.
4. Use the Arrow buttons on the
remote to highlight the Install
button and press OK, then
highlight Install and press OK
on the following page.
34
4
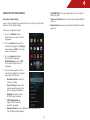
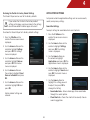
Managing Favorite Apps
To remove apps from the Favorite Apps section:
Add your most used apps to the Favorite Apps section in the
on-screen menu to access them more quickly.
1. Press the V Button on the
remote. The on-screen menu is
displayed.
To add apps to the Favorite Apps section:
2. Use the Arrow buttons on the
remote to highlight an app
that you wish to remove from
the Favorites section and press
the
Menu button. The app
options menu is displayed.
1. Press the V Button on the
remote. The on-screen menu is
displayed.
2. Use the Arrow buttons on the
remote to highlight an app that
you wish to add to the Favorites
section and press the
Menu
button. The app options menu
is displayed.
3. Use the Arrow buttons on the remote to highlight Remove
From Favorite Apps and press OK.
The app is removed from the Favorite Apps section.
3. Use the Arrow buttons on the
remote to highlight Add to
Favorite Apps and press OK.
The app is under the Favorite
Apps section.
35
4
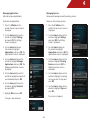
Creating a Custom Category
Removing Apps from a Custom Category
The drop-down arrow on the top right-hand corner of the on-screen
menu allows you to select categories to file applications under
for easy access. You can create your own custom category for
apps to help organize them in the on-screen menu.
To remove apps from a custom category:
To add apps to a custom category:
1. Press the V Button on the
remote. The on-screen menu is
displayed.
2. Use the Arrow buttons on the
remote to highlight an app
you wish to remove and press
the
Menu button. The app
options menu is displayed.
1. Press the V Button on the
remote. The on-screen menu is
displayed.
2. Use the Arrow buttons on
the remote to highlight the
category selector to the right of
the Category title and press the
Menu button. The category
options menu is displayed.
3. Highlight Remove From [Category Name] and press OK.
The app is now removed from the category.
Deleting a Custom Category
3. Highlight Add New Category
and press OK.
To delete a custom category:
1. Press the V Button on the
remote. The on-screen menu is
displayed.
4. Use the keyboard on the back
of the remote to enter a name
for your new category. Use the
Arrow buttons to highlight Save
and press OK.
2. Use the Arrow buttons on
the remote to highlight the
category selector to the right
of the Category title and press
the Menu button. The category
options menu is displayed.
5. Highlight and check each app
you wish to add to the new
category. Highlight Save and
press OK when you are finished.
3. Highlight Delete [Category
Name] and press OK.
You now see the newly created
category with the selected
apps in the on-screen menu.
The category is removed.
36
4
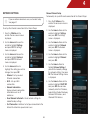
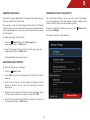
USING THE SETTINGS MENUS
• TV (HDMI Out) to set up control of devices using the
HDMI Out port.
Using the Guided Setup
• Video and Audio devices to add and remove HDMI-In
devices.
Access these step-by-step guides for help in setting up the main
features of the Stream Player.
To access the guided setup:
1. Press the V Button on the
remote. The on-screen menu is
displayed.
2. Use the Arrow buttons on the
remote to highlight the Settings
icon and press OK. The Settings
menu is displayed.
3. Use the Arrow buttons on
the remote to highlight
Guided Setup and press OK.
The Guided Setup menu is
displayed.
4. Use the Arrow buttons on the
remote to highlight the guided
setup you wish to view:
• Remote Control to reset or
set up a remote.
• Screen Sizing to adjust the
display area to provide the
best screen presentation.
• Network to connect to a
Wi-Fi/Ethernet network.
• VIZIO Registration to
register the Co-Star for
warranty purposes.
• Network Name to set up different devices to work with
the Co-Star remote control.
37
• Remote Demo to view a demo of the different remote
gestures.
4
Adjusting Video Settings
Adjust the display to best fit your preferences and viewing
conditions.
To adjust the Video Settings:
• Screen Format - Adjust the width/height ratio to remove
side bars. Select Normal, Wide, Zoom, or Stretch.
• Color Space - Choose a Color Space. Select RGB or
YCbCr 4:4:4.
Adjusting Basic Video Settings
1. Press the V Button on the
remote. The on-screen menu is
displayed.
See below for Basic Video Settings descriptions:
• Picture Mode - Choose from different video settings to
create a custom setting. Select Standard, Movie, Sport,
Vivid, Game, or Computer.
2. Use the Arrow buttons on the
remote to highlight the Settings
icon and press OK. The Settings
menu is displayed.
• Brightness - Adjusts the brightness to affect the overall
brilliance of the picture.
3. Use the Arrow buttons on the
remote to highlight Video and
press OK. The Video Settings
menu is displayed.
• Contrast - Adjusts the white level of the picture. When
this setting is too low, the picture may appear dark. When
this setting is too high, the picture may appear faded or
washed out. If the setting is too high or too low, details
may be difficult to distinguish in dark or bright areas of
the picture.
4. Use the Arrow buttons to
highlight the setting you wish
to adjust, then press the Left/
Right Arrow to change the
Setting:
• Color - Adjust the intensity of the picture colors.
• Tint - Adjusts the hue of the picture. This setting is useful
in adjusting the flesh tones in the picture. If flesh appears
too orange, reduce the level of color before adjusting tint.
• Basic Settings - Adjust
primary picture settings.
• Sharpness - Adjusts the edge sharpness of picture
elements. It can be used to sharpen non-HD (high
definition) content; however, it will not produce detail that
does not otherwise exist.
• Advanced Settings - Adjust
advanced picture settings.
• Screen Saver - Adjust the
duration of no activity
before the screen saver
begins. Select Off, 10 min,
30 min, 1 hour, 2 hours, or 3
hours.
• Noise Reduction - Diminishes artifacts in the image
caused by the digitizing of image motion content. Select
Off, Low, Medium, or High.
• Reset Video Settings to Default - Reset the input Video
settings to the initial factory settings.
• Video Resolution - Adjust
the video resolution. Select
Auto, 1080p, 1080i, or 720p.
38
4
Adjusting Advanced Video Settings
Adjusting Audio Settings
See below for Advanced Video Settings descriptions:
Adjust audio for the TV speakers or set up an external audio
source such as a Sound Bar or AV receiver.
• Color Enhancement - Reduces oversaturation of some
colors and improves flesh tones. Select Off, Normal, Rich
Color, Flesh Tone, or Blue Tone.
To adjust the Audio Settings:
1. Press the V Button on the
remote. The on-screen menu is
displayed.
• Contrast Enhancement - Reduces background picture
noise selecting a level that corrects best based on the
content. Select Off, Low, Medium, Strong, or Extend.
2. Use the Arrow buttons on the
remote to highlight Settings
and press OK. The Settings
menu is displayed.
3. Use the Arrow buttons on the
remote to highlight Audio and
press OK. The Audio Settings
menu is displayed.
4. Use the Arrow buttons to
highlight the setting you wish
to adjust, then press the Left/
Right Arrow to change the
Setting:
• Lip Sync - Adds delay to
audio track to match with
the display video.
• HDMI Audio Out - Select
Auto to have audio as
provided. For audio
with system mixing or
headphones, select PCM.
• Bluetooth Audio - Pair
Bluetooth headset or
headphones and turn the
audio signal on or off.
• Reset Audio to Defaults - Reset Audio Settings to initial
factory defaults.
39
4
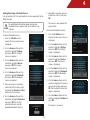
SETTING UP DEVICES
7. To remove a device, highlight the device you wish to remove
and press OK. The Device Info menu is displayed. Highlight
Delete and press OK.
Adding/Removing Video and Audio Devices
View an editable list of audio and video input devices connected
to your Stream Player.
The device is removed.
Adding/Removing a TV (HDMI Out device)
To add/remove devices:
Set up the remote to control a TV or another device.
1. Press the V Button on the
remote. The on-screen menu is
displayed.
To add/remove devices:
1. Press the V Button on the
remote. The on-screen menu is
displayed.
2. Use the Arrow buttons on the
remote to highlight Settings
and press OK. The Settings
menu is displayed.
2. Use the Arrow buttons on the
remote to highlight Settings
and press OK. The Settings
menu is displayed.
3. Use the Arrow buttons on the
remote to highlight Devices
and press OK. The Devices
menu is displayed.
3. Use the Arrow buttons on the
remote to highlight Devices
and press OK. The Devices
menu is displayed.
4. Use the Arrow buttons on the
remote to highlight Video and
Audio Devices and press OK.
The Video and Audio Devices
menu is displayed.
4. Use the Arrow buttons on the
remote to highlight TV (HDMI
Out) and press OK. The TV
(HDMI Out) menu is displayed.
5. Use the Arrow buttons on the remote to highlight Add
Device and press OK. The Set Up Your Devices menu is
displayed.
5. Use the Arrow buttons on
the remote to highlight Add
Device or Delete Device and
press OK. Follow the on-screen
instructions to Add or Delete a
device.
6. Choose your device from the list and follow the on-screen
instructions.
If you can not classify your device, select Other and follow
the on-screen instructions to define your device.
40
4
Adding/Removing a Bluetooth Device
Set up control of a TV or add another device connected to the
HDMI Out port.
7. Highlight the device you wish
to pair from the list and press
OK.
The device is now paired with
your Co-Star.
For additional information about pairing your
bluetooth device, please refer to the device user
manual.
To remove a Bluetooth device:
1. Press the V Button on the
remote. The on-screen menu is
displayed.
To add a Bluetooth device:
1. Press the V Button on the
remote. The on-screen menu is
displayed.
2. Use the Arrow buttons on the
remote to highlight Settings
and press OK. The Settings
menu is displayed.
2. Use the Arrow buttons on the
remote to highlight Settings
and press OK. The Settings
menu is displayed.
3. Use the Arrow buttons on the
remote to highlight Devices
and press OK. The Devices
menu is displayed.
3. Use the Arrow buttons on the
remote to highlight Devices
and press OK. The Devices
menu is displayed.
4. Use the Arrow buttons on the
remote to highlight Bluetooth
and press OK. The Bluetooth
menu is displayed.
4. Use the Arrow buttons on the
remote to highlight Bluetooth
and press OK. The Bluetooth
menu is displayed.
5. Use the Arrow buttons on the
remote to highlight the device
you wish to remove and press
OK. The Bluetooth Device Info
page is displayed.
5. Place your device in pairing
mode. For VIZIO remotes, press
and hold the Record and Blue
buttons for five seconds.
6. Use the Arrow buttons on the
remote to highlight Delete and
press OK.
6. Use the Arrow buttons on the
remote to highlight Pair device
and press OK. The Co-Star
will automatically scan for
available Bluetooth devices.
The device is removed.
41
4
Managing Pointer Devices
Enabling/Disabling HDMI CEC
Set up a touchpad/mouse or WiFi remote.
The CEC function on your Stream Player enables you to control
HDMI-connected devices with the included remote without any
additional programming.
To manage Pointer devices:
1. Press the V Button on the
remote. The on-screen menu is
displayed.
To enable/disable HDMI CEC:
1. Press the V Button on the
remote. The on-screen menu is
displayed.
2. Use the Arrow buttons on the
remote tow highlight Settings
and press OK. The Settings
menu is displayed.
2. Use the Arrow buttons on the
remote to highlight Settings
and press OK. The Settings
menu is displayed.
3. Use the Arrow buttons on the
remote to highlight Devices
and press OK. The Devices
menu is displayed.
3. Use the Arrow buttons on the
remote to highlight Devices
and press OK. The Devices
menu is displayed.
4. Use the Arrow buttons on the
remote to highlight Pointer and
press OK. The Pointer menu is
displayed.
4. Use the Arrow buttons on the
remote to highlight HDMI CEC
and press OK. The HDMI CEC
menu is displayed.
5. Use the Arrow buttons on the
remote to highlight and set up:
5. Use the Arrow buttons on the remote to highlight CEC and
use the Left/Right Arrow to change the setting. Selecting
On enables CEC for all connected devices. Selecting Off
disables CEC for all connected devices.
• Manage IP remotes Connect and disconnect IP
remotes.
• Chrome to Co-Star - Register the Co-Star so Google
Chrome can share links, maps, and selected text
between your computer and TV. (Note: The Chrome
browser extension needs to be installed on your
computer in order to send links to your TV)
• Point Settings - Adjust the speed and acceleration of the
pointing device.
42
4
APPLICATION SETTINGS
Restoring the Co-Star to Factory Default Settings
The Stream Player can be reset to the factory defaults.
Set up and customize application settings such as user accounts,
search, and privacy settings.
If you restore the Co-Star to the factory default
settings, all changes you have made to the settings
and all non-default installed apps will be lost!
Search Bar Settings
To adjust settings for searchable items and shortcuts:
To restore the Stream Player to its factory default settings:
1. Press the V Button on the
remote. The on-screen menu is
displayed.
1. Press the V Button on the
remote. The on-screen menu is
displayed.
2. Use the Arrow buttons on the
remote to highlight Settings
and press OK. The Settings
menu is displayed.
2. Use the Arrow buttons on the
remote to highlight Settings
and press OK. The Settings
menu is displayed.
3. Use the Arrow buttons on
the remote to highlight
Applications and press OK. The
Applications menu is displayed.
3. Use the Arrow buttons on the
remote to highlight Devices
and press OK. The Devices
menu is displayed.
4. Use the Arrow buttons on the
remote to highlight Search and
press OK. The Search menu is
displayed.
4. Use the Arrow buttons on
the remote to highlight Reset
Devices to Defaults and press
OK.
5. Use the Arrow buttons to
highlight the setting you wish
to adjust, then press OK to
change the Setting:
5. Use the Arrow buttons on the
remote to highlight OK and
press OK.
• Searchable items - Allow certain apps to be searchable
through the search option.
Factory default settings are
restored.
• Clear Shortcuts - Clears the shortcuts to recently chosen
search suggestions.
43
4
Managing Privacy and Safety
• Parental Control - Set up a PIN for Google Chrome and
Google Play Store to restrict access.
You can edit history logs and other tracked usage statistics.
• Back up my data - Back up application data and other
settings to Google servers.
To manage Privacy and Safety options:
• Bankup account - Set a backup account to store your
settings.
1. Press the V Button on the
remote. The on-screen menu is
displayed.
• Automatic restore - Set whether to restore backed up
settings or data when reinstalling an application.
2. Use the Arrow buttons on the
remote to highlight Settings
and press OK. The Settings
menu is displayed.
3. Use the Arrow buttons on
the remote to highlight
Applications and press OK. The
Applications menu is displayed.
4. Use the Arrow buttons on the
remote to highlight Privacy
and Safety and press OK. The
Privacy and Safety menu is
displayed.
5. Use the Arrow buttons to
highlight the setting you wish
to adjust, then press OK to
change the Setting:
• Reporting - Set whether to
send Google TV usage and
crash reports to Google.
• Clear video history - Clears
history of viewed videos.
• Safe search - Block adult
content from appearing in
search results.
44
4
Managing Accounts
To add an account:
Set up and edit accounts for services provided by Google or
other apps.
1. Press the V Button on the remote. The on-screen menu is
displayed.
To manage accounts:
2. Use the Arrow buttons on the remote to highlight Settings
and press OK. The Settings menu is displayed.
1. Press the V Button on the
remote. The on-screen menu is
displayed.
3. Use the Arrow buttons on the remote to highlight
Applications and press OK. The Applications menu is
displayed.
2. Use the Arrow buttons on the
remote to highlight Settings
and press OK. The Settings
menu is displayed.
4. Use the Arrow buttons on the remote to highlight Accounts
and sync and press OK. The Accounts and sync menu is
displayed.
3. Use the Arrow buttons on
the remote to highlight
Applications and press OK. The
Applications menu is displayed.
5. Use the Arrow buttons on the remote to highlight Add
Account and press OK. The Google Account Registration
page is displayed. Follow the on-screen instructions to
register for a new account.
4. Use the Arrow buttons on the
remote to highlight Accounts
and sync and press OK. The
Accounts and sync menu is
displayed.
5. Use the Arrow buttons to
highlight the setting you wish
to adjust, then press OK to
change the Setting:
• Background data - Enable
to allow applications to
sync, send, and receive
data at any time.
• Auto-sync - Enable to allow applications to sync data
automatically.
45
4
Managing Applications
Managing Services
Edit and remove applications.
Review and manage currently running services.
To remove an application:
To access the running services:
1. Press the V Button on the
remote. The on-screen menu is
displayed.
1. Press the V Button on the
remote. The on-screen menu is
displayed.
2. Use the Arrow buttons on the
remote to highlight Settings
and press OK. The Settings
menu is displayed.
2. Use the Arrow buttons on the
remote to highlight Settings
and press OK. The Settings
menu is displayed.
3. Use the Arrow buttons on
the remote to highlight
Applications and press OK. The
Applications menu is displayed.
3. Use the Arrow buttons on
the remote to highlight
Applications and press OK. The
Applications menu is displayed.
4. Use the Arrow buttons on the
remote to highlight Manage
Applications and press OK. The
Manage Applications menu is
displayed.
4. Use the Arrow buttons on the
remote to highlight Running
Services and press OK. The
Running Services menu is
displayed.
5. Use the Arrow buttons on the
remote to highlight an app that
you installed and press OK.
5. Use the Arrow buttons on the
remote to highlight a running
service you wish to stop, and
press OK.
6. Use the Arrow buttons on the
remote to highlight Uninstall
and press OK.
6. Use the Arrow buttons on the
remote to highlight Stop and
press OK.
7. Highlight OK and press OK.
The service is stopped.
The app is now removed.
46
4
Accessing Development Tools
Reset Applications to Factory Default Settings
There are several tools for debugging and testing the system.
To reset all applications to factory default settings:
1. Press the V Button on the
remote. The on-screen menu is
displayed.
Development tools are recommended for advanced
users only.
2. Use the Arrow buttons on the
remote to highlight Settings
and press OK. The Settings
menu is displayed.
To access development tools:
1. Press the V Button on the
remote. The on-screen menu is
displayed.
3. Use the Arrow buttons on
the remote to highlight
Applications and press OK. The
Applications menu is displayed.
2. Use the Arrow buttons on the
remote to highlight Settings
and press OK. The Settings
menu is displayed.
4. Use the Arrow buttons on
the remote to highlight Reset
Applications and press OK.
3. Use the Arrow buttons on
the remote to highlight
Applications and press OK. The
Applications menu is displayed.
5. Use the Arrow buttons to
highlight OK and press OK.
4. Use the Arrow buttons on
the remote to highlight
Development and press OK.
The Development menu is
displayed.
All applications are now reset
to the factory default settings
and any customization options
within the apps have returned
to their default.
5. Use the Arrow buttons to
highlight the tool you wish to
enable/disable, then press OK:
• Remote Debugging - Enable to allow remote
connections from debugging tools.
• Remote IP Address - If Remote Debugging is enabled,
enter the IP address for remote debugging.
• Allow Mock Locations - Allow mock locations.
47
4
NETWORK SETTINGS
Manual Ethernet Setup
To manually set up an Ethernet connection to the Stream Player:
If you are not an advanced user, use Guided Setup.
See page 37.
1. Press the V Button on the
remote. The on-screen menu is
displayed.
To set up the Internet connection to the Stream Player:
1. Press the V Button on the
remote. The on-screen menu is
displayed.
2. Use the Arrow buttons on the
remote to highlight Settings
and press OK. The Settings
menu is displayed.
2. Use the Arrow buttons on the
remote to highlight Settings
and press OK. The Settings
menu is displayed.
3. Use the Arrow buttons on the
remote to highlight Network
and press OK. The Network
menu is displayed.
3. Use the Arrow buttons on the
remote to highlight Network
and press OK. The Network
menu is displayed.
4. Use the Arrow buttons on the
remote to highlight Ethernet
and press OK.
5. Use the Arrow buttons to
highlight Manual Settings if
you wish to manually change
the network settings, then press
OK. The Manual Settings menu
is displayed.
4. Use the Arrow buttons to
highlight the setting you wish to
change, then press OK:
• Ethernet - Set up a wired
Ethernet connection.
• Wi-Fi - Set up a Wi-Fi
connection.
6. Use the Arrow buttons on the
remote to highlight DHCP Off
and press OK. You can now
manually enter the IP Address,
Subnet Mask, Default Gateway,
Preferred DNS Address, and
Alternate DNS Address.
• Network Information Review network connection
information such as IP
addresses.
• Reset Network to Defaults - Reset network settings to
default factory settings.
• Test Connection - Initiate a test of your connection to the
Internet to determine speeds and issues.
48
4
Wi-Fi Setup
Manual Wi-Fi Network Setup
To set up a Wi-Fi connection to the Stream Player:
To manually add a Wi-Fi network:
1. Press the V Button on the
remote. The on-screen menu is
displayed.
1. Use the Arrow buttons on
the remote to highlight Add
Network and press OK. The Add
Network menu is displayed.
2. Use the Arrow buttons on the
remote to highlight Settings
and press OK. The Settings
menu is displayed.
2. Use the keyboard on the
back of the remote to enter
the Network SSID you wish to
connect to.
3. Use the Arrow buttons on the
remote to highlight Network
and press OK. The Network
menu is displayed.
3. Use the Arrow buttons on the
remote to highlight a type of
Security you wish to use and
press OK.
4. Use the Arrow buttons on the
remote to highlight Wi-Fi and
press OK.
4. Use the Arrow buttons on the
remote to highlight Connect
and press OK. The Co-Star will
now attempt to connect to the
network you entered.
5. Use the Arrow buttons to
highlight a wireless network you
wish to connect to and press
OK or WPS (if available).
To switch to DHCP and STATIC connections:
1. Use the Arrow buttons on the
remote to highlight Manual
and press OK. The Manual
Settings menu is displayed.
6. If required, enter the password.
2. Use the Arrow buttons on the
remote to highlight DHCP Off
and press OK. You can now
manally enter the IP Address,
Subnet Mask, Default Gateway,
Preferred DNS Address, and
Alternate DNS Address.
49
4
SYSTEM SETTINGS
Adjusting the Time and Local Settings
Adjust system settings such as language, time, accessibility,
system info, and updates.
To manually add a network:
1. Press the V Button on the
remote. The on-screen menu is
displayed.
To adjust the time or local settings:
1. Use the Arrow buttons on
the remote to highlight Time
& Local Settings. The Time &
Settings menu is displayed.
2. Use the Arrow buttons to
highlight the setting you wish to
change, then press OK:
2. Use the Arrow buttons on the
remote to highlight Settings
and press OK. The Settings
menu is displayed.
• Automatic - Enable
automatic set up of the
clock using the network
connection
3. Use the Arrow buttons to
highlight the setting you wish to
change, then press OK:
• Use 24-Hour Format - Select between 12 or 24 hour time
format.
• Select Date Format - Select date formatting. Select
MM-DD-YYYY, DD-MM-YYYY, or YYYY-MM-DD formats.
• Time & Local Settings Adjust the time, date, and
location for your Co-Star.
• Zip Code - Set your preferred ZIP code.
• Menu Language - Select
the language for the
Co-Star menu display. Select
English, French, or Spanish.
• Accessibility - Access tools
for supporting sight and
hearing impaired.
• System Info - Select to view
the system info.
• System Update - Select to launch the system update.
(Must be connected to the Internet)
• Legal Information - Select to view legal information.
• Restore to Factory Settings - Reset entire system to initial
factory default settings, erasing all data.
50
5
Using Chrome with the Co-Star
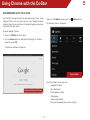
WEB BROWSING WITH THE CO-STAR
Your Co-Star is designed with easy web browsing in mind. Using
Google Chrome, you can easily access your Google account,
making it easy to view your Docs, Gmail and Google+ page from
the comfort of your couch.
To access the Options menu, press the
Menu button.
The Options menu is displayed.
To open Google Chrome:
1. Press the V Button on the remote.
2. Use the Arrow buttons or Trackpad to highlight the Chrome
icon, then press OK.
The browser window is displayed.
Options Menu
From the Options menu, you can:
• Navigate the Web
• Save Bookmarks
Surfing the Web with Chrome
• Delete browser history
• Share pages
• Search web content
• Edit your homepage and privacy settings
51
5
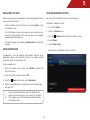
NAVIGATING THE WEB
DELETING BROWSER HISTORY
There are several ways to navigate the web using Google Chrome
on your Co-Star. You can:
You may wish to delete the history of your browsing.
• Enter an address into the URL bar by selecting Go to... from
the Options menu.
• Use the Windows menu to view open a new window or view
recently closed windows. You can also open an incognito
window for private browsing.
• Visit favorite pages by navigating to Bookmarks and selecting
a page.
USING BOOKMARKS
To delete the browser history:
1. Press the V Button.
2. Select the Chrome icon.
3. Press the
Menu button to open the Options menu.
4. Select History.
5. Select Clear history.
Your browser’s navigation history is deleted.
A bookmark is used to organize your favorite websites. Using
bookmarks allows you to quickly return to a website without
having to search for it or enter a URL.
To add a bookmark:
1. From the Options menu, press the V Button to open the
on-screen menu.
2. Select the Chrome icon and press OK.
3. Press the
Menu button, and select Bookmarks.
4. Enter the information for the website you wish to bookmark
and press OK.
Deleting Browser History
Chrome will automatically enter the details for the
page you are currently on, so to save time, navigate
to the page you wish to bookmark before opening
the Options menu.
52
5
SHARING WEB PAGES
MANAGING PRIVACY AND SAFETY
Some of the apps available from the Google Play store allow you
to share content from the Internet.
From the Browser Settings menu, you can set your homepage,
sync your bookmarks with your Google Account, configure your
privacy settings and clear saved browsing data.
For example, using the Share Page function from the Chrome
Options menu, you can share a link to an article on your favorite
social networking site, or you can print a recipe that you found
on the Internet.
To share web pages from Chrome:
To access the Browser Settings menu, press the
and select Settings.
The Browser Settings menu appears.
1. Press the
Menu button, select Share page and
double-tap or press the OK button.
2. Select the app you wish to use to share the web page and
double-tap or press the OK button.
The application you selected opens.
SEARCHING WEB CONTENT
To seach for a term on a webpage:
1. Press the
Menu button.
2. Select Find. A search bar appears at the top of the Chrome
browser.
3. Enter the term you wish to find using the keyboard on the
remote. If found, the term you are searching for will be
highlighted.
4. To go to the next instance of the term on the webpage, select
the up or down arrow in the search bar and press OK.
5. To exit the search bar, select the X in the right-hand corner of
the screen and press the OK button.
53
Browser Settings
Menu button,
A
Troubleshooting
DO YOU HAVE QUESTIONS?
LET US HELP!
YOUR PRODUCT INCLUDES FREE LIFETIME TECH SUPPORT
The VIZIO support team is highly trained
and is based in the United States.
We can help with:
• New Product Setup
• Connecting Your Devices
• Technical Problems
• And More
Phone: (877) 878-4946 (TOLL-FREE)
Email: [email protected]
Web: www.VIZIO.com/support
Hours of operation: Monday - Friday: 5 AM TO 9 PM (PST)
Saturday - Sunday: 8 AM TO 4 PM (PST)
We speak English • Se habla Español • Nous parlons Français
54
A
How do I add apps to my Co-Star?
• Open the Google Play Store app. This app offers easy
access to a wide variety of applications specifically for
your device.
There is a picture but no sound.
• Ensure your TV is not set to MUTE.
• Increase the volume on your TV.
• If you are using a cable or satellite box, increase the
volume on that device.
• If the issue only happens with one app, try restarting
that app or checking the in-app settings.
I am having trouble connecting to my network.
• If you are using an Ethernet cable, ensure it is securely
connected to your router/modem and the Co-Star.
• If you are connecting wirelessly, try repositioning the
Co-Star or your router/modem for the best wireless
connection.
How do I reset the Co-Star to factory default settings?
WARNING: All of your data will be deleted.
There is no picture on the TV.
• Ensure all devices are plugged in. Turn all devices on.
1. Press the V Button on your remote.
2. Select Settings > System Settings >
Restore to Factory Settings.
• Set your TV input to the HDMI port the Co-Star is
connected to.
• Ensure the HDMI cable connected to your TV is
connected to the OUT port on the Co-Star. See page
15.
3. Confirm that you wish to reset the
unit back to default by selecting
RESET.
• Press the INPUT button. Select a different app or input
source.
4. The player will reboot. Follow the
on-screen instructions.
The remote control is not working.
• Ensure the battery tray is inserted properly. See page 11.
• Place new batteries into the remote.
• TIP: Your Player is also compatible with many USB
keyboards and mice. Connect the keyboard or mouse
to the USB port on the player to use.
• Your remote should be in IR mode when you remove it
from the box, but if this is not the case, simultaneously
press the Q key, =, and Space to put it into IR mode.
55
A
What is a Google account and why do I need one?
• A Google® account is a sign-in system that gives you
access to Google services such as Gmail® e-mail
services, Picasa® Web album, and iGoogle.
When I try to access Netflix® I get error code 300 or 600.
• Error code 300 and 600 indicates that Netflix® is
unavailable at the moment. Try to access the service
later.
• If the error continues to show, contact Netflix customer
support for further assistance.
How do I sign up for a Google® account?
1. Press the V button on your remote.
How do I create a Netflix® account?
1. Press the V button on your remote.
2. Select Settings > Applications > Accounts & sync > Add
Account
2. Select the Netflix app and press OK.
3. Follow the on-screen instructions to create a Google®
account.
3. Follow the on-screen instructions to create a Netflix
account.
• You can also sign up for an account at
http://www.google.com/accounts
Why does my video feed keep freezing or rebuffering while
I’m using Netflix?
• Rebuffering is caused by changes in your Internet
connection speed.
Can I use the same Google account on multiple Internet TV
devices at the same time?
• Yes, you can use the same Google® account on
different Internet TV devices at the same time.
• Playing a Netflix movie requires a stable high speed
Internet connection to avoid freezing and rebuffering.
Should I keep my cable/satellite service?
Does Google® TV require a subscription?
• No, Google® TV does not require a subscription.
• The Co-Star should be used as a complement to
your exisiting cable/satellite service, rather than a
replacement.
• However many movies on demand, TV on demand
services, along with many other content providers
require a paid subsciption.
• While many of the latest in entertainment selection is
available through the Co-Star, cable/satellite channels
still offer a unique range of programing.
Why can’t I play Facebook® games?
• Most games on the Facebook® social networking site
require plug-ins that enable the game to operate.
56
B
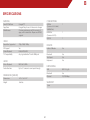
SPECIFICATIONS
CONNECTIONS
FEATURES
Smart TV Platform
Google TV
App Store
Google Play, Access to thousands of apps
Web Browser
Chrome web browser with thousands of
apps, with Adobe Flash Player and HTML 5
support
®
HDMI In
(Connects to Cable/
Satellite Box)
1
HDMI Out
(Connects to TV)
1
USB 2.0
1
VIDEO
Resolution Supported
720p, 1080i, 1080p
3D Support
Yes
Video Playback
H.264, MP4, MKV
TV Compatibility
Any high-definition TV with HDMI port
REMOTE
AUDIO
Music Playback
MP3, AAC, WMA
Audio Features
Up to 5.1 surround sound pass-through
4.2” x 1.6” x 4.2”
Weight
0.66 lbs
Yes
Bluetooth
Yes
Touchpad
Yes
Keyboard
Yes
NETWORKING
DIMENSIONS (WXHXD)
Dimensions
Built-In IR Blaster
WiFi
802.11n/g/b
Bluetooth
Yes
Ethernet
10/100 Mbps
WARRANTY
1 year
57
C
Limited Warranty
ON PARTS AND LABOR
will provide instructions for packing and shipping the covered
Product to the VIZIO service center.
Covers units purchased as new in United States and Puerto Rico
Only
Limitations and Exclusions
VIZIO provides a warranty to the original purchaser of a new
Product against defects in materials and workmanship for a
period of one year of non-commercial usage and ninety (90)
days of commercial use. If a Product covered by this warranty
is determined to be defective within the warranty period, VIZIO
will either repair or replace the Product at its sole option and
discretion.
VIZIO’s one-year limited warranty only covers defects in materials
and workmanship. This warranty does not cover, for example:
cosmetic damage, normal wear and tear, improper operation,
improper voltage supply or power surges, signal issues, damages
from shipping, acts of God, any type of customer misuse,
modifications or adjustments, as well as installation and set-up
issues or any repairs attempted by anyone other than by a VIZIO
authorized service center. Products with unreadable or removed
serial numbers, or requiring routine maintenance are not covered.
This one year limited warranty does not cover Products sold “AS
IS”, “FACTORY RECERTIFIED”, or by a non-authorized reseller.
To obtain warranty service, contact VIZIO Technical Support via
email: [email protected] or via phone at 877 MY VIZIO
(877.698.4946) from 6:00AM to 9:00PM Monday through Friday
and 8:00AM to 4:00PM Saturday and Sunday, Pacific Time, or visit
www.VIZIO.com. PRE-AUTHORIZATION MUST BE OBTAINED BEFORE
SENDING ANY PRODUCT TO A VIZIO SERVICE CENTER. Proof of
purchase in the form of a purchase receipt or copy thereof is
required to show that a Product is within the warranty period.
THERE ARE NO EXPRESS WARRANTIES OTHER THAN THOSE LISTED
OR DESCRIBED ABOVE. ANY IMPLIED WARRANTIES, INCLUDING
ANY IMPLIED WARRANTY OF MERCHANTABILITY AND FITNESS
FOR A PARTICULAR PURPOSE, SHALL BE LIMITED IN DURATION TO
THE PERIOD OF TIME SET FORTH ABOVE. VIZIO’S TOTAL LIABILITY
FOR ANY AND ALL LOSSES AND DAMAGES RESULTING FROM ANY
CAUSE WHATSOEVER INCLUDING VIZIO’S NEGLIGENCE, ALLEGED
DAMAGE, OR DEFECTIVE GOODS, WHETHER SUCH DEFECTS ARE
DISCOVERABLE OR LATENT, SHALL IN NO EVENT EXCEED THE
PURCHASE PRICE OF THE PRODUCT.VIZIO SHALL NOT BE RESPONSIBLE
FOR LOSS OF USE, LOSS OF INFORMATION OR DATA, COMMERCIAL
LOSS, LOST REVENUE OR LOST PROFITS, OR OTHER INCIDENTAL
OR CONSEQUENTIAL DAMAGES. SOME STATES DO NOT ALLOW
LIMITATIONS ON HOW LONG AN IMPLIED WARRANTY LASTS OR THE
EXCLUSION OF INCIDENTAL OR CONSEQUENTIAL DAMAGES, SO
THE ABOVE LIMITATIONS OR EXCLUSIONS MAY NOT APPLY TO YOU.
THIS WARRANTY GIVES YOU SPECIFIC LEGAL RIGHTS, AND YOU MAY
ALSO HAVE OTHER RIGHTS, WHICH VARY FROM STATE TO STATE. THIS
WARRANTY IS SUBJECT TO CHANGE WITHOUT NOTICE.
Parts and Labor
There will be no charge for parts or labor during the warranty
period. Replacement parts and Products may be new or
recertified at VIZIO’s option and sole discretion. Replacement
parts and Products are warranted for the remaining portion of
the original warranty or for ninety (90) days from warranty service
or replacement, whichever is greater.
Type of Service
Defective Products must be sent to a VIZIO service center to obtain
warranty service. VIZIO is not responsible for transportation costs
to the service center, but VIZIO will cover return shipping to the
customer. PRE-AUTHORIZATION IS REQUIRED BEFORE SENDING ANY
PRODUCT TO A VIZIO SERVICE CENTER FOR WARRANTY SERVICE.
CHECK www.VIZIO.com FOR THE MOST CURRENT VERSION.
Product returns to VIZIO’s service centers must utilize either the
original carton box and shipping material or packaging that
affords an equal degree of protection. VIZIO Technical Support
58
D
Legal and Compliance
FCC Class B Radio Interference Statement
to radio waves. This device is designed and manufactured not
to exceed the emission limits for exposure to radio frequency
(RF) energy set by the Federal Communications Commission of
the U.S. Government. This device complies with FCC radiation
exposure limits set forth for an uncontrolled environment.
NOTE: This equipment has been tested and found to comply
with the limits for a Class B digital device, pursuant to Part 15 of
the FCC Rules. These limits are designed to provide reasonable
protection against harmful interference in a residential
installation.This equipment generates, uses and can radiate radio
frequency energy, and if not installed and used in accordance
with the instructions, may cause harmful interference to radio
communications. However, there is no guarantee that interference
will not occur in a particular installation. If this equipment does
cause harmful interference to radio or television reception, which
can be determined by turning the equipment off and on, the
user is encouraged to try to correct the interference by one or
more of the following measures:
IC Statement
Operation is subject to the following two conditions:
1. This device may not cause interference, and
2. This device must accept any interference, including
interference that may cause undesired operation of the
device.
This Class B digital apparatus complies with Canadian ICES-003.
Cet appareil numérique de la classe B est conforme à la norme
NMB-003 du Canada.
1. Reorient or relocate the receiving antenna.
2. Increase the separation between the equipment and receiver.
IC Radiation Exposure Statement
3. Connect the equipment into an outlet on a circuit different
from that to which the receiver is connected.
4. Consult the dealer or an experienced radio/Player technician
for help.
This equipment complies with IC RSS-102 radiation exposure
limits set forth for an uncontrolled environment. This equipment
should be installed and operated with minimum distance 20cm
between the radiator & your body.
Notice:
Internet Connectivity
1. The changes or modifications not expressly approved by
the party responsible for compliance could void the user’s
authority to operate the equipment.
High speed internet connectively required and sold separately.
Network conditions, environmental and other factors may
negatively affect connectivity and the resulting video quality.
2. Shielded interface cables and AC power cord, if any, must be
used in order to comply with the emission limits.
VIZIO Internet Applications (VIA) Policy
VIZIO Internet Applications (“VIA”) affords the opportunity to
access third party Internet product offerings or services (“VIA
Services”) on certain VIZIO devices incorporating the VIA
functionality. The VIA Services accessible herein are provided as
per our agreement with these third parties. These agreements
are subject to change, interruption, suspension (including
termination) at any time and for various reasons. VIZIO makes
no warranties or representations that any particular VIA Service
3. The manufacturer is not responsible for any radio or Player
interference caused by unauthorized modification to this
equipment. It is the responsibilities of the user to correct such
interference.
RF Exposure Information
This device meets the government’s requirements for exposure
59
D
will be accessible, available, function in any particular manner
or function at all. This Policy, the VIZIO Privacy Policy and the V.I.A.
Software License Agreement apply equally to V.I.A. devices and
V.I.A. Plus devices.
Some or all of the data or functionality of VIA Services may require
additional payment and/or subscription by you. However, in
no event will you be charged for any VIA Services unless those
charges are made known to you in advance. VIZIO makes no
warranties or representations of any kind as to the accuracy,
currency, or completeness of any information contained on the
data servers of such third party providers of any VIA Services.
Furthermore, we do not review, control, or endorse the content,
products or services of VIA Services or their data servers.
Internet Access Required for VIA Services; Updates:
To use these VIA Services, you must obtain high-speed/broadband
access to the Internet (such as DSL, cable or T1 lines), either
directly or through devices that access the Internet and pay any
service fees associated with such access. In addition, you must
provide all equipment necessary to make such connection to
the Internet including a modem or other Internet access device.
Each individual third party Internet product may require different
minimum Internet connection speed. The usability and availably
of a functional VIA device and its Internet connected feature
may highly be dependent and varied based on high-speed/
broadband internet access, connection speed, bandwidth,
other equipment(s), third party applications, firmware updates
and other factors outside of VIZIO’s control and/or responsibility
which may also be independent of the actual operation of
the device.
It is further understood that VIA enabled devices
are integrated with sophisticated technologies (software and
hardware) which may exhibit delayed boot-up/shutdown time
and/or interrupted services. You further understand that the VIA
Services specifications and functionality are constantly evolving
and that we may directly, or indirectly via third parties, update
or change the VIA Services, in whole or in part, at any time and
without notice to you. Such updates may be required for you to
use certain aspects of the VIA services or to continue to connect
to the VIA Services.
VIA SERVICES ARE PROVIDED “AS IS” AND “AS AVAILABLE,” WITHOUT
WARRANTY OF ANY KIND (INCLUDING ANY IMPLIED WARRANTY
OF MERCHANT¬ABILITY, NON-INFRINGEMENT, OR FITNESS FOR A
PARTICULAR PURPOSE), TO THE MAXIMUM EXTENT PERMITTED BY
LAW. USE OF THE VIA SERVICES IS AT YOUR SOLE RISK. THIS MEANS,
FOR EXAMPLE, THAT VIZIO DOES NOT GUARANTEE THAT THE VIA
SERVICES WILL ALWAYS WORK PROPERLY OR WORK AT ALL. THIS
ALSO MEANS WE DO NOT GUARANTEE THAT THE VIA SERVICES,
CONTENT OR PRODUCTS WILL BE FREE FROM VIRUSES, HACKS,
OR OTHER POTENTIALLY HARMFUL INTRUSIONS. PLEASE NOTE THAT
SOME STATES DO NOT ALLOW SUCH WARRANTY LIMITATIONS, SO
THESE LIMITATIONS MAY NOT APPLY TO YOU.
VIA Services Content Disclaimer:
Certain VIA Services may include materials from third parties or
links to certain third party data servers. You acknowledge and
agree that VIZIO is not responsible for examining or evaluating
the content or accuracy of any VIA Services, their data servers or
related third-party materials. VIZIO does not warrant or endorse
and does not assume and will not have any liability or responsibility
for any third-party materials or web sites, or for any other materials,
products, or services of third parties. Links to VIA Services and any
associated links to other data servers are provided solely as a
convenience to you. To the extent provided, content types or
descriptions of VIA Services are provided for convenience, and
you acknowledge and agree that VIZIO does not guarantee their
accuracy. You understand that by using any of the VIA Services,
you may encounter content that may be deemed offensive,
indecent, or objectionable, which content may or may not be
Availability of Content on VIA Services:
VIZIO or said third parties providing VIA Services reserve the right
to delete data from their servers, or prevent access to their servers
or to change data categories, product offerings or service levels
for any reason that VIZIO or said third parties deem sufficient in
their sole discretion at any time, without notice. VIZIO may also
impose additional or different limits on the use of or access to
certain VIA Services, in any case and without notice or liability.
60
D
identified as having explicit language. Nevertheless, you agree
to use the VIA Services at your sole risk and that VIZIO shall have
no liability to you for content that may be found to be offensive,
indecent, or objectionable.
You agree that you will not use any third-party materials in a
manner that would infringe or violate the rights of any other
party, and that VIZIO is not in any way responsible for any such
use by you.
VIZIO Privacy Policy; VIA Software License Agreement:
Your right to use links to access VIA Services is also governed by
VIZIO’s Privacy Policy and the VIZIO Internet Applications Software
License Agreement (“VIA Software License Agreement”), the terms
of which are incorporated herein by this reference. The terms of
both the Privacy Policy and VIA Software License Agreement may
be found in your Product Guide and on VIZIO’s website. In the
event of a conflict between the VIZIO Internet Applications (VIA)
Policy and the VIA Software License Agreement, the VIA Software
License Agreement shall control. BY YOUR USE OF THE VIA SERVICES,
YOU EXPRESSLY AGREE TO ALL THE TERMS AND CONDITIONS OF THE
FOREGOING POLICIES AND AGREEMENT.
VIZIO may change the terms and conditions of this VIA Policy, the
VIZIO Privacy Policy and/or the VIA Software License Agreement,
at any time and without prior notice. The most up to date versions
are available on the Internet at: www.vizio.com. If you do not have
Internet access, you should periodically contact our customer
service department and we will mail you a current version,
free of charge. IF YOU DO NOT AGREE TO ALL OF THE TERMS AND
CONDITIONS OF THE VIA POLICY, THE VIZIO PRIVACY POLICY AND/
OR THE VIA SOFTWARE LICENSE AGREEMENT OR ANY CHANGES
THERETO, YOU MUST IMMEDIATELY CEASE USE OF THE VIA SERVICES.
61
MODELS
// E3D320VX
// E3D420VX
// E3D470VX
© 2012 VIZIO INC. ALL RIGHTS RESERVED.
120727CH-NC