1
16-Port Fast Ethernet PoE+ Switch • User Manual
English
Thank you for purchasing the Intellinet Network Solutions™ 16-Port Fast Ethernet PoE+
Switch, Model 560849. For specifications, go to intellinet-network.com.
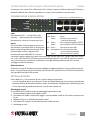
CONNECTIONS & INDICATORS
PoE
2
4
6
8
10 12 14 16
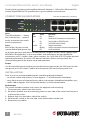
16 RJ45 10/100M ports (1-8 shown)
2
4
6
3
5
8
Link/Act
PoE
Power
Link/Act
1
3
5
7
9
11 13 15
1
7
LEDs
The LED indicators — Power,
PoE, Link/Activity — make it
easier to monitor the switch
and its connections.
LED StatusOperation
Power
On
Power on
Off
Check the AC connection; turn the power on
PoE
On
Port is linked to a PSE/PoE device
Off
No PSE/PoE device is linked
Ports
Link/Act On
Valid port connection
Each of the 16 ports can be
Blinking
Valid port connection; data transmitted/received
Off
No link established
used to deliver both power (up to 30 watts per port) and data to remote devices. All ports on the switch support AutoMDI/MDI-X functionality, so crossover cables and uplink ports are not needed for
connections to PCs, routers, hubs, other switches, etc. Cat5/5e/6 UTP/STP cables provide
optimal performance; if a status LED doesn’t indicate a link or activity, check the
corresponding device for proper setup and operation.
Power
Use the included power cord to connect the device (next to the On/Off switch on the
rear panel) to an AC outlet. Confirm that the power LED on the front panel is lit.
INSTALLATION
Prior to use, it is recommended that the switch be placed/positioned:
• on a level surface with at least 25 mm (approx. 1”) of clearance for ventilation;
• away from sources of electrical noise: radios, transmitters, broadband amplifiers, etc.;
• within 100 m (approx. 328’) of network devices it’s to be connected to.
Rackmount
The switch includes brackets and screws for optional rack mounting.
1. Disconnect any cables from the switch.
2. Position a bracket over the mounting holes on one side of the switch and secure it
in place with screws.
3. Repeat Step 2 on the other side of the switch.
4. Position the switch in the rack and screw the brackets to the rack.
5. Reconnect any cables.
2
ENGLISH