1
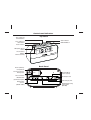
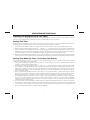
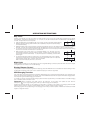
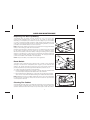
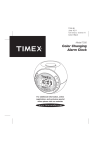
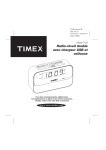
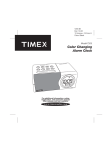
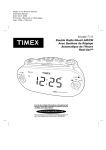
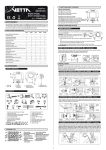
T128 IB
Dec 10,12
151mmw x 151mm H
Color: Black
Model T128
Dual Alarm Clock
with USB Charging
& Night Light
For additional information, online
registration, and exclusive special
offers please visit our website:
Introduction
Thank you for selecting this Timex Model T128 Dual Alarm Clock with USB Charging. This model includes:
•
•
•
•
•
•
A large LED display with three level brightness control
LED nightlight with four level brightness control including ‘Off’
A separate NAP timer alarm you can set without changing your normal alarm settings
Selectable soft or loud alarm volume
A Daylight Saving Time (DST) switch for easy adjustments
Timex exclusive XBBU Xtreme Battery Back Up System that provides back-up power for up to 3 years and will even
operate the alarms during a power failure. The lithium back-up battery is included.
Please take the time to review this manual completely and carefully to insure that you are getting the maximum benefit from
all of the unique features included in this Timex product.
Once again, thank you for selecting Timex.
Table of Contents
Controls And Indicators................................................................................................................................................. 1
Front Panel .......................................................................................................................................................................2
Installing The Backup Batteries....................................................................................................................................2
Operating Instructions................................................................................................................................................ 3-5
Care And Maintenance...................................................................................................................................................6
A Consumer Guide To Product Safety.........................................................................................................................7
Limited 90-day Warranty Information..........................................................................................................................8
FCC Information
This device complies with Part 15 of the FCC Rules, operation is subject to the
following two conditions: (1) This device may not cause harmful interference, and
(2) this device must accept any interference received, including interference that
may cause undesired operation.
Warning: Changes or modifications to this unit not expressly approved by the party responsible
for compliance could void the user’s authority to operate the equipment.
NOTE: This equipment has been tested and found to comply with the limits for a Class B digital
device, pursuant to Part 15 of the FCC Rules.
These limits are designed to provide reasonable protection against harmful interference in a
residential installation. This equipment generates, uses and can radiate radio frequency energy
and, if not installed and used in accordance with the instructions, may cause harmful interference
to radio communications.
However, there is no guarantee that interference will not occur in a particular installation. If
this equipment does cause harmful interference to radio or television reception, which can be
determined by turning the equipment off and on, the user is encouraged to try to correct the
interference by one or more of the following measures:
• Reorient or relocate the receiving antenna.
• Increase the separation between the equipment and receiver.
• Connect the equipment into an outlet on a circuit different from that to which
the receiver is connected.
• Consult the dealer or an experienced radio/TV technician for help.
This Class B digital apparatus complies with Canadian ICES-003.
Cet appareil numérique de la classe B est conforme à la norme NMB-003 du Canada.
Battery Warning
For models that use Lithium batteries
• Lithium batteries can explode or cause burns if disassembled, shorted, recharged, exposed to
water, fire, or high temperatures. & not handled appropriately
• Do not place loose batteries in a pocket, purse, or other container containing metal objects, mix
with used or other battery types, or store with hazardous or combustible materials.
• Store in cool, dry, ventilated area.
• Follow applicable laws and regulations for transport and disposal.
Controls and Indicators
Top Panel
Time / Alarm Set
Forward Button
Alarm 2 Button
Time / Alarm Set
Back Button
NITELITE Button
Alarm 1 Button
NAP (Alarm Reset)
Button
Snooze Button
(Display
Dimmer Control)
Back Panel
Back-up Battery
Compartment
Pin Hole To Release
Battery Door
Charging Mode
Selector (A / B)
OPEN
Time Set Button
AC Adapter Jack
RESET button
(behind back panel)
USB Charging Port
Alarm Volume
Selector
(LOUD / SOFT)
DST(Daylight Saving
Time) Switch
(OFF/ON)
1
Front Panel
Time Display
ALM 1 (Alarm 1) Indicator
PM Indicator
ALM 2 (Alarm 2) Indicator
BATT LOW (Low Back-up
Battery Warning Indicator)
Activating the Backup Batteries
TEST
T EST
2
RESET
R ESET
• Remove the alarm clock and the AC power adapter from the carton.
Remove all packing material from the alarm clock. The carton is
recyclable.
• The CR2032 lithium back up battery has been pre-installed in the battery
compartment on the back panel. To activate the back up battery circuit,
remove the clear battery insulation tab by pulling the tab to the right as
shown in the illustration.
• When the battery low indicator appears on the display, the battery needs
to be replaced with a fresh battery. Press the point of a pin or paperclip
firmly into the hole by the battery compartment on the bottom of the unit
to release the cover. Slide the battery holder out (remove old battery if
replacing).Make sure battery polarity matches diagram (+ side facing up).
In the event of a power failure, the backup battery will maintain clock and
alarm settings.
• Fully unwind the cord of the AC power adapter. Connect the female plug
of the adapter to the DC jack on the back panel of the clock. Insert the
AC plug of the adapter into a normal AC outlet. We suggest that you use
an outlet that is always ‘live’, not an outlet controlled by a wall switch.
OPEN
OPERATING INSTRUCTIONS
Adjusting For Daylight Saving Time (DST)
If you are currently observing Daylight Saving Time, set the DST switch on the back panel to the ‘On’ position. If you are
currently observing Standard Time, set the DST switch on the back panel to the ‘Off’ position.
Setting The Time
When the clock is connected to the AC outlet for the first time the display will show “12:00” and the PM indicator will be ‘On’,
indicating that the time displayed is 12:00 noon. Set the display to the correct time as follows:
1. Press and hold the TIME SET button on the back panel until the clock ‘beeps’ once and the display begins to flash.
2. While the display is flashing depress either the “ – “ (Back) or “ + “ (Forward) buttons on the top panel to adjust the time
display. The display will change rapidly when the buttons are depressed. When the display approaches the correct time,
release the buttons and then press repeatedly to make final adjustments to the exact minute. Observe the PM indicator
to confirm that the time is correct. If the PM indicator does not appear, the time on the display is ‘AM’.
3. When you are finished adjusting the display you may press the TIME SET button again to exit the setting mode. The clock
will ‘beep’ twice. Or after 10 seconds with no adjustment the clock will ‘beep’ twice and exit the setting mode automatically.
Setting The Wake Up Times / Activating The Alarms
The initial default setting for Alarm 1 is 6:00 AM. The initial default setting for Alarm 2 is 7:00 AM. The procedure for setting
the ALM 1 or ALM 2 wake up time is the same.
1. Press and hold the ALM 1 or ALM 2 button for 2 seconds. The clock beeps once and the currently set alarm time and
the ALM 1 or ALM 2 indicator begins to flash.
2. While the display is flashing depress either the “ – “ (Back) or “ + “ (Forward) buttons on the top panel to adjust the wake
up time display. The display will change rapidly when the buttons are depressed. When the display approaches the correct
wake up time, release the buttons and then press repeatedly to make final adjustments to the exact wake up minute.
Observe the PM indicator to confirm that the wake up time is correct. If the PM indicator does not appear, the wake up
time on the display is ‘AM’.
3. When you are finished adjusting the wake up time display you may press the ALM 1 or ALM 2 button again to exit the
setting mode. The clock will ‘beep’ twice. Or after 10 seconds with no adjustment the clock will ‘beep’ twice and exit the
setting mode automatically. The ALM 1 or ALM 2 indicator will remain in the display indicating that the alarm is set.
4. At the selected wake up time the alarm will turn on. Alarm 1 has a ‘single beep’ sound and Alarm 2 has a ‘double beep’
sound. You can tell which alarm has turned on by the sound that it makes. The alarm sound starts softly and gradually
increases in volume to wake you gently. The alarm will continue sounding for one hour and then shut off automatically
and reset itself for the following day.
5. To turn off the alarm sooner and reset it for the following day, press the NAP (ALM RESET) button. The Alarm sound stops
but the ALM 1 or ALM 2 indicator remains in the display and the alarm remains set for the same time on the following day.
6. To turn the alarm off completely so that it does not turn on the following day press either the ALM 1 or ALM 2 button. The
alarm sound stops and the ALM 1 or ALM 2 indicator disappears.
3
OPERATING INSTRUCTIONS
Reviewing The Wake Up Times
To review the current wake up time settings, press the ALM 1 or ALM 2 button once. The display will change from current
time to wake-up time for 5 seconds and the selected ALM 1 or ALM 2 indicator will flash. After 5 seconds the display
changes back to current time.
Activating / Deactivating The Alarms
Whenever you adjust the wake up time setting for ALM 1 or ALM 2 the alarms are automatically activated and the ALM 1 or
ALM 2 indicators appear in the display.
• To deactivate the alarms so they do not turn on, press the ALM 1 or ALM 2 button once and when the wake up time and
the flashing alarm indicator are appearing on the display, press the ALM 1 or ALM 2 button once more within 5 seconds.
The display immediately returns to current time and the clock will ‘beep’ twice. The ALM 1 or ALM 2 indicator disappears,
indicating that the alarms are deactivated.
• To reactivate the alarms, press the ALM 1 or ALM 2 button once and when the wake up time and the flashing alarm
indicator are appearing on the display, press the ALM 1 or ALM 2 button once more within 5 seconds. The display
immediately returns to current time and the clock will ‘beep’ twice. The ALM 1 or ALM 2 indicator reappears, indicating
that the alarms are activated again.
Snooze/Repeat Alarm
When the alarm turns on in the morning you may press the SNOOZE button to stop the alarm temporarily. The alarm will shut
off for 9 minutes and then turn on again. When the snooze function is active the alarm indicator for that alarm will flash. The
snooze operation may be repeated several times within the one-hour alarm duration, but after one hour the alarm resets for
the following day.
Adjusting The Snooze Time
The default snooze time setting is 9 minutes but you may adjust the snooze time between 1 minute and 29 minutes as
desired. To adjust the snooze time:
• Press and hold the SNOOZE button for two seconds. The clock will ‘beep’ once and the snooze time display begins
flashing.
• While the display is flashing press the “ – “ or “ + “ buttons to adjust the snooze time display down or up to the desired
setting.
• When the display is showing the desired snooze time, press the SNOOZE button once more. The clock will ‘beep’ twice
and the display returns to current time. The new snooze time setting becomes the new default and remains in the memory
until you change it again.
Sure Alarm
This Timex alarm clock includes a Sure-Alarm feature that will operate the buzzer alarms even during a power failure. If your
AC power is interrupted or if the AC adapter is accidentally disconnected, the display will turn ‘off’ but the alarms will still turn
‘on’ at the normal times.
Note: The Snooze function does not operate when the alarms are turned ‘on’ by the Sure-Alarm back up battery.
4
OPERATING INSTRUCTIONS
Nap Timer
The Nap Timer allows you to set a 3rd alarm to wake you after a nap of up to 90 minutes without disturbing your regular
alarm settings. The Nap timer settings are 5, 10, 15, 20, 30, 45, 60, 90 minutes and OFF The default Nap Timer setting is 5
minutes. To adjust the amount of nap time:
• Press the NAP button to activate the Nap Timer mode. The nap time display begins flashing.
• While the display is flashing press the NAP button repeatedly to adjust the nap time display
to the desired setting.
• Release the NAP button when the display is showing the desired nap time. The display will return to current time after 5
seconds. The new nap time setting becomes the new default and remains in the memory until you change it again.
• To check the amount of nap time remaining press the NAP button once. The display will show the amount of remaining
nap time for 5 seconds and then return to current time.
• When the Nap Timer counts down to “0”, the display flashes “n 0”, the alarm turns ‘On’
and gradually increases in volume to wake you gently. The alarm sound continues for one
hour and then shuts off automatically. To stop the nap alarm immediately, press the NAP
button again.
• To cancel the Nap Timer before it counts down to “0”, press the NAP button once to display
the amount of remaining nap-time and then press and hold the NAP button for 2 seconds
until the display shows “OFF”. The Nap Timer is cancelled.
After 5 seconds the display returns to current time.
Night Light
Press the NITELITE button to turn the night light ‘On’ at it’s brightest setting. Continue to press the NITELITE button to adjust
the brightness to the medium, low and ‘Off’ settings
Display Dimmer Control
If you prefer to reduce the display brightness for sleeping, press the SNOOZE bar once to select the medium setting or twice
to select the low setting. Press once more to restore the display to maximum brightness.
USB Charging Function
This Timex alarm clock is equipped with a convenient USB charging port on the back panel that allows you to recharge many
brands of mobile phones, portable music players, and other handheld devices that are supplied with USB charging cables.
The output rating of the USB charging port is 500mA.
To charge your device, connect the USB charging cable that was supplied with your handled device to the USB charging
port on the back panel of this alarm clock.
IMPORTANT! When connecting your USB cable to the USB port on this alarm clock please be sure that the
USB symbol (pleaon your plug is facing down when you insert the plug into the USB port.
Observe the charging indicator on your device to confirm that it is charging. If your device is not charging when the USB
selector switch is in the “A” position, slide the selector switch to the “B” position to begin charging.
Note: Charging time will vary depending on the charging current that your device requires. Therefore some devices will take
longer to charge than others.
5
CARE AND MAINTENANCE
Replacing The Back Up Battery
The CR2032 back up battery that was supplied with your Timex alarm clock
should provide adequate back up power for up to 3 years or even longer,
depending on the frequency and duration of power outages in your home. When
it is time to change the battery the BATT LOW indicator begins flashing in the
lower right corner of the display. When you see the flashing indicator you should
purchase a new CR2032 battery as soon as practical.
Note: Leave the AC adapter connected to your outlet when changing the CR2032
battery to avoid having to reset the time and alarms.
Place the clock face down. Press the point of a pin or paperclip firmly into the hole
by the battery compartment on the bottom of the unit to release the cover.
Remove the old battery. Insert fresh battery making sure battery polarity matches
diagram (+ side facing up). In the event of a power failure, the backup battery will
maintain clock and alarm settings. Return the clock to the upright position and
confirm that the BATT LOW indicator has disappeared.
NOTE: Dispose of battery in accordance with local regulations.
Reset Switch
This alarm clock is equipped with a special circuit to protect it from permanent
damage in the event of an unexpected power surge. If you find that the clock
seems to be ‘locked’ and does not respond to any of the normal controls, you
probably experienced a power surge that activated the protection circuit.
To ‘unlock’ the clock and resume normal operation:
• Insert a straightened paper-clip, toothpick, or similar device into the Reset hole
on the back panel to depress the Reset button. See illustration
• Keep the Reset button depressed for 1-2 seconds until you see the clock display
return to the “12:00 PM” initial default setting, then release the Reset button.
Note: Resetting the clock completely erases the memory so it will be necessary
to reset the time, the wake up times, the snooze time and the nap time when
normal operation resumes.
Cleaning The Cabinet
If the cabinet becomes dusty or smudged with fingerprints it may be wiped with a
soft cloth slightly moistened with a mild soap and water solution. Never use
abrasive cleaners and never allow water or any other liquids to enter the cabinet.
6
A Consumer Guide to Product Safety
IMPORTANT SAFETY INSTRUCTIONS
This unit has been designed and manufactured to assure your personal safety. Improper use can result in potential electrical shock or fire
hazards. Please read all the safety and operating instructions carefully before installation and use. Keep these instructions handy for future
reference. Take special note, adhere to all warning, and always follow the instructions on the unit and in the instruction and service manuals.
1. Water and Moisture – The unit should not be used near water. For example: near a bathtub, washbowl, kitchen sink, laundry tub,
swimming pool or in a wet basement.
2. Ventilation – The unit should be situated so that its location or position does not interfere with it’s proper ventilation. For example, it
should not be situated on a bed, sofa, rug or similar surface that may block ventilation openings. Also, it should not be placed in a built-in
installation, such as a bookcase or cabinet that may impede the flow of air through the ventilation openings.
3. Heat – The unit should be situated away from heat sources such as radiators, heat registers, stoves or other appliances (including
amplifiers) that produce heat.
4. Power Sources – The unit should be connected to a power supply only of the type described in the operating instructions or as marked
on the appliance itself.
5. Power-cord Protection – Power supply cords should be routed so that they are not likely to be walked on or pinched by items placed
upon or against them. It is always best to have a clear area from where the cord exits the unit to where it is plugged into an AC outlet.
6. Cleaning – Unplug this product from the wall outlet before cleaning. Do not use liquid cleaners or aerosol cleaners. Use a damp cloth
for cleaning.
7. Non-Use Periods – The power cord of the unit should be unplugged from the outlet when it is to be left unused for a long period of
time.
8. Object and Liquid Entry – Care should be taken so that objects do not fall and liquids are not spilled into an enclosure through
openings.
9. Attachments – Do not use attachments not recommended by the product manufacturer as they may cause hazards.
10. Lightning – For added protection for this product during a lightning storm, or when it is left unattended and unused for long periods of
time, unplug it from the wall outlet and disconnect the antenna or cable system. This will prevent damage to the product due to lightning
and power-line surges.
11. Overloading – Do not overload wall outlets, extension cords, or integral convenience receptacles as this can result in a risk of fire or
electric shock.
12. Damage Require Service – The unit should be serviced by qualified service personnel when:
A.The power supply cord or plug has been damaged.
B.Objects have fallen into or liquid has been spilled into the enclosure.
C.The unit has been exposed to rain.
D.The unit has been dropped or the enclosure damaged.
E.The unit does not appear to operate normally or exhibits a marked change in performance.
13. Servicing – The user should not attempt to service the unit beyond that described in the user’s operating instructions. All other servicing
should be referred to qualified service personnel.
14. Safety Check – Upon completion of any service or repairs to this product, ask the service technician to perform safety checks to
determine that the product is in proper operating condition.
For questions or comments regarding this or other products, please call our toll-free number 1-800-888-4491.
7
Limited 90-Day Warranty Information
Timex Audio Products, a division of SDI Technologies Inc. (hereafter referred to as SDI Technologies), warrants this product
to be free from defects in workmanship and materials, under normal use and conditions, for a period of 90 days from the date
of original purchase.
Should service be required by reason of any defect or malfunction during the warranty period, SDI Technologies will repair
or, at its discretion, replace this product without charge (except for a $5.00 charge for handling, packing, return
UPS/postage, and insurance). This decision is subject to verification of the defect or malfunction upon delivery of this product
to the Factory Service Center listed below. The product must include proof of purchase, including date of purchase. The fee
for service after the warranty period or without proof of purchase is $10.00.
Before returning this product for service, please first replace the batteries (if applicable) with fresh ones, as exhausted or
defective batteries are the most common cause of problems encountered.
If service is still required:
1. Remove batteries (if applicable) and pack the unit in a well-padded, heavy corrugated box.
2. Enclose a photocopy of your sales receipt, credit card statement, or other proof of the date of purchase.
3. Enclose a check or money order payable to the order of SDI Technologies, Inc. for the sum of $5.00 (or $10.00 if after
the warranty period or without proof of purchase).
4. Send the unit prepaid to the Factory Service Center listed below:
Consumer Repair Department
SDI Technologies Inc.
Timex Audio Products Division
1330 Goodyear Drive
El Paso TX 79936-6420
NOTE: This warranty is valid only if the product is used for the purpose for which it was designed. It does not cover (i)
products which have been damaged by negligence, misuse or accident, or which have been modified or repaired by
unauthorized persons; (ii) cracked or broken cabinets, or units damaged by excessive heat; (iii) damage to tape cassettes (if
applicable); (iv) the cost of shipping this product to the Factory Service Center and its return to the owner.
This warranty is valid only in the United States of America and does not extend to owners of the product subsequent to the
original purchaser. Any applicable implied warranties are also limited to 90 days, and SDI Technologies will not be liable for
consequential damages. (Some states do not allow limitations on implied warranties or exclusion of consequential damages,
so these restrictions may not apply to you.) This warranty gives you specific legal rights, and you may also have other rights
which vary from state to state.
© 2013 SDI Technologies, Inc. All rights reserved
TIMEX is a registered trademark of Timex Corporation the United States and other countries
8
T128-121012-A
Printed in China