1
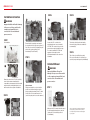
COOLER RCX-Z300
user manual
COOLER RCX-Z300
user manual
STEP 4
Installation instruction
E
WARNING
STEP 2
G
Improper Intallation will result in damage
to the processor. Never switch on the
computer system until the fan is
connected on to the motherboard
power connector.
STEP 1
Pre-installation
A
Remove the transparent cover
Ensure that all four push-pins are turned in
the opposite direction of the arrow ( picture C ).
Place the cooler on the CPU aligning the push
pins into the securing position on the
motherboard ( Picture D and E ).
STEP 3
F
B
Connect the CPU cooler fan to the
motherboard power connector marked
CPU FAN. This connector is keyed so the
power lead can only be installed one way.
If a connector marked CPU FAN is not
apparent on the board,check the
motherboard manual for fan connection
information.
Turn the pins in the direction indicated by
the arrows.( using a flat head screwdriver is
recommended ).
STEP 3
Take off the cooler by lifting it up gently.
If the cooler still seems to be secured, try to
ease the pins by retracting each pin individually.
Uninstall Manual
WARNING
Improper Intallation will result in
damage to the processor. Never switch
on the computer system until the fan is
connected on to the motherboard
power connector.
Grey thermal grease
Ensure the surface of the CPU die is perfectly
clean. Hi-performance thermal interface
compound has been preapplied to the heatsink
and protected by a transparent plastic cover
which must be removed prior to installation.
STEP 2
C
Clip attachment
Placing one hand on the cooler to hold it in
position, use the other hand to secure the
pins by pushing them down( Picture F ) until a
locking click is felt or heard from each one
( secure the push-pins in a crosswise manner ).
STEP 1
D
Make sure the PC is turned off and disconnect
the fan from motherboard power connector
( placing the PC in horizontal position is
recommended ).
Thank you for purchasing a quality Rosewill Product.
Please register your product at : www.rosewill.com
for complete warranty information and future support
for your product.