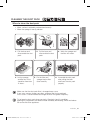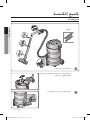
1
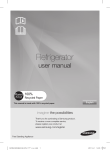
sW7500 sERiEs Vacuum Cleaner user manual This manual is made with 100% recycled paper. ✻ Before operating this unit, please read the instructions carefully. ✻ For indoor use only. English imagine the possibilities Thank you for purchasing a Samsung product. To receive a more complete service, please register your product at www.samsung.com/register Code No. DJ68-00605A REV(0.2) DJ68-00605A-1 EN.indd 1 DJ68-00605A(0.2)-축소.indd 1 2011.6.15 AM 2011.6.15 8:57:26 5:45:3 PM safety information sAFETY inFORMATiOn WARning WARning • Before operating the appliance, please read this manual thoroughly and retain it for your reference. • Because these following operating instructions cover various models, the characteristics of your vacuum cleaner may differ slightly from those described in this manual. CAUTION/WARNINGSYMBOLSUSED WARning cAuTiOn Indicates that a danger of death or serious injury exists. Indicates that a risk of personal injury or material damage exists. OTHERSYMBOLSUSED Represents something you must NOT do. Represents something you must follow. Indicates that you must disconnect the power plug from the socket. 02_ safety information DJ68-00605A-1 EN.indd 2 DJ68-00605A(0.2)-축소.indd 2 2011.6.15 AM 2011.6.15 8:57:27 5:45:3 PM safety information iMpORTAnT sAFEguARds 1. Read all instructions carefully. Before switching on, make sure that the voltage of your electricity supply is the same as that indicated on the rating plate on the side of the cleaner. 2. WARNING : Do not use the vacuum cleaner when rug or floor is wet. Do not use to suck up water. 3. Close supervision is necessary when any appliance is used by or near children. Do not allow the vacuum cleaner to be used as a toy. Do not allow the vacuum cleaner to run unattended at any time. Use the vacuum cleaner only for its intended use as described in these instructions. 4. Do not use the vacuum cleaner without a dust bin. Empty the dust bin before it is full in order to maintain the best efficiency. 5. Do not use the vacuum cleaner to pick up matches, live ashes or cigarette butts. Keep the vacuum cleaner away from stoves and other heat sources. Heat can deform and discolour the plastic parts of the unit. Also do not use your vacuum cleaner to pick up sugar, salt, dust of building materials (e.g. cement, metal shavings and so on). 6. Avoid picking up hard, sharp objects with the vacuum cleaner as they may damage the cleaner parts. Do not stand on the hose assembly. Do not put weight on the hose. Do not block the suction or the exhaust port. 7. Switch the vacuum cleaner off on the body of the machine before unplugging from the electrical outlet. Disconnect the plug from the electrical outlet before emptying the dust bin. To avoid damage, please remove the plug by grasping the plug itself, not by pulling on the cord. 8. This appliance is not intended for use by persons (including children) with reduced physical, sensory or mental capabilities, or lack of experience and knowledge, unless they have been given supervision or instruction concerning use of the appliance by a person responsible for their safety. 9. Children should be supervised to ensure that they do not play with the appliance. 10. The plug must be removed from the socket outlet before cleaning or maintaining the appliance. 11. The use of an extension cord is not recommended. 12. If your vacuum cleaner is not operating correctly, switch off the power supply and consult an authorized service agent. 13. If the supply cord is damaged, it must be replaced by the manufacturer or its service agent or a similarly qualified person in order to avoid a hazard. 14. Don’t carry the vacuum cleaner by holding the hose. Use the handle on the vacuum cleaner set. 15. Unplug the cleaner when not in use. Turn off the power switch before unplugging. WARning This vacuum cleaner is designed for domestic household use only. Do not use this vacuum cleaner to clean building waste or debris. Do Not use this vacuum cleaner with any of the filters removed as this could cause damage to the internal components and void your warranty. safety information _03 DJ68-00605A-1 EN.indd 3 DJ68-00605A(0.2)-축소.indd 3 2011.6.15 AM 2011.6.15 8:57:27 5:45:3 PM contents ASSEMBLINGTHECLEANER 05 OpERATINGTHECLEANER 06 05 Assembling the cleaner 06 07 08 08 09 10 10 Power control Using accessory Emptying the dust bin Check filter indicator Cleaning the dust pack Maintain tools Power cord TROUBLESHOOTING 11 04_ contents DJ68-00605A-1 EN.indd 4 DJ68-00605A(0.2)-축소.indd 4 2011.6.15 AM 2011.6.15 8:57:27 5:45:4 PM assembling the cleaner AssEMbling ThE clEAnER 01 AssEMbling Optional • Features may vary according to model. • Before using the vacuum cleaner put the brush and cleaner, accessory out of the dust bin. • For storage, park the floor nozzle. assembling _05 DJ68-00605A-1 EN.indd 5 DJ68-00605A(0.2)-축소.indd 5 2011.6.15 AM 2011.6.15 8:57:32 5:45:5 PM operating the cleaner pOWER cOnTROl -BODY Press the power control button repeatedly to select the correct mode. (ON↔OFF) The Power control button operates the vacuum cleanner or stops it. -HOSE To reduce suction for cleaning draperies, small rugs and other light fabrics, pull the tap air until the hole is open. -BRUSH FLOOR NOZZLE using on carpet using on tile or floor using AccEssORY Accessory • Push the accessory on to the end of the hose handle. 06_ operating DJ68-00605A-1 EN.indd 6 DJ68-00605A(0.2)-축소.indd 6 2011.6.15 AM 2011.6.15 8:57:34 5:45:6 PM • To use the dusting tool, push the accessory on to the end of the hose handle. 02 OpERATing • To use the upholstery tool, push the accessory on to the end of the hose handle. pipe (Optional) • Adjust the length of the telescopic pipe by sliding the length control button located in the center of the telescopic pipe back and forth. using the blower 1. Disconnect the hose from the body of the cleaner. 2. Connect the hose clamper to the blow hole. 3. Turn the hose clamper to the clockwise and lock the clamper properly. • To use the blower, disassemble the pipe and the brush. operating _07 DJ68-00605A-1 EN.indd 7 DJ68-00605A(0.2)-축소.indd 7 2011.6.15 AM 2011.6.15 8:57:35 5:45:7 PM maintain tools and filter EMpTYing ThE dusT bin 1. Disassemble the suction hose clamper. 2. Unlock the body clamper at both side and lift the upper body to disassemble it from the dust tank. 3. Lift the dust cover to open and put it down carefully. Please beware of dust falling off from the dust cover. 4. Dispose dust materials. 5. Assemble the dust cover properly. 6. Assemble the upper body and lock the body clamper at both side. chEcK FilTER indicATOR If the indicator turns to yellow color while you are cleaning, the dust pack is required to be cleaned. If the indicator continues to display yellow color even after cleaning the dust pack, turn the vacuum cleaner off and check if there is any clogging in the hose, tube, floor nozzle or inlet of the dust cover. 08_ maintain DJ68-00605A-1 EN.indd 8 DJ68-00605A(0.2)-축소.indd 8 2011.6.15 AM 2011.6.15 8:57:38 5:45:8 PM clEAning ThE dusT pAcK When to clean the dust pack 1. Pull the lever and disassemble the dust pack. 4. Let the sponge and filter dry in the shade for more than 12 hours. 2. Pull the lever and disassemble the dust pack. 5. Put the filter and sponge into the filter cover carefully 03 MAinTAin • When suction is noticeably reduced continuously. • When the sponge is heavily polluted. 3. Wash the sponge and the filter with water. 6. Assemble the dust pack after pulling the lever and insert the dust pack properly. Make sure that the dust pack filter is changed once a year. If you use a vacuum cleaner very often, resource filter can be reduced. In this case it is recommended to change the filter with greater frequency. Try to keep the dust pack clean constantly. Regularly check its condition. Ignoring this requirement can lead to motor and body overheating, failure and reduce the service life of the appliance. maintain _09 DJ68-00605A-1 EN.indd 9 DJ68-00605A(0.2)-축소.indd 9 2011.6.15 AM 2011.6.15 8:57:41 5:45:9 PM maintain tools and filter MAinTAin TOOls 2-stepbrush • Remove waste matter completely if the inlet is blocked. pipe(Optional) • To check for blockages, separate the telescopic pipe and adjust to shorten. This allows for easier removal of waste clogging the tube. pOWER cORd After cleaning, wind the power cord and hang it on the hanger. dusT bin WARning Do not give any impact to the dust bin. The dust bin can be dented by external impact. 10_ maintain DJ68-00605A-1 EN.indd 10 DJ68-00605A(0.2)-축소.indd 10 2011.6.15 2011.6.15 8:57:42 AM 5:45:10 PM troubleshooting sOluTiOn Motor downs and does not start. • Check cable, plug and socket. • Leave to cool. suction force is gradually decreasing. • Check for blockage and remove. Vacuum cleaner downs, does not pick up dirt • Check hose and replace if required. low or decreasing suction. • Please check filters. If required clean it as illustrated in the instruction. If filters are out of conditions, change them to new one. body overheating • Please check filters. If required clean it as illustrated in the instruction. unpleasant smell during vacuuming • Please note that there may be a slight smell during vacuuming when the cleaner is new (4-5 days). 04 TROublEshOOTing pROblEM troubleshooting _11 DJ68-00605A-1 EN.indd 11 DJ68-00605A(0.2)-축소.indd 11 2011.6.15 2011.6.15 8:57:42 AM 5:45:10 PM DJ68-00605A-1 EN.indd 12 DJ68-00605A(0.2)-축소.indd 12 2011.6.15 2011.6.15 8:57:42 AM 5:45:10 PM DJ68-00605A(0.2)-축소.indd 13 2011.6.15 5:45:10 PM استكشاف األخطاء وإصالحها تعطل املوتور وعدم إميانية بدء العكل. • • افحص الكبل والقابس واملقبس. اتركه حتى يبرد. تدريجيا. تناقص قوة الشفط ً • افحص ما إذا كان يوجد انسداد وقم بإزالته. تعطل املينسة اليهربائية وعدم التقاطها لألوساخ • افحص اخلرطوم واستبدله إذا لزم األمر. تناقص الشفط أو ضعفه. • الرجاء فحص املرشحات .إذا لزم األمر ،قم بتنظيفها كما هو موضح في اإلرشادات. إذا كانت املرشحات ليست بحالة جيدة استبدلها مبرشحات جديدة. حدوث سخونة زائدة في جسم املينسة • الرجاء فحص املرشحات .إذا لزم األمر ،قم بتنظيفها كما هو موضح في اإلرشادات. • الرجاء االنتباه إلى احتمالية وجود رائحة بسيطة عند استخدام مكنسة كهربائية جديدة مت شراؤها منذ ) 4-5أيام(. حدوث رائحة كريهة أثناء استخدام املينسة اليهربائية 04استيشاف األخطاء وإرالحها املشيلة احلل استكشاف األخطاء وإصالحها _11 5:45:11 PM 2011.6.15 14 DJ68-00605A(0.2)-축소.indd صيانة األدوات واملرشح ريانة األدوات الفرشاة املزدوجة • قم بإزالة أية مواد متبقية متاما إذا كان املنفذ مسدودًا. األنبوب (اختياري) • لفحص االنسدادات ،افصل األنبوب املتداخل وقم بضبطه على طول قصير. ذلك يتيح تسهيل إزالة األشياء العالقة املتبقية في األنبوب. سلك الطاقة بعد التنظيف ،قم بلف سلك الطاقة وتعليقه في احلمالة. حاوية األتربة حتذير ال تُعرض حاوية األتربة ألية صدمة. قد تتعرض حاوية األتربة إلى االنبعاج بسبب أية صدمة خارجية. _10صيانة األدوات واملرشح 5:45:11 PM 2011.6.15 15 DJ68-00605A(0.2)-축소.indd تنظيف كيس األتربة متى ينبغي تنظيف كيس األتربة .1اجذب الذراع ثم قم بفك كيس األتربة. .2اجذب الذراع ثم قم بفك كيس األتربة. 03ريانة األدوات واملرشح • • في حالة استمرار تناقص قوة الشفط بشكل ملحوظ. في حالة تلوث اإلسفنجة بشكل كبير. .3قم بغسل اإلسفنجة واملرشح باملياه. 2 .4اترك اإلسفنجة واملرشح في الظل ألكثر من 12ساعة حتى جتف. .5ضع املرشح واإلسفنجة في غطاء املرشح بعناية 1 .6قم بتركيب كيس األتربة بعد جذب الذراع وأدخل كيس األتربة بشكل سليم. تأكد من تغيير مرشح كيس األتربة مرة واحدة كل عام. إذا كنت تستخدم املكنسة الكهربائية باستمرار ،قد يتضاءل املرشح املصدر. في هذه احلالة من املستحسن تغييره مبرشح بتردد أعلى. حاول إبقاء كيس األتربة نظيف بشكل مستمر .وافحص حالته بانتظام. قد يؤدي جتاهل هذا املتطلب إلى حدوث سخونة زائدة في املوتور وجسم املكنسة وفشل و ِقصر في مدة خدمة اجلهاز. صيانة األدوات واملرشح _09 5:45:12 PM 2011.6.15 16 DJ68-00605A(0.2)-축소.indd صيانة األدوات واملرشح تفريغ حاوية األتربة 2 1 .1قم بفك مشبك خرطوم الشفط. .2قم بإقفال مشبك جسم املكنسة بكال اجلانبني ثم ارفع اجلزء العلوي من اجلسم لفكه من خزان األتربة. .3ارفع غطاء األتربة لفتحه ثم ضعه بعناية .الرجاء االنتباه لسقوط األتربة من غطاء األتربة. .4تخلص من املواد الترابية. 1 2 .5قم بتركيب غطاء األتربة بشكل سليم. .6قم بتركيب اجلزء العلوي من جسم املكنسة ثم قم بإقفال مشبك اجلسم بكال اجلانبني. افحص مؤشر املرشح في حالة حتول املؤشر إلى اللون األصفر أثناء التنظيف ،فهذا يعني أن كيس األتربة بحاجة إلى التنظيف. في حالة استمرار عرض املؤشر للون األصفر حتى بعد تنظيف كيس األتربة ،قم بإيقاف تشغيل املكنسة الكهربائية وافحص ما إذا كانت هناك أي أشياء عالقة في اخلرطوم أو األنبوب أو خرطوم األرضية أو منفذ غطاء األتربة. _08صيانة األدوات واملرشح 5:45:13 PM 2011.6.15 17 DJ68-00605A(0.2)-축소.indd • الستخدام أداة تنظيف األتربة ،ادفع امللحق إلى نهاية مقبض اخلرطوم. 02تشغيل املينسة • الستخدام أداة تنظيف املفروشات املنجدة ،ادفع امللحق إلى نهاية مقبض اخلرطوم. األنبوب (اختياري) • قم بضبط طول األنبوب املتداخل عن طريق حتريك زر التحكم في الطول املوجود بوسط األنبوب املتداخل للخلف ولألمام. استخدام دافل الهواء .1انزع اخلرطوم من جسم املكنسة. .2قم بتوصيل مشبك اخلرطوم بفتحة الهواء. .3أدر مشبك اخلرطوم في اجتاه عقارب الساعة وقم بإقفال املشبك بشكل سليم. • الستخدام دافع الهواء ،قم بفك األنبوب والفرشاة. تشغيل املكنسة _07 5:45:15 PM 2011.6.15 18 DJ68-00605A(0.2)-축소.indd تشغيل املكنسة التحيم في الطاقة اجلسماضغط على زر التحكم في الطاقة بشكل متكرر لتحديد الوضع الصحيح. (تشغيل إيقاف تشغيل) يقوم زر التحكم في الطاقة بتشغيل املكنسة الكهربائية أو إيقافها. اخلرطوملتقليل قوة الشفط لتنظيف الستائر والسجاد الصغير واألقمشة اخلفيفة األخرى ،اسحب هواء الصنبور حتى يتم فتح الفتحة. الفرشاةخرطوم األرضية االستخدام على السجاد االستخدام على السيراميك أو األرضية استخدام امللحق امللحق • ادفع امللحق إلى نهاية مقبض اخلرطوم. _06تشغيل املكنسة 5:45:16 PM 2011.6.15 19 DJ68-00605A(0.2)-축소.indd جتميع املكنسة نكيل املينسة 01نكيل املينسة اختياري • قد تختلف امليزات حسب الطراز. • قبل الشروع في استخدام املكنسة الكهربائية ،أخرج الفرشاة واملنظف واحمللق من حاوية األتربة. • بالنسبة للتخزين ،قم بتثبيت خرطوم األرضية. جتميع املكنسة _05 5:45:17 PM 2011.6.15 20 DJ68-00605A(0.2)-축소.indd احملتويات جتميع املكنسة 05 جتميع املكنسة تشغيل املكنسة 06 06 08 08 09 10 10 10 التحكم في الطاقة استخدام امللحق تفريغ حاوية األتربة افحص مؤشر املرشح تنظيف كيس األتربة صيانة األدوات سلك الطاقة حاوية األتربة 05 06 استكشاف األخطاء وإصالحها 11 _04احملتويات 5:45:18 PM 2011.6.15 21 DJ68-00605A(0.2)-축소.indd معلومات السالمة احتياطات سالمة هامة .1 .2 .3 .4 .5 .6 .7 .8 .9 .10 .11 .12 .13 .14 .15 اقرأ كافة اإلرشادات بعناية. قبل الشروع في التشغيل ،تأكد أن اجلهد الكهربائي ملصدر الكهرباء هو نفسه املوضح على لوحة التقدير املوجودة باجلزء اجلانبي من املكنسة الكهربائية. حتذير :ال تستخدم املكنسة الكهربائية عندما تكون السجادة أو األرضية مبتلة. جتنب استخدامها لشفط املياه. يُعد االهتمام الوثيق أمرًا ضروريًا عندما تكون املكنسة الكهربائية قيد االستخدام من ِقبل األطفال أو بالقرب منهم. ال تسمح باستخدام املكنسة الكهربائية كلعبة. ال تسمح للمكنسة الكهربائية بالعمل دون مراقبة في أي وقت. استخدم املكنسة الكهربائية للغرض اخملصص لها فقط كما هو موضح في هذه اإلرشادات. ال تستخدم املكنسة الكهربائية بدون حاوية األتربة. افرغ حاوية األتربة قبل امتالئها للحفاظ على كفاءتها. ال تستخدم املكنسة الكهربائية اللتقاط أعواد الثقاب أو الرماد الساخن أو أعقاب السجائر. احفظ املكنسة الكهربائية بعي ًدا عن املواقد ومصادر احلرارة األخرى .قد تتسبب احلرارة في تلف األجزاء البالستيكية للوحدة وتغيير ألوانها .وكذلك جتنب استخدام املكنسة الكهربائية في التقاط السكر وامللح واألتربة الناجتة عن مواد البناء )على سبيل األسمنت ورقاقات املعدن وما إلى ذلك(. جتنب التقاط األشياء الصلبة واحلادة باملكنسة الكهربائية حيث أنها قد تتسبب في تلف أجزاء املكنسة .ال تقف على أجزاء اخلرطوم. ال تضع أي شيء على اخلرطوم .ال تقم بسد منفذ الشفط أو الطرد. قم بإيقاف تشغيل املكنسة الكهربائية من املفتاح املوجود باجلهاز قبل نزع القابس من مأخذ التيار الكهربي .انزع القابس من مأخذ التيار الكهربي قبل تفريغ حاوية األتربة .لتجنب حدوث تلف ،الرجاء نزع القابس عن طريق اإلمساك بالقابس نفسه وليس بسحب السلك. لم يتم تصميم هذا اجلهاز لالستخدام من ِقبل أشخاص )مبا في ذلك األطفال( من ذوي القدرات البدنية أو احلسية أو العقلية احملدودة أو غير امللمني باخلبرة واملعرفة املطلوبة إال إذا مت ذلك حتت إشراف أو توجيه شخص مسؤول عن احلفاظ على سالمتهم. ينبغي مراقبة األطفال للتأكد من عدم عبثهم باجلهاز. يجب إزالة القابس من مأخذ التيار الكهربي قبل تنظيف اجلهاز أو صيانته. من املستحسن استخدام وصلة سلكية. في حالة عدم عمل املكنسة الكهربائية بشكل سليم ،قم بإيقاف تشغيل مصدر الطاقة واتصل بأحد وكالء اخلدمة املعتمدين. في حالة تلف سلك مصدر التيار ،يجب استبداله من اجلهة املُصنّعة أو وكيل اخلدمة التابع لها أو أي شخص مؤهل على نحو مماثل لتجنب حدوث أخطار. ال تقم بحمل املكنسة الكهربائية من خالل اإلمساك باخلرطوم .استخدم املقبض املوجود مبجموعة أجزاء املكنسة الكهربائية. انزع قابس املكنسة الكهربائية عندما تكون غير مستخدمة .قم بإيقاف تشغيل مفتاح الطاقة قبل نزع القابس. حتذير هذه املكنسة الكهربائية مصممة لالستخدام املنزلي احمللي فقط. ال تستخدم هذه املكنسة الكهربائية في تنظيف مخلفات أو حطام البناء. ال تستخدم هذه املكنسة الكهربائية في حالة إزالة أي من املرشحات حيث أن ذلك قد يتسبب في حدوث تلف للمكونات الداخلية وإلغاء الضمان اخلاص بك. معلومات السالمة _03 5:45:18 PM 2011.6.15 22 DJ68-00605A(0.2)-축소.indd معلومات السالمة معلومات السالمة حتذير • قبل تشغيل اجلهاز ،الرجاء قراءة هذا الدليل بعناية واالحتفاظ به للرجوع إليه فيما بعد. • نظرا ً ألن إرشادات التشغيل التالية تقوم بتغطية مختلف الطرازت ،قد تختلف خصائص املكنسة الكهربائية لديك اختالفا ً طفيفا ً عن تلك األنواع املوصوفة في هذا الدليل. حتذير الرموز املستخدمة في التنبيه/التحذير حتذير التنبيه يشير إلى وجود خطر قد يؤدي إلى حدوث حالة وفاة أو إصابة خطيرة. يشير إلى وجود خطر حدوث إصابة شخصية أو تلف ملاد ٍة ما. الرموز األخرى املستخدمة يقدم ما ال يجب عليك فعله. يقدم ما يجب عليك اتباعه. يشير إلى أنه يجب عليك نزع قابس التيار الكهربي من املقبس. _02معلومات السالمة 5:45:18 PM 2011.6.15 23 DJ68-00605A(0.2)-축소.indd SW7500ةلسلس املكنسة الكهربائية دليل املستخدم مت إنتاج هذا الدليل باستخدام ورق ُمعاد تدويره بنسبة .100% ✻ قبل الشروع في تشغيل هذه الوحدة ،الرجاء قراءة اإلرشادات بعناية. ✻ لالستخدام الداخلي فقط. اللغة العربية إمكانات هائلة شكرًا لشرائك أحد منتجات .Samsung للحصول على مستوى كامل من اخلدمة، الرجاء تسجيل املنتج لديك على املوقع www.samsung.com/register )Code No. DJ68-00605A REV(0.2 5:45:18 PM 2011.6.15 24 DJ68-00605A(0.2)-축소.indd