1
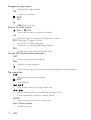
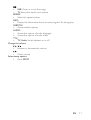
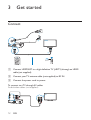
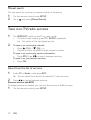
Always there to help you Register your product and get support at www.philips.com/welcome HMP2500T Question? Contact Philips User manual Contents 1 Safety and notice 3 Safety 3 Compliance 4 Care of the environment 5 Copyright 5 Warranty 6 Trademark notice 6 2 Overview 8 Main unit 8 Remote control 9 3 Get started 12 Connect 12 Switch on or off 13 4 Play from DVB services 15 First-time setup 15 Tune in to TV/radio services 16 Use the Electronic Program Guide (EPG) 19 Use the Personal Video Recorder (PVR) 21 5 Play from a USB mass storage device 24 EN 1 6 Setup Program 25 25 Picture 26 Channel Search 26 Time 26 Option 26 System 27 28 29 2 EN 1 Safety and notice Read and understand all instructions before you use this product. If damage is caused by failure to follow the instructions, the warranty does not apply. Safety This 'bolt of lightning' indicates uninsulated material within the device may cause an electrical shock. For the safety of everyone in your household, please do not remove the covering. The 'exclamation mark' calls attention to features for which you should read the enclosed literature closely to prevent operating and maintenance problems. !"#$ not be placed on the device. CAUTION: To prevent electric shock, fully insert the plug. (For regions with polarized plugs: To prevent electric shock, match wide blade to wide slot.) %&!*&!+ The product shall not be exposed to dripping or splashing. ;&<=+<+$" lighted candles). EN 3 other unsafe operation. Warning > > > > > > Never remove the casing of this product. Never lubricate any part of this product. $!+ ?#&!<@!+ Ensure that you always have easy access to the power cord, plug or adaptor to disconnect the product from the power. Where the mains plug or an appliance coupler is used as the disconnect device, the disconnect device shall remain readily operable. Compliance !#$!B Community. Class II equipment symbol: This symbol indicates that this product has a double insulation system. !" #" approved by Philips Consumer Lifestyle may void the user’s authority to operate the equipment. Note > The type plate is located on the bottom of the product. 4 EN Care of the environment Environmental information All unnecessary packaging has been omitted. We have tried to make the packaging easy to separate into three materials: cardboard (box), polystyrene foam (buffer) and polyethylene (bags, protective foam sheet.) Your system consists of materials which can be recycled and reused if disassembled by a specialized company. Please observe the local regulations <<<<!$!+ D<!#<$&! components, which can be recycled and reused. When this crossed-out wheeled bin symbol is attached to a product it means that the product is covered by the European Directive 2002/96/EC. Please inform yourself about the local separate collection system for electrical and electronic products. Please act according to your local rules and do not dispose of your old products with your normal household waste. Correct disposal of your old product helps to <$!!+ Copyright EN 5 This item incorporates copy protection technology that is protected by U.S. patents and other intellectual property rights of Rovi Corporation. Reverse engineering and disassembly are prohibited. K"<#+ !& of Koninklijke Philips Electronics N.V or their respective owners. Philips reserves the right to change products at any time without being obliged to adjust earlier supplies accordingly. Warranty > > > > Never attempt to repair the product, this could lead to the risk of injury, damage to the product and will void your warranty. Use the product and accessories only as intended by the manufacturer. The caution sign printed on the back of the product indicates risk of electric shock. Never remove the cover of the product. Always contact Philips Customer Support for service or repairs. Any operation expressly prohibited in this manual, or any adjustments and assembly procedures not recommended or authorized in this manual shall void the warranty. Trademark notice ® Q;XQ;X<Q<Z;X!! or registered trademarks of HDMI licensing LLC in the United States and other countries. 6 EN Manufactured under license from Dolby Laboratories. "Dolby" and the double-D symbol are trademarks of Dolby Laboratories. The USB-IF Logos are trademarks of Universal Serial Bus Implementers Forum, Inc. EN 7 2 Overview Through HMP2500T&#<&<Z ^=Q; ^_ > Receive digital TV/ radio programs from the latest Digital Video Broadcasting (DVB-T2) services; > Schedule your watching, listening, or recording of the programs; > Play media that you store on the USB device. Main unit i OK j h k g a f e dc b a MAINS ~ > AC power cord b L/R > Connectors for audio output c Pr / Pb / Y > Connectors for component video output d VIDEO > Connector for video output e HDMI > HDMI connector for audio/ video output f RF LOOP THROUGH > Output connector for external TV antenna 8 EN g RF IN > Input connector for external TV antenna h > i USB connector for media play and power charging of a USB mass storage device Status display j > Press the button to switch on; To switch off, press and hold the button for more than three seconds. CH+/CH-/ / > Navigate through the list of options OK > Select an option CH+/CH> DVB: Select the next or previous service / > Increase or decrease the volume k Power indicator Remote control Switch HMP2500T on or to standby mode > Press Select TV resolutions > Press TV MODE repeatedly Select media sources TV / RADIO > Press the button repeatedly to switch between the TV and Radio modes USB > Switch to the USB mode EN 9 Navigate through options > Navigate through options OK > q! / EXIT > Exit > USB: Back one level Select a TV/ radio service (CH+) / (CH-) > Switch to the next or previous channel 0-9 > Numeric keys for the entry of channel numbers EPG (Electronic Program Guide) > List of all TV/ radio programs > Create your watching/ listening schedule FAV > Access the list of your favorite services Use the PVR (Personal Video Recorder) LIST > Access the recorded programs REC > Record current program > Access the programs in your watching/listening/recording schedule $" > Start, pause, or resume the play / EXIT > Stop the play / > K! / > K### > Press repeatedly to select a search speed GOTO > Skip to a point of time for media play Red / Green buttons > Rotate a photo 10 EN > USB: Zoom in or out the image > TV: Select the aspect ratio options REPEAT > Select the repeat options INFO > ;&!<!*<& SUBTITLE > Access subtitle options AUDIO > Access the options of audio languages > Access the options of audio tracks TTX > TV/ Radio: Switch teletext on or off Change the volume / > Increase or decrease the volume > Mute/ unmute Select setup options > Press SETUP EN 11 3 Get started Connect Cable 3 HDMI HDMI IN SOURCE TV a %$&'**, 7,8;%<,8= %<> cable (not supplied). b Connect your TV antenna cable (not supplied) to RF IN. c Connect the power cord to power. To connect to a TV through AV cables Audio/video cables (not supplied): AV L VIDEO 12 VIDEO L R EN R Component video cables (not supplied): AV Pr VIDEO > Pb L Y R Pr/Cr Pb/Cb Y Make sure that the plugs and sockets match in color. Switch on or off 1 On HMP2500T, press on the remote control to switch on. > Alternatively, press on the main unit. OK 2 On the TV, switch to the input source of HMP2500T: > On the remote control of your TV, use the source button to select the input source of HMP2500T. AV HDMI 1 HDMI 2 HDMI 3 Side HDMI Side AV SOURCE TV 3 To switch HMP2500T to standby mode, press control. » The power indicator lights up red. again on the remote EN 13 > Alternatively, press and hold seconds to switch off. on the main unit for more than three Auto standby If there is no button press or media play on HMP2500T for three hours, HMP2500T can switch to standby mode automatically to save power. On the remote control, press SETUP. Go to to switch on [Auto Standby]. 14 EN 4 Play from DVB services First-time setup !&HMP2500T, do the following setup: Installation Guide OSD Language English Country England Channel Search EXIT 1 2 3 EXIT OK Confirm In [OSD Language], select the language for the onscreen menus. In [Country], select the country of your current location. In [Channel Search], press or OK to start auto search. » HMP2500T starts to search for available services. » ! ^ play. Auto search When you move to a new place (such as a new city or country), restart auto search for better reception. 1 2 On the remote control, press SETUP. Go to and select [Auto Search]. » HMP2500T starts to search for available services. » ! ^&+ EN 15 Manual search D&!$&+ 1 2 On the remote control, press SETUP. Go to and select [Manual Search]. Tune in to TV/radio services 1 On HMP2500T, switch to the TV or radio mode. > On the remote control, press TV / RADIO repeatedly. » You switch to the last played service. 2 To tune in to a service by channel, > Press (CH+) / (CH-), or > Use the numeric keys 0-9 to enter channel numbers. To tune in to a service by service information, > Press EPG. Press to switch between services. To tune in to your favorite services, > Press FAV. Select from the list of services 1 In the TV or Radio mode, press EPG. » You can select from the list of available TV/ radio services. 2 Press to switch between services. Sort services in the EPG To display services as needed, you can sort the services in different ways. 1 On the remote control, press SETUP. 16 EN Program Program Edit EPG Sort LCN EXIT Return By Service Name Off OK Confirm 2 Select > [Sort]: [By LCN]: Services are sorted by Logical Channel Number (LCN). [By ONID]: Services are sored by Original Network ID (ONID). [By Service Name]: Services are sorted by service name. [By Service ID]: Services are sorted by service ID. 3 Press to switch between options. Create a list of favorites On the remote control, press FAV. You can access the services that you have added to the list of favorites. To add/ remove a service 1 2 On the remote control, press SETUP. Select > [Program Edit]. > Enter your password (000000 by default). » A list of services is displayed. EN 17 3 To add a service, > Select a service. Press FAV. » A pop-up screen is displayed for you to select the program type. » The Favorite icon is added next to the service. 4 To remove the service, > Select the service. Press FAV again. » The Favorite icon is removed. To access a favorite service 1 On the remote control, press FAV. » A pop-up screen is displayed for you to select a service. 2 3 To switch between program types, press To select a service, press . and OK. Re-assign channel numbers 1 Switch off the logical channel number (LCN). a On the remote control, press SETUP. b In 2 > LCN, press to select [Off]. Move a service to the channel number that you want to assign: a In > [Program Edit], select a service. Enter your password (000000 by default). b On the remote control, press the Red button. » The Move icon is added next to the service. c Press / to move the service. d To stop moving, press the Red button again. » The Move icon is removed. 18 EN Edit the program list By editing the program list, you can lock services, skip services, or change the service name. 1 2 On the remote control, press SETUP. Select > [Program Edit]. > Enter your password (000000 by default). » A list of services is displayed. » You can edit the program list as needed. Lock a service You can set a password for some services. 1 2 Select a service. Lock the service: > On the remote control, press the Yellow button. » The Lock icon is added next to the service. » To watch the locked service, enter your password (000000 by default). 3 To unlock the service: > Select the service. Press the Yellow button again. Use the Electronic Program Guide (EPG) With the Electronic Program Guide (EPG), you can get the information about current and upcoming programs, such as introduction and schedules. EN 19 Create your watching /listening schedule With the EPG, you can create a schedule for the TV/ radio programs that you want to watch or listen to. 1 Go to the EPG. > On the remote control, press EPG. > Alternatively, press SETUP, and then, select 2 Select a program: a Press b Press > EPG. to select a service. / to navigate through the programs. Program Guide 001 TV ONE 25/05 14: 05-14:55 Program 1 25/05 14: 55-14:25 Program 2 Fri 25/05/2001 14:39 Page: 1 / 1 Book OK 3 Book list Page Down Page Up On your selected program, press OK. » The event is added to your schedule. » A pop-up screen is displayed for you to edit the event. Schedule Event 01 Program Mode OK 20 Date Time Repeat Status Event14:55-15:25 Eidt TV ONE 25/05 Once Channel Type TV Channel No. 0004 Channel Name TV ONE Start Date(D/M/Y) 25/05/2001 Start Time 14:55 End Time 15:25 Repeat Weekly EN Confirm View EXIT EXIT 4 Edit the event: In [Repeat]: Select how often event repeats, once, daily, or weekly. In [Mode]: Select whether to view or record the program. » At the scheduled time, the play or recording starts automatically (see 'Record as scheduled' on page 21). To add, edit, or delete an event 1 On the remote control, press . » The schedule is displayed. 2 On the remote control, press the red, green, or blue buttons to add, edit, or delete a selected event. Use the Personal Video Recorder (PVR) With the Personal Video Recorder (PVR), you can record a program at the scheduled time, or record the program during watching. The recordings are saved to the USB device that you have connected to HMP2500T. OK Record as scheduled 1 2 On HMP2500T, connect a USB mass storage device. On the remote control, press . » Your watching/ listening schedule is displayed. EN 21 Schedule Event 01 Program TV ONE Add 3 Edit Date Time 25/05 14:55-15:25 Repeat Status Delete Once EXIT To change an event to the recording mode, a On the selected event, press the Green button to edit the event. » A pop-up screen is displayed for you to edit the event. b In [Mode], press to switch to [Record]. Schedule Event 01 Program Date Time Repeat Status Event14:55-15:25 Eidt TV ONE 25/05 Once Channel Type TV Channel No. 0004 Channel Name TV ONE Start Date(D/M/Y) 25/05/2001 Start Time 14:55 End Time 15:25 Repeat Weekly Mode OK Confirm Record EXIT EXIT To add an event for recording, > Press the Red button. In the pop-up screen, add an event and select [Record] in [Mode]. » At the scheduled time, recording starts. Record during watching/listening 1 2 On HMP2500T, connect a USB mass storage device. 22 EN When you watch or listen to a program, press REC on the remote control. » You start to record current program. Play recorded programs 1 Make sure that you have connected the USB mass storage device to HMP2500T. 2 On the remote control, press LIST. » The list of recordings is displayed. 3 Select a recording to start play. EN 23 5 1 Play from a USB mass storage device On HMP2500T, connect a USB mass storage device. OK 2 Switch to the USB mode. > On the remote control, press USB. 3 K&+ 24 EN 6 Setup You can change the setup options of HMP2500T. 1 On the remote control, press SETUP. » The setup menu is displayed. Program Program Edit EPG Sort LCN EXIT 2 By Service Name Off Return OK Confirm To select an option, a Press to switch to a menu: [Program], [Channel Search], [Time], [Option], and b Press c Press 3 / [Picture], [System]. to select a menu item. to select an option. To exit, press EXIT. Program [Program Edit]B+D<$ services, change the service names, and lock, skip, and delete some services. EPG: Check the program information and schedules, and create your schedule of watching, listening and recording [Sort]: Sort the list of services in different ways (see 'Sort services in the EPG' on page 16). EN 25 LCN: Select whether to keep the logical channel numbers of the services. To reassign channel numbers to the services, switch off LCN. Picture [Aspect Ratio]: Select display aspect ratio. [Resolution]: Select the video resolution that your TV supports. See your TV manual for details. [TV Format]: Select the TV color system of your country. See your TV manual for details. Channel Search [Auto Search]: Start the auto search of available TV/ radio services. [Manual Search]K ^*&!$&+ [Country]: Select the country of your current location. [Antenna Power]: Increase the power of the external antenna. Time [Time Offset]: Select [Auto] to use the time of the TV/ radio services. Select [Manual] to select your time zone in [Time Zone]. [Country Region]: Select the country of your current location. [Time Zone]: To select your time zone, select [Manual] in [Time Offset]. [Auto Standby]: Switch HMP2500T off automatically when there is no button press or media play for three hours. Option [OSD Language]: Select languages for the onscreen menus. [Subtitle Language]: Select languages for the subtitle. [Audio Language]: Select languages for the audio. 26 EN HDMI Audio: Select options for HDMI audio output. If you use TV speakers for audio output, select [PCM]+&!<[RAW HDMI On]. To switch off HDMI audio output, select [Off]. System Parental Guidance In [Parental Guidance], you can set password to programs with age restrictions. By default, the password is 000000. You can also lock some services in > [Program Edit]. Set Password In [Set Password], you can set your password that you use in [Program Edit]and [Parental Guidance]. Restore factory default In [Restore Factory Default], restore the factory defaults of the HMP2500T. Information In [Information], check the information about your HMP2500T. Before you <!#!&HMP2500T. EN 27 7 1 Update the firmware through a USB storage device On your computer, do the following: a Go to www.philips.com/support ^ b Search for your model and click on "Software and drivers". c < directory of a USB storage device. 2 On HMP2500T, do the following: a Connect the USB storage device. b On remote control, press SETUP, and then, select [System] > [Software Update] > [USB Upgrade]. » !#&! update. » HMP2500T restarts automatically and then, the update starts. 3 Follow onscreen instructions to complete the update. » When the update is complete, HMP2500T switches off automatically. Caution > Keep HMP2500T #<!!# complete. 28 EN 8 Specification Note > K<"<#+ AC power Voltage information is printed on the bottom of HMP2500T. Power consumption 9 - 9.5 W Power consumption in standby mode < 0.5 W Supported formats: > Video: MPEG 1/2, H.264, MPEG 4, Xvid (1.00, 1.01, 1.03, 1.10-beta1/2),JPEG, DAT, MPG, MPEG, TS, TRP, TP, M2TS, VOB, MP4, MKV, AVI, DMF (0, 1, 2,), Motion JPEG > Audio: Dolby Digital, MPEG Audio, AC3, EAC3, AAC, HEAAC, LPCM, IMP/MS ADPCM, LBR, MP3, M4A > Picture: JPEG, PNG, BMP HDD & USB support > NTFS, FAT32, FAT16 > USB MSC support > Q;; K+ B#$+ 2.5'' HDD Subtitle support > .srt, .sub, .smi, .ssa, idx+.sub Video > HDMI output: 480i, 480p, 576i, 576p, 720p, 1080i, 1080p Audio > Signal to noise ratio (1 kHz): > 90 dB (A-weighted) > Dynamic Range (1 kHz): > 80 dB (A-weighted) > $&*Z Main Unit > Dimensions (L x W x H): 180 x 113 x 45 mm > Net Weight: 0.48 Kg EN 29 Specifications are subject to change without notice © 2012 Koninklijke Philips Electronics N.V. All rights reserved. HMP2500T_12_UM_V1.0wk42.3