1
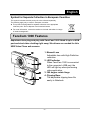
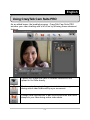
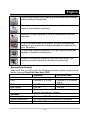
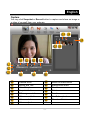
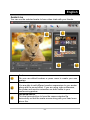
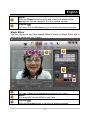
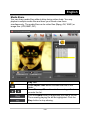
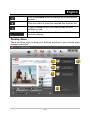
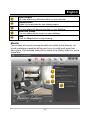
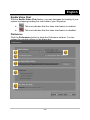
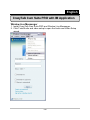
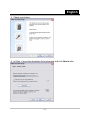
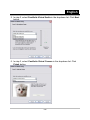
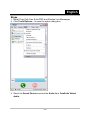
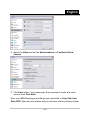
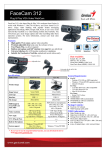
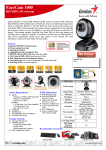
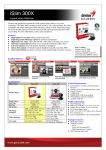
English Table of Contents FaceCam 1000 Features 1 Set up the device 2 Setting the LED On/Off and Frequency 3 Using Instant Messenger Application 4-5 CrazyTalk CamSuite PRO 6-16 CrazyTalk CamSuite PRO with IM Application 17-21 Trouble shooting for web camera 22 i English Symbol for Separate Collection in European Countries This symbol indicates that this product is to be collected separately. The following apply only to users in European countries: This product is designated for separate collection at an appropriate collection point. Do not dispose of as household waste. For more information, contact the retailer or the local authorities in charge of waste management. FaceCam 1000 Features Experience true plug and play with FaceCam 1000! Hook it up to a USB port and start video chatting right away! No drivers are needed for this USB Video Class web camera. 1. Manual Lens Adjustable lens with High Definition resolution 2. LED Indicator When FaceCam 1000 is connected to the computer's USB port, the LED will light up when performing video application. 3. 360 degree rotate hinge 4. Clipping Base The adjustable clipping base fits easily to Notebook - 1- English Set up the Device FaceCam 1000 supports UVC (USB Video Class) which can plug and play in Windows 7/Vista/XP SP2 or Mac 10.4.9 and above without using a device driver. 1. Make sure your PC OS system is Windows 7/Vista/XP SP2 or Mac 10.4.9 and above. 2. Plug in the FaceCam 1000 to a USB port. 3. FaceCam 1000 is now ready for use with any application. It can work properly with any video chat software that supports a video feature. If you use Mac OS, you can use iChat for online chatting. Image Capture under Windows XP SP2 and Vista: 1. Double-click on the My Computer icon. Or click Start My Computer 2. Now look for and double-click on “USB Video Device”, then you can start to capture still images. NOTE To check if Windows XP system is SP2 (Service Pack 2). Click on the My Computer icon on your desktop or in the Windows Start menu. When the menu appears, click Properties. If your Windows XP system isn’t SP2 (Service Pack 2), go to the website http://www.microsoft.com to upgrade your version. - 2- English I.P.M(Image Protection Mechanism) setting FaceCam 1000 embed I.P.M function. This feature prevents any person trying to hack into your system and use your web cam. 1. When you turn on the web cam, the system will display a dialog box to ask you “Do you want to open the image from web cam?” Press “Yes” to open the image. Any hacker can not turn on your webcam because they can not press “Yes”. This keeps your web cam safe. 2. Every time when you turn the web cam, the system will ask again if you want to prevent any hacker invasion. Using Instant Messenger Application MSN Messenger a. For live video function, you’ll need MSN Messenger version 6 or later. If you don’t have it, refer to the website: http://messenger.msn.com to download. b. Sign onto MSN Messenger service. c. Choose a friend on the contact list and click “OK” to confirm. d. Double-click on your friends, who are available to chat. Click on the webcam icon. e. Your friend will then receive an invitation message. When your friend confirms to talk, the video chat will start. f. For the further information, refer to the website at http://messenger.msn.com Yahoo Messenger a. Download Yahoo Messenger at http://messenger.yahoo.com and finish the registration, if you don’t have it. b. Sign onto Yahoo Messenger. - 3- English c. From the main window, click Tools menu, then select “Start My Webcam”. d. Right-click on a name in your Messenger List and choose “View Webcam”. e. Your friend will then receive an invitation message. When your friend clicks YES, the video chat will start. f. For the further information, refer to the website at http://messenger.yahoo.com AOL Instant Messenger a. You can download AOL Instant Messenger free at http://www.aim.com and finish the registration, if you don’t have it. b. Sign onto AOL Instant Messenger. c. Click on “Show Messenger Lists” and choose the friend you want to start with video chat. d. Your friend will then receive an invitation message. When your friend confirms to talk, the video chat will start. e. For the further information, refer to the website at http://www.aim.com NOTE Make sure you already connected the camera to the computer before running any video conferencing or video chat programs. Also make sure you close other webcam programs before running the video conferencing or video chat program. - 4- English Using CrazyTalk Cam Suite PRO As an added bonus, the bundled program - CrazyTalk Cam Suite PRO enriches your video chatting with a lot of fun by following these advanced features. Capture still image and video in different resolutions and upload to YouTube directly. Continuously changing talking animated characters appear during online video chats with lip-sync movement. Change facial expressions or add face accessories and comic stamps to your face during online video chats. - 5- English Shares your favorite video clips and photo slideshows instantly without waiting to download. Shows live desktop activity for online presentation, distant training, and software operation. Notifies you what happens in front of the webcam while you are away. With the Enable Video Chat feature, you may decrease the loading of your system by stopping sending the video data to your IM partner. To show the Preference window. You can change the general settings in Preference dialog box. Shows the properties window of your web cam driver. The controls provided depend on the drivers respectively. System Requirements Make sure that your PC meets the following minimum system requirements before running CrazyTalk Cam Suite PRO. Minimum Recommended Hardware CPU Pentium 4, 2.0 GHz Pentium 4, 3.0 GHz or higher RAM 256 MB 512 MB or higher Disk Space 100 MB 200 MB Accessories Duplex sound card, VGA card, keyboard, mouse, microphone, speaker Software Operating System Windows 2000, XP and Vista Instant Messenger Such as Skype for Windows v3.0 or above DirectX DirectX 9 or above - 6- English Capture You may click Snapshot or Record button to capture and share an image or a video of yourself from your webcam. Camera on/off Mixer for music/sound Sketch and Text Voice Morph Snapshot button Background Music Preview Delete Still image resolution Video record button Video resolution Email YouTube upload Thumbnail/List view Volume adjust - 7- English Avatar Live You can use the selected avatar to have video chats with your friends. Avatar You can use default avatars or press more to create your own avatars. Emoticons You are able to add different emotive expressions to your avatar along with the sound effect. If you are using video conference, the avatar and emotive animation are both visible to your conferencing partner. Horizontal Mirror Tick the Horizontal box to have the camera window flip horizontally so that the avatar moves along with your head more mirror-like. - 8- English Reset Click the Reset button to rectify and zoom your avatar to the appropriate size and angle to fit in the camera window. Preview You may click the Preview button to launch the preview window Magic Mirror You can utilize your own face applied different effects by Magic Mirror and to have video chats with your friends. Morph You can change the selected face morph to your face. Effect You may add a comic effect to your face. Preview Click the Preview button to launch the preview window - 9- English Media Share You can share media files without delay during video chats. You may playback multiple media files and have your friends view them simultaneously. The media files can be video files (Mpeg, AVI, WMV) or image files (JPG, BMP, GIF). / Play List Press Import Files button to select the files in the folder. Press Move up /Move down button or drag a file to re-order the list. Click the Share button to play/share the files in the list. The currently playing file will be highlighted. Click the Stop button to stop sharing. -10- English Click the Preview button to preview by yourself before sharing Click this button to clear the selected files from the list. Toggle to Loop button if you want to play the files selected in loop. Drag the Slider bar to browse the frame of the file currently playing. Desktop Share There are three ways to show your desktop activities to your friends when having a video chat. -11- English Share Region You can share any desired position on your desktop. Repeat button Press it to re-activate the last sharing region. Share window You can share the desired window on your desktop. Share full screen You can share whole screen on your desktop. Stop Click the Stop button to stop sharing. Monitor This function will record movements which are visible to the webcam. An e-mail containing snapshots will be sent to you to notify such event had taken place. The recorded video will be saved in the Gallery folder for you to check later. -12- English Motion sensitivity level Drag the Motion sensitivity level slider to adjust the sensitivity level. The lower the sensitivity level, the less motion will be recorded. That means minor movements will not be recorded. HD space setting Since the recorded videos will occupy hard drive space, you can stop recording when HD space is at certain level. You can adjust when you want to stop recording by dragging the slider. Email notification with snapshot Check the Email notification with snapshot checkbox if you want the snapshot to be sent to you by e-mail. Click E-mail setting button to set E-mail address. Start/Stop Monitor Click the Start Monitor button to start monitoring. Click it again to stop monitoring. -13- English Enable Video Chat With the Enable Video Chat feature, you may decrease the loading of your system by stopping sending the video data to your IM partner. This icon indicates that the video chat feature is enabled. This icon indicates that the video chat feature is disabled. Preference Click the Preferences button to show the Preference window. You can change the general settings in this dialog box. -14- English Select Camera allows you to select your default camera. If you have multiple cameras installed on your PC, you need to select one of them. Check the Enable auto zoom so the webcam can detect your face, zoom automatically and self center your face. Check the Auto preview after captured box and the preview window pops up, auto-playbacks right after you capture an image or a video. Click Browse button to select a folder to store the captured images and videos. This is to set Face/Mouse tracking to trigger the head movement radio button so your avatar's head and eyes will track your head or mouse and move under the Avatar Live function. This is to set the Delay time per slide (second) for each image to last for specific seconds under Media share function. Camera setting Click the Camera Settings button to show the properties window of your web cam driver. The controls provided depend on the drivers respectively. NOTE For detailed setting of each function, press -15- for online help. English CrazyTalk Cam Suite PRO with IM Application Window Live Messenger 1. Install CrazyTalk Cam Suite PRO and Window Live Messenger. 2. Click Tools/Audio and video setup to open the Audio and Video Setup wizard. -16- English 3. Check next button. 4. In Step 1, leave the dropdown list unchanged and click Next button. -17- English 5. In step 2, select CamSuite Virtual Audio in the dropdown list. Click Next button. 6. In step 3, select CamSuite Virtual Camera in the dropdown list. Click Finish button. -18- English Skype 1. Install CrazyTalk Cam Suite PRO and Window Live Messenger. 2. Click Tools/Options... to open the option dialog box. 3. Select the Sound Devices and set the Audio In to CamSuite Virtual Audio. -19- English 4. Select the Video and set the Select webcam to CamSuite Virtual Camera. 5. Click Save button. Your messenger then receives its audio and video sources from Cam Suite. Now, your MSN Messenger and Skype are connected to CrazyTalk Cam Suite PRO. Execute this software and you will have effects including Avatar -20- English Live, Magic Mirror, Media Share and Desktop Share that can be seen during your video conference after turn on the Enable Video Chat feature . Trouble shooting Q1: My computer cannot detect the web camera when connected with an extended USB cable. Solution: Connect the web camera directly to a USB port on your computer. Make sure the web camera is connected to the USB port at the back of your computer. Some USB ports at the front of computers may not supply sufficient power for your web camera. Q2: Insufficient system resources reserved for the USB port, causing the system to be unable to function. There are too many devices in the system, causing IRQ problems with the system's USB controller. Do the following: Remove some USB devices from the system. Restart the system. The computer reallocates resources. Q3: The web camera does not light up or the computer restarts for no apparent reason. You may have a USB device drawing too much power from your computer. This can happen especially when connecting USB devices to a passive or self-powered USB hub. A USB Hub Power Exceeded dialog box appears. Try the following: Connect the web camera directly to your computer's USB port. Use a USB hub with an external power supply. -21-