1
TO SOFT-COOK EGGS:
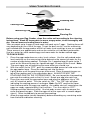
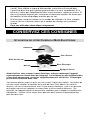
1. Place the egg cooker on a dry, level surface. Use the soft cooked water level
markings on the measuring cup to determine the amount of water for the
number of eggs being cooked. Example: If soft cooking 7 eggs, fill the
measuring cup to the 7 mark.
2. With the switch set to “OFF”, pour the recommended amount of cold water into
the egg cooker base. The recommended amount of water will provide eggs with
soft yolks and cooked egg whites.
3. Place the cooking rack onto the base. Pierce the large end of each egg with the
pin that is attached to the bottom of the measuring cup. This will help prevent
the shell from cracking while the eggs are cooking. Place the eggs, pierced-end
up onto the cooking rack.
4. Place the cover onto the egg cooker base and plug appliance into a 120 volt, AC
electrical outlet. Turn the switch to “ON”. The “ON” light will glow indicating the
cooking process has begun. Note: Do NOT remove the cover from the base
while the eggs are cooking. An audible alert will sound when the eggs are
ready, after approximately 11 to 13 minutes. Turn the switch to “OFF”. Unplug
the cord from the electrical outlet. Use hot pads or oven mitts to remove the
cover and cooking rack. Serve immediately to prevent overcooking. Eggs may
be rinsed briefly with cold water while in the cooking rack for easy handling.
5. Allow the egg cooker to cool completely before discarding any remaining water
from the base and before cleaning.
TO HARD-COOK EGGS:
1. Place the egg cooker on a dry, level surface. Use the hard cooked water level
markings on the measuring cup to determine the amount of water for the
number of eggs being cooked. Example: If hard cooking 7 eggs, fill the
measuring cup to the 7 mark on the hard cooked-side of the measuring cup.
2. With the switch set to “OFF”, pour the recommended amount of cold water into
the egg cooker base. Note: When cooking more eggs, less water is used.
3. Place the cooking rack onto the base. Pierce the large end of each egg with the
pin that is attached to the bottom of the measuring cup. This will help prevent
the shell from cracking while the eggs are cooking. Place the eggs, pierced-end
up onto the cooking rack.
4. Place the cover onto the egg cooker base. Plug the appliance into a 120 volt,
AC electrical outlet. Turn the switch to “ON”. The “ON” light will glow indicating
the cooking process has begun. Note: Do NOT remove the cover from the base
while the eggs are cooking. An audible alert will sound when the eggs are
ready, after approximately 13 to 17 minutes. Turn the switch to “OFF.” Unplug
the cord from the electrical outlet. Use hot pads or oven mitts to remove the
cover and cooking rack. Eggs may be rinsed briefly with cold water while in the
cooking rack for easy handling. For easy peeling, crack the shell all over by
tapping on a hard surface. Hard-cooked eggs may be refrigerated for up to 4
weeks.
5. Allow the egg cooker to cool completely before discarding any remaining water
from the base and before cleaning.
• A small amount of smoke and/or odor may occur upon heating due to the
release of manufacturing oils – this is normal.
• Some minor expansion/contraction sounds may occur during heating and
cooling – this is normal.
4