1
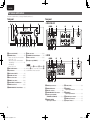
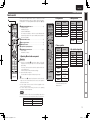
SVENSKA
NEDERLANDS
ESPAÑOL
ITALIANO
FRANÇAIS
DEUTSCH
ENGLISH
Integrated Amplifier
PM-KI-PEARL-LITE
PM7004
1.PM-KI PEARL LITE_N_ENG_0617.indd
1
2010/06/21
19:18:26
1.PM-KI PEARL LITE_N_ENG_0617.indd
2
2010/06/21
19:18:26
SVENSKA
nSAFETY PRECAUTIONS
CAUTION
RISK OF ELECTRIC SHOCK
DO NOT OPEN
CAUTION:
TO REDUCE THE RISK OF ELECTRIC SHOCK, DO NOT REMOVE
COVER (OR BACK). NO USER-SERVICEABLE PARTS INSIDE.
REFER SERVICING TO QUALIFIED SERVICE PERSONNEL.
The lightning flash with arrowhead symbol, within an equilateral
triangle, is intended to alert the user to the presence of
uninsulated “dangerous voltage” within the product’s enclosure
that may be of sufficient magnitude to constitute a risk of
electric shock to persons.
The exclamation point within an equilateral triangle is intended
to alert the user to the presence of important operating
and maintenance (servicing) instructions in the literature
accompanying the appliance.
WARNING:
1.
2.
3.
4.
5.
6.
7.
8.
9.
10.
11.
12.
TO REDUCE THE RISK OF FIRE OR ELECTRIC SHOCK, DO NOT
EXPOSE THIS APPLIANCE TO RAIN OR MOISTURE.
13.
NEDERLANDS
ESPAÑOL
ITALIANO
IMPOTANT SAFETY
INSTRUCTIONS
Read these instructions.
Keep these instructions.
Heed all warnings.
Follow all instructions.
Do not use this apparatus near water.
Clean only with dry cloth.
Do not block any ventilation openings.
Install in accordance with the manufacturer’s instructions.
Do not install near any heat sources such as radiators, heat registers,
stoves, or other apparatus (including amplifiers) that produce heat.
Do not defeat the safety purpose of the polarized or grounding-type plug. A
polarized plug has two blades with one wider than the other. A grounding
type plug has two blades and a third grounding prong. The wide blade or the
third prong are provided for your safety. If the provided plug does not fit into
your outlet, consult an electrician for replacement of the obsolete outlet.
Protect the power cord from being walked on or pinched particularly at
plugs, convenience receptacles, and the point where they exit from the
apparatus.
Only use attachments/accessories specified by the manufacturer.
Use only with the cart, stand, tripod, bracket, or table
specified by the manufacturer, or sold with the apparatus.
When a cart is used, use caution when moving the cart/
apparatus combination to avoid injury from tip-over.
Unplug this apparatus during lightning storms or when
unused for long periods of time.
14. Refer all servicing to qualified service personnel. Servicing
is required when the apparatus has been damaged in any
way, such as power-supply cord or plug is damaged, liquid has been spilled
or objects have fallen into the apparatus, the apparatus has been exposed
to rain or moisture, does not operate normally, or has been dropped.
15. Batteries shall not be exposed to excessive heat such as sunshine, fire or
the like.
CAUTION:
PRECAUCIÓN:
The top surface over the internal heat sink may become hot when
operating this product continuously.
Do not touch hot areas, especially around the “Hot surface mark” and
the top panel.
La superficie superior sobre el disipador de calor interno podría llegar
a calentarse al operar este producto de forma continua.
No toque las áreas calientes, especialmente las situadas alrededor de
la “Hot surface mark” y del panel superior.
HOT SURFACE. DO NOT TOUCH.
Hot
surface
mark
SUPERFICIE CALIENTE. NO TOCAR.
FRANÇAIS
DEUTSCH
ENGLISH
CAUTION:
To completely disconnect this product from the mains, disconnect
the plug from the wall socket outlet.
The mains plug is used to completely interrupt the power supply to
the unit and must be within easy access by the user.
VORSICHT:
Um dieses Gerät vollständig von der Stromversorgung abzutrennen,
ziehen Sie bitte den Stecker aus der Wandsteckdose.
Der Netzstecker wird verwendet, um die Stromversorgung zum
Gerät völlig zu unterbrechen; er muss für den Benutzer gut und
einfach zu erreichen sein.
PRECAUTION:
Pour déconnecter complètement ce produit du courant secteur,
débranchez la prise de la prise murale.
La prise secteur est utilisée pour couper complètement
l’alimentation de l’appareil et l’utilisateur doit pouvoir y accéder
facilement.
ATTENZIONE:
Per scollegare completamente questo prodotto dalla rete di
alimentazione elettrica, scollegare la spina dalla relativa presa a
muro.
La spina di rete viene utilizzata per interrompere completamente
l’alimentazione all’unità e deve essere facilmente accessibile
all’utente.
PRECAUCIÓN:
Para desconectar completamente este producto de la alimentación
eléctrica, desconecte el enchufe del enchufe de la pared.
El enchufe de la alimentación eléctrica se utiliza para interrumpir
por completo el suministro de alimentación eléctrica a la unidad
y debe de encontrarse en un lugar al que el usuario tenga fácil
acceso.
WAARSCHUWING:
HEET OPPERVLAK. NIET AANRAKEN.
Om de voeding van dit product volledig te onderbreken moet de
stekker uit het stopcontact worden getrokken.
De netstekker wordt gebruikt om de stroomtoevoer naar het toestel
volledig te onderbreken en moet voor de gebruiker gemakkelijk
bereikbaar zijn.
PRECAUTION:
FÖRSIKTIHETSMÅTT:
Koppla loss stickproppen från eluttaget för att helt skilja produkten
från nätet.
Stickproppen används för att helt bryta strömförsörjningen till
apparaten, och den måste vara lättillgänglig för användaren.
La surface supérieure du dissipateur de chaleur peut devenir chaude
si vous utilisez ce produit en continu.
Ne touchez pas les zones chaudes, tout particulièrement vers
l’inscription “Hot surface mark” et le panneau supérieur.
Ytan ovanför den interna kylflänsen kan bli varm när produkten
används kontinuerligt.
Rör inte varma områden. Var särskilt försiktig vid märkningen “Hot
surface mark” och på toppanelen.
VORSICHT:
WAARSCHUWING:
Die Oberseite über dem inneren Kühlkörper könnte heiß werden,
wenn dieses Produkt dauerhaft betrieben wird.
Berühren Sie keine heißen Bereiche, hier besonders um die
Kennzeichnung “Hot surface mark” und die Oberseite.
Bij ononderbroken bediening van dit product kan het oppervlak boven
de interne koelplaat heet worden.
Raak het toestel niet aan waar het heet is, vooral niet in de buurt van
het “Hot surface mark” en het bovenpaneel.
HEISSE OBERFLÄCHE. NICHT ANFASSEN.
SURFACE CHAUDE. NE PAS TOUCHER.
VARM YTA. RÖR EJ.
FÖRSIKTIHETSMÅTT:
ATTENZIONE:
SUPERFICIE CALDA. NON TOCCARE.
La superficie superiore al di sopra del dissipatore interno può
riscaldarsi quando si adopera questo prodotto in maniera continuativa.
Non toccare parti calde, in particolare quelle intorno alla dicitura “Hot
surface mark” e al pannello superiore.
I
1.PM-KI PEARL LITE_N_ENG_0617.indd
3
2010/06/21
19:18:26
ENGLISH
DEUTSCH
FRANÇAIS
ITALIANO
ESPAÑOL
NEDERLANDS
SVENSKA
nNOTE ON USE / HINWEISE ZUM GEBRAUCH / OBSERVATIONS RELATIVES A L’UTILISATION / NOTE SULL’USO /
NOTAS SOBRE EL USO / ALVORENS TE GEBRUIKEN / OBSERVERA ANGÅENDE ANVÄNDNINGEN
WARNINGS
WARNHINWEISE
AVERTISSEMENTS
AVVERTENZE
ADVERTENCIAS
WAARSCHUWINGEN
VARNINGAR
•Avoid high temperatures.
Allow for sufficient heat
dispersion when installed in a
rack.
•Handle the power cord carefully.
Hold the plug when unplugging
the cord.
•Keep the unit free from
moisture, water, and dust.
•Unplug the power cord when
not using the unit for long
periods of time.
•Do not obstruct the ventilation
holes.
•Do not let foreign objects into
the unit.
•Do not let insecticides,
benzene, and thinner come in
contact with the unit.
•Never disassemble or modify
the unit in any way.
•Ventilation should not be
impeded by covering the
ventilation openings with
items, such as newspapers,
tablecloths or curtains.
•Naked flame sources such as
lighted candles should not be
placed on the unit.
•Observe and follow local
regulations regarding battery
disposal.
•Do not expose the unit to
dripping or splashing fluids.
•Do not place objects filled with
liquids, such as vases, on the
unit.
•Do not handle the mains cord
with wet hands.
•When the switch is in the OFF
position, the equipment is not
completely switched off from
MAINS.
•The equipment shall be
installed near the power supply
so that the power supply is
easily accessible.
•Vermeiden Sie hohe Temperaturen.
Beachten Sie, dass eine
ausreichende Belüftung
gewährleistet wird, wenn das Gerät
auf ein Regal gestellt wird.
•Gehen Sie vorsichtig mit dem
Netzkabel um.
Halten Sie das Kabel am
Stecker, wenn Sie den Stecker
herausziehen.
•Halten Sie das Gerät von
Feuchtigkeit, Wasser und Staub
fern.
•Wenn das Gerät längere Zeit
nicht verwendet werden soll,
trennen Sie das Netzkabel vom
Netzstecker.
•Decken Sie den Lüftungsbereich
nicht ab.
•Lassen Sie keine fremden
Gegenstände in das Gerät
kommen.
•Lassen Sie das Gerät nicht
mit Insektiziden, Benzin oder
Verdünnungsmitteln in Berührung
kommen.
•Versuchen Sie niemals das Gerät
auseinander zu nehmen oder zu
verändern.
•Die Belüftung sollte auf keinen
Fall durch das Abdecken der
Belüftungsöffnungen durch
Gegenstände wie beispielsweise
Zeitungen, Tischtücher, Vorhänge
o. Ä. behindert werden.
•Auf dem Gerät sollten keinerlei
direkte Feuerquellen wie
beispielsweise angezündete
Kerzen aufgestellt werden.
•Bitte beachten Sie bei der
Entsorgung der Batterien
die örtlich geltenden
Umweltbestimmungen.
•Das Gerät sollte keiner tropfenden
oder spritzenden Flüssigkeit
ausgesetzt werden.
•Auf dem Gerät sollten keine mit
Flüssigkeit gefüllten Behälter wie
beispielsweise Vasen aufgestellt
werden.
•Das Netzkabel nicht mit feuchten
oder nassen Händen anfassen.
•Wenn der Schalter ausgeschaltet
ist (OFF-Position), ist das Gerät
nicht vollständig vom Stromnetz
(MAINS) abgetrennt.
•Das Gerät sollte in der Nähe einer
Netzsteckdose aufgestellt werden,
damit es leicht an das Stromnetz
angeschlossen werden kann.
•Eviter des températures
élevées.
Tenir compte d’une dispersion
de chaleur suffisante lors de
l’installation sur une étagère.
•Manipuler le cordon
d’alimentation avec précaution.
Tenir la prise lors du
débranchement du cordon.
•Protéger l’appareil contre
l’humidité, l’eau et la poussière.
•Débrancher le cordon
d’alimentation lorsque l’appareil
n’est pas utilisé pendant de
longues périodes.
•Ne pas obstruer les trous
d’aération.
•Ne pas laisser des objets
étrangers dans l’appareil.
•Ne pas mettre en contact des
insecticides, du benzène et un
diluant avec l’appareil.
•Ne jamais démonter ou
modifier l’appareil d’une
manière ou d’une autre.
•Ne pas recouvrir les orifi ces
de ventilation avec des objets
tels que des journaux, nappes
ou rideaux. Cela entraverait la
ventilation.
•Ne jamais placer de flamme
nue sur l'appareil, notamment
des bougies allumées.
•Veillez à respecter les lois en
vigueur lorsque vous jetez les
piles usagées.
•L’appareil ne doit pas être
exposé à l’eau ou à l’humidité.
•Ne pas poser d’objet contenant
du liquide, par exemple un
vase, sur l’appareil.
•Ne pas manipuler le cordon
d’alimentation avec les mains
mouillées.
•Lorsque l’interrupteur est sur
la position OFF, l’appareil n’est
pas complètement déconnecté
du SECTEUR (MAINS).
•L’appareil sera installé près de
la source d’alimentation, de
sorte que cette dernière soit
facilement accessible.
•Evitate di esporre l’unità a
temperature elevate.
Assicuratevi che vi sia
un’adeguata dispersione del
calore quando installate l’unità
in un mobile per componenti
audio.
•Manneggiate il cavo di
alimentazione con attenzione.
Tenete ferma la spina quando
scollegate il cavo dalla presa.
•Tenete l’unità lontana
dall’umidità, dall’acqua e dalla
polvere.
•Scollegate il cavo di
alimentazione quando
prevedete di non utilizzare
l’unità per un lungo periodo di
tempo.
•Non coprite i fori di
ventilazione.
•Non inserite corpi estranei
all’interno dell’unità.
•Assicuratevi che l’unità non
entri in contatto con insetticidi,
benzolo o solventi.
•Non smontate né modificate
l’unità in alcun modo.
•Le aperture di ventilazione
non devono essere ostruite
coprendole con oggetti, quali
giornali, tovaglie, tende e così
via.
•Non posizionate sull’unità fi
amme libere, come ad esempio
candele accese.
•Prestate attenzione agli aspetti
legati alla tutela dell’ambiente
nello smaltimento delle
batterie.
•L’apparecchiatura non deve
essere esposta a gocciolii o
spruzzi.
•Non posizionate sull’unità alcun
oggetto contenente liquidi,
come ad esempio i vasi.
•Non toccare il cavo di
alimentazione con le mani
bagnate.
•Quando l’interruttore
è nella posizione OFF,
l’apparecchiatura non è
completamente scollegata da
MAINS.
•L’apparecchio va installato
in prossimità della fonte di
alimentazione, in modo che
quest’ultima sia facilmente
accessibile.
•Evite altas temperaturas.
Permite la suficiente dispersión
del calor cuando está instalado
en la consola.
•Maneje el cordón de energía
con cuidado.
Sostenga el enchufe cuando
desconecte el cordón de
energía.
•Mantenga el equipo libre de
humedad, agua y polvo.
•Desconecte el cordón de
energía cuando no utilice el
equipo por mucho tiempo.
•No obstruya los orificios de
ventilación.
•No deje objetos extraños
dentro del equipo.
•No permita el contacto
de insecticidas, gasolina y
diluyentes con el equipo.
•Nunca desarme o modifique el
equipo de ninguna manera.
•La ventilación no debe quedar
obstruida por haberse cubierto
las aperturas con objetos
como periódicos, manteles o
cortinas.
•No deberán colocarse sobre
el aparato fuentes inflamables
sin protección, como velas
encendidas.
•A la hora de deshacerse de las
pilas, respete la normativa para
el cuidado del medio ambiente.
•No exponer el aparato al goteo
o salpicaduras cuando se
utilice.
•No colocar sobre el aparato
objetos llenos de líquido, como
jarros.
•No maneje el cable de
alimentación con las manos
mojadas.
•Cuando el interruptor está en la
posición OFF, el equipo no está
completamente desconectado
de la alimentación MAINS.
•El equipo se instalará cerca
de la fuente de alimentación
de manera que resulte fácil
acceder a ella.
•Vermijd hoge temperaturen.
Zorg er bij installatie in een
audiorack voor, dat de door het
toestel geproduceerde warmte
goed kan worden afgevoerd.
•Hanteer het netsnoer
voorzichtig.
Houd het snoer bij de stekker
vast wanneer deze moet
worden aan- of losgekoppeld.
•Laat geen vochtigheid,
water of stof in het apparaat
binnendringen.
•Neem altijd het netsnoer uit
het stopkontakt wanneer het
apparaat gedurende een lange
periode niet wordt gebruikt.
•De ventilatieopeningen mogen
niet worden beblokkeerd.
•Laat geen vreemde
voorwerpen in dit apparaat
vallen.
•Voorkom dat insecticiden,
benzeen of verfverdunner met
dit toestel in contact komen.
•Dit toestel mag niet
gedemonteerd of aangepast
worden.
•De ventilatie mag niet
worden belemmerd door
de ventilatieopeningen af
te dekken met bijvoorbeeld
kranten, een tafelkleed of
gordijnen.
•Plaats geen open vlammen,
bijvoorbeeld een brandende
kaars, op het apparaat.
•Houd u steeds aan de
milieuvoorschriften wanneer u
gebruikte batterijen wegdoet.
•Stel het apparaat niet bloot aan
druppels of spatten.
•Plaats geen voorwerpen gevuld
met water, bijvoorbeeld een
vaas, op het apparaat.
•Raak het netsnoer niet met
natte handen aan.
•Als de schakelaar op OFF
staat, is het apparaat niet
volledig losgekoppeld van de
netspanning (MAINS).
•De apparatuur wordt in de
buurt van het stopcontact
geïnstalleerd, zodat dit altijd
gemakkelijk toegankelijk is.
•Undvik höga temperaturer.
Se till att det finns möjlighet
till god värmeavledning vid
montering i ett rack.
•Hantera nätkabeln varsamt.
Håll i kabeln när den kopplas
från el-uttaget.
•Utsätt inte apparaten för fukt,
vatten och damm.
•Koppla loss nätkabeln om
apparaten inte kommer att
användas i lång tid.
•Täpp inte till
ventilationsöppningarna.
•Se till att främmande föremål
inte tränger in i apparaten.
•Se till att inte insektsmedel
på spraybruk, bensen och
thinner kommer i kontakt med
apparatens hölje.
•Ta inte isär apparaten och
försök inte bygga om den.
•Ventilationen bör inte
förhindras genom att täcka
för ventilationsöppningarna
med föremål såsom tidningar,
bordsdukar eller gardiner.
•Placera inte öppen eld, t.ex.
tända ljus, på apparaten.
•Tänk på miljöaspekterna när du
bortskaffar batterier.
•Apparaten får inte utsättas för
vätska.
•Placera inte föremål fyllda
med vätska, t.ex. vaser, på
apparaten.
•Hantera inte nätsladden med
våta händer.
•Även om strömbrytaren står
i det avstängda läget OFF,
så är utrustningen inte helt
bortkopplad från det elektriska
nätet (MAINS).
•Utrustningen ska vara
installerad nära strömuttaget
så att strömförsörjningen är lätt
att tillgå.
II
1.PM-KI PEARL LITE_N_ENG_0617.indd
4
2010/06/21
19:18:27
SVENSKA
• DECLARATION OF CONFORMITY
We declare under our sole responsibility that this product, to which
this declaration relates, is in conformity with the following standards:
EN60065, EN55013, EN55020, EN61000-3-2 and EN61000-3-3.
Following the provisions of Low Voltage Directive 2006/95/EC and
EMC Directive 2004/108/EC, the EC regulation 1275/2008 and its
frame work Directive 2009/125/EC for Energy-related Products (ErP).
• ÜBEREINSTIMMUNGSERKLÄRUNG
Wir erklären unter unserer Verantwortung, daß dieses Produkt, auf das
sich diese Erklärung bezieht, den folgenden Standards entspricht:
EN60065, EN55013, EN55020, EN61000-3-2 und EN61000-3-3.
Following the provisions of low voltage directive 2006/95/EC and
EMC directive 2004/108/EC, the EC regulation 1275/2008 and its
frame work directive 2009/125/EC for energy-related products (ErP).
• DECLARATION DE CONFORMITE
Nous déclarons sous notre seule responsabilité que l’appareil, auquel
se réfère cette déclaration, est conforme aux standards suivants:
EN60065, EN55013, EN55020, EN61000-3-2 et EN61000-3-3.
Selon la directive 2006/95/EC concernant la basse tension et la
directive CEM 2004/108/EC, la réglementation européenne 1275/2008
et la directive 2009/125/EC établissant un cadre de travail applicable
aux produits liés à l'énergie (ErP).
• DICHIARAZIONE DI CONFORMITÀ
Dichiariamo con piena responsabilità che questo prodotto, al quale la
nostra dichiarazione si riferisce, è conforme alle seguenti normative:
EN60065, EN55013, EN55020, EN61000-3-2 e EN61000-3-3.
Facendo seguito alle disposizioni della direttiva sul basso voltaggio
2006/95/EC alla direttiva EMC 2004/108/EC, alla norma EC 1275/2008
e alla relativa legge quadro 2009/125/EC in materia di prodotti
alimentati ad energia (ErP).
QUESTO PRODOTTO E’ CONFORME
AL D.M. 28/08/95 N. 548
• DECLARACIÓN DE CONFORMIDAD
Declaramos bajo nuestra exclusiva responsabilidad que este producto
al que hace referencia esta declaración, está conforme con los
siguientes estándares:
EN60065, EN55013, EN55020, EN61000-3-2 y EN61000-3-3.
De acuerdo con la directiva sobre baja tensión 2006/95/CE y la
directiva sobre CEM 2004/108/CE, la normativa CE 1275/2008 y su
directiva marco 2009/125/EC para productos relacionados con la
energía (ErP).
• EENVORMIGHEIDSVERKLARING
Wij verklaren uitsluitend op onze verantwoordelijkheid dat dit produkt,
waarop deze verklaring betrekking heeft, in overeenstemming is met
de volgende normen:
EN60065, EN55013, EN55020, EN61000-3-2 en EN61000-3-3.
Volgens de voorzieningen van lage spanningsrichtlijn 2006/95/EC
en EMC-richtlijn 2004/108/EC, de EU-richtlijn 1275/2008 en de
kaderrichtlijn 2009/125/EC voor energieverbruikende producten (ErP).
• ÖVERENSSTÄMMELSESINTYG
Härmed intygas helt på eget ansvar att denna produkt, vilken detta
intyg avser, uppfyller följande standarder:
EN60065, EN55013, EN55020, EN61000-3-2 och EN61000-3-3.
Uppfyller reglerna i lågspänningsdirektivet 2006/95/EC och
EMC-direktivet 2004/108/EC, EU-förordningen 1275/2008 och
ramverksdirektivet 2009/125/EC för energirelaterade produkter (ErP).
Marantz Europe
A division of D&M Europe B.V.
Beemdstraat 11, 5653 MA Eindhoven,
The Netherlands
NEDERLANDS
ESPAÑOL
ITALIANO
A NOTE ABOUT RECYCLING:
This product’s packaging materials are recyclable and can be reused. Please
dispose of any materials in accordance with the local recycling regulations.
When discarding the unit, comply with local rules or regulations.
Batteries should never be thrown away or incinerated but disposed of in
accordance with the local regulations concerning battery disposal.
This product and the supplied accessories, excluding the batteries, constitute
the applicable product according to the WEEE directive.
HINWEIS ZUM RECYCLING:
Das Verpackungsmaterial dieses Produktes ist zum Recyceln geeignet und kann
wieder verwendet werden. Bitte entsorgen Sie alle Materialien entsprechend
der örtlichen Recycling-Vorschriften.
Beachten Sie bei der Entsorgung des Gerätes die örtlichen Vorschriften und
Bestimmungen.
Die Batterien dürfen nicht in den Hausmüll geworfen oder verbrannt werden;
bitte entsorgen Sie die Batterien gemäß der örtlichen Vorschriften.
Dieses Produkt und das im Lieferumfang enthaltene Zubehör (mit Ausnahme
der Batterien!) entsprechen der WEEE-Direktive.
FRANÇAIS
DEUTSCH
ENGLISH
n CAUTIONS ON INSTALLATION
VORSICHTSHINWEISE ZUR AUFSTELLUNG
PRÉCAUTIONS D’INSTALLATION
PRECAUZIONI SULL’INSTALLAZIONE
EMPLAZAMIENTO DE LA INSTALACIÓN
VOORZORGSMAATREGELEN BIJ DE
INSTALLATIE
FÖRSIKTIGHET VID INSTALLATIONEN
z
z
z
UNE REMARQUE CONCERNANT LE RECYCLAGE:
Les matériaux d’emballage de ce produit sont recyclables et peuvent être
réutilisés. Veuillez disposer des matériaux conformément aux lois sur le recyclage
en vigueur.
Lorsque vous mettez cet appareil au rebut, respectez les lois ou réglementations en vigueur.
Les piles ne doivent jamais être jetées ou incinérées, mais mises au rebut conformément aux lois
en vigueur sur la mise au rebut des piles.
Ce produit et les accessoires inclus, à l’exception des piles, sont des produits conformes à la
directive DEEE.
NOTA RELATIVA AL RICICLAGGIO:
I materiali di imballaggio di questo prodotto sono riutilizzabili e riciclabili. Smaltire i materiali
conformemente alle normative locali sul riciclaggio.
Per lo smaltimento dell’unità, osservare le normative o le leggi locali in vigore.
Non gettare le batterie, né incenerirle, ma smaltirle conformemente alla normativa locale sui
rifiuti chimici.
Questo prodotto e gli accessori inclusi nell’imballaggio sono applicabili alla direttiva RAEE, ad
eccezione delle batterie.
ACERCA DEL RECICLAJE:
Los materiales de embalaje de este producto son reciclables y se pueden volver a utilizar.
Disponga de estos materiales siguiendo los reglamentos de reciclaje de su localidad.
Cuando se deshaga de la unidad, cumpla con las reglas o reglamentos locales.
Las pilas nunca deberán tirarse ni incinerarse. Deberá disponer de ellas siguiendo los reglamentos
de su localidad relacionados con los desperdicios químicos.
Este producto junto con los accesorios empaquetados es el producto aplicable a la directiva
RAEE excepto pilas.
EEN AANTEKENING MET BETREKKING TOT DE RECYCLING:
Het inpakmateriaal van dit product is recycleerbaar en kan opnieuw gebruikt worden. Er wordt
verzocht om zich van elk afvalmateriaal te ontdoen volgens de plaatselijke voorschriften.
Volg voor het wegdoen van de speler de voorschriften voor de verwijdering van wit- en bruingoed
op.
Batterijen mogen nooit worden weggegooid of verbrand, maar moeten volgens de plaatselijke
voorschriften betreffende chemisch afval worden verwijderd.
Op dit product en de meegeleverde accessoires, m.u.v. de batterijen is de richtlijn voor
afgedankte elektrische en elektronische apparaten (WEEE) van toepassing.
OBSERVERA ANGÅENDE ÅTERVINNING:
Produktens emballage är återvinningsbart och kan återanvändas. Kassera det enligt lokala
återvinningsbestämmelser.
När du kasserar enheten ska du göra det i överensstämmelse med lokala regler och bestämmelser.
Batterier får absolut inte kastas i soporna eller brännas. Kassera dem enligt lokala bestämmelser
för kemiskt avfall.
Denna apparat och de tillbehör som levereras med den uppfyller gällande WEEE-direktiv, med
undantag av batterierna.
z
Wall
Wand
Paroi
Parete
Pared
Muur
Vägg
zzFor proper heat dispersal, do not install this unit in a
confined space, such as a bookcase or similar enclosure.
•More than 0.3 m is recommended.
•Do not place any other equipment on this unit.
zzStellen Sie das Gerät nicht an einem geschlossenen Ort,
wie in einem Bücherregal oder einer ähnlichen Einrichtung
auf, da dies eine ausreichende Belüftung des Geräts
behindern könnte.
•Empfohlen wird über 0,3 m.
•Keine anderen Gegenstände auf das Gerät stellen.
zzPour permettre la dissipation de chaleur requise, n’installez
pas cette unité dans un espace confiné tel qu’une
bibliothèque ou un endroit similaire.
•Une distance de plus de 0,3 m est recommandée.
•Ne placez aucun matériel sur cet appareil.
zzPer una dispersione adeguata del calore, non installare
questa apparecchiatura in uno spazio ristretto, come ad
esempio una libreria o simili.
•Si raccomanda una distanza superiore ai 0,3 m.
•Non posizionare alcun altro oggetto o dispositivo su questo
dispositivo.
zzPara la dispersión del calor adecuadamente, no instale
este equipo en un lugar confinado tal como una librería o
unidad similar.
•Se recomienda dejar más de 0,3 m alrededor.
•No coloque ningún otro equipo sobre la unidad.
zzPlaats dit toestel niet in een kleine afgesloten ruimte, zoals
een boekenkast e.d., omdat anders de warmte niet op
gepaste wijze kan worden afgevoerd.
•Meer dan 0,3 m is aanbevolen.
•Plaats geen andere apparatuur op het toestel.
zzFör att tillförsäkra god värmeavledning får utrustningen
inte installeras i instängda utrymmen, som t.ex. en
bokhylla eller liknande.
•Mer än 0,3 m rekommenderas.
•Placera ingen annan utrustning ovanpå den här enheten.
III
1.PM-KI PEARL LITE_N_ENG_0617.indd
5
2010/06/21
19:18:27
ИНТЕГРИРОВАННЫЙ
УСИЛИТЕЛЬ
Marantz PM-KI-PEARL-LITE/PM7004
(РУКОВОДСТВО ПО ЭКСПЛУАТАЦИИ)
Вы приобрели устройство усилительное/преобразовательное производства компании “D&M Холдингс Инк”, Япония (“D&M Holdings Inc.”, Japan). Модель РMKI-PEARL-LITE/PM7004 является интегрированным усилителем и предназначена для усиления аудиосигналов в домашних аудиосистемах. Это изделие широко
известно в кругах истинных ценителей высококлассного звука. Качество и безопасность подтверждены множеством тестов, проведенных как зарубежными, так и
российскими испытательными лабораториями.
Изготовитель в течение 3 лет (срок службы) после выпуска данного изделия обеспечивает наличие комплектующих в целях возможности проведения ремонта
и технического обслуживания, по истечении которого эксплуатация и техническое обслуживание продолжается в соответствии с действующими нормативными
документами. Изделие остается безопасным для жизни, здоровья человека и окружающей среды в течение всего срока эксплуатации. Гарантийный срок - 1 год.
Информация о Российской сертификации
No сертификата
соответствия
РОСС JP.АЯ46.B13676
См. в конце инструкции
Орган по
сертификации
РОСТЕСТ-МОСКВА
Нормативные документы Наименование сертифицированной продукции
ГОСТ Р МЭК 60065-2005
ГОСТ 22505-97
ГОСТ Р 51515-99
ГОСТ Р 51317.3.2-2006
ГОСТ Р 51317.3.3-2008
Устройства усилительные/ преобразовательные
Срок действия
сертификата
До 16.03.2013
Основные технические характеристики
ВНИМАНИЕ: Если Вы приобрели аудиоаппаратуру надлежащего качества, то, по Российским законам, она не подлежит возврату или обмену на аналогичный товар других
размера, формы и т.д.
D&M Холдингс Инк
Здание D&M, 2-1 Ниссин-тё
Кавасаки-ку, Кавасаки-си, Канагава
2108569, Япония
D&M Holdings Inc.
D&M Building, 2-1 Nisshin-Cho
Kawasaki-Ku, Kawasaki-Shi, Kanagawa
2108569, Japan
IV
1.PM-KI PEARL LITE_N_ENG_0617.indd
6
2010/06/21
19:18:27
ENGLISH
Contents
Accessories·····················································································1
About this manual·········································································1
Main features··················································································2
Feautures of the PM7004 and PM-KI-PEARL-LITE························2
Feautures of the PM-KI-PEARL-LITE·············································2
Cautions on handling·····································································3
About the remote control·····························································3
Inserting the batteries···································································3
Operating range of the remote control ·········································3
Part names and functions·····························································4
Front panel·····················································································4
Rear panel······················································································4
Remote control··············································································5
Before use·······················································································8
Turning the power on····································································8
Turning the power standby····························································8
Turning the power off····································································8
Starting playback···········································································9
Direct playback using a source audio component·························9
Muting sound················································································9
Using headphone set·····································································9
Starting Recording·········································································9
Basic connections··································································6
Connecting P.DIRECT connectors·················································9
Connecting pre out connectors··················································10
Connecting the remote control connectors······························10
w
e
About this manual
nnOperation buttons
The operations described in this manual are based mainly on
remote control operation.
nnSymbols
Advanced operations·························································10
v
Setting Auto standby mode························································10
This symbol indicates a reference page on which
related information is described.
This symbol indicates a supplementary information
and tips for operations.
NOTE
Specifications·········································································12
nnIllustrations
Index···························································································12
Explanation terms Index
Explanation terms· ······························································12
Note that the illustrations in these instructions are for explanation
purposes and may differ from the actual unit.
Specifications
This symbol indicates points to remember operations
or function limitations.
Troubleshooting···································································11
Troubleshooting
Preparations···················································································6
Connecting cables·········································································6
Connecting the audio equipment·················································6
Connecting the speakers·······························································6
Connecting the speakers cables····················································6
Speaker connections·····································································7
Connecting players········································································7
Connecting recorders····································································7
Connecting the power cord··························································8
Advanced connections························································9
qOwner’s manual....................................................................... 1
wPower cord (Cord length: Approx. 1.8 m).................................. 1
eRemote control (RC003PM)..................................................... 1
rR03/AAA batteries.................................................................... 2
Advanced connections Advanced operation
Basic operation· ······································································8
Check that the following parts are supplied with the product.
Basic operation
Getting started········································································1
Accessories
Basic connections
Thank you for purchasing this MARANTZ product. To ensure properoperation, please read this owner’s manual carefully before using the
product.
After reading the manual, be sure to keep it for future reference.
Getting started
Getting started
1
1.PM-KI PEARL LITE_N_ENG_0617.indd
1
2010/06/21
19:18:27
ENGLISH
Main features
Feautures of the PM7004 and PM-KI-PEARL-LITE Feautures of the PM-KI-PEARL-LITE
Tri-tone control
This unit has a 3-tone control function for adjusting the midrange
sound in addition to the bass and treble sounds so that you can
make a more variable sound adjustment according to source and
system.
All-discrete current-feedback amplifier
Marantz’ proprietary current-feedback circuit, using discrete
components, is adopted in the pre amplifier and power amplifier.
It is a high-speed amplifier using the latest technology developed
for the higher-grade amplifiers.
HDAM-SA3 Technology
The V/I converter circuit, which is the key block of the currentfeedback pre-amplifier and power amplifier, is equivalent to the
HDAM-SA3 ampmodule developed for such higher-grade models
as the PM-11S2.
All-Discrete current-feedback phono equalizer
As a phono equalizer amplifier for MM cartridges, a constant
current-feedback PHONO equalizer of quality equal to that of the
higher-grade model PM-11S2 is used.
Double-shielded triodal transformer
The unit is equipped with a toroidal power transformer to minimize
vibration and leakage flux specific to the transformer.
Especially to reduce leakage flux, which affects sound quality, the
periphery is double-shielded, using a core ring and a short ring.
Block condenser of large capacity
A large-capacity condenser of 18,000μF is used in the power circuit
of the power amplifier. In the preamplifier, a 4700μF condenser is
used.
High-performance volume
CD direct buffer amplifier
An input buffer amplifier exclusive for CD is mounted near the
CD input jacks. This is a high-speed buffer amplifier made with
discrete components, which avoids interference between right
and left channels and can send the signals to the pre-amplifier with
very high fidelity.
Improved momentary current supply ability
Capacitor for high quality sound
Double-layered and Copper-finished chassis
High-grade speaker terminals
It is generally known that the sound quality is not necessarily the
same even if amplifiers have the same specifiations.
Marantz considers the cause to be the power to drive speakers.
The power amplifier of this unit has the ability to momentarily
supply current of 25 A or more to drive speakers strongly.
Short-power-line layout
For strong momentary current supply, a short power-line layout
unifies the power circuit and output stage of the power amplifier
section.
This layout allows connecting the large-current lines via the shortest
route while to arranging the left and right channels symmetrically.
2
1.PM-KI PEARL LITE_N_ENG_0617.indd
2
2010/06/21
19:18:28
ENGLISH
Inserting the batteries
qRemove the rear cover of the remote
Operating range of the remote control
operate the remote control while pointing it at the remote sensor.
Basic connections
control.
wSet two R03/AAA batteries in the battery
compartment in the indicated direction.
Basic operation
Approx. 5 m
30°
30°
ePut the rear cover back on.
NOTE
NOTE
The unit may function improperly or the remote control may not
operate if the remote control sensor is exposed to direct sunlight, or
strong artificial light from a fluorescent or infrared light.
Troubleshooting
Specifications
Explanation terms Index
•Replace the batteries with new ones if the unit does not operate
even when the remote control is operated close to the unit.
•The supplied batteries are only for verifying operation.
•Insert the batteries in the proper direction, following the “q” and
“w” marks in the battery compartment.
•To prevent damage or leakage of battery fluid:
•Do not use a new battery with an old one.
•Do not use two different types of batteries.
•Do not attempt to charge dry batteries.
•Do not short-circuit, disassemble, heat or dispose of batteries in
a fire.
•Do not keep the battery in a place exposed to direct sunlight or in
places with extremely high temperatures, such as near a heater.
•If the battery fluid leaks, carefully wipe the fluid off the inside of the
battery compartment and insert new batteries.
•Remove the batteries from the remote control if it will not be used
for a long time.
•Used batteries in accordance with local regulations on battery
disposal.
Advanced connections Advanced operation
•Before turning the power switch on
Check once again that all connections are correct and that there are
no problems with the connection cables.
•Power is supplied to some of the circuitry even when the unit is set
to the standby mode. When leaving home for long periods of time,
be sure to unplug the power cord from the power outlet.
•About condensation
If there is a major difference in temperature between the inside
of the unit and the surroundings, condensation may form on parts
inside the unit, causing the unit to fail to operate properly.
If this happens, let the unit sit for an hour or two with the power off
and wait until there is little difference in temperature before using
the unit.
•Cautions on using mobile phones
Using a mobile phone near this unit may result in noise. If that
occurs, move the mobile phone away from the unit when it is in
use.
•Moving the unit
Turn off the power and unplug the power cord from the power
outlet.
Next, disconnect the cables connected to other system units
before moving the unit.
About the remote control
Getting started
Cautions on handling
3
1.PM-KI PEARL LITE_N_ENG_0617.indd
3
2010/06/21
19:18:29
ENGLISH
Part names and functions
For buttons not explained here, see the page indicated in parentheses ( ).
Rear panel
Front panel
q
w
e
r
nn PM-KI-PEARL-LITE
y
t
q we
Q5
Q4
Q3 Q2
Q1 Q0
o
i
Indicates the status of the unit’s as follows:
•Power “ON” : Off
•When the protection circuit is activated :
Red (blinking)............................................... (6)
•Standby : Red
•Power “OFF” : Off
eINPUT SELECTOR knob································ (9)
rInput indicators············································· (8)
tMUTE indicator (MUTE)································ (9)
yVOLUME control knob······························ (8, 9)
uRemote control sensor··························· (3, 10)
iBALANCE control knob····························· (8, 9)
oSOURCE DIRECT switch/indicator·············· (9)
Q0TREBLE control knob································ (8, 9)
Q1POWER AMP DIRECT switch/indicator······· (9)
t
y
u
y
u
u
Q2 Q1 Q0 o
qPower switch (ON/OFF)································ (8)
wSTANDBY indicator······································· (8)
r
Q2MID control knob······································· (8, 9)
Q3SPEAKERS A/B switch/indicators··············· (9)
Q4BASS control knob···································· (8, 9)
Q5Headphone jack (PHONES)··························· (9)
i
nn PM7004
q we
r
t
NOTE
You can adjust the i BALANCE, Q0 TREBLE,
MID and Q4 BASS control knobs only when
SOURCE DIRECT switch is turned off.
Q2
o
Q2 Q1 Q0 o
i
qPHONO input connectors····························· (7)
wPHONO GND terminal··································· (7)
ePRE OUT connectors··································· (10)
rPOWER AMP DIRECT IN connectors··········· (9)
tSpeaker system terminals
(SPEAKERES SYSTEM A/B)····················· (6, 7)
yREMOTE CONTROL
input/output connectors···························· (10)
uAC inlet (AC IN)·············································· (8)
iRECORDER 2
input/output connectors······························ (7)
oRECORDER 1
input/output connectors······························ (7)
Q0AUX/DVD input connectors························· (7)
Q1TUNER input connectors······························ (7)
Q2CD input connectors····································· (7)
4
1.PM-KI PEARL LITE_N_ENG_0617.indd
4
2010/06/21
19:18:30
ENGLISH
Remote control
w
qPOWER ON/STANDBY buttons················································ (8)
t
r
•MUTE Button
•VOLUME + / – Button
nnOperating Marantz audio components
t
Operation
8 9
2
1
3
0–9
T.MODE
Skip
Stop
Playback
Pause
Track selection
Sound mode selection
Operation
buttons
8 9
2
1
3
MENU
d f 0 1
ENTER
0–9
DISPLAY
Function
Skip
Stop
Playback
Pause
Menu
Cursor operation
Enter setting
Enter number
Display disc
information
nnTuner operation
Operation
buttons
P.SCAN/A.TUNE
d/TUNE+
f/TUNE–
Function
Operation
buttons
Function
8
9
2
1
3
CLEAR
Fast-rewind
Fast-forward
Stop
Playback
Pause
Counter reset
Explanation terms Index
preset scan
Tuning up
Tuning down
Preset channel
0/PRESET–
selection
Preset channel
1/PRESET+
selection
BAND
FM/AM switching
0–9
Enter number
Clear memory
CLEAR
or input data
Save preset
MEMO
station number
Direct frequency
F.DIRECT
tuning
Auto stereo/
T.MODE
monaural switching
•The remote control buttons may
not function properly for some
Marantz tuners.
nnCassette deck operation
Specifications
•The remote control e Input selector buttons are used to select the
input source for this unit and switch the remote control operation
mode at the same time.
•You can operate the remote control of this unit regardless of the
remote control mode setting.
•To use the remote control correctly, also refer to the operating
instructions of other components.
Function
Troubleshooting
1Press the corresponding e Input selector button of the audio
component for selecting the input source to be used in playback
and recording.
•The remote control operation is switched to operation mode of the
selected input source.
•This unit’s function will be switched accordingly.
2Operate the audio component.
•See the table on the right for the buttons you can use.
Operation
buttons
Advanced connections Advanced operation
wSOURCE DIRECT button···························································· (9)
eInput selector buttons······························································· (5)
y rINPUT d/f buttons···································································· (9)
tComponent operating buttons
yVOLUME adjustment buttons··············································· (8, 9)
nnDVD operation
Basic operation
e
•POWER ON button
•POWER OFF button
•SOURCE POWER button
You can press this button to switch the mode of Marantz audio
components (provided with a power standby function) between
power-on and standby.
nnCD operation
Basic connections
You can use the supplied remote control to operate this unit and
Marantz audio components such as CD players, tuners, DVD players,
and tape decks. See “Operating Marantz audio components”(vpage
5).
q
Getting started
Part names and functions
NOTE
Some input terminals of this unit and corresponding input selector
buttons on the remote control have different names, as shown below.
Remote control buttons The unit input terminals
AUX, DVD
AUX/DVD
CD-R
RECORDER1
TAPE, MD
RECORDER2
5
1.PM-KI PEARL LITE_N_ENG_0617.indd
5
2010/06/21
19:18:30
ENGLISH
Basic connections
NOTE
•Do not plug in the power cord until all connections have been
completed.
•When making connections, also refer to the operating instructions
of the other components.
•Be sure to connect the left and right channels properly (left with
left, right with right).
•Do not bundle power cords with connection cables. Doing so can
result in humming or noise.
•Do not turn up the volume without a turntable connected to the
PHONO input terminals. Doing so will cause humming or noise.
Cautions on playing SA(Super Audio) sources:
When regular speakers not compatible with SA sources (DVD Audio discs, Super Audio CDs and other sources, including treble components
above the audible range), set the properties of the player (DVD Audio player, Super Audio CD player, etc.) for use with regular speakers (or
amplifiers).
The speakers may be damaged if the volume is set too high when playing SA sources. For instructions on player settings, refer to the
operating instructions included with the player.
Connecting the speakers
Connecting the speakers cables
Preparations
Connecting cables
Select the cables according to the equipment being connected.
Audio cables
Analog connections (stereo)
(L)
(R)
Connecting the audio equipment
L
L
R
R
Stereo pin-plug cable
Carefully check the left (L) and right (R) channels and + (red) and –
(PM-KI-PEARL-LITE(white)) (PM7004(black)) polarities on the speakers
being connected to the unit, and be sure to connect the channels and
polarities correctly.
off about 10 mm of sheathing
1 Peel
from the tip of the speaker cable,
then either twist the core wire tightly
or apply solder to it.
the speaker terminal
2 Turn
counterclockwise to loosen it.
Speaker connections
Speaker cables
the speaker cable’s core
3 Insert
wire to all the way into the speaker
terminal.
the speaker terminal clockwise
4 Turn
to tighten it.
NOTE
•Connect the speaker cables so they do not stick out of the speaker
terminals. The protection circuit may be activated if the wires touch
the rear panel or if the + and – sides touch each other (“Protection
circuit”).
•Never touch the speaker terminals while the power supply is
connected. Doing so could result in electric shock.
nnProtection circuit
The protection circuit is be activated in the following situations:
•If the speaker cable wire touches the rear panel or screws or if
the speaker cable wire touches the speaker cable’s + and – sides
are touching
•If the surrounding temperature is extremely high
•If the inside of the amplifier gets hot to extended use at a high
output
If the protection circuit is activated, the speaker output is blocked
and the power indicator flashes in red. If this happens, unplug the
power cord, then check the connections of the speaker cables and
input cables. If the unit becomes very hot, wait for it to cool off and
improve the ventilation around it. After doing this, plug the power
cord back in.
If the protection circuit is activated even though there are no
problems with the ventilation around the unit or in connections,
the unit may be damaged. Turn off the power and then contact a
Marantz service center.
6
1.PM-KI PEARL LITE_N_ENG_0617.indd
6
2010/06/21
19:18:30
ENGLISH
Speaker connections
Speakers A
(R)
q
w
Turntable
Speakers B
(L)
q
w
Connect the ground wire from your turntable here.
(R)
q
w
Basic operation
(L)
w
A turntable with an MM type cartridge can be connected to this unit. To use an MC cartridge, please
install a step-up transformer.
•If humming or other noise is generated when the ground wire is connected, disconnect it.
Basic connections
•The same signal is output from the SPEAKERS A and B terminals.
•When only one set of speakers is to be connected, use either the SYSTEM A or B terminals.
Connecting players
Getting started
Connecting the speakers
q
AUDIO
OUT
GND
Tuner
AUDIO
L
R
L
L
R
R
Advanced connections Advanced operation
AUDIO OUT
L
R
DVD player
CD player
AUDIO
AUDIO
AUDIO OUT
AUDIO OUT
nnSpeaker impedance
Use speakers with impedances within the ranges shown below to suit how they are used.
Impedance
4 - 16 Ω
4 - 16 Ω
8 - 16 Ω
L
L
L
L
L
R
R
R
R
R
Connecting recorders
Recorder-2
Recorder-1
AUDIO
AUDIO
L
R
R
L
R
L
L
L
R
R
R
L
L
L
R
R
R
AUDIO OUT
AUDIO OUT
R
L
R
L
R
Explanation terms Index
L
Specifications
AUDIO IN
AUDIO IN
L
Troubleshooting
Speakers used
A
B
A and B
L
R
7
1.PM-KI PEARL LITE_N_ENG_0617.indd
7
2010/06/21
19:18:31
ENGLISH
Connecting the power cord
Wait until all connections have been completed before connecting the
power cord.
To household power
outlet
(AC 230 V, 50/60 Hz)
Power cord
(supplied)
Basic operation
Symbols used to indicate buttons in this manual
Button located on both the main unit and
the remote control
Button only on the main unit
Button only on the remote control
BUTTON
<BUTTON>
[BUTTON]
Before use
1 Turn the VOLUME all the way down.
Set <BASS>, <MID>, <TREBLE> and <BALANCE> to
2 the
center positions.
<INPUT SELECTOR>
<POWER AMP DIRECT>
VOLUME
Input indicators
<SPEAKERS A/B>
SOURCE DIRECT
Turning the power on
Press <ON/OFF>.
•Power is turned on.
•Input indicator for the selected source lights.
•The unit will be ready to start playback after several seconds.
NOTE
•Insert the plugs securely. Loose connections will result in the
generation of noise.
•Do not use any cord other than the provided power cord.
STANDBY
indicator <ON/OFF> <BASS>
<TREBLE> <BALANCE>
PHONES jack <MID>
Turning the power standby
Press [POWER OFF].
•The power is set to the standby mode.
•The STANDBY indicator lights in red.
[POWER OFF]
SOURCE DIRECT
[POWER ON]
•Press [POWER ON] to turn on power from standby mode.
•You can also turn on power by using either <INPUT SELECTOR>
from standby mode.
NOTE
[INPUTd,f]
VOLUME
Power continues to be supplied to some of the circuitry even when the
power is in the standby mode. When leaving home for long periods of
time or when going on vacation, either press <ON/OFF> to turn off the
power, or unplug the power cord from the power outlet.
[MUTE]
Turning the power off
Press <ON/OFF>.
•Power is turned off.
•All indicators will turn off.
8
1.PM-KI PEARL LITE_N_ENG_0617.indd
8
2010/06/21
19:18:32
ENGLISH
1
Use either <INPUT SELECTOR> or [INPUT d,f] to
select an input source you want for playback.
PHONO
TUNER
CD
AUX/DVD
RECORDER-1
RECORDER-2
The indicator for the selected speaker system lights.
3 Start playing back the source.
4 Adjust the VOLUME to the desired level.
nnAdjusting the tone
Adjusts the bass sound.
Adjusts the midrange sound.
Adjusts the treble sound.
Adjusts the left and right output balance.
To switch the POWER AMP DIRECT mode, press and
hold <POWER AMP DIRECT> for at least 3 seconds.
•Switching <POWER AMP DIRECT> “ON”, allows the device
connected to the Power Amp Direct connector on the rear panel to
be played. When ON, the input indicator turns off.
•Switching <POWER AMP DIRECT> “OFF”, allows the program
source selected using the INPUT SELECTOR knob to be played.
When OFF, the input indicator lights up.
Plug headphones into PHONES jack.
•To listen with headphones, turn speaker output OFF.
nnAdjusting the volume
Adjust the VOLUME to the desired level.
NOTE
To prevent hearing loss, do not raise the volume level excessively
when using headphones.
For details on operations of the preamplifier, refer to the instruction
manual supplied with the preamplifier to be used.
Pre-amplifier
Speaker
(L)
Speaker
(R)
(L)
(R)
Starting Recording
Use either <INPUT SELECTOR> or [INPUT
] to
1 select
the input source you want to record.
2 Set the recorder to recording mode.
3 Start playback of the source you want to record.
d,f
R
R
L
To PRE OUT
connectors
w
q w
q
L
•Recording will start in sync with the playback operation of the
source.
Specifications
Direct playback using a source audio
component
If you use a preamplifier, connect it as shown below, and then you
can use this unit as a power amplifier.
Press SOURCE DIRECT.
The SOURCE DIRECT indicator lights.
NOTE
•When the POWER AMP DIRECT is “ON”, adjustment of the
volume, balance and tone on the main unit has no effect. Adjust the
volume on the input device.
•When the POWER AMP DIRECT is “ON”, the main unit outputs
at maximum volume. Check the output level on the input device
before playing it and adjust the volume accordingly.
Explanation terms Index
Since the audio signals bypass the tone control circuits (BASS/MID/
TREBLE/BALANCE), the music reproduction is more faithful to the
original sound.
To adjust the tone, turn off SOURCE DIRECT.
Troubleshooting
• <BASS>
• <MID>
• <TREBLE>
• <BALANCE>
Using headphone set
Connecting P.DIRECT connectors
Advanced connections Advanced operation
2 to be used for playback.
Press <SPEAKERS A/B> to select the speaker system
The MUTE indicator lights.
•To cancel the mute operation, press the button again.
You can also cancel the mute operation by operating VOLUME of
the remote control.
Basic operation
•You can also select an input source by pressing the Input selector
buttons of the remote control.
•The input source you select is stored in memory even after you turn
off power, and the same source is selected when power is turned
on again.
Press [MUTE].
Advanced connections
Basic connections
The input indicator for the selected source lights.
GSelectable sourcesH
This function mutes the sound by stopping audio output.
Getting started
Muting sound
Starting playback
9
1.PM-KI PEARL LITE_N_ENG_0617.indd
9
2010/06/21
19:18:32
ENGLISH
Connecting pre out connectors
If you use a power amplifier, connect it as shown below, and then
you can use this unit as a preamplifier.
For connecting speaker systems, refer to the instruction manual
supplied with the power amplifier to be used.
Power-amplifier
Connecting the remote control connectors
When you use this unit connected to Marantz audio components, it
sends control signals to operate each component.
nnConnection
Use the remote connection cable (supplied with a Marantz
audio component you want to connect) to connect the REMOTE
CONTROL OUT terminal of this unit to the REMOTE CONTROL IN
terminal of the component to be connected.
Advanced operations
Setting Auto standby mode
With the Auto standby mode ON, this unit will automatically enter
the Auto standby mode after about 30 continuous minutes of no
output from the speakers or headphones.
SOURCE DIRECT
nnSetting
L
R
To input
connectors
L
R
Set the remote control switch located on the rear panel of the
connected audio component to “EXTERNAL” or “EXT.” to use
this feature.
•This setting will disable remote sensor reception of the connected
audio component.
•To operate the connected audio component, point the remote
control at the remote sensor of this unit.
Press and hold <SOURCE DIRECT> for at least 5 seconds.
•Auto standby mode is switched between On and Off.
Auto standby mode “Off”
Power indicator
Flashes once
Auto standby mode “On”
Power indicator
Flashes three times
NOTE
Perform the operation using the buttons on the unit. You cannot
perform the operation using [SOURCE DIRECT] on the remote control.
NOTE
•NEVER insert the short-circuiting pin plug into the PRE OUT
terminals. Doing so could result in damage.
•Signals are output from the PRE OUT terminals even when using
headphones.
INPUT
IN
•The default setting for the Auto standby mode is OFF.
•This unit will automatically enter Auto standby mode after about
continuous 30 minutes in the following conditions.
•No output from the selected input source.
•No operation performed on the remote control.
•No operation of <SPEAKERS A/B>, <POWER AMP DIRECT>,
<SOURCE DIRECT> or <INPUT SELECTOR>.
OUTPUT
OUT
REMOTE CONTROL
CD player
RC OUT
Option unit
(such as remote control receiver unit)
10
1.PM-KI PEARL LITE_N_ENG_0617.indd
10
2010/06/21
19:18:33
ENGLISH
Getting started
Troubleshooting
Symptom
Countermeasure
Page
•Make sure that the power cord is plugged in properly.
•Either turn the INPUT SELECTOR knob of this unit or press POWER ON of the remote
control.
•If the STANDBY indicator is blinking, turn off power, wait 1 minute or longer, and turn on
power again.
8
8
7
7
9
9
9
•The mute function activated.
•Make sure the speakers are connected properly.
•Make sure the input cables are connected properly.
•Set the INPUT SELECTOR knob at the correct setting position.
•Use the VOLUME control knob to turn volume up to an appropriate level.
•Turn on the SPEAKERS A/B switch corresponding to the speaker system terminals (SYSTEM
A or SYSTEM B) to which the speakers are connected.
•Turn on the SPEAKERS A/B switch corresponding to the speaker system terminals (SYSTEM
A or SYSTEM B) to which the speakers are connected.
•If the MUTE indicator is lit, press MUTE on the remote control to cancel muting.
•The protection circuit is activated.
•Turn off power, wait 1 minute or longer, and turn on power again.
6
•The power cord’s plug is not plugged in firmly.
•The unit is in standby mode.
•The protection circuit is activated.
•The incorrect SPEAKERS A/B switch is turned on.
The volume drops automatically.
6
9
9
•Make sure that the speakers are connected correctly.
7
Noise is produced during a record •The ground wire from the turntable is disconnected.
•The PHONO input terminals are not properly connected.
playback.
•A TV set near the turntable is causing the noise.
•Make sure that the PHONO GND terminal is connected properly.
•Make sure that the PHONO input terminal is connected properly.
•Relocate the TV set or turntable in another place.
7
7
–
An audio feedback occurs when you •The turntable and speakers are too close to each other.
turn up the volume during a record •The turntable is placed on a rack or floor that vibrates easily.
playback.
•Install the speakers as far away from the turntable as possible.
•If the turntable is not supplied with an insulating pad, use insulating pad available in the
market.
–
–
The unit does not function when a •Batteries are low.
•You are operating the remote control outside of the specified
remote control button is pressed.
range.
•There is an obstacle between the main unit and remote
control.
•You have pressed the wrong button.
•Batteries are not inserted in the proper direction as indicated
by polarity markers (q and w) in the battery compartment.
•Replace with new batteries.
•Operate within the specified range.
3
3
•Remote the obstacle.
3
•Press the correct button.
•Insert the batteries in the proper direction in accordance with the polarity markers in the
battery compartment.
5
3
Explanation terms Index
The left and right channels are
reversed.
Specifications
7
9
Troubleshooting
Sound is produced from either one •The speaker cables are not properly connected.
•Make sure that the speakers are connected properly.
•The BALANCE control knob setting position is inappropriate. •Set the BALANCE control knob at the appropriate position.
speaker only.
•Either the left/right speaker or left/right input cable
connections are reversed.
Advanced connections Advanced operation
When power is turned on but there is •The speaker cables are not properly connected.
no sound.
•The input cable is not properly connected.
•The INPUT SELECTOR knob setting position is incorrect.
•The VOLUME control knob is set to minimum.
•The SPEAKERS A/B switches are turned off.
Basic operation
Power is not turned on.
Cause
Basic connections
If a problem occurs, first check the following:
1.Are the connections correct?
2.Is the unit being operated as described in the owner’s manual?
3.Are the other components operating properly?
If this unit does not operate properly, check the items listed in the table below. If the problem persist there may be a malfunction.
In that case, disconnect the power immediately and contact your retail outlet.
11
1.PM-KI PEARL LITE_N_ENG_0617.indd
11
2010/06/21
19:18:33
ENGLISH
Specifications
•Power output
(20 Hz – 20 kHz simultaneous drive of both channels):
•Total harmonic distortion
(20Hz – 20kHz simultaneous drive of both channels, 8Ω load):
•Output band width
(8Ω load, 0.05%):
•Frequency response
(CD, 1W, 8Ω load):
•Dumping factor
(8Ω load, 20Hz – 20kHz):
•Input sensitivity/Input impedance
PHONO (MM):
CD, TUNER, AUX/DVD, RECORDER:
MAIN IN
•Output voltage/Output impedance
PRE OUT
•Maximum allowable PHONO input level (1kHz)
MM •RIAA deviation (20Hz ~ 20kHz)
•S/N (IHF-A, 8Ω load)
PHONO (MM)
(PM-KI-PEARL-LITE)
(PM7004)
CD, TUNER, AUX/DVD, RECORDER
(PM-KI-PEARL-LITE)
(PM7004) POWER AMP DIRECT IN .
•Tone control
Bass (50Hz)
Mid (900Hz)
Treble (15kHz)
•Power requirement
•Power consumption
(EN60065) Standby power consumption
•Weight
PM-KI-PEARL-LITE
PM7004
Explanation terms
70 W x 2 (8 Ω load)
100 W x 2 (4 Ω load)
0.02%
5Hz – 60kHz
5Hz – 100kHz ±3dB
100
2mV/47kΩ
200mV/20kΩ
1.6V/15kΩ
1.6V/600Ω
100mV
±0.5dB
87dB (5mV input, 1W output)
85dB (5mV input, 1W output)
106dB (2V input, Rated output)
104dB (2V input, Rated output)
125dB (Rated output)
P
Protection Circuit
This is a function to prevent damage to components
within the power supply when an abnormality such
as an overload or excess voltage occurs for any
reason.
In this unit, the STANDBY indicator blinks and the
unit enters standby mode when an abnormality
occurs.
S
Speaker impedance
This is certain-rated resistance of the speaker set
to an alternating current and expressed in ohms.
The smaller the impedance, the greater the output.
However, load on the amplifier is increased. Use
speakers whose impedance is supported by this
unit.
Index
vvA
Adjusting the tone················································· 9
Adjusting the volume············································ 9
Auto standby mode············································· 10
vvB
BALANCE·························································· 4, 8
BASS································································· 4, 8
Batteries································································ 3
Before use····························································· 8
vvC
Connection
Connecting cables·············································· 6
Connecting players············································· 7
Connecting recorders········································· 7
Connecting the speakers································ 6, 7
vvI
INPUT SELECTOR············································· 4, 8
vvM
MID··································································· 4, 8
Mute·································································· 4, 8
vvP
±10dB
±6dB
±10dB
AC 230V 50/60Hz
POWER AMP DIRECT······································ 4, 9
Power cord···························································· 8
PRE OUT························································· 4, 10
Protection circuit············································· 6, 12
200W
0.3W
Remote control··········································· 3, 5, 10
11.2kg
10.5kg
For the purpose of improvement, the specifi cations and design are subject to change without notice.
vvR
vvS
SOURCE DIRECT·············································· 4, 8
Speaker cables·················································· 6, 7
Stereo pin-plug cable············································· 6
vvT
TREBLE····························································· 4, 8
vvV
VOLUME··························································· 4, 8
12
1.PM-KI PEARL LITE_N_ENG_0617.indd
12
2010/06/21
19:18:33
•PM7004 (unit: mm)
23
365
328.5
127
110.5
17.5
379
16.5
16.5
8.PM-KI PEARL LITE_N_Backpage.indd
128
440
111.5
440
17.5
328.5
33
19
•PM-KI-PEARL-LITE (unit: mm)
2010/06/21
19:32:01
D&M Holdings Inc.
Printed in China 5411 10491 035M
8.PM-KI PEARL LITE_N_Backpage.indd
24
2010/06/21
19:32:01