1
Contents
Connections
Playback
Settings
Tips
Appendix
Integrated Amplifier
PM8005
You can print more than one page of a PDF onto a single sheet of paper.
Front panel
Rear panel
Remote
Index
Owner’s Manual
Contents
Connections
Playback
Settings
Tips
Appendix
Contents
Connecting a playback device···················································· 19
Connecting a recording device··················································· 20
Connecting amplifiers··································································· 21
Connecting devices with remote control connectors········· 22
Accessories························································································· 4
Inserting the batteries······································································· 5
Operating range of the remote control unit······································ 5
Features······························································································· 6
High quality sound············································································· 6
High performance············································································· 7
Easy operation··················································································· 7
Performing operations by RC on this unit
without visual contact····································································· 22
Remotely connecting Marantz devices··········································· 22
Connecting the power cord························································· 23
Part names and functions
Playback
Front panel························································································· 8
Rear panel························································································· 10
Remote control unit······································································· 12
Turning the power on······································································ 25
Selecting the speakers for audio output········································· 26
Selecting the input source······························································ 26
Adjusting the volume······································································ 26
Turning off the sound temporarily··················································· 26
Adjusting the tone··········································································· 26
Playing CDs····················································································· 27
Recording························································································ 28
Amplifier operations········································································ 12
CD player operations······································································· 13
Network audio player operations···················································· 14
Connections
Speaker connection······································································· 16
Connecting the speakers cables····················································· 16
Speaker A/B connection·································································· 17
Bi-wiring connection········································································ 18
Front panel
Rear panel
Remote
2
Index
Contents
Connections
Playback
Settings
Settings
Setting the Auto Standby mode················································ 30
Turning Auto Standby mode on······················································ 30
Turning Auto Standby mode off······················································ 30
Setting the power amp direct mode········································ 31
Turning power amp direct mode on················································ 31
Turning power amp direct mode off················································ 31
Tips
Contents···························································································· 32
Tips·································································································· 33
Troubleshooting·············································································· 34
Appendix
Explanation terms············································································· 39
Trademark information····································································· 39
Specifications···················································································· 40
Index··································································································· 42
Front panel
Rear panel
Remote
3
Index
Tips
Appendix
Contents
Connections
Playback
Settings
Appendix
Tips
Thank you for purchasing this Marantz product. To ensure proper operation, please read this owner’s manual carefully before using the product.
After reading this manual, be sure to keep it for future reference.
Accessories
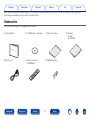
Check that the following parts are supplied with the product.
qGetting Started
wCD-ROM (Owner’s Manual)
eSafety Instructions
tPower cord
yRemote control unit
uR03/AAA batteries
Front panel
(RC002PMSA)
Rear panel
Remote
4
Index
rWarranty
(for USA)
(for CANADA)
Contents
Connections
Playback
Settings
Inserting the batteries
Appendix
Tips
Operating range of the remote control unit
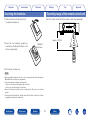
Point the remote control unit at the remote sensor when operating it.
q Remove the rear lid in the direction of
the arrow and remove it.
Approx. 23 ft/7 m
wLoad the two batteries properly as
indicated by the q and w marks in the
battery compartment.
R03/AAA
batteries
30°
e Put the rear cover back on.
NOTE
•When inserting the batteries, be sure to do so in the proper direction, following the
q and w marks in the battery compartment.
•To prevent damage or leakage of battery fluid:
•Do not use a new battery together with an old one.
•Do not use two different types of batteries.
•Remove the batteries from the remote control unit if it will not be in use for long
periods.
•If the battery fluid should leak, carefully wipe the fluid off the inside of the battery
compartment and insert new batteries.
Front panel
Rear panel
Remote
5
Index
30°
Contents
Connections
Playback
Settings
Tips
Appendix
Features
•Short-power-line layout
For strong momentary current supply, a short power-line layout unifies
the power circuit and output stage of the power amplifier section.
This layout allows connecting the large-current lines via the shortest
route while to arranging the left and right channels symmetrically.
High quality sound
•All-discrete current-feedback amplifier
Marantz proprietary current-feedback circuit, using discrete components,
is adopted in the pre-amplifier and power amplifier. It is a high-speed
amplifier using the latest technology developed for the higher-grade
amplifiers.
•CD direct buffer amplifier
An input buffer amplifier exclusive for CD is mounted near the CD
input jacks. This is a high-speed buffer amplifier made with discrete
components, which avoids interference between right and left channels
and can send the signals to the pre-amplifier with very high fidelity.
•HDAM®SA3 Module
This unit includes the HDAM®SA3 which had been developed for highend models. The HDAM®SA3 is incorporated into many components,
such as the current feedback phono equalizer.
•All-Discrete current-feedback phono equalizer
As a phono equalizer amplifier for MM cartridges, a constant currentfeedback PHONO equalizer of quality equal to that of the higher-grade
model is used.
•Improved momentary current supply ability
It is generally known that the sound quality is not necessarily the same
even if amplifiers have the same specifiations. Marantz considers the
cause to be the power to drive speakers. The power amplifier of this unit
has the ability to momentarily supply current of 45 A or more to drive
speakers strongly.
Front panel
Rear panel
Remote
6
Index
Contents
Connections
Playback
Settings
•Double-shielded triodal transformer
The unit is equipped with a toroidal power transformer to minimize
vibration and leakage flux specific to the transformer. Especially to
reduce leakage flux, which affects sound quality, the periphery is doubleshielded, using a core ring and a short ring.
•Tri-tone control
This unit is equipped with a tone control function that enables adjustment
of the strength of the mid range as well as the low and high ranges
(vpage 26).
•Power Amplifier Direct In Mode
In this mode, this unit works as a power amplifier. This mode will be
useful in home theater systems.
•Two-sets of speaker output terminals
In addition to using two sets of speakers (Speakers A and Speakers B),
you can connect to bi-wiring speakers with separate input terminals
for high range and low range (vpage 18). The unit adopts screw
terminals that can connect thick audio cables.
Rear panel
Remote
Appendix
High performance
•Block condenser of large capacity
The unit is equipped with a newly developed 18000 μF large capacity
condenser that incorporates the concepts of high-end devices into the
power amplifier power circuit.
Front panel
Tips
Easy operation
•Remote control compatible with CD players and network audio
players
The remote control provided with this unit can control Marantz CD
players and network audio players in addition to this unit (vpage 13).
7
Index
Contents
Connections
Playback
Settings
Appendix
Tips
Part names and functions
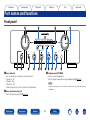
Front panel
Q4
Q5
q
w
e
r
qPower indicator
This is lit as follows according to the power status :
•Power on : Off
•Standby : Red
•Power off : Off
•When the protection circuit is activated : Red (blinking)
t y
Q3
Q1
u i o Q0
eHeadphone jack (PHONES)
Used to connect headphones.
Turn off speaker output when using headphones (vpage 26).
NOTE
•To prevent hearing loss, do not raise the volume level excessively when using
headphones.
wPower operation button (X)
This turns the power on/off (vpage 25).
Front panel
Rear panel
Remote
Q2
8
Index
Contents
Connections
Q5
Q4
Playback
Q3
Settings
Tips
Appendix
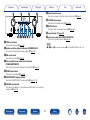
Q1Remote control sensor
Q2
This receives signals from the remote control unit (vpage 5).
Q2VOLUME control knob
This adjusts the volume level (vpage 26).
Q3MUTE indicator
This lights while the sound is muted (vpage 26).
Q4Input indicator (vpage 26)
Q5Input source select knob (INPUT SELECTOR)
r t y u i o Q0 Q1
This selects the input source (vpage 26).
rBASS control knob
NOTE
This adjusts the bass (vpage 26).
•r, y, i and Q0 can be adjusted when o is off (SOURCE DIRECT mode is off).
tSpeaker switching buttons/indicators (SPEAKERS A/B)
These select the speaker for audio output (vpage 26).
yMID control knob
This adjusts the mid (vpage 26).
uPower amplifier direct mode button/indicator
(POWER AMP DIRECT)
This switches the power amp direct mode on/off (vpage 31).
iTREBLE control knob
This adjusts the treble (vpage 26).
oSOURCE DIRECT button/indicator
This turns SOURCE DIRECT mode on/off (vpage 27, 30).
Q0BALANCE control knob
This adjusts the balance of the volume output from the left and right
speakers (vpage 26).
Front panel
Rear panel
Remote
9
Index
Contents
Connections
Playback
Settings
Tips
Appendix
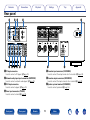
Rear panel
Q3
Q2 Q1
Q0
q w e r t
qCD input connectors
o
y
u
i
tRecorder input connectors (RECORDER)
Used to connect a CD player (vpage 19).
Used to connect the output connector of a recorder (vpage 20).
wNetwork audio player input connectors (NETWORK)
yRecorder output connectors (RECORDER)
eAUX input connectors
uSpeaker system terminals (SPEAKERS)
Used to connect a network audio player (vpage 19).
Used to connect the input connector of a recorder (vpage 20).
Used to connect a player (vpage 19).
Used to connect speakers (vpage 16).
rTuner input connectors (TUNER)
Used to connect a tuner (vpage 19).
Front panel
Rear panel
Remote
10
Index
Contents
Connections
Playback
Settings
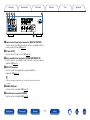
o
Q3 Q2 Q1 Q0
i
iRemote control input/output connectors (REMOTE CONTROL)
Used to connect to a Marantz audio device that is compatible with the
remote control function (vpage 22).
oAC inlet (AC IN)
Used to connect the power cord (vpage 23).
Q0Power amplifier direct connectors (POWER AMP DIRECT IN)
Used to connect a pre-amplifier when this unit is used as a power
amplifier (vpage 21).
Q1PRE OUT connectors
Use this to add such equipment as a power amplifier or
subwoofer (vpage 21).
%
•When connecting a subwoofer, also consult the subwoofer instruction
manual.
Q2SIGNAL GND jacks
Used to connect a turntable (vpage 19).
Q3Turntable input connectors (PHONO)
Used to connect a turntable (vpage 19).
Front panel
Rear panel
Remote
11
Index
Tips
Appendix
Contents
Connections
Playback
Settings
Tips
Appendix
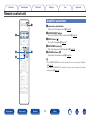
Remote control unit
Amplifier operations
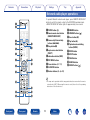
r
qInput source select buttons
These select the input source (vpage 26).
wSOURCE DIRECT button
q
This turns SOURCE DIRECT mode on/off (vpage 27).
eMUTE button (
)
This mutes the audio (vpage 26).
rAMP POWER button (X)
This turns the power on/off (standby) (vpage 25).
w
t
tVOLUME buttons (df)
These adjust the volume level (vpage 26).
e
%
•Press REMOTE MODE CD to switch the remote control to operate the CD player
(vpage 13).
•Press REMOTE MODE NET to switch the remote control to operate the network
audio player (vpage 14).
Front panel
Rear panel
Remote
12
Index
Contents
Connections
Playback
Settings
Tips
Appendix
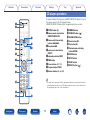
CD player operations
To operate Marantz CD player, press REMOTE MODE CD button to switch
the remote control to the CD operation mode.
•REMOTE MODE CD button lights for approximately two seconds.
q
w
qPOWER button (X)
wRemote mode select button
(REMOTE MODE CD)
Q3
e
r
eReverse-skip/Forward-skip
buttons (8, 9)
Q4
Q5
t
rStop button (2)
tInput source select button
(INPUT)
y
u
o
Q8
Q9
•The amp can be operated with the amp operation buttons even when the remote
control operation mode is set to CD. When using this remote control, also refer to
the operating instructions of the other devices.
%
Q0
Q1
Q2
Front panel
W0
Rear panel
button (MODE)
Q7ENTER button
Q8SETUP button
Q9CLEAR button
W0REPEAT button (
yInformation button (INFO)
uTIME button
iCursor buttons (uio p)
oProgram button (PROG)
Q0Number buttons (0 – 9, +10)
Q6
Q7
i
Q1DIMMER button
Q2RANDOM button ( )
Q3SOUND MODE button
Q4Pause button (3)
Q5Play button (1)
Q6Playback mode switching
Remote
13
Index
)
Contents
Connections
Playback
Settings
Tips
Appendix
Network audio player operations
To operate Marantz network audio player, press REMOTE MODE NET
button to switch the remote control to the NETWORK operation mode.
•REMOTE MODE NET button lights for approximately two seconds.
q
w
qPOWER button (X)
wRemote mode select button
(REMOTE MODE NET)
eReverse-skip/Forward-skip
e
r
buttons (8, 9)
Q3
Q4
t
rStop button (2)
tInput source select button
(INPUT)
y
yInformation button (INFO)
uTOP MENU button
iCursor buttons (uio p)
oFAVORITES button
Q0Number buttons (0 – 9, +10)
Q5
Q6
u
i
o
Q7
%
Q8
Front panel
Q9
W0
Rear panel
button (MODE)
Q6ENTER button
Q7SETUP button
Q8CLEAR button
Q9SEARCH button
W0REPEAT button (
)
•The amp can be operated with the amp operation buttons even when the remote
control mode is NET. When using this remote control, also refer to the operating
instructions of the other devices.
Q0
Q1
Q2
Q1DIMMER button
Q2RANDOM button ( )
Q3Pause button (3)
Q4Play button (1)
Q5Playback mode switching
Remote
14
Index
Contents
Connections
Playback
Settings
Tips
Appendix
Connections
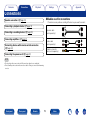
22Cables used for connections
Speaker connection (vpage 16)
Provide necessary cables according to the devices you want to connect.
Connecting a playback device (vpage 19)
Speaker cable
(sold separately)
Connecting a recording device (vpage 20)
Connecting amplifiers (vpage 21)
Audio cable
(sold separately)
Connecting devices with remote control connectors
(vpage 22)
Remote connector
cable (sold separately)
Connecting the power cord (vpage 23)
NOTE
•Do not plug in the power cord until all connections have been completed.
•Do not bundle power cords with connection cables. Doing so can result in humming
or noise.
Front panel
Rear panel
Remote
15
Index
L
L
R
R
Contents
Connections
Playback
Settings
Tips
Appendix
Speaker connection
NOTE
Connecting the speakers cables
•Disconnect this unit’s power plug from the power outlet before connecting the
speakers.
•Connect so that the speaker cable core wires do not protrude from the speaker
terminal. The protection circuit may be activated if the core wires touch the rear
panel or if the + and – sides touch each other (vpage 39 “Protection circuit”).
•Never touch the speaker terminals while the power cord is connected.
•Use speakers with impedances within the ranges shown below to suit how they
are used.
Speakers used
Impedance
SPEAKERS A
4 – 16 Ω/ohms
(Standard connection)
SPEAKERS B
4 – 16 Ω/ohms
SPEAKERS A and SPEAKERS B
8 – 16 Ω/ohms
SPEAKERS A and SPEAKERS B
4 – 16 Ω/ohms
(for bi-wiring connections)
Spade lug connector
Front panel
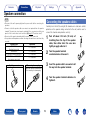
Carefully check the left (L) and right (R) channels and + (red) and – (white)
polarities on the speakers being connected to the unit, and be sure to
connect the channels and polarities correctly.
When using a banana plug
Tighten the speaker terminal firmly
before inserting the banana plug.
Rear panel
Remote
16
1
Peel off about 3/8 inch (10 mm) of
sheathing from the tip of the speaker
cable, then either twist the core wire
tightly or apply solder to it.
2
Turn the speaker terminal
counterclockwise to loosen it.
3
Insert the speaker cable’s core wire to all
the way into the speaker terminal.
4
Turn the speaker terminal clockwise to
tighten it.
Index
Contents
Connections
Playback
Settings
Appendix
Tips
Speaker A/B connection
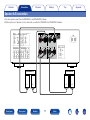
•The same signal is output from the SPEAKERS A and SPEAKERS B terminals.
•When only one set of speakers is to be connected, use either the SPEAKERS A or SPEAKERS B terminals.
SPEAKERS A
(L)
w
Front panel
Rear panel
SPEAKERS B
(R)
q
w
(L)
q
Remote
w
17
Index
(R)
q
w
q
Contents
Connections
Playback
Settings
Appendix
Tips
Bi-wiring connection
•When bi-wiring with bi-wireable speakers, connect the mid and high range terminals to SPEAKERS A (or SPEAKERS B), the low range terminals to
SPEAKERS B (or SPEAKERS A).
•This connection limits the effect of signal interference between the high range speakers and low range speakers, allowing you to enjoy high quality
playback.
Speaker (R)
Speaker (L)
HIGH
HIGH
w q
w q
LOW
LOW
w q
Remove
shorting bar
Front panel
Rear panel
w q
Remove
shorting bar
Remote
Remove
shorting bar
18
Index
Remove
shorting bar
Contents
Connections
Playback
Settings
Tips
Appendix
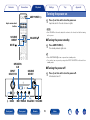
Connecting a playback device
You can connect Blu-ray disc players, turntables, CD players, network audio players and tuners to this unit.
This unit is compatible with turntables equipped with a moving magnet (MM) phono cartridge. When you connect to a turntable with a low output moving
coil (MC) cartridge, use a commercially available MC head amp or a step-up transformer.
If you set this unit’s input source to “PHONO” and you accidentally increase the volume without having a turntable connected, you may hear a hum noise
from the speakers.
Blu-ray disc
player
AUDIO
OUT
R
L
AUDIO
OUT
R
L
AUDIO
OUT
R
L
R
L
R
L
R
L
R
L
R
L
R
L
L
AUDIO
OUT
R
Tuner
Turntable
AUDIO
OUT
R
L
R
CD player
Network
audio
player
GND
L
L
R
NOTE
•The ground line (SIGNAL GND) on this unit is not a safety
ground. Connect it to reduce noise when noise is excessive.
Note that depending on the turntable, connecting the ground line
may have the reverse effect of increasing noise. In this case, it is
not necessary to connect the ground line.
Front panel
Rear panel
Remote
19
Index
Contents
Connections
Playback
Settings
Tips
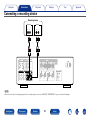
Connecting a recording device
Recording device
AUDIO OUT
R
L
AUDIO IN
R
L
R
L
R
L
R
L
R
L
NOTE
•Never insert the short-circuiting pin plug into the recording output connectors (AUDIO OUT RECORDER). Doing so could result in damage.
Front panel
Rear panel
Remote
20
Index
Appendix
Contents
Connections
Playback
Settings
Connecting amplifiers
Power
amplifier
Preamplifier
AUDIO
IN
R
L
AUDIO
OUT
R
L
R
L
R
L
R
L
R
L
NOTE
•Never insert the short-circuiting pin plug into the PRE OUT terminals. Doing so could result in damage.
Front panel
Rear panel
Remote
21
Index
Tips
Appendix
Contents
Connections
Playback
Settings
Tips
Appendix
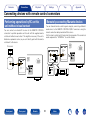
Connecting devices with remote control connectors
Performing operations by RC on this
unit without visual contact
Remotely connecting Marantz devices
You can transmit remote control signals simply by connecting a Marantz
audio device to the REMOTE CONTROL IN/OUT connectors using the
remote connection cable provided with the device.
Set the remote control switch located on the rear panel of the connected
audio component to “EXTERNAL” to use this feature.
You can connect an external IR receiver to the REMOTE CONTROL
connectors to perform operations on this unit with the supplied remote
control unit without visual contact. This might be necessary if the unit is
hidden in a cupboard or corner, so you can’t directly point with the remote
control unit to the device.
IR receiver
RC OUT
Front panel
Rear panel
Remote
22
Index
Contents
Connections
Playback
Settings
Tips
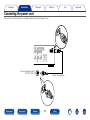
Connecting the power cord
Wait until all connections have been completed before connecting the power cord.
To household power outlet
(AC 120 V, 60 Hz)
Front panel
Rear panel
Remote
Power cord (supplied)
23
Index
Appendix
Contents
Connections
Playback
Settings
Tips
Appendix
Playback
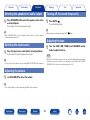
Turning the power on (vpage 25)
Turning off the sound temporarily (vpage 26)
Selecting the speakers for audio output (vpage 26)
Adjusting the tone (vpage 26)
Selecting the input source (vpage 26)
Playing CDs (vpage 27)
Adjusting the volume (vpage 26)
Recording (vpage 28)
Front panel
Rear panel
Remote
24
Index
Contents
Connections
Playback
Settings
Tips
Appendix
Turning the power on
AMP POWER X
1
Input source select
buttons
Press X on this unit to turn the power on.
Input indicator for the selected source lights.
NOTE
SOURCE
DIRECT
•Turn VOLUME on this unit to adjust the volume to the lowest level before turning
on the power.
VOLUME df
22Turning the power standby
MUTE
1
Press AMP POWER X.
The standby indicator lights red.
%
•Press AMP POWER X to turn on power from standby mode.
•You can also turn on power by using either INPUT SELECTOR on this unit from
standby mode.
SPEAKERS
A/B
X
BASS
Front panel
22Turning the power off
SOURCE
DIRECT
INPUT
SELECTOR
1
Press X on this unit to turn the power off.
All indicators turn off.
MID TREBLE BALANCE VOLUME
Rear panel
Remote
25
Index
Contents
Connections
Playback
Settings
Selecting the speakers for audio output
1
Turning off the sound temporarily
1
Press SPEAKERS A/B to select the speaker system to be
used for playback.
The indicator of the selected speakers lights.
Press MUTE
•Muting can be cancelled by pressing MUTE
•Press SPEAKERS A/B to turn the speaker audio output off, and the speaker
switching indicator turns off.
1
Press the input source select button to be played back.
The indicator of the selected input source lights.
Turn the BASS, MID, TREBLE and BALANCE control
knobs to adjust the tone.
NOTE
•When the source direct mode is on, the tone cannot be adjusted because the audio
signal does not pass through the tone adjustment circuit (BASS, MID, TREBLE,
BALANCE). Check that the source direct indicator is off.
%
•You can also select the input source by turning INPUT SELECTOR on the main unit.
Adjusting the volume
Use VOLUME df to adjust the volume.
%
•You can also adjust the volume by turning VOLUME on the main unit.
Front panel
Rear panel
Remote
again.
Adjusting the tone
Selecting the input source
1
.
The mute indicator lights.
%
%
1
Appendix
Tips
26
Index
Contents
Connections
Playback
Settings
Tips
Playing CDs
22Playback in source direct mode
1
2
1
The signal does not pass through the tone adjustment circuitry (BASS,
MID, TREBLE and BALANCE), resulting in playback of a higher sound
quality.
Press X on this unit to turn the power on.
Press the input source select buttons to switch the
input source to “CD”.
Press SOURCE DIRECT to turn on source direct mode.
The SOURCE DIRECT indicator lights.
The “CD” input indicator lights.
3
4
Playback the CD.
Use VOLUME df to adjust the volume.
Front panel
Rear panel
Remote
Appendix
27
Index
Contents
Connections
Playback
Settings
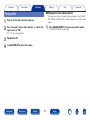
Recording
1
2
Press X on this unit to turn the power on.
Press the input source select buttons to switch to the
input source from which you want to record.
The indicator of the selected input source lights.
3
Recording starts.
•For information on operations, see the owner’s manual of the
recording device.
Front panel
Rear panel
Remote
28
Index
Tips
Appendix
Contents
Connections
Playback
Settings
Settings
Setting the Auto Standby mode (vpage 30)
Setting the power amp direct mode (vpage 31)
Front panel
Rear panel
Remote
29
Index
Tips
Appendix
Contents
Connections
Playback
Settings
Tips
Appendix
Setting the Auto Standby mode
You can set the unit to automatically switch to standby mode if the unit is
not operated for 30 minutes when there is no audio input.
Auto Standby mode is set to off by default.
Turning Auto Standby mode on
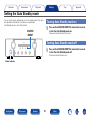
1
SOURCE
DIRECT
Press and hold SOURCE DIRECT for more than 5 seconds
to turn the Auto Standby mode on.
The power indicator flashes three times.
Turning Auto Standby mode off
1
Press and hold SOURCE DIRECT for more than 5 seconds
to turn the Auto Standby mode off.
The power indicator flashes once.
Power indicator
Front panel
Rear panel
Remote
30
Index
Contents
Connections
Playback
Settings
Tips
Appendix
Setting the power amp direct mode
When a pre-amplifier is connected to this unit and the unit is used as a
power amplifier, follow the instructions below to turn power amp direct
mode on.
Turning power amp direct mode on
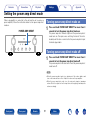
1
POWER AMP DIRECT
Press and hold POWER AMP DIRECT for more than 3
seconds to turn the power amp direct mode on.
The power amp direct indicator lights and the power amp direct
mode turns on. The input source switching function of the unit is
disabled, and the device connected to the power amp direct input
terminal is played back.
Turning power amp direct mode off
1
Press and hold POWER AMP DIRECT for more than 3
seconds to turn the power amp direct mode off.
The power amp direct indicator turns off and the power amp direct
mode turns off.
NOTE
•When the power amp direct mode is on, adjustment of the volume, balance and
tone on the main unit has no effect. Adjust the volume on the pre-amplifier.
•When the power amp direct mode is on, the main unit outputs at maximum
volume. Check the output level on the input device before playing it and adjust the
volume accordingly.
Front panel
Rear panel
Remote
31
Index
Contents
Connections
Playback
Settings
Tips
Appendix
Tips
Contents
22Tips.....................................................................(33)
22Troubleshooting...............................................(34)
I want to adjust the tone myself.......................................................(33)
Power does not turn on/Power is turned off.....................................(34)
I want sound playback that is faithful to the original sound..............(33)
Operations cannot be performed through
the remote control unit......................................................................(36)
I want to operate a Marantz CD player or network audio player
using the remote control from of unit...............................................(33)
No sound comes out.........................................................................(37)
I want to use this unit as a power amplifier......................................(33)
Desired sound does not come out....................................................(38)
I want to use this unit as a pre-amplifier...........................................(33)
Sound is interrupted or noise occurs.................................................(38)
Front panel
Rear panel
Remote
32
Index
Contents
Connections
Playback
Settings
Tips
Appendix
Tips
I want to adjust the tone myself
•Use the BASS, MID, TREBLE and BALANCE knobs to adjust the sound as desired (vpage 26).
I want sound playback that is faithful to the original sound
•Set the Source Direct mode on (vpage 27).
I want to operate a Marantz CD player or network audio player using the remote control of this unit
•Switch the remote control operating mode (vpage 13, 14).
•Also refer to the CD player or network audio player instruction manuals.
I want to use this unit as a power amplifier
•Set the power amp direct mode on (vpage 31).
I want to use this unit as a pre-amplifier
•Connect a power amplifier to the pre out connectors of this unit (vpage 21).
Front panel
Rear panel
Remote
33
Index
Contents
Connections
Playback
Settings
Tips
Appendix
Troubleshooting
If a problem occurs, first check the following:
1. Are the connections correct?
2. Is the unit being operated as described in the owner’s manual?
3. Are the other components operating properly?
If this unit does not operate properly, check the items listed in the table below. If the problem persist there may be a malfunction.
In that case, disconnect the power immediately and contact your retail outlet.
22Power does not turn on/Power is turned off
Symptom
Cause / Solution
Page
Power does not turn on.
•Check whether the power plug is correctly inserted into the power outlet.
23
Power automatically turns off.
•The Auto Standby mode is set. The Auto Standby mode switches the unit to standby mode
when the unit is not operated for approximately 30 minutes. To disable the Auto Standby
mode, press and hold the SOURCE DIRECT button on the unit for more than 5 seconds when
the Auto Standby mode is enabled.
30
Front panel
Rear panel
Remote
34
Index
Contents
Connections
Playback
Settings
Symptom
Tips
Appendix
Cause / Solution
Power turns off and the power
•Due to the temperature rise within this unit, the protection circuit is working. Turn off the
indicator flashes red approx. every 0.5
power and wait about an hour until this unit sufficiently cools down. Then, turn on the power
seconds.
again.
•Please re-install this unit in a place having good ventilation.
Page
39
–
Power turns off and the power
indicator flashes red approx. every
0.25 seconds.
•Check the speaker connection. The protection circuit may have been activated because
speaker cable core wires came in contact with each other or a core wire was disconnected
from the connector and came in contact with the rear panel of this unit. After unplugging the
power cord, take corrective action such as firmly re-twisting the core wire or taking care of the
connector, and then reconnect the wire.
•Turn down the volume and turn on the power again.
16, 39
When the power is turned on, the
power indicator flashes red approx.
every 0.25 seconds.
•This unit’s amplifier circuit has failed. Turn off the power and please contact the Marantz
service adviser.
–
Front panel
Rear panel
Remote
35
Index
25, 26
Contents
Connections
Playback
Settings
Tips
Appendix
22Operations cannot be performed through the remote control unit
Symptom
Operations cannot be performed
through the remote control unit.
Front panel
Rear panel
Cause / Solution
Page
•Batteries are worn out. Replace with new batteries.
•Operate the remote control unit within a distance of about 23 ft/7 m from this unit and at an
angle of within 30°.
•Remove any obstacle between this unit and the remote control unit.
•Insert the batteries in the proper direction, checking the q and w marks.
•The set’s remote control sensor is exposed to strong light (direct sunlight, inverter type
fluorescent bulb light, etc.). Move the set to a place in which the remote control sensor will
not be exposed to strong light.
•When using a 3D video device, the remote control unit of this unit may not function due to
effects of infrared communications between units (such as TV and glasses for 3D viewing). In
this case, adjust the direction of units with the 3D communications function and their distance
to ensure they do not affect operations from the remote control unit of this unit.
5
5
Remote
36
Index
–
5
–
–
Contents
Connections
Playback
Settings
Tips
Appendix
22No sound comes out
Symptom
No sound comes out of speakers.
Front panel
Rear panel
Cause / Solution
Page
•Check the connections for all devices.
•Insert connection cables all the way in.
•Check that input connectors and output connectors are not reversely connected.
•Check cables for damage.
•Check that speaker cables are properly connected. Check that cable core wires come in
contact with the metal part on speaker terminals. Also, securely tighten speaker terminals.
Check speaker terminals for looseness.
•Check that a proper input source is selected.
•Adjust the volume.
•Cancel the mute mode.
•Check the settings of the SPEAKERS A/B button.
15
–
–
–
16
Remote
37
Index
26
26
26
26
Contents
Connections
Playback
Settings
Tips
Appendix
22Desired sound does not come out
Symptom
Cause / Solution
Page
No sound comes out of a specific
speaker.
•Check that the speaker cable is properly connected.
•Adjust the BALANCE control knob.
16
26
The left and right of stereo sound is
reversed.
•Check whether the left and right speakers are connected to the correct speaker terminals.
17
22Sound is interrupted or noise occurs
Symptom
Cause / Solution
Page
When playing a record, the sound is
distorted.
•Adjust to a proper needle pressure.
•Check the tip of the needle.
•Replace the cartridge.
When playing a record, a humming
noise comes out of the speakers.
•Check that the turntable is connected correctly.
•If there is a TV or AV device near the turntable, such devices may affect the playback sound.
Install the turntable in a location as far away as possible from the TV or other AV devices.
19
–
When playing a record at high
volume, a “howling” sound comes
out of the speakers.
•Install the turntable and speakers as far from each other as possible.
•The vibrations from the speakers are being transmitted to the player through the floor. Use
cushions, etc., to absorb the speakers’ vibrations.
19
–
Front panel
Rear panel
Remote
38
–
–
–
Index
Contents
Connections
Playback
Settings
Tips
Appendix
Appendix
Explanation terms
Trademark information
P
Protection circuit
This is a function to prevent damage to devices within the power supply
when an abnormality such as an overload, excess voltage occurs or over
temperature for any reason.
If a malfunction occurs in this unit, the power indicator blinks red and the
unit switches to standby mode.
Adobe, the Adobe logo and Reader are either registered trademarks or
trademarks of Adobe Systems Incorporated in the United States and/or
other countries.
S
Source direct
Playback with higher fidelity to the source becomes possible, as input
audio signals are output by bypassing the audio quality-control circuits
(BASS/MID/TREBLE/BALANCE).
Speaker impedance
This is an AC resistance value, indicated in Ω (ohms). Greater power can
be obtained when this value is smaller.
Front panel
Rear panel
Remote
39
Index
Contents
Connections
Playback
Settings
Specifications
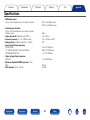
•RMS Power output
(20 Hz – 20 kHz simultaneous drive of both channels) :
•Total harmonic distortion
(20 Hz – 20 kHz simultaneous drive of both channels,
8 Ω/ohms load) :
•Output band width (8 Ω/ohms load, 0.06 %) :
•Frequency response (CD, 1 W, 8 Ω/ohms load) :
•Dumping factor (8 Ω/ohms load, 40 Hz – 20 kHz) :
•Input sensitivity/Input impedance
PHONO (MM) :
CD, TUNER, NETWORK, AUX, RECORDER :
POWER AMP DIRECT IN :
•Output voltage/Output impedance
PRE OUT :
•Maximum allowable PHONO input level (1 kHz)
MM :
•RIAA deviation (20 Hz – 20 kHz) :
Front panel
Rear panel
Remote
70 W x 2 (8 Ω/ohms load)
100 W x 2 (4 Ω/ohms load)
0.02 %
5 Hz – 60 kHz
5 Hz – 100 kHz ±3.0 dB
100
2 mV / 47 kΩ/kohms
200 mV / 20 kΩ/kohms
1.6 V / 15 kΩ/kohms
1.6 V / 600 Ω/ohms
100 mV
±0.5 dB
40
Index
Tips
Appendix
Contents
Connections
Playback
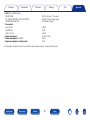
•S/N (IHF-A, 8 Ω/ohms load)
PHONO (MM) :
CD, TUNER, NETWORK, AUX, RECORDER :
POWER AMP DIRECT IN :
•Tone control
Bass (50 Hz) :
Mid (900 Hz) :
Treble (15 kHz) :
•Power requirement :
•Power consumption (UL60065) :
•Power consumption in standby mode :
Settings
87 dB (5 mV input, 1 W output)
106 dB (2 V input, Rated output)
125 dB (Rated output)
±10 dB
±6 dB
±10 dB
AC 120 V, 60 Hz
220 W
0.2 W
For the purpose of improvement, the specifications and design are subject to change without notice.
Front panel
Rear panel
Remote
41
Index
Tips
Appendix
Contents
Connections
Playback
Settings
Index
vv A
vv P
Accessories······························································· 4
Adjusting the tone··················································· 26
BALANCE····························································· 26
BASS···································································· 26
MID······································································ 26
TREBLE································································ 26
Adjusting the volume·············································· 26
Auto Standby mode················································ 30
vv C
Cables used for connections··································· 15
Connection
Players·································································· 19
Power amplifier···················································· 21
Power cord··························································· 23
Pre-amplifier························································· 21
Recording device·················································· 20
Remote control connectors·································· 22
Speaker·························································· 16, 17
Speaker (Bi-wiring)··············································· 18
Front panel
Rear panel
Power amp direct mode········································· 31
Protection circuit····················································· 39
vv R
Remote control unit················································ 12
Inserting the batteries············································ 5
vv S
Selecting the input source······································ 26
Source direct····················································· 27, 39
Speaker impedance················································ 39
vv T
Tips········································································· 33
Troubleshooting······················································ 34
Turning off the sound temporarily··························· 26
Turning the power on·············································· 25
Remote
42
Index
Tips
Appendix
Contents
Connections
Playback
Settings
Appendix
Tips
1 19/64
(33)
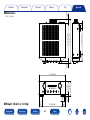
22Dimensions
43/64
(17)
8 55/64 (225)
2 21/64
(59)
14 59/64 (379)
12 61/64 (329)
1 49/64
(45)
Unit : in. (mm)
1 31/32
(50)
22Weight : 26 lbs 7 oz (12.0 kg)
Front panel
Rear panel
Remote
13 25/64 (340)
43
Index
2 13/64
(56)
1 31/32
(50)
43/64
(17)
4 3/8
(111)
5 3/64
(128)
17 21/64 (440)
D&M Holdings Inc.
3520 10268 00AM