1
AXIS P1204 Network Camera
Hardware Overview
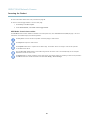
NOTICE
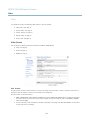
To prevent corruption of recordings, the SD card should be unmounted before removal. To unmount, go to Setup > System
Options > Storage > SD Card and click Unmount.
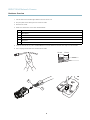
Control button - The control button is used for:
•
Connecting to an AXIS Video Hosting System service. See page 33. To connect, press and hold the button for about
1 second until the Status LED flashes green.
•
Connecting to AXIS Internet Dynamic DNS Service. See page 33. To connect, press and hold the button for
about 3 seconds.
•
Resetting the product to factory default settings. See page 40.
Power connector - 2-pin terminal block for power input.
I/O terminal connector - Use in applications for e.g. motion detection, event triggering, time lapse recording and alarm notifications.
In addition to an auxiliary power and a GND pin, the I/O terminal connector provides the interface to:
•
Digital output – For connecting external devices such as relays and LEDs. Connected devices can be activated by
the VAPIX® Application Programming Interface, output buttons on the Live View page or by an Action Rule. The
output will show as active (shown under System Options > Ports & Devices) if the alarm device is activated.
•
Digital input – An alarm input for connecting devices that can toggle between an open and closed circuit, for
example: PIRs, door/window contacts, glass break detectors, etc. When a signal is received the state changes and
the input becomes active (shown under System Options > Ports & Devices).
LED Indicators
LED
Color
Indication
Network
Green
Steady for connection to a 100 MBit/s network. Flashes for network activity.
Amber
Steady for connection to a 10 MBit/s network. Flashes for network activity.
Unlit
No network connection.
Green
Steady green for normal operation.
Amber
Steady during startup and when restoring settings.
Red
Slow flash for failed upgrade.
Unlit
No connection between sensor unit and main unit.
Green
Normal operation.
Amber
Flashes green/amber during firmware upgrade.
Status
Power
Note
• The Status LED can be configured to be unlit during normal operation. To configure, go to Setup > System Options >
Ports & Devices > LED. See the online help for more information.
• The Status LED can be configured to flash while an event is active.
• The Status LED can be configured to flash for identifying the unit. Go to Setup > System Options > Maintenance .
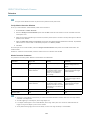
Shorten Sensor Unit Cable
The sensor unit is delivered with a 8 m (26 ft) cable.
To shorten the cable follow these steps:
5