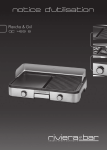
1
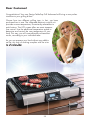
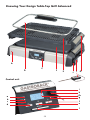
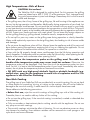
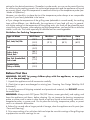
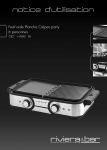
Operating Instructions
Design Table-Top Grill Advanced
Art.-Nr. 42530 Design Table-Top Grill Advanced
Read all provided instructions before first use!
Model and attachments are subject to change!
For household use only!
Carefully read all provided instructions before you start running
the appliance and pay attention to the warnings mentioned in
these instructions.
Table of Contents
Knowing Your Design Table-Top Grill Advanced....................................................... 26
Important Safeguards........................................................................................... 28
General Safety Instructions................................................................................. 28
Important Safeguards for Electrical Appliances..................................................... 30
High Temperatures—Risk of Burns....................................................................... 31
Non-Stick Coating............................................................................................. 31
Technical Specifications........................................................................................ 32
Properties of Your New Table-Top Grill.................................................................... 32
Safety Concept................................................................................................. 32
Modes of Operation.......................................................................................... 33
Tips for Best Results........................................................................................... 34
Before First Use.................................................................................................... 35
Operation........................................................................................................... 36
Preparations..................................................................................................... 36
Cooking Your Food........................................................................................... 37
Using the Temperature Probe ............................................................................. 38
Using the Control Function................................................................................. 39
Solving Problems.................................................................................................. 40
Care and Cleaning.............................................................................................. 41
Disassembling the Appliance.............................................................................. 41
Cleaning the Appliance..................................................................................... 41
Storage............................................................................................................... 42
Notes for Disposal............................................................................................... 43
Information and Service........................................................................................ 43
Warranty............................................................................................................ 43
Recipe Ideas ....................................................................................................... 48
28
Dear Customer!
Congratulations! Your new Design Table-Top Grill Advanced will bring a new professionalism to your grilling dishes.
Choose from two different grilling tops; in fact, you have
purchased two in one. The integrated electronic control unit
provides an even temperature, conveniently selectable via
push buttons. The LCD screen offers an exact temperature control. Use the additional temperature probe to
determine and control the core temperature of your
food. This way, you will unconditionally achieve best
results, according to your individual taste.
As you can prepare your food without any additional fat, this way of cooking complies with the criteria of modern diet.
29
Knowing Your Design Table-Top Grill Advanced
A
D
C
F
E
J
G
I
Control unit
i
h
j/k
g
a
b
c
f
e
d
l
30
A Housing
B Power cord (not visible)
C Control unit – foldable for a better view on the controls.
D Glass lid – to avoid splashes
E
Grill – use this grilling top to get the usual grilling results.
F
Griddle with drain – use this grilling top for food that easily falls to pieces.
G Insulated handles
H Oil tray – for collecting surplus fat and juices; removable for easy cleaning.(not visible)
I
Temperature probe – for measuring the core temperature during cooking your food.
J
Probe site – place the temperature probe here, when not in use.
Control unit
a.
Red PREHEAT indicator – is illuminated during preheating; goes out when the
set temperature is reached.
b. Green READY indicator – goes on when the set temperature is reached.
c. Scale switch button – toggles the display between degrees of Fahrenheit or Celsius.
d. Decrease button – press here to lower the set temperature.
e. ON/OFF button – use this button to switch the control unit ON or OFF.
f. Increase button – press here to raise the set temperature.
g.
MODE button – with connected temperature probe, press this button for starting the
probe mode.
h. Connector for temperature probe
i. LCD screen – for showing the temperature.
j. Probe setting icon SET – is displayed, when a target temperature is selected.
k. Probe icon – is displayed, if in probe mode.
l. RELEASE button – press here to fold back the control unit.
31
Important Safeguards
Carefully read all instructions before operating this appliance and save for further reference.
Do not attempt to use this appliance for any other than the intended use, described in these
instructions. Any other use, especially misuse, can cause severe injuries or damage by electric
shock, heat, or fire.
These instructions are an essential part of the appliance. Do not pass the appliance without
this booklet to third parties.
Any operation, repair and technical maintenance of the appliance or any part of it other than
described in these instructions may only be performed at an authorised service centre. Please
contact your vendor.
General Safety Instructions
• This appliance is for household use only and NOT intended for use in moving vehicles. Do
not operate or store the appliance in humid or wet areas or outdoors. Any use of accessories,
attachments or spare parts that are not recommended by the manufacturer or damaged in any
way may result in injuries to persons and/or damage.
• Check the entire appliance regularly for proper operation—especially the power cord (e.g.
check for distortion, discolouration, cracks, corroded pins of the power plug). Do not operate
the appliance, when the appliance or any part of it is likely to be damaged, to avoid risk of
fire, electric shock or any other injuries to persons and/or damage. The appliance or its parts
are likely to be damaged, if the appliance has been subject to inadmissible strain (e.g. over
heating, mechanical or electric shock), or if there are any cracks (e.g. lid is broken or cracked), excessively frayed or melted parts, or distortions, or if the appliance is not working
properly. If one of these cases occur during operation, immediately unplug the appliance. Get
in contact with an authorized service centre for examination and/or repair.
• Operate the appliance on a well accessible, stable, level, dry, and suitable large table or
counter that is resistant against water, fat, and heat.
• Always keep the appliance and the table or counter clean and dry, and wipe off spilled
liquids immediately. Do not place any clothes or tissue or other foreign objects under or on the
appliance during operation, to avoid risk of fire, electric shock and overheating. Do not place
the appliance or any hot parts of it (lid, grilling top, or oil tray) over a power cord or on any
surfaces sensitive to heat, fat, or moisture, or near the edge of the table or counter, or on wet
or inclined surfaces.
• During operation keep the appliance in an appropriate distance of at least 50 cm on each
side to the edge of the working space and furniture, walls, boards, curtains to avoid damage
due to heat. Leave at least 1 m of free space above the appliance. Do not operate the appliance under over hanging boards or drop lights.
• To avoid risk of fire: do not pour any inflammable liquids onto the appliance. Do not place
any inflammable objects or inflammable liquids (e.g. high-proof alcoholic drinks) on or directly
near the appliance during operation. The appliance is NOT suited for flambéing!
• This appliance is NOT intended for use by persons (including children) with reduced physical, sensory or mental capabilities, or lack of experience and knowledge, unless they have
been given supervision or instruction concerning use of the appliance by a person responsible
for their safety. Children must always be supervised to ensure that they do not
play with the appliance or any parts of the appliance or the packaging. Always
32
keep the appliance where it is dry, frost-free, and clean, and where young children cannot
reach it. Do not leave the appliance or any part of it unattended, when in reach of young
children.
• Do not place the appliance or any part of it on or near hot surfaces (e.g. burner, heater or
oven). Do not use any parts of the appliance with any other device or for any other purpose.
Before operation, always ensure that the appliance is assembled and connected completely and correctly according to the instructions in this booklet. Do
not handle the appliance or any part of it with violence.
• Do not hold your hands or any foreign objects (e.g. clothes, cooking utensils) or the handle,
cable, or plug of the temperature probe on the grilling area, with the appliance connected to
the power supply. Do not use any hard, sharp or edged objects (e.g. knives, forks) with the
appliance. For example, use barbecue tongs made of wood or plastic to take your food.
• Fresh moistened food will splash, when placed on the hot grilling area, and hot steam will
escape. During operation, do not hold any part of your body or delicate objects over the grilling plate. Always ensure that persons (including you) keep sufficient distance to the appliance
during operation. Always expect that splashes of hot fat and juices will escape form the grilling
area. Do not place any frozen food on the hot grilling plate.
• During operation and shortly thereafter, hot steam could escape from under the lid even with
the lid securely closed. Do not hold any parts of your body or any delicate objects over the
appliance during operation. Also, when opening the lid, always ensure not to get scalded by
splashes and steam.
• Do not use the lid, if the lid is broken or cracked in any way. Otherwise, splinters could get
into your food, causing severe injuries.
• Always wipe off spilled liquids immediately. If liquids run out or are spilled on the housing,
immediately unplug the appliance.
• During operation the appliance and the lid will become very hot. Only touch the appliance
and all its parts by the handles.
• Do not leave the appliance unattended, when it is connected to the power supply. Always
switch OFF (ON/OFF button; screen gets dark, indicators go out) then unplug the appliance,
and leave the appliance cool down, before moving, or cleaning the appliance, or assembling
or disassembling any parts, or when the appliance is not in use. Always hold the housing at
both sides near the bottom for moving the appliance. Do not hold the appliance at the
power cord for moving the appliance. Do not place any hard and/or heavy objects
on the appliance or any part of it.
• Do not use any abrasive cleaners, cleaning pads (e.g. metal scouring pads), or any corrosive chemicals (e.g. bleach) for cleaning. Do not immerse the housing, control unit, handle,
cable, or plug of the temperature probe, or power cord in water or any other liquid. Do not
spill or drip any liquids on the housing, control unit, handle, cable, or plug of the temperature
probe, or on the power cord to avoid risk of fire and electric shock.
• Do not place the housing, temperature probe, or the power cord in an
automatic dishwasher.
• Do not leave any food dry on the appliance. Always clean the appliance after each use
to prevent an accumulation of baked-on foods (see: ´Care and Cleaning`). Always keep the
appliance and its parts, where it is clean.
33
Important Safeguards for Electrical Appliances
The appliance is heated electrically. Place the appliance near a suitable wall power socket to
connect the appliance directly to a protected mains power supply with protective conductor
(earth/ground) connected properly. Ensure that the voltage rating of your mains power supply
corresponds to the voltage requirements of the appliance (230 V, 50 Hz, AC, rated for at least
16 A). The power outlet socket must be installed separately from other power outlet sockets to
avoid interference with other appliances.
The installation of a residual current operated circuit breaker (r.c.c.b.) with a maximum rated
residual operating current of 30 mA in the supplying electrical circuit is strongly recommended. If in doubt, contact your electrician for further information.
In various foreign countries, the specifications for power supplies are subject to incompatible
norms. Therefore it is possible that power supplies in foreign countries do not meet the requirements for safe operation of the appliance. Thus, before operating the appliance abroad,
ensure that safe operation is possible.
• Do not to use any desk top multi socket outlet, external timer, or remote control systems.
It is best to avoid using an extension cord, but if you wish to use one, only use an extension
cord rated for a maximum continuous current of at least 16 A (1 mm² minimum core crosssection) with safety plug and safety coupler plug and protective conductor (earth/ground)
connected properly. Additionally, the extension cord must be of sufficient length.
When laying power cords, always ensure that no one will step on the extension cord or get
entangled or trip over the power cords. Also, ensure that no tension is applied to any part
of the power cords. Tie the extension cord loosely onto the leg of the table using a separate
cord, to ensure that no one will pull the power cord. To connect: always connect the appliance
to the extension cord first. To disconnect: Always unplug the extension cord from the power
supply first.
• Always handle power cords with care. The pins of the power plug must be smooth and
clean. Always completely unwind the power cord before use. Do not place the appliance on
a power cord. Power cords may never be knotted, twisted, pulled, strained or squeezed. Do
not let the plug or power cord hang over the edge of the table or counter. The power cord may
not touch hot surfaces or sharp edges. Ensure that no one will pull the appliance by the power
cord. Take care not to entangle in the power cord. Always grasp the plug to disconnect the
power cord. Do not touch the appliance or power plug with wet hands when the appliance is
connected to the power supply.
• DO NOT drip or spill any liquids on the housing, control unit, temperature probe, or power
cord. Do not place the grilling top on the housing, when these parts are wet. Otherwise liquid
will evaporate during heat-up and could run into the housing, causing risk of electric shock
or fire. When liquids overflowed or are spilled on the housing, control unit, or power cord,
immediately unplug the appliance. Thereafter, clean the appliance and let it dry for at least
1 day (see: ´Care and Cleaning`).
• Do not operate the appliance without the oil tray to avoid risk of overheating, fire and electric shock!
34
High Temperatures—Risk of Burns
CAUTION: Hot surface!
The Table-Top Grill is designed for cooking food. For this purpose, the grilling
areas are heated up to 450 °F (232 °C) at the maximum. Thus, improper handling could cause severe injuries and damage. Please keep this in mind to avoid
scalds and damage.
• The grilling area, the oil tray, frame of the grilling top, lid and housing of the appliance can
be very hot during operation and thereafter. Additionally, during preparation of your food, hot
steam and splashes could escape. Do not touch the hot surfaces with any parts or your body
or any heat-sensitive or moisture-sensitive objects during operation or when still hot. Only touch
the appliance and its parts at the handles and operating elements during operation and when
still hot. Protect your hands and arms with oven gloves. Do not leave any foreign objects on
the hot grilling plate (e.g. grilling shovels, barbecue utensils, temperature probe).
• Do not spill or pour any water on the grilling area during operation or shortly thereafter.
Water could explosively vaporize on the hot grilling plate, thus leading to risk of severe scalds
and damage.
• Do not move the appliance when still hot. Always leave the appliance and all its parts cool
down before moving the appliance, emptying the oil tray or cleaning the appliance. Do not
place the appliance on heat-sensitive surfaces, for operation or when hot.
• Even with the lid properly closed, steam could escape from the lid during operation and
shortly thereafter. Condensate could accumulate under the lid and drip, when opening the lid.
Beware of hot steam and condensate when opening the lid.
• Do not place the temperature probe on the grilling area! The cable and
handle of the temperature probe may never touch hot surfaces. Otherwise, the
temperature probe will be damaged. Only insert the tip of the temperature probe into your
food. For this, it is best to hold the temperature probe in your hand. Immediately after measurement, do not place the temperature probe on heat-sensitive surfaces.
• DO NOT cook any high-proof alcoholic liquid or alcoholic foodstuffs (e.g.
mulled wine, grog) on the appliance to avoid risk of explosion and fire. The
appliance is not suited for flambéing.
Non-Stick Coating
The grilling tops of your Table-Top Grill are provided with a non-stick coating. Do not use hard
or sharp objects for scratching, stirring, or cutting on the coatings. We will not be liable for
damage to the non-stick coating, if metal utensils or similar objects have been used.
Please adhere to the following precautions:
• Before first use, wipe the non-stick coatings of the grilling tops with a little cooking oil.
Thereafter, there is no need to add any further oil for cooking.
• Do not use the grilling tops, if the non-stick coating is scratched, cracked or detached due
to overheating.
• Only use wooden or heat-resistant plastic cooking utensils with the appliance. Do not use
any spray-on non-stick coatings.
• The non-stick coatings minimise the effort of cleaning. Do not use abrasive scorers or abrasive cleaners for cleaning. Even stubborn residues can be removed via a soft sponge or soft
nylon brush and warm dishwater.
35
Technical Specifications
Model:
Art.-No.: 42530 Design Table-Top Grill Advanced
Power supply:
230 V AC, 50 Hz
Maximum power consumption: Grill: 2000 W, Griddle: 1600 W
Length of power cord:
approx. 95 cm
Weight (including lid):
approx. 7.65 / 7.68 kg
Abmessungen:
approx. 55.5 cm x 40.3 cm x 17.3 cm
(width x depth x height)
Size of grilling areas:
30 cm x 41 cm
Certification:
Properties of Your New Table-Top Grill
WARNING: Your new Design Table-Top Grill Advanced is intended for cooking edible food
and is heated electrically. Do not place any inflammable objects on the grilling plates. Do not
leave any food bake on the grilling plates. Do not place any clothes on or under the appliance
to avoid risk of overheating and fire.
Also splashes will escape from the grilling areas when placing food on it. Keep sufficient
distance to other objects and the edge of the workspace. Do not place any delicate objects
near the appliance.
Safety Concept
WARNING: For your protection and convenience, your new Table-Top Grill is equipped
with various safety features. Do not attempt to damage or by-pass the safety interlocks! Do
not attempt to operate the appliance using others than the designated parts (e.g. grilling top).
Safety switch
The appliance may not be operated without the grilling top (grill or griddle). Thus, a safety
switch completely disables the appliance, if the grilling top has been removed from the
housing, or when the grilling top is not assembled correctly.
Automatic Time-Out Function
For your safety, after 2 hours of continuous operation, the appliance will sound an acoustic
signal and thereafter automatically shut off. If you wish to still operate the appliance, simply
press the ON/OFF button to switch ON the appliance again. There is no need to wait, before
switching on the appliance. The time-out function is intended to guarantee your safety, even
when you have forgotten to switch OFF the appliance.
36
Modes of Operation
Your new Table-Top Grill provides a series of smart functions and options:
• Select the temperature unit, you are used to: Fahrenheit (°F) or Celsius (°C).
• The screen display provides an exact control of the cooking process.
• A signal sounds, when the selected temperature is reached.
• You can operate the appliance in two different modes: normal mode and probe mode. During operation, you can toggle these modes of operation as you like. However, for operating
the probe mode, the temperature probe must be plugged in.
Normal Mode
In normal mode, the screen shows the set temperature of the grilling top. This is the temperature, you selected via the + and/or – buttons. The PREHEAT indicator shows, whether the
heating elements are operating. The temperature of the grilling area is freely selectable: from
150 °F (66 °C) to 450 °F (232 °C). See the ´Temperature setting chart` on the following page.
As soon as the READY indicator illuminates and a beeper sounds, the set temperature displayed on the screen is reached (see: ´Cooking Your Food`).
Probe Mode
For always getting optimum results, the appliance is equipped with a temperature probe.
This accessory is for determining the actual temperature of the food on the grilling area. For
measuring the temperature, simply plug the temperature probe to the control unit and, press
the MODE button. Then insert the tip of the temperature probe in your food on the grilling top.
After 10 - 15 seconds, the screen will show the temperature of your food. Using this feature,
you can monitor the cooking process just like a professional chef.
Additionally, the appliance provides a control function (see below) that sounds an acoustic
signal, when a pre-selected target temperature is reached.
Control Function
Using the temperature probe you can monitor the cooking process. For this, in probe mode,
set the desired temperature for your food and put the tip of the temperature probe into your
food, as far as possible just into the centre. On the screen, the actual temperature at the tip
of the temperature probe and the desired target temperature (marked with SET) are displayed
in rotation. The appliance will sound an acoustic signal as soon as the target temperature is
reached. The target temperature range is 130 °F (54 °C) to 184 °F (84 °C) (see: following
Temperature setting chart and ´Using the Control Function`).
Tip: Probe mode and normal mode does not influence each other; i.e. your selection of the
temperature for the grilling area will remain unchanged even when setting the target temperature of your food (and vice versa). You may toggle to normal mode any time by pressing the
MODE button. In normal mode (no probe icon on the screen) you can change the set temperature of the grilling area and, thereafter, toggle back to probe mode (probe icon on the screen)
by pressing the MODE button again: you will find the target temperature of the control function
(SET displayed on the screen) unchanged.
37
Temperature setting chart
Mode
Normal mode
Probe Mode
Temperature setting
Keep-warm
Cooking
66°C/150°F
79°C/175°F
177°C/350°F
191°C/375°F
204°C/400°F
218°C/425°F
232°C/450°F
54°C/130°F
59°C/139°F
64°C/148°F
69°C/157°F
74°C/166°F
79°C/175°F
84°C/184°F
Selecting the Grilling Top
You can operate the appliance using one of two different grilling tops:
• Using the griddle will result in a somewhat more even cooking result. The difference to using
a pan is: surplus juices and fat will run into the oil tray through the drain slot. This way, you
will get the typical consistency of grilled dishes.
The griddle is suited especially for meatballs (rissoles) and other food that easily falls to pieces,
like fish.
• Using the grill (grating), you will get the typical structure of grilled dishes. Juices will drip
directly into the oil tray. This way, the dishes will be somewhat more crusty and aromatic. The
typical usage is for sausages and steaks, Hamburgers, Hot Dogs, slices of meat, and bread.
Depending on your personal liking make your decision on which type of grilling top you prefer
for the various types of food. Just give it a try!
Tips for Best Results
• Temperatures and cooking times depend on your individual liking as well as thickness, type
and consistency of your food. If required, check your food during cooking to reach the desired
results. Control the core temperature (temperature in the centre) of your food, using the temperature probe and compare the respective readings to the achieved results. This way you can
adapt the results to your liking.
• You should dab dry humid food before placing on the hot grilling area.
• Add salt after cooking.
• Frozen food must be completely thawed before grilling.
• Cut the food to be grilled into slices no more than 2-3 cm (1 inch) thick.
• If you are using chopped foods, or a runny mixture, or anything containing set liquids
(gravy, jelly, etc.), use the griddle. Additionally, if required, wrap the food securely in thick
high-quality aluminium foil. Leave some free space within the wrapping for expansion. At the
top of your foil pack, pierce a little hole in the foil to let steam and air escape. Otherwise the
foil could crack. Additionally, you can insert the temperature probe using this hole, if you wish
to check the temperature in the interior of your foil pack. Increase the cooking time a little, for
the heat must penetrate the wrapping first.
IMPORTANT: Do not use thin aluminium foil or plastic foil, because it could damage the nonstick coating. Additionally, plastic foil could cause overheating.
• When preparing your meal with the Design Table-Top Grill Advanced for the first time, you
should use the temperature probe for measuring the core temperature (temperature in the
centre) of your food (see: ´Using the Temperature Probe`). This way, you will find out, the best
38
settings for the desired consistency. Thereafter in probe mode, you can use the control function
for monitoring the cooking process. Set up the target temperature and the appliance will sound
an acoustic signal, when this temperature is measured at the tip of the temperature probe (see:
´Modes of Operation`).
However, you should try to place the tip of the temperature probe always at an comparable
position in your food; preferable in the centre.
• If you change the temperature of the grilling area (selectable in normal mode), the cooking
times will be different, too. Additionally, the consistency of your food will vary. In general,
with higher settings for the temperature of the grilling area, your food will be somewhat more
crispy and crusty. However, when selecting too high temperatures, you food will burn while the
interior is still raw. This holds especially for delicate food as some vegetables.
Guidelines for Cooking Temperatures
Type of Meat
Well Done
Medium
Medium Rare
Rare
Beef, Lamb, Veal, Ribs
170 °F
(76 °C)
160 °F
(71 °C)
145 °F
(63 °C)
140 °F
(60 °C)
Pork
170 °F
(76 °C)
Poultry: Turkey,
Chicken, Duck
180 °F
(82 °C)
Ham, Veal, Grounded Beef,
Pork or Lamb
160 °F
(71 °C)
Grounded Poultry
(Turkey or Chicken)
165 °F
(74 °C)
Before First Use
WARNING: DO NOT let young children play with the appliance, or any part
of it, or the packaging!
1. Unpack the appliance and all accessories carefully.
2. Check that no parts are damaged or missing (see: ´Knowing Your Design Table-Top Grill
Advanced`).
3. Carefully remove all shipping materials and promotional materials, but DO NOT remove
the model label.
WARNING: Always switch OFF (press ON/OFF button; screen gets dark), and unplug, and
leave the appliance cool down, before cleaning. Do not immerse the housing, temperature
probe, or power cord in water or other liquids or spill any liquids on the housing, control unit,
temperature probe, or power cord. Do not place the housing, temperature probe, or power
cord in an automatic dishwasher.
4. Before first use and after a longer period of storage, clean the appliance and its parts (see:
´Care and Cleaning`).
5. Drip some cooking oil on a kitchen cloth and wipe the non-stick coatings of the grilling tops
to prepare the non-stick coatings for use.
39
Operation
WARNING: Always ensure that the appliance and all its parts and accessories are out of
reach of young children. The appliance is intended for cooking food, thus the surfaces
will become very hot. During operation, only touch the appliance at the operating elements
to avoid scalds.
Only place the appliance on a stable, dry, heat-resistant, and level surface (see: ´General
Safety Instructions`). Do not place any clothes or tissue or other foreign objects on or under the
appliance during operation, to avoid risk of fire, overheating, or electric shock. Do not block
the ventilation slots at the bottom of the housing. During operation, the operating elements
(see: ´Knowing Your Design Table-Top Grill Advanced`) must be accessible all the time.
Ensure to keep the appliance in an appropriate distance of at least 50 cm on each side to the
edge of the working space and any other objects. During operation leave at least 1 m of free
space above the appliance for free access.
Before assembling the appliance, always ensure that all parts are in proper working order
and completely dry (see: ´General Safety Instructions`). Do not use any damaged or unsuitable
parts to avoid risk of injuries and damage. Do not operate the appliance without the oil tray,
to avoid risk of fire and electric shock. Do not use the lid when the lid is broken or cracked in
any way. Otherwise splinters could get into your food, causing severe injuries.
Please keep in mind that fresh food will splash and hot steam will escape, when placed on
the hot grilling plate. Do not hold any part of your body or any delicate objects over the
appliance. Protect your hands and arms with oven gloves. During operation, ensure that all
persons (including you) stay in sufficient distance. Expect splashes of hot fat and juices in the
surroundings of the appliance.
Do not place any frozen food on the hot grilling plate. Do not scratch or cut on the grilling
areas. Do not use any hard or edged objects (e.g. knives, metal scrapers) on the grilling areas
to avoid damage to the non-stick coating. Only use cooking utensils made of wood or plastics.
Preparations
1. Prepare your food. Remove all inedible parts and cut your food in pieces of sufficient size.
Leave frozen food thaw, before cooking. Dab dry humid pieces of food, using a kitchen cloth.
2. Place the appliance on a suitable surface (see: ´General Safety Instructions`), if possible,
near a suitable wall power outlet (see: ´Important Safeguards for Electrical Appliances`).
WARNING: Do not place any objects under the feet of the housing. Otherwise, the appliance
could fall over and/or hot food or juices running out could cause severe injuries and damage.
Special care is necessary, if using an extension cord (see: ´Important Safeguards for Electrical
Appliances`).
3. If you wish to use an extension cord, ensure that the extension cord is of sufficient length
(see also: ´Important Safeguards for Electrical Appliances`).When laying power cords, always
ensure that no one will step on the extension cord or get entangled or trip over the power
cords. Also, ensure that no tension is applied to any part of the power cords. Tie the extension
cord loosely onto the leg of the table using a separate cord, to ensure that no one will pull the
power cord.
4. Place the oil tray on the appliance. The warning labels on the oil tray must be in correct
orientation and readable. The oil tray is for collecting surplus juices and fat and protecting the
housing against oil and water.
40
5. Place the grill (grating) OR griddle on the housing. There is only one orientation to place
the grilling top correctly on the housing. If the grilling top is tilted on the housing, turn it by
180° and try again. When correctly inserted, the brim of the grilling top projects the brim of
the housing by about 2 cm at all sides.
6. If requested, fold up the control unit by up to 30°. This way, you can get a better view on
the controls.
7. Connect the appliance to the power supply. If you decided to use an extension cord: first
connect the appliance to the extension cord, then connect the extension cord to the power
supply. The screen and the PREHEAT and READY indicators will light up for 1 second. Then—
with no key pressed—the control unit turns OFF, as the appliance toggles into standby mode.
8. Place the lid on the grilling top. Thus, the grilling area is protected against unintended touch
and you will save energy during pre-heating.
Cooking Your Food
1. Press the ON/OFF button to switch the appliance ON. The Table-Top Grill starts heating
immediately in normal mode, where the screen shows the pre-set temperature 450 °F (232 °C),
and the red PREHEAT indicator is illuminated.
NOTE: As soon as you switch ON the control unit, the appliance starts heating and the grilling
area is getting hot.
2. When switching ON, the screen shows the set temperature in °F (Fahrenheit). This is a
common temperature unit in English speaking countries, whereas the Celsius scale is frequently
used in many other countries. Select your preferred temperature scale by pressing the F/C
button.
3. Press the – (decrease) or + (increase) buttons, until the desired temperature of the grilling area is shown on the screen (see: ´Modes of Operation`). When the set temperature is
reached, the PREHEAT indicator goes out, the READY indicator illuminates, and three beeps
sound. Now you can start cooking.
Tip: Each time you press the – or + buttons, the set temperature is changed. The minimum
temperature is 150 °F (66 °C). The maximum temperature is 450 °F (232 °C). When pressing
the button for longer than 3 seconds, the set temperature moves automatically to the minimum
(– button) or maximum (+ button).
4. Cook your food (see: ´Tips for Best Results`). During cooking, the appliance controls the
temperature of the grilling area automatically. The alternation between red PREHEAT indicator
and green READY indicator is a hint to the controlling process.
Tip: Your food will cook more evenly with the lid placed on the grilling top. Additionally, this
way, you can save energy and catch a lot of splashes.
5. If applicable, cover the grilling area with the lid, as soon as you placed your food on the
grilling area.
NOTE: When wrapping your food in aluminium foil, you should use the lid in any case.
6. You can change the set temperature of the grilling area at any time. Simply press the button
+ and/or –. After changing the set temperature, the appliance will sound an acoustic signal,
when the new temperature is reached.
NOTE: The temperature of the grilling area can only be changed in normal mode (probe icon
NOT shown on the screen) (see: ´Using the Temperature Probe`).
41
Tip: You can use the temperature probe to monitor the cooking process (see: ´Using the Temperature Probe`).
7. When you finished cooking, switch OFF the appliance by pressing the ON/OFF button.
The screen gets dark.
WARNING: Even after switching OFF the grilling area is still very hot.
8. Unplug the appliance.
9. Always wait until the appliance cooled down completely, before moving, disassembling or
cleaning the appliance. Thereafter, clean the appliance according to the instructions in chapter
´Care and Cleaning`.
Using the Temperature Probe
CAUTION: Protect your hand and arm with oven gloves against splashes and hot steam,
when working over the grilling area. Do not place the temperature probe on the
grilling area! Handle and cord of the temperature probe may never touch the
hot grilling area. Otherwise, the temperature probe will be damaged. Only insert the
metal tip of the temperature probe into your food for measuring the temperature.
Do not leave the temperature probe in your food, while closing the lid, to
avoid damage to the temperature probe.
Using the temperature probe, you can operate the appliance in two additional ways:
• Measurement: When switching to probe mode, the temperature probe is used for measuring the actual core temperature (temperature in the centre) of your food on the grill. The temperature at the tip of the temperature probe is shown on the screen, indicated via the probe
icon. However, when in probe mode, you can activate the control function (see below). The
actual temperature is given with an accuracy of 1° (see also: ´Modes of Operation`).
• Control function: You can select the desired core temperature (target temperature) of your
food. As soon as the temperature probe detects the selected temperature, a beep sounds.
Measuring the Core Temperature with the Temperature Probe
1. Prepare the appliance as described in section ´Preparations`. Switch on the appliance and
set the desired temperature for the grilling area, using the – and + buttons (see: ´Cooking Your
Food`). Place your food on the grilling area, as soon as the grilling area has reached the set
temperature and the READY indicator is illuminated.
NOTE: As soon as you switch ON the control unit, the appliance starts heating and the grilling
area is getting hot.
2. Insert the plug of the temperature probe in the connector at the control unit.
3. Press the MODE button.
The probe icon appears on the screen and the actual temperature at the probe tip will be
shown on the display.
The appliance will detect, whether the probe plug is in place. If not, the display will alternate
between “PLUG” and “PROB”. The probe icon on the screen will flash for 1 second. If you
do not insert the probe plug within 30 seconds, the appliance will go back to normal mode.
WARNING: Please keep in mind that the food on the grill could splash and hot steam could
escape. Ensure not to touch the hot surfaces with your hand. Possibly, protect your hands with
42
oven gloves. Also, do not place the temperature probe on the grilling area. The temperature probe measures the temperature only at the tip. The handle and cable of the
temperature probe do not withstand high temperatures.
4. Put the tip of the probe into the food and wait for approx. 10 seconds. Then read the actual
temperature on the display.
5. After measuring the temperature, place the temperature probe back into the probe site at
the right side of the housing. Do not leave the temperature probe on the grilling area.
IMPORTANT: If you wish to change the set temperature of the grilling area, you must switch
back to normal mode first. By pressing the + or – button in probe mode, you simply change
the target temperature as described below.
6. If you wish to switch back to normal mode, press the MODE button. Thereafter, the temperature of the grilling area is displayed again, and the probe icon is deleted from the screen.
Tip: Even when in probe mode, the Table-Top Grill will keep the temperature set for the grilling area. There is no need to switch back to normal mode for cooking your food. The probe
mode is just intended for checking the actual core temperature of your food. This way, you can
always get the best results even with delicate food and low cooking temperatures.
Using the Control Function
The appliance is able to monitor the actual temperature of your food. When the target temperature is reached the appliance will sound an acoustic signal.
1. Prepare the appliance as described in section ´Preparations`. Switch on the appliance and
set the desired temperature for the grilling area, using the – and + buttons (see: ´Cooking Your
Food`). Place your food on the grilling area, as soon as the grilling area has reached the set
temperature and the READY indicator is illuminated.
2. Press the MODE button to switch to the probe mode. The probe icon and the actual temperature at the probe tip are displayed on the screen.
3. Press the + or – button to switch to control mode. SET is displayed on the screen and the
pre-selected value of the target temperature is shown (184 °F / 84 °C).
4. Using the + and/or – buttons, select the desired target temperature. The target temperature
range is: 130 °F (54 °C) to 184 °F (84 °C).
Tip: With the hint SET and the probe icon at the right side of the screen, the target temperature
for your food is shown on the screen and you can only set this temperature by pressing the
buttons – and +. For changing the temperature of the grilling area, you must toggle to normal
mode first. For this, press the MODE button. However, in this case the temperature selected
within the probe mode will be maintained.
5. If you do not press any key for some seconds, the screen will show the actual temperature
at the probe tip and the set target temperature in rotation, with the target temperature marked
via the hint SET. This way, you can monitor the cooking process.
Additionally, the appliance will sound an acoustic signal, as soon as the target temperature is
reached. Thus, you do not have to observe the displayed temperature values.
6. You can change your setting for the target temperature any time. In probe mode (probe icon
on the screen), simply press the + or – button.
43
Solving Problems
If any problems occur during operation, you will find solutions in this section. Further information on processing your food is given in section ´Tips for Best Results`.
Problem
Reason
The Solution
The appliance does not respond,
The appliance is not live.
when pressing the ON/OFF button.
The screen remains dark.
The screen shows PLUG and PROB
in rotation.
Please check:
• Is the appliance connected to the power
supply?
• Is the power outlet live?
• When using an extension cord: check the
extension cord for proper operation (e.g. by
connecting a lamp).
The oil tray is in wrong
orientation.
Remove the grilling top and turn the oil
tray over. The letters on the oil tray must
be in correct orientation (NOT upside-down
or mirror-image). Insert grilling top and
try again.
The grilling top is not assembled correctly.
The grilling top can only be operated in one
orientation. Turn the grilling top by 180°.
You have selected the probe mode without
temperature probe connected.
• If you do not wish to use the temperature
probe: press the MODE button, or simply
wait for about 30 seconds.
• If you wish to operate the
appliance in probe mode:
connect the temperature probe.
You changed the temperature
The control unit is switched to probe mode.
setting, but there is no response of
the heating system.
You CANNOT change the set temperature
of the grilling area with the control unit in
probe mode (probe icon on the screen).
Press the MODE button to switch back to
normal mode. Then try again.
After giving an acoustic signal, the
appliance shuts off.
For your safety, the appliance switches OFF
automatically after 2 hours.
To reactivate the appliance, simply press
the ON/OFF button. If you do this within 10
seconds, the selected temperature values
will be maintained.
The time-out function is active.
44
Care and Cleaning
WARNING: Always switch OFF the appliance (press ON/OFF button), then unplug the
appliance, and wait until the grilling area cooled down (at least 45 minutes), before moving,
disassembling, or cleaning the appliance. Do not attempt to move the appliance with
fat and juices in the oil tray still hot! Otherwise, hot fat could be spilled, causing severe
injuries and damage.
Keep in mind that fat and juices could drip especially from the grilling top, when removing
the grilling top. Keep delicate objects in sufficient distance. Do not place the appliance or any
parts of it on surfaces that are sensitive to heat, fat or moisture.
CAUTION: Do not use any abrasive cleaners or corrosive chemicals (e.g. bleach) for cleaning
the appliance or any parts of it, to avoid damage to the surfaces. Do not use any hard or
sharp-edged objects for cleaning any surface of the appliance. Do not immerse the housing,
control unit, or handle, cable or plug of the temperature probe, or the power cord in water or
any other liquid. Do not spill or drip any liquids on or in these parts to avoid risk of fire and
electric shock. Do not clean the housing, temperature probe, or power cord in
an automatic dishwasher. Do not use violence!
Disassembling the Appliance
1. Switch OFF the appliance (press ON/OFF button; screen gets dark), unplug and leave the
appliance cool down to room temperature (at least 45 minutes).
2. Remove the lid.
3. The grilling top is simply laying on the housing, and is fixed via clamps located below the
handles. The clamps will open automatically, when you grasp the handles. Grasp the grilling
top at the handles and remove it.
4. Remove the oil tray. Doing so, ensure not to spill the juices.
5. Pour fat and juices into a vessel that can be closed tightly. Then dispose the vessel in domestic waste. Do not dispose fat and juices in the sink!
6. Unplug the temperature probe.
Cleaning the Appliance
1. Clean the lid, and oil tray in warm dish water, using a soft brush.
Tip: You may clean the oil tray and lid in an automatic dishwasher.
CAUTION: Do not immerse the housing, grilling top, handle, cable, or plug of the temperature probe, or power cord into liquids. Do not clean the housing, grilling top, or
temperature probe in an automatic dishwasher.
2. Wipe the housing, grilling top, temperature probe and power cord carefully with a cloth,
slightly damped with warm dishwater. Thereafter, wipe with clear tap water. Doing so, ensure
not to spill water on the housing, or in the connector at the bottom of the grilling top.
WARNING: Always ensure that the appliance and all parts of it are out of reach of
young children.
3. Dry the parts thoroughly after cleaning, and thereafter let dry naturally for approx. 1 hour,
where the parts are out of reach of young children.
4. Reassemble the oil tray, grilling top and lid.
45
Storage
WARNING: Young children must be supervised that they do not play with the appliance or
any part of it. When the appliance is not in use, always switch OFF: press ON/OFF button;
screen gets dark and indicators go out. Thereafter, unplug the appliance. Do not leave the appliance unattended while connected to the power supply to avoid risk of electric shock or fire.
Always clean the appliance and all its parts before storing to avoid accumulation of dried-on
food (see: ´Care and Cleaning`).
Ensure to store the appliance where it is clean, dry and safe from frost, direct sunlight and
inadmissible strain (mechanical or electric shock, heat, moisture) and where it is out of reach
of young children. Place the appliance on a clean and stable surface, where it cannot fall.
Do not place any hard or heavy objects on the appliance or any part of it. Never place the
appliance in an upright position. Do not place the grilling tops on one another to
avoid damage to the non-stick coatings.
Always handle the power cord and temperature probe with special care. Electric cables may
never be knotted, twisted, pulled, strained, or squeezed.
Do not use any parts or accessories of the appliance for any other purpose than operating
the appliance. It is good advice to store the parts and accessories of the appliance with the
appliance.
CAUTION: Do not hold the appliance by the power cord for moving the appliance. To move
the appliance, always grasp the housing at both sides to avoid damage.
1. If you do not wish to use the appliance for a longer period of time, then switch OFF (press
ON/OFF button; screen gets dark) and unplug the appliance. Leave the appliance cool down.
Then clean the appliance. Thereafter, reassemble the appliance with oil tray, one grilling top
and the lid (see: ´Care and Cleaning`). If required, press the RELEASE button to fold the control
unit back into the housing.
CAUTION: Ensure to get a save grip at the housing at both sides, when attempting to
move the complete appliance. If you only grasp a handle of the grilling top, the appliance
could tilt and/or fall.
2. Grasp the housing with both hands at its sides, and place it on a suitable surface, where it
cannot fall, and is out of reach of young children.
3. Put the temperature probe in the probe site of the housing.
4. It is best to place the second grilling top besides the appliance. DO NOT place the grilling tops on one another to avoid damage to the non-stick coatings.
5. Lay the power cord loosely around the housing.
46
Notes for Disposal
Dispose of the appliance and packaging must be effected in accordance with the
corresponding local regulations and requirements for electrical appliances and packaging. Please contact your local disposal company.
Do not dispose of electrical appliances as unsorted municipal waste, use separate
collection facilities. Contact your local government for information regarding the collection systems available. If electrical appliances are disposed of in landfills or dumps, hazardous substances can leak into the groundwater and get into the food chain, damaging your
health and well-being. When replacing old appliances with new once, the retailer is legally
obligated to take back your old appliance for disposal at least for free of charge.
Information and Service
Please check www.gastroback.de for further information. For technical support, please
contact Gastroback Customer Care Center by phone: +49 (0)4165/22 25-0 or e-mail
[email protected].
Warranty
We guarantee that all our products are free of defects at the time of purchase. Any demonstrable manufacturing or material defects will be to the exclusion of any further claim and
within warranty limits of the law free of charge repaired or substituted. There is no warranty
claim of the purchaser if the damage or defect of the appliance is caused by inappropriate
treatment, over loading or installation mistakes. The warranty claim expires if there is any
technical interference of a third party without an written agreement.
The purchaser has to present the sales slip in assertion-of-claim and has to bear all charges
of costs and risk of the transport.
47
Recipe Ideas
In Grill Mode
Beef Tenderloin Steak with Roquefort Sauce
Ingredients:
• One steak of beef tenderloin
• 3.5 oz. Roquefort cheese
• 2 cups crème fraîche
1. Cook steak on the Grill surface, adjusting cooking time to taste.
2. While steak is cooking, melt 3.5 oz. of Roquefort in 2 cups of crème fraîche,
stirring continuously.
Pour sauce over steak to serve, with pasta or steamed vegetables on the side.
Lemon-Honey Chicken Skewers
Ingredients:
• 1 lb. chicken breast
• 2 tbs. lemon juice
• 2 tbs. honey
• 2 tsp. sesame seeds
• 1 tsp. grated ginger
1. Slice chicken into thin strips and thread onto 8 skewers.
2. Place skewers on Grill cooking surface, adjusting cooking time to taste.
3. While chicken is cooking, whisk lemon juice, honey, sesame seeds, and ginger together
in a bowl.
Pour sauce over chicken before serving. Accompany kabobs with steamed rice and green
vegetables.
Grilled Duck Breasts
Ingredients:
• 1 duck breast
1. Score skin in a diamond pattern, making cuts of about 1/8 inch in depth.
2. Cook, skin side down, on Grill surface, adjusting cooking time to taste.
Serve with a spiced apple or fig compote, and garlic potato or celery root purée.
Lamb Chops With Thyme
Ingredients:
• 3 lamb chops per person
• olive oil
• salt/pepper
• thyme
1. Brush chops with a small amount of olive oil. Season with salt, pepper,
and sprinkle with thyme.
2. Cook on Grill surface, adjusting cooking time to taste.
Enjoy while still hot.
48
Hamburger/Cheeseburger/Baconburger
Ingredients:
• 1 lb. ground beef
• 1 eg
• chopped onion
• salt/pepper
• fines herbes
• mustard/ketchup
• lettuce
• tomatoes
• pickles
1. Mix together 1 lb. of ground beef with egg, chopped onion, salt, pepper, and herbs.
Form meat into balls, and flatten into hamburger patties.
2. Cook on Grill surface, adjusting cooking time to taste.
3. Toast hamburger buns on Grill surface.
4. Serve burgers on buns with mustard, ketchup, lettuce, tomatoes, and pickles, as desired.
Variations: add melted cheese, or bacon cooked on Grill surface.
Sweet and Salty Zucchini-Apricot Brochettes
Ingredients:
• 4 small zucchini
• salt/pepper
• herbes de Provence
• cayenne pepper
• 10 – 12 slices of bacon
• 12 apricots
1.Steam zucchini, or blanch in salted boiling water for 3 to 4 minutes.
Chop into bite sized pieces.
2.Mix together salt, ground pepper, herbes de Provence, and a pinch of cayenne pepper.
Coat zucchini in spice mixture.
3.Place bacon on Grill surface, and cook according to taste.
4.Cut bacon slices in half, lengthwise, depending on the size of the zucchini bits.
Wrap zucchini pieces in bacon.
5.Cut apricots in half or into thirds, depending on the size of the fruit.
6.Thread skewers, alternating between apricots and zucchini, and sprinkle with herbes
de Provence.
7.Place brochettes onto Grill surface and cook, rotating occasionally, adjusting cooking
time to taste.
Enjoy while still hot.
49
In Griddle Mode
Sweet and Salty Zucchini-Apricot Brochettes
Ingredients:
• 4 salmon steaks (about 1/3 lb. each)
• 2 tbs. olive oil
• 2 tbs. fresh tarragon
• freshly ground black pepper
1. Whisk together olive oil, tarragon, and pepper.
2. Brush salmon steaks with olive oil mixture to coat.
3. Cook steaks on Griddle surface, adjusting cooking time to taste.
Garnish salmon with slices of lime and serve with potato purée.
Grilled Fillet of Fish
Ingredients:
• 4 firm, white fish fillets (halibut, sole, turbot)
• 3 tbs. oil
• lemon juice
• thyme
• 2 bay leaves
1. Whisk together oil, lemon juice, thyme, and crushed bay leaves.
2. Brush fish fillets with marinade, and cook on Griddle surface, adjusting cooking time to taste.
Hamburger/Cheeseburger/Baconburger
Ingredients:
• 2 cloves garlic
• 2 tbs. tandoori spice
• 2 cups plain yogurt
• 6 tbs. lemon juice
• 2 tbs. olive oil
• 2 cloves garlic, crushed
• salt
• 6 chicken breasts
1.Peel and mince 2 cloves of garlic. In a bowl, whisk together tandoori spice, yogurt, lemon
juice, olive oil, garlic, and salt.
2.Chop chicken breast into small chunks and brush generously with yogurt mixture to coat.
3.Place in fridge, and let marinate for 24 hours.
4.Cook marinated chicken on Griddle surface, adjusting cooking time to taste.
Serve with steamed rice.
50
Grilled Fish With a Parsley and Parmesan Sauce
Ingredients:
• 1 cup fresh parsley
• ½ cup grated Parmesan cheese
• ½ cup ground pine nuts
• ¼ cup capers
• 2 tbs. lemon juice
• 2 tbs. lemon zest
• salt/pepper
• ½ cup olive oil
• 4 firm white fish fillets (halibut, sole, turbot)
To make the parsley and Parmesan sauce:
1. In a blender or food processor, blend together parsley, cheese, pine nuts, capers,
and lemon juice.
2. Mix in olive oil little by little, until fully blended. Set sauce aside.
To prepare the fish:
1. Brush fillets of fish with olive oil. Season with salt and pepper.
2. Cook fish on Griddle surface until the skin pulls away easily with a fork.
Serve immediately, accompanied by the parsley and Parmesan sauce.
Pancakes
IIngredients:
• 4 cups flour
• 2 ½ tbs. sugar
• 1 tbs. baking powder
• pinch of salt
• 2 eggs
• ¼ cup butter
• 1 ¼ cups milk
1. In a big bowl, combine flour, sugar, baking powder, and salt. Add eggs, and mix until
smooth. Add melted butter and milk, and stir together to combine.
2. Let batter chill for at least one hour.
3. Pour batter onto griddle in batches, making small pancakes about four inches in diameter. Adjust cooking time according to taste.
Top with sugar, cinnamon, melted chocolate, jelly, or whipped cream, and enjoy.
Grilled Fruit
Ingredients:
• Various fruits of your choice (apples, bananas, pears…)
1. Cut fruit into thin strips or small pieces, and thread onto skewers.
2. Cook on Griddle surface, adjusting the cooking time according to taste.
Top with honey or melted chocolate and enjoy.
51
GASTROBACK GmbH
[email protected] . www.gastroback.de
20120815
Gewerbestraße 20 . D-21279 Hollenstedt / Germany
Telefon +49 (0)41 65/22 25-0 . Telefax +49 (0)41 65/22 25-29