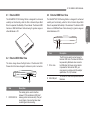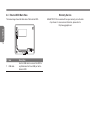
1
Copyright © 2010 by GIGABYTE TECHNOLOGY CO., LTD.
All rights reserved.
GIGABYTE Booktop™ D1125 Docking Station User’s Manual
Release Edition: 2010/10
This manual guides you in setting up and using your new docking station.
Information in the manual has been carefully checked for accuracy and is subject to change without notice.
No part of this manual may be reproduced, stored in a retrieval system, or transmitted, in any form or by any means, electronic, mechanical, by photocopy, recording, or otherwise, without prior written consent from GIGABYTE.
Trademarks
GIGABYTE™, Booktop™ are registered trademarks of GIGABYTE Technology.
All other brands or product names mentioned in this manual are trademarks or registered trademarks of their respective companies.
CE Notice (European Union)
English
2
This symbol
indicates this T1125 notebook complies with the
EMC Directive and the European Union’s Low Voltage Directive.
This symbol also indicates that T1125 meets the following technical
standards:
• EN 55022 — “Limitations and Methods of Measurement for the
Radio Interferences of Information Technology Equipment.”
• EN 55024 — “Information technology equipment - Immunity characteristics - Limits and methods of measurement.”
• EN 61000-3-2 — “Electromagnetic compatibility (EMC) - Chapter
3: Limits - Section 2: Limits on the harmonic current emissions
(Equipment input current up to and including 16 A per phase).”
• EN 61000-3-3 — “Electromagnetic compatibility (EMC) - Chapter
3: Limits - Section 3: Limits on the voltage fluctuations and flicker
in low-voltage power supply systems for equipment with rate current up to and including 16 A.”
• EN 60950 — “Safety of Information Technology Equipment.”
NOTE: EN 55022 emissions requirements provide for two
classifications
• Class A governs commercial use
• Class B is governs residential use
For CB:
• Only use batteries designed for this computer. The wrong battery
type may explode, leak or damage the computer
• Do not remove any batteries from the computer while it is powered on
• Do not continue to use a battery that has been dropped, or that appears damaged (e.g. bent or twisted) in any way. Even if the computer
continues to work with a damaged battery in place, it may cause circuit
damage, which may possibly result in fire.
• Recharge the batteries using the notebook’s system. Incorrect recharging may make the battery explode.
• Do not try to repair a battery pack. Refer any battery pack repair or
replacement to your service representative or qualified service personnel.
• Keep children away from, and promptly dispose of a damaged battery.
Always dispose of batteries carefully. Batteries may explode or leak if
exposed to fire, or improperly handled or discarded.
• Keep the battery away from metal appliances.
• Affix tape to the battery contacts before disposing of the battery.
• Do not touch the battery contacts with your hands or metal objects.
D1125 SERIES USER’S MANUAL
FCC statement
• Reorient or relocate the receiving antenna.
• Increase the separation between the device and receiver.
• Connect the device into an outlet on a circuit different from that to
which the receiver is connected.
• Consult the dealer or an experienced radio/television technician
for help.
Notice: Shielded cables
All connections to other computing devices must be made using
shielded cables to maintain compliance with FCC regulations.
Notice: Peripheral devices
Only peripherals (input/output devices, terminals, printers, etc.)
certified to comply with the Class B limits may be attached to this
equipment. Operation with non-certified peripherals is likely to result
in interference to radio and TV reception.
Caution
Changes or modifications not expressly approved by the manufacturer could void the user’s authority, which is granted by the Federal
Communications Commission, to operate this computer.
Notice: Canadian users
This Class B digital apparatus complies with Canadian ICES-003.
Remarque à l’intention des utilisateurs canadiens
Cet appareil numérique de la classe B est conforme a la norme
NMB-003 du Canada.
Compliant with Russian regulatory certification
МЛ04
English
This device has been tested and found to comply with the limits for
a Class B digital device pursuant to Part 15 of the FCC rules. These
limits are designed to provide reasonable protection against harmful interference in a residential installation. This device generates,
uses, and can radiate radio frequency energy and, if not installed
and used in accordance with the instructions, may cause harmful
interference to radio communications. However, there is no guarantee that interference will not occur in a particular installation. If this
device does cause harmful interference to radio or television reception, which can be determined by turning the device off and on, the
user is encouraged to try to correct the interference by one or more
of the following measures:
3
English
4
Modem notices (only for certain models)
Notice for USA
This equipment complies with Part 68 of the FCC rules. Located on
the modem is a label that contains, among other information, the
FCC Registration Number and Ringer Equivalence Number (REN)
for this equipment. Upon request, you must provide this information to
your telephone company. If your telephone equipment causes harm
to the telephone network, the telephone company may discontinue
your service temporarily. If possible, they will notify you in advance.
But, if advance notice is not practical, you will be notified as soon as
possible. You will also be informed of your right to file a complaint
with the FCC.
Your telephone company may make changes in its facilities,
equipment, operations, or procedures that could affect the proper
functioning of your equipment. If they do, you will be notified in
advance to give you an opportunity to maintain uninterrupted
telephone service.
If this equipment should fail to operate properly, disconnect the
equipment from the phone line to determine if it is causing the
problem. If the problem is with the equipment, discontinue use and
contact your dealer or vendor.
Caution:
To reduce the risk of fire, use only No. 26 AWG or larger UL Listed or
CSA Certified Telecommunication Line Cord.
TBR 21
This equipment has been approved [Council Decision 98/482/EC
- "TBR 21"] for single terminal connection to the Public Switched
Telephone Network (PSTN).
However, due to differences between the individual PSTNs provided
in different countries, the approval does not, of itself, give an
unconditional assurance of successful operation on every PSTN
termination point. In the event of problems,
you should contact your equipment supplier in the first instance.
For more information about applicable countries, please refer to
"Regulations and safety notices" on page 46
This device complies with Part 15 of the FCC Rules.
Operation is subject to the following two conditions:
(1) This device may not cause harmful interference, and
(2) This device must accept any interference received, including
interference that may cause undesired operation.
D1125 SERIES USER’S MANUAL
Notice for Australia
For safety reasons, only connect headsets with a telecommunications
compliance label. This includes customer equipment previously
Notice for New Zealand
1. The grant of a Telepermit for any item of terminal equipment
indicates only that Telecom has accepted that the item complies
with minimum conditions for connection to its network. It indicates
no endorsement of the product by Telecom, nor does it provide
any sort of warranty. Above all, it provides no assurance that
any item will work correctly in all respects with another item of
Telepermitted equipment of a different make or model, nor does it
imply that any product is compatible with all of Telecom's network
services.
2. This equipment is not capable, under all operating conditions, of
correct operation at the higher speeds for which it is designed.
Telecom will accept no responsibility should difficulties arise in
such circumstances.
3. Some parameters required for compliance with Telecom's
Telepermit requirements are dependent on the equipment (PC)
associated with this device. The associated equipment shall
be set to operate within the following limits for compliance with
Telecom's Specifications: a There shall be no more than 10 call
attempts to the same number within any 30 minute period for any
single manual call initiation, and b The equipment shall go onhook for a period of not less than 30 seconds between the end of
one attempt and the beginning of the next call attempt.
5. This equipment shall not be set up to make automatic calls to
Telecom's 111 Emergency Service.
6. This device is equipped with pulse dialing while the Telecom
standard is DTMF tone dialing. There is no guarantee that
Telecom lines will always continue to support pulse dialing.
7. Use of pulse dialing, when this equipment is connected to the
same line as other equipment, may give rise to bell tinkle or
noise and may also cause a false answer condition. Should such
problems occur, the user should NOT contact the telecom Fault
Service.
8. This equipment may not provide for the effective hand-over of a
call to another device connected to the same line.
9. Under power failure conditions this appliance may not operate.
Please ensure that a separate telephone, not dependent on local
power, is available for emergency use.
English
labelled permitted or certified.
4. Some parameters required for compliance with Telecom's
Telepermit requirements are dependent on the equipment (PC)
associated with this device. In order to operate within the limits
for compliance with Telecom's specifications, the associated
equipmentlabelled permitted or certified. shall be set to ensure
that automatic calls to different numbers are spaced such that
there is not less than 5 seconds between the end of one call
attempt and the beginning of another.
5
English
6
D1125 SERIES USER’S MANUAL
English
Chapter 1
This section will tell you how to connect and operate the docking
station. It provides basic configuring operations.
7
1.2 Top View: Docking Station
The extensive features of the GIGABYTE Docking Station are
designed for enhanced usability and functionality and to extend the
usability of T1125.
The below image shows the top of the docking station.
When placing the notebook into the docking station, make
sure to align the connection ports on the notebook and the
docking station.
The docking station features a number of ports and connections
allowing for easy management and control of multiple peripherals.
Below lists the types of connections available to the user.
Compatibility
I/O Port
LAN
External Optical
Disk Driver
Buttons
Dimensions
Weight
Specifications
GIGABYTE T1125 Notebook
2 x USB 2.0
2 x USB 3.0
HDMI, D-sub, ODD SATA
RJ45
Mic-in, Earphone-out
DC-in Jack
10/100/1000Base-T Compliant Ethernet
LAN
1
* The Specifications list above may appear different from your
model.
3
4
#
Item
Description
1
Docking Port
Connector
The docking port is used to interface between
the notebook and the station itself allowing
control and connectivity. Care must be taken
when connecting and disconnecting.
2
External ODD
Docking Port
Connector
The docking port is used to interface
between the External ODD and the station
itself.
3
Power Button
The Power On / Off button can switch on and
shut down the attached notebook.
4
Battery Capacity
To inspect the battery capacity of the
attached notebook
Slot-in DVD-Super Multi Dual-Layer Drive
Power On / Off Button
Battery Capacity inspection Button
96.7(W) x 301.3(D) x 56.9(H)mm
about 465g
(without external Optical Disk Driver)
2
N
OPE
English
8
1.1 Features & Specifications
D1125 SERIES USER’S MANUAL
1.3 Rear View: Docking Station
The below image shows the rear of the docking station. All of the
interface ports for peripherals are on the rear of the docking station.
Please refer to the below image to see placement of the ports.
3
LINE OUT
#
6
The Docking Station has a total of 2 available
USB2.0 Ports for peripheral connections and
the ports are USB 2 Compliant.
6
USB3.0 Ports
The Docking Station has a total of 2 available
USB3.0 Ports for peripheral connections and
the ports are USB 3/ USB 2 Compliant.
7
HDMI Port
For Connecting High Definition Monitors and
TV’s/Panels.
2
HDMI
7
USB2.0 Ports
4
5
Item
Description
1
RJ-45 LAN Port
The LAN Port is used to connect the Docking
Station and docked notebook to a wired
network. The port is capable of speeds up to
1Gbps.
2
VGA D-Sub Port
The VGA D-Sub port is used to connect an
external analogue monitor to the docking
station. These can be CRT, LCD or TV
Displays.
3
Mic-In Jack
For connecting an external Microphone.
4
Audio Jacks
For connecting External Speakers/
Headphones.
English
1
5
9
1.5
The below image shows the Left t side of the GIGABYTE Docking
station. Please refer to the below images for reference to ports /
connectors.
Connect the AC adaptor and power cord
Connect the AC adaptor to ensure that the Docking Station is
powered. A number of ports on the docking station also use the
power to operate. It will also enable the charging of the notebook
battery pack when the unit is attached to the docking station.
English
1.4 Side Views: Docking Station
1
Dock and Un-dock of the Docking Station
The AC adaptor can be connected to any power source supplying
from 100 to 240 volts and 50 or 60 hertz. This allows the AC adaptor
to work in most countries and regions.
10
#
Item
Description
1
DC-in Jack
The DC Jack is used to connect power to the
dock to power the ports on the station itself
as well as to charge the units battery.
It is recommended to use only the AC adaptor supplied in the
box with the ˇDocking Station and any AC adaptor approved by
the supplier. Using any other adaptor could cause damage or
malfunction and might result in injury.
3
2
1
1. Connect the power cord to the AC adapter.
2. Connect the AC adaptor to the DC-in Jack on the left side of the
rear of the docking station.
3. Connect the power cord to the power outlet.
D1125 SERIES USER’S MANUAL
Rotate the Docking Station
T1125 can be used as the second Screen output if rotate the D1125
anti-clockwise up to 90 degree with the T1125 in Tablet PC mode.
N
OPE
English
Connect the Docking Station
The image above show the notebook and the docking station.
Please take note of the placement of the docking ports. When the
notebook is placed the right way up, the docking connectors will be
on the same side. Ensure that these are aligned correctly before
trying to dock the notebook to the docking station.
11
1.6
The images aboveLine up the notebook with the docking station as
shown above and make sure of the positioning. Once aligned gently
place the notebook onto the docking station and press down firmly
once aligned until the notebook is connectedd. The battery light
should come on to indicate that it is seated and connected properly.
Ensure that the AC adaptor is connected first before connecting the
notebook to the docking station.
Un- Dock the Notebook
Life the Notebook offs from the Docking Station easily, so as not to
damage the docking connector. To un-dock the notebook from the
Docking Station does not need to shut down the notebook first.
English
12
1.7 How to: Connect an External D-Sub Display
1.8 How to: Connect a USB Devices
Connect an External D-Sub Display
To insert the cable, simply line it up with the port on the back of the
dock and press it into the port securely. Tighten the two securing
screws so as to ensure that the cable stays connected.
Connect a USB Device
To connect a USB device simply line it up with the USB port on the
unit and press it into the port securely. It will only go in one way
because of the notching used so ensure that it is lined up correctly
and do not force the USB connector into the port if it does not want
to go in. USB Devices support Plug and Play and should auto
discover once detected within the operating system.
HDMI
LINE OUT
HDMI
LINE OUT
Disconnect an External D-Sub Display
To remove the cable simply loosen the securing screws and grab
the head of the cable and gently pull it out of the dock, ensuring that
the port is no longer active with a display out-put. DO NOT pull by
the cable itself is this can damage the display cable of the monitor
or projector or display device.
Remove the USB Device
To remove the device, look for the Safely Remove Hardware icon
on the taskbar and open the tool by double clicking with the left
mouse button. Select the dive you would like to remove and click
on stop, and windows will then let you know that it is safe to remove
the device, and then pull the cable out of the port. If there is no
notebook installed on the docking station you will be able to pull the
cable out without needing to follow the Safety Remove steps
D1125 SERIES USER’S MANUAL
1.10How To: Connect an RJ45 Ethernet LAN
Connect an HDMI Display
To insert the cable, simply lines it up with the HDMI port on the
HDMI port on the docking station and press it into the port. It will
click lightly into place when it is inserted properly. Use the operating
systems display properties to then get an image on the HDMI
Output port.
The docking station features an RJ45 Ethernet port with an
integrated LAN controller capable of operational speeds of 10Mbps,
100Mbps or Gigabit (1000Mbps) – When active it will override the
port on connected notebooks.
13
HDMI
HDMI
LINE OUT
LINE OUT
Disconnect an HDMI Display
To remove the cable simply grab the head of the cable and gently
pull out of the GRFN, ensuring that the port is no longer active with
a display output. DO NOT pull by the cable itself is this can damage
the HDMI cable or the cables connector head as well as the HDMI
port.
English
1.9 How To: Connect an HDMI Display
English
14
Chapter 2 External ODD
This section will tell you how to connect and operate the External
ODD that comes with D1125. It provides basic configuring
operations.
D1125 SERIES USER’S MANUAL
2.3 External ODD Rear View
The GIGABYTE D1125 Docking Station is designed for enhanced
usability and functionality, while the Slot-in External Super Multi
Drive for expanded the flexibility of the notebook. The External ODD
features a USB Data/Power Cable allowing for greater usage on
others Notebook or PC.
The GIGABYTE D1125 Docking Station is designed for enhanced
usability and functionality, while the Slot-in External Super Multi
Drive for expanded the flexibility of the notebook. The External ODD
features a USB Data/Power Cable allowing for greater usage on
others Notebook or PC.
English
2.1 External ODD
15
1
#
Item
Description
1
DC-In Jack
The DC Jack is used to connect power to
External ODD. Note: The External ODD can
be powered by Notebook when connects
by USB cable. No Power cord or adaptor
is provided for the External ODD, you
may require to purchase (with the adaptor
specification: 5V, 1A) if needed.
2
Mini USB port
To connect the USB cable provided and the
Notebook
2.2 External ODD Side View
The below image shows the Right sides of the External ODD.
Please refer to the below images for reference to ports / connectors.
SATA
1
#
1
Item
Description
ODD SATA Port
The docking port is used to interface
between D1125 and External ODD itself
allowing control and connectivity. This port
is very fragile. Care must be taken when
connecting and disconnecting.
2
2.4 External ODD Back View
The below image shows the Back side of the External ODD..
English
16
1
#
Item
Description
1
USB cable
Use this USB cable to connect the ODD to
any Notebooks that have USB port as the
External ODD.
Warranty Service
GIGABYTE D1125 is covered with two year warranty, since the date
of purchase. For more service information, please refer to
http://www.gigabyte.com