1
TM-xA Series
Barcode Label Printing Scale
Manual
User
Modal:TM-30A /TM-15A / TM-6A
2008.06 Version1.51
Preface
Thank you for use the product. Before you start to use this product, please be sure you have read the
content in the 《Preface》 and follow these notices.
1.1 Notices:
Make sure the electric plugs and wires are all properly connected, and use the 3-cell electric wire only. If
an extension-board is used, the outlet of the extension-board is also 3-cell. Make sure the earth wire is
properly connected to the earth in order to prevent the leakage of electricity.
Don’t touch the electric plug with wet hand, in case of electric shock.
Don’t lean your body on the scale to avoid damaging the load cell.
Don’t impact the scale or shock the scale with heavy goods, in case of damaging the load cell. When
weighing, don’t exceed the maximum weighing range
Don’t get the product rained or washed by water; If there is some water on the product by inadvertence,
please wipe it clean with a dry cloth; If the scale doesn’t work normally, please send the scale to our
distributor as soon as possible. We shall do our best to service you.
Don’t put the scale in the places which are ultimately cold, hot or wet. These working conditions may
make the product not work normally or damage the product.
Don’t use organic chemistry solutions to wipe the surface or the panel of the product.
Don’t try to take the scale apart and repair the scale by non-professonal staff.
Don’t put your hands into the product through the place where the printer spins out. It may cause electric
shock with 110V/220V electricity.
Cut the connection between the scale and AC electricity when taking the scale apart under the guidance
of professional staff from our company.
Don’t try to disassembly the switch power inside of the scale. Because it takes a long time to discharge
the high voltage capacitance, and it’s very dangerous to disassembly the switch power when the high
voltage capacitance is not fully discharged.
Strongly recommend users to use thermal paper sold by our company. The scale can have a longer
life if working with thermal paper sold by our company because we have done a lot of experiments
and optimizations on the our thermal paper. On contrary, the life span of the printer may get
shortened if the printer works with the thermal paper which is likely to deposit or leave carbon
deposits.
Thermal header is a precise instrument. Don’t touch it with fingers or sharp tools. Always use the
accessary cleaning tools to keep the header clean.
i
1.2 Guide to read
Please go to page 6 《Thermal printer》 and learn the method to install paper and notices for users.
Please read page 2《General functions, configuration and using index》carefully first in order to know
about the performance of the scale.
Please read page 15 《Fast Prog》carefully first , and learn frequently used programme operations of the
scale.
For ordinary users, please first read page 19, the two chapters《Transfer and Lock of PLU》(page 19) and
《Manual Goods Sale》 (page 21) in the《Sale Operations》, and learn general sale operations of the scale.
For ordinary users, read page 98《Account Operations》, get to know how to print the report forms and
delete the records. And read page 36《Inquiry of Sale Records and Markers of Returns of Goods》to learn
how to look over the recent sale records.
For advanced users, read the rest of 《Sale Operations》, and learn auto mode and other functions.
For professional users, such as managers in big supermarket, should continue reading the rest of the
instruction.
When error warning shows up, check 《Error: No se encuentra la fuente de referencia》 in page
Error: No se encuentra la fuente de referencia .
ii
Menu
Preface..........................................................................................................................i
1.1 Notices:...................................................................................................................i
Make sure the electric plugs and wires are all properly connected, and use the 3-cell
electric wire only. If an extension-board is used, the outlet of the extension-board is
also 3-cell. Make sure the earth wire is properly connected to the earth in order to
prevent the leakage of electricity...................................................................................i
Don’t touch the electric plug with wet hand, in case of electric shock.......................i
Don’t lean your body on the scale to avoid damaging the load cell............................i
Don’t impact the scale or shock the scale with heavy goods, in case of damaging
the load cell. When weighing, don’t exceed the maximum weighing range................i
Don’t get the product rained or washed by water; If there is some water on the
product by inadvertence, please wipe it clean with a dry cloth; If the scale doesn’t
work normally, please send the scale to our distributor as soon as possible. We shall
do our best to service you..............................................................................................i
Don’t put the scale in the places which are ultimately cold, hot or wet. These
working conditions may make the product not work normally or damage the
product...........................................................................................................................i
Don’t use organic chemistry solutions to wipe the surface or the panel of the
product...........................................................................................................................i
Don’t try to take the scale apart and repair the scale by non-professonal staff...........i
Don’t put your hands into the product through the place where the printer spins out.
It may cause electric shock with 110V/220V electricity...............................................i
Cut the connection between the scale and AC electricity when taking the scale apart
under the guidance of professional staff from our company........................................i
Don’t try to disassembly the switch power inside of the scale. Because it takes a
long time to discharge the high voltage capacitance, and it’s very dangerous to
disassembly the switch power when the high voltage capacitance is not fully
discharged......................................................................................................................i
Strongly recommend users to use thermal paper sold by our company. The scale can
have a longer life if working with thermal paper sold by our company because we
have done a lot of experiments and optimizations on the our thermal paper. On
contrary, the life span of the printer may get shortened if the printer works with the
thermal paper which is likely to deposit or leave carbon deposits...............................i
Thermal header is a precise instrument. Don’t touch it with fingers or sharp tools.
Always use the accessary cleaning tools to keep the header clean. .............................i
1.2 Guide to read..........................................................................................................ii
Please go to page 6 《Thermal printer》 and learn the method to install paper and
notices for users............................................................................................................ii
Please read page 2《General functions, configuration and using index》carefully first
in order to know about the performance of the scale. .................................................ii
Please read page 15 《 Fast Prog 》 carefully first , and learn frequently used
iii
programme operations of the scale. ............................................................................ii
For ordinary users, please first read page 19, the two chapters 《Transfer and Lock
of PLU》(page 19) and《Manual Goods Sale》 (page 21) in the《Sale Operations》,
and learn general sale operations of the scale..............................................................ii
For ordinary users, read page 98 《Account Operations》, get to know how to print
the report forms and delete the records. And read page 36 《Inquiry of Sale Records
and Markers of Returns of Goods》to learn how to look over the recent sale records.
......................................................................................................................................ii
For advanced users, read the rest of 《Sale Operations》, and learn auto mode and
other functions. ............................................................................................................ii
For professional users, such as managers in big supermarket, should continue
reading the rest of the instruction. ...............................................................................ii
When error warning shows up, check 《 Error: No se encuentra la fuente de
referencia》 in page Error: No se encuentra la fuente de referencia . ......................ii
Menu...........................................................................................................................iii
Examples Menu.........................................................................................................xx
1 Components of Barcode Lbel Printing Scale.........................................................1
1.1 Check Accessories..................................................................................................1
One Barcode label Printing Scale; .............................................................................1
One display pole; ........................................................................................................1
One tray; .....................................................................................................................1
One pack of screws used to fix the pole; ....................................................................1
One copy
《TM-xA Series Barcode Label Printing Scale User Manual 》(this book); 1
One CD for PC software 《TM-xA data management software》 ..........................1
One set of clean appliance for thermal printer head;..................................................1
One overlay for shortcut PLU; ...................................................................................1
One power plug ..........................................................................................................1
1.2 Keyboard................................................................................................................1
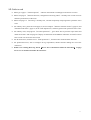
1.2.1 The original overlay of the keyboard.........................................................................................................1
Picture 1.1 Sketch map of keyboard function.....................................................................................1
1.2.2 Instructions for Keys..................................................................................................................................1
1.2.3 Instruments for Keys in Function Area......................................................................................................2
【Sale】:Enter sale mode and execute the operation of goods sale........................2
【 Prog 】: Enter programme mode and can programme scale parameters, PLU,
print formats, time and so on. ......................................................................................2
【Account】: Enter Account mode to check deals data or print reports and so on. . 2
【Time】: Display current time and return to the previous interface when you press it
again. ............................................................................................................................2
【Tare】: Set current weight as tare or appoint certain data as tare (When there is a
number in input window, number tare is the priority.). Pressing 【Tare】 for a long
time without releasing, system would enter【Tare】. And do it again to exit this state.
......................................................................................................................................2
iv
【 Zero 】 : Clear current weight and reset zero within allowed range. If not within
allowed range, set zero would fail. ..............................................................................2
【 Shift 】 : Shife key used for extending PLU shortcut key, and switching case
sensitivity in text input interface. When current input number is decimal (tare,
weight, U.Price, T.Price) , long press 【Shift 】 can change the position of decimal
point..............................................................................................................................2
【Auto Mode】: Switch between ordinary mode and auto mode. Users can enter auto
mode if current sale buffer is empty. ...........................................................................2
【Print type】: The key owns no meaning in this edition. The print type is decided by
selected Print format. ...................................................................................................2
【Paper type】: Long Press it to switch the paper type between gap thermal paper and
plain thermal paper. .....................................................................................................2
【 Re-print】 : Repeat last print in current buffer (Repeated print data would not be
stored in deal records as sale record.). This function can be forbidden in Spec..........2
【Feed】: Roll the gap thermal paper or plain thermal paper. Unprinted buffer data
will be cleared in the process of feed...........................................................................2
【-%】: Discount in percentage, . Please notice that input is decimal and pay extra
attention to the position of decimal point. Discount is 5% off while input is 500, if
there are two zeroes after decimal point. And input should be 5000, If there are three
zeroes............................................................................................................................2
【-Num】: Discount in subtraction. . Input is also decimal. .................................3
【-@】: Discount to a fixed price. . Input is also decimal.........................................3
【T-Sale】: Set input number as U.Price and set a temporary PLU. Users can amend
price unit of temporary weight PLU. For example, when users set the price unit of
temporary weight PLU is 500g while the unit of the scale is kg, system would
automatically convert input number (double input number). .....................................3
【Drawer】: Open drawer besides normal operations. .........................................3
【F-Prog】: Change some setting or values of PLU fastly in sale mode. Please refer
to process instructions to understand the use of combination keys. ...........................3
【×】: Input count amount in sale. Or do temporary count goods sale according to
inputted U.Price............................................................................................................3
【 Amend 】 : Amend deal data in sale interface and store amended data in
programme interface. ...................................................................................................3
【←】【↑】【↓】【→】: Switch among neighbouring steps and numbers in
programme and account interfaces...............................................................................3
【V1】~【V4】: Activate corresponding sale buffers. ......................................3
【0】~【9】、【00】: Input corresponding numbers. .....................................3
【Back】: Delete the last digit of the inputted number. ............................................3
【PLU】: Transfer PLU datas by using input numbers as serial numbers................3
【 Cash/Print 】 : Check out in cash; calculate changes and print labels or receipts
according to setting. ....................................................................................................3
【Cancel】: Clear data, cancel operations or go back to previous step.................3
【Accu/Confirm】: Save accumulative deal data into activated sale buffer and other
confirmation operations................................................................................................3
1.2.4 Character Input Instructions.......................................................................................................................3
v
【Amend】: Confirm text input. Save and exit.........................................................3
【Cancel】: Cancel edited data and quit without saving. .........................................3
【Confirm】: Confirm the input in special IME (not used in pure English version). . 3
【End】: Input end character, and all characters after appointed position are deleted. 3
【Delete】: Delete the character at the position of cursor . ......................................3
【 Insert 】 : Switch between cover mode and insert mode. Cover mode is activated
when cursor is constant on, insert mode is activated when cursor is glittering...........3
【IME】: Input method editor. Switch the input languages: En-1(in small letters), En2 (in big letters), Code(machine code). There are special IMEs for not pure English
version (e.g., Chs for Chinese ISN.)............................................................................3
【Shift】: Switch En-1, En-2 in temporary state. .....................................................3
【←】【→】: Move current editing position backwards or forwards. ...................3
【0】~【9】 and【SC1】~【SC59】: Input characters or codes. ........................4
The first window: Display current input mode: one of En-1, En-2 and Code............4
The second window: Display the position of current editing letters in the text.........4
The third window: Display current editing position and content of neighbouring
letters. In En-1 or En-2 ASCII mode is displayed, in Code Hex mode is displayed.
Cover mode is activated when cursor which shows the position is constant on; insert
mode is activated when cursor is glitter.......................................................................4
The fourth window: Display current input content. In En-1 or En-2 the window
displays nothing, and in Code displays the inputted machine code. ..........................4
En-1: Input numbers or ASCII characters. For the keys with ‘/’, input character is
the one on the left of ‘/’. Pressing 【Shift】 , next input character and only this one is
under the rule of En-2 . ................................................................................................4
En-2: Input numbers or ASCII characters. For the keys with ‘/’, input character is
the one on the right of ‘/’. Pressing 【Shift】 , next input character and only this one
is under the rule of En-1 ..............................................................................................4
Code: Input machine code mode. Users can input ASCII, symbols in special IMEs.
The system could automatically distinguish the input content as ASCII, symbols in
special IMEs. Machine codes of each field can be found in following table. ............4
1.3 Display Panel.........................................................................................................4
1.3.1 Sketch Map of Display Panel.....................................................................................................................4
Picture 1.1 Display overlay.................................................................................................................4
1.3.2 Indication Signs .........................................................................................................................................4
【Zero】: It’s on when weight is zero and stable.......................................................4
【Stable】: It’s on when weight is stable...................................................................4
【Lock Tare 】: It’s on when tare is locked. Long press 【Tare 】 would lock tare.
Under this condition, tare would not be cleared after the sale. Long press 【 Tare 】
again would exit lock tare............................................................................................4
【Lock PLU】: It’s on when PLU is locked (lock U.Price at the same time.). Long
press【PLU】 would lock PLU. Under this condition, after the sale, the former PLU
sale state would remain till new PLU is transferred. Long press【PLU】 again would
exit lock PLU................................................................................................................5
【 Auto mode 】: It’s on in auto mode. In auto mode, lock PLU would be activated
automatically. In auto mode: If a weight PLU is transferred, print would operate
vi
automatically in condition that weight is new (Weight was set to zero in last sale.). If
a count PLU is transferred, system would print the amount bill when the print
amount has been set......................................................................................................5
【Label mode】: This sign is meaningless in this edition.........................................5
【Gap paper】: It’s on when paper type is gap paper. It’s off when paper type is plain
paper..............................................................................................................................5
【Shift】: Press 【Shift】 and it is on......................................................................5
【Sale】: It’s on in sale mode.....................................................................................5
【Prog】: It’s on in programme mode........................................................................5
【Account】: It’s on in account mode........................................................................5
【Change】: It’s on when the data in third window displayed is cash change..........5
【U.Price】: It’s on when the data in third window displayed is goods U.Price......5
【V1】~【V4】: It’s on when there are buffers in V1~V4 records. And it’s glittering in
edit mode......................................................................................................................5
【Discount】: When display single means that current goods has been discounted in
U.Price; when display total means that current accumulative total has been
discounted in T.Price ...................................................................................................5
【Single】: It’s on when current goods’ single price is displayed in fourth window. . 5
【Total】: It’s on when the subtotal of current sale buffers (V1~V4) is displayed in
fourth window. .............................................................................................................5
1.3.3 Expression of Characters............................................................................................................................5
Picture 3.1
Picture 3.2
Picture 3.3
Picture 3.4
Number characters 0~9...................................................................................................5
Characters A~M..............................................................................................................5
Characters N~Z...............................................................................................................5
Dash、underline, aboveline, three lineations of special symbols....................................5
Dash of special symbols: the same as ‘-’ in ASCII. ...................................................6
Underline of special symbols: Used to represent the characters which cannot be
displayed in ASCII(the symbols except 0~9, A~Z and ‘-’)......................................6
Aboveline of special symbols: Used to represent extended characters. In Chinese
edition, two aboveline represent a Chinese character. In Russian edition, one
aboveline represent a Russian character.......................................................................6
Three lineations of special symbols: In calibrating processes, it’s used as a prompt
to decide to enter demarcated interface or standard interface. ...................................6
1.4 Specifications.........................................................................................................6
Power supply: AC 90V~264V, 47~63Hz....................................................................6
Operation temperature: 0℃~40℃.............................................................................6
Conservation temperature: -20℃~70℃....................................................................6
Operation humidity: 15%~85%RH...........................................................................6
1.5 Thermal printer ......................................................................................................6
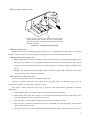
1.5.1 Install gap paper .........................................................................................................................................6
Picture 1.1
Picture 1.2
Picture 1.3
Picture 1.4
Open side door of scale printer.........................................................................................6
Open press mouth..............................................................................................................7
Place paper roller ..............................................................................................................7
Install paper loop...............................................................................................................7
vii
Picture 1.5 Finish installing paper.......................................................................................................8
Picture 1.6 Close side door of scale printer.........................................................................................8
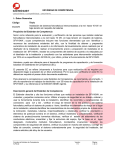
1.5.2 Gap paper mounts recycle..........................................................................................................................9
Picture 2.1 Gap paper mounts recycle.................................................................................................9
1.5.3 Install plain paper.......................................................................................................................................9
1.5.4 Operations concerning paper......................................................................................................................9
【Paper type】: Make sure the type of paper set is the same as the type used. When
【Gap Paper】is light in the display, you should set to use gap paper. Otherwise you
should set to use plain paper. If the type of paper you set to use is different from the
type currently used, please long press 【Paper Type】to change the set. ..................9
【Feed】: After installing the paper, press【Feed】. You can also press【Feed】to clear
abnormities of the printer and make paper roll for a certain length............................9
1.5.5 Abnormity of gap paper print.....................................................................................................................9
Install gap label paper, and make the edges of label paper and print head parallel. ..9
Switch off the scale. There are two keys near the component which draws back the
paper in the printer. Press and hold these two keys, and switch on the scale. ............9
After the printer is started, printer would roll out the paper at the length of 75mm. .9
After the paper is rolled out, malfunctions have been eliminated if two test lights
don’t glitter and one light is on and the other is off. ...................................................9
Then, press the key near to the component which draws back the paper. There
would be one test paper been printed...........................................................................9
Go to normal operation processes. ...........................................................................10
Picture 5.2 Test keys of printer..........................................................................................................10
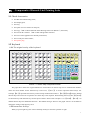
2 General functions, configuration and using index...............................................11
2.1 General functions.................................................................................................11
The printer can store 5990 PLUs, and the user can edit numbers of PLU from 10 to
5999. ..........................................................................................................................11
Users can use gap thermal paper and plain thermal paper. ......................................11
The printer provides many kinds of price input and discount. .................................11
The printer provides reports printing for different time periods and classifications
....................................................................................................................................11
Precision of measurement: business mode 1/6000, industrial mode 1/30000..........11
You can use USB flash disk to transfer and save the data. All the parameters can be
set on the compter and downloaded with USB flash disk. ........................................11
2.2 Setting of Print Format.........................................................................................11
Press 【 Paper type 】 for 4 seconds to switch between gap paper and plain paper.
This key would amend Spec021.................................................................................11
There are 9 kinds of print formats. Please reference to page 48 table 5-5 《 Factory
default print formats》...............................................................................................11
58mm*40mm and 40mm*30mm gap paper, 58mm and 40mm width plain paper are
available in default print formats. When using different type of paper, please adjust
the corresponding Spec shown in the table below. ...................................................11
Print formats include label print and receipt print. If user need to custom print
viii
format, please use PC ssoftware to change or contact with appointed after-service
cencer. ........................................................................................................................12
Don’t print bills while saling: amend Spec003 and Spec008 to 0. If some specific
deals need to print bills, please press 【Re-print】. .................................................12
To print a few copies of one bill, put the amount into Spec003 and Spec008. ........12
To print two different kinds of bills: set the type of one kind of bill in
Spec000~Spec009, and set the another in Spec010~Spec019. Strongly suggest users
contact with appointed after-service cencer. .............................................................12
Set grey level of gap thermal paper in Spec022. ......................................................12
Set grey level of plain thermal paper in Spec023. ...................................................12
The distance for paper cut should be long enough. Usually the value you set in
Spec025 is bigger than 30 when plain paper is used.................................................12
You can set different kinds of print formats and barcode types for each PLU. You
can check the details in PLU parameters for print formats and barcode types. Set the
value of these parameters to 0 if you choose the system type...................................12
The procedures to confirm print format: take bill 1 as an example. If two or more
goods are sold, print sum bill and use Spec005 as print format. If only one good is
sold, print the item bill. If sale PLU has been set for a specific print format (not 0),
system would use this special print format. If no specific print format has been set to
sale PLU (The setting number is 0.), the print format would be Spec000................12
2.3 Barcode Settings ..................................................................................................12
9 kinds of barcode settings, details in page 78 1.4《Factory Default barcode》....12
Barcodes can be divided by purpose into item barcodes and total barcodes, which
are printed in item labels and total labels respectively. If users need to custom print
format, please use PC software to change or contact with appointed after-service
center. .........................................................................................................................12
2.4 Measure Functions ..............................................................................................13
The scale offers 6 measure units as kg, gram, ton, lb, 500g, 100g. .........................13
Based on the difference national regulations, some of the measure unit may Not
Open. The combinations and recommended Spec settings are all shown below: ....13
Weight precision: The precisions are divided into four levels. Level 0 owns original
1/3000 . Level 0 and level 1 are available for commercial users while level 2 and
level 3 are only available for industrial users (“Ind” would be attached in the print of
weight). Please refer to Spec213. ..............................................................................13
We guarantee the stability and reliability for precision level 0 (1/3000 ) when the
scale leaves factory. But the higher precisions are just to satisfy the need of high
definition print for some users, so factory would not guarantee the stability and
reliability for higher precision levels for every scale. Please choose the precision
prudentially.................................................................................................................13
The request Zero-Return for scale print: it’s requested in commercial sales that the
display have to return to zero when the scale is going to print the weights of two
goods. But for industrial users, this rule could be ignored. Set the value of Spec069
to 2. (“Ind” would be attached in the print of weight). .............................................13
2.5 Sale Functions .....................................................................................................13
ix
Users could operate accumulative sales with 4 customers at the same time. Please
refer to the 1.1 in page 32 for operations. .................................................................13
Rounding methods could be divided into rounding method for single and rounding
method for total. The settings of rounding methods are shown in Spec100 and
Spec101......................................................................................................................13
Suggest that set the value of Spec100 to 1 if users don’t want the unit “cent” to be
displayed in sales........................................................................................................13
Suggest that set the values of Spec100 to 0 and Spec101 to 1 if users want the unit
“cent” to be in sale while unit “cent” is not displayed in grandtotal and print..........13
The units’ conversion for preset PLU U.Price: for example: set PLU10 U.Price to
10.00, the unit is 500gram and unit displayed is kg. When transfer PLU10, unit price
is displayed as 20.00...................................................................................................13
Units’ conversion for temporary unit price: the scale offers the function of units’
conversion for temporary unit goods and price from 500gram to kg. When U.Price’
display unit is /kg, set the value of Spec210 to 7 and the value of Spec073 to 1 to
activate this function. Please refer to the 1.2 in page 20, 1.1in page 27....................13
No Weigh Sale for Weight PLU: set the value of Spec071 to 1. When the weight
returns to zero in weigh sale, input the price and sell the goods at the price you
input. Please refer to 1.1 in page 22...........................................................................13
Users can discount on U.Price and T.Price conveniently. The discount methods
include discount at a fixed number, discount in subtraction and discount in
percentage. Please refer to 《Discount Operations》 in page 25. ..........................14
2.6 Report Functions .................................................................................................14
Users could print the total reports with time periods of last 32 stat. day, stat. month,
stat. quarter or manual time period............................................................................14
Users can print the reports for all departments, all classes and part of PLU (below
1000), with a time period of present stat. day, stat. month, stat. quarter or manual
time period..................................................................................................................14
Please refer to《Account Operations》 in page 98 for the details..........................14
3 Fast Prog..................................................................................................................15
3.1 Fast-Prog of PLU.................................................................................................15
Example 1.1 Fast-Prog of PLU..................................................................................................15
Note 1 Except the parts which have been instructed, meaning of the other
words are listed in《List of Programme Interface》in page 43. ......................16
Note 2 PLU fast-prog is forbidden when SPEC080=0. ....................................16
Note 3 Before you move to next step, if it display “ E1.01 Data Invalid”, it
means that the programme data you input is invalid. .......................................16
Note 4 The xx in PLU.xx means the content in the data which is marked with
the number of xx in PLU fast prog. ..................................................................16
Note 5 Xx is not continuous when users press 【 】 and 【 】 to select the
programme content. There are two reasons. First reason is that the content in
that part is meaningless. For example, tare will not present in count PLU
programme. The second reason is that the content in that part is seldom used
and has been set as non-programme content (Skip) in P3.01 and P3.02. Users
x
could change that setting for personel usage. Please refer to corresponding
chapters for details..............................................................................................16
Note 6 PLU that users can edit are from 10 to 5999, total 5990 PLU...............16
3.2 Fast-Prog of Shortcut Key for PLU.....................................................................16
Example 1.1 Fast-Prog of Shortcut Key for PLU. Amend a shortcut key. ...............................17
Note 1 When SPEC081=0, PLU shortcut-key fast-prog is forbidden. .............17
Example 1.2 Fast-Prog of Shortcut Key for PLU. Amend two or more shortcut keys.............17
Note 1 When SPEC081=0, PLU shortcut key fast prog is forbidden................17
3.3 Fast-Prog of Spec Parameters..............................................................................17
Example 1.1 Fast-Prog of Spec Parameters...............................................................................18
Note 1 Spec fast-prog programme is forbidden when SPEC082 = 0. ..............18
Note 2 Refer to 《Definitions of Spec data parameters 》 in page 116 to know
the definitions of data parameters . ...................................................................18
Note 3 Read the definition of the parameter before you change it. And don’ t
change any unknown parameters in Spec programme. .....................................18
Note 4 xxx in SP.xxx means the number of the data content in Spec
programme. ........................................................................................................18
Note 5 xxx is not continuous when users press 【】and【】 to select the
programme content. That’s because users can only select Spec in level 0 by
pressing 【】and【】. You have to input corresponding numbers afterting
pressing【×】to change Spec in level 1. And users cannot change Spec in level 2
and level 3 because their data are involved with some specifications in
measurement and other hardware fields.............................................................18
4 Sale Operations.......................................................................................................19
4.1 Transfer and Lock of PLU....................................................................................19
4.1.1 Transfer by using PLU number................................................................................................................19
Example 1.1 Use PLU number to transfer weight PLU.............................................................19
Example 1.2 Use PLU number to transfer count PLU...............................................................19
4.1.2 Tranfer by Using PLU Shortcut Keys......................................................................................................19
Example 1.1 Use PLU shortcut keys to transfer weight PLU....................................................19
Example 1.2 Use PLU shortcut keys to transfer count PLU......................................................20
4.1.3 Transfer Temporary Weight PLU (The number of PLU is 1)..................................................................20
Example 1.1 Transfer temporary weight PLU...........................................................................20
Note 1 Temporary weitht PLU could be converted into count PLU if users
press 【×】 or the weight is zero. ....................................................................20
Example 1.2 Transfer temporary weight PLU with a unit conversion of the U.Price...............20
Note 1 Assume temporary weight unit is 500g(Spec210) and the unit of scale is
kg. After input the U.Price of 1.70 and press【T-Sale】, the U.Price is converted
into 3.40. That means the conversion of the unit between 500g and kg is done.
............................................................................................................................20
4.1.4 Transfer temporary count PLU (The number of PLU is 2.) ....................................................................21
Example 1.1 Transfer temporary count PLU.............................................................................21
4.1.5 Lock and unlock of PLU .........................................................................................................................21
xi
Example 1.1 Lock and unlock PLU ..........................................................................................21
Note 1 For weight PLU, the tare is locked while you lock PLU without exiting
PLU.....................................................................................................................21
Note 2 When you long press 【 PLU 】 , you can hear one beep first (beep for
correctness or error) . Hold pressing for 4 seconds you will hear the beep for
correctness. ........................................................................................................21
Note 3 Once PLU is locked, it wouldn’t be unlocked unless users unlock PLU
manually. ...........................................................................................................21
Note 4 There’s no difference in weight or count for lock temporary goods. The
scale could distinguish weight or count according to operation process. .........21
Note 5 When users try ro enter auto mode and then exit the mode, the scale
would unlock the lock of PLU because auto mode could influence on lock of
PLU.....................................................................................................................21
4.2 Manual Goods Sale .............................................................................................21
4.2.1 Sale and Print of Single Weight Goods....................................................................................................21
Example 1.1 Sale for single weight goods ...............................................................................21
Note 1 Two qualifications are indispensable when directly print without
accumulating: 1. Current accumulative buffer is empty, 2. The value of
SPEC060 is not set to be 3 (cashing mode without zero change default).........22
Note 2 The system would have to wait for several seconds if users sell the
weigh goods when the display of weight is not stable. If the display of weight
is stable in the waiting time, system would sell the goods according to the
operations. Please refer to SPEC151 about the waiting time. ..........................22
4.2.2 Sale and Print of Single Count Goods......................................................................................................22
Example 1.1 Sale and print for single count goods....................................................................22
Note 1 Two qualifications are indispensable when directly print without
accumulating: 1. Current accumulative buffer is empty, 2. The value of
SPEC060 is not set to be 3 (cashing mode without zero change default).........22
4.2.3 No Weigh Sale for Weight Goods............................................................................................................22
Example 1.1 No Weigh Sale for Weight PLU............................................................................22
Note 1 To execute no weigh sale, the value of Spec071 needs to be set to 1
while the default value is 0. ...............................................................................23
Note 2 No weigh sale for temporary goods is not restricted by Spec071. And it
will automatically convert to count sale for temporary count goods................23
4.2.4 Sale and Print for different kinds of goods (No Cashing Mode).............................................................23
Example 1.1 Sale and print for different kinds of goods (No Cashing Mode)..........................23
Note 1 Users can execute no cashing mode when the value of SPEC60 is 0 or
1. ........................................................................................................................23
4.2.5 Sale and Print for Different Kinds of Goods (cashing mode, input payment).........................................23
Example 1.1 sale and print for different kinds of goods (cashing mode, input payment).........23
Note 1 Cashing mode is available and change interface is displayed when the
value of SPEC60 is 1, 2, or 3. ...........................................................................24
4.2.6 Sale and Print for Different Kinds of Goods (cashing mode, payment equal to price)...........................24
Example 1.1 Sale and print for different kinds of goods (cashing mode, payment equal to
xii
price)...........................................................................................................................................24
Note 1 Cashing mode without input the amount of payment is available and
change interface is displayed when the value of SPEC060 is set to 2. .............24
4.3 Discount Operations.............................................................................................25
4.3.1 U.Price Discount ......................................................................................................................................25
Example 1.1 Execute discount in percentage ............................................................................25
Note 1 In the discount in percentage, the data object to discount on is floatingpoint decimal. For the discount at 5% off, if input number is 2-digit decimals,
users need to input 500. If input number is 3-digit decimals, users need to input
5000. Users can change the decimal point position by long press 【Shift】. . 25
Example 1.2 Execute discount in subtraction............................................................................25
Example 1.3 Execute discount at a fixed number .....................................................................25
4.3.2 T.Price Discount ......................................................................................................................................26
4.3.3 Auto Discount...........................................................................................................................................26
Example 1.1 Auto discount.........................................................................................................26
Note 1 All details about the auto discount setting of PLU, please read
definitions of auto discount settings in《List of Programme Interface》 on page
43 and Spec115 carefully. Suggest users edit the content on PC......................26
4.3.4 Unit Conversion of Temporary U.Price...................................................................................................27
Example 1.1 Unit Conversion of Temporary U.Price................................................................27
Note 1 Spec210 is 7 (500g), and kg is the measure unit of the scale................27
Note 2 Spec073 is 1: Put 【T-Sale】 into use of 【Unit Conversion】..........27
4.4 Setting and Lock of Tare......................................................................................27
4.4.1 Weight Tare...............................................................................................................................................27
Example 1.1 Weight tare.............................................................................................................27
Note 1 If users need to cancel tare, current total weight should be 0 and users
do not input any number.....................................................................................27
4.4.2 Number Tare ............................................................................................................................................27
Example 1.1 Number tare...........................................................................................................27
Note 1 Spec067 is 0: Number tare is forbidden ...............................................28
Note 2 Spec067 is 1: Use absolute value to tare. For example, when the tare
definition is 0.001 and input is 0.32, tare is 0.032. ...........................................28
Note 3 Spec067 is 2. Use floating-point values to tare . For example if input
0.32 it will show 0.320 after tare........................................................................28
Note 4 When there are numbers in input window and total weight is not 0,
weight tare is the priority....................................................................................28
4.4.3 Lock and Unlock of Tare..........................................................................................................................28
Example 1.1 Tare lock and unlock.............................................................................................28
Note 1 When you long press 【 Tare 】 , you can hear one beep first (beep for
correctness or error) . Hold pressing for 4 seconds you will hear the beep for
correctness..........................................................................................................28
Note 2 Once tare locked, it cannot be changed or cleared automatically. Only
manual tare can change tare. .............................................................................28
xiii
Note 3 Once tare locked, it cannot be unlocked unless users unlock tare
manually. ...........................................................................................................28
4.5 Auto Mode............................................................................................................28
4.5.1 Enter and Exit of Auto Mode...................................................................................................................28
Example 1.1 Enter and Exit of Auto Mode................................................................................28
Note 1 Current accumulative buffer must be empty if you enter auto mode.
Users cannot switch buffer in auto mode if target accumulative buffer is not
empty. ................................................................................................................29
Note 2 Activate lock PLU while enter auto mode and unlock PLU while exit
auto mode...........................................................................................................29
Note 3 Enter or exit auto mode could only be done in 『Sale Idle』...............29
4.5.2 Sales in Auto Mode ..................................................................................................................................29
Example 1.1 Sale in auto mode: weight goods .........................................................................29
Example 1.2 Sale in auto mode: count goods ...........................................................................31
4.6 Operations of Sale Buffers...................................................................................32
4.6.1 Switch Sale Buffers..................................................................................................................................32
Example 1.1 Switch sale buffers................................................................................................32
4.6.2 Amend the data in sale buffers.................................................................................................................33
Example 1.1 Clear all data in current sale buffers.....................................................................33
Example 1.2 Clear one certain goods in current sale buffer......................................................35
Note 1 In amend window: the window of tare is in the form of xx xx. The first
part shows accumulative times; the latter part is the object to be amended. 00 is
total and 01~31 are accumulative number. .......................................................36
Note 2 If users amend the total, the whole deal l is cleared..............................36
Note 3 If users amend xx goods, information of xx goods is cleared. And if
there was a T.Price discount, T.Price discount information is ignored. T.Price
will be calculated based on U.Price (or discounted U.Price) and weight/count
amount of sold goods.........................................................................................36
Note 4 If T.Price is selected, the window of『Weight/Count』 will display piece
number of sold goods. The definition of the piece number is: 5 count goods add
5 , each weight goods add 1. .............................................................................36
4.7 Inquiry of Sale Records and Markers of Returns of Goods.................................36
Example 1.1 Inquiry of sale records and markers of returns of goods......................................37
Note 1 The light of 【Shift】 on means the corresponding record is marked as
return of goods. If users want to mark return of goods, Spec074 must be
opened which is Not Open in default.................................................................39
Note 2 The display form of this window is xx.xx. The first part shows
accumulative times; The latter part shows sequence numbers of the
corresponding deal. 02.02 means that accumulative times is 2 and this goods is
the second accumulative goods. If show 02.00, it means itself is not a goods
but just a independent statistic price due to discount or rounding. See detail of
Spec102. ............................................................................................................39
Note 3 The number shown in the window of change / U.Price is the amount of
xiv
sale record stored in the scale. When the number is close to 8000, the scale
would delete the earlist records automaticlly. And single / total shows the
sequence number of this record in all the records. ............................................39
5 Programme Operations .........................................................................................40
5.1 Please read this part first......................................................................................40
5.2 Basic Operations in Programme Interface...........................................................40
5.2.1 Tree-shaped Design of Edit Steps............................................................................................................40
Picture 1.1 Sketch map of tree-shaped design of edit interface........................................................42
5.2.2 Frequently-used Keys in Prog Interfaces.................................................................................................42
【 Amend 】 : Save the amended content and go back to previous interface. If
operation is in DTSet, go back to step 0 after save and wait for new number to be
input to amend. ..........................................................................................................42
【Cancel】: Don’t save the amended data and go back to previous interface........42
【Confirm】: Get into the next interface. Such as enter P31 by pressing 【Confirm】
when operation is in P3. Or press 【Confirm 】 to enter certain edit interface when
operation is in text edit or in edit interface of print format. Then press 【Amend】 to
save and exit, or press 【Cancel】 to exit without saving. .....................................42
【←】、
【→】: Steps selection. Such as in step P21, press【←】 and【→】 to select
steps P21~ P27...........................................................................................................43
【↑】、
【↓】: Press【↑】
【↓】 to select previous or next valid data when amending
data in programme. And its function is the same as 【←】【→】 in some interfaces
when no data is to be amended. .................................................................................43
【0】~【9】、00: Input corresponding numbers. ...............................................43
【back】: Delete the last digit number. ...................................................................43
【×】: There are many steps to select in processes of Spec and DTSet edit operations
in TMSet, users can use【×】 to select step to edit. After press【×】, there would be a
hint for you to input the step number you want to select. Input the number and press
【Confirm】...............................................................................................................43
5.2.3 List of Programme Interface.....................................................................................................................43
5.3 The Edit of All Parts in TMSet.............................................................................69
5.3.1 Time Programme......................................................................................................................................69
Example 1.1 Time Programme...................................................................................................69
5.3.2 Programme of Spec Data Parameters.......................................................................................................69
Example 1.1 Programme of Spec parameters............................................................................69
Note 1 This programme way is the same as the way Fast-Prog of Spec
Parameters in example 3-4 in page Error: No se encuentra la fuente de
referencia, except the way it enters programme page. ......................................70
Note 2 Please refer to 《Definitions of Spec data parameters 》 in page 116 for
definitions of all items of Spec data parameters . ............................................70
5.3.3 Programme of String Parameters.............................................................................................................70
Example 1.1 Programme of string parameters...........................................................................70
Note 1 Please refer to 7.3 Definitions of String data paremeters for definitions
xv
of each string parameter. ...................................................................................70
5.3.4 Prog of PLU Shortcut Keys......................................................................................................................71
Example 1.1 Prog of PLU Shortcut keys...................................................................................71
Note 1 The way it programmes is the same as the way of 1.1 and 1.2 in page
17, except the way it enters programme interface. ...........................................71
5.4 The Edit of All Parts in DTSet ............................................................................71
5.4.1 Department Programme ...........................................................................................................................71
Example 1.1 Department Programme........................................................................................72
5.4.2 Class Programme......................................................................................................................................72
Example 1.1 Class programme ..................................................................................................72
5.4.3 PLU Programme.......................................................................................................................................73
Example 1.1 PLU programme....................................................................................................73
Note 1 Except the parts which have been instructed, meaning of the other
words are listed 《List of Programme Interface》in page 43...........................74
Note 2 The way it programmes is the same as the way Fast-Prog of 1.1 in page
15, except the way it enters programme page. ..................................................74
Note 3 xx is not continuous when users press 【 】 and 【 】 to select the
programme content. There are two reasons. One reason is that the content in
this part is meaningless. For example, tare will not present in count PLU
programme. The other reason is that the content in that part is seldom used and
has been set as non-programme content (Skip) in P31 and P32. Users could
change that setting for personal usage and please refer to corresponding
chapters for details. ............................................................................................74
5.4.4 Unit Programme (Not Open)....................................................................................................................75
Note 1 Default weight unit is the measure unit of the scale. ............................75
5.4.5 Barcode Programme.................................................................................................................................75
Example 1.1 Barcode Programme..............................................................................................75
Table 1.1 List of barcode types ........................................................................................76
Note 1 Only EAN13 are opened currently. No matter which kind of code you
choose, print will be in format of EAN13. ........................................................77
Table 1.2 Table 5-2 Check digit of barcode......................................................................77
Note 1 Check digit of barcode for barcode formats is just an advice for the
scale. The scale would process the check based on the selected barcode format.
For example, EAN13 is verified by End Check no matter which kind of check
is selected. ..........................................................................................................77
Table 1.3 Descriptions of barcode data items...................................................................77
Table 1.4 Factory Default barcode ...................................................................................78
5.4.6 Print Formats Programme.........................................................................................................................79
Table 1.1 Factory default print formats.............................................................................79
Note 1 If users use gap paper in size of 58mm*30mm, set the value of Spec000
to 1, Spec001 to 4. .............................................................................................83
Note 2 If users use gap paper in size of 40mm*30mm, set the value of Spec000
to 2, Spec005 to 5. .............................................................................................83
Note 3 If users use gap paper in size of 58mm*30mm, set the value of Spec000
xvi
to 3, Spec005 to 6. .............................................................................................83
Note 4 If users use plain paper in width of 58mm, set the value of Spec000 and
Spec005 to 7.......................................................................................................83
Note 5 If users use plain paper in width of 40mm, set the value of Spec000 and
Spec005 to 8. .....................................................................................................83
5.4.7 Salesman Programme (Not Open)............................................................................................................83
Example 1.1 Salesman programme............................................................................................83
Note 1 Number 1~99 is the content for users to edit.........................................84
5.5 Assistant Data Programme...................................................................................85
5.5.1 Steps Select of PLU Prog.........................................................................................................................85
Example 1.1 Steps select of PLU prog.......................................................................................85
Note 1 The steps above activate steps index and shield steps cost. So, there is a
step to input index in the programme of P23, but without a step to input cost.
Select Prog or Skip by pressing【↑】or【↓】. If Prog is selected, the step is in
the programme. If Skip is selected, the step is skiped and not in programme. 86
Note 2 Amended content would be in effect only in PLU programme and not
effective in fast-prog. ........................................................................................86
5.5.2 Steps Select of PLU Fast Prog.................................................................................................................87
Example 1.1 Steps select of PLU fast prog................................................................................87
Note 1 The processes are the same as 1.1 , only if amended contents only work
in PLU fast-prog instead of PL U programme. ................................................88
5.5.3 Delete Sale Data.......................................................................................................................................88
Example 1.1 Delete PLU20~30................................................................................................89
Note 1 Once confirming to delete object, users shall be requested to input 2
numbers. And system would delete data objects in the range between the two
numbers. If the 2nd number is 0, the object appointed by 1st number is deleted.
If 2nd number is less than 1st number, no object is deleted. ............................90
5.6 Communication and Data Update .......................................................................90
5.6.1 Operations of files in USB flash disk.......................................................................................................90
Example 2.13 Load files in USB flash disk...............................................................................90
Note 1 If the loading files ends normally, system would change the state into
Finish. Normally, the amount of error commands should be 0. .......................91
Note 2 If system encounters with invalid files or other serious mistakes, change
the state into Error. ............................................................................................91
Note 3 In the state of Finish or Error, press any key to exit. If users want to exit
midway, press 【Cancel】.................................................................................91
Example 1.2 Save to files in USB flash disk.............................................................................92
Note 1 Exporting data to files in USB flash disk may take a lot of time. Please
wait.....................................................................................................................92
Note 2 Press any key to exit when saving is ended. If users want to exit
midway, press 【Cancel】.................................................................................92
5.6.2 Ethernet Monitor Interface.......................................................................................................................92
Example 1.1 Enter Ethernet monitor interface...........................................................................92
xvi
i
Note 1 This monitor interface is usually used when the scale is set to not update
in real-time on Internet. .....................................................................................93
5.6.3 RS232 Communications...........................................................................................................................93
5.6.4 USB Slave Communications....................................................................................................................93
5.7 Hardware Assistant...............................................................................................93
5.7.1 Validate Code ...........................................................................................................................................93
5.7.2 Password...................................................................................................................................................93
Note 1 That Password is 0 means no passwords needed. Users could set the
password to be 0 when canceling the password.................................................94
Note 2 Admin password is in a higher level than the other 3 passwords. Users
do not need to input any password to enter all interface if admin password is 0 ,
no matter whether the other passwords are 0 or not. If users want to protect
Prog interface or Account interface, first change the admin password other than
factory default, then set passwords of corresponding interfaces.......................94
Example 1.2 Process of amending passwords............................................................................94
Note 1 Only the input passwords match for the two times, password setting can
be done. ..............................................................................................................95
5.7.3 Recover Factory Default Setting..............................................................................................................96
Example 1.1 Process of amending passwords............................................................................96
Note 1 Please pay attention to this. Execute recovery 1 or 4, and then
passwords would change to factory default.......................................................97
6 Account Operations................................................................................................98
6.1 List of Account Interfaces....................................................................................98
Table 1.1 List of Account interfaces..................................................................................98
6.2 Operations of Printing Report..............................................................................99
6.2.1 Print Total Report ....................................................................................................................................99
Example 1.1 Print daily reports of today and yesterday..........................................................100
Note 1 If some buffers store no data, these buffers would be skiped off without
printing.............................................................................................................100
Note 2 If 2nd number input is 0, system would only print the buffer appointed
by 1st number. .................................................................................................100
Note 3 If 2nd number input is not 0 and less than 1st number, no buffer would
be printed..........................................................................................................100
Note 4 The hints about currently print object may appear on the screen for just
a few seconds when system is printing. ..........................................................100
6.2.2 Print Department Report.........................................................................................................................100
6.2.3 Print Class Report...................................................................................................................................100
6.2.4 Print PLU Report....................................................................................................................................101
Example 1.1 Print PLU daily reports with the numbers from 10 to 20...................................101
Note 1 If some buffers store no data, these buffers would be skiped off without
printing.............................................................................................................101
Note 2 If 2nd number input is 0, system would only print the buffer appointed
xvi
ii
by 1st number...................................................................................................101
Note 3 If 2nd number input is not 0 and less than 1st number, no buffer would
be printed..........................................................................................................101
6.3 Clear Report Information ..................................................................................101
6.3.1 Clear Report Information Manually.......................................................................................................101
Example 1.1 Clear information in manual report.....................................................................102
6.3.2 Clear All Reports and Records Information...........................................................................................102
Example 1.1 Clear All Reports and Records Information.......................................................102
Note 1 This operation would clear the records of all deals. And it’s irreversible.
Please operate it carefully. ...............................................................................102
7 Appendix................................................................................................................103
7.1 Error messages and solution...............................................................................103
7.2 Definitions of Spec data parameters ..................................................................116
7.3 Definitions of String data paremeters................................................................130
xix
Examples Menu
Example 1.1Fast-Prog of PLU..................................................................................15
Example 1.1Fast-Prog of Shortcut Key for PLU. Amend a shortcut key. ...........17
Example 1.2Fast-Prog of Shortcut Key for PLU. Amend two or more shortcut
keys..............................................................................................................................17
Example 1.1Fast-Prog of Spec Parameters.............................................................18
Example 1.1Use PLU number to transfer weight PLU..........................................19
Example 1.2Use PLU number to transfer count PLU............................................19
Example 1.1Use PLU shortcut keys to transfer weight PLU.................................19
Example 1.2Use PLU shortcut keys to transfer count PLU..................................20
Example 1.1Transfer temporary weight PLU.........................................................20
Example 1.2Transfer temporary weight PLU with a unit conversion of the
U.Price........................................................................................................................20
Example 1.1Transfer temporary count PLU...........................................................21
Example 1.1Lock and unlock PLU .........................................................................21
Example 1.1 Sale for single weight goods ...............................................................21
Example 1.1Sale and print for single count goods..................................................22
Example 1.1No Weigh Sale for Weight PLU...........................................................22
Example 1.1Sale and print for different kinds of goods (No Cashing Mode)......23
Example 1.1sale and print for different kinds of goods (cashing mode, input
payment).....................................................................................................................23
Example 1.1Sale and print for different kinds of goods (cashing mode, payment
equal to price).............................................................................................................24
Example 1.1Execute discount in percentage ..........................................................25
Example 1.2Execute discount in subtraction..........................................................25
Example 1.3Execute discount at a fixed number ...................................................25
Example 1.1Auto discount........................................................................................26
Example 1.1Unit Conversion of Temporary U.Price..............................................27
Example 1.1Weight tare............................................................................................27
Example 1.1Number tare..........................................................................................27
Example 1.1Tare lock and unlock............................................................................28
Example 1.1Enter and Exit of Auto Mode..............................................................28
Example 1.1Sale in auto mode: weight goods ........................................................29
Example 1.2Sale in auto mode: count goods ..........................................................31
Example 1.1Switch sale buffers................................................................................32
Example 1.1Clear all data in current sale buffers..................................................33
Example 1.2Clear one certain goods in current sale buffer...................................35
Example 1.1Inquiry of sale records and markers of returns of goods.................37
Example 1.1Time Programme..................................................................................69
Example 1.1Programme of Spec parameters..........................................................69
Example 1.1Programme of string parameters........................................................70
Example 1.1Prog of PLU Shortcut keys..................................................................71
Example 1.1Department Programme......................................................................72
Example 1.1Class programme .................................................................................72
Example 1.1PLU programme...................................................................................73
Example 1.1Barcode Programme.............................................................................75
Example 1.1Salesman programme...........................................................................83
Example 1.1Steps select of PLU prog......................................................................85
Example 1.1Steps select of PLU fast prog...............................................................87
Example 1.1Delete PLU20~30................................................................................89
Example 2.13Load files in USB flash disk...............................................................90
Example 1.2Save to files in USB flash disk.............................................................92
Example 1.1Enter Ethernet monitor interface.......................................................92
Example 1.2Process of amending passwords..........................................................94
Example 1.1Process of amending passwords..........................................................96
Example 1.1Print daily reports of today and yesterday.......................................100
Example 1.1Print PLU daily reports with the numbers from 10 to 20...............101
Example 1.1Clear information in manual report.................................................102
Example 1.1Clear All Reports and Records Information....................................102
1
Components of Barcode Lbel Printing Scale
1.1 Check Accessories
One Barcode label Printing Scale;
One display pole;
One tray;
One pack of screws used to fix the pole;
One copy《TM-xA Series Barcode Label Printing Scale User Manual 》(this book);
One CD for PC software 《TM-xA data management software》
One set of clean appliance for thermal printer head;
One overlay for shortcut PLU;
One power plug
1.2 Keyboard
1.2.1 The original overlay of the keyboard
a/A
1
f/F
6
f/F
11
k/K
b/B
2
a/A
g/G
7
g/G
p/P
p/P
21
u/U
u/U
z/Z
26
l/L
17
!
!
q/Q
h/H
8
22
v/V
v/V
SP
27
13
?
?
m/M
m/M
r/R
18
i/I
9
w/W
w/W
<
28
x/X
25
=
>
;
60
End
End
61
:
_
58
\
Del
Del
62
Insert
Insert
~
63
69
70
66
Print
Type
Time
67
Paper
Type
71
72
Feed
F-Prog
68
RePrint
Zero
73
-%
-Num
-@
T-Sale Drawer
Tare
7
8
9
×
↑
V1
Amend
4
5
6
←
V2
↓
V3
→
V4
1
2
3
PLU
Cash/Print
0
00
Back
Cancel
Accu/Confirm
~
59
_
65
Auto
Mode
Account
:
55
`
\
57
|
;
35
,
|
56
$
`
54
^
Prog
$
51
&
^
53
%
“
&
50
64
Shift
“
47
‘
#
49
}
43
}
‘
46
#
%
52
y/Y
30
@
{
42
]
Sale
/
{
]
45
@
>
,
34
y/Y
[
[
48
)
41
/
39
*
)
44
t/T
x/X
29
t/T
20
s/S
24
o/O
(
(
*
38
-
40
o/O
=
.
.
s/S
19
<
33
15
n/N
-
37
+
j/J
n/N
14
j/J
10
+
36
e/E
i/I
r/R
23
e/E
5
d/D
h/H
SP
32
d/D
4
c/C
q/Q
z/Z
31
l/L
12
k/K
16
c/C
3
b/B
IME
IME
Picture 1.1 Sketch map of keyboard function
The graph above shows the original definitions. Some buttons on the left top area are marked with numbers,
which are serial number for the shortcut keys. In this text, 【 SCxx 】 is used to represent shortcut keys. For
example,【SC1】 represents the first key on the left top marked with number 1.【SC1】~【SC63】are PLU default
shortcut keys and can be set to represent one certain key if user requests. When editing the text,【SC1】~【SC63】
are function keys and character keys for the input of letters. Please refer to chapter 1.2.4. 【SC64】~【SC73】 are
default shortcut keys for additional functions . The default setting is shown in the graph. And it’s not available to
change the setting of function keys now.
1.2.2 Instructions for Keys
When you press right keys, the scale would beep shortly to show the operation is right.
1
When you press wrong keys, the scale will beep in 1 long sound and 2 short sounds. This composite beeps
mean the failure in operation process or errors in pressing keys. If operaton process fails, there will be Ex.xx
displayed on the screen (e.g., E1.01 means programme data is invalid.).
It need to press one key for 4 seconds in some operation which needs to Long Press the key without
releasing it. During the period you will hear 2 beeps. The first beep sounds when you press the key and the
second beep sounds after pressing the key for 4 seconds.
In some【F-Prog】+ 【Other keys】 operations, users should first press 【Fast-Prog】 without releasing and
press the other key in order to complete the operation.
In the following instruction:【Key1】【Key2】 means the operation that press【Key 1】 first and release it,
then perss【Key 2】 and release it.【Key1】+【Key2】means the operation that press【Key1】 and【Key2】 at the
same time. When users do it , press 【Key1】 first, and press 【Key2】 without releasing 【Key1】 .
1.2.3 Instruments for Keys in Function Area
1.1 shows the default setting of keys in the function area. According to customer’s requests, default setting
may be different. And the specific setting will be on the overlay:
【Sale】:Enter sale mode and execute the operation of goods sale.
【Prog】: Enter programme mode and can programme scale parameters, PLU, print formats, time and so
on.
【Account】: Enter Account mode to check deals data or print reports and so on.
【Time】: Display current time and return to the previous interface when you press it again.
【 Tare 】 : Set current weight as tare or appoint certain data as tare (When there is a number in input
window, number tare is the priority.). Pressing 【Tare】 for a long time without releasing, system would
enter 【Tare】. And do it again to exit this state.
【Zero】: Clear current weight and reset zero within allowed range. If not within allowed range, set zero
would fail.
【Shift】:Shife key used for extending PLU shortcut key, and switching case sensitivity in text input
interface. When current input number is decimal (tare, weight, U.Price, T.Price) , long press【Shift】 can
change the position of decimal point.
【Auto Mode】: Switch between ordinary mode and auto mode. Users can enter auto mode if current sale
buffer is empty.
【Print type】: The key owns no meaning in this edition. The print type is decided by selected Print format.
【Paper type】: Long Press it to switch the paper type between gap thermal paper and plain thermal paper.
【Re-print】: Repeat last print in current buffer (Repeated print data would not be stored in deal records as
sale record.). This function can be forbidden in Spec.
【Feed】: Roll the gap thermal paper or plain thermal paper. Unprinted buffer data will be cleared in the
process of feed.
【-%】: Discount in percentage, PDis = P (1 −
Input
) . Please notice that input is decimal and pay extra
100
attention to the position of decimal point. Discount is 5% off while input is 500, if there are two zeroes
2
after decimal point. And input should be 5000, If there are three zeroes.
【-Num】: Discount in subtraction. PDis = P − Input . Input is also decimal.
【-@】: Discount to a fixed price. PDis = Input . Input is also decimal.
【 T-Sale 】 : Set input number as U.Price and set a temporary PLU. Users can amend price unit of
temporary weight PLU. For example, when users set the price unit of temporary weight PLU is 500g
while the unit of the scale is kg, system would automatically convert input number (double input
number).
【Drawer】: Open drawer besides normal operations.
【F-Prog】: Change some setting or values of PLU fastly in sale mode. Please refer to process instructions
to understand the use of combination keys.
【×】: Input count amount in sale. Or do temporary count goods sale according to inputted U.Price.
【Amend】: Amend deal data in sale interface and store amended data in programme interface.
【←】【↑】【↓】【→】: Switch among neighbouring steps and numbers in programme and account
interfaces.
【V1】~【V4】: Activate corresponding sale buffers.
【0】~【9】、【00】: Input corresponding numbers.
【Back】: Delete the last digit of the inputted number.
【PLU】: Transfer PLU datas by using input numbers as serial numbers.
【Cash/Print】: Check out in cash; calculate changes and print labels or receipts according to setting.
【Cancel】: Clear data, cancel operations or go back to previous step.
【 Accu/Confirm 】 : Save accumulative deal data into activated sale buffer and other confirmation
operations.
1.2.4 Character Input Instructions
The key of function section remains the same when system enters letters input interface, while
【SC1】~【SC63】 are used to input letters. In input process, definitions of keyboard are shown below:
【Amend】: Confirm text input. Save and exit.
【Cancel】: Cancel edited data and quit without saving.
【Confirm】: Confirm the input in special IME (not used in pure English version).
【End】: Input end character, and all characters after appointed position are deleted.
【Delete】: Delete the character at the position of cursor .
【Insert】: Switch between cover mode and insert mode. Cover mode is activated when cursor is constant
on, insert mode is activated when cursor is glittering.
【IME】: Input method editor. Switch the input languages: En-1(in small letters), En-2 (in big letters),
Code(machine code). There are special IMEs for not pure English version (e.g., Chs for Chinese ISN.)
【Shift】: Switch En-1, En-2 in temporary state.
【←】【→】: Move current editing position backwards or forwards.
3
【0】~【9】 and【SC1】~【SC59】: Input characters or codes.
In the process of input text, meanings of four windows are shown below:
The first window: Display current input mode: one of En-1, En-2 and Code.
The second window: Display the position of current editing letters in the text.
The third window: Display current editing position and content of neighbouring letters. In En-1 or En-2
ASCII mode is displayed, in Code Hex mode is displayed. Cover mode is activated when cursor which shows
the position is constant on; insert mode is activated when cursor is glitter.
The fourth window: Display current input content. In En-1 or En-2 the window displays nothing, and in
Code displays the inputted machine code.
Switch 4 kinds of input languages by pressing switch keys. Input mode of each kind of input language is
shown below:
En-1: Input numbers or ASCII characters. For the keys with ‘/’, input character is the one on the left of ‘/’.
Pressing 【Shift】 , next input character and only this one is under the rule of En-2 .
En-2: Input numbers or ASCII characters. For the keys with ‘/’, input character is the one on the right of
‘/’. Pressing 【Shift】 , next input character and only this one is under the rule of En-1 .
Code: Input machine code mode. Users can input ASCII, symbols in special IMEs. The system could
automatically distinguish the input content as ASCII, symbols in special IMEs. Machine codes of
each field can be found in following table.
1.3 Display Panel
1.3.1 Sketch Map of Display Panel
4D
ig
its
5D
ig
its
6D
ig
its
7D
ig
its
T
a
re
W
e
ig
h
t/C
o
u
n
t
C
h
a
n
g
e
/U
n
it P
ric
e
S
in
g
le
/T
o
ta
l
Zero
Stable
Lock
Tare
Lock
PLU
Auto
Mode
Label
Print
Gap
Paper
Shift
Sale Prog
Account
Change U.Price
V1
V2
V3
V4 Discount Single Total
Picture 1.1 Display overlay
1.3.2 Indication Signs
【Zero】: It’s on when weight is zero and stable.
【Stable】: It’s on when weight is stable.
【Lock Tare】: It’s on when tare is locked. Long press 【Tare】 would lock tare. Under this condition, tare
4
would not be cleared after the sale. Long press 【Tare】 again would exit lock tare.
【Lock PLU】: It’s on when PLU is locked (lock U.Price at the same time.). Long press【PLU】would lock
PLU. Under this condition, after the sale, the former PLU sale state would remain till new PLU is
transferred. Long press 【PLU】 again would exit lock PLU.
【Auto mode】: It’s on in auto mode. In auto mode, lock PLU would be activated automatically. In auto
mode: If a weight PLU is transferred, print would operate automatically in condition that weight is new
(Weight was set to zero in last sale.). If a count PLU is transferred, system would print the amount bill
when the print amount has been set.
【Label mode】: This sign is meaningless in this edition.
【Gap paper】: It’s on when paper type is gap paper. It’s off when paper type is plain paper.
【Shift】: Press 【Shift】 and it is on.
【Sale】: It’s on in sale mode.
【Prog】: It’s on in programme mode.
【Account】: It’s on in account mode.
【Change】: It’s on when the data in third window displayed is cash change.
【U.Price】: It’s on when the data in third window displayed is goods U.Price.
【V1】~【V4】: It’s on when there are buffers in V1~V4 records. And it’s glittering in edit mode.
【Discount】: When display single means that current goods has been discounted in U.Price; when display
total means that current accumulative total has been discounted in T.Price
【Single】: It’s on when current goods’ single price is displayed in fourth window.
【Total】: It’s on when the subtotal of current sale buffers (V1~V4) is displayed in fourth window.
1.3.3 Expression of Characters
Picture 3.1 Number characters 0~9
Picture 3.2 Characters A~M
Picture 3.3 Characters N~Z
Picture 3.4 Dash、underline, aboveline, three lineations of special symbols
5
Dash of special symbols: the same as ‘-’ in ASCII.
Underline of special symbols: Used to represent the characters which cannot be displayed in ASCII(the
symbols except 0~9, A~Z and ‘-’)
Aboveline of special symbols: Used to represent extended characters. In Chinese edition, two aboveline
represent a Chinese character. In Russian edition, one aboveline represent a Russian character.
Three lineations of special symbols: In calibrating processes, it’s used as a prompt to decide to enter
demarcated interface or standard interface.
1.4 Specifications
Power supply: AC 90V~264V, 47~63Hz
Operation temperature: 0℃~40℃
Conservation temperature: -20℃~70℃
Operation humidity: 15%~85%RH
1.5 Thermal printer
1.5.1 Install gap paper
1. Press and open side door.
Picture 1.1 Open side door of scale printer
6
Open
2. Move the Switch
Picture 1.2 Open press mouth
4. Pull the steel plate which is used to restrain paper
out at the direction 1,Then rotate the steel plate by
90 degrees at the direction 2 in order to let print
paper pass by.
2
1
3. Place paper roller
Picture 1.3 Place paper roller
6. Pull up U-shaped paper retaining spring.
7. Wrap the paper roller
by print paper.
5. Put print paper through
paper inlet sensor.
Inlet sensor
Picture 1.4 Install paper loop
7
10. Put the steel plate back to original position
and adjust its height which is just close to paper.
8. Put U-shaped paper
retaining spring
outside of roll-up
paper circle.
9. Push the print mouth
to let the ring fasten
print mouth .
Picture 1.5 Finish installing paper
12. Press 【Feed】
11. Close side door of scale printer.
Picture 1.6 Close side door of scale printer
8
1.5.2 Gap paper mounts recycle
When gap paper is used up, users need to move away paper
mounts. Pull roll paper out at the direction of the arrowhead
until end of the paper. Then pull retaining spring out and tear
down the used paper.
Picture 2.1 Gap paper mounts recycle
1.5.3 Install plain paper
Different from the way in installing gap paper shown in1.5.1, U-shaped paper retaining spring is not needed
anymore. All you need to do is to put the paper into the paper sensor and let the tear part be outside.
1.5.4 Operations concerning paper
【Paper type】: Make sure the type of paper set is the same as the type used. When【Gap Paper】is light in
the display, you should set to use gap paper. Otherwise you should set to use plain paper. If the type of
paper you set to use is different from the type currently used, please long press 【Paper Type】to change
the set.
【Feed】: After installing the paper, press【Feed】. You can also press【Feed】 to clear abnormities of the
printer and make paper roll for a certain length.
1.5.5 Abnormity of gap paper print
Users of plain paper don’t need to do any adjustment for this.
Abnormity of printer parameters may happen when gap paper prints are unnormal, paper goes out
continuously, or printer can’ work after one paper is printed.
Users need to check whether the paper type is right first. Then follow below operations to eliminate
malfunctions:
Install gap label paper, and make the edges of label paper and print head parallel.
Switch off the scale. There are two keys near the component which draws back the paper in the printer.
Press and hold these two keys, and switch on the scale.
After the printer is started, printer would roll out the paper at the length of 75mm.
After the paper is rolled out, malfunctions have been eliminated if two test lights don’t glitter and one
light is on and the other is off.
Then, press the key near to the component which draws back the paper. There would be one test paper
9
been printed.
Go to normal operation processes.
Gap Peper Test Key
Plain paper test key
Picture 5.2 Test keys of printer
10
2 General functions, configuration and using index
2.1 General functions
The printer can store 5990 PLUs, and the user can edit numbers of PLU from 10 to 5999.
Users can use gap thermal paper and plain thermal paper.
The printer provides many kinds of price input and discount.
The printer provides reports printing for different time periods and classifications
Precision of measurement: business mode 1/6000, industrial mode 1/30000.
You can use USB flash disk to transfer and save the data. All the parameters can be set on the compter
and downloaded with USB flash disk.
2.2 Setting of Print Format
Press 【Paper type】 for 4 seconds to switch between gap paper and plain paper. This key would amend
Spec021.
There are 9 kinds of print formats. Please reference to page 48 table 5-5《Factory default print formats》
58mm*40mm and 40mm*30mm gap paper, 58mm and 40mm width plain paper are available in default
print formats. When using different type of paper, please adjust the corresponding Spec shown in the
table below.
11
Print formats include label print and receipt print. If user need to custom print format, please use PC
ssoftware to change or contact with appointed after-service cencer.
Don’t print bills while saling: amend Spec003 and Spec008 to 0. If some specific deals need to print bills,
please press 【Re-print】.
To print a few copies of one bill, put the amount into Spec003 and Spec008.
To print two different kinds of bills: set the type of one kind of bill in Spec000~Spec009, and set the
another in Spec010~Spec019. Strongly suggest users contact with appointed after-service cencer.
Set grey level of gap thermal paper in Spec022.
Set grey level of plain thermal paper in Spec023.
The distance for paper cut should be long enough. Usually the value you set in Spec025 is bigger than 30
when plain paper is used.
You can set different kinds of print formats and barcode types for each PLU. You can check the details in
PLU parameters for print formats and barcode types. Set the value of these parameters to 0 if you choose
the system type.
The procedures to confirm print format: take bill 1 as an example. If two or more goods are sold, print
sum bill and use Spec005 as print format. If only one good is sold, print the item bill. If sale PLU has
been set for a specific print format (not 0), system would use this special print format. If no specific print
format has been set to sale PLU (The setting number is 0.), the print format would be Spec000..
2.3 Barcode Settings
9 kinds of barcode settings, details in page 78 1.4《Factory Default barcode》.
Barcodes can be divided by purpose into item barcodes and total barcodes, which are printed in item
labels and total labels respectively. If users need to custom print format, please use PC software to
change or contact with appointed after-service center.
12
2.4 Measure Functions
The scale offers 6 measure units as kg, gram, ton, lb, 500g, 100g.
Based on the difference national regulations, some of the measure unit may Not Open. The combinations
and recommended Spec settings are all shown below:
Weight precision: The precisions are divided into four levels. Level 0 owns original 1/3000 . Level 0 and
level 1 are available for commercial users while level 2 and level 3 are only available for industrial users
(“Ind” would be attached in the print of weight). Please refer to Spec213.
We guarantee the stability and reliability for precision level 0 (1/3000 ) when the scale leaves factory. But
the higher precisions are just to satisfy the need of high definition print for some users, so factory would
not guarantee the stability and reliability for higher precision levels for every scale. Please choose the
precision prudentially.
The request Zero-Return for scale print: it’s requested in commercial sales that the display have to return
to zero when the scale is going to print the weights of two goods. But for industrial users, this rule could
be ignored. Set the value of Spec069 to 2. (“Ind” would be attached in the print of weight).
2.5 Sale Functions
Users could operate accumulative sales with 4 customers at the same time. Please refer to the 1.1 in page
32 for operations.
Rounding methods could be divided into rounding method for single and rounding method for total. The
settings of rounding methods are shown in Spec100 and Spec101.
Suggest that set the value of Spec100 to 1 if users don’t want the unit “cent” to be displayed in sales.
Suggest that set the values of Spec100 to 0 and Spec101 to 1 if users want the unit “cent” to be in sale
while unit “cent” is not displayed in grandtotal and print.
The units’ conversion for preset PLU U.Price: for example: set PLU10 U.Price to 10.00, the unit is
500gram and unit displayed is kg. When transfer PLU10, unit price is displayed as 20.00.
Units’ conversion for temporary unit price: the scale offers the function of units’ conversion for
temporary unit goods and price from 500gram to kg. When U.Price’ display unit is /kg, set the value of
Spec210 to 7 and the value of Spec073 to 1 to activate this function. Please refer to the 1.2 in page 20,
1.1in page 27.
No Weigh Sale for Weight PLU: set the value of Spec071 to 1. When the weight returns to zero in weigh
sale, input the price and sell the goods at the price you input. Please refer to 1.1 in page 22.
13
Users can discount on U.Price and T.Price conveniently. The discount methods include discount at a fixed
number, discount in subtraction and discount in percentage. Please refer to 《Discount Operations》 in
page 25.
2.6 Report Functions
Users could print the total reports with time periods of last 32 stat. day, stat. month, stat. quarter or
manual time period.
Users can print the reports for all departments, all classes and part of PLU (below 1000), with a time
period of present stat. day, stat. month, stat. quarter or manual time period.
Please refer to《Account Operations》 in page 98 for the details.
14
3 Fast Prog
Fast prog is the programme operation that draws out some frequently-used programme functions and enables
users enter certain frequently-used programme interfaces without selecting in programme interface.
Please make sure system is in the interface of idle sale before transferring fast prog. If system is not in sale
operation, pressing【Sale】 could enter the interface of idle sale. If system is in sale operation, pressing【Cancel】
for several times could quit sale process and enter the interface of 『Sale Idle』. The sign of the interface of idle
sale is that two lights 【Sale】 and 【Total】 are on. On contrary, if two light of 【Sale】 and 【Single】 are on ,
system is in sale PLU interface.
3.1 Fast-Prog of PLU
Press 【F-Prog】+【PLU】 to enter PLU Fast Prog.
The process of programme is similar with PLU programme in standard programme interface. But users can
finish PLU Fast Prog in sale interface.
Example 1.1 Fast-Prog of PLU
Edit PLU10 as a weight PLU with the name Pork-2, U.Price $30.00/kg, cost $24.00/kg and tare 0.005g.
15
N o t e 1 Except the parts which have been instructed, meaning of the other words are listed in 《 List of
Programme Interface》in page 43.
N o t e 2 PLU fast-prog is forbidden when SPEC080=0.
N o t e 3 Before you move to next step, if it display “ E1.01 Data Invalid”, it means that the programme data
you input is invalid.
N o t e 4 The xx in PLU.xx means the content in the data which is marked with the number of xx in PLU fast
prog.
N o t e 5 Xx is not continuous when users press【】and【】to select the programme content. There are two
reasons. First reason is that the content in that part is meaningless. For example, tare will not present in
count PLU programme. The second reason is that the content in that part is seldom used and has been
set as non-programme content (Skip) in P3.01 and P3.02. Users could change that setting for personel
usage. Please refer to corresponding chapters for details.
N o t e 6 PLU that users can edit are from 10 to 5999, total 5990 PLU.
3.2 Fast-Prog of Shortcut Key for PLU
Press【F-Prog】+【SCxx】to enter PLU shortcut key programme.【SCxx】could be one of【SC1】~【SC63】.
After pressing one key, Users can input the PLU which the pressed key appoints to .Then press【Amend】to save
and exit.
Users can save without exit if they would like to go on to amend other shortcut keys. Press 【Confirm】 to
save the change and press another 【SCxx】 to amend. The number of input PLU must exist. User can select
existing PLU by pressing 【↑】【↓】. The process of programme is similar with scPLU programme in standard
programme interface. Please refer to the process shown below.
16
Example 1.1 Fast-Prog of Shortcut Key for PLU. Amend a shortcut key.
N o t e 1 When SPEC081=0, PLU shortcut-key fast-prog is forbidden.
Example 1.2 Fast-Prog of Shortcut Key for PLU. Amend two or more shortcut keys.
N o t e 1 When SPEC081=0, PLU shortcut key fast prog is forbidden.
3.3 Fast-Prog of Spec Parameters
Press 【F-Prog】+【Prog】 to enter Spec parameters fast prog.
Please select the number you want to edit by pressing【←】【】. The second window shows the number of
17
Spec which is being edited. The third window shows current parameters configuration. The fourth window shows
the data which has been edited by users.
Spec data parameters are made up of 250 data. Refer to《Definitions of Spec data parameters 》in page
116 in order to understand functions of these parameters.
Press 【Amend】 to save and quit, or press【Cancel】to quit without saving. The process of programme is
similar with Spec programme in standard programme interface. For details, please refer to the process shown
below.
Here, we are going to amend Spec000 to 2, Spec002 to 77 and Spec040 to 99. We would present the
processes without discussing on the parameters we actually amend and their meanings.
Example 1.1 Fast-Prog of Spec Parameters
N o t e 1 Spec fast-prog programme is forbidden when SPEC082 = 0.
N o t e 2 Refer to 《 Definitions of Spec data parameters 》 in page 116 to know the definitions of data
parameters .
Note 3
Read the definition of the parameter before you change it. And don’ t change any unknown
parameters in Spec programme.
N o t e 4 xxx in SP.xxx means the number of the data content in Spec programme.
N o t e 5 xxx is not continuous when users press 【】and【】 to select the programme content. That’s
because users can only select Spec in level 0 by pressing 【 】 and 【 】 . You have to input
corresponding numbers afterting pressing【×】to change Spec in level 1. And users cannot change Spec
in level 2 and level 3 because their data are involved with some specifications in measurement and
other hardware fields.
18
4 Sale Operations
4.1 Transfer and Lock of PLU
Attention: PLU1 is a temporary weight goods, PLU2 is a temporary count goods. And both of them can’t be
edited and tranfered. PLU that can be edited start from the number 10.
4.1.1 Transfer by using PLU number
Example 1.1 Use PLU number to transfer weight PLU
Transfer PLU10, assuming PLU10 is a weight PLU with U.Price $2.00/kg and tare 0.100kg.
Example 1.2 Use PLU number to transfer count PLU
Transfer PLU11, assuming PLU11 is count PLU with U.Price $5.00/pc
4.1.2 Tranfer by Using PLU Shortcut Keys
Example 1.1 Use PLU shortcut keys to transfer weight PLU
19
Example 1.2 Use PLU shortcut keys to transfer count PLU
Transfer SC2, assuming SC2=PLU11 and SC2 is count PLU with U.Price $5.00/pc
4.1.3 Transfer Temporary Weight PLU (The number of PLU is 1)
Example 1.1 Transfer temporary weight PLU
N o t e 1 Temporary weitht PLU could be converted into count PLU if users press 【×】 or the weight is zero.
Example 1.2 Transfer temporary weight PLU with a unit conversion of the U.Price.
N o t e 1 Assume temporary weight unit is 500g(Spec210) and the unit of scale is kg. After input the U.Price
of 1.70 and press 【T-Sale】, the U.Price is converted into 3.40. That means the conversion of the unit
between 500g and kg is done.
20
4.1.4 Transfer temporary count PLU (The number of PLU is 2.)
Example 1.1 Transfer temporary count PLU
4.1.5 Lock and unlock of PLU
Example 1.1 Lock and unlock PLU
N o t e 1 For weight PLU, the tare is locked while you lock PLU without exiting PLU.
N o t e 2 When you long press 【PLU】, you can hear one beep first (beep for correctness or error) . Hold
pressing for 4 seconds you will hear the beep for correctness.
N o t e 3 Once PLU is locked, it wouldn’t be unlocked unless users unlock PLU manually.
N o t e 4 There’s no difference in weight or count for lock temporary goods. The scale could distinguish
weight or count according to operation process.
N o t e 5 When users try ro enter auto mode and then exit the mode, the scale would unlock the lock of PLU
because auto mode could influence on lock of PLU.
4.2 Manual Goods Sale
4.2.1 Sale and Print of Single Weight Goods
Example 1.1 Sale for single weight goods
Sell 1 kg PLU10 goods. Assume PLU10 is a weight PLU with U.Price is $2.00/kg and tare is 0.100kg.
21
N o t e 1 Two qualifications are indispensable when directly print without accumulating: 1. Current
accumulative buffer is empty, 2. The value of SPEC060 is not set to be 3 (cashing mode without zero
change default).
N o t e 2 The system would have to wait for several seconds if users sell the weigh goods when the display of
weight is not stable. If the display of weight is stable in the waiting time, system would sell the goods
according to the operations. Please refer to SPEC151 about the waiting time.
4.2.2 Sale and Print of Single Count Goods
Example 1.1 Sale and print for single count goods
Sell 5 PLU11. Assume PLU11 is count PLU with U.Price is $5.00/pc
N o t e 1 Two qualifications are indispensable when directly print without accumulating: 1. Current
accumulative buffer is empty, 2. The value of SPEC060 is not set to be 3 (cashing mode without zero
change default).
4.2.3 No Weigh Sale for Weight Goods
Example 1.1 No Weigh Sale for Weight PLU
22
N o t e 1 To execute no weigh sale, the value of Spec071 needs to be set to 1 while the default value is 0.
N o t e 2 No weigh sale for temporary goods is not restricted by Spec071. And it will automatically convert to
count sale for temporary count goods.
4.2.4 Sale and Print for different kinds of goods (No Cashing Mode)
Example 1.1 Sale and print for different kinds of goods (No Cashing Mode)
Sell 1kg PLU10 goods. Assume PLU10 is weight PLU with U.Price $2.00 /kg and tare 0.100kg. 5pcs PLU11
goods, PLU11 is count PLU with U.Price $5.00/pc
N o t e 1 Users can execute no cashing mode when the value of SPEC60 is 0 or 1.
4.2.5 Sale and Print for Different Kinds of Goods (cashing mode, input payment)
Example 1.1 sale and print for different kinds of goods (cashing mode, input payment)
Sell 1kg PLU10 goods. Assume PLU10 is weight PLU with U.Price $2.00/kg and tare 0.100kg. 5pcs PLU11
goods, PLU11 is count PLU with U.Price $5.00/pc and payment $30
23
N o t e 1 Cashing mode is available and change interface is displayed when the value of SPEC60 is 1, 2, or 3.
4.2.6 Sale and Print for Different Kinds of Goods (cashing mode, payment equal to price)
Example 1.1 Sale and print for different kinds of goods (cashing mode, payment equal to price)
Sell 1kg PLU10 goods. Assume PLU10 is weight PLU with U.Price $2.00/kg and tare 0.100kg. 5pcs PLU11,
PLU11 is count PLU with U.Price $5.00/pc and payment $30 .
N o t e 1 Cashing mode without input the amount of payment is available and change interface is displayed
when the value of SPEC060 is set to 2.
24
4.3 Discount Operations
4.3.1 U.Price Discount
The data after discount should be within the discountable area. If the data exceeds the area, discount
operation would fail.
Example 1.1 Execute discount in percentage
Discount in U.Price: at the percentage of 95%, as ×
100.00 − 5.00
. Assume that PLU10 is weight PLU with
100.00
U.Price $2.00 /kg and tare 0.100kg.
N o t e 1 In the discount in percentage, the data object to discount on is floating-point decimal. For the
discount at 5% off, if input number is 2-digit decimals, users need to input 500. If input number is 3digit decimals, users need to input 5000. Users can change the decimal point position by long press
【Shift】.
Example 1.2 Execute discount in subtraction
Discount in U.Price: discount at the subtraction of $0.10 . Assume that PLU10 is weight PLU with U.Price
$2.00 /kg and tare 0.100kg.
Example 1.3 Execute discount at a fixed number
Discount in U.Price: discount the U.Price to $1.80. Assume that PLU10 is weight PLU with U.Price $2.00
/kg and tare 0.100kg.
25
4.3.2 T.Price Discount
The operations of T.Price discount and U.Price discount are the same. Under the condition that PLU is not
transferred and accumulative buffers are present, execute discount operation is to discount on T.Price. The
processes are not repeated here. The limit of discount on T.Price is a accumulative value of U.Price discount limits
of all goods.
4.3.3 Auto Discount
When goods are setting on auto discount, the price of activated PLU would change in real-time according to
the settings and system would shield any actions of manual change on the price.
Assume PLU20 is at the U.Price $10.00. U.Price goes to $9.00 when sale weight is more than 1kg and
U.Price goes to $8.00 when sale weight is more than 2kg. The change of U.Price of this goods is shown below:
Example 1.1 Auto discount
N o t e 1 All details about the auto discount setting of PLU, please read definitions of auto discount settings
in《List of Programme Interface》 on page 43 and Spec115 carefully. Suggest users edit the content on
PC.
26
4.3.4 Unit Conversion of Temporary U.Price
Example 1.1 Unit Conversion of Temporary U.Price
N o t e 1 Spec210 is 7 (500g), and kg is the measure unit of the scale.
N o t e 2 Spec073 is 1: Put 【T-Sale】 into use of 【Unit Conversion】.
4.4 Setting and Lock of Tare
4.4.1 Weight Tare
Example 1.1 Weight tare
N o t e 1 If users need to cancel tare, current total weight should be 0 and users do not input any number.
4.4.2 Number Tare
Example 1.1 Number tare
27
N o t e 1 Spec067 is 0: Number tare is forbidden
N o t e 2 Spec067 is 1: Use absolute value to tare. For example, when the tare definition is 0.001 and input is
0.32, tare is 0.032.
N o t e 3 Spec067 is 2. Use floating-point values to tare . For example if input 0.32 it will show 0.320 after
tare.
N o t e 4 When there are numbers in input window and total weight is not 0, weight tare is the priority.
4.4.3 Lock and Unlock of Tare
Example 1.1 Tare lock and unlock
N o t e 1 When you long press 【Tare】, you can hear one beep first (beep for correctness or error) . Hold
pressing for 4 seconds you will hear the beep for correctness.
N o t e 2 Once tare locked, it cannot be changed or cleared automatically. Only manual tare can change tare.
N o t e 3 Once tare locked, it cannot be unlocked unless users unlock tare manually.
4.5 Auto Mode
4.5.1 Enter and Exit of Auto Mode
Example 1.1 Enter and Exit of Auto Mode
28
N o t e 1 Current accumulative buffer must be empty if you enter auto mode. Users cannot switch buffer in
auto mode if target accumulative buffer is not empty.
N o t e 2 Activate lock PLU while enter auto mode and unlock PLU while exit auto mode.
N o t e 3 Enter or exit auto mode could only be done in 『Sale Idle』
4.5.2 Sales in Auto Mode
Example 1.1 Sale in auto mode: weight goods
Weight PLU can do auto sale. Assume PLU10 is weight PLU with U.Price 2.00yuan/kg and tare 0.100kg.
29
30
Example 1.2 Sale in auto mode: count goods
Count PLU sale in auto sale mode. Assume PLU11 is count PLU with U.Price $2.00/pc. Sell 10 deals and
each deal sells 5 items.
31
4.6 Operations of Sale Buffers
4.6.1 Switch Sale Buffers
Example 1.1 Switch sale buffers
32
4.6.2 Amend the data in sale buffers
Example 1.1 Clear all data in current sale buffers
33
34
Example 1.2 Clear one certain goods in current sale buffer
35
N o t e 1 In amend window: the window of tare is in the form of xx xx. The first part shows accumulative
times; the latter part is the object to be amended. 00 is total and 01~31 are accumulative number.
N o t e 2 If users amend the total, the whole deal l is cleared
N o t e 3 If users amend xx goods, information of xx goods is cleared. And if there was a T.Price discount,
T.Price discount information is ignored. T.Price will be calculated based on U.Price (or discounted
U.Price) and weight/count amount of sold goods.
N o t e 4 If T.Price is selected, the window of 『Weight/Count』 will display piece number of sold goods. The
definition of the piece number is: 5 count goods add 5 , each weight goods add 1.
4.7 Inquiry of Sale Records and Markers of Returns of Goods
Mark the tenth item in the sale record as return of goods.
36
Example 1.1 Inquiry of sale records and markers of returns of goods
37
38
N o t e 1 The light of 【Shift】 on means the corresponding record is marked as return of goods. If users want
to mark return of goods, Spec074 must be opened which is Not Open in default.
N o t e 2 The display form of this window is xx.xx. The first part shows accumulative times; The latter part
shows sequence numbers of the corresponding deal. 02.02 means that accumulative times is 2 and this
goods is the second accumulative goods. If show 02.00, it means itself is not a goods but just a
independent statistic price due to discount or rounding. See detail of Spec102.
N o t e 3 The number shown in the window of change / U.Price is the amount of sale record stored in the
scale. When the number is close to 8000, the scale would delete the earlist records automaticlly. And
single / total shows the sequence number of this record in all the records.
39
5 Programme Operations
5.1 Please read this part first
For ordinary users, they can use 3 kinds of Fast Progs in 《Fast Prog》 in chaper 3 to handle most
applications.
There are detailed programme operations of the scale in this chapter, as well as examples for users. But some
parts of programme content are very complicated such as print format edit and barcode format edit. Devisers
suggest users use company offered software when users are in need of these functions. The company software
offers users a convenient interface to edit all the working parameters and sale data of the scale. The setting data
can be downloaded from Ethernet (real-time download), or transferred in the form of files by USB flash disk
(Users edit the data on PC and store the data in USB flash disk , then download the data to scale from USB flash
disk.).
Devisers are convinced that it’s easy to learn to use the company offered software. As long as users own
basic computer operation knowledge and learn with user manual of this software (User manual would be
installed with the software), users can operate the software in a very short time. If users cannot use
computer and are still in need of complicated programme operations, users can write down the demands
and send to us.
If computers cannot be used in users’ circumstances, and users are indeed in need of functions of this part,
please read content in this chapter carefully. In consideration of too much content, detailed example instructions of
all operations will not be provided in some chapters. But all the functions are instructed in words and processes
are arranged in sequence of steps. Users should read 《Tree-shaped Design of Edit Steps》 and 《Frequently-used
Keys in 》 first carefully. Then do programme operations according to instructions in 《 List of Programme
Interface》 and corresponding chapters on the basis of fully understanding of these two parts.
5.2 Basic Operations in Programme Interface
5.2.1 Tree-shaped Design of Edit Steps
40
41
P1.-TM-Set
Fast Prog
Time
Spec
String
ScPLU
Dept.
Class
PLU
Bcode
Label
Sales
P2.-DT-Set
Unit
ProgMenu
P3.-DT-Ass
SK-PLU
SKFPLU
Delete
P4.-Commu
U-Disk
Ethnet
RS232
USlave
P5.-HW-Ass
Set-PW
TMS-DF
Note: Hardware information must be operated in this machine.
Picture 1.1 Sketch map of tree-shaped design of edit interface
5.2.2 Frequently-used Keys in Prog Interfaces
【Amend】: Save the amended content and go back to previous interface. If operation is in DTSet, go
back to step 0 after save and wait for new number to be input to amend.
【Cancel】: Don’t save the amended data and go back to previous interface.
【Confirm】: Get into the next interface. Such as enter P31 by pressing【Confirm】 when operation is in
P3. Or press 【Confirm】 to enter certain edit interface when operation is in text edit or in edit interface
of print format. Then press 【Amend】 to save and exit, or press 【Cancel】 to exit without saving.
42
【←】、【→】: Steps selection. Such as in step P21, press 【←】 and【→】 to select steps P21~ P27.
【↑】、
【↓】: Press【↑】
【↓】 to select previous or next valid data when amending data in programme.
And its function is the same as 【←】【→】 in some interfaces when no data is to be amended.
【0】~【9】、00: Input corresponding numbers.
【back】: Delete the last digit number.
【×】: There are many steps to select in processes of Spec and DTSet edit operations in TMSet, users can
use【×】 to select step to edit. After press【×】, there would be a hint for you to input the step number you
want to select. Input the number and press 【Confirm】.
5.2.3 List of Programme Interface
43
44
45
46
47
48
49
50
51
52
53
54
55
56
57
58
59
60
61
62
63
64
65
66
67
68
5.3 The Edit of All Parts in TMSet
5.3.1 Time Programme
Example 1.1 Time Programme
5.3.2 Programme of Spec Data Parameters
Example 1.1 Programme of Spec parameters
69
N o t e 1 This programme way is the same as the way Fast-Prog of Spec Parameters in example 3-4 in page
Error: No se encuentra la fuente de referencia, except the way it enters programme page.
N o t e 2 Please refer to 《Definitions of Spec data parameters 》 in page 116 for definitions of all items of
Spec data parameters .
5.3.3 Programme of String Parameters
Example 1.1 Programme of string parameters
N o t e 1 Please refer to 7.3 Definitions of String data paremeters for definitions of each string parameter.
70
5.3.4 Prog of PLU Shortcut Keys
Example 1.1 Prog of PLU Shortcut keys
N o t e 1 The way it programmes is the same as the way of 1.1 and 1.2 in page 17, except the way it enters
programme interface.
5.4 The Edit of All Parts in DTSet
5.4.1 Department Programme
The department (Dept. for short) is the largest category in sales statistics. And it’s marked with number from 1 to
99 and the corresponding meanings are shown below:
71
Example 1.1 Department Programme
5.4.2 Class Programme
Class is the second largest category in sales statistics. And it is marked with number from 1 to 99 and the
corresponding meanings are shown below:
Example 1.1 Class programme
72
5.4.3 PLU Programme
Price-LookUp is information cell for goods sale. Serial number of PLU, as the only sign of scale store PLU, is
defined by user to correspond to actual goods. Remark number, as the number defined by users or the serial
number of actual goods, is often printed as barcode. All the serial numbers which can be edited by users are from
10 to 5999. And special serial numbers are corresponding to the meanings shown below :
Example 1.1 PLU programme
73
N o t e 1 Except the parts which have been instructed, meaning of the other words are listed 《 List of
Programme Interface》in page 43.
N o t e 2 The way it programmes is the same as the way Fast-Prog of 1.1 in page 15, except the way it enters
programme page.
N o t e 3 xx is not continuous when users press【】and【】to select the programme content. There are two
reasons. One reason is that the content in this part is meaningless. For example, tare will not present in
count PLU programme. The other reason is that the content in that part is seldom used and has been set
as non-programme content (Skip) in P31 and P32. Users could change that setting for personal usage
and please refer to corresponding chapters for details.
74
5.4.4 Unit Programme (Not Open)
Unit is the basis of sale price. The scale has shielded parts of functions in consideration that edit of units may
cause unnecessary trouble. The 8 units edited when the scale is released from factory are shown as below:
N o t e 1 Default weight unit is the measure unit of the scale.
5.4.5 Barcode Programme
Barcodes have different meanings in various applications and coding systems. Some barcodes are already edited
when the scale is released from factory. Users could choose some barcodes from them to use or edit the barcode
by themselves.
Example 1.1 Barcode Programme
75
Table 1.1 List of barcode types
76
N o t e 1 Only EAN13 are opened currently. No matter which kind of code you choose, print will be in format
of EAN13.
Table 1.2 Table 5-2 Check digit of barcode
N o t e 1 Check digit of barcode for barcode formats is just an advice for the scale. The scale would process
the check based on the selected barcode format. For example, EAN13 is verified by End Check no
matter which kind of check is selected.
Table 1.3 Descriptions of barcode data items
77
Table 1.4 Factory Default barcode
78
5.4.6 Print Formats Programme
Different print formats are needed in various applications. Some print types are already edited when the scale
is released from factory. Users could choose some formats from them or edit the format by themselves. It’s very
hard to edit print format on the scale. Suggest users do not edit print format on the scale.
This chapter would not offer any examples about print formats edit. Users should use the software on PC to
edit print formats or write down demands and send them to us. We will edit the print format you need.
Table 1.1 Factory default print formats
79
80
81
82
N o t e 1 If users use gap paper in size of 58mm*30mm, set the value of Spec000 to 1, Spec001 to 4.
N o t e 2 If users use gap paper in size of 40mm*30mm, set the value of Spec000 to 2, Spec005 to 5.
N o t e 3 If users use gap paper in size of 58mm*30mm, set the value of Spec000 to 3, Spec005 to 6.
N o t e 4 If users use plain paper in width of 58mm, set the value of Spec000 and Spec005 to 7
N o t e 5 If users use plain paper in width of 40mm, set the value of Spec000 and Spec005 to 8.
5.4.7 Salesman Programme (Not Open)
Example 1.1 Salesman programme
83
N o t e 1 Number 1~99 is the content for users to edit.
84
5.5 Assistant Data Programme
5.5.1 Steps Select of PLU Prog
Example 1.1 Steps select of PLU prog
85
N o t e 1 The steps above activate steps index and shield steps cost. So, there is a step to input index in the
programme of P23, but without a step to input cost. Select Prog or Skip by pressing【↑】or【↓】. If
Prog is selected, the step is in the programme. If Skip is selected, the step is skiped and not in
programme.
N o t e 2 Amended content would be in effect only in PLU programme and not effective in fast-prog.
86
5.5.2 Steps Select of PLU Fast Prog
Example 1.1 Steps select of PLU fast prog
87
N o t e 1 The processes are the same as 1.1 , only if amended contents only work in PLU fast-prog instead of
PL U programme.
5.5.3 Delete Sale Data
When entering the interfaces of delete, users would be requested to receive validate code. Validate code is
9958. Confirm and enter delete process.
88
Example 1.1 Delete PLU20~30
89
N o t e 1 Once confirming to delete object, users shall be requested to input 2 numbers. And system would
delete data objects in the range between the two numbers. If the 2nd number is 0, the object appointed
by 1st number is deleted. If 2nd number is less than 1st number, no object is deleted.
5.6 Communication and Data Update
5.6.1 Operations of files in USB flash disk.
Data edited on PC could be transferred by USB flash disk.
The software would create a file in the directory of JHSCALE when exporting a file to USB flash disk.
If users export auto-update file, the form of file is A_xxx.TMS. If the scale has set USB flash disk autoupdate (factory default setting), after switch on, the scale would update the data when system detects the file in
USB flash disk
In P51, press【×】 to select auto-update file A_xxx.TMS, or input number to select numbered files from
A_000.TMS to A_999.TMS (The number is file serial number ). Press【Confirm】 to load file data and update the
information in the scale. Or press 【Amend】 to save scale information to appointed file.
Example 2.13 Load files in USB flash disk
90
N o t e 1 If the loading files ends normally, system would change the state into Finish. Normally, the amount
of error commands should be 0.
N o t e 2 If system encounters with invalid files or other serious mistakes, change the state into Error.
N o t e 3 In the state of Finish or Error, press any key to exit. If users want to exit midway, press 【Cancel】.
91
Example 1.2 Save to files in USB flash disk
N o t e 1 Exporting data to files in USB flash disk may take a lot of time. Please wait.
N o t e 2 Press any key to exit when saving is ended. If users want to exit midway, press 【Cancel】.
5.6.2 Ethernet Monitor Interface
Example 1.1 Enter Ethernet monitor interface
92
N o t e 1 This monitor interface is usually used when the scale is set to not update in real-time on Internet.
5.6.3 RS232 Communications
The interface is similar to ethernet monitor interface.
5.6.4 USB Slave Communications
The interface is similar to ethernet monitor interface.
5.7 Hardware Assistant
5.7.1 Validate Code
On the purpose of preventing any misoperation in important operation interfaces, users are requested to input
validate code when entering these operation interfaces. The interface is shown below:
Input
Code
0
Validate code of this scale is 9958. When the scale requests to input validate code, users should first make
sure whether this operation interface is the one you intend to enter and understand the meaning of this operation.
Then input validate code and do operations.
5.7.2 Password
Password is the code to obtain the right to operate the scale. And there are 4 passwords in all.
93
N o t e 1 That Password is 0 means no passwords needed. Users could set the password to be 0 when
canceling the password.
N o t e 2 Admin password is in a higher level than the other 3 passwords. Users do not need to input any
password to enter all interface if admin password is 0 , no matter whether the other passwords are 0 or
not. If users want to protect Prog interface or Account interface, first change the admin password other
than factory default, then set passwords of corresponding interfaces.
Example 1.2 Process of amending passwords
94
N o t e 1 Only the input passwords match for the two times, password setting can be done.
95
5.7.3 Recover Factory Default Setting
Example 1.1 Process of amending passwords
96
N o t e 1 Please pay attention to this. Execute recovery 1 or 4, and then passwords would change to factory
default.
97
6 Account Operations
6.1 List of Account Interfaces
Entering to Account interface, the scale would enter a calculate process, which first calculate sale records that
haven’t Stat.. Then enter A1 select interface.
Table 1.1 List of Account interfaces
98
6.2 Operations of Printing Report
6.2.1 Print Total Report
Total reports are divided into total daily report, total monthly report, total quarterly report and total manual
report. Each report owns 32 buffer zones (0~31).
Take total daily report as an example: The buffer zone 0 stores total daily report of current day; buffer zone 1
stores total daily report of the last day. The rest may be deduced by analogy. So buffer zone 31 stores total daily
report of the day dating back to 31 days ago.
Total monthly report and total quarterly report works in the same way, storing total report of the last x
99
months or quarters (x=0~31).
Total manual report would take operation A51 as time point to divide the storage. The buffer zone delays a
position automatically when a report is cleared (That means: Buffer 31 records the information which was stored
in buffer 30. By analogy, buffer 1 record the information which was stored in buffer 0 and information stored in
buffer 0 is cleared. Then start accumulating in buffer 0. ).
When printing total report, system would request to input 2 numbers. And the scale would print total buffer
which is added up with the buffers whose numbers are between the 2 input numbers.
Example 1.1 Print daily reports of today and yesterday
N o t e 1 If some buffers store no data, these buffers would be skiped off without printing.
N o t e 2 If 2nd number input is 0, system would only print the buffer appointed by 1st number.
N o t e 3 If 2nd number input is not 0 and less than 1st number, no buffer would be printed.
N o t e 4 The hints about currently print object may appear on the screen for just a few seconds when system
is printing.
6.2.2 Print Department Report
The scale could print report of all departments. Operation steps are similar as《Print PLU Report Print》.
Only the step to enter is different and 2 input numbers is the department numbers.
6.2.3 Print Class Report
The scale could print reports of all Classes. Operation steps are similar as《Print PLU Report Print》.
Only the step to enter is different and 2 input numbers is the class numbers.
1
00
6.2.4 Print PLU Report
The scale could print PLU reports whose number is less than 1000.
When printing PLU reports, system would orderly print those PLU reports whose serial numbers is between
the 2 input numbers as well as the 2 input numbers.
Example 1.1 Print PLU daily reports with the numbers from 10 to 20
N o t e 1 If some buffers store no data, these buffers would be skiped off without printing.
N o t e 2 If 2nd number input is 0, system would only print the buffer appointed by 1st number.
N o t e 3 If 2nd number input is not 0 and less than 1st number, no buffer would be printed.
6.3 Clear Report Information
6.3.1 Clear Report Information Manually
The information in manual reports would not be cleared automatically unless users enter A51 (clear current
manual report) interface to clear it. After this operation, manual reports of all departments, classes and PLU would
be cleared, and total manual report would delay its serial number.
1
01
Example 1.1 Clear information in manual report
6.3.2 Clear All Reports and Records Information
Example 1.1 Clear All Reports and Records Information
N o t e 1 This operation would clear the records of all deals. And it’s irreversible. Please operate it carefully.
1
02
7Appendix
7.1 Error messages and solution
1
03
1
04
1
05
1
06
1
07
1
08
1
09
11
0
11
1
11
2
11
3
11
4
11
5
7.2 Definitions of Spec data parameters
11
6
11
7
11
8
11
9
1
20
1
21
1
22
1
23
1
24
1
25
1
26
1
27
1
28
1
29
7.3 Definitions of String data paremeters
1
30
1
31