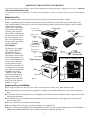
1
uUse only a good, reliable standard brand of cooking oil for deep frying. Deep frying foods in olive oil is not
recommended because it has a lower smoking temperature.
uDo not use solid fat (shortening, butter, margarine, lard). Solid fat will not melt uniformly and will cause severe
smoking. It may also cause the unit to overheat resulting in the reset button tripping. In addition, solid fat will solidify
once it has cooled making it very difficult to remove or insert the control assembly.
uBefore deep frying, remove ice crystals and excess moisture from food by blotting with toweling—moist foods cause
excess foaming and/or spattering and may cause oil to overflow. Do not add wet food to cooking oil. Even small
amounts of moisture may cause the oil to spatter, foam, and/or overflow.
uDo not use cover while frying french fries and other high moisture foods.
uAlways unplug cord from wall outlet and then from deep fryer when unit is not in use.
uAlways allow fryer to cool completely before removing any parts, before removing oil, and before cleaning.
Basket Handle Assembly/Storage
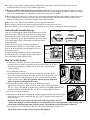
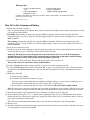
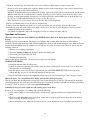
Your fryer will be shipped with the basket handle in the storage
position (Fig. B1). When ready to use the basket, simply lift the
handle out of the basket. Then, gently squeeze the drain hooks
(Fig. C), keeping the pegs in the bracket holes, and fit the handle
bars in the brackets (Fig. D). The handle is now in the locked
position (Fig. B2).
Caution: To insure against accidental detachment of
Drain hooks
handle from basket during use, always make sure both
pegs are in the bracket holes and the handle bars are in
Handle bars
the brackets (Fig. D).
To unlock the basket handle for storage, gently squeeze
Fig. C
the drain hooks (Fig. C), keeping the pegs in the bracket
holes, and fold the handle into the basket.
Fig. B1
Fig. B2
STORAGE
POSITION
Locked
Position
To lock and unlock handle,
gently squeeze drain hooks.
How To Use For Frying
Handle bars
Brackets
Peg
Fig. D
Bracket Peg
holes
1. Position base on a clean, dry, level, stable, and heatFig. E
resistant surface in center of countertop. Always use the handles on the base
when lifting or moving the appliance. Never lift or move appliance using
control assembly.
2. Place removable pot in base.
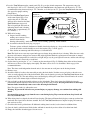
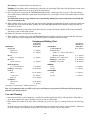
3. Attach the control assembly to the base by aligning the two guides on the
front of the control unit with the two tracks on the back of the base (Fig. E).
Slide the control assembly down (Fig. F) as far as it goes making sure both
Tracks
guides are in the tracks. Note: The appliance will only operate when both
Guides
guides are properly positioned in the tracks.
4. Fill removable pot with cooking oil up to the MAX level marking
Fig. F
(approximately 41⁄2 quarts), which is located on the inside of the removable pot
(Fig. A1, page 2). The amount of oil must always be between the MIN and MAX level
markings inside the removable pot (Fig. A1). Never exceed the MAX level mark.
5. Place the cover on the deep fryer.
6. Attach the cord to the unit by aligning the magnetic plug end with the two electrical pins
located on the back of the control unit (Fig. A2, page 2). The plug can be attached in
either direction.
Important: The magnetic cord was designed to detach easily from the fryer. As
a result, if it is bumped or touched during use it could possibly detach causing the unit to stop heating. Avoid
contact with cord during operation. If contact occurs, verify that the cord is still properly connected.
7. Plug cord into a 120 volt wall outlet. The unit will beep two times when you plug it in.
Always make sure fryer and cord are out of reach of children.
3