1
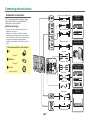
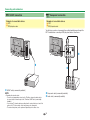
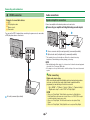
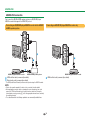
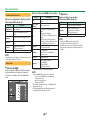
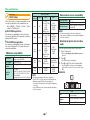
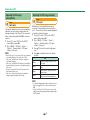
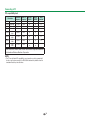
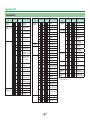
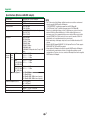
Useful viewing functions
Terminal setting
Option
Option
Audio select
Input select
When using the PC terminal or HDMI 2 terminal, you
must select which terminal uses the AUDIO (L/R)
jack for analogue audio input.
Go to “HOME” > “TV Menu” > “Setup” >
“Option” > “Terminal setting” > “Audio select”.
When selecting “HDMI 2” from the “INPUT” menu
HDMI
HDMI +
Analogue
Item
When connecting devices (including a
PC) with a HDMI cable to the HDMI 2
terminal.
When connecting devices (including
a PC) with a DVI/HDMI cable to
the HDMI 2 terminal and inputting
analogue audio signals from the AUDIO
(L/R) jack.
When selecting “PC” from the “INPUT” menu
Video
Video+Audio
Item
When connecting devices with an
AV cable to the PC terminal, displays
images without audio.
When connecting a PC to the PC
terminal, and inputting analogue audio
signals from the AUDIO (L/R) jack.
Skipping specified inputs
NOTE
Input source settings
For setting the signal type of external equipment.
1 Press b to select the input source for setting
2
CH list
the input signal (“EXT1”) from the “INPUT”
menu, and then press ;.
Go to “HOME” > “TV Menu” > “Setup” >
“Option” > “Terminal setting” > “Input select”.
INPUT
TV
Item
Y/C, CVBS, RGB
EXT1
NOTE
• If no (colour) image displays, try changing to another
signal type.
• Check the operation manual of the external equipment
for the signal type.
Option
Input label
You can label each input source with a custom
description.
1 Press b to select the desired input source
from the “INPUT” menu, and then press ;.
2 Go to “HOME” > “TV Menu” > “Setup” >
“Option” > “Terminal setting” > “Input label”.
3 Select each character of the new name for the
input source with using the software keyboard
(Page 13).
Option
Input skip
This setting allows you to skip the inputs on the
input source selection operation.
Go to “HOME” > “TV Menu” > “Setup” >
“Option” > “Terminal setting” > “Input skip”.
NOTE
• When you select “ATV”, “DTV” or “SAT”, the skip
function works only when using the b button on the
TV.
• The label can be six characters or less.
• This menu can be changed in the case of the following
input sources:
− EXT1–3
− HDMI1–4
− PC
41
Switchable
Selecting the HDMI picture size
automatically
Option
HDMI auto view
This function allows you to automatically change to
the appropriate picture size when viewing an HDMI
signal using the HDMI 1, 2, 3 and 4 terminals.
1 Press b to select the input source (“HDMI 1”,
“HDMI 2”, “HDMI 3” or “HDMI 4”) connected to
your HDMI device, and then press ;.
2 Go to “HOME” > “TV Menu” > “Setup” >
“Option” > “Terminal setting” > “HDMI auto
view”.