1
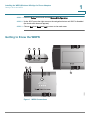
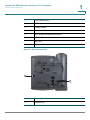
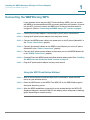
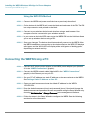
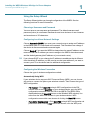
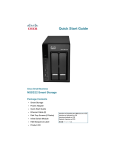
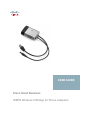
USER GUIDE
Cisco Small Business
WBPN Wireless-N Bridge for Phone Adapters
December 2011
Cisco and the Cisco Logo are trademarks of Cisco Systems, Inc. and/or its affiliates in the U.S. and other countries. A listing of Cisco's trademarks can be found
at www.cisco.com/go/trademarks. Third party trademarks mentioned are the property of their respective owners. The use of the word partner does not imply
a partnership relationship between Cisco and any other company. (1005R)
© 2011 Cisco Systems, Inc. All rights reserved.
OL-26019-01
Contents
Chapter 1: Installing the WBPN Wireless-N Bridge for Phone Adapters
Before You Begin
Using the WBPN With the Cisco SPA525G/525G2
5
5
Getting to Know the WBPN
6
Connecting the WBPN Using WPS
8
Using the WPS Push Button Method
8
Using the WPS PIN Method
9
Connecting the WBPN Using a PC
9
Using the Setup Wizard
10
Choosing a Username and Password
10
Configuring Local Area Network Settings
10
Configuring the Wireless Connection
10
Setting a Static IP Address on Your PC
Installing the WBPN Into the SPA Phone Stand
Chapter 2: Using the WBPN Wireless-N Bridge for Phone Adapters
Configuration Utility
11
16
19
Logging in to the Configuration Utility
19
Navigating through the Pages
20
Viewing Status Information
21
Configuring Wired Parameters
23
Configuring LAN Settings
23
Configuring Date and Time Settings
24
Configuring Wireless Parameters
24
Configuring Basic Settings
24
Configuring Advanced Settings
26
Discovering Available Wireless Networks
28
Using Wi-Fi Protected Setup (WPS)
29
Performing Administrative Tasks
Cisco WBPN User Guide
5
30
Viewing Logs
30
Upgrading Firmware
31
Saving and Reloading Your Configuration
31
3
Contents
Changing Your Username or Password
31
Rebooting and Restoring to Factory Default
32
Appendix A: Where to Go From Here
Cisco WBPN User Guide
33
4
1
Installing the WBPN Wireless-N Bridge for
Phone Adapters
This chapter describes how to install and initially configure your WBPN Wireless-N
Bridge for Phone Adapters. It contains the following sections:
•
Before You Begin, page 5
•
Getting to Know the WBPN, page 6
•
Connecting the WBPN Using WPS, page 8
•
Connecting the WBPN Using a PC, page 9
•
Installing the WBPN Into the SPA Phone Stand, page 16
Before You Begin
Before you begin the installation, make sure that you have the following equipment
and information:
•
Power Supply for your Small Business IP Phone (not included)
•
PC to use the web-based system management tools to configure the WBPN
(required if you are not using Wi-Fi Protected Setup). The web-based
configuration manager is supported on Microsoft Internet Explorer (version
8 or higher) and Mozilla Firefox (version 3.6.3 and higher).
Using the WBPN With the Cisco SPA525G/525G2
You can use the WBPN with the Cisco SPA525G/525G2 IP phone to improve the
wireless performance of the phone. You must first disable the internal Wireless-G
controller on the Cisco SPA525G in order to use the WBPN as your wireless
controller. To disable the phone’s internal wireless:
Cisco WBPN User Guide
5
1
Installing the WBPN Wireless-N Bridge for Phone Adapters
Getting to Know the WBPN
STEP 1 Press the Setup button and choose Network Configuration.
STEP 2 Under Wi-Fi, press the right arrow on the navigation button until Wi-Fi is disabled
(the check mark does not appear).
STEP 3 Choose Set, then Back and Exit to return to the main menu.
Getting to Know the WBPN
1
8
6
2
3
5
7
283688
4
Figure 1
Cisco WBPN User Guide
WBPN Connections
6
1
Installing the WBPN Wireless-N Bridge for Phone Adapters
Getting to Know the WBPN
1
Power adapter port
2
WBPN power cable
3
Network cable
4
Reset button
5
Wi-Fi Protected Setup (WPS) button
6
WLAN LED
7
WPS LED
8
System LED
Figure 2
Phone Connections
1
283689
2
Cisco WBPN User Guide
1
Power adapter port
2
Ethernet port
7
Installing the WBPN Wireless-N Bridge for Phone Adapters
Connecting the WBPN Using WPS
1
Connecting the WBPN Using WPS
If your wireless device supports Wi-Fi Protected Setup (WPS), you can connect
the WBPN to the phone and use WPS to connect the phone your network. If you do
not use WPS, you must connect the WBPN to a PC and use a web browser to
configure it. See the “Connecting the WBPN Using a PC” section on page 9.
STEP 1 If the IP phone power adapter is connected to your IP phone, disconnect it.
STEP 2 Unplug the IP phone power adapter from the power source.
STEP 3 Connect the WBPN power cable to the power port on the IP phone (labeled #1 in
the “Phone Connections” graphic).
STEP 4 Connect the network cable from the WBPN to the Ethernet port on the IP phone
(labeled #2 in the “Phone Connections” graphic).
STEP 5 Connect the IP phone power adapter to the power port on the WBPN (labeled #1
in the “WBPN Connections” graphic).
STEP 6 (Optional) Place the WBPN inside the hollow desktop phone stand. See “Installing
the WBPN Into the SPA Phone Stand” section on page 16.
STEP 7 Plug the IP phone power adapter into the power source.
Using the WPS Push Button Method
STEP 1 After all connections are made and devices are powered on, press the WPS
button on your wireless device.
STEP 2 Press the WPS button on the WBPN. The WPS LED on the WBPN flashes green
during the discovery period.
STEP 3 After the WBPN establishes a connection to the wireless device, the WPS LED
displays solid green, and the WLAN LED will display either solid green or flashing
green, depending on network activity.
Cisco WBPN User Guide
8
Installing the WBPN Wireless-N Bridge for Phone Adapters
Connecting the WBPN Using a PC
1
Using the WPS PIN Method
STEP 1 Connect the WBPN and power on all devices as previously described.
STEP 2 On the bottom of the WBPN unit, locate the label and make note of the PIN. The PIN
is a unique numeric code printed on the label.
STEP 3 Connect to your wireless device’s web interface using a web browser. Your
computer must be connected to your wireless network.
STEP 4 In your router or device’s WPS menu, enter the WBPN PIN into the field that allows
you to set up wireless devices using a PIN.
STEP 5 Save your changes. The device should automatically connect to the WBPN. After
the WBPN establishes a connection to the wireless device, the WPS LED displays
solid green, and the WLAN LED will display either solid green or flashing green,
depending on network activity.
Connecting the WBPN Using a PC
STEP 1 Connect the IP phone power adapter to the WBPN power adapter port (labeled
#1 in the “WBPN Connections” graphic).
STEP 2 Connect the WBPN network cable (labeled #3 in the “WBPN Connections”
graphic) to the Ethernet port on your PC.
STEP 3 Set your PC’s IP address to a static IP address on the same subnet as the WBPN.
See Setting a Static IP Address on Your PC.
STEP 4 Open your web browser and enter the default IP address for the WBPN:
192.168.1.254.
STEP 5 Enter the default username (cisco) and password (cisco). You should change the
default username and password as soon as possible using the Setup Wizard or by
choosing Administration > Change Password in the management interface.
STEP 6 Follow the steps in the Setup Wizard to configure the WBPN. See the following
sections for more information.
Cisco WBPN User Guide
9
Installing the WBPN Wireless-N Bridge for Phone Adapters
Connecting the WBPN Using a PC
1
Using the Setup Wizard
The Setup Wizard guides you through configuration of the WBPN. See the
following sections for more information.
Choosing a Username and Password
You must enter a new username and password. The default username and
password (cisco) is not allowed. Passwords must be a minimum of one character
and a maximum of 30 characters.
Configuring Local Area Network Settings
Choose Automatic (DHCP) if you want your network router to assign an IP address
to the WBPN when it is connected to the network. This IP address can change if
the device is disconnected and connected again.
Choose Static IP if you want the WBPN to always have the same IP address on the
network. Enter the IP address you want to assign to the WBPN, the subnet mask,
and the default gateway (the IP address of your network router).
TIP
If you choose DHCP or you change the IP address to an address that is different
from the default IP address, you will need to use that new address if you want to
connect your PC to the device later for additional configuration.
Configuring the Wireless Connection
Choose the type of wireless configuration method:
Automatically Using WPS
If your wireless device supports Wi-Fi Protected Setup (WPS), you can choose
this option to connect the phone your wireless network. Then choose the type of
WPS configuration:
Cisco WBPN User Guide
•
PIN Number—Click Start PIN to begin WPS configuration via the PIN
number. After clicking Start PIN, on your wireless device, go to the WPS
configuration menu and enter the PIN of the WBPN. (The WBPN PIN is
displayed above the Start PIN button on the Wireless WPS window.) You
must enter the WBPN PIN number in your wireless device’s WPS
configuration menu within two minutes of clicking the Start PIN button.
•
Push Button Configuration—Click Start PBC to begin WPS configuration via
push button. After clicking PBC, within two minutes, click the WPS push
10
Installing the WBPN Wireless-N Bridge for Phone Adapters
Connecting the WBPN Using a PC
1
button on your wireless device. The device will communicate with the
WBPN and connect it to your network.
Manually
Choose this option if your wireless device does not support WPS:
STEP 1 Enter the network name of your wireless network in the SSID field, or click Site
Survey to see a list of all wireless devices in the area. Click the Select button to
choose a device and click Next.
STEP 2 Select the type of encryption:
•
None—Choose if security is not enabled on your wireless device. (Not
recommended.)
•
WEP—Wired Equivalent Privacy encryption. WEP is a weak form of
encryption and is not recommended. With this type of security, you enter a
64 or 128-bit key on the WBPN, which the WBPN uses to authenticate with
your wireless router to provide a secure connection. You must choose the
key length and format, and enter the key in the Key Setting field.
•
WPA/PSK or WPA2/PSK—Wi-Fi Protected Access/pre-shared key
encryption. Either of these encryption types is more secure than WEP and is
recommended instead of WEP. Choose the protocol (TKIP or AES) and the
pre-shared key format (passphrase or HEX [64 characters]). If you chose
passphrase, enter a 8 to 63-character passphrase in the Pre-Shared Key
field. If you chose HEX (64 characters), enter a string of 64 hexadecimal
digits in the Pre-Shared Key field.
STEP 3 Click Next. The WBPN reboots.
Setting a Static IP Address on Your PC
Many PCs are configured to obtain an IP address automatically from the router or
device to which they are connected (for example, a wireless router or cable
modem). To connect your PC to the WBPN, your PC needs to have an IP address in
the same subnet as the IP address of the WBPN. For example, the WBPN has a
network address of 192.168.1.254. Your PC needs to have an IP address of
192.168.1.x (where x equals any number from 2 to 253) in order to initially configure
Cisco WBPN User Guide
11
Installing the WBPN Wireless-N Bridge for Phone Adapters
Connecting the WBPN Using a PC
1
the WBPN. If your computer is set up to obtain an IP address automatically, you will
need to change it to have a static IP address. If your PC is set up to have a static IP
address, you need to make sure that the IP address is in the range of 192.168.1.1 to
192.168.1.253.
You should revert to your original IP address settings after configuring the WBPN.
The following sections describe how to set a static IP address on several
operating systems. Your PC or network may vary. Consult the user documentation
for your PC for more information.
Windows 7 (IPv4)
STEP 1 From the Control Panel window, under Network and Internet , click View network
status and tasks.
STEP 2 In the left panel, click Change adapter settings.
STEP 3 Right-click on the Local Area Connection icon.
STEP 4 Click Internet Protocol Version 4 (TCP/IPv4) and click the Properties button below.
STEP 5 Select Use the following IP address and enter an address in the range of
192.168.1.2 to 192.168.1.253; for example, 192.168.1.115. Enter 255.255.255.0 for
the subnet mask. Leave the default gateway field blank.
Cisco WBPN User Guide
12
Installing the WBPN Wireless-N Bridge for Phone Adapters
Connecting the WBPN Using a PC
1
STEP 6 Click OK.
Windows XP
STEP 1 From the Start Menu, choose Control Panel > Network Connections > Local Area
Connection.
STEP 2 Click on Internet Protocol (TCP/IP) and click the Properties button below.
STEP 3 Select Use the following IP address and enter an address in the range of
192.168.1.2 to 192.168.1.253; for example, 192.168.1.115. Enter 255.255.255.0 for
the subnet mask. Leave the default gateway field blank.
STEP 4 Click OK.
Macintosh OSX
(The following example uses Macintosh OSX 10.6.4.)
STEP 1 Open System Preferences.
STEP 2 Choose Network.
Cisco WBPN User Guide
13
Installing the WBPN Wireless-N Bridge for Phone Adapters
Connecting the WBPN Using a PC
Cisco WBPN User Guide
1
14
Installing the WBPN Wireless-N Bridge for Phone Adapters
Connecting the WBPN Using a PC
1
STEP 3 With Airport selected, click Advanced.
Cisco WBPN User Guide
15
Installing the WBPN Wireless-N Bridge for Phone Adapters
Installing the WBPN Into the SPA Phone Stand
1
STEP 4 Click on the TCP/IP tab.
STEP 5 Under Configure IPv4, choose Manually.
STEP 6 Enter an address in the range of 192.168.1.2 to 192.168.1.253; for example,
192.168.1.115. The subnet mask and router values do not need to be changed.
STEP 7 Click OK.
Installing the WBPN Into the SPA Phone Stand
STEP 1 If the stand is attached to the phone, remove it.
STEP 2 Hold the stand with the Cisco logo facing you and the opening on the top.
STEP 3 Hold the WBPN so that the Cisco logo is facing you and the three LEDs are on the
top.
Cisco WBPN User Guide
16
Installing the WBPN Wireless-N Bridge for Phone Adapters
Installing the WBPN Into the SPA Phone Stand
1
STEP 4 Route the WBPN power cable through the left side of the phone stand.
STEP 5 Route the network cable from the WBPN to the Ethernet port on the phone through
the right side of the phone stand.
STEP 6 Line up the tabs on the desk stand with the slots on the back of the phone.
STEP 7 Slide the bottom tabs into the slots.
STEP 8 Ensure all cables are tucked inside the stand and will not interfere with the stand
attachment.
Cisco WBPN User Guide
17
Installing the WBPN Wireless-N Bridge for Phone Adapters
Installing the WBPN Into the SPA Phone Stand
1
Lightly press down on the top of the desk stand. It should easily slide into the top
slots. Do not force.
Cisco WBPN User Guide
18
2
Using the WBPN Wireless-N Bridge for Phone
Adapters Configuration Utility
This chapter describes how to use the web-based configuration utility for the
WBPN Wireless-N Bridge for Phone Adapters. It contains the following sections:
•
Logging in to the Configuration Utility
•
Navigating through the Pages
•
Viewing Status Information
•
Configuring Wired Parameters
•
Configuring Wireless Parameters
•
Performing Administrative Tasks
Logging in to the Configuration Utility
To log in to the configuration utility, follow the instructions in Connecting the
WBPN Using a PC. If you chose the WBPN to be assigned an IP address by DHCP,
or you changed the IP address to an address that is different from the default IP
address, you will need to use that new address to access the configuration utility.
Cisco WBPN User Guide
19
Using the WBPN Wireless-N Bridge for Phone Adapters Configuration Utility
Navigating through the Pages
2
Navigating through the Pages
Figure 1
Cisco WPBN Management Interface
Use the navigation tree (labeled #1 in Figure 1) in the left pane to open the
configuration pages. Click a menu item on the left panel to expand it. Under it, click
a menu name to perform an action or display a sub-menu.
To view more information about a configuration page, click the Help link (labeled
#2 in Figure1) near the top right corner of the page.
Cisco WBPN User Guide
20
Using the WBPN Wireless-N Bridge for Phone Adapters Configuration Utility
Viewing Status Information
2
When you finish making changes on a configuration page, click Apply (labeled #3
in Figure1) to save the changes. Click Reset (labeled #4 in Figure1), Clear, or
Cancel to undo your changes.
Viewing Status Information
The WBPN provides information about its status, including system information and
statistics.
System Information
The following system information is provided:
Firmware Version
Firmware version that is installed on the WBPN.
Build Time
Date and time that the firmware was built.
Serial Number
Unique serial number of the WBPN unit.
HW_Rev
Hardware version number.
PID VID
Product ID and version identifier of the WBPN.
Wired Network Information
The following wired network information is provided:
Cisco WBPN User Guide
IP Address
IP address of the WBPN.
Subnet Mask
Subnet mask of the WBPN IP address.
Default Gateway
The node that the network software uses when an IP
address does not match any other routes in the routing
table.
MAC Address
Hardware address of the wired (Ethernet) interface on
the WBPN.
Send Packets
Packets that have been transmitted over the Ethernet
interface from the WBPN to the network.
21
Using the WBPN Wireless-N Bridge for Phone Adapters Configuration Utility
Viewing Status Information
2
Received Packets
Packets that have been received by the WBPN on the
Ethernet interface from the network.
Reset Counter
Click to reset the send and received packet counters.
Wireless Network Information
The following wired network information is provided:
Mode
•
Infrastructure—The WBPN is connected to the
wireless network through a wireless router or
access point (AP).
•
Ad-hoc—The WBPN directly communicates with
other devices in the ad-hoc network. Each
device must be configured with the same SSID
and channel number in order to communicate
with other devices in the ad-hoc network.
Band
The band that the WBPN is using to transmit wireless
data (2.4GHz for Wireless B, G, or N).
SSID
The service set identifier, or name, of the wireless
network to which the WBPN is connected.
Channel Number
The wireless channel on which the WBPN is connected.
Encryption
Wireless encryption settings for the WBPN:
BSSID
Cisco WBPN User Guide
The WBPN mode:
•
None—Security is not enabled on your wireless
device. (Not recommended.)
•
WEP—Wired Equivalent Privacy encryption.
(WEP is a weak form of encryption and is not
recommended.)
•
WPA/PSK or WPA2/PSK—Wi-Fi Protected
Access/pre-shared key encryption. Either of
these encryption types is more secure than WEP
and is recommended instead of WEP.
The MAC address of the wireless router or AP in the
network.
22
Using the WBPN Wireless-N Bridge for Phone Adapters Configuration Utility
Configuring Wired Parameters
2
State
State of the wireless network (for example, disabled or
connected).
Data Rate
Rate of data transmission, in megabits per second
(Mbps).
RSSI
Received signal strength indicator of the wireless
signal received from the router or AP.
Region
Geographical region in which the WBPN is intended for
operation.
Send Packets
Packets that have been transmitted over the wireless
interface from the WBPN to the network.
Received Packets
Packets that have been received by the WBPN on the
wireless interface from the network.
Reset Counter
Click to reset the send and received packet counters.
Configuring Wired Parameters
Cisco recommends using the Setup Wizard to configure the WBPN. However, the
Navigation Menu can also be used for configuration.
Configuring LAN Settings
STEP 1 From the Navigation Menu, choose Wired > LAN IP Address.
STEP 2 Under IP Settings, choose Automatic (DHCP) if you want your network router to
assign an IP address to the WBPN when it is connected to the network. This IP
address can change if the device is disconnected and connected again.
Choose Static IP if you want the WBPN to always have the same IP address on the
network. Enter the IP address you want to assign to the WBPN, the subnet mask,
and the default gateway (the IP address of your network router).
TIP
Cisco WBPN User Guide
If you choose DHCP or you change the IP address to an address that is different
from the default IP address, you will need to use that new address if you want to
connect your PC to the device later for additional configuration.
23
Using the WBPN Wireless-N Bridge for Phone Adapters Configuration Utility
Configuring Wireless Parameters
2
Configuring Date and Time Settings
You can manually configure the date and time on the WBPN, or you can configure it
to synchronize its time clock to a Network Time Protocol (NTP) server.
To configure the date and time settings:
STEP 1 From the Navigation Menu, choose Wired > Time Settings (NTP).
STEP 2 Choose one of the following date and time configuration methods:
•
To copy the date and time from the computer that is connected to the WBPN,
click Copy.
•
To configure the WBPN to connect to an NTP server, in the NTP Client field,
check Enable. In the NTP Server field, select a server from the list, or click the
button next to the Manual field and enter the IP address of an NTP server.
STEP 3 Choose the time zone for your location.
STEP 4 (Optional) For regions that observe Daylight Saving Time, check the Enable box.
STEP 5 Click Apply.
Configuring Wireless Parameters
Cisco recommends using the Setup Wizard to configure the WBPN. However, the
Navigation Menu can also be used for configuration.
Configuring Basic Settings
To configure basic wireless settings:
STEP 1 From the Navigation Menu, choose Wireless > Basic Settings.
STEP 2 In the Band field, choose the type of wireless connection—B, G, N, B+G, G+N,
B+G+N. If you have 802.11n, 802.11g and 802.11b devices in your network, keep
the default setting, 2.4GHz (B+G+N). If you have 802.11n and 802.11g devices,
choose 2.4GHz (G+N). If you have 802.11g and 802.11b devices, select 2.4GHz
(B+G). If you have only 802.11n devices, select 2.4GHz(N). If you have only 802.11g
devices, select 2.4GHz (G). If you have only 802.11b devices, select 2.4GHz (B).
Cisco WBPN User Guide
24
Using the WBPN Wireless-N Bridge for Phone Adapters Configuration Utility
Configuring Wireless Parameters
2
STEP 3 Choose the Network Type:
•
Infrastructure—The WBPN is connected to the wireless network through a
wireless router or access point (AP).
•
Ad-hoc—The WBPN directly communicates with other devices in the adhoc network. Each device must be configured with the same SSID and
channel number in order to communicate with other devices in the ad-hoc
network.
STEP 4 If you chose the ad-hoc network type, you can configure the following parameters:
•
Channel width—Choose to manually configure the channel bandwidth for
Wireless-N connections. When it is set to 20MHz, only the 20MHz channel is
used. When it is set to 40MHz, Wireless-N connections will use the 40MHz
channel but Wireless-B and Wireless-G connections will still use the 20MHz
channel. If there is no Wireless-B nor Wireless-G broadcast, selecting 40Mhz
will enhance the throughput. This field is unavailable if you chose the
infrastructure network type.
•
Control Sideband— Specify if the extension channel should be in the Upper
or Lower sideband. This field is not configurable if you chose the
infrastructure network type.
•
Channel Number—Select the appropriate channel from the list. Select the
same channel on which the other ad-hoc devices in the network are
broadcasting. This field is not configurable if you chose the infrastructure
network type.
•
Data Rate—Select the data transmission speed. This field is not
configurable if you chose the infrastructure network type.
STEP 5 Wi-Fi Multimedia (WMM) is a component of the IEEE 802.11e wireless LAN
standard for quality of service (QoS). It specifically supports priority tagging and
queuing. It is enabled by default when the band is set to N, G+N, or B+G+N. You
can choose to disable WMM if the band is set to B, G, or B+G.
STEP 6 In the Encryption field, choose the type of security for the WBPN:
Cisco WBPN User Guide
•
None—Security is not enabled on your wireless device. (Not
recommended.)
•
WEP—Wired Equivalent Privacy encryption. (WEP is a weak form of
encryption and is not recommended.) If you choose WEP, choose the type of
authentication (Open System, Shared Key, or Auto). In the Key Length field,
choose the length of the encryption bit. 128-bit encryption is more secure
25
Using the WBPN Wireless-N Bridge for Phone Adapters Configuration Utility
Configuring Wireless Parameters
2
but can slow traffic. Choose a key format (ASCII or hexadecimal) and enter a
passphrase or key in the Encryption Key field. Hexadecimal format is more
secure.
•
WPA/PSK or WPA2/PSK—Wi-Fi Protected Access/pre-shared key
encryption. Either of these encryption types is more secure than WEP and is
recommended instead of WEP. There are two encryption options for WPA/
PSK: TKIP (Temporal Key Integrity Protocol) and AES (Advanced Encryption
System). TKIP utilizes dynamic keys and incorporates Message Integrity
Code (MIC) to provide protection against hackers. AES uses a symmetric
128-bit block data encryption. WPA2 uses AES-CCMP to perform user
authentication, which uses a symmetric 128-Bit block data encryption.
Choose the pre-shared key format (passphrase or hexadecimal) and enter
the pre-shared key in the field. Hexadecimal format is more secure.
STEP 7 Click Apply.
Configuring Advanced Settings
To configure advanced wireless settings, from the Navigation Menu, choose
Wireless > Advanced Settings. You can configure the following settings:
Cisco WBPN User Guide
Fragmentation
Threshold
This value specifies the maximum size for a packet
before data is fragmented into multiple packets. If you
experience a high packet error rate, you can slightly
increase the Fragmentation Threshold. Setting the
Fragmentation Threshold too low may result in poor
network performance. Only minor reduction of the
default value is recommended. In most cases, it should
remain at its default value.
RTS Threshold
“Request to send” threshold. If you configure Request
to Send/Clear to Send (RTS/CTS) on the WBPN, the
RTS threshold is the packet size included in the
request. You can configure this value if the WBPN has
inconsistent data flow. Only minor reduction of the
default value, 2347, is recommended. The RTS
Threshold value should normally remain at the default
value of 2347.
26
Using the WBPN Wireless-N Bridge for Phone Adapters Configuration Utility
Configuring Wireless Parameters
2
Beacon Interval
The Beacon Interval value indicates the frequency
interval of the beacon. The beacon is a packet
transmitted at regular intervals from APs in order to
synchronize the wireless network.
Preamble Type
The preamble is at the head or front of the Physical
Layer Convergence Protocol (PLCP), which is one of
the parts of the wireless physical layer. Devices use the
preamble type to start transferring data.
Long—The long preamble ensures compatibility with
legacy 802.11b devices but can slightly reduce
throughput at high data rates.
Short—The short preamble reduces the header's size
by 50%, down to 9 bytes. The short preamble is
optional for 802.11b. The 802.11g and newer standards
all support the short preamble. If you do not have
802.11b devices in your network, you can enable the
short preamble for a small throughput increase.
Protection
If you apply RTS/CTS flow control on the
communication with wireless LAN handsets, choose
Enabled to improve communication speed. If you have
few wireless LAN handsets, choose Disabled.
Aggregation
With frame aggregation, up to 64 MSDUs (MAC Service
Data Units, or Layer 2 frames) can be sent at one time.
This “super” frame has one physical layer header and
data frames (each with its own MAC header). Once all
the data has been sent, a block acknowledgment is
sent.
Enabling aggregation can help reduce bandwidth size
by reducing the “overhead” in networks with high
transmission rates, and allows higher throughput.
Cisco WBPN User Guide
Short GI
The guard interval (GI) is the space between symbols
(characters) being transmitted. The short guard interval
time is 400ns, which is half of the usual GI (800ns).
Enabling short GI helps throughput.
20/40MHz Coexist
Allows data to be transmitted on both the 20 MHz and
40MHz channels of the wireless LAN.
27
Using the WBPN Wireless-N Bridge for Phone Adapters Configuration Utility
Configuring Wireless Parameters
RF Output Power
2
Sets the strength of the wireless signal that the WBPN
transmits. If there are many wireless networks
broadcasting in or near the area where the WBPN is
physically located, you can lower the RF output power
to avoid overlap with other wireless networks and
reduce interference.
Click Apply to save any changes.
Discovering Available Wireless Networks
To discover available wireless networks, from the Navigation Menu, choose
Wireless > Site Survey. A table displays the wireless networks that are
broadcasting, and contains the following information:
SSID
Wireless network name, or identifier, of the network.
BSSID
MAC or hardware addresses of the network.
Channel
Channel on which the wireless network is broadcasting
and the 802.11 network type.
Type
Type of wireless network (for example, access point).
Encrypt
Security used on the wireless network.
Signal
Wireless signal strength of the network.
Click Refresh to repeat the survey.
Connecting to a Wireless Network
To connect to one of the wireless networks displayed in the Wireless Site Survey
table:
STEP 1 In the Select column, click the row of the network to which you want to connect.
STEP 2 Click Next.
STEP 3 Choose the type of encryption (normally, the WBPN detects the encryption and
you do not have to change this value).
Cisco WBPN User Guide
28
Using the WBPN Wireless-N Bridge for Phone Adapters Configuration Utility
Configuring Wireless Parameters
2
STEP 4 Depending on the type of encryption chosen, enter the following:
•
WEP—Key Length, Key Format, and Key Setting
•
WPA/PSK or WPA2/PSK—WPA or WPA2 Encryption, Pre-shared Key
Format, and Pre-shared Key
STEP 5 Click Connect.
For more information on encryption, see Configuring Wireless Parameters.
Using Wi-Fi Protected Setup (WPS)
If your wireless device supports Wi-Fi Protected Setup (WPS), you can choose
this option to connect the WBPN to your wireless network. You can either use the
physical button on the WBPN unit to start the WPS process, or use the
management interface. For information on using the physical button on the WBPN,
see Connecting the WBPN Using WPS.
To use WPS from the management interface, from the Navigation Menu, choose
Wireless > WPS. Choose the WPS configuration method:
Personal Identification Number (PIN) Configuration
The WBPN has a Personal Identification Number (PIN) that is displayed on this
page in the Self-PIN Number field, and on a printed label on the WBPN unit. You
can use this PIN to configure WPS:
STEP 1 On your wireless router or AP, go to the menu that allows you to set up wireless
devices via WPS with a PIN. Enter the PIN of the WBPN into the appropriate field
on your wireless router or AP and begin the WPS PIN process. (See the user
documentation for your router or AP for more information on where to configure
WPS on your particular device.)
STEP 2 In the management interface of the WBPN, from the Navigation Menu, choose
Wireless > WPS.
Cisco WBPN User Guide
29
Using the WBPN Wireless-N Bridge for Phone Adapters Configuration Utility
Performing Administrative Tasks
2
STEP 3 Click Start PIN.
Note: The Start PIN button must be clicked within two minutes of beginning WPS
PIN configuration on your wireless router or AP.
STEP 4 Click OK to continue. The WBPN should successfully connect to your device. If not,
repeat steps 1 and 2. If the process is still unsuccessful, try using the push-button
configuration described below.
Push-Button Configuration
STEP 1 In the management interface of the WBPN, from the Navigation Menu, choose
Wireless > WPS.
STEP 2 Click Start PBC.
STEP 3 On your wireless router or AP, push the button that allows you to set up WPS. (See
the user documentation for your router or AP for more information on your
particular device.)
Note: The WPS button on your wireless router or AP must be clicked within two
minutes of beginning PBC configuration on the WBPN.
STEP 4 Click OK to continue. The WBPN should successfully connect to your device. If not,
repeat steps 1 and 2. If the process is still unsuccessful, try using the PIN
configuration method described in the previous section.
Performing Administrative Tasks
You can perform various administrative tasks from the management interface. See
the following sections for more information.
Viewing Logs
Cisco WBPN User Guide
•
To view logs, from the Navigation Menu, choose Administration > Log.
•
To send logs to a remote server, check Enable Remote Log and enter the IP
address of the server to which to send logs.
•
Click Refresh to view the latest logs, or Clear to delete all logs.
30
Using the WBPN Wireless-N Bridge for Phone Adapters Configuration Utility
Performing Administrative Tasks
2
Upgrading Firmware
STEP 1 From the Navigation Menu, choose Administration > Upgrade Firmware.
STEP 2 Click Browse and navigate to the firmware file. Select the file.
STEP 3 Click Apply. The upgrade takes several minutes; do not power off the WBPN
during the upgrade.
Saving and Reloading Your Configuration
To save your current configuration (for example, wireless device information such
as SSID, security, and password):
STEP 1 From the Navigation Menu, choose Administration > Save/Reload Configuration.
STEP 2 Under Save Settings to File, click Save and choose to save the file to your PC. The
configuration is saved as a .dat file.
To load a previously saved configuration:
STEP 1 From the Navigation Menu, choose Administration > Save/Reload Configuration.
STEP 2 Under Load Settings from File, click Browse and locate the saved configuration file
that you want to restore.
STEP 3 Click Apply.
Changing Your Username or Password
To change your username or password:
STEP 1 From the Navigation Menu, choose Administration > Change Password.
STEP 2 Enter the new username and/or password. Enter the new password again to
confirm. The default username and password (cisco) is not allowed. Passwords
must be a minimum of one character and a maximum of 30 characters.
Cisco WBPN User Guide
31
Using the WBPN Wireless-N Bridge for Phone Adapters Configuration Utility
Performing Administrative Tasks
2
STEP 3 Click Apply.
Rebooting and Restoring to Factory Default
To reboot the WBPN:
STEP 1 From the Navigation Menu, choose Administration > Reboot.
STEP 2 Click Reboot.
To restore the WBPN to factory settings (all configuration changes that you have
made will be erased):
STEP 1 From the Navigation Menu, choose Administration > Reboot.
STEP 2 Under Reset Settings to Factory Default , click Reset.
Cisco WBPN User Guide
32
A
Where to Go From Here
Cisco provides a wide range of resources to help you and your customer obtain
the full benefits of the Cisco WBPN Wireless-N Bridge for Phone Adapters.
Support
Cisco Small Business
Support Community
www.cisco.com/go/smallbizsupport
Cisco Small Business
Support and Resources
www.cisco.com/go/smallbizhelp
Phone Support Contacts
www.cisco.com/en/US/support/
tsd_cisco_small_business
_support_center_contacts.html
Cisco Small Business
Firmware Downloads
www.cisco.com/go/smallbizfirmware
Cisco Small Business Open
Source Requests
www.cisco.com/go/smallbiz_opensource_request
Select a link to download firmware for Cisco Small
Business Products. No login is required.
Product Documentation
Cisco WBPN
www.cisco.com/go/spabridge
Cisco SPA50X Phones
www.cisco.com/go/spa500phones
Cisco SPA30X Phones
www.cisco.com/go/300phones
Cisco Small Business
Cisco WBPN User Guide
Cisco Partner Central for
Small Business (Partner
Login Required)
www.cisco.com/web/partners/sell/smb
Cisco Small Business
Home
www.cisco.com/smb
33