1
USER GUIDE
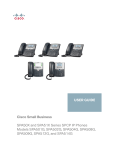
Cisco SPA302D Mobility Enhanced Cordless Handset
Contents
Chapter 1: Getting Started
1
Overview
1
Understanding Your Cisco SPA302D
2
Cisco SPA302D Display Screen
4
Turning the Handset On and Off
5
Navigating through the Phone Menus
6
Display Screen Icons
7
Entering Numbers and Text in Fields
8
Installing the Cisco SPA302D
9
Charging the Handset
10
Registering the Handset to the Cisco SPA232D Mobility
Enhanced ATA
11
Deregistering the Handset
12
Locating Handsets
Chapter 2: Using Your Cisco SPA302D
13
14
Placing a Call
15
Adjusting Handset Volume and Muting
15
Answering or Ignoring a Call
16
Putting a Call on Hold
16
Ending a Call
16
Using Call Waiting
16
Transferring a Call
17
Redialing a Call
17
Placing a Three-Way Conference Call
18
Picking Up a Call
18
Parking a Call
18
Managing Missed Calls
19
Using the Intercom Feature
20
Viewing the Call History
20
Cisco SPA302D Mobility Enhanced Cordless Handset User Guide
1
Contents
Using Contacts
21
Configuring Call Settings
22
Accessing the Call Settings Menu
22
Configuring Do Not Disturb, Call Waiting, and Call Blocking
22
Configuring and Using Speed Dials
23
Creating Speed Dials
23
Managing Speed Dials
24
Using Speed Dials
24
Configuring Call Forwarding
24
Choosing the Default Outgoing Line
25
Viewing the Line Status
26
Configuring Phone Settings
26
Configuring Network Settings
27
SIP Settings
28
Changing Your Ringtone
28
Configuring Keypad and Call Park Tones
29
Configuring the Backlight Timeout Setting
29
Configuring the Date and Time
29
Changing Handset Settings
30
Upgrading the Handset Software
30
Performing a Factory Reset
31
Viewing Phone Information
31
Advanced Handset Configuration Options
32
Troubleshooting the Cisco SPA302D
33
No Network Message
33
Unresponsive Handset
33
Appendix A: Where to Go From Here
Cisco SPA302D Mobility Enhanced Cordless Handset User Guide
34
2
Cisco and the Cisco logo are trademarks or registered trademarks of Cisco and/or its affiliates in the U.S. and other countries. To view a list of Cisco trademarks,
go to this URL: www.cisco.com/go/trademarks. Third-party trademarks mentioned are the property of their respective owners. The use of the word partner
does not imply a partnership relationship between Cisco and any other company. (1110R)
© 2012 Cisco Systems, Inc. All rights reserved.
OL-25472-01
1
Getting Started
This chapter provides an overview of your Cisco SPA302D Mobility Enhanced
Cordless Handset. It contains the following sections:
•
Overview, page 1
•
Understanding Your Cisco SPA302D, page 2
•
Installing the Cisco SPA302D, page 9
•
Locating Handsets
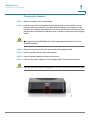
Overview
The Cisco SPA302D Mobility Enhanced Cordless Handset is part of the Cisco
Small Business voice endpoint product portfolio. The Cisco SPA302D provides
wireless phone service using the DECT standard. It provides both standard and
business-class phone features, such as multi-line support, conferencing, call
pickup, call park, and accessing voicemail.
The Cisco SPA302D works exclusively with the Cisco SPA232D Mobility
Enhanced ATA, which has an integrated DECT Base Station to provide telephone
service for the handsets. The Cisco SPA232D provides telephone and fax service
using a connection to the Internet and to the Public Switched Telephone Network
(PSTN).
Cisco SPA302D Mobility Enhanced Cordless Handset User Guide
1
1
Getting Started
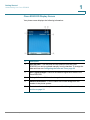
Understanding Your Cisco SPA302D
Understanding Your Cisco SPA302D
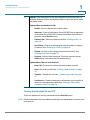
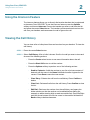
Use the following illustration and table to identify the parts of your phone.
Figure 1 Cisco SPA302D Mobility Enhanced Cordless Handset Phone
Components
#
Description
1
Earphone speaker.
2
Handset display.
3
Right softkey—Press the softkey to perform the action shown in the
lower right of the handset display.
4
End Call button—Press the button briefly to end a call. Press the button
and hold it to turn the handset on and off.
5
Dial keypad.
Cisco SPA302D Mobility Enhanced Cordless Handset User Guide
2
1
Getting Started
Understanding Your Cisco SPA302D
6
Mute button.
7
Microphone.
8
Speakerphone button—Press this button during a call to use the
speakerphone.
9
Start Call button.
10
Left softkey—Press the softkey to perform the action shown in the lower
left corner of the handset display.
11
4-way navigation keypad—Press the arrow buttons to move up, down,
left, or right through menus displayed on the handset.
12
Center Select button.
13
Headset port.
14
Speakerphone speaker.
Cisco SPA302D Mobility Enhanced Cordless Handset User Guide
3
1
Getting Started
Understanding Your Cisco SPA302D
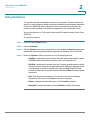
Cisco SPA302D Display Screen
Your phone screen displays the following information:
#
Description
1
Date and time—The date and time are obtained from the Cisco
SPA232D, but can be updated manually from the handset. To change the
date and time, see Configuring the Date and Time, page 29.
2
DECT signal strength—Reflects the handset registration status to the
Cisco SPA232D.
3
Battery indicator—Reflects the charge level and status of the batteries.
4
Handset information—Lists the name and number assigned to the
handset in the phone system.
5
Contacts—Accesses the phone contacts. See “Using Contacts”
section on page 21.
Cisco SPA302D Mobility Enhanced Cordless Handset User Guide
4
1
Getting Started
Understanding Your Cisco SPA302D
6
Options—Items displayed in this menu depend on the phone state. For
example, different options are displayed when a call is active than when
the phone is idle.
Options When the Handset is Idle
•
Redial—Press to dial the last number called.
•
Intercom—Press to call another Cisco SPA302D that is registered
to the same Cisco SPA232D. Choose the handset from a list and
press the center Select button.
•
Parked Calls—Retrieve a parked call. See “Parking a Call” on
page 18.
•
Grp Pickup—Pick up a call ringing at another handset in a group
of phones. See “Picking Up a Call” on page 18.
•
Pickup—Pick up a call ringing at a specified extension. See
“Picking Up a Call” on page 18.
•
Keylock—Press to lock the phone. To unlock, press the center
Select button, and then press the asterisk key (*).
Options When There is an Active Call
•
New Call—Put an active call on hold and create a new call.
•
Hold—Put a call on hold. See “Putting a Call on Hold” on page
16.
•
Transfer—Transfer the call. See “Transferring a Call” on page
17.
•
Conference—Create a conference call between you, the caller on
the active call and another caller. See “Placing a Three-Way
Conference Call” on page 18.
Turning the Handset On and Off
To turn the handset off and on, press and hold the End Call button.
NOTE Placing the handset into the cradle automatically turns the handset on, even if it has
been shut off.
Cisco SPA302D Mobility Enhanced Cordless Handset User Guide
5
1
Getting Started
Understanding Your Cisco SPA302D
Navigating through the Phone Menus
From the main display screen, press the Left softkey to access the Options menu
(Redial, Intercom, and Keylock). Press the Right softkey to access the Contacts
menu. These buttons also provide other options such as Cancel and Back,
depending on the phone menu that you are viewing.
On the Cisco SPA302 handset, press the Select button in the center of the 4-way
navigation keypad to access additional phone functions.
The table below lists these functions and where to look for configuration
information.
Icon
Name
Description
Call History
View a list of calls placed from and received by the
handset. Press the left and right arrow buttons to filter
calls by Incoming, Outgoing, and Missed status. See
Viewing the Call History, page 20.
Contacts
View lists of private and shared contacts. See Using
Contacts, page 21.
Call
Settings
Configure or view call preferences, speed dials, call
forwarding, and other options. See Configuring Call
Settings, page 22.
Settings
Register the handset, configure the network settings,
choose ringtones, update the handset software, perform
a factory reset, view the handset information (such as
model and software version) and view and configure
other options. See Configuring Phone Settings,
page 26.
Cisco SPA302D Mobility Enhanced Cordless Handset User Guide
6
1
Getting Started
Understanding Your Cisco SPA302D
Display Screen Icons
The display screen contains icons that indicate phone functions and status. The
following table displays the most common phone icons:
Icon
Name
Description
Active call
A call is in progress.
Call forwarding
Call forwarding is configured on the phone.
See Configuring Call Forwarding, page 24.
Conference call
A conference call is in progress. See Placing
a Three-Way Conference Call, page 18.
Do Not Disturb
Incoming calls do not reach your handset
because the phone has been set to Do Not
Disturb. See Configuring Do Not Disturb,
Call Waiting, and Call Blocking, page 22.
Hold
A call is on hold. See Putting a Call on Hold,
page 16.
Incoming call
A call is coming in to the phone.
Missed call
An incoming call was not answered. See
Managing Missed Calls, page 19.
Mute
The phone speaker is muted. Appears during
an active call. See Adjusting Handset Volume
and Muting, page 15.
Cisco SPA302D Mobility Enhanced Cordless Handset User Guide
7
1
Getting Started
Understanding Your Cisco SPA302D
Speaker
The speakerphone is turned on.
Voicemail
You have new voicemail.
Recovery Software
Notification
When this icon appears in the center of the
display screen, it indicates that the handset
has loaded the recovery software image. This
event can occur when, for example, the
software image on the Cisco SPA302D has
been corrupted.
If this notification appears, download and
reinstall the latest software on the handset.
See Upgrading the Handset Software,
page 30.
Entering Numbers and Text in Fields
Some fields on the Cisco SPA302D require you to enter numbers and text by using
the keypad. In general, the following guidelines apply:
•
Use the keypad to enter numbers and characters, pressing the key multiple
times to select the correct number or letter.
•
Press the number key multiple times to move to a different letter under that
number. (For example, to enter “Mary,” you would press 6 five times rapidly
and then pause (for M); press 2 and then pause (for a), press 7 three times
rapidly (for r), and then press 9 three times rapidly (for y).
•
Press the Right softkey (Delete) to backspace and delete the last character,
or cancel data entry.
•
Press the Left softkey to save entered data.
•
Press the arrow buttons on the keypad to move between fields.
Cisco SPA302D Mobility Enhanced Cordless Handset User Guide
8
1
Getting Started
Installing the Cisco SPA302D
Available characters are shown in the following table:
Key
Character Set
1
1/:\,!;$^|
2
abc2ABC
3
def3DEF
4
ghi4GHI
5
jkl5JKL
6
mno6MNO
7
pqrs7PQRS
8
tuv8TUV
9
wxyz9WXYZ
0
Space 0 ~ ? > ‘ < “
*
.@*&%[]_
#
#+-=(){}
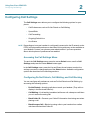
Installing the Cisco SPA302D
Before using the Cisco SPA302D, you must do the following:
1. Install and configure the Cisco SPA232D Mobility Enhanced ATA. See the
Cisco SPA232D Quick Start Guide and User Guide for more information.
2. Insert batteries into the Cisco SPA302D and charge for a minimum of 10
hours. See Charging the Handset, page 10.
3. Register the Cisco SPA302D handset to the Cisco SPA232D. See
Registering the Handset to the Cisco SPA232D Mobility Enhanced ATA,
page 11.
Cisco SPA302D Mobility Enhanced Cordless Handset User Guide
9
Getting Started
Installing the Cisco SPA302D
1
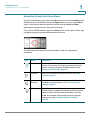
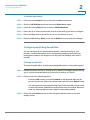
Charging the Handset
STEP 1 Remove the back cover of the handset.
STEP 2 Insert the two AAA rechargeable batteries (included) into the handset. Correct
battery placement is shown on the label inside the battery compartment. If the
batteries are charged, the handset turns on when the batteries are inserted. If the
batteries are not charged, the handset turns on when it is placed into the charging
cradle.
!
CAUTION Use only size AAA Ni-MH 800 mAh (1.2V) rechargeable batteries in the Cisco
SPA302D handset.
STEP 3 Remove the protective film from the handset and charging cradle.
STEP 4 Insert the power clip into the power adapter.
STEP 5 Insert the power adapter into the power source.
STEP 6 Connect the power adapter to the charging cradle in the port shown below.
!
CAUTION Only use the power adapter designed for use with Cisco SPA300 Series devices.
Cisco SPA302D Mobility Enhanced Cordless Handset User Guide
10
Getting Started
Installing the Cisco SPA302D
1
STEP 7 Place the handset into the charging cradle. The light on the charging cradle
appears solid green when the handset is charging. Charge the handset for a
minimum of 10 hours before using the handset for the first time to ensure that the
handset is fully charged.
Registering the Handset to the Cisco SPA232D Mobility
Enhanced ATA
STEP 1 Install and configure the Cisco SPA232D. See the Cisco SPA232D Quick Start
Guide for more information.
STEP 2 On the Cisco SPA302 handset, press the Select button in the center of the 4-way
navigation keypad.
STEP 3 Using the navigation arrow buttons, scroll to the Settings icon and press the
center Select button to select it.
STEP 4 Select Handset Registration.
STEP 5 Select Register.
STEP 6 On the Cisco SPA232D, press the Page/Registration button and hold it down for
at least seven seconds until the green status light flashes quickly.
TIP
If you press the button for fewer than seven seconds, the green status light flashes
slowly, indicating the unit is in “paging” mode and is not in registration mode.
Registration will not work if the unit is in paging mode.
Cisco SPA302D Mobility Enhanced Cordless Handset User Guide
11
Getting Started
Installing the Cisco SPA302D
1
STEP 7 Enter the PIN code (available from your phone system administrator). By default,
there is no PIN code. Press the Left softkey to confirm that you want to register the
handset. The “registering” message appears.
To verify that the handset registered to the base station, confirm that the DECT
signal strength icon is solid (not flashing) and that the handset ID, such as Handset
1 (or Handset 2), appears near the top right corner of the display screen.
Deregistering the Handset
To remove the association between the Cisco SPA302D handset and the Cisco
SPA232D base station, you must deregister the handset.
STEP 1 On the Cisco SPA302 handset, press the Select button in the center of the 4-way
navigation keypad.
STEP 2 Using the navigation arrow buttons, scroll to the Settings icon and press the
center Select button to select it.
STEP 3 Select Handset Registration.
STEP 4 Select Deregister.
STEP 5 Enter the PIN code (available from your phone system administrator). By default,
there is no PIN code; however, a PIN code may be set by your administrator to
prevent inadvertent deregistration of another handset. Press the Left softkey to
confirm.
STEP 6 A list of all handsets registered to the Cisco SPA232D appears. Choose your
handset from the list and press the center Select button. (Be sure to choose the
correct handset.)
Cisco SPA302D Mobility Enhanced Cordless Handset User Guide
12
1
Getting Started
Locating Handsets
Locating Handsets
To locate handsets that may have been misplaced, you can have all handsets
registered to the Cisco SPA232D receive a ringing “locator call.” To page all
handsets, on the Cisco SPA232D, briefly press the Page/Registration button until
the green status light flashes slowly.
A “handset locator” message displays on the ringing handsets. Press the Start
Call or End Call button to stop the ringing.
NOTE If the handset ringer is turned off, the handset locator call does not ring.
Cisco SPA302D Mobility Enhanced Cordless Handset User Guide
13
2
Using Your Cisco SPA302D
This chapter describes how to use your Cisco SPA302D. It includes the following
sections:
•
Placing a Call, page 15
•
Adjusting Handset Volume and Muting, page 15
•
Answering or Ignoring a Call, page 16
•
Putting a Call on Hold, page 16
•
Ending a Call, page 16
•
Using Call Waiting, page 16
•
Transferring a Call, page 17
•
Redialing a Call, page 17
•
Placing a Three-Way Conference Call, page 18
•
Picking Up a Call, page 18
•
Parking a Call, page 18
•
Managing Missed Calls, page 19
•
Using the Intercom Feature, page 20
•
Viewing the Call History, page 20
•
Using Contacts, page 21
•
Configuring Call Settings, page 22
•
Configuring Phone Settings, page 26
•
Advanced Handset Configuration Options, page 32
•
Troubleshooting the Cisco SPA302D, page 33
Cisco SPA302D Mobility Enhanced Cordless Handset User Guide
14
2
Using Your Cisco SPA302D
Placing a Call
Placing a Call
To place a call, do one of the following tasks:
•
Enter the number on the keypad and press the green Start Call button.
•
To use the speakerphone, enter the number on the keypad and press the
Speakerphone button.
NOTE Depending on your phone system or dial plan configuration, you may have to enter
a digit, such as 9, before entering the number to place an external call.
Adjusting Handset Volume and Muting
To adjust the audio volume during a call:
•
Press the Right Arrow button on the 4-way navigation keypad to increase
the volume.
•
Press the Left Arrow button to decrease the volume.
To adjust the ringtone volume when a call is not in progress:
•
Press the Right Arrow button to increase the volume.
•
Press the Left Arrow button to decrease the volume.
To turn off the ringer, continue to press the Left Arrow button until the message on
the display and the ringer off icon indicate that the ringer is turned off.
To mute the handset microphone, press the Mute button on the handset. The mute
icon appears at the top of the handset display.
Cisco SPA302D Mobility Enhanced Cordless Handset User Guide
15
2
Using Your Cisco SPA302D
Answering or Ignoring a Call
Answering or Ignoring a Call
To answer an incoming call, do one of the following tasks:
•
Press the Start Call button.
•
Press the Left softkey to select Answer.
•
Press the Speakerphone button to answer with the speakerphone.
To decline to answer a call, press the Right softkey to select Ignore.
Putting a Call on Hold
To put a call on hold, press the Left softkey to select Options. Scroll to Hold and
press the center Select button. The Hold icon and on-screen message indicates a
call is on hold.
To resume the call, press the Left softkey to select Options. Scroll to Resume and
press the center Select button. The Active Call icon indicates the call is active
again.
Ending a Call
To end a call, do one of the following tasks:
•
Press the red End Call button.
•
Press the Right softkey to select End Call.
Using Call Waiting
If Call Waiting is enabled, while on a call, a beep tone will alert you of a second
incoming call.
To answer the call, press the Left softkey to select Answer and put the first call on
hold. To ignore the call, press the Right softkey to select Ignore.
Cisco SPA302D Mobility Enhanced Cordless Handset User Guide
16
2
Using Your Cisco SPA302D
Transferring a Call
To return to the first call, do one of the following tasks:
•
Press the Right softkey to select End Call to end the active call and return
to the call on hold.
•
Press the Left softkey to select Options and choose Swap to place the
current call on hold and return to the first call. The active call is shown at the
top of the screen and is indicated by the active call icon.
Transferring a Call
To transfer a call:
STEP 1 Press the Left softkey to select Options.
STEP 2 Scroll to Transfer and press the Select button.
STEP 3 Enter the number to which to transfer. The Cisco SPA302D automatically dials the
number.
STEP 4 You can transfer before the called number answers, or you can wait to speak to the
called number. To transfer, press the Left softkey to select Options, scroll to
Transfer, and then press the Left softkey button.
Redialing a Call
To redial the last number called, press the Left softkey to select Options. Select
Redial.
Cisco SPA302D Mobility Enhanced Cordless Handset User Guide
17
Using Your Cisco SPA302D
Placing a Three-Way Conference Call
2
Placing a Three-Way Conference Call
You can create a conference call between you, the caller on an active call with you,
and a third party. To create a conference call:
STEP 1 Press the Options softkey during an active call. The first call is placed on hold, a
second line is opened, and you hear a tone. Enter the second telephone number on
the keypad. The number is automatically dialed.
STEP 2 When the second party answers, press the Options softkey and choose
Conference. The three calls are connected and the display screen shows that a
conference call is in progress. When you hang up, the conference call is ended for
all parties.
Picking Up a Call
You can pick up a call that is ringing at another extension. Depending on the way
your telephone network is configured, you can pick up a call in the following ways:
•
Pick up a call that is ringing at a handset in your group by pressing the
Options softkey and selecting Grp Pickup. The phone displays any
handsets in the group that have ringing calls. Choose the call to pick up and
press the center Select button.
•
Pick up a call that is ringing at specific extension by pressing the Options
softkey and selecting Pickup. Enter the handset number where the call you
want to pickup is ringing and press the Start Call button.
Parking a Call
You can park a call on a designated line (“parking lot”) so that another person in
your office can retrieve the call. The call is active until it is unparked or the caller
hangs up.
Cisco SPA302D Mobility Enhanced Cordless Handset User Guide
18
Using Your Cisco SPA302D
Managing Missed Calls
2
To park a call:
STEP 1 While on an active call, press the Options softkey.
STEP 2 Select Park.
STEP 3 In the Lot Number field, enter a number to identify the park line and press the
Confirm softkey. The lot number does not correspond to a physical phone
extension number; you can pick any easily remembered number (for example,
100). The call is then parked on that line, and the caller hears music-on-hold or
messages.
To unpark a call from another Cisco SPA302D:
STEP 1 From the main display, press the Options softkey.
STEP 2 Select Parked Calls. A list of parked calls is displayed.
STEP 3 Scroll to choose the call you want to unpark and press the center Select button.
The call is picked up on your phone.
Managing Missed Calls
A message appears on the display screen notifying you if a call is not answered.
Pressing any button on the handset clears this message from the screen.
NOTE The missed call notification cannot be turned off, only cleared after the notification
appears.
To view and return a missed call, press the Up Arrow button to display the Call
History, or press the center Select button and select Call History. Select the
missed call you want to return and press the Start Call button. For more
information on options in the Call History menu, see “Viewing the Call History” on
page 20.
Cisco SPA302D Mobility Enhanced Cordless Handset User Guide
19
2
Using Your Cisco SPA302D
Using the Intercom Feature
Using the Intercom Feature
The intercom feature allows you to directly dial another handset that is registered
to the same Cisco SPA232D. To use the intercom feature, press the Options
softkey and choose Intercom. Choose the handset you want to call from the list
and press the center Select button. The handset you have selected receives the
call from your handset, and can answer the call or ignore the call.
Viewing the Call History
You can view a list of calls placed from and received on your handset. To view the
call history:
STEP 1 Press the center Select button.
STEP 2 Select Call History. A list of calls is shown. Scroll to the call you want to view and
do one of the following actions:
•
Press the Center select button to see more information about the call.
•
Press the Start Call button to call the number.
•
Press the Options softkey to perform one of the following actions:
-
Send to Contacts—Adds the number to your list of private contacts. If
desired, edit the name in the Name field and choose a ringtone for the
contact. Press Save to save the new contact.
-
Clear Entry—Deletes the call from the call history. Press Confirm to
delete.
-
Clear List—Deletes all calls from the call history. Press Confirm to clear
the list.
-
Edit Dial—Retrieves the number from the call history and opens the
dialer window, so that the number can be edited before dialing (for
example, to add a steering digit to reach an outside line). Press the Right
and Left Arrow buttons to move the cursor in the number field and the
Back softkey to delete characters.
Cisco SPA302D Mobility Enhanced Cordless Handset User Guide
20
2
Using Your Cisco SPA302D
Using Contacts
Using Contacts
You can store private and shared contacts on your handset. Private contacts are
specific to each handset. Shared contacts are available on all handsets registered
to the Cisco SPA232D. When a shared contact is entered from a handset, the
contact is made available to all handsets registered to the same base station.
You can configure up to 100 private contacts and 50 shared contacts on the Cisco
SPA302D.
To configure contacts:
STEP 1 Press the center Select button.
STEP 2 Choose Contacts.
STEP 3 Choose Private (contacts are stored only on this handset) or Shared (contacts are
shared and stored among all handsets registered to the same Cisco SPA232D).
STEP 4 Press the Options softkey to perform one of the following actions:
•
Add New—Add a new contact. Enter the name and number, and then press
the Save softkey. Names and numbers have a 32-character limit.
•
Edit Dial—Retrieves the number from the Contacts list and opens the dialer
window, so that the number can be edited before dialing (for example, to add
a steering digit to reach an outside line). Press the Right and Left Arrow
buttons to move the cursor in the number field and the Back softkey to delete
characters.
•
Edit—Edit the name and number of the contact. You can also assign a
ringtone for the contact. Press Save to save your changes.
•
Delete—Deletes the selected contact. Press Confirm to delete.
•
Delete All—Deletes all contacts. Press Confirm to delete all contacts.
Cisco SPA302D Mobility Enhanced Cordless Handset User Guide
21
2
Using Your Cisco SPA302D
Configuring Call Settings
Configuring Call Settings
The Call Settings menu allows you to configure the following options for your
phone:
•
Call Preferences, such as Do Not Disturb or Call Waiting
•
Speed Dials
•
Call Forwarding
•
Outgoing Default Line
•
Line Status
NOTE Depending on how your handset is configured (connected to the IP network or the
PSTN), all options and preferences described in this guide may not be available on
your handset. Contact your phone system administrator if you have questions
about which options or preferences are enabled.
Accessing the Call Settings Menu
To reach the Call Settings menu, press the center Select button, scroll to Call
Settings, and press the center Select button again.
In the Call Settings menu, press the Up and Down Arrow buttons to select the
settings you want to change and press the Select button. Available configuration
options are described in the following sections.
Configuring Do Not Disturb, Call Waiting, and Call Blocking
You can configure call preferences, such as Do Not Disturb and Call Waiting, by
accessing the following options:
•
Do Not Disturb—Incoming calls do not reach your handset. (They will not
display in the Received Calls list.)
•
Call Waiting—If call waiting is enabled, while on a call, a beep tone will alert
you of a second incoming call.
•
Block Caller ID—Prevents your Caller ID information from being sent when
placing a call.
•
Block Anonym Call—Blocks incoming calls to your handset from callers
who have blocked their Caller ID.
Cisco SPA302D Mobility Enhanced Cordless Handset User Guide
22
2
Using Your Cisco SPA302D
Configuring Call Settings
To configure these features:
STEP 1 Press the center Select button to view the available preferences.
STEP 2 Scroll to Call Settings and press the center Select button again.
STEP 3 Press the center Select button to choose Call Preferences.
STEP 4 Press the Up or Down Arrow button to scroll to the setting you want to configure.
STEP 5 Press the Right and Left Arrow buttons to turn the feature on or off.
STEP 6 Press the Left softkey (Save), or the center Select button to save your changes.
Configuring and Using Speed Dials
You can configure up to 9 speed dials (numbers 2 through 9 and 0) on your
handset. A speed dial number can be configured by pressing and holding an
unassigned number on the keypad, or by using the Call Settings menu on the
handset.
Creating Speed Dials
To create a speed dial by choosing an unassigned number on the phone keypad:
STEP 1 Press and hold the number (2 through 9 or 0). When the message appears asking
you to confirm the speed dial entry, press the Left softkey to Confirm.
STEP 2 Perform one of the following actions:
•
Press the Left softkey to choose Contacts to add a speed dial from the
private Contacts list. Select the contact and press the center Select button.
•
Use the keypad to enter the speed dial name. Press the Down Arrow button
to reach the number field and use the keypad to enter the number. Be sure to
enter any steering digits, access codes, or area codes needed.
STEP 3 Press the center Select button to save the speed dial and return to the main
display screen.
Cisco SPA302D Mobility Enhanced Cordless Handset User Guide
23
2
Using Your Cisco SPA302D
Configuring Call Settings
To create a speed dial from the handset menu:
STEP 1 Press the center Select button to view the available preferences.
STEP 2 Scroll to Call Settings and press the Select button again.
STEP 3 Select Speed Dial.
STEP 4 Press the Up and Down Arrow buttons to move to the speed dial slot that you want
to configure. Press Options, and then select Edit.
STEP 5 Perform one of the following actions:
•
Press the Left softkey to choose Contacts to add a speed dial from the
private Contacts list. Select the contact and press the center Select button.
•
Use the keypad to enter the speed dial name. Press the Down Arrow button
to reach the number field and use the keypad to enter the number. Be sure to
enter any steering digits, access codes, or area codes needed.
STEP 6 Press the center Select button to save the speed dial and return to the list of
speed dials.
Managing Speed Dials
From the Speed Dial menu, press Options. You can do the following:
•
Edit—Edit the selected speed dial.
•
Clear Entry—Delete the selected speed dial.
•
Clear List—Delete all speed dials.
Using Speed Dials
To use a speed dial, press the asterisk key (*), press the number of the speed dial,
and then press the Start Call button.
Configuring Call Forwarding
You can forward all calls to another phone number, forward calls when your phone
is busy, or forward calls to another phone number when there is no answer at your
phone.
Cisco SPA302D Mobility Enhanced Cordless Handset User Guide
24
2
Using Your Cisco SPA302D
Configuring Call Settings
To configure call forwarding:
STEP 1 Press the center Select button to view the available preferences.
STEP 2 Scroll to Call Settings and press the center Select button again.
STEP 3 Scroll to Call Forwarding and press the center Select button.
STEP 4 In one or more of the fields, enter the number to which you want to forward calls.
You can forward calls to a voice mailbox, another extension, or an outside line. If
forwarding calls to an outside line, be sure to enter any steering digits, access
codes, or area codes required to complete the call. Press the Delete key to
backspace.
•
Forward All Dest—Forwards all incoming calls to the destination of the
entered number.
•
Forward Busy Dest—Forwards incoming calls to the destination of the
entered number when your phone is busy.
•
Forward No Ans Dest—Forwards incoming calls to the destination of the
entered number when you do not answer the phone.
STEP 5 Press Save.
Choosing the Default Outgoing Line
You can configure the outgoing line for calls made from the Cisco SPA302D. For
example, you can select one of the ten DECT Lines or the PSTN (phone) line as the
outgoing line. The default outgoing line is the first line chosen when an outgoing
call is made from the Cisco SPA302D.
To choose the default outgoing line:
STEP 1 Press the center Select button to view the available preferences.
STEP 2 Scroll to Call Settings and press the Select button again.
STEP 3 Select Outgoing Default Line.
STEP 4 Choose the line you want to set as the default and press the Select softkey.
Cisco SPA302D Mobility Enhanced Cordless Handset User Guide
25
2
Using Your Cisco SPA302D
Configuring Phone Settings
NOTE You can choose the outgoing line on a per-call basis by pressing and holding the
Start Call button. A list of lines that can be selected for an outgoing call appears.
Viewing the Line Status
You can view the status of all DECT Lines and the PSTN line by doing the following:
STEP 1 Press the center Select button to view the available preferences.
STEP 2 Scroll to Call Settings and press the center Select button again.
STEP 3 Select Line Status. The lines and status are displayed:
•
Not Ready—The SIP line is not registered.
•
Ready—The SIP line is registered.
•
In Use—The SIP line is in on a call.
•
Busy—The maximum number of calls in use for a SIP line has been reached.
Configuring Phone Settings
To reach the Settings menu, press the center Select button, scroll to Settings,
and press the Select button again.
In the Settings menu, press the arrow buttons to select the settings you want to
change and press the Select button. You can perform the following tasks or
configure the following options from the Settings menu:
•
Handset Registration—See “Registering the Handset to the Cisco
SPA232D Mobility Enhanced ATA” section on page 11.
•
Network Settings
•
SIP Settings
•
Ringtones
•
Tones
•
Backlight Settings
Cisco SPA302D Mobility Enhanced Cordless Handset User Guide
26
2
Using Your Cisco SPA302D
Configuring Phone Settings
•
Date and Time
•
Handset Settings
•
Update Software
•
Factory Reset
•
Phone Info
Configuring Network Settings
You can enter or modify the network settings on your handset. These settings
indicate the method that your handset and base station use to connect to the
Internet.
NOTE You should only change this setting if advised to do so by your phone system
administrator.
STEP 1 From the Settings menu, choose Network Settings.
STEP 2 Enter the PIN code (available from your phone system administrator). By default,
there is no PIN code. Press Confirm.
STEP 3 Press the Right and Left arrow buttons on the navigation keypad to scroll through
the available network settings and press Confirm to change the selected setting.
You can choose from the following settings:
•
DHCP (most common)—The Cisco SPA302D and the Cisco SPA232D
receive an IP address from the DHCP server on your network (typically, the
router or switch to which your hardware is connected).
•
Static IP—Choose this setting if you need the Cisco SPA302D to have an
assigned IP address that does not change. Enter the IP address, subnet
mask, gateway address and DNS server addresses.
•
PPPoE—Choose this setting if you have a Point-to-Point Protocol over
Ethernet connection to the Internet. Enter your username, password, and
service information for your Internet connection.
STEP 4 Press Confirm to save your changes.
Cisco SPA302D Mobility Enhanced Cordless Handset User Guide
27
2
Using Your Cisco SPA302D
Configuring Phone Settings
SIP Settings
You can enter or modify the settings for your Session Initiation Protocol (SIP)
connection, which is the Voice over IP (VoIP) connection to the Internet.
NOTE You should only change this setting if advised to do so by your phone system
administrator. Only DECT Line 1 is configurable from the Cisco SPA302D handset.
Additional DECT Lines for VoIP are configurable by an administrator on the Cisco
SPA232D.
STEP 1 From the Settings menu, choose SIP Setting.
STEP 2 Enter the PIN code (available from your phone system administrator). By default,
there is no PIN code. Press Confirm.
STEP 3 Press the Up and Down Arrow buttons on the navigation keypad to scroll through
the following fields:
•
Display Name—Identifier of DECT Line 1.
•
User Name—SIP User Name of VoIP account.
•
Password—SIP password of VoIP account.
•
Proxy—The SIP proxy IP address of the VoIP service provider.
•
Authen ID—An ID used by some VoIP service providers to authenticate
login information. Your phone system administrator can provide this
information if necessary.
STEP 4 Press Confirm to save your settings.
Changing Your Ringtone
To change your handset ringtone:
STEP 1 From the Settings menu, choose Ringtones.
STEP 2 Press the Up and Down Arrow buttons to select a ringtone. The ringtone plays.
STEP 3 Press Save to save the selected ringtone as the ringtone for your handset.
Cisco SPA302D Mobility Enhanced Cordless Handset User Guide
28
Using Your Cisco SPA302D
Configuring Phone Settings
2
Configuring Keypad and Call Park Tones
You can configure a tone to play when keys on the handset are pressed or when a
phone call is parked. To configure tones:
STEP 1 From the Settings menu, choose Tones.
STEP 2 Press the Up and Down Arrow buttons to select the tone setting that you want to
change. Press the Right and Left arrow buttons to turn the tone on or off.
STEP 3 Press Save to save your changes.
Configuring the Backlight Timeout Setting
You can configure the amount of time that the handset display screen remains lit
before it is turned off to conserve battery power. To configure the timeout setting:
STEP 1 From the Settings menu, choose Backlight Settings.
STEP 2 Press the Right and Left Arrow buttons to choose from 15, 30, or 60 seconds.
STEP 3 Press Save.
Configuring the Date and Time
The handset date and time is synchronized with the Cisco SPA232D. You can also
enter the date and time manually from the handset. To configure the date and time
from the handset:
STEP 1 From the Settings menu, choose Date/time.
STEP 2 Press the Up and Down Arrow buttons to select the field you want to change (for
example, hour and minute). Press the Right and Left Arrow buttons to change the
values in the field.
STEP 3 Press Save.
Cisco SPA302D Mobility Enhanced Cordless Handset User Guide
29
Using Your Cisco SPA302D
Configuring Phone Settings
2
Changing Handset Settings
A unique handset name can be defined which is reflected in the upper right corner
of the display. The handset name is used to identify the SPA302D with the
Intercom and handset deregistration.
To change the handset name, display language, and input language:
STEP 1 From the Settings menu, choose Handset Settings.
STEP 2 Press the Up and Down Arrow buttons to select the field you want to change.
Press the Right and Left Arrow buttons to change the values in the field.
STEP 3 Press Save.
Upgrading the Handset Software
To upgrade the handset software, you must first upgrade the software on the
Cisco SPA232D. For more information on upgrading the software on the base
station, see the Cisco SPA232D Mobility Enhanced Phone Adapter
Administration Guide.
After upgrading the software on the Cisco SPA232D, you can then download the
new software to the handset and upgrade the handset software.
Software upgrades are performed “over the air” and the Cisco SPA232D does not
have an external interface requiring a physical connection to another device.
To upgrade the software:
STEP 1 From the Settings menu, choose Update Software.
STEP 2 At the Check for software update prompt, press Confirm.
STEP 3 Within a moment, the handset displays the current version of software on the
handset and the latest software version available from the Cisco SPA232D. Press
the Select softkey.
Cisco SPA302D Mobility Enhanced Cordless Handset User Guide
30
Using Your Cisco SPA302D
Configuring Phone Settings
2
STEP 4 Place the handset in the charging cradle.
!
CAUTION Do not remove the handset from the charging cradle during the upgrade. Do not
power off the handset, charging cradle, or base station, or otherwise interrupt the
upgrade process.
STEP 5 The handset erases the flash memory, downloads the new software, and verifies
the upgrade data. After the upgrade, a message appears indicating the status of
the upgrade (for example, if the upgrade succeeded). Press Reset to reboot the
handset.
NOTE If the upgrade fails, press Reset to reboot the handset. Check the status lights on
the Cisco SPA232D to make sure the unit is powered on and functioning. Repeat
the upgrade. If the upgrade continues to fail, contact your phone system
administrator.
Performing a Factory Reset
NOTE Do not perform a factory reset unless advised to do so by your phone system
administrator or by technical support.
Performing a factory reset removes all of the information from your handset (for
example, contacts, speed dials, and call records) and restores it to the original
factory software state. The Cisco SPA302D remains registered to the Cisco
SPA232D after a factory reset, and must be manually deregistered.
To perform a factory reset:
STEP 1 From the Settings menu, choose Factory Reset.
STEP 2 When prompted to confirm the reset, press Confirm. The handset returns to the
main display screen after the reset.
Viewing Phone Information
To view information about your handset, including the software version, hardware
version, and serial number:
Cisco SPA302D Mobility Enhanced Cordless Handset User Guide
31
Using Your Cisco SPA302D
Advanced Handset Configuration Options
2
STEP 1 From the Settings menu, choose Phone Info.
STEP 2 Press the Up and Down Arrow buttons to scroll through the available phone
information:
•
Model—Handset model.
•
Software Version—Version of software that is installed on the handset.
•
HID VID—Hardware version ID.
•
PID—Product ID.
•
SN—Serial number of your hardware.
•
IPEI—International Portable Equipment ID, or a unique number used to
identify each DECT handset to the base station.
•
Base RFPI—Radio Fixed Part ID, or a unique number used to identify each
DECT base station to the handset.
•
IP Address—IP address of your handset.
•
IP Mask—Subnet mask of your handset.
•
Gateway IP—IP address of the router providing the Internet connection to
the handset and base station.
•
WAN MAC Address—MAC (hardware) address of the handset.
•
Default outgoing line—The outgoing line that the handset chooses first
when a call is placed.
•
Incoming Lines—Incoming lines that are configured for the handset (for
example, DECT and PSTN lines).
Advanced Handset Configuration Options
You can configure some of the Cisco SPA302D handset options using the webbased configuration utility. The Cisco SPA302D does not have its own
configuration utility, but is part of the configuration utility for the Cisco SPA232D.
The configuration utility is best used by a VoIP service provider, the phone system
administrator, or with the assistance of technical support personnel.
For more information about using the configuration utility, see the Cisco SPA232D
Mobility Enhanced Phone Adapter Administration Guide.
Cisco SPA302D Mobility Enhanced Cordless Handset User Guide
32
Using Your Cisco SPA302D
Troubleshooting the Cisco SPA302D
2
Troubleshooting the Cisco SPA302D
Advanced troubleshooting is performed by phone system administrators and is
not covered in this document. However, some common problems and solutions are
described below.
No Network Message
If a “No Network” message is displayed on the phone screen, the WAN interface of
Cisco SPA232D is not connected to the network. This means that the Cisco
SPA232D cannot connect to the Internet and some functions are unavailable. Try
the following actions:
1. Make sure the Internet connection is active.
2. Check the cable connecting the WAN interface of the Cisco SPA232D to the
Internet source (for example, the cable modem) to make sure it is functional.
3. Reboot the Cisco SPA232D.
Unresponsive Handset
If the handset is unresponsive after a few moments, press the End Call button to
turn the handset off. Wait a few moments and then press the End Call button again
to turn the handset back on. If the handset is still unresponsive, remove the
batteries for a few moments to “reboot” the handset, and then replace the
batteries.
NOTE There is no “hard reset” button on the handset.
Cisco SPA302D Mobility Enhanced Cordless Handset User Guide
33
A
Where to Go From Here
Cisco provides a wide range of resources to help you obtain the full benefits of
your Cisco SPA302D Mobility Enhanced Cordless Handset.
Support
Cisco Small Business Support
Community
www.cisco.com/go/smallbizsupport
Online Technical Support and
Documentation (Login Required)
www.cisco.com/support
Cisco Small Business Support
and Resources
www.cisco.com/go/smallbizhelp
Downloads and Documentation
Firmware
www.cisco.com/go/software
Cisco Small Business Voice
Gateways Documentation
www.cisco.com/go/smallbizvoicegateways
Cisco Small Business SPA300
Series Phones
www.cisco.com/go/300phones
Open Source Documentation
Follow the Release Notes link at
www.cisco.com/go/smallbizvoicegateways
Cisco Small Business
Cisco Partner Central for Small
Business (Partner Login
Required)
www.cisco.com/web/partners/sell/smb
Cisco Small Business Home
www.cisco.com/smb
Cisco SPA302D Mobility Enhanced Cordless Handset User Guide
34