1
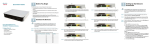
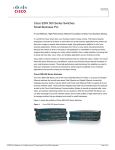
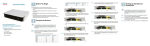
Quick Start Guide
Cisco Small Business
Unified Communications UC320W with FXO
Package Contents
• Unified Communications System
• Ethernet Network Cable
• Phone Cable
• Power Adapter
• Power Cord Retention Kit
• Quick Start Guide
• Phone Quick Reference Card
• Product CD-ROM
CAUTION
Be sure to read Section 1 before installation.
Welcome
Thank you for choosing the Cisco Small Business Unified Communications
Model UC320W. This guide describes how to install the equipment and
get started configuring the system.
1
Before You Begin
Minimum Requirements
• PC with web browser and Adobe Flash Player version 10.1 or later.
• Cisco SPA300 Series or Cisco SPA500 Series IP phones.
• Power adapters for the phones, as needed. Cisco SPA300 Series
phones always require power adapters. Cisco SPA500 Series phones
can receive power from a Power over Ethernet switch.
• Ethernet cables to connect IP phones and computers.
• Internet service.
• Voice over IP service or analog phone service.
Default Settings
Parameter
Default Value
Username
cisco
Password
cisco
LAN IP
(Also the address for the webbased configuration utility.)
192.168.10.1
DHCP Range
192.168.10.100 to 149
(DHCP server is enabled by default.)
Netmask
255.255.255.0
Voice VLAN
100
Default Voice VLAN Subnet
10.1.1.1
NOTE Be sure to update to the latest firmware when asked at the
beginning of the installation.
Before installing the Cisco UC320W into an existing network
with another DHCP server, refer to the Smart Designs (see links on
page 7). Carefully follow the instructions in this guide and in the UC320W
Simple Configuration Utility. IP address conflicts will result if two DHCP
servers are installed on your network.
CAUTION
2
Cisco UC320W Quick Start Guide
Optional Equipment and Services
• Secure router for Internet access: Cisco recommends using a secure
router, such as a Cisco SRP500 Series Services Ready Platform or a
Cisco SA500 Series Security Appliance.
• Additional ports for IP phones and network devices: Connect a Cisco
ESW500 Series Power over Ethernet Switch to a LAN port. Other
switches may be used but may require configuration of VLAN and QoS
settings. Refer to the VLAN information in Default Settings, page 2. For
application notes, see the documentation links in Where to Go From
Here, page 7.
• Additional ports for analog devices and analog phone lines: Add up
to two Cisco SPA8800 IP Telephone Gateways with 4 FXO ports and 4
FXS ports. All added FXS ports count toward the 24 user maximum. A
device connected to the Cisco UC320W built-in FXS port (shown
below) is not counted.
• ISDN BRI service: Install a Mediatrix™ 4400 Digital Gateway, Connect
both the Cisco UC320W and the BRI gateway to a secure router such as
Cisco SA500. For application notes, see the documentation links in
Where to Go From Here, page 7.
• Power cord retention kit: To prevent accidental removal of the power
cord, you can install the supplied power cord retention kit (not
illustrated). Remove the screw next to the power port. Connect the
clamp to the power cord. Insert the screw and install it onto the Cisco
UC320W. For detailed instructions, see the Cisco UC320W
administration guide.
NOTE For best results, install the latest firmware for any network devices,
such as routers and Ethernet switches, before proceeding.
2
Installing the Equipment and Configuring the
System
STEP 1 Before you begin, gather the following information:
•
Account information from your Internet Service Provider
•
Phone numbers and account information for all phone services
•
Names and phone settings for your users and groups
•
Details for telephony features such as internal dialing, call
routing, and Auto Attendant
STEP 2 Connect a network cable from the WAN port of the Cisco
UC320W to your Internet Service or Internet access device.
Cisco UC320W Quick Start Guide
3
STEP 3 Connect the supplied power cord to the POWER port and to a
power outlet.
When the device is fully booted, the POWER/SYS light is steady
green.
STEP 4 Connect your PC to a LAN port on the Cisco UC320W. Do not
connect any devices to the LAN ports at this point. Your PC
will receive an IP address in the 192.168.10.x range.
3
2
LINE (FXO)
4
1
PHONE
(FXS)
WAN
(10/100/1000)
UC 320W
3
2
LAN (10/100/1000)
1
LINE
OUT
LINE
IN
Power
12VDC
194793
4
192.168.10.x
NOTE:
•
You may need to adjust your PC’s connecting settings to
receive an IP address dynamically.
•
For best results, set the screen resolution to 1024x768 or
higher.
STEP 5 Start a web browser. In the Address bar, enter the IP address of the
Cisco UC320W (default 192.168.10.1).
STEP 6 To log in, enter the username cisco and the password cisco.
Both the username and the password are case sensitive.
STEP 7 When prompted, enter a new username and password. Neither
cisco nor admin is valid.
STEP 8 Follow the instructions in the configuration utility to connect the
equipment and configure the system.
Notes:
4
•
If you are installing the Cisco UC320W in a network with
another DHCP server, be sure to complete the Network
Topology step in the Getting Started menu.
•
For best results, enable access to Cloud Services and accept
all available firmware updates.
Cisco UC320W Quick Start Guide
3
Getting to Know the Cisco UC320W
Installation Guidelines
• Ensure adequate air flow.
• Do not stack or place anything on top of the Cisco UC320W, or install it
on a hot surface.
• Ensure that the Cisco UC320W is secure and stable.
NOTE For mounting options, see the Cisco UC320W administration
guide.
Environmental Considerations
• Storage Temperature (sea level): -22° F to 140° F (-30° C to +60° C)
• Operating Temperature (sea level): 32°F to 104°F (0°C to 40°C)
• Relative Humidity (sea level): 5 to 95% RH (non-condensing)
Front Panel
7
1
2
3
4
5
6
8
9
195715
UC 320W
1
2
3
4
5
6
7
8
POWER/SYS On - Normal operation. Slow flashing - Booting up. Fast
flashing - Upgrading firmware. Off - No power.
LAN On - Connected to a device. Flashing - Sending or receiving data.
Off- Not connected.
WAN On - Connected to WAN. Flashing - Sending or receiving data. OffNot connected.
PHONE (FXS) On - Service is available on the port, and the port is not in
use. Slow Flashing - Service is available and the attached phone is off
hook (in use). Off - The port is disabled.
LINE (FXO) On - PSTN line loop detected. Slow Flashing - FXO port is in
use. Off - Not connected.
WLAN On - Wireless radio is on. Flashing - Sending or receiving data.
Off - Disabled.
VM On - Voice mail is enabled. Fast Flashing - System is full. Slow
flashing - Retrieving or recording voice mail. Off - Disabled.
USB For future use.
Cisco UC320W Quick Start Guide
5
9
WPS On - WiFi Protected Setup succeeded. Slow flashing - Setup is in
progress. Fast flashing - Setup error. Off - Not in use. To configure a WiFi
connection by using WPS, make sure the wireless device is located near
the Cisco UC320W, and then press and hold this button until the WPS
light flashes.
Back Panel
4
3
2
LINE (FXO)
1
2
3
4
5
6
7
2
3
4
4
1
WAN
(10/100/1000)
PHONE
(FXS)
3
2
5
6
LINE
OUT
LINE
IN
7
1
LAN (10/100/1000)
195714
1
Power
12VDC
LINE (FXO) Connect phone lines for traditional phone service.
PHONE (FXS) Connect an analog phone or fax machine.
WAN Connect to the broadband network access device or to an uplink
port on an Ethernet switch that is connected to the Internet.
LAN Connect IP phones and other network devices.
LINE OUT Connect to an external speaker system.
LINE IN Connect to an external music source for Music On Hold service
(optional).
POWER Connect to a power source. Use only the provided power
adapter. Optionally, you can use the power cord retention clamp to
prevent accidental removal of the power cord. See instructions in the
Cisco UC320W administration guide.
Side Panel
2
3
195716
1
1, 3
2
6
For future use.
RESET - Using a paperclip or similar object, press this button briefly to
restart the unit. Press and hold for 10 seconds to restore the factory
default settings.
Cisco UC320W Quick Start Guide
4
Where to Go From Here
Support
Cisco Small Business Support
Community
www.cisco.com/go/
smallbizsupport
Cisco Small Business Support and
Resources
www.cisco.com/go/smallbizhelp
Phone Support Contacts
www.cisco.com/go/sbsc
Cisco Small Business Firmware
Downloads
www.cisco.com/go/software
Product Documentation
Unified Communications UC320W
www.cisco.com/go/uc300
Smart Designs
www.cisco.com/go/partner/
smartdesigns
SPA300 Series IP Phones
www.cisco.com/go/300phones
SPA500 Series IP Phones
www.cisco.com/go/
spa500phones
SA500 Series Security Appliances
www.cisco.com/go/sa500
ESW500 Ethernet Switches
www.cisco.com/go/esw500help
SPA8800 IP Telephony Gateway
www.cisco.com/go/gateways
Cisco Small Business
Cisco Partner Central for Small
Business (Partner Login Required)
www.cisco.com/web/partners/
sell/smb
Cisco Small Business Home
www.cisco.com/smb
Cisco UC320W Quick Start Guide
7
Americas Headquarters
Cisco Systems, Inc.
170 West Tasman Drive
San Jose, CA 95134-1706
USA
www.cisco.com
Small Business Support US: 1-866-606-1866 (Toll Free, 24/7)
Small Business Support, Global: www.cisco.com/go/sbsc
78-19296-01 Rev. B0
Cisco and the Cisco Logo are trademarks of Cisco Systems, Inc. and/or its affiliates in the U.S.
and other countries. A listing of Cisco's trademarks can be found at www.cisco.com/go/
trademarks. Third party trademarks mentioned are the property of their respective owners.
The use of the word partner does not imply a partnership relationship between Cisco and any
other company. (1005R)
© 2011 Cisco Systems, Inc. All rights reserved.