1
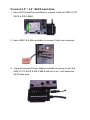
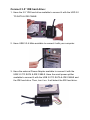
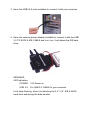
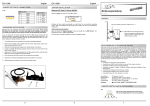
USB 3.0 IDE & SATA CABLE
User Manual
DA-70325
Specifications & Features:
● Compliant to Universal Serial Bus 3.0 specification, downwards
compatible to USB 2.0 and 1.1 specification
● Supports data transfer rates: Super-speed (5Gbps) / High-speed
(480Mbps) / Full-speed (12Mbps) / Low-speed (1.5Mbps)
● Compliant to Serial ATA 2.6
● Supports SATA 1.5 Gbps / 3.0 Gbps speed negotiation
● Support s 2.5"/3.5" IDE hard drive
● Supports 2.5"/3.5" Serial ATA hard drive
● Supports USB mass storage class bulk-only transport specification
● Hot swappable, plug and play
● Power Supply: Input AC 100-240V, 50/60Hz
Output DC 12V 2A
● Supports Windows 2000 / XP / Vista / WIN7, Mac 9.2 or higher
Doesn`t support Linux
Product description:
1. Connect the SATA 2.5" / 3.5" hard drive
2. The 4 Pin Power port is available to supply power for the 3.5” IDE
hard drive
3. Connect the 3.5” IDE hard drive
4. Connect the hard drive’s USB 3.0 port with the USB 3.0 host of your
computer
5. DC power input
6. LED INDICATORS:
SATA:
It will keep flashing when it is detecting the 2.5’’/3.5’’
SATA hard drive and during the data transfer
IDE:
It will keep flashing when it is detecting the 2.5’’/3.5’’
IDE hard drive and during the data transfer
USB3.0: For USB 3.0 cable to your computer
Power:
12V power on
Connect 2.5’’ / 3.5’’ SATA hard drive:
1. Have SATA Hard Drive available to connect it with the USB 3.0 TO
SATA & IDE CABLE.
2. Have USB 3.0 A Male available to connect it with your computer.
3. Have the external Power Adapter available to connect it with the
USB 3.0 TO SATA & IDE CABLE and turn it on. It will detect the
SATA hard drive.
Connect 3.5’’ IDE hard drive:
1. Have the 3.5’’ IDE hard drive available to connect it with the USD 3.0
TO SATA & IDE CABLE.
2. Have USB 3.0 A Male available to connect it with your computer.
3. Have the external Power Adapter available to connect it with the
USB 3.0 TO SATA & IDE CABLE. Have the small power splitter
available to connect it with the USB 3.0 TO SATA & IDE CABLE and
the IDE hard drive. Then, turn it on. It will detect the IDE hard drive.
Connect 2.5’’ IDE Hard Drive
1. Have the 2.5’’ HDD Adapter available to connect it with the 3.5’’ IDE
connector. Please pay attention to the pin direction.
2. Please make sure that you have the 2.5’’ HDD Adapter connected
with the 3.5’’ IDE connector in the right direction. Then, have the
2.5’’ hard drive available to connect it with the 2.5’’ HDD adapter.
Afterwards, please have the small power splitter available (4P
Housing to 2P housing ) to connect it with the USB3.0 TO SATA &
IDE CABLE and the 2.5’’ HDD adapter.
Note: For the 4P to 2P Housing - when you have it connected with the
2.5’’ HDD adapter, please make sure that the BLACK wire goes with
the B marked side of the adapter, and the RED wire goes with the R
marked side.
3. Have the USB3.0 A male available to connect it with your computer.
4. Have the external power adapter available to connect it with the USB
3.0 TO SATA & IDE CABLE and turn it on. It will detect the IDE hard
drive.
REMARKS:
LED Indicators:
POWER: 12V Power on
USB 3.0: For USB 3.0 CABLE to your computer
It will keep flashing, when it is detecting the 2.5’’/ 3.5’’ IDE & SATA
hard drive and during the data transfer.