1
GFI Product Manual
Administrator Guide
The information and content in this document is provided for informational purposes only and is
provided "as is" with no warranty of any kind, either express or implied, including but not limited to
the implied warranties of merchantability, fitness for a particular purpose, and non-infringement.
GFI Software is not liable for any damages, including any consequential damages, of any kind that
may result from the use of this document. The information is obtained from publicly available
sources. Though reasonable effort has been made to ensure the accuracy of the data provided, GFI
makes no claim, promise or guarantee about the completeness, accuracy, recency or adequacy of
information and is not responsible for misprints, out-of-date information, or errors. GFI makes no
warranty, express or implied, and assumes no legal liability or responsibility for the accuracy or
completeness of any information contained in this document.
If you believe there are any factual errors in this document, please contact us and we will review
your concerns as soon as practical.
All product and company names herein may be trademarks of their respective owners. Microsoft
and Windows are either registered trademarks or trademarks of Microsoft Corporation in the
United States and other countries.
GFI MailArchiver® is copyright of GFI SOFTWARE Ltd. - 1999-2012 GFI Software Ltd. All rights
reserved.
Document Version: 2.0.2
Last updated (month/day/year): 1/28/2013
Contents
1 About GFI MailArchiver®
1.1 Introduction to GFI MailArchiver
1.2 How Does GFI MailArchiver Work?
1.3 GFI MailArchiver Licensing
1.3.1 Terms and conventions used in this manual
1.4 Legal Compliance
2 Installing GFI MailArchiver
2.1 System Requirements
2.1.1 Software Requirements
2.1.2 Hardware Requirements
2.1.3 Important Settings
2.2 Where Should I Install GFI MailArchiver?
2.2.1 Preparing the Journal Mailbox
2.2.2 Preparing the Journal Mailbox in Microsoft® Exchange Server 2003
2.2.3 Preparing the Journal Mailbox in Microsoft® Exchange Server 2007/2010
2.3 Choosing and Preparing a Database
2.3.1 Choosing Your Database Type
2.3.2 Using GFI MailArchiver Database
2.3.3 Using SQL Server® Express
2.3.4 Using Microsoft® SQL Server
2.4 Before You Install
2.5 Installing GFI MailArchiver
3 GFI MailArchiver Post-install Wizard
3.1 License Configuration
3.2 Configure Archive Store Settings
3.2.1 Configure Archive Store - GFI MailArchiver Database
3.2.2 Configure Archive Store - SQL Server®
3.3 Configure Archiving Method
3.3.1 Set Up a Journal Mailbox
3.4 Finalizing the Post Install Setup
3.5 Test Your Setup
4 Upgrading From Previous Versions
4.1 Why Upgrade to GFI MailArchiver 2012?
4.1.1 What Benefits do the new Archive Stores offer?
4.2 Upgrading from Versions Earlier than GFI MailArchiver 2012
4.3 Before You Upgrade
4.4 Upgrading GFI MailArchiver
4.5 Post Upgrade Actions
4.5.1 Check Licensing
5 Using GFI MailArchiver
5.1 Logging In GFI MailArchiver
16
16
16
17
17
17
18
18
18
20
20
23
24
24
24
25
25
26
27
28
29
29
31
32
32
34
36
40
42
44
45
48
48
48
48
49
50
51
51
53
53
5.2 Browsing Archived Emails
5.3 Working With Emails
5.4 Searching Archived Emails
5.4.1 Advanced Search
5.4.2 Email Search Using Smart Phones
5.5 Accessing Multiple Mailboxes
5.6 GFI MailInsights
5.6.1 GFI MailInsights Requirements
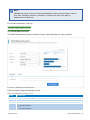
5.6.2 Generating Reports
5.6.3 Scheduling Reports
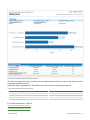
5.6.4 Communication Flow
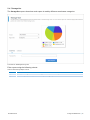
5.6.5 WebMail Use
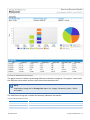
5.6.6 Email Responsiveness
5.6.7 Storage Use
5.6.8 Inactive Accounts
5.6.9 Inappropriate Words
5.6.10 Internal Spammers
5.6.11 Outside Office Hours
5.6.12 Data Leakage Detection
5.6.13 Job Search
5.6.14 Phrase Search
5.6.15 User Traffic Report
5.7 Changing User Preferences
6 Monitoring GFI MailArchiver operations
6.1 Introduction
6.2 Using the Home Tab
6.2.1 About GFI MailArchiver
6.2.2 Heartbeat
6.2.3 Servers
6.2.4 Archive Stores
6.2.5 Email Flow
6.2.6 Event Viewer
7 Configuring GFI MailArchiver
7.1 Settings Overview
7.2 Configuring Archiving Method
7.3 Managing the Mail Servers to Archive
7.3.1 Viewing Configured Mail Servers
7.3.2 Adding a New Journal Mailbox
7.3.3 Editing an Existing Journal Mailbox
7.3.4 Deactivating and Activating an Existing Journal Mailbox
7.3.5 Removing an Existing Journal Mailbox
7.4 Configuring Archiving Rules
7.4.1 Adding Archiving Rules
7.4.2 Editing Archiving Rules
7.4.3 Removing Archiving Rules
53
55
56
57
58
62
63
64
64
65
65
68
70
72
74
75
77
80
83
84
86
89
90
92
92
92
93
93
94
94
95
96
97
97
98
100
101
101
103
104
104
104
105
107
107
7.5 Mailbox Archive Restrictions
7.5.1 Enabling Mailbox Archive Restrictions
7.5.2 Disabling Mailbox Archive Restrictions
7.6 Managing the Archiving Scope
7.7 Configuring Mailbox Folder Structure Retrieval
7.7.1 Enabling Mailbox Folder Structure Retrieval
7.7.2 Disabling Mailbox Folder Structure Retrieval
7.7.3 Excluding Folders From Folder Structure Retrieval
7.7.4 Removing Excluded Folders Policies
7.8 Managing Archive Stores
7.8.1 Viewing Configured Archive Stores
7.8.2 Configuring New Archive Store Settings
7.8.3 Choosing and Preparing a Database for Use With GFI MailArchiver
7.8.4 Attaching an Archive Store
7.8.5 Editing Existing Archive Store Details
7.8.6 Detaching an Existing Archive Store
7.8.7 Indexing
7.8.8 Scheduling Archive Stores
7.8.9 Backup Archive Stores
7.8.10 Online Backup
7.8.11 Offline Backup
7.8.12 Moving Emails From One Database to Another
7.8.13 Upgrading the Database Schema
7.8.14 Attaching a GFI MailArchiver 3 Database
7.9 Email Access Control
7.9.1 Adding An Active Directory Group to the Full Access Group
7.9.2 Adding Users to the Group Manager Archive Access
7.9.3 Define User Access Control
7.9.4 Configuring Shared Mailboxes
7.10 Configuring IMAP Server
7.10.1 Working With Certificates
7.11 Retention Policies
7.11.1 How Are Retention Policies Applied?
7.11.2 Viewing Retention Policies
7.11.3 Adding a New Retention Policy
7.11.4 Changing the Order of Retention Policies
7.11.5 Adding a SPAM Retention Policy
7.11.6 Configuring Legal Hold
7.12 Classification Rules
7.12.1 Adding a New Classification Rule
7.12.2 Editing a Classification Rule
7.12.3 Removing a Classification Rule
7.13 Auditing
7.13.1 Configuring Database Activity Auditing
7.13.2 Editing Database Activity Auditing
7.13.3 Audit Reports
7.14 Configuring Email Deletion
108
108
110
110
111
111
113
113
115
116
116
117
117
118
119
119
120
123
124
124
124
129
130
131
132
132
132
132
133
134
136
137
137
138
138
142
142
143
144
144
146
146
146
147
149
149
151
7.15 Viewing and Editing License Keys
7.16 General Settings
7.16.1 Changing General Settings
7.16.2 Changing Version Check Settings
8 Configuring Email Client Access
8.1 Installing GFI MailArchiver Outlook Connector
8.2 How Does the GFI MailArchiver Outlook® Connector Work
8.3 Downloading GFI MailArchiver Outlook Connector
8.3.1 Changing the Outlook® Connector Tab Availability
8.4 Outlook® Connector System Requirements
8.4.1 Software
8.4.2 Hardware
8.4.3 Installing GFI MailArchiver Outlook Connector Without GPO - Manual Install
8.5 Installing GFI MailArchiver Outlook Connector via GPO
8.5.1 Installing Outlook® Connector via GPO in Windows® Server 2003
8.5.2 Installing Outlook® Connector via GPO in Windows Server 2008
8.6 Configuring Manual Archiving
8.6.1 How Does Manual Archiving Work?
8.6.2 GFI MailArchiver Outlook Addon System Requirements
8.6.3 Software
8.6.4 Hardware
8.7 Enabling and Disabling GFI MailArchiver Outlook® Addon
8.8 Downloading and Installing GFI MailArchiver Outlook Addon
8.8.1 Changing the Outlook® Addon Tab Availability
8.8.2 Installing GFI MailArchiver Outlook Addon Manually
8.8.3 Installing Manual Archiving Plugin Through GPO
8.8.4 Installing GFI MailArchiver Outlook Addon Through GPO Windows® Server 2003
8.8.5 Installing Manual Archiving Through GPO Windows® Server 2008
8.8.6 Configuring Outlook Addon
8.9 Configuring GFI MailArchiver IMAP Client Access
8.9.1 Configuring IMAP in Apple Mail 3.0
8.9.2 Configuring IMAP in iOS5
8.9.3 Configuring IMAP in Microsoft Outlook® 2003
8.9.4 Configuring IMAP in Microsoft Outlook® 2007
8.9.5 Configuring IMAP in Microsoft Outlook® 2010
8.9.6 Configuring IMAP in Microsoft Outlook 2013
8.9.7 Configuring IMAP in Outlook® 2011 for Mac
8.9.8 Configuring IMAP in Windows® Live Mail
8.9.9 Configuring IMAP on Android
8.9.10 Configuring IMAP in Mozilla Thunderbird 10
9 Import and Export Emails
9.1 Import Emails From Microsoft® Exchange Mailboxes
9.1.1 Step 1: Importing emails from a remote computer
9.1.2 Microsoft® Exchange mailbox access permissions – Grant Permissions
9.1.3 Step 2: Run the GFI MailArchiver Import Export Tool
153
153
153
154
156
156
156
157
157
157
157
158
158
159
160
162
164
165
165
165
166
166
167
168
168
168
168
169
172
175
175
177
178
178
179
180
181
182
182
183
185
185
186
187
189
9.1.4 Microsoft® Exchange mailbox access permissions – Revoke Permissions
9.2 Import emails from PST files locally
9.2.1 Step 1: Importing emails from a remote computer
9.2.2 Step 2: Run the GFI MailArchiver Import Export Tool to Import from PST Files
9.3 Import emails from PST files on the network
9.3.1 Step 1: Install GFI PST Exporter
9.3.2 Step 2: Configure the General Settings of GFI PST Exporter
9.3.3 Step 3: Configure the Notification Settings of GFI PST Exporter
9.3.4 Step 4: Configure Computer Groups
9.3.5 Step 5: Add end-user machines in computer groups
9.3.6 Step 6: Deploy the GFI PST Exporter agent to end-user machines
9.3.7 Step 7: Process PST files on end-user machines
9.3.8 Reports and logs
9.3.9 Adding imported emails to the GFI MailArchiver archive stores
9.4 Export emails from GFI MailArchiver Archive Stores
9.4.1 Exporting Emails
10 Restoring Mailboxes
10.1 Restore a mailbox
11 Troubleshooting
11.1 GFI SkyNet
11.2 Web Forum
11.3 Request technical support
11.4 Documentation
11.5 Installation problems
11.6 General Issues
11.7 Import Export Problems
11.8 Outlook® Connector Issues
193
194
195
196
199
199
200
202
203
207
208
211
212
214
215
215
222
222
224
224
224
224
224
225
226
229
232
12 Glossary
234
13 Appendix 1 - Microsoft Exchange Manual Operations
239
13.1 Create a Journal Mailbox in Microsoft® Exchange Server 2000/2003
13.1.1 Step 1: Create a New Journaling Mailbox.
13.1.2 Step 2: Configure Email Archival to Journaling Mailbox
13.1.3 Step 3: Enable BCC Information Journaling
13.1.4 Step 4: Enable Envelope Journaling
13.2 Disabling Journaling in Microsoft® Exchange Server 2000/2003
13.3 Removing Email from Microsoft® Exchange 2003
13.3.1 Configure mailbox management at the server level
13.4 Creating a Journaling Mailbox in Microsoft® Exchange Server 2007
13.4.1 Set up standard journaling
13.4.2 Set up premium journaling
13.5 Disabling standard journaling in Microsoft® Exchange Server 2007
13.5.1 Disable standard journaling from the Microsoft Exchange Management Shell
13.5.2 Disable premium journaling
239
239
240
242
243
245
247
250
251
251
254
256
258
258
13.5.3 Disable premium journaling from the Microsoft® Exchange Server Management
Shell
259
13.6 Removing Email Microsoft® Exchange 2007
259
13.7 To use the Microsoft® Exchange Management Console to create new managed content
settings:
260
13.8 Create a Journal Mailbox in Microsoft® Exchange Server 2010
261
13.8.1 Set up standard journaling
262
13.8.2 Set up premium journaling
264
13.9 Disabling standard journaling in Microsoft® Exchange Server 2010
265
13.9.1 Disable standard journaling from the Microsoft Exchange Management Shell
267
13.9.2 Disable premium journaling
267
13.10 Removing Email from Microsoft® Exchange 2010
268
13.10.1 Use the Exchange Management Console to create a retention policy
268
13.10.2 Use the EMC to apply a retention policy to a mailbox
268
13.11 Creating a Journaling Mailbox in Microsoft® Exchange 2013
269
13.12 Removing Email from Microsoft® Exchange 2013
269
13.12.1 Step 1: Create a retention tag
270
13.12.2 Step 2: Create a retention policy
270
13.12.3 Step 3: Apply a retention policy to mailbox users
271
14 Appendix 2 - Role Based Installations
14.1 How Role-based Deployment Works
14.2 System Requirements
14.3 Installing GFI MailArchiver in a Role-based Environment
14.3.1 Installing GFI MailArchiver
14.3.2 Executing the Deployment Manager Wizard on Each Instance
14.3.3 Launching the Deployment Manager Wizard
14.3.4 Assigning the User Mailbox Synchronization Role
14.3.5 Assigning the IMAP Server Role
14.3.6 Assigning Multiple Roles to a Server
14.3.7 Identifying the Storage Role Server
14.3.8 Identifying the Search and Indexing Role Server
14.3.9 Recommended Deployment Scenario
14.4 Uninstall Information
272
273
274
274
275
275
275
285
286
287
290
291
292
294
15 Appendix 3 - Using the Port Changing Tool
295
16 Index
297
List of Figures
Screenshot 1: Registering ASP.NET with IIS
22
Screenshot 2: Specify the website and virtual directory alias for the web application
30
Screenshot 3: Post install wizard start screen
31
Screenshot 4: Post install wizard - select database type.
33
Screenshot 5: Archive Store creation: Select locations
35
Screenshot 6: Archive Store creation: Select database
37
Screenshot 7: Archive Store creation: Select data and log file location.
38
Screenshot 8: Archive Store creation: Select locations
39
Screenshot 9: Post install wizard - choose archiving method
41
Screenshot 10: Journal Mailbox wizard
43
Screenshot 11: Post Install Wizard completed successfully
45
Screenshot 12: Search for email
46
Screenshot 13: Specify the website and virtual directory alias for the web application
51
Screenshot 14: Browsing Archived Emails
54
Screenshot 15: Working with emails within GFI MailArchiver
55
Screenshot 16: Advanced Search Options
57
Screenshot 17: Smart Phone Login Screen
59
Screenshot 18: GFI MailArchiver Home Page for Smart Phones
60
Screenshot 19: Search Result by Smart Phone
61
Screenshot 20: Conversation View Smart Phone
62
Screenshot 21: Accessing multiple mailboxes
63
Screenshot 22: MailInsights report scheduling
65
Screenshot 23: MailInsights Communication Flow
66
Screenshot 24: MailInsights Communication Flow Report
67
Screenshot 25: MailInsights WebMail Use
68
Screenshot 26: MailInsights WebMail Communicators Report
69
Screenshot 27: MailInsights Email Responsiveness
70
Screenshot 28: MailInsights Email Responsiveness Report
71
Screenshot 29: MailInsights Storage Use
72
Screenshot 30: MailInsights Storage Use Report
73
Screenshot 31: MailInsights Inactive Accounts
74
Screenshot 32: Inactive Accounts Report
75
Screenshot 33: MailInsights Inappropriate Words
76
Screenshot 34: MailInsights Inappropriate Words Report
77
Screenshot 35: MailInsights Internal Spammers
78
Screenshot 36: MailInsights Internal Spammers Report
79
Screenshot 37: MailInsights Outside Office Hours
80
Screenshot 38: MailInsights Outside Office Hours Report
82
Screenshot 39: MailInsights Data Leakage Detection report
83
Screenshot 40: MailInsights Data Leakage Detection Report
84
Screenshot 41: MailInsights Job Search report
85
Screenshot 42: MailInsights Job Search Report
86
Screenshot 43: MailInsights Phrase Search report
87
Screenshot 44: MailInsights Phrase Search Report
88
Screenshot 45: MailInsights User Traffic
89
Screenshot 46: MailInsights User Traffic Report
90
Screenshot 47: User profile preferences
91
Screenshot 48: The GFI MailArchiver dashboard
92
Screenshot 49: About GFI MailArchiver area
93
Screenshot 50: GFI MailArchiver Heartbeat
93
Screenshot 51: Servers area
94
Screenshot 52: Archive Stores area
94
Screenshot 53: GFI MailArchiver Email flow area
95
Screenshot 54: Email flow area configuration
95
Screenshot 55: Event Viewer tab
96
Screenshot 56: GFI MailArchiver Settings Page
97
Screenshot 57: Configuring Archiving Method
99
Screenshot 58: Manage Journaling Mailboxes screen
101
Screenshot 59: Add Journaling Mailbox
101
Screenshot 60: Choose how you want the wizard to setup GFI MailArchiver to use a journal mailbox.
102
Screenshot 61: Existing mailbox added successfully
103
Screenshot 62: Configuring Archiving Rules
105
Screenshot 63: Select Enable Archiving Restrictions
108
Screenshot 64: Add emails, groups or users
110
Screenshot 65: Configuring email archive restrictions.
111
Screenshot 66: Enable folder structure retrieval
112
Screenshot 67: Add exclude policy
114
Screenshot 68: Select users to exclude
115
Screenshot 69: Viewing Archive Stores
116
Screenshot 70: Attaching an Archive Store
118
Screenshot 71: Search Index Management
121
Screenshot 72: Backup an SQL database
125
Screenshot 73: Backup an SQL database
127
Screenshot 74: The Bulk Schema Upgrader
130
Screenshot 75: Attach a GFI MailArchiver 3 database
131
Screenshot 76: Configuring access control
133
Screenshot 77: IMAP Server configuration
135
Screenshot 78: Viewing retention and spam policies
138
Screenshot 79: Select SPAM or email retention policy
139
Screenshot 80: Retention Policy details
140
Screenshot 81: SPAM Retention Policy dialog
143
Screenshot 82: Categorization rule details
145
Screenshot 83: Select authentication method
147
Screenshot 84: Enable user interaction auditing
148
Screenshot 85: Configuring Email deletion
152
Screenshot 86: General Settings
154
Screenshot 87: Version check configuration
155
Screenshot 88: Setting GFI MailArchiver server URL in Windows® Server 2003 GPO
161
Screenshot 89: Setting GFI MailArchiver server URL in Windows® Server 2003 GPO
163
Screenshot 90: Enable or disable Manual Archiving
167
Screenshot 91: Setting GFI MailArchiver server URL in Windows® Server 2008 GPO
170
Screenshot 92: GFI MailArchiver Outlook Addon configuration settings.
173
Screenshot 93: Importing from a Microsoft Exchange mailbox
190
Screenshot 94: Import from Microsoft Exchange: Mailbox and folder selection
191
Screenshot 95: Import from Microsoft Exchange: Configure import options
192
Screenshot 96: Microsoft Outlook® personal folders (PST) files
197
Screenshot 97: Import from Microsoft Exchange: Configure import options
198
Screenshot 98: GFI PST Exporter Master Service credentials
200
Screenshot 99: GFI PST Exporter: general settings
201
Screenshot 100: GFI PST Exporter: General Settings: verify query root
202
Screenshot 101: GFI PST Exporter: notification settings
203
Screenshot 102: GFI PST Exporter: computer groups
204
Screenshot 103: GFI PST Exporter: create a computer group
204
Screenshot 104: GFI PST Exporter: computer group properties
205
Screenshot 105: GFI PST Exporter: computer group locations to search
206
Screenshot 106: GFI PST Exporter: edit computer group configuration
207
Screenshot 107: GFI PST Exporter: add computer
208
Screenshot 108: GFI PST Exporter: deploying the agent
209
Screenshot 109: GFI PST Exporter: deploying the agent
210
Screenshot 110: GFI PST Exporter: remote computer requirements
211
Screenshot 111: GFI PST Exporter: processing at remote computer
212
Screenshot 112: GFI PST Exporter: export report
213
Screenshot 113: GFI PST Exporter: processing logs
214
Screenshot 114: Email Export: Connecting to GFI MailArchiver
216
Screenshot 115: Email Export: Search options
217
Screenshot 116: Email Export: Export options
220
Screenshot 117: Restore mailbox utility
222
Screenshot 118: Add new user in Microsoft® Exchange Server 2003
239
Screenshot 119: New Object - User dialog
240
Screenshot 120: Mailbox store node properties
241
Screenshot 121: Enabling journaling on a Microsoft® Exchange Server mailbox store
242
Screenshot 122: ADSI Edit
244
Screenshot 123: Heuristics attribute
245
Screenshot 124: Editing the heuristics attribute value
245
Screenshot 125: Mailbox store node properties
246
Screenshot 126: Enabling journaling on a Microsoft Exchange mailbox store
247
Screenshot 127: New user mailbox details
252
Screenshot 128: Configuring a Mailbox Database
253
Screenshot 129: Mailbox Database properties
254
Screenshot 130: Configuring Journaling rules
255
Screenshot 131: Creating a new Journaling rule
256
Screenshot 132: Configuring a Mailbox Database
257
Screenshot 133: Mailbox Database properties
258
Screenshot 134: Configuring Journaling rules
259
Screenshot 135: New user mailbox details
262
Screenshot 136: Configuring a Mailbox Database
263
Screenshot 137: Mailbox Database properties
264
Screenshot 138: Creating a new Journaling rule
265
Screenshot 139: Configuring a Mailbox Database
266
Screenshot 140: Mailbox Database properties
267
Screenshot 141: How Role-based Deployment works
273
Screenshot 142: Selecting roles
276
Screenshot 143: Assigning the Central Configuration Service role
277
Screenshot 144: Assigning the Data Collection role
278
Screenshot 145: Assigning the Storage role
279
Screenshot 146: Assigning the Search and Indexing role
280
Screenshot 147: Specify the word breaker for the Search and Indexing role
281
Screenshot 148: Assigning the User Interface and Administration role
282
Screenshot 149: Specify User Interface and Administration role settings
283
Screenshot 150: Assigning the Data Import Service role
284
Screenshot 151: Assigning the Data Import Service role
285
Screenshot 152: Assigning the IMAP Server role
286
Screenshot 153: Assigning multiple roles
287
Screenshot 154: Identifying the Central Configuration Service Role server
288
Screenshot 155: Identifying the Data Collection Role server
289
Screenshot 156: Identifying the Storage Role server
290
Screenshot 157: Identifying the Search and Indexing Role server
291
Screenshot 158: Port Changing Tool user interface
295
List of Tables
Table 1: Terms and conventions used in this manual
17
Table 2: Supported operating systems
18
Table 3: Supported databases
19
Table 4: Other supported components
19
Table 5: Minimum and recommended processors
20
Table 6: Memory requirements
20
Table 7: Physical Storage requirements
20
Table 8: Folders to exclude from Antivirus scanning
20
Table 9: Locations to exclude from antivirus scanning
21
Table 10: Listening Ports on the GFI MailArchiver Server
21
Table 11: Ports used by GFI MailArchiver
21
Table 12: Installation considerations
23
Table 13: Choosing your database type
25
Table 14: Microsoft SQL Server limitations
27
Table 15: Post installation tasks
31
Table 16: Archived emails storage options
33
Table 17: Archive Store file locations
35
Table 18: Database server details
37
Table 19: Archive Store authentication options
38
Table 20: Archive Store database file location options
38
Table 21: Database file location options
40
Table 22: Configure archiving method
41
Table 23: Journal Mailbox options
43
Table 24: New journal mailbox options
44
Table 25: New feature requirements related to Archive Store automation
49
Table 26: Licensing options
52
Table 27: Archive Tab options
54
Table 28: Email View options
56
Table 29: Wildcard description
57
Table 30: Advanced Search options
57
Table 31: Communication Flow Report criteria
66
Table 32: Communication Flow Report criteria
68
Table 33: WebMail Use Report criteria
68
Table 34: WebMail Use Report criteria
69
Table 35: Email Responsiveness Report criteria
70
Table 36: Email Responsiveness Report criteria
71
Table 37: Email Storage Report criteria
72
Table 38: Storage Use Report criteria
73
Table 39: Inactive Accounts Report criteria
74
Table 40: Inappropriate Words Report criteria
76
Table 41: Inappropriate Words Report criteria
77
Table 42: Internal Spammers Report criteria
78
Table 43: Internal Spammers Report criteria
79
Table 44: Outside Office Hours Report criteria
80
Table 45: Outside Office Hours Report criteria
82
Table 46: Data Leakage Detection Report criteria
83
Table 47: Data Leakage Detection Report criteria
84
Table 48: Job Search Report criteria
85
Table 49: Job Search Report criteria
86
Table 50: Phrase Search Report criteria
87
Table 51: Phrase Search Report criteria
88
Table 52: MailInsights User Traffic Report criteria
89
Table 53: User Traffic Report criteria
90
Table 54: Email flow area options
95
Table 55: Overview of current settings
97
Table 56: Archiving Method Wizard options
99
Table 57: Mail Server options
101
Table 58: Journal Mailbox wizard options
102
Table 59: Existing Journal Mailbox options
103
Table 60: Archiving Rule conditions
106
Table 61: Archiving restriction options
109
Table 62: Email archive restrictions options
111
Table 63: Folder Structure Retrieval Options
112
Table 64: Archive Store table
117
Table 65: Database type recommendations
118
Table 66: Editing Archive Store settings
119
Table 67: Editing Archive Store settings
119
Table 68: Indexing Schedule options
121
Table 69: Search index states
122
Table 70: Archive Store properties
128
Table 71: Email Access Control groups
132
Table 72: Retention policy table fields
138
Table 73: New retention policy options
140
Table 74: Pre-defined retention file types
142
Table 75: SPAM Retention Policy options
143
Table 76: Classification Policy options
145
Table 77: SQL Server® Authentication methods
147
Table 78: General Settings Options
154
Table 79: Version Check settings
155
Table 80: GFI MailArchiver Outlook Connector versions
157
Table 81: Outlook® Connector Tab Availability options
157
Table 82: GFI MailArchiver Outlook Connector software requirements
157
Table 83: GFI MailArchiver Outlook Connector hardware requirements
158
Table 84: GFI MailArchiver Outlook Addon software requirements
165
Table 85: GFI MailArchiver Outlook Addon hardware requirements
166
Table 86: Outlook® Connector Tab Availability options
168
Table 87: Outlook® Addon Server address configuration
173
Table 88: Actions to perform on local emails
174
Table 89: Outlook Addon authentication method
174
Table 90: Outlook Addon archiving options
175
Table 91: Email export search criteria
217
Table 92: Email export options
220
Table 93: Installation problems
225
Table 94: General issues
226
Table 95: Import Export problems
229
Table 96: Outlook® connector issues
232
Table 97: Deployment scenario
292
Table 98: Deployment order
293
1 About GFI MailArchiver®
1.1 Introduction to GFI MailArchiver
GFI MailArchiver is an email archiving solution that can archive all internal and external email into a
central Archive Store. You can then easily manage the email Archive Stores from the web-based
configuration of GFI MailArchiver. You can also allow users to browse and search old emails via the
web-based browse and search interface. GFI MailArchiver also provides Microsoft Outlook®
integration.
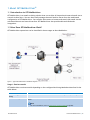
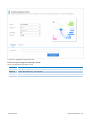
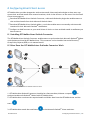
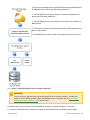
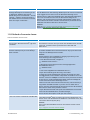
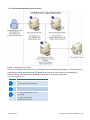
1.2 How Does GFI MailArchiver Work?
GFI MailArchiver operations can be classified in three stages as described below.
Figure 1: Typical GFI MailArchiver installation diagram.
Stage 1: Retrieve emails
GFI MailArchiver retrieves emails depending on the configured Archiving Method as described in the
table below:
ARCHIVING METHOD
DESCRIPTION
Auto-Archiving (Journaling)
GFI MailArchiver collects emails from the Microsoft® Exchange Server journaling mailbox.
Manual Archiving
GFI MailArchiver, receives manually archived emails from GFI MailArchiver Outlook
Addon.
NOTE
For more information, refer to Configuring Archiving Method (page 98).
GFI MailArchiver
1 About GFI MailArchiver® | 16
Optionally, emails can also be imported into GFI MailArchiver through the GFI MailArchiver Import
Export Tool. For more information, refer to Import and Export Emails (page 185).
Stage 2: Archive emails
GFI MailArchiver stores collected emails in Archive Stores created automatically based on the
configured New Archive Store Settings. Emails are archived according to their sent date. If an Archive
Store does not exist for the period that matches the date of the email, a new Archive Store is
automatically created. For more information, refer to Configuring New Archive Store Settings (page
117).
NOTE
When Rule-based method of archiving is selected, GFI MailArchiver only archives emails
that match criteria specified in the configured Archiving Rules. For more information,
refer to Configuring Archiving Rules (page 104).
Stage 3: Browse archived emails
Users can browse and search archived emails via the GFI MailArchiver web interface or from Microsoft
Outlook® using the GFI MailArchiver Outlook Connector.
1.3 GFI MailArchiver Licensing
For information on GFI MailArchiver licensing, refer to:
http://go.gfi.com/?pageid=MAR_Licensing
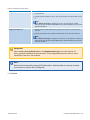
1.3.1 Terms and conventions used in this manual
Table 1: Terms and conventions used in this manual
Term
Description
Additional information and references essential for the operation of GFI MailArchiver.
Important notifications and cautions regarding potential issues that are commonly encountered.
>
Step by step navigational instructions to access a specific function.
Bold text
Items to select such as nodes, menu options or command buttons.
Italics text
Parameters and values that you must replace with the applicable value, such as custom paths and file
names.
Code
Indicates text values to key in, such as commands and addresses.
1.4 Legal Compliance
Ensure that by enabling the Rule-based method of archiving or the Email deletion feature you are not
breaching your company policy or any laws and regulations related to email storage in your
jurisdiction. For more information refer to Configuring Archiving Rules and Email Deletion chapters.
GFI MailArchiver
1 About GFI MailArchiver® | 17
2 Installing GFI MailArchiver
Installing GFI MailArchiver is a two-step process:
1. Run the GFI MailArchiver installer to install GFI MailArchiver and missing pre-requisites.
2. Follow the GFI MailArchiver post-install wizard to configure GFI MailArchiver and its operating
environment.
2.1 System Requirements
This section describes software and hardware requirements and related settings to ensure a
successful deployment of GFI MailArchiver.
Software requirements:
Supported Operating Systems
Supported Mail Servers
Supported Databases
Other Required Components
Hardware requirements:
Processor
Memory
Physical Storage
Important Settings:
Antivirus and Backup Software
Firewall Port Settings
Database Settings
ASP.NET ® Settings
NOTE
The recommended software and hardware specifications depend on the number of
users, settings enabled, email flow and message sizes.
2.1.1 Software Requirements
Supported Operating Systems
GFI MailArchiver can be installed on all the operating systems listed below:
Table 2: Supported operating systems
OS VERSION
SUPPORTED OPERATING SYSTEM
32 BIT
Windows® SBS 2003 & SBS 2011
Windows® 2003 Standard & Enterprise
Windows® 2008 Standard & Enterprise
GFI MailArchiver
2 Installing GFI MailArchiver | 18
OS VERSION
SUPPORTED OPERATING SYSTEM
64 BIT
Windows® SBS 2008 Standard & SBS 2011
Windows® 2003 Standard & Enterprise
Windows® 2008 Standard, Enterprise, Datacentre & Hyper-V® Environments
Windows® Server 2008 R2 Enterprise & Hyper-V® Environments
Windows® Server 2012
NOTE
The server on which to install GFI MailArchiver must have access to Active Directory®.
Supported Mail Servers
Microsoft® Exchange Server 2003 or later.
IMAP compatible mail servers (with journaling-like feature)
Supported Databases
GFI MailArchiver supports the database back-ends listed below:
Table 3: Supported databases
SUPPORTED DATABASE
DESCRIPTION
Firebird
An open source database used for evaluation purposes
bundled with GFI MailArchiver. Recommended for evaluation
purposes only for organizations with less than 50 email users
and with an average mail flow of up to 2500 per day.
SQL Server® 2005 or later
(including SQL Server® Express editions)
Recommended for all organizations. Not included with GFI MailArchiver installation and is required to be installed as a separate process.
Other Required Components
Table 4: Other supported components
OTHER COMPONENTS
Microsoft .NET® Framework 4.0 or 4.5
Access to Microsoft® Active Directory
ASP.NET® 4.0
Internet Information Services (IIS®) 6.0 or later - SMTP & World Wide Web services
Internet Explorer® 8 or later, Mozilla Firefox, Google Chrome, Safari®
Microsoft® Data Access Components (MDAC) 2.6 or higher
Microsoft® Exchange Server MAPI Client and Collaboration Data Objects 1.2.1 - Required (unless Outlook® 2003 32-bit or
later is installed or unless GFI MailArchiver is installed with Microsoft® Exchange Server 2003). Download from:
http://www.microsoft.com/download/en/details.aspx?id=6248
NOTE
Minimum supported screen resolution is 1024 x 768.
GFI MailArchiver
2 Installing GFI MailArchiver | 19
IMPORTANT
After installing Microsoft .NET ® Framework 4.0 or 4.5 restart the machine.
2.1.2 Hardware Requirements
Processor
Table 5: Minimum and recommended processors
REQUIREMENT
DESCRIPTION
Minimum
Intel Pentium or compatible - 2GHz 32 bit processor.
Recommended
x64 architecture-based server with Intel 64 architecture or AMD64 platform.
Memory
Table 6: Memory requirements
REQUIREMENT
DESCRIPTION
Minimum
1GB RAM (dedicated to GFI MailArchiver)
Recommended
3GB RAM (dedicated to GFI MailArchiver)
Physical Storage
Table 7: Physical Storage requirements
REQUIREMENT
DESCRIPTION
Minimum
400MB physical disk space (NTFS) for GFI MailArchiver installation. More
space is required for the database (Firebird or Microsoft® SQL server).
Storage space depends on mail volume to archive.
Recommended
Server with 4 physical drives, with the ability to increase storage space on
demand when required. Refer to Database Settings section within this
chapter for more information on how to configure your database.
NOTE
It is highly recommended that you store databases and Index files on separate,
appropriately sized hard disks. SAS hard disks are highly recommended.
2.1.3 Important Settings
Excluding Folders from Antivirus Scanning
Antivirus software may cause GFI MailArchiver to malfunction. This occurs when such software denies
access to certain files required by GFI MailArchiver.
It is recommended to exclude the following folders and subfolders from antivirus software (on-access
and on demand) running on the GFI MailArchiver server:
Table 8: Folders to exclude from Antivirus scanning
GFI MailArchiver FOLDERS
<GFI MailArchiver Installation folder> and subfolders.
<..\Program Files\Common Files\GFI>
GFI MailArchiver
2 Installing GFI MailArchiver | 20
Also, exclude the index and the Archive Store locations from antivirus scans. The default Index and
Archive Store locations are:
Table 9: Locations to exclude from antivirus scanning
GFI MailArchiver DEFAULT INDEX AND ARCHIVE STORE LOCATIONS
<GFI MailArchiver Installation folder>\Indexes\default
<GFI MailArchiver Installation folder>\Databases\default\>
NOTE
You can change the Index and Archive Store locations after installing GFI MailArchiver.
For information, refer to the Configure Archive Stores and Configure search indexes
sections in this manual.
Firewall Port Settings
Configure your firewall to allow connections from the GFI MailArchiver server on the following ports:
Table 10: Listening Ports on the GFI MailArchiver Server
PORT
DESCRIPTION
Remoting (Ports 8014,
8017, 8018, 8019, 8020,
8022)
Used for communication between GFI MailArchiver components when installed in a role
based setup. Ensure these ports are open only when the server is installed in a distributed
environment.
Use the Port Changing Utility to easily change remoting port numbers. For more information, refer to
Appendix 3 - Using the Port Changing Tool (page 295).
Connections Established From the GFI MailArchiver Server
Table 11: Ports used by GFI MailArchiver
PORT
DESCRIPTION
PROTOCOL
25
Used by GFI MailArchiver when an email needs to be restored to a user’s mailbox or a notification is
sent to the GFI MailArchiver administrator.
SMTP
80
Used by the GFI MailArchiver user interface and web services.
HTTP
135
Enable this port when GFI MailArchiver is installed on the same machine as Microsoft® Exchange
Server and configured to use ExOLEDB to retrieve emails.
MAPI/RPC
143
Enable this port to retrieve emails when GFI MailArchiver is not installed on the same server as Microsoft® Exchange Server.
IMAP
1443
Enable this port when GFI MailArchiver is configured to archive emails to a SQL Server® Database.
Microsoft
SQL
Server
®
3268
Used for connections done from the GFI MailArchiver Server to the Domain Controller which stores
the Microsoft® Global Catalog.
Microsoft
Global
Catalog
8096
to
8099
Enable this port when using GFI PST Exporter to communicate with GFI MailArchiver when exporting
data from networked computers.
<Optional>
44143
Default port assigned to GFI MailArchiver IMAP Service. IMAP Service enables users to access archived
email via IMAP from 3rd party email clients such as Thunderbird, Microsoft Outlook®, Apple Mail,
Android, iOS and others.
IMAP
GFI MailArchiver
2 Installing GFI MailArchiver | 21
Database Settings
GFI MailArchiver requires SQL Server® (if used as the archival database) to be installed in case
insensitive mode. This is the default installation setting of SQL Server®. The SQL Server® collation
modes apply to all SQL Server® objects including login names. In such cases if a user changes a
property in the name and does not make EXACT character case matches, GFI MailArchiver will fail
since it would not find the resources required.
Once installed, it is not possible to change the SQL Server® collation mode easily. It requires a rebuild
of the master database using advanced Microsoft® SQL tools or methods. The best solution is to install
another instance of SQL Server® (set to operate in insensitive collation mode).
IMPORTANT
Ensure SQL Server® is installed in case insensitive mode if SQL Server® is used as the
archival database.
ASP.NET® Settings
Register and enable ASP.NET ® with IIS® for GFI MailArchiver to work.
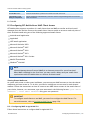
Register ASP.NET® With IIS®
If the Microsoft® .NET framework is installed after IIS is installed this is automatically registered. Else,
register ASP.NET ® with IIS® by following these steps:
1. From command prompt, navigate to:
<WindowsDirectory>\Microsoft.NET\Framework\<v4.0.xxxxx>\
NOTE
Replace <v4.0.xxxxx> with the folder name of Microsoft® .NET Framework version
number.
For example: C:\Windows\Microsoft.NET\Framework\v4.0.30319\
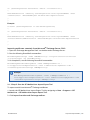
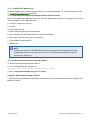
Screenshot 1: Registering ASP.NET with IIS
2. Key in aspnet_regiis.exe -i and press Enter.
GFI MailArchiver
2 Installing GFI MailArchiver | 22
Enable ASP.NET® From IIS®
NOTE
Ensure that ASP.NET ® is allowed by Internet Information Services (IIS®) Manager.
IIS 6
1. Navigate to Control Panel > Administrative Tools > Internet Information Services (IIS) Manager.
2. Expand the local computer node and select Web Service Extensions.
3. In the right pane, right click ASP.NET v4.0.xxxxx and select Allow.
IIS 7
1. Navigate to Control Panel > Administrative Tools > Internet Information Services (IIS) Manager.
2. Select the local computer node and from the Features View pane launch ISAPI and CGI
Restrictions.
3. In the Features View pane, right click ASP.NET v4.0.xxxxx and select Allow.
2.2 Where Should I Install GFI MailArchiver?
Install GFI MailArchiver on any machine that meets the system requirements and is part of an Active
Directory® domain. Before proceeding with the installation, first consider the details listed below:
Table 12: Installation considerations
CONSIDERATION
DESCRIPTION
Email volume on
your servers
Installing GFI MailArchiver on a mail server where a high volume of emails received and processed
will invariably put more load on server resources. This can cause these servers to become
unresponsive and not process mail in a timely fashion.
Hardware and
software specifications of your
servers
The hardware and software specifications listed in the System requirements section above should
be considered to be over and above the requirements of other software installed on the same
server. Servers which are nearing their capacity in terms of resources should not be used to install
GFI MailArchiver.
Need to archive
Installing GFI MailArchiver on a server which is not granted access to multiple sources creates a
email from mulproblem in the centralization efforts of email data archival.
tiple sources concurrently
If all of the above details are considered not to be of significant issues then you can consider
installing GFI MailArchiver on the mail server.
For example:
If you need to archive email from one Microsoft® Exchange Server, and the server is
handling the email flow on your network and still has spare processing capacity, then you
can consider installing GFI MailArchiver directly on the Microsoft® Exchange Server
machine.
If you want to archive email from multiple Microsoft® Exchange Servers using IMAP, it is recommended that you install GFI MailArchiver on a separate server.
GFI MailArchiver does not require a dedicated machine when it is not installed on the mail server.
GFI MailArchiver
2 Installing GFI MailArchiver | 23
2.2.1 Preparing the Journal Mailbox
A Journal mailbox is a mailbox that stores copies of emails sent or received by email users. This
enables the recording of all email in an organization, with minimum performance overheads. GFI
MailArchiver uses Microsoft® Exchange Server journaling to centralize all the emails to archive in a
single mailbox.
IMPORTANT
If journaling is not set up correctly, email archiving will NOT work.
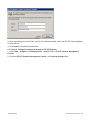
2.2.2 Preparing the Journal Mailbox in Microsoft® Exchange Server 2003
Configuring a Microsoft® Exchange Server journaling mailbox for use within GFI MailArchiver requires
you to create a new journal mailbox and to configure Microsoft Exchange to archive emails to the
journal mailbox. Then you are also to configure whether to journal just the BCC information or all the
header information
For detailed instructions on configuring a journaling mailbox in Microsoft® Exchange Server 2003 for
use with GFI MailArchiver, refer to Create a Journal Mailbox in Microsoft Exchange Server 2000/2003
in Appendix 1 .
2.2.3 Preparing the Journal Mailbox in Microsoft® Exchange Server 2007/2010
Microsoft® Exchange Server 2007 and Microsoft® Exchange Server 2010 support two types of
journaling:
Standard journaling: This feature enables the configuration of a Mailbox store that enables the
recording of email in an organization. GFI MailArchiver can use Microsoft® Exchange Server journaling to centralize all the emails to archive in a single mailbox for archival. This type of journaling is also called per-mailbox database journaling.
Premium journaling: Only available with the Microsoft® Exchange Server Enterprise client access
license. It enables an administrator to setup custom journaling rules such as Archive only incoming emails, Archive only outgoing emails or Archive emails for a particular group. This journaling is
also called per-recipient journaling.
GFI MailArchiver utilizes this type of journaling by detecting and displaying these rules in the Data
Sources Configuration Wizard.
Choosing a Journaling Method
Choose standard journaling to archive all emails (inbound and outbound) for all users in your
organization.
Choose premium journaling of you want more control over the emails to archive (e.g. only for specific users or for inbound or outbound only).
NOTE
Premium journaling requires a Microsoft® Exchange Enterprise client access license.
GFI MailArchiver
2 Installing GFI MailArchiver | 24
Enabling Journaling for Microsoft® Exchange Server 2007 or Microsoft® Exchange Server
2010
For Microsoft® Exchange Server 2007 pre-service pack 2 installations, journal mailbox creation should
be created using the instructions listed in Creating a Journaling Mailbox in Microsoft Exchange Server
2007 or Create a Journal Mailbox in Microsoft Exchange Server 2010 in this guide. Installations running
Microsoft® Exchange Server 2007 SP2 or Microsoft® Exchange Server 2010 can:
Use the GFI MailArchiver Post-Installation wizard to automatically create the required journal
mailbox, or
Use the instructions listed in Appendix 1 in this guide.
2.3 Choosing and Preparing a Database
As an archiving solution, GFI MailArchiver is highly dependent on your database infrastructure setup
for high performance of data archival and retrieval processes.
The following sections help you to understand the following options:
Choosing Your Database Type
GFI MailArchiver Database (For evaluation purposes)
Microsoft SQL Server Express (Recommended)
Microsoft SQL Server
NOTE
It is highly recommended to use Microsoft® SQL Server Express or Microsoft® SQL Server
as your database. The Firebird database included in the GFI MailArchiver installation is
intended for evaluation purposes only.
2.3.1 Choosing Your Database Type
GFI MailArchiver can be configured to run in various hardware setups and combinations. The table
below shows the typical recommended configurations. These guidelines and configurations may vary
according to user activity and daily email flow.
Table 13: Choosing your database type
NUMBER OF MAILBOXES TO ARCHIVE
RECOMMENDED DATABASE TYPE
50 mailboxes or less
Evaluation ONLY
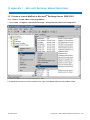
GFI MailArchiver database
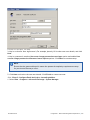
DESCRIPTION WHERE
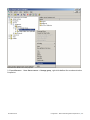
EACH COMPONENT IS
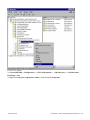
STORED
Email headers – Firebird database
Metadata – Firebird
database
Email data – On disk
100 mailboxes or less Average mail flow of up to 6000
emails/day
SQL Server® Express
with File Storage
Email headers – SQL
Server® Express
Metadata – SQL
Server® Express
Email data – On disk
GFI MailArchiver
2 Installing GFI MailArchiver | 25
NUMBER OF MAILBOXES TO ARCHIVE
RECOMMENDED DATABASE TYPE
50 mailboxes or more
Average mailflow of more than 8000/day
SQL Server®
DESCRIPTION WHERE
EACH COMPONENT IS
STORED
Email headers – SQL
Server®
Metadata – SQL
Server®
Email data – SQL
Server®
More than 500 mailboxes
Average mailflow of more than 8000/day
SQL Server® with File
Storage
Email headers – SQL
Server®
Metadata – SQL
Server®
Email data – On disk
NOTE
Email metadata is the information about emails archived within GFI MailArchiver.
NOTE
It is highly recommended to use Microsoft® SQL Server Express or Microsoft® SQL Server
as your database. The Firebird database included in the GFI MailArchiver installation is
intended for evaluation purposes only.
2.3.2 Using GFI MailArchiver Database
GFI MailArchiver ships with a Firebird database that is recommended for evaluation purposes.
NOTE
Ensure that the size of each Firebird database never exceeds 2GB.
To minimize any potential performance issues, the following setup is strongly recommended when
using the Firebird database:
Physical HDD 1: Operating system and GFI MailArchiver installation.
Physical HDD 2: Firebird database data store.
Physical HDD 3: Mail database indexes.
The above setup reduces data read/write operations on the same physical hard disk drive to improve
performance.
IMPORTANT
Failing to follow the above recommendations may result in substantial performance
degradation.
GFI MailArchiver
2 Installing GFI MailArchiver | 26
NOTE
Archive email auditing feature is only available when emails are archived in SQL
Server®. Microsoft® SQL Server with File Storage option is not supported.
2.3.3 Using SQL Server® Express
SQL Server® Express is recommended for medium sized organizations (approximately 1-100 email
users) with an average mail flow of up to 6000 emails/day
The recommended setup for GFI MailArchiver using a SQL Server® Express 2000/2005/2008 database
is as follows:
Physical HDD 1: Operating system and GFI MailArchiver installation.
Physical HDD 2: Microsoft® SQL Server data file (.mdf).
Physical HDD 3: Microsoft® SQL Server log file (.ldf)
Physical HDD 4: Mail database indexes.
This configuration ensures that different processes are distributed to distinct physical hard disk
drives. This eliminates performance loss due to excessive data read/write operations on the same
physical hard disk drive.
NOTE
Archive email auditing feature is only available when emails are archived in SQL
Server®. Microsoft® SQL Server with File Storage option is not supported.
There are however a number of SQL Server® Express limitations to consider:
Database size has a limit of 4GB (10GB for SQL Server® Express 2008 R2)
It uses 1 CPU only
It uses a maximum of 1GB RAM.
It is therefore highly recommended that:
Table 14: Microsoft SQL Server limitations
OPTION
DESCRIPTION
SQL Server Express and file system are used as the back-end
database.
This method uses SQL Server® Express as the backend database and a separate
location (not a database) for the binary sources files. This saves up on the SQL
Server® Express space required for archiving.
Refer to the GFI MailArchiver Administration and Configuration manual (installed
with GFI MailArchiver) for detailed information on Archive Stores.
Enable the ‘Use a new Archive
Store when full’ feature within
Archive Store Management.
This instructs GFI MailArchiver to automatically switch to a new database when
the 4GB limit of SQL Server® Express is reached. This feature requires that
Archive Stores are based on SQL and Filesystem.
Refer to the GFI MailArchiver Administration and Configuration manual (installed
with GFI MailArchiver) for detailed information on the Use a new Archive Store
when full feature within Archive Store Management
GFI MailArchiver
2 Installing GFI MailArchiver | 27
NOTE
After the first month of archiving, note the database data file size. With this value,
estimate the archive database size after six months, for example. If you estimate that
your archive database will be larger than 20 GB, you should consider configuring the
Archive Stores management feature of GFI MailArchiver.
2.3.4 Using Microsoft® SQL Server
Microsoft® SQL Server is recommended for larger organizations (100+ email users) with a substantial
volume of emails to archive (more than 6000 email per day). For organizations with more than 500
email users (or more than 8000 emails per day) to archive emails for, it is highly recommended to use
Microsoft® SQL Server with File Storage option. This substantially increases the archival capacity of
GFI MailArchiver.
NOTE
Archive email auditing feature is only available when emails are archived in Microsoft®
SQL Server. Microsoft® SQL Server with File Storage option is not supported.
The recommended setup for GFI MailArchiver using a Microsoft® SQL Server 2000/2005/2008
database is as follows:
Physical HDD 1: Operating system and GFI MailArchiver installation.
Physical HDD 2: Microsoft® SQL Server data file (.mdf).
Physical HDD 3: Microsoft® SQL Server log file (.ldf)
Physical HDD 4: Mail database indexes.
This configuration ensures that different processes are distributed to distinct physical hard disk
drives. This eliminates performance loss due to excessive data read/write operations on the same
physical hard disk drive.
NOTE
After the first month of archiving, note the database data file size. With this value,
estimate the archive database size after six months, for example. If you estimate that
your archive database will be larger than 20 GB, you should consider configuring the
Archive Stores management feature of GFI MailArchiver.
IMPORTANT
Configure Microsoft® SQL Server to use Mixed Authentication mode for use with GFI
MailArchiver.
To change to Mixed Authentication mode:
1. Right-click on the SQL Server node > Properties from the Enterprise Manager
2. Access Security tab and select SQL Server and Windows under Authentication.
GFI MailArchiver
2 Installing GFI MailArchiver | 28
3. Save settings.
2.4 Before You Install
1. Ensure that you are logged on as Administrator or using an account with administrative privileges.
2. Save any pending work and close all open applications on the machine.
3. Check that the machine on which you are installing GFI MailArchiver meets the system and
hardware requirements specified earlier in this chapter.
4. Check the Microsoft® Exchange Server role:
GFI MailArchiver cannot be installed on the Microsoft® Exchange Server 2007/2010 Edge Role,
since such a server is typically deployed on a DMZ using ADAM (Active Directory® Application
Mode)/AD LDS (Lightweight Directory Services) instead of Active Directory.
Ensure to enable IMAP if installing on the Microsoft® Exchange Server 2007/2010 Client Access
Role.
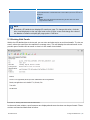
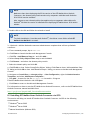
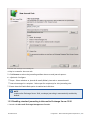
2.5 Installing GFI MailArchiver
1. Double-click on:
Mailarchiver.exe to install GFI MailArchiver on x86 systems
Mailarchiver_x64.exe to install GFI MailArchiver on x64 systems
2. In the Choose Setup Language dialog, select the language you want to use during installation and
click OK.
3. On the Welcome page, click Next.
4. If you want GFI MailArchiver to check for a newer build other than the one being installed, select
Check for a newer build of GFI MailArchiver on the GFI web site and click Next. Otherwise, select
Do not check for a new build and click Next.
NOTE
Checking for a newer build requires an active Internet connection.
5. Read the license agreement and select I accept the terms in the license agreement option. Click
Next to continue.
6. Click Next to continue by installing GFI MailArchiver to the default folder. For an alternative
location, click Change and select a new installation path.
GFI MailArchiver
2 Installing GFI MailArchiver | 29
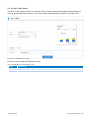
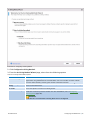
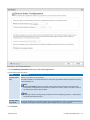
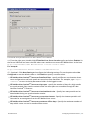
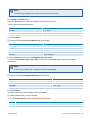
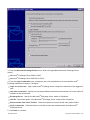
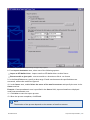
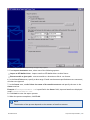
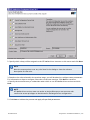
Screenshot 2: Specify the website and virtual directory alias for the web application
7. If you want to change the default values for the Website and Virtual Directory Alias, modify the
values in the Website: and Virtual Directory Alias: fields. These values define which URL you use to
access GFI MailArchiver. Click Next.
8. Click Install to install GFI MailArchiver.
9. On completion, click Finish to close the installation wizard.
GFI MailArchiver
2 Installing GFI MailArchiver | 30
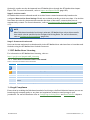
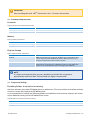
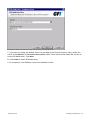
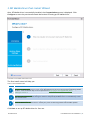
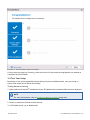
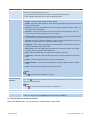
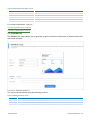
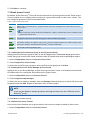
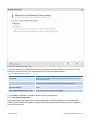
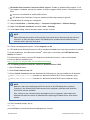
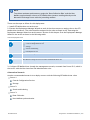
3 GFI MailArchiver Post-install Wizard
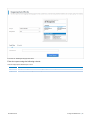
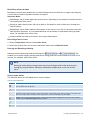
After GFI MailArchiver is successfully installed, the Congratulations screen is displayed. Click
Configure to start the post-install wizard that assists in setting up GFI MailArchiver .
Screenshot 3: Post install wizard start screen
The Post Install wizard will help you:
Table 15: Post installation tasks
TASK
DESCRIPTION
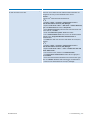
Enter a valid license key - A valid license key is required to use GFI MailArchiver after the product is installed.
Use your purchased license key or enter a User Evaluation Key if you are in the process of evaluating GFI MailArchiver. A User Evaluation Key can be requested from http://go.gfi.com/?pageid=MAR_DownloadRegistrationForm.
Setup Archive Store settings - Configure Archive Store settings that define properties such as name, database
type and index locations. These settings are used as a template by GFI MailArchiver to automatically create
new Archive Stores.
Select an Archiving Method - The archiving method defines how Microsoft® Exchange Server archives emails
within GFI MailArchiver Archive Stores. Choose your preferred archiving method from available options.
Click Next to set up GFI MailArchiver for first use.
GFI MailArchiver
3 GFI MailArchiver Post-install Wizard | 31
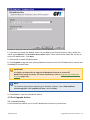
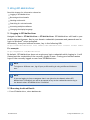
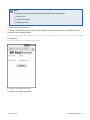
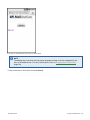
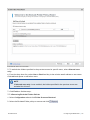
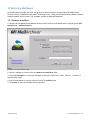
3.1 License Configuration
In the License Configuration screen, enter the license key obtained when purchasing your GFI
MailArchiver product. Click Verify License Key, then click Next to continue.
NOTE
To evaluate GFI MailArchiver, request a free evaluation key from GFI Software Ltd
http://go.gfi.com/?pageid=MAR_DownloadRegistrationForm.
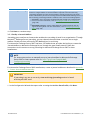
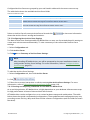
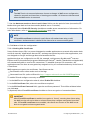
3.2 Configure Archive Store Settings
Within GFI MailArchiver, Archive Stores can be described as the containers that contain the archived
emails. Archive Stores consist of several components, such as:
A database where email metadata is stored
A database where both email metadata and email data is stored
A disk location used as an email index
A disk location used as storage for email data.
Archive Stores are created based on an Archive Store profile that defines details such as Archive
Store name, database type, database file location, email file location and index locations. Use the
Archive Store Wizard to create your Archive Store settings that will be used as a template to
automatically create future Archive Stores.
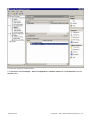
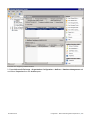
To trigger the Archive Store Wizard manually:
1. From Configuration tab, select > Archive Stores.
2.In the Archive Stores window, click New Archive Store Settings.
3.(Optional) To disable browse and search functionality within the archive stores, uncheck Allow
users to browse and search this archive store (enabled by default). Click Next to continue.
4. (Optional) Click Advanced to edit the naming pattern for new Archive Stores. Select an option
from the predefined list or select Custom Pattern to customize the naming convention. Click Next to
continue.
GFI MailArchiver
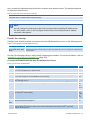
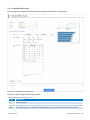
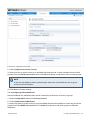
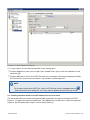
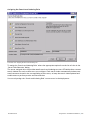
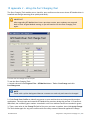
3 GFI MailArchiver Post-install Wizard | 32
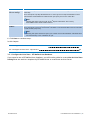
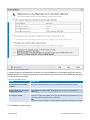
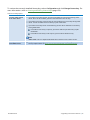
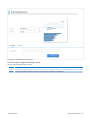
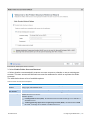
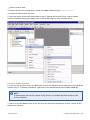
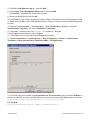
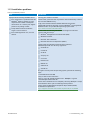
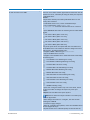
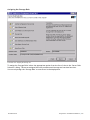
Screenshot 4: Post install wizard - select database type.
5. Select where to store your archived emails. Available options are:
Table 16: Archived emails storage options
DATABASE TYPE
DESCRIPTION
Microsoft SQL
Server with File
Storage
Recommended if you have more than 500 mailboxes to archive or an average mail flow of more
than 8000/day.
Select this option to prompt GFI MailArchiver to use a SQL Server® to store the email headers
and metadata, and a disk location you specify to store the email data.
NOTE
Choosing this option requires a SQL Server® installation.
Microsoft SQL
Server
Recommended if you have less than 500 mailboxes to archive, an average mail flow of more than
8000/day or if you need full auditing of both user and database activity.
Select this option to prompt GFI MailArchiver to use a SQL Server® to store both email
headers/metadata as well as email data.
NOTE
Choosing this option requires a SQL Server® installation.
GFI MailArchiver
3 GFI MailArchiver Post-install Wizard | 33
DATABASE TYPE
DESCRIPTION
SQL Server Express
with File Storage
Recommended if you have less than 100 mailboxes to archive or an average mail flow up to 6000
emails/day.
Select this option to prompt GFI MailArchiver to use a SQL Server® Express database to store
email headers and metadata and a disk location you specify to store the email data.
NOTE
Choosing this option requires a SQL Server® Express installation. This is freely
downloadable from the Microsoft® website.
GFI MailArchiver
Database
Recommended for evaluation purposes only.
Select this option to store all email header/metadata in a Firebird database and the email data
in a disk location you specify.
NOTE
Choosing this option does NOT require you to install the Firebird database. GFI MailArchiver
will automatically create a database for you.
6. Click Next to continue setup.
In this chapter:
3.2.1 Configure Archive Store - GFI MailArchiver Database
34
3.2.2 Configure Archive Store - SQL Server®
36
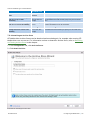
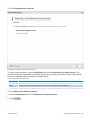
3.2.1 Configure Archive Store - GFI MailArchiver Database
If you opted to use a GFI MailArchiver database, you will now be guided to create New Archive Store
Settings that are used as a template by GFI MailArchiver to create new Archive Stores.
GFI MailArchiver
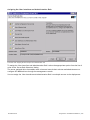
3 GFI MailArchiver Post-install Wizard | 34
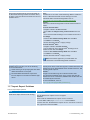
Screenshot 5: Archive Store creation: Select locations
1. Browse and select the Database File, Email File and Search Index locations to use for the GFI
MailArchiver database. Also, provide any required credentials to access the provided locations.
Table 17: Archive Store file locations
OPTION
DESCRIPTION
Database file location
Defines the location where the Firebird database file will be
located. Key in or click Browse… to select a location where to store
this file.
NOTE
UNC paths are not allowed.
Email file location
Defines the location where the email data files will be located. Key
in or click Browse… to select a location where to store this file.
NOTE
UNC paths are allowed.
GFI MailArchiver
3 GFI MailArchiver Post-install Wizard | 35
OPTION
DESCRIPTION
Search Index location
Defines the location where the email search index will be located.
Key in or click Browse… to select a location where to store this file.
NOTE
UNC paths are allowed.
Use the following login and password to access
the above UNC path
Enable this option to allow input in the Login: and Password: fields.
The credentials keyed in are used to access the UNC paths
selected.
2. Click Next to continue setup.
3. Click Finish.
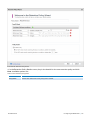
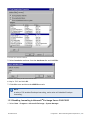
3.2.2 Configure Archive Store - SQL Server®
If you have opted to use a Microsoft® SQL Server, Microsoft® SQL Server with File Storage or SQL
Server® Express with File Storage, you will now be guided to set up a new Archive Store settings.
NOTE
Ensure SQL Server® is installed in Mixed Mode authentication and TCP IP is enabled.
GFI MailArchiver
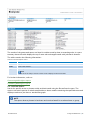
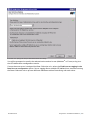
3 GFI MailArchiver Post-install Wizard | 36
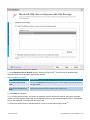
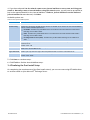
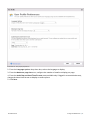
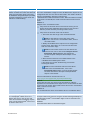
Screenshot 6: Archive Store creation: Select database
1. In the Database Server Details screen, choose an SQL Server® from the list of automatically
discovered servers or manually provide the details.
Table 18: Database server details
OPTION
DESCRIPTION
Select the database server to
use to store the archived
emails.
Enables you to select a SQL Server® from the list of discovered Microsoft® SQL
Servers. Click Recheck to recheck for any servers that might have come online since
the page loaded.
Manually specify the database
server to use to archive your
emails.
Choose this option to disregard the list of discovered Microsoft® SQL Servers and to
specify the details of the server used for your Archive Store.
2. Click Next to continue.
3. If, in the previous screen, you chose to manually specify the details used to store your archived
emails, provide the Microsoft® SQL Server database name in the Database Server field. If a database
server was selected, continue with the next step.
4. Select the authentication method used to connect to the selected SQL Server®.
GFI MailArchiver
3 GFI MailArchiver Post-install Wizard | 37
Table 19: Archive Store authentication options
OPTION
DESCRIPTION
Integrated Windows
Authentication
Uses the login credentials of the currently logged on user to access the SQL Server®. Keying
in a username and a password is not required.
Microsoft SQL Server
Authentication
Uses the username and password provided in the Username and Password fields to access
the SQL Server®.
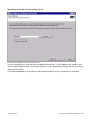
5. Click Next to continue.
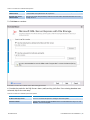
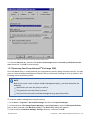
Screenshot 7: Archive Store creation: Select data and log file location.
6. Provide the paths for the SQL Server® data (.mdf) and log (.ldf) files. If an existing database was
selected, skip to the next step.
Table 20: Archive Store database file location options
OPTION
DESCRIPTION
Use the default path as defined in
the Microsoft SQL Server
Instructs GFI MailArchiver to use the default paths configured within SQL
Server®. Uncheck this option to configure alternate paths.
Data file location
Defines the location used by GFI MailArchiver to store data files. Key in or click
Browse… to select the path.
GFI MailArchiver
3 GFI MailArchiver Post-install Wizard | 38
OPTION
DESCRIPTION
Use the same path for both data
file and log file.
Instructs GFI MailArchiver to use the path in the Data & Log File Location text
box as the location for the Log file.
Uncheck this option to key in a custom log file location.
Log File Location
Defines the location used by GFI MailArchiver to store the log files. Key in or
click Browse… to select the path.
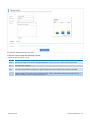
7. Click Next to continue.
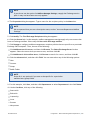
Screenshot 8: Archive Store creation: Select locations
8. Provide the file locations required for the type of selected SQL Server® type.
NOTE
Some options are not selectable depending on the chosen SQL Server® type.
For example, selecting Microsoft SQL Server with File Storage disables Database File Location and
Email File Location options.
GFI MailArchiver
3 GFI MailArchiver Post-install Wizard | 39
Table 21: Database file location options
OPTION
DESCRIPTION
Email file location
Defines the location where the email data will be located. Key in or click
Browse… to select a location where to store this file.
NOTE
UNC paths are allowed.
Search Index location
Defines the location where the email search index will be located. Key in or
click Browse… to select a location where to store this file.
NOTE
UNC paths are allowed.
Use the following login and password
to access the above UNC path
Enable this option to allow input in the Login: and Password: fields. The
credentials keyed in will be used to access the UNC paths selected.
9. Click Next to continue.
IMPORTANT
For more information, refer to Choosing Your Database Type (page 25).
10. Click Finish.
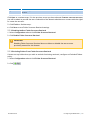
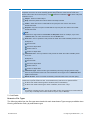
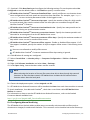
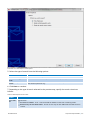
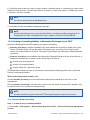
3.3 Configure Archiving Method
The Archiving Method determines which emails are archived by GFI MailArchiver. For example, you
can select Auto-Archiving (journaling) with Rule-Based Archiving if you want to archive emails based
on configured Archiving Rules.
GFI MailArchiver
3 GFI MailArchiver Post-install Wizard | 40
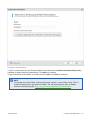
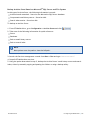
Screenshot 9: Post install wizard - choose archiving method
To configure the Archiving Method:
1. From Configuration tab, select Archiving Method.
2. Click Configure Archiving Method.
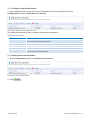
3. From the Configuration Wizard screen, select one or a combination of the following options:
Table 22: Configure archiving method
OPTION
DESCRIPTION
Manual Archiving
This archiving method enables users to manually archive messages from their Microsoft Outlook® client into GFI MailArchiver. Users need to deploy GFI MailArchiver Outlook Addon to be able to manually archive emails. For more information, refer to
Configuring Manual Archiving (page 164).
GFI MailArchiver
3 GFI MailArchiver Post-install Wizard | 41
OPTION
DESCRIPTION
Auto-Archiving (Journaling)
GFI MailArchiver uses Microsoft® Exchange Server journaling to retrieve emails to
archive in a single mailbox. A Journal mailbox is required to use Auto-Archiving
(Journaling) method. An initial Journal mailbox is configured using the post-install
wizard. This enables you to start archiving emails from a Microsoft® Exchange Server. If
Auto-Archiving (Journaling) method is enabled, select one of the following options:
All Emails - select to archive all emails that pass through your configured mail
servers. For more information, refer to Managing the Mail Servers to Archive
(page 100).
Rule-Based Archiving - archive emails based on criteria specified in the configured Archiving Rules. For more information, refer to Configuring Archiving
Rules (page 104).
4. Click Next to continue setup.
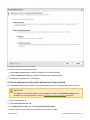
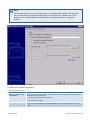
3.3.1 Set Up a Journal Mailbox
Journaling is an email server feature that enables the recording of email in an organization. Through
Microsoft® Exchange Server journaling, you can channel the email data to archive into a single
mailbox. Emails are then retrieved by GFI MailArchiver for archiving.
For Microsoft® Exchange Server 2007 and later, GFI MailArchiver provides the facility to create the
Journal Mailbox on Microsoft® Exchange Server through the post install wizard. Follow the
instructions in this section to set up journaling for Microsoft Exchange Server 2007 or later
installations.
NOTE
For instructions on how to manually set up a journal mailbox for Microsoft® Exchange
Server 2007 or later systems refer to: http://go.gfi.com/?pageid=MAR_
ConfiguringJournaling
For Microsoft® Exchange Server 2003 installations, create a journal mailbox as described in Appendix
1 - Create Journal Mailbox Manually.
IMPORTANT
If journaling is not set up correctly, Auto-archiving (journaling) method of email
archiving will NOT work.
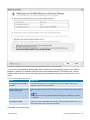
1. In the Configuration Wizard that opens after creating the Archive Store Profile, click Next.
GFI MailArchiver
3 GFI MailArchiver Post-install Wizard | 42
Screenshot 10: Journal Mailbox wizard
2. Select whether to automatically create a new Journal Mailbox or to manually specify all Journal
Mailbox details. The configuration wizard can also detect any existing journaling mailboxes and gives
you the facility to use them.
Table 23: Journal Mailbox options
OPTION
DESCRIPTION
Select a journal mailbox from
the detected journal mailbox
list below.
Displays a list of Journal Mailboxes detected by the Configuration Wizard. Select this
option and a Journal Mailbox from the list displayed to use selected mailbox.
Let the wizard create a new
journal mailbox to use to start
archiving your emails
Provides the facility to automatically create a new Journal Mailbox. Select this
option and a detected Microsoft® Exchange Server to create the new journal
mailbox for.
Manually create a Journal Mailbox using this wizard
Provides the facility to create a new Journal Mailbox, providing all the details
required to create such mailbox. These may include specifying a Mailbox Store, the
connection method, ports used and credentials.
NOTE
Choose this option to configure a Journal Mailbox in Microsoft® Exchange Server 2003.
3. Click Next to continue setup.
GFI MailArchiver
3 GFI MailArchiver Post-install Wizard | 43
4. If you have selected Let the wizard create a new journal mailbox to use to start archiving your
emails or Manually create a Journal Mailbox using this wizard option, you will now be prompted to
key in the required details for the Journal Mailbox. If Select a journal mailbox from the detected
journal mailbox list was selected, click Next.
Available options are:
Table 24: New journal mailbox options
OPTION
DESCRIPTION
Mail Server
Shows the detected name of the mail server where the Journal Mailbox resides.
Connect using:
Defines the connection method used to connect to the Mail Server where the new Journal Mailbox
will be created. Available options are:
ExOLEDB – Available only if GFI MailArchiver is installed on the same machine as Microsoft®
Exchange Server 2003 or 2007.
IMAP - Available only if GFI MailArchiver is not installed on the same machine as Microsoft®
Exchange Server 2003 or 2007.
Exchange Web Services (EWS) - Available only for Microsoft® Exchange Server 2007 SP1 or
2010.
IMAP Port
Shown only if IMAP is selected as the connection method. Defines the IMAP port used to connect to
the Mail Server.
Default value: 143
Use SSL
Defines whether SSL (Secure Sockets Layer) should be used to secure the connection between GFI
MailArchiver and the Mail Server
Login:/Password:
Enables you to provide the login name and password used to connect to the Mail Server.
Mailbox/Folder
Defines the default mailbox/folder that is used to journal emails.
Default value: Inbox.
5. Click Next to continue setup.
6. Click Finish to finalize Journal Mailbox setup.
3.4 Finalizing the Post Install Setup
On completing the requirements of the Post Install wizard, you can now start using GFI MailArchiver
to archive emails on your Microsoft® Exchange Server.
GFI MailArchiver
3 GFI MailArchiver Post-install Wizard | 44
Screenshot 11: Post Install Wizard completed successfully
Confirm that the setup for Licensing, the Archive Store Profile and Archiving Method are marked as
completed and click Finish.
3.5 Test Your Setup
Depending on the Archiving Method chosen during the post installation tasks, test your setup to
ensure that emails are archived successfully.
Testing Manual Archiving
1. Open a Microsoft Outlook® installation where GFI MailArchiver Outlook Addon has been deployed.
NOTE
For more information, refer to Configuring Manual Archiving (page 164).
2. Select an email and click the Archive button.
3. In GFI MailArchiver, go to Archive tab.
GFI MailArchiver
3 GFI MailArchiver Post-install Wizard | 45
4. Ensure the correct Archive Store is selected and verify that the email archived using the GFI
MailArchiver Outlook Addon is displayed in the Conversation pane.
Testing Archiving of Auto-Archiving (Journaling) All Emails
1. Create a new email and send it to an email address that belongs to a mailbox that is being
archived.
2. In GFI MailArchiver, go to Archive tab.
Screenshot 12: Search for email
3. Ensure the correct Archive Store is selected and verify that the archived email is displayed in the
Conversation pane.
Testing Rule-based Archiving
1. Ensure that Archiving rules have been configured. For more information, refer to Configuring
Archiving Rules (page 104).
2. Create a new email based on the criteria configured in the Archiving Rules and send it to a valid
email address.
3. In GFI MailArchiver, go to Archive tab.
4. Ensure the correct Archive Store is selected and verify that the archived email is displayed in the
Conversation pane.
GFI MailArchiver
3 GFI MailArchiver Post-install Wizard | 46
NOTE
When satisfied that GFI MailArchiver is archiving emails correctly, you may want to set
up mailbox management policies that remove email from your Microsoft Exchange
server. Refer to the following sections in this guide for more information:
Removing emails from Microsoft Exchange Server 2003
Removing emails from Microsoft Exchange Server 2007
Removing emails from Microsoft Exchange Server 2010
Removing emails from Microsoft Exchange 2013
GFI MailArchiver
3 GFI MailArchiver Post-install Wizard | 47
4 Upgrading From Previous Versions
4.1 Why Upgrade to GFI MailArchiver 2012?
GFI MailArchiver 2012 includes a number of new features aimed at making email archiving an easier
job for you, with improved user experience and performance. Most importantly, this edition includes
a simplified archiving configuration, where the archiving process is fully automatic, making it easier to
understand and manage.
Other important features in GFI MailArchiver 2012:
Anywhere, anytime access via IMAP to the email archive from any device - iPhone®, iPad®,
Android™ and more.
Archive business-critical documents in addition to email - all the benefits of the email archive
have been extended to other important files.
Choose how to archive using rule-based archiving which allows for selective archiving and the
deletion of archived email.
Extract business intelligence from your email archive - MailInsights reports can help you identify
potential security breaches, legal risks and productivity issues by extracting key data from your
email archive. Reports can be issued on demand or scheduled and sent to your inbox on a regular
basis.
4.1.1 What Benefits do the new Archive Stores offer?
New functionality within GFI MailArchiver automatically creates new Archive Stores ensuring all
emails are correctly categorized into their respective Archive Stores, enabling users to manage and
browse the email archive better and in a more organized fashion.
As soon as a new email is waiting to be archived, GFI MailArchiver categorizes the email based on the
received date and assigns the email to the respective Archive Store. If no valid Archive Store is found,
a new one is created automatically based on the New Archive Store Settings configured using the
Post Install Wizard. A valid Archive Store is one that is not marked as Full or Read-only.
NOTE
You can prevent email archiving in a particular archive store. This will mark the archive
store as full and a new archive store will be created when new emails need to be
archived to that particular date range. For more information, refer to Editing Existing
Archive Store Details (page 119).
Another new feature related to Archive Stores is the ability to define a naming pattern for new
Archive Stores. This pattern ensures consistency, creates uniformity and makes it more
understandable to the users when they are browsing their Archive Stores.
4.2 Upgrading from Versions Earlier than GFI MailArchiver 2012
Archive Stores from an older version of GFI MailArchiver can be upgraded and used under the new
architecture. When the upgrade procedure is carried out, GFI MailArchiver 2012 prompts you to
upgrade all existing Archive Stores. This is mandatory in order for GFI MailArchiver to automatically
detect a date range for each archive store. Once this is done then all Archive Stores will have their
respective date ranges assigned and new emails can be archived to them. Empty Archive Stores will
be marked as invalid and can be safely deleted.
GFI MailArchiver
4 Upgrading From Previous Versions | 48
In GFI MailArchiver 2012, Archive Store Management is redesigned to automate the Archive Store
creation process. This has an effect on how several features within the product work. There are also
new requirements that must be met for new Archive Store automation to work.
The table below lists the new feature requirements and changes:
Table 25: New feature requirements related to Archive Store automation
FEATURE / REQUIREMENT
DESCRIPTION
Database Schema Upgrade
Ensure that the Database Schema is upgraded during the installation /
upgrade process, otherwise Archive Store automation is not implemented
and GFI MailArchiver 2012 does not work. The Database Schema can also
be upgraded manually using the Database Schema Upgrader tool. For
more information, refer to Upgrading the Database Schema (page 130).
Databases cannot be created manually
Archive Stores can no longer be created manually. Archive Store management is an automated process handled by GFI MailArchiver.
Automatic Archive Store Creation
To facilitate Archive Store management, GFI MailArchiver creates new
Archive Stores as required. The new Archive Stores are created when
emails are received into GFI MailArchiver from Journaling or from Manual
Archiving, based on the template settings specified in the New Archive
Store Settings.
New Archive Store Settings
A template for automatically creating new Archive Stores is created
based on New Archive Store Settings specified during post installation
tasks. This template can be modified later from the GFI MailArchiver UI.
For more information, refer to Configuring New Archive Store Settings
(page 117).
Scheduling Archive Stores
Archive Stores are automatically created periodically on a predefined
schedule. The default and recommended rollover period is Bi-Monthly.
For more information, refer to Scheduling Archive Stores (page 123).
No active / inactive Archive Store
Created Archive Stores remain active until the Archive Store is full, or
set as read-only, so emails with dates that span the Archive Store period
are archived within the respective container.
A read-only Archive Store
An Archive Store can be set as Read-only. When this happens, a new
Archive Store for the same period is created when an email that falls
within that time bracket needs to be archived. For more information,
refer to Editing Existing Archive Store Details (page 119).
A full Archive Store
A new Archive Store for the same period is created if the recommended
size limit for that Archive Store is reached. This feature is only available
for Archive Stores based on SQL Server® Express and Firebird databases.
Single instance storage
Using a single-instance storage system, GFI MailArchiver ensures that no
duplicate emails are kept within the same Archive Store.
Importing emails into GFI MailArchiver
When using the GFI MailArchiver Import Export Tool to import emails in
GFI MailArchiver, emails are sorted and archived according to their date
without the need of creating a plan. New Archive Stores are created as
required if none exist for a particular period. If an email is imported for 1
user, then all recipients / senders in the email have ownership of that
email, and they can access it. Archive Stores created during import
process can be used for normal GFI MailArchiver operations when emails
are archived from journaling or manual archiving. For more information,
refer to Import and Export Emails (page 185).
4.3 Before You Upgrade
1. Ensure that you are logged on as Administrator or using an account with administrative privileges.
2. Before starting installation, save and close all open applications on the machine.
3. Check all the System requirements before proceeding with upgrade.
GFI MailArchiver
4 Upgrading From Previous Versions | 49
NOTE
For more information on upgrading from versions earlier than GFI MailArchiver 6, refer
to:
http://go.gfi.com/?pageid=MAR_UpgradeDatabase
4.4 Upgrading GFI MailArchiver
1. Double-click on:
Mailarchiver.exe to upgrade GFI MailArchiver on x86 systems
Mailarchiver_x64.exe to upgrade GFI MailArchiver on x64 systems
2. On the Welcome page, click Next.
3. Select whether to check for a newer build of GFI MailArchiver on the GFI Website. Click Next to
continue.
4. Read the license agreement and select I accept the terms in the license agreement option. Click
Next to continue.
5. If you are upgrading from a previous version of GFI MailArchiver, you are asked to key in the
administrator email address and license key. Click Next to continue. Otherwise skip to the next step.
NOTE
To upgrade the license from a previous version or to evaluate GFI MailArchiver, click
Tell me more and apply for a key. For further information refer to:
http://go.gfi.com/?pageid=MAR_UpgradeInformation
GFI MailArchiver
4 Upgrading From Previous Versions | 50
Screenshot 13: Specify the website and virtual directory alias for the web application
6. If you want to change the default values for the Website and Virtual Directory Alias, modify the
values in the Website: and Virtual Directory Alias: fields. These values define which URL you use to
access GFI MailArchiver. Click Next.
7. Click Install to install GFI MailArchiver.
8. Click Upgrade to upgrade your existing database schemas to the new GFI MailArchiver schema and
click Next to continue setup.
IMPORTANT
It is highly recommended to upgrade all Database Schemas to ensure GFI
MailArchiver works correctly. For more information, refer to Upgrading the Database
Schema (page 130).
NOTE
To continue setup without updating your database schemas, select Skip Database
schema upgrade. I will upgrade this later. and click Next.
9. Click Finish to close the installation wizard.
4.5 Post Upgrade Actions
4.5.1 Check Licensing
A valid license key enables you to use GFI MailArchiver without any restrictions.
GFI MailArchiver
4 Upgrading From Previous Versions | 51
To review the currently installed license key, select Configuration and click Change license key. For
more information, refer to Viewing and Editing License Keys (page 153).
Table 26: Licensing options
UPGRADE TYPE
From the same version
but an older build
DESCRIPTION
If previous license key was full you will not be asked for a license key during installation. Once the UI is loaded, you will not be asked to enter the key.
If previous license key is expired you will not be asked for a license key during installation. You will be asked to enter the key in post installation.
If previous license key was an evaluation key you will not be asked for a License key
during installation.
If evaluation license key is expired, you will be asked to purchase a key in post
installation.
If evaluation license key is not expired, you will not be asked for a key.
NOTE
'Older build' refers to compiled GFI MailArchiver software for the same version.
From a previous version
of GFI MailArchiver
GFI MailArchiver
The previous license key is not valid. Enter the new license key during installation
when prompted. Refer to: http://go.gfi.com/?pageid=MAR_UpgradeInformation
4 Upgrading From Previous Versions | 52
5 Using GFI MailArchiver
Read this chapter for information related to:
Logging in GFI MailArchiver
Browsing archived emails
Working with emails
Searching for archived emails
Accessing multiple mailboxes
Changing the display language
5.1 Logging In GFI MailArchiver
Navigate to Start > GFI MailArchiver > GFI MailArchiver. GFI MailArchiver will load in your
default Internet browser. Key in your domain credentials (username and password used to
login to Windows®) when prompted.
Alternately, from your Internet browser, key in the following URL:
http://<GFI MailArchiver host name>/<GFI MailArchiver virtual folder name>
For example:
http://mydomain.com/MailArchiver
By default, GFI MailArchiver does not require any login credentials while logging in. It will
instead use the credentials of the currently logged in user. Closing your browser session
logs off the currently logged on user from GFI MailArchiver.
NOTE
To login as a different user, log off your profile and log in using a different Windows®
user.
NOTE
If you are logging in from a computer that is not joined to the domain where GFI
MailArchiver is installed, you will be prompted to key in the credentials used to log in
the domain where GFI MailArchiver is installed.
5.2 Browsing Archived Emails
1. From GFI MailArchiver, select Archive tab.
GFI MailArchiver
5 Using GFI MailArchiver | 53
Screenshot 14: Browsing Archived Emails
2. In the Archive tab, you can view emails archived for all the mailboxes that you have been granted
access to. You can also perform several actions as described in the table below.
Table 27: Archive Tab options
OPTION
DESCRIPTION
Enables you to search for emails. Key in the words or phrases to search for
and click . Results are displayed in the emails pane.
Hides the email preview pane.
Shows the email preview pane.
Toggles the email preview pane from displaying emails at the bottom to displaying emails at the side of the email list page.
Displays emails in message view.
Displays emails in mailbox view.
Displays the list of mailboxes the currently logged in user has access to.
From the accounts list, select the Archive Store to view mailboxes for form
the List accounts in archive option. Click Close to exit Account list.
GFI MailArchiver
5 Using GFI MailArchiver | 54
OPTION
DESCRIPTION
Deletes the selected Emails if Email Deletion has been enabled by your
System Administrator. If Email Deletion is not enabled, this icon will not be
displayed.
NOTE
Emails cannot be deleted from Read-only Archive Stores or when
Legal-hold is enabled.
NOTE
By default, GFI MailArchiver displays 25 emails per page. To change this value, click the
user name displayed on the top right hand corner of your screen and change the value of
the Number of emails to display per page option. Click Save.
5.3 Working With Emails
Within the GFI MailArchiver Archive tab, you can view and take action on archived emails. To view an
email, select the email from the mailbox or message view. This will display the selected email in the
preview pane. Double click an email to view it in the email view window.
Screenshot 15: Working with emails within GFI MailArchiver
In the email view window, email contents are displayed and several actions can be performed. These
actions are listed and described in below.
GFI MailArchiver
5 Using GFI MailArchiver | 55
Table 28: Email View options
OPTION
DESCRIPTION
View email headers.
Click to view email Internet headers. These are displayed in a panel. Click this button again or select close
to close panel.
View conversation thread
Click button to view the whole conversation in the mail view window. All emails forming part of the
conversation are listed. Click this button again or select close to close the panel.
Edit email labels (Personal and Global)
Enables you to categorize emails through labeling. This feature is useful during searches for specific mail
types, For example search all emails labeled as “Important”.
To add a label:
1. From ‘Available Labels’, key in a new email label or select an existing one.
2. Click Label Email to label email with the keyed in or selected label.
To remove a previously assigned label:
1. Select a previously assigned label.
2. Click Remove label.
Click this button again or select close to close panel.
NOTE
Labels are displayed in the ‘Labels’ field in black. Labels assigned at an organization level through
categorization policies are in red. You cannot remove categorization policies labels from an email.
Restore email
Restores emails using the OneClick Restore feature that restores an archived email to a specific mailbox or
forwards a copy to an email address.
In the restore email panel, key in the email address where to send a copy of the current email and click
Restore Email.
Save email to disk (EML format)
Downloads the whole email to disk including any attachments, in .eml format. This format is compatible with
a number of email clients such as Microsoft Outlook® Express, Windows® Mail, and Mozilla Thunderbird. In
the File download dialog box, select Save, and select the location where to save the file.
Save email to disk (MSG format)
Downloads the whole email to disk including any attachments, in .msg format, which is compatible with
Microsoft Outlook®. In the File download dialog box, select Save, and select the location where to save the
file.
Print email
Displays email in a printer friendly format in a new browser window. Use the print function of your browser
to print the email.
Show images in email
Use this button to display embedded images within the email.
Mark as not SPAM
Use this button to mark as not SPAM an email that was previously identified as SPAM by an anti-spam
solution. Requires a SPAM retention policy to be set up
Delete Email
Deletes the current email if Email Deletion has been enabled by your System Administrator. If Email
Deletion is not enabled, this icon will not be displayed.
NOTE
Emails cannot be deleted from Read-only Archive Stores or when Legal-hold is enabled.
5.4 Searching Archived Emails
Within GFI MailArchiver, you can search for emails using the Search Archived Emails text box. When
searching for emails, GFI MailArchiver will query the email index retrieve any matching email and its
GFI MailArchiver
5 Using GFI MailArchiver | 56
respective attachment.
Apart from the Search Archived Emails text box, GFI MailArchiver also provides you with an
Advanced Search feature that provides an extensive range of search options.
NOTE
For more information, refer to Advanced Search (page 57).
In the Search Archived Emails text box, you can also use wildcards as described in the table below.
Table 29: Wildcard description
WILDCARD
DESCRIPTION
?
Matches any single character.
*
Matches any string of characters.
For example:
To search for emails containing the word ‘Swiss’, key in ‘sw??s’ or ‘sw*s’ in the Archived Emails text
box.
Emails matching the search query are displayed in the emails pane. GFI MailArchiver displays up to 25
emails per page. If more than 25 emails are matched for each search query, GFI MailArchiver will
spread the emails out on separate pages. Use the slider at the bottom of the email pane to change
from one page to the next.
5.4.1 Advanced Search
The Advanced Search is an extension of the Search feature that enables you to use a wide range of
search criteria when searching for emails.
1. From the Archive tab, select
.
Screenshot 16: Advanced Search Options
2. In the Advanced Search Options area, use the features described in the table below to perform an
advanced search.
Table 30: Advanced Search options
OPTION
DESCRIPTION
Archive Store
Defines the Archive Store where the search will be performed. Select one or more Archive Stores
from the available list of Archive Stores.
Sent date
Defines the date when the email to search for was sent.
GFI MailArchiver
5 Using GFI MailArchiver | 57
OPTION
DESCRIPTION
Includes all/any
Defines whether to display emails that match all conditions or emails that match any of the
conditions. From the drop-down list select:
All – Displays emails that match at least one of the conditions specified.
Any – Displays emails that meet all the conditions specified.
Click this button to add conditions. Available conditions are:
Subject – Search for emails having a specific subject.
Sender - Specify the email address or Active Directory® display name of the email sender for
which to search emails.
Recipient - Specify the email address or Active Directory® display name of the email recipient for which to search emails.
Sent Date - Search for emails sent before, after or exactly on a specific date. Key in or
select a date, and select Is before, Is after or Is exactly.
Received Date - Search for emails received before, after or exactly on a specific date. Key
in or select a date, and select Is before, Is after or Is exactly.
Size (KB) - Search for emails that are bigger, smaller or equal to a particular size. Key in a
size and select Is greater than, Is smaller than and Is exactly.
Message ID - Search using the ‘Message ID’ field contained in the email header. Key in or
paste the message ID of the email to find.
Whole Email - Search for emails that have some specific content anywhere in the email
(including the body, headers and attachments).
Body - Search for emails that have some specific content in the body.
Attachment - Search for emails that have some specific content anywhere in the attachment.
Folder - Search for emails contained in a specific mailbox folder.
Folder/Subfolders - Search for emails contained in a specific subfolder within a mailbox
folder.
Label - Search for emails categorized with a specific label.
NOTE
Click
Exclude emails
with the following
conditions
next to a search condition to remove it.
Defines a list of conditions that the email will NOT have to meet to be returned as a search
result. Click and select the conditions to apply. The conditions that can be selected are similar
to the ones described above.
NOTE
Click
next to a search criteria to remove it from search.
Search
Starts the search for the archived emails. Results are returned as per the conditions selected.
Reset
Resets the search conditions and enables you to start all over again.
Save
Saves the search conditions as a saved search query that can be triggered at any time. Saved
searches are displayed in the Classifications window under Archive tab.
5.4.2 Email Search Using Smart Phones
Within GFI MailArchiver, you can search for emails using a smart phone.
GFI MailArchiver
5 Using GFI MailArchiver | 58
NOTE
This feature is supported by the following mobile Operating Systems:
Android 2.1+
Apple iPhone iOS 4
Blackberry OS5+
To perform a simple search:
1. Launch the Internet browser on your smart phone and key in the URL where GFI MailArchiver is
located in the following format:
http://<GFI MailArchiver host name>/<GFI MailArchiver virtual folder name>
For example:
http://mydomain.com/MailArchiver
Screenshot 17: Smart Phone Login Screen
2. Sign in using your credentials.
GFI MailArchiver
5 Using GFI MailArchiver | 59
Screenshot 18: GFI MailArchiver Home Page for Smart Phones
NOTE
The Mobile User Interface uses the same language settings as those configured by the
user in GFI MailArchiver. For more information, refer to Changing User Preferences
(page 90).
3. Key in the text to search for and click Search.
GFI MailArchiver
5 Using GFI MailArchiver | 60
Screenshot 19: Search Result by Smart Phone
4. Browse through the displayed results using the controls provided. Results are sorted by date in
descending order.
NOTE
The mobile search feature returns 10 emails per page. You can browse additional pages
using the controls provided. The maximum number of results is 5000.
GFI MailArchiver
5 Using GFI MailArchiver | 61
Screenshot 20: Conversation View Smart Phone
5. Click the Email subject to display the email or click View Conversation to display related emails.
NOTE
The mobile user interface is focused on searching email archives. For advanced search
and browsing features, access GFI MailArchiver from your computer.
NOTE
The mobile user interface enables users to access ONLY their mailbox.
5.5 Accessing Multiple Mailboxes
From within the Archive tab, you can also browse other users’ archived emails. The users for which
you can access emails depend on the access granted from the GFI MailArchiver Access Control
feature.
NOTE
Search user to add feature is disabled if currently logged on user does not have access
to other user’s mailboxes, or if there are no emails to view.
GFI MailArchiver
5 Using GFI MailArchiver | 62
Screenshot 21: Accessing multiple mailboxes
To view archived emails for a different mailbox:
1. Key in the name of the mailbox for which to view emails in the Search users to add search box . A
list of names matching the one keyed and for which you have access to will be displayed.
2. Select the user and click
next to the search field.
3. Select the newly added user from the Browse conversations for: field.
4. Browse or search the displayed emails using the controls provided.
5.6 GFI MailInsights
GFI MailInsights is a reporting facility within GFI MailArchiver that uses archived emails to deliver
information related to email usage and trends. Use this feature to generate management and HR
reports that provide insight on email and resource use or misuse.
NOTE
GFI MailInsights is only enabled for users with full access rights. For more information,
refer to Adding An Active Directory Group to the Full Access Group (page 132).
The available reports are:
GFI MailArchiver
5 Using GFI MailArchiver | 63
Communication Flow – Monitor user/group communication patterns inside and outside the organization.
WebMail Use - Identify top users exchanging email with webmail services. Identifies potential data
leakages and inappropriate email use.
Email Responsiveness - Gain insight into the average time it takes users to reply to internal and
external email.
Storage Use - Understand the impact of attachments on email storage costs. Use this report to
create appropriate retention policies to control email-related storage space.
Inactive Accounts - Returns a list of user accounts that received email but have not replied within
the specified time.
Inappropriate Words - Track inappropriate language in email that violates company policy.
Internal Spammers - Find out which internal users tend to include too many recipients in the
To/CC/BCC fields. Use this report to know about and minimize such behavior.
Outside Office Hours - Returns a list of internal mail accounts with sending activity outside office
hours. Use this report to spot behavior which may need more investigation
Data Leakage Detection - Identify emails with major credit card numbers and US Social Security
numbers, or other confidential documents and information.
Job Search - Identify sent or received emails that contain resumes, or are addressed to job search
sites.
Phrase Search - Search for specific terms or phrases within archived emails.
User Traffic - View the number of emails exchanged between selected users or groups and their
contacts.
5.6.1 GFI MailInsights Requirements
GFI MailInsights requires the following configurations:
A preconfigured SMTP server. For more information, refer to General Settings (page 153).
Email indexing. For more information, refer to Indexing (page 120).
Data within Archive Stores for reports to generate successfully.
5.6.2 Generating Reports
Generated reports are sent by email either to the logged in user or to a user specified in the Send To
field. Reports are sent as an attachment in PDF format.
To generate a report:
1. Select MailInsights tab and choose desired report.
2. Use available filters by selecting a value to filter by.
3. (Optional) In the Forward to field, enter the recipient email address.
NOTE
When using the email forwarding option, the report is received by the user generating
the report and by any users specified in the Forward to field.
GFI MailArchiver
5 Using GFI MailArchiver | 64
NOTE
You can insert multiple email addresses separated by ';'
4. Click Send Report, located at the bottom of each report page.
5.6.3 Scheduling Reports
Every MailInsights report can be scheduled to run automatically.
To schedule a report:
1. Select MailInsights tab and choose desired report.
2. Use available filters by selecting a value to filter by.
3. Click Schedule.
Screenshot 22: MailInsights report scheduling
4. In the Report Name field, enter a meaningful name for your report.
5. (Optional) In the Forward to field, enter the recipient (or recipients) email address.
6. From the Schedule Report drop down list, select the report run frequency. Available options
are: Daily, Weekly or Monthly.
7. In the At field, specify the time.
8. Click Save & Schedule Report.
5.6.4 Communication Flow
The Communication Flow graph provides an overview of emails exchanged between selected
users/groups and their contacts.
GFI MailArchiver
5 Using GFI MailArchiver | 65
Screenshot 23: MailInsights Communication Flow
Filter the report using the following criteria:
Table 31: Communication Flow Report criteria
OPTION
DESCRIPTION
Scope
Specify date range or use default setting. You can only select dates in the last 6 months.
Report for
Select Active Directory® user or group.
Recipients
Select Internal, External or All.
Include
Specify number of results up to a maximum of 1000 recipients. Default value is Top 20.
GFI MailArchiver
5 Using GFI MailArchiver | 66
Screenshot 24: MailInsights Communication Flow Report
Senders can be a user or group displayed as a single entity in the middle of the report. Contacts are
segregated by domains. Each domain cluster is shown in different color. Edge width between the
nodes shows the strength of the email relation between different entities.
The table below the graph shows the following information:
GFI MailArchiver
5 Using GFI MailArchiver | 67
Table 32: Communication Flow Report criteria
OPTION
DESCRIPTION
Contact Email
Contact email address
Sent Emails
Total number of sent emails
Received Emails
Total number of received emails
Total Emails
Total number of sent and received emails
Last Communication
Date and time of last sent/received email.
For further information, refer to:
Generating MailInsights reports
Scheduling MailInsights reports
5.6.5 WebMail Use
The WebMail Use area enables you to generate a report that shows interaction of internal users with
web email accounts.
Screenshot 25: MailInsights WebMail Use
The report can be filtered using the following criteria:
Table 33: WebMail Use Report criteria
OPTION
DESCRIPTION
Scope
Specify date range or use default setting. You can only select dates in the last 6 months.
Report for
Select Active Directory® user or group.
Include
Specify number of results up to a maximum of 1000 recipients, default value is Top 20.
GFI MailArchiver
5 Using GFI MailArchiver | 68
Screenshot 26: MailInsights WebMail Communicators Report
The graph represents total emails sent and received in specified period. A Summary area at the top of
the report shows the top WebMail providers, with a summary of sent and received emails per
provider.
The table below the graph contains the following information:
Table 34: WebMail Use Report criteria
OPTION
DESCRIPTION
User
User email address.
Total Emails
Total number of internal contacts.
Sent Emails
Total number of sent emails.
Received Emails
Total number of received emails.
Average/Day
Average emails sent and received per day.
Total Percentage
Percentage of total web emails.
GFI MailArchiver
5 Using GFI MailArchiver | 69
NOTE
WebMail Use report covers the following WebMail providers: Hotmail; Gmail; Yahoo!;
Live; AOL; Facebook; Yandex.ru; Seznam.cz; Gawab.com; Gmx.com; Mail.ru;
Hushmail.com; Rediff.com
For further information, refer to:
Generating MailInsights reports
Scheduling MailInsights reports
5.6.6 Email Responsiveness
The Email Responsiveness report shows how long it takes employees to reply to emails.
Screenshot 27: MailInsights Email Responsiveness
Filter the report using the following criteria:
Table 35: Email Responsiveness Report criteria
OPTION
DESCRIPTION
Scope
Specify date range or use default setting (Last 7 days). You can only select dates in the last 6 months.
Report for
Select Active Directory® user or group.
Include
Specify number of results up to a maximum of 1000 recipients, default value is All.
Sort By
Specify sorting method. Options are:
By name (default)
By responsiveness
GFI MailArchiver
5 Using GFI MailArchiver | 70
Screenshot 28: MailInsights Email Responsiveness Report
The bar chart represents users on the y-axis and responsiveness in hours on the x-axis. Data is sorted
according to defined criteria.
Additional data is displayed in a table below the chart with the following information:
Table 36: Email Responsiveness Report criteria
OPTION
DESCRIPTION
User
Name or email address of user
Average responsiveness
All Email (Hours)
Average Internal responsiveness
Internal Email (Hours)
Average external responsiveness
External Email (Hours)
For further information, refer to:
Generating MailInsights reports
Scheduling MailInsights reports
GFI MailArchiver
5 Using GFI MailArchiver | 71
5.6.7 Storage Use
The Storage Use report shows how much space is used by different attachment categories.
Screenshot 29: MailInsights Storage Use
Filter report using the following criteria:
Table 37: Email Storage Report criteria
OPTION
DESCRIPTION
Scope
Specify date range or use default setting (This Month). You can only select dates in the last 6 months.
Report for
Select Everyone (default), Active Directory® user or group
GFI MailArchiver
5 Using GFI MailArchiver | 72
Screenshot 30: MailInsights Storage Use Report
The graph consists of stacks representing different attachment categories. The graph’s x-axis shows
the different size brackets and the y-axis shows the attachment size.
NOTE
Attachment categories for Storage Use report are: Images, Documents, Music, Videos
and Others
The table below the graph contains the following additional information:
Table 38: Storage Use Report criteria
OPTION
DESCRIPTION
Date
Date email was received.
Total Size (KB)
Total size of attachment.
Images (KB)
Total size of attachment for category Images.
GFI MailArchiver
5 Using GFI MailArchiver | 73
OPTION
DESCRIPTION
Documents (KB)
Total size of attachment for category Documents.
Music (KB)
Total size of attachment for category Music.
Videos (KB)
Total size of attachment for category Videos.
Other (KB)
Total size of attachment for category Other.
For further information, refer to:
Generating MailInsights reports
Scheduling MailInsights reports
5.6.8 Inactive Accounts
The Inactive Accounts area enables you to generate a report that shows internal accounts that are no
longer active.
Screenshot 31: MailInsights Inactive Accounts
Filter report using the following criteria:
Table 39: Inactive Accounts Report criteria
OPTION
DESCRIPTION
Scope
Specify date range or use default setting (Last 30 days). You can only select dates in the last 6 months.
GFI MailArchiver
5 Using GFI MailArchiver | 74
Screenshot 32: Inactive Accounts Report
NOTE
An inactive account is an account that has received emails but has not sent any emails
in the date range covered.
The report returns a list of inactive accounts.
For further information, refer to:
Generating MailInsights reports
Scheduling MailInsights reports
5.6.9 Inappropriate Words
The Inappropriate Words area enables you to generate a report that identifies any inappropriate
language used in emails. Inappropriate words can include words considered sexist, racist or swear
words.
GFI MailArchiver
5 Using GFI MailArchiver | 75
Screenshot 33: MailInsights Inappropriate Words
Filter the report using the following criteria:
Table 40: Inappropriate Words Report criteria
OPTION
DESCRIPTION
Scope
Specify date range or use default setting (Today). You can only select dates in the last 6 months.
Recipients
Select All, Internal Only, External Only
GFI MailArchiver
5 Using GFI MailArchiver | 76
Screenshot 34: MailInsights Inappropriate Words Report
NOTE
When the Inappropriate Words report exceeds 1,500 rows, the report will be generated
in .xls format.
Report data is displayed in a table listing the following:
Table 41: Inappropriate Words Report criteria
OPTION
DESCRIPTION
Date/Time
Email date and time
Sender
Sender email address
Subject
Email subject
For further information, refer to:
Generating MailInsights reports
Scheduling MailInsights reports
5.6.10 Internal Spammers
The Internal Spammers report enables you to generate a list that identifies internal email accounts
of users who include a large number of recipients in their emails. This reports takes into
consideration recipients in the To, CC or BCC fields.
GFI MailArchiver
5 Using GFI MailArchiver | 77
Screenshot 35: MailInsights Internal Spammers
Filter the report using the following criteria:
Table 42: Internal Spammers Report criteria
OPTION
DESCRIPTION
Scope
Specify date range or use default setting (Last 30 days). You can only select dates in the last 6 months.
Include
Specify the amount of email accounts to include up to a maximum of 1000 users.
GFI MailArchiver
5 Using GFI MailArchiver | 78
Screenshot 36: MailInsights Internal Spammers Report
Report data is displayed in a table listing the following:
Table 43: Internal Spammers Report criteria
OPTION
DESCRIPTION
Username
Sender username or email address.
Average Number of Recipients
Average number of recipients who received email from the sender during the specified
time period.
For further information, refer to:
Generating MailInsights reports
Scheduling MailInsights reports
GFI MailArchiver
5 Using GFI MailArchiver | 79
5.6.11 Outside Office Hours
Use this report to identify internal users who send emails outside of office hours.
Screenshot 37: MailInsights Outside Office Hours
Filter the report using the following criteria:
Table 44: Outside Office Hours Report criteria
OPTION
DESCRIPTION
Report
for
Enables you to choose for whom this report applies. Run report on all employees (default) or on an Active
Directory® group.
Include
Specify number of results to display, up to a maximum of 1000. Default = 50.
Scope
Specify date range or use default setting (This Month). You can only select dates in the last 6 months.
GFI MailArchiver
5 Using GFI MailArchiver | 80
OPTION
DESCRIPTION
Office
Hours
Enter a time range according to your organization's normal working hours.
Working
Week
Select the days of work of your organization. Checked days are considered as part of normal office hours.
NonWorking
Days
Use the calendar to define non-working days for past and future dates. Selected dates are listed in the
provided window. Non-working days can include public holidays and company shutdown.
IMPORTANT
The settings will only be saved upon successful generation of the report. If you navigate away from the
page before generating the report, all settings will be lost.
NOTE
When using the Clear All Dates button, configured dates will be cleared for all years.
The following examples describe how the report will work when configured in typical scenarios:
Scenario 1: An organization working from Monday to Friday, with start time and end time within the
same day, example from 9.00 am to 6.00 pm.
The report will cover emails sent between 6.00 pm and 9.00 am from Monday to Friday, and all day
during Saturday and Sunday.
Scenario 2: An organization working from Monday to Friday. Start time and end time span across
midnight, example from 8.00 pm to 5.00 am.
In this case the report will cover emails sent between 5.00 am and 8.00 pm from Monday to Friday
and those sent on Saturday and Sunday. Emails sent on Saturdays between midnight and 5.00 am will
not be taken into account, since they are considered within normal working hours.
Scenario 3: An organization working from Monday to Friday. Start time and end time span across
midnight, Wednesday is a public holiday.
The report will cover emails sent between 5.00 am and 8.00 pm from Monday to Friday, emails sent
on Saturday and Sunday, and all emails sent on Wednesday from midnight to midnight.
GFI MailArchiver
5 Using GFI MailArchiver | 81
Screenshot 38: MailInsights Outside Office Hours Report
The results of the generated report are displayed in a horizontal bar chart. A report summary above
the chart displays the top 3 users who sent emails outside office hours.
Additional data is displayed in a table below the chart with the following information:
Table 45: Outside Office Hours Report criteria
OPTION
DESCRIPTION
Email
Email address of user
Number of Emails Sent
Number of emails sent outside office hours
For further information, refer to:
Generating MailInsights reports
Scheduling MailInsights reports
GFI MailArchiver
5 Using GFI MailArchiver | 82
5.6.12 Data Leakage Detection
Use this report to detect emails that potentially contain sensitive data. The report will detect sent or
received emails containing:
Major credit card numbers (VISA, Mastercard, American Express, Diner’s Club, Discover)
USA Social Security numbers
Confidential documents and information
NOTE
The report analyzes both sent and received email for a selected user.
Screenshot 39: MailInsights Data Leakage Detection report
Filter the report using the following criteria:
Table 46: Data Leakage Detection Report criteria
OPTION
DESCRIPTION
Scope
Specify date range or use default setting (Last 3 Months). You can only select dates in the last 6 months.
Report for
Enables you to choose for whom this report applies. Run report on all employees (default) or on an Active
Directory® user or group.
Recipients
Internal recipients, external recipients or both. Default is both.
GFI MailArchiver
5 Using GFI MailArchiver | 83
Screenshot 40: MailInsights Data Leakage Detection Report
The results of the generated report are listed in a table sorted by date in ascending order. A report
summary above the table displays the top 3 senders.
The table contains the following information:
Table 47: Data Leakage Detection Report criteria
OPTION
DESCRIPTION
Date
Displays the date and time of the email.
Sender
Sender email address.
Subject
Email subject.
NOTE
Entries in the subject column contain a link to display the detected email.
Leakage Type
Leakage type can be: Credit card, Social Security Number, confidential data, medical,
NOTE
If more than one type of leak is detected, only the first one is displayed.
For further information, refer to:
Generating MailInsights reports
Scheduling MailInsights reports
5.6.13 Job Search
Use this report to identify internal users who exchange emails with job search sites. The report
detects sent or received emails containing resumes.
NOTE
The report is able to identify both sent and received email for a selected user.
GFI MailArchiver
5 Using GFI MailArchiver | 84
Screenshot 41: MailInsights Job Search report
Filter the report using the following criteria:
Table 48: Job Search Report criteria
OPTION
DESCRIPTION
Scope
Specify date range or use default setting (This Month). You can only select dates in the last 6 months.
Report
for
Enables you to choose for whom this report applies. Run report on all employees (default) or on an Active
Directory® user or group.
Domains
The list of domains listed in this area will be added to the search criteria of the report. Add domains by
typing the URL in the available field and clicking . To remove a domain, click . Clear all removes all the
listed URLs.
The default list of job search sites includes: Monster.com; Jobster.com; jobcentral.com; hotjobs.yahoo.com;
careerbuilder.com; indeed.com; simplyhired.com; jobing.com; reed.co.uk; jobsearch.co.uk; monster.co.uk;
totaljobs.com; fish4.co.uk; cityjobs.com.
GFI MailArchiver
5 Using GFI MailArchiver | 85
Screenshot 42: MailInsights Job Search Report
The results of the generated report are listed in a table sorted by date in ascending order. A report
summary above the table displays the top 3 users who exchanged emails with job search domains.
The table contains the following information:
Table 49: Job Search Report criteria
OPTION
DESCRIPTION
Date
Displays the date and time of the email.
Sender
Sender email address.
Subject
Email subject.
NOTE
Entries in the subject column contain a link to display the detected email.
For further information, refer to:
Generating MailInsights reports
Scheduling MailInsights reports
5.6.14 Phrase Search
Search for specific terms or phrases within archived emails using the Phrase Search report. The
report runs search queries on whole email bodies to detect emails containing the specified terms and
displays results as a pie chart or stacked line graph.
NOTE
The report detects phrases in both sent and received email for a selected user or group.
GFI MailArchiver
5 Using GFI MailArchiver | 86
Screenshot 43: MailInsights Phrase Search report
Filter the report using the following criteria:
Table 50: Phrase Search Report criteria
OPTION
DESCRIPTION
Scope
Specify date range or use default setting (This Month). You can only select dates in the last 6 months.
Report
for
Enables you to choose for whom this report applies. Run report on all employees (default) or on an Active
Directory® user or group.
Chart
Type
Choose between a Pie chart and Stacked Bar graph. The pie chart displays the total percentage of emails for
the results found while the stacked line graph displays the count of emails sent on a day-by-day basis.
Phrases
Phrases can be composed of 1 or more words. Use quotes (") to search for exact phrases or enter words
without quotes to search for any of the words entered. A limit of 10 phrases ensures the report does not
consume too many resources or take too long to run.
GFI MailArchiver
5 Using GFI MailArchiver | 87
Screenshot 44: MailInsights Phrase Search Report
The results of the generated report are listed in a table sorted by date in ascending order. A report
summary above the table displays the total number of emails, and the total emails that matched a
phrase.
The table contains the following information:
Table 51: Phrase Search Report criteria
OPTION
DESCRIPTION
Date
Displays the date and time of the email.
Sender
Sender email address.
Subject
Email subject.
NOTE
Entries in the subject column contain a link to display the detected email.
Phrase
The phrase that was part of the search.
For further information, refer to:
Generating MailInsights reports
Scheduling MailInsights reports
GFI MailArchiver
5 Using GFI MailArchiver | 88
5.6.15 User Traffic Report
The User Traffic graph provides an overview of the number of emails exchanged between selected
users or groups and their contacts. It also lists unique email addresses of sent or received email.
Screenshot 45: MailInsights User Traffic
Filter the report using the following criteria:
Table 52: MailInsights User Traffic Report criteria
OPTION
DESCRIPTION
Scope
Specify date range or use default setting. You can only select dates in the last 6 months.
Report for
Select Active Directory® user or group.
GFI MailArchiver
5 Using GFI MailArchiver | 89
Screenshot 46: MailInsights User Traffic Report
The selected mailbox can belong to a user or group (displayed at the top of the report). Different
colors denote whether the emails were Sent, Received, Internal, Inbound or Outbound.
The table below the graph shows the following information:
Table 53: User Traffic Report criteria
OPTION
DESCRIPTION
Email Address
Contact email address
Sent
Total number of sent emails
Received
Total number of received emails
Internal
Total number of sent and received emails
Inbound
Total number of inbound email.
Outbound
Total number of outbound email.
For further information, refer to:
Generating MailInsights reports
Scheduling MailInsights reports
5.7 Changing User Preferences
1. Click the user name displayed on the upper right hand corner of the screen.
GFI MailArchiver
5 Using GFI MailArchiver | 90
Screenshot 47: User profile preferences
2. From the Language options drop down box, select the language to display.
3. From the Maximum page size area, configure the number of emails to display per page.
4. From the Audit Reports Date/Time Format area (available only if logged in as an administrator),
change the date/time format to display on audit reports.
5. Click Save.
GFI MailArchiver
5 Using GFI MailArchiver | 91
6 Monitoring GFI MailArchiver operations
6.1 Introduction
Through the GFI MailArchiver Home tab, you can easily monitor your GFI MailArchiver installation.
The graphical and statistical information provides a real-time overview of the general operational
parameters of GFI MailArchiver. It also helps to identify any issues before these have serious
repercussions on your system.
6.2 Using the Home Tab
Screenshot 48: The GFI MailArchiver dashboard
From the GFI MailArchiver interface, select the Home tab. The information is displayed in various
screen elements that are grouped by type. The sections below describe each section and how to
interpret the data presented:
About GFI MailArchiver
Heartbeat
Servers
Archive Stores
Email Flow
Event Viewer
GFI MailArchiver
6 Monitoring GFI MailArchiver operations | 92
6.2.1 About GFI MailArchiver
Screenshot 49: About GFI MailArchiver area
The ‘About GFI MailArchiver’ area provides you with important licensing information required for
correct operation of GFI MailArchiver. The information displayed includes:
Version and build number – Shows the version and build of the current GFI MailArchiver installation
License validity – Shows whether license key is valid and whether the installation is in evaluation
or fully licensed mode.
Number of licenses used – Shows how many licenses are still free for use within GFI MailArchiver.
Legal Hold – Shows whether Legal Hold is enabled or not.
6.2.2 Heartbeat
Screenshot 50: GFI MailArchiver Heartbeat
The ‘Heartbeat’ area shows the time since last successful connection to Mail Servers, Archive Stores,
IMAP Server and Notification Servers. This enables you to quickly identify any unresponsive servers
and investigate any interruptions in service.
GFI MailArchiver
6 Monitoring GFI MailArchiver operations | 93
6.2.3 Servers
Screenshot 51: Servers area
The ‘Servers’ area provides you with information on how much disk space you have free on the Server
where GFI MailArchiver is installed. This enables you to easily keep track of any servers that are
running out of disk space and to take remedial action before you run out of disk space.
6.2.4 Archive Stores
Screenshot 52: Archive Stores area
The ‘Archive Stores’ area provides information about the total number of emails stored in GFI
MailArchiver and the number of Archive Stores used. This information enables you to identify whether
emails are being archived correctly.
GFI MailArchiver
6 Monitoring GFI MailArchiver operations | 94
6.2.5 Email Flow
Screenshot 53: GFI MailArchiver Email flow area
The ‘Email Flow’ graph provides a graphical overview of the quantity of emails that GFI MailArchiver
is archiving. Spikes or dips that fall outside of the normal email flow should be investigated since this
can indicate that email journaling is not functioning correctly.
The ‘Email Flow’ graph is customizable to enable to view the flow for all journal mailboxes, a single
mailbox or a specific period. To customize the view:
1. Click Change Filter.
Screenshot 54: Email flow area configuration
2. Change any of the values listed and click Done. Available options are:
Table 54: Email flow area options
OPTION
DESCRIPTION
Source
Defines what the email flow area will show in terms of either the whole queue or a single
journal mailbox. Select Queue to view the entire queue or a mailbox name to view a single
journal mailbox.
Period
Defines the period of time that will be shown in the email flow area.
GFI MailArchiver
6 Monitoring GFI MailArchiver operations | 95
OPTION
DESCRIPTION
Start Data and Time:
Defines the start date that will be shown in the email flow area. Click
and
to set the date
to set the time.
End Date and Time:
Defines the end date that will be shown in the email flow area. Click
and
to set the date
to set the time.
6.2.6 Event Viewer
Screenshot 55: Event Viewer tab
The ‘GFI MailArchiver Event Viewer’ provides information about GFI MailArchiver events. The
messages provided here enable you to gain information about system processes that are typically
hidden from the system administrator’s view, but which can lead you to discover that some system
functions require your attention.
GFI MailArchiver
6 Monitoring GFI MailArchiver operations | 96
7 Configuring GFI MailArchiver
7.1 Settings Overview
GFI MailArchiver enables you to gain a comprehensive overview of the settings currently in force
within GFI MailArchiver.
NOTE
Use the buttons located in the top right hand corner of the Configuration page to
switch between Tile and List View.
Screenshot 56: GFI MailArchiver Settings Page
Click Configuration tab to load the Overview of current settings page.
The table below describes the information available.
Table 55: Overview of current settings
OPTION
DESCRIPTION
Archiving Method
Shows the Archiving Method currently enabled. An Archiving Method needs to be specified for GFI
MailArchiver to start archiving emails.
Mail Servers to
Archive
Shows the number of Journal mailboxes configured for use with this installation of GFI
MailArchiver.
Archiving Rules
If Rule-based Archiving is enabled, the number of configured rules is displayed.
GFI MailArchiver
7 Configuring GFI MailArchiver | 97
OPTION
DESCRIPTION
Mailboxes to
Archive
Shows whether User Mailbox Archive Restrictions are in force or not. User Mailbox Archive
Restrictions define which mailboxes to archive.
Archiving Scope
Shows whether Email Archive Restrictions are in force or not. These define whether incoming, outgoing, or internal emails (or a combination) are archived.
Mailbox Folder
Structure Retrieval
Shows whether Folder Structure Retrieval is enabled or not. Folder Structure Retrieval enables
the replication of the folder structure of the mailboxes within Microsoft® Exchange Server with
GFI MailArchiver.
Archive Stores
Shows the number of Archive Stores configured with this installation of GFI MailArchiver.
Access Control
Archive Mailbox Access defines who has access to which mailboxes.
Import old emails
Provides information on how to import emails to this installation of GFI MailArchiver.
IMAP Server
Shows whether IMAP Server is enabled or not. When enabled, users can retrieve archived emails
using supported IMAP email clients.
Retention and
Spam policies
Retention and Spam policies define the lifetime of an archive email within GFI MailArchiver.
Emails matching specific criteria can be deleted immediately or after a specific period of time.
Classification Rules
Email Classifications automate the labeling of emails through policies. Emails matching specific
criteria can be automatically classified.
Auditing
Shows and defines whether GFI MailArchiver Auditing is switched on or not.
Email Deletion
Shows whether Email Deletion is enabled or not. When enabled, users can permanently delete
archived emails from mailboxes they have access to.
Change license key
Displays license key information associated with your GFI MailArchiver installation
General Settings
Displays the version and build number of the current GFI MailArchiver installation
7.2 Configuring Archiving Method
The Archiving Method enables you to define how GFI MailArchiver stores emails in the archive stores.
IMPORTANT
Without an Archiving Method GFI MailArchiver will not archive any emails.
To configure Archiving Method:
1. Select Configuration tab and from Mail Servers to Archive, click Archiving Method.
GFI MailArchiver
7 Configuring GFI MailArchiver | 98
Screenshot 57: Configuring Archiving Method
2. Click Configure Archiving Method.
3. From the Archiving Method Wizard page, select from the following options:
Table 56: Archiving Method Wizard options
OPTION
DESCRIPTION
Manual Archiving
Enables users to manually select which emails to archive from their Microsoft Outlook®
applications using GFI MailArchiver Outlook Addon. Users are also able to define a folder
structure when manually archiving their emails to facilitate searches.
Auto-Archiving (Journaling)
When selected, GFI MailArchiver will automatically move emails from Microsoft® Exchange
Server to an Archive Store.
All Emails
Select this option to archive all incoming emails.
Rule-Based Archiving
Archive specific emails from journaling that match configured rules and specify how these
emails are archived in particular folders. For more information, refer to Configuring
Archiving Rules (page 104).
IMPORTANT
Emails are not archived if Archiving Rules are not configured.
GFI MailArchiver
7 Configuring GFI MailArchiver | 99
NOTE
More than one method of archiving can be selected. For example, you can enable
Manual Archiving and Auto-Archiving (Journaling) of All Emails at the same time.
4. Click Save.
7.3 Managing the Mail Servers to Archive
Within GFI MailArchiver, the mail servers to archive are defined by the configured journal mailboxes.
A Journal mailbox is a type of mailbox within Microsoft® Exchange Server that enables the recording
of emails in an organization. The difference between journaling and archiving is that, by definition,
journaling is the ability to record emails while archival reduces the strain of storing data through
backups, removal, and storage. GFI MailArchiver uses Microsoft Exchange journaling to centralize all
the emails to archive in a single mailbox. An initial Journal mailbox is configured using the GFI
MailArchiver post-install wizard. This enables you to start archiving emails from a Microsoft®
Exchange Server.
This section provides information on how to:
View configured mail servers
Create Journal Mailboxes in Microsoft® Exchange Server and use them with GFI MailArchiver
Editing existing Journal Mailbox details
Removing existing Journal Mailbox details
IMPORTANT
For journaled emails to be archived within GFI MailArchiver, the archiving method AutoArchiving (Journaling) must be enabled. For more information, refer to Configuring
Archiving Method (page 98).
NOTE
GFI MailArchiver will create the Journal Mailbox for you within Microsoft® Exchange
Server using the GFI MailArchiver post install wizard. For more information, refer to
Create a Journal Mailbox in Microsoft® Exchange Server 2000/2003 (page 239).
In this chapter:
7.3.1 Viewing Configured Mail Servers
101
7.3.2 Adding a New Journal Mailbox
101
7.3.3 Editing an Existing Journal Mailbox
103
7.3.4 Deactivating and Activating an Existing Journal Mailbox
104
7.3.5 Removing an Existing Journal Mailbox
104
GFI MailArchiver
7 Configuring GFI MailArchiver | 100
7.3.1 Viewing Configured Mail Servers
To view configured mail servers from where GFI MailArchiver archives emails, select the
Configuration tab and click Mail Servers to Archive.
Screenshot 58: Manage Journaling Mailboxes screen
The table below provides a list of available information and options:
Table 57: Mail Server options
OPTION
DESCRIPTION
Journal Mailbox
Defines the name of the Journal mailbox set up within Microsoft® Exchange Server and configured for use within GFI MailArchiver.
Active
Denotes whether the Journal Mailbox is active or not.
Mailbox Server
The machine name of the server on which the Journal Mailbox is configured.
Mailbox Store
Defines the name of the Mailbox Store to which the configured Journal Mailbox belongs.
Connection Type
Defines the type of connection that GFI MailArchiver will use to retrieve emails from the
mail servers to archive emails from.
7.3.2 Adding a New Journal Mailbox
1. Select Configuration tab and click Mail Servers to Archive.
Screenshot 59: Add Journaling Mailbox
2. Click
GFI MailArchiver
.
7 Configuring GFI MailArchiver | 101
Screenshot 60: Choose how you want the wizard to setup GFI MailArchiver to use a journal mailbox.
3. From the Journal Mailbox Wizard page, select whether to automatically create a new Journal
Mailbox or whether to manually specify all the Journal Mailbox details. GFI MailArchiver Journal
Mailbox Wizard can also detect any existing journaling mailboxes and gives you the facility to use
them.
Table 58: Journal Mailbox wizard options
OPTION
DESCRIPTION
Select a journal mailbox from
the detected journal mailbox
list below.
Displays a list of Journal Mailboxes that were detected by the GFI MailArchiver
Journal Mailbox Wizard. Select this option and a Journal Mailbox from the list
displayed to use the selected mailbox.
Let the wizard create a new
journal mailbox to use to start
archiving your emails
Provides the facility to automatically create a new Journal Mailbox. Select this
option and a detected Microsoft® Exchange Server to create the new journal mailbox
for.
NOTE
This feature works only with Microsoft® Exchange Server 2007 Service Pack 2
onwards.
Manually create a journal mailbox using this wizard.
Provides the facility to create a new Journal Mailbox while providing all the details
required to create such mailbox. These may include specifying a Mailbox Store, the
connection method, ports used and credentials.
Click Next to continue setup.
GFI MailArchiver
7 Configuring GFI MailArchiver | 102
4. If you have selected Let the wizard create a new journal mailbox to use to start archiving your
emails or Manually create a journal mailbox using this wizard option in the Journal Mailbox Wizard
screen, you will now be prompted to key in the required details for the Journal Mailbox. If Select a
journal mailbox from the detected list to use to archive your emails was selected, click Next.
Available options are:
Table 59: Existing Journal Mailbox options
OPTION
DESCRIPTION
Mail Server
Shows the detected name of the mail server of where the Journal Mailbox resides.
Connect using:
Defines the connection method used to connect to the Mail Server where the new Journal Mailbox
will be created. Available options are:
ExOLEDB – Available only if GFI MailArchiver is installed on the same machine as Microsoft®
Exchange Server 2003 or 2007.
IMAP - Available only if GFI MailArchiver is not installed on the same machine as Microsoft®
Exchange Server 2003 or 2007.
Exchange Web Services (EWS) - Available only for Microsoft® Exchange Server 2007 SP1 or
2010.
Login:/Password:
Enables you to key in a login name and a password used to connect to the selected mail server.
Folder
Defines the default folder that is used to journal emails.
Default value: Inbox.
5. Click Next to continue setup.
Screenshot 61: Existing mailbox added successfully
6. Click Finish to finalize Journal Mailbox setup.
7.3.3 Editing an Existing Journal Mailbox
1. Select Configuration tab and click Mail Servers to Archive.
GFI MailArchiver
7 Configuring GFI MailArchiver | 103
2. Select a Journal Mailbox to edit and click
.
3. From the Journal Mailbox Wizard page, adjust the settings as per the instructions in the Adding a
New Journal Mailbox section within this chapter in this manual.
7.3.4 Deactivating and Activating an Existing Journal Mailbox
1. Select Configuration tab and click Mail Servers to Archive.
2. Select a Journal Mailbox to edit and click
or
to deactivate an existing Journaling mailbox
to activate a previously deactivated journal mailbox.
7.3.5 Removing an Existing Journal Mailbox
1. Select Configuration tab and click Mail Servers to Archive.
2. Select the Journal Mailboxes to delete and click
.
IMPORTANT
Deleting a Journal Mailbox is an irreversible procedure. Journal mailbox emails cannot
be retrieved if deleted.
IMPORTANT
Removing a Journal Mailbox from GFI MailArchiver does not delete or make inoperative
any existing Journal Mailboxes in Microsoft® Exchange Server.
For more information on how to remove Journaling Mailboxes from Microsoft® Exchange Server, refer
to Disabling Journaling section within Appendix 1 - Journal Mailbox Manual Operations in this manual.
7.4 Configuring Archiving Rules
IMPORTANT
This feature is disabled if Rule-based Archiving is not enabled in the Archiving Method
wizard. For more information, refer to Configuring Archiving Method (page 98).
A number of Archiving Rules can be set up to determine what emails are archived. Rules are created
based on different criteria, and GFI MailArchiver applies each rule against incoming and outgoing
emails that match configured rules. If a rule is matched, the email is archived and moved to the
configured folder.
IMPORTANT
Enabling this feature may breach company policy or legal compliance related to email
retention.
GFI MailArchiver
7 Configuring GFI MailArchiver | 104
Screenshot 62: Configuring Archiving Rules
NOTE
GFI MailArchiver applies rules from top to bottom of the list. Rules can be moved up or
down the list using the provided arrows.
IMPORTANT
Emails archived through the GFI MailArchiver Outlook Addon get archived irrespective of
any rules set in Rules-based Archiving.
In this chapter:
7.4.1 Adding Archiving Rules
105
7.4.2 Editing Archiving Rules
107
7.4.3 Removing Archiving Rules
107
7.4.1 Adding Archiving Rules
To add an Archiving Rule:
1. From Configuration tab, click Archiving Rules.
2. Click Add.
GFI MailArchiver
7 Configuring GFI MailArchiver | 105
3. In the Rule Name field, specify a meaningful name for the archiving rule.
4. In the Email Criteria section, specify rule conditions from the available options described in the
table below. Click
to add more conditions.
Table 60: Archiving Rule conditions
CONDITION
DESCRIPTION
Subject
Emails that match the specified subject are archived.
Body
Emails that are an exact match to the a word or a sentence specified in this criteria are archived.
Sender
Select Email and type the email address or select User and type the name of the user.
NOTE
A list of AD users will be displayed when you start typing the first letters of an email address or a
user name.
Recipient
Select Email and type the email address or select User and type the name of the user.
NOTE
A list of AD users will be displayed when you start typing the first letters of an email address or a
user name.
Full email
size
Select a filter from the available options (Equals, Greater Than, Greater or Equal Than, Smaller Than,
Smaller or Equal Than) and specify an email size in MB.
Attachment
Size
Select a filter from the available options (Equals, Greater Than, Greater or Equal Than, Smaller Than,
Smaller or Equal Than) and specify an attachment size in MB.
GFI MailArchiver
7 Configuring GFI MailArchiver | 106
CONDITION
DESCRIPTION
Attachment
Type
Select a filter from the available options: Images, Documents, Music, Videos, Custom.
NOTE
Wildcards are supported for both Sender and Recipient fields. For example, if you enter
'*@domain.com', the value will match all users of 'domain.com'.
5. In the Place matching email in folder field, specify to which folder the email is archived.
NOTE
Using special characters in folder names
By default, Inbox\ is displayed in the Place matching email in folder field. This path
can be overwritten with the desired folder path using the following conventions:
\ (back slash) is represented by /\
/ (forward slash) is represented by //
For example:
To input a folder path for the following folder structure:
Input the following path in the Place matching email in folder field:
Inbox\Managerial//CEO\Requests/\Queries
NOTE
If the folder specified by the user does not exist, it is created automatically.
6. Click Next.
7. Click Finish.
7.4.2 Editing Archiving Rules
To edit an Archiving Rule:
1. From Configuration tab, click Archiving Rules.
2. Click Edit.
3. Use the Archiving Rule Wizard to modify the required fields.
4. Click Finish.
7.4.3 Removing Archiving Rules
1. Select Configuration tab and click Archiving Rules.
GFI MailArchiver
7 Configuring GFI MailArchiver | 107
2. Select the rule or rules to delete and click
.
7.5 Mailbox Archive Restrictions
Mailbox archive restrictions enable you to define specific mailboxes to exclude from archiving. This
feature can also be used to exclude all mailboxes from archival while including only specific ones.
7.5.1 Enabling Mailbox Archive Restrictions
1. Select Configuration tab and click Mailboxes to Archive.
2. Click Change Settings.
Screenshot 63: Select Enable Archiving Restrictions
3. Select Enable Archiving Restrictions and choose one of the following options:
GFI MailArchiver
7 Configuring GFI MailArchiver | 108
Table 61: Archiving restriction options
EXCLUSION / INCLUSION
Using an exclusion list
OPTION
DO NOT archive email at all if ANY of the recipients or senders are in the
restriction list
Always archive email but users in the restriction list will not be able to view
it
NOTE
When Manual Archiving is configured, users in an exclusion list cannot
manually archive emails using GFI MailArchiver Outlook Addon if any of these
options is enabled.
Using an inclusion list
Always archive email if ANY of the recipients or senders are in the restriction list
Only archive email if all recipients and senders are in the restriction list
NOTE
When Manual Archiving is configured, all users in an inclusion list are able to
manually archive emails using GFI MailArchiver Outlook Addon if any of these
options is enabled.
IMPORTANT
After enabling Archive Restrictions, click Manage Restrictions to create the list of
users, groups or mailboxes to be restricted. The configured Restrictions will not come
into affect if the list is not created.
NOTE
Emails archived manually using the GFI MailArchiver Outlook Addon are always archived,
even when an exclusion list is configured.
4. Click Save.
GFI MailArchiver
7 Configuring GFI MailArchiver | 109
Screenshot 64: Add emails, groups or users
5. Click
and select an option between email, group or users and key in the email,
group name or user name of the user to restrict.
6. Click Save.
7.5.2 Disabling Mailbox Archive Restrictions
To disable mailbox archive restrictions:
1. Select Configuration tab.
2. Click Mailboxes to Archive.
3. Click Change Settings.
4. Unselect Enable Archiving Restrictions.
5. Click Save.
7.6 Managing the Archiving Scope
The Archiving Scope enables you to define which types of emails to archive. Using this feature you
can, for example, instruct GFI MailArchiver to exclude internal emails from being archived or to
include all inbound and internal emails while excluding all outbound emails.
1. Select Configuration tab and click Archiving Scope.
GFI MailArchiver
7 Configuring GFI MailArchiver | 110
Screenshot 65: Configuring email archive restrictions.
2. Select Configure Archiving Scope and from the list displayed unselect the emails to exclude from
archiving as shown in the table below :
Table 62: Email archive restrictions options
OPTION
DESCRIPTION
Inbound
emails
Defines whether GFI MailArchiver will archive emails originating from outside the organizations’ domain.
Uncheck this option to not archive this type of emails.
Outbound
emails
Defines whether GFI MailArchiver will archive emails destined to recipients not within the organizations’
domain. Uncheck this option to not archive this type of emails.
Internal
emails
Defines whether GFI MailArchiver will archive emails originating from and destined to the organizations’
domain. Uncheck this option to not archive this type of emails.
3. Click Save to save configuration.
7.7 Configuring Mailbox Folder Structure Retrieval
By default, GFI MailArchiver does not automatically archive emails according to the folder structure in
which they were originally contained within the source mailbox. To replicate the folder structure of
the original mailboxes, enable the GFI MailArchiver Folder Structure Retrieval feature.
IMPORTANT
The GFI MailArchiver Folder Structure Retrieval feature adds a computational and
network access overhead to the archival process and may slow down your system.
This feature requires a user account with access to all mailboxes to which to retrieve the folder
structure. GFI MailArchiver can automatically create this account.
7.7.1 Enabling Mailbox Folder Structure Retrieval
1. Select Configuration tab and click Folder Structure Retrieval.
2. Select Change Settings.
GFI MailArchiver
7 Configuring GFI MailArchiver | 111
Screenshot 66: Enable folder structure retrieval
3. Select Enable Folder Structure Retrieval.
4. Select whether to automatically create a new user account or whether to use an existing user
account. This user account will be used to access the mailboxes for which to replicate the folder
structure.
The table below shows a list of available options.
Table 63: Folder Structure Retrieval Options
OPTION
DESCRIPTION
Create a new user
account
Instructs GFI MailArchiver to create a new user account using the provided details in the Connect
using, Login, and Password fields.
Use an existing
user account
Instructs GFI MailArchiver to use an existing user account that was previously created.
Connect using
Defines the connection method used to connect to the Microsoft® Exchange Server to access the
mailbox structure to retrieve.
Available options:
Exchange Web Services (EWS) - Recommended for Microsoft® Exchange Server 2007 SP1 or
2010 mail servers.
Traditional Message Application Programming Interface (MAPI) - Recommended for NON
Microsoft® Exchange Server 2007 SP1 or 2010 mail servers.
GFI MailArchiver
7 Configuring GFI MailArchiver | 112
OPTION
DESCRIPTION
Login
Enter the Login name that will be used for the new account to create or for the previously created
account.
Password
Defines the Password used for the new account or for the previously created account.
Click Next to continue setup. If in the previous screen you have selected Create a new user account,
you will be asked to provide the user credentials of the domain administrator account with the rights
to create the account.
5. Click Finish to finalize setup.
6. Click Save to save Folder Structure Retrieval settings.
7.7.2 Disabling Mailbox Folder Structure Retrieval
1. Select Configuration tab and click Folder Structure Retrieval.
2. Click Disable Folder Structure Retrieval.
IMPORTANT
Disabling Folder Structure Retrieval does not delete or disable the user account
previously created for this feature.
7.7.3 Excluding Folders From Folder Structure Retrieval
If there are any folders that you wish to exclude from being retrieved, configure an Excluded Folders
policy.
1. Select Configuration tab and click Folder Structure Retrieval.
2. Click
GFI MailArchiver
.
7 Configuring GFI MailArchiver | 113
Screenshot 67: Add exclude policy
3. Key in a policy name for the Exclude Folders Policy and select the Enable excluded folder policy
checkbox to apply the policy immediately. Click Next to continue.
4. Key in the name of the folder to exclude and click Add. Click Next to continue.
NOTE
To exclude users from Folder Structure Retrieval, specify * as the folder name. The * is
a special keyword that represents all folders. For more information refer to SkyNet
article at the following link: http://go.gfi.com/?pageid=MAR_ExcludeFolders.
GFI MailArchiver
7 Configuring GFI MailArchiver | 114
Screenshot 68: Select users to exclude
5. To exclude the folders specified in the previous screen for specific users, select Selected users
only:.
6. From the drop down list, select User or Email and key in the relative email address or user name.
Click Add and repeat to add other users.
NOTE
If Selected users only: is not enabled, the folders specified in the previous screen are
excluded for all users.
7. Click Finish to finalize setup.
7.7.4 Removing Excluded Folders Policies
1. Select Configuration tab and click Folder Structure Retrieval.
2. Select the Excluded Folder policy to remove and click
GFI MailArchiver
.
7 Configuring GFI MailArchiver | 115
7.8 Managing Archive Stores
Within GFI MailArchiver, Archive Stores are the containers that contain the archived emails. Archive
Stores include several components, such as:
A database where email metadata is stored
A database where both email metadata and email data is stored
A disk location used as an email index
A disk location used as storage for email data.
Archive Stores are created automatically by GFI MailArchiver, based on an Archive Store Profile that
defines their name, database type and file locations.
IMPORTANT
If New Archive Store Settings are not configured, emails are not archived. For more
information, refer to Configuring New Archive Store Settings (page 117).
7.8.1 Viewing Configured Archive Stores
To view configured Archive Stores, select Configuration tab and from Archive area, click Archive
Stores.
Screenshot 69: Viewing Archive Stores
GFI MailArchiver
7 Configuring GFI MailArchiver | 116
Configured Archive Stores are grouped by year and listed in tables with the most recent on top.
The table below shows the available Archive Store fields:
Table 64: Archive Store table
OPTION
DESCRIPTION
Archive Store
Defines the name given to the Archive Store previously configured.
Start Date
The start date indicates the first day of the period for emails contained within the archive store.
Emails that fall outside this range are archived in another Archive Store.
End Date
The end date is the last day of the period for emails contained within the archive store. Emails
that fall outside this range are archived in another Archive Store.
Status
Defines the status of the Archive Store in question.
Select an Archive Store from any Archive Stores list and click
about that Archive Store’s settings and statistics.
to view more information
7.8.2 Configuring New Archive Store Settings
The New Archive Store Settings enable GFI MailArchiver to use a set of previously keyed in settings to
create new archive stores automatically. To view a summary of the current New Archive Store
settings:
1. Select Configuration tab.
2. Click Archive Stores.
3. Click
next to Summary of Archive Store Settings.
NOTE
After installing GFI MailArchiver, you will be prompted by the post installation wizard to
configure New Archive Store Settings. For more information, refer to Configure Archive
Store Settings (page 32).
To edit New Archive Store Settings:
1. Select Configuration tab, then click Archive Stores.
2. Click
.
3. Follow the on-screen instructions to edit the existing New Archive Store Settings. For more
information, refer to Editing Existing Archive Store Details (page 119).
7.8.3 Choosing and Preparing a Database for Use With GFI MailArchiver
As an archiving solution, GFI MailArchiver is highly dependent on your database infrastructure setup
for high performance in terms of data archival and retrieval.
GFI MailArchiver can be configured to run in various hardware setups and combinations. The table
below shows the typical recommended configurations. These guidelines and configurations may vary
according to user activity, daily email flow and the software configurations (such as Folder Structure
Retrieval).
GFI MailArchiver
7 Configuring GFI MailArchiver | 117
Table 65: Database type recommendations
MAILBOXES/VOLUME
RECOMMENDED
DATABASE TYPE
DESCRIPTION
50 mailboxes or less Evaluation
ONLY
GFI MailArchiver
database
Uses a Firebird-based database to archive all email data.
100 mailboxes or less Average
mail flow of up to 6000
emails/day
SQL Server®
Express with File
Storage
Uses a SQL Server® Express database to store email headers
and metadata and a disk location you specify to store email
data.
50 mailboxes or more Average
mail flow of more than 8000/day
Microsoft® SQL
Server
Uses a SQL Server® database to store both email
headers/metadata as well as email data.
More than 500 mailboxes
Average mail flow of more than
8000/day
Microsoft® SQL
Server with File
Storage
Uses a SQL Server® database to store email headers and
metadata and a disk location you specify for the email data.
7.8.4 Attaching an Archive Store
GFI MailArchiver Archive Stores can be detached and attached again, for example when moving GFI
MailArchiver to a new server. For information on how to detach an Archive Store, refer to Detaching
an Existing Archive Store in this chapter.
1. From Configuration tab, click Archive Stores.
2. Click Attach Archive.
Screenshot 70: Attaching an Archive Store
GFI MailArchiver
7 Configuring GFI MailArchiver | 118
3. In the Configuration screen, perform one of the following:
Table 66: Editing Archive Store settings
OPTION
DESCRIPTION
Archive Store Name
Move cursor in this field and type to edit the current name.
Allow users to browse and search
the archive store
Select to enable users to search within this particular Archive Store.
Read-only access
Enable this option to stop emails from being deleted from the selected Archive
Store (when Email Deletion is enabled). While emails can be viewed, new emails
are not archived. Additionally, users are also prevented from adding labels to
archived emails.
Do not archive more emails in
this Archive Store
When enabled, no further emails are archived in the selected Archive Store and it
is marked as 'Full'. If Email Deletion is enabled, users are able to remove emails
from this Archive Store. Additionally, users are able to add labels to archived
emails. A new archive store will be created when new emails need to be archived
to that particular date range.
4. Click Next.
5. Select the database type where you want to store archived emails and click Next.
6. Specify the Database File Location, Email File Location and Search Index Location and click
Next.
7. Review the Archive Store Summary and click Next.
8. Click Finish.
7.8.5 Editing Existing Archive Store Details
1. Select Configuration tab, and click Archive Stores.
2. Select an existing Archive Store and click
.
3. In the Configuration screen, perform one of the following:
Table 67: Editing Archive Store settings
OPTION
DESCRIPTION
Archive Store Name
Move cursor in this field and type to edit the current name.
Allow users to browse and search
the archive store
Select to enable users to search within this particular Archive Store.
Read-only access
Enable this option to stop emails from being deleted from the selected Archive
Store (when Email Deletion is enabled). While emails can be viewed, new emails
are not archived. Additionally, users are also prevented from adding labels to
archived emails.
Do not archive more emails in
this Archive Store
When enabled, no further emails are archived in the selected Archive Store and it
is marked as 'Full'. If Email Deletion is enabled, users are able to remove emails
from this Archive Store. Additionally, users are able to add labels to archived
emails. A new archive store will be created when new emails need to be archived
to that particular date range.
4. Click Finish to save changes and exit the wizard or Next to edit additional details related to the
existing Archive Store.
7.8.6 Detaching an Existing Archive Store
1. Select Configuration tab and Archive Stores.
2. Select an existing Archive Store and click Detach.
GFI MailArchiver
7 Configuring GFI MailArchiver | 119
IMPORTANT
Detaching an Archive Store does not delete any Archived Email data.
3. When prompted, click OK.
7.8.7 Indexing
The Search Index feature within GFI MailArchiver automatically indexes new email content archived
in the corresponding archive store. This constantly updated search enables users to perform precise
and fast searches.
This section will show you how to configure the frequency with which GFI MailArchiver shall index new
archived emails into the search indexes. You will also learn how to force a full search index rebuild, in
cases where you might suspect that the search index is no longer valid.
Important Notes
1. Search indexes must always reside on a local hard drive. Indexing will not be available if the index
path is specified via a UNC path.
2. For best performance, locate the search index on a separate physical drive than where:
Microsoft® Exchange Server is installed
GFI MailArchiver is installed
SQL Server®/Firebird database is located.
3. Indexes are used only for searches. Users are always able to view the new archived emails through
the browse feature notwithstanding the fact whether emails are indexed or not.
Configuring Indexing Frequency
1. Select Configuration tab and click Archive Stores.
2. Select Index Management.
GFI MailArchiver
7 Configuring GFI MailArchiver | 120
Screenshot 71: Search Index Management
3. From Indexing Schedule select any of the following options:
Table 68: Indexing Schedule options
OPTION
DESCRIPTION
Index new
archived emails
every
Search index are updated with the latest archived emails at a fixed interval, For example every half
an hour, every hour, every two hours.
This index schedule is recommended since it strikes the right balance between update frequency
and performance hit.
NOTE
Choosing Immediately causes new email content to be indexed as soon as it is stored in an
archive store. This guarantees the most up-to-date search index; users will be able to search
for and find the latest archived emails.
NOTE
Choosing this option can degrade performance due to the updating frequency - depending on
the amount of emails archived.
Index new
archived emails
every day at
Email content is updated on a daily basis at a preset time.
This option enables you to schedule indexing during off peak hours. Search for emails that archived
during the last 24 hours will not be possible due to emails that are not yet indexed.
4. Click Save.
GFI MailArchiver
7 Configuring GFI MailArchiver | 121
Rebuilding a Search Index
Rebuilding a search index enables you to rebuild indexes that you think are no longer returning the
correct search results or became somehow corrupted.
Important Notes
Rebuilding a search index might take several hours, depending on the amount of emails stored in
the respective archive store.
During an index rebuild, users will not be able to find emails in that archive store through the
search feature.
Rebuilding a search index impacts performance on the server, since this is a processor and hard
disk intensive operation. It is recommended that this procedure is undertaken during off peak
hours, for example after office hours.
Always rebuild one index at a time for the reasons listed above.
Rebuilding a Search Index
1. Select Configuration tab and click Archive Stores.
2. Select the Archive Store for which to rebuild the index and click Rebuild Index.
Pausing and Resuming Indexing
Indexing can be paused and restarted through the
and
. This
enables you to pause lengthy indexing operations during peak hours and continue at a time of low
activity, for example, after office hours.
NOTE
Pausing an index during a merge stops users from finding emails in that archive store
through the search feature. Pausing a rebuild does enable users to use the archive
store.
Search Index States
The different states of a GFI MailArchiver search indexes:
Table 69: Search index states
STATE
DESCRIPTION
Initializing - this is the status when the search index is being created. An index is not expected to stay in this
state for more than 10 minutes.
Invalid - this indicates that the search index is most likely to be corrupt.
Merging - GFI MailArchiver maintains sub-indexes which are smaller versions of the main index. These are
used to increase the performance of the search index. Sub-indexes for an archive store are merged to the
main search index when a number of sub-indexes are created or automatically at 2:00am.
Paused - the process is manually paused from the GFI MailArchiver Configuration. The index will remain in
this state until the Resume Index button is clicked.
Online - the search index is online.
Pending - this state shows that the search index will start rebuilding shortly.
GFI MailArchiver
7 Configuring GFI MailArchiver | 122
STATE
DESCRIPTION
Rebuilding - this indicates that the indexer is indexing a database. The duration of rebuilding an index
depends on the size of the database being indexed.
Configuring the Language Analyzer
Word Breaking is the breaking down of text into individual text tokens or words. Many languages,
especially those with Roman alphabets, have an array of word separators (such as white space) and
punctuation used to distinguish words, phrases, and sentences. Word breakers must rely on accurate
language heuristics to provide reliable and accurate results.
Word breaking is more complex for character-based systems of writing or script-based alphabets,
where the meaning of individual characters is determined from context.
A "Word Breaker" is vital for the proper indexing of the most of the Asian languages (For example
Japanese, Chinese, and Arabic) and other languages
The GFI MailArchiver language analyzer is enabled by default. It is highly recommended that for
optimal indexing performance this is not disabled.
Setting Up the Language Analyzer
1. Select Configuration tab and click Archive Stores.
2. Select Index Management.
3. Select/Unselect Enable Auto Language Analyzer to enable/disable Language Analyzer.
4. Select a default language from the Default Language drop down list.
NOTE
If the required language is not listed in the Default Language drop down list, add the
required language from the Regional settings option within the Windows® control panel.
7.8.8 Scheduling Archive Stores
The Archive Store Schedule enables you to set the frequency with which GFI MailArchiver
automatically starts archiving emails to a new Archive Store.
IMPORTANT
Changing these settings can affect performance. We recommend configuring your
Archive Stores to roll-over on a Bi-Monthly schedule. This way, databases should stay at
a more manageable size, which is beneficial if there is a need to move the database or
rebuilding its search index. A Bi-Monthly archive store should also have some
performance gains when searching. For example, to search for an email dated February
2012, GFI MailArchiver searches a small Bi-Monthly database instead of a large yearly
database, hence providing faster retrieval.
GFI MailArchiver changes the Archive Store based on a specifically configured time schedule. This
feature is available for all types of databases used with Archive Stores. The available options are:
Monthly
Bi-Monthly (default)
GFI MailArchiver
7 Configuring GFI MailArchiver | 123
Quarterly
Half yearly
Yearly
NOTE
If an Archive Store exceeds the maximum database size, GFI MailArchiver automatically
creates a new Archive Store based on the configured New Archive Store Settings. This
feature is only available for Archive Stores based on SQL Server® Express databases.
To change the Archive Store Schedule:
1. From Configuration tab, click Archive Stores.
2. Select Schedule Archive.
3. Select one of the available options and click Save.
7.8.9 Backup Archive Stores
It is highly recommended to include the GFI MailArchiver Archive Stores in routine server backup
procedures.
7.8.10 Online Backup
Online backup is done using a backup application which backups Archive Stores without the need to
stop the GFI MailArchiver services. For more information refer to
http://go.gfi.com/?pageid=MAR_BackupArchiveStores.
7.8.11 Offline Backup
Offline backup can be done in environments where online backup is not possible. The GFI MailArchiver
services must be temporarily stopped while backing up Archive Stores.
The following is a list of offline backups:
Backup an Archive Store Based on Microsoft SQL Server
Backup an Archive Store Based on Microsoft SQL Server and File System
Backup an Archive Store Based on GFI MailArchiver (Firebird) Database and File System
Backup an Archive Store Based on SQL Server ®
In this type of Archive Store, the following information is stored:
Archived email metadata - Stored in the SQL Server® database.
Compressed email binary source - Stored in the SQL Server® database.
Search index entries - Stored on disk.
To backup an Archive Store:
1. From GFI MailArchiver, go to Configuration > Archive Stores and click
2. Take note of the following information for quick reference:
Server
Database
GFI MailArchiver
7 Configuring GFI MailArchiver | 124
Path to search index
3. Launch the Services management console from Start > Run and type ‘services.msc’.
4. Stop all GFI MailArchiver services.
5. Using the search index path determined in step 2, backup the Archive Stores’ search indexes,
either by manually copying and pasting the search index folder or using a backup utility.
Screenshot 72: Backup an SQL database
6. From the SQL Server®, launch the Microsoft® SQL Server Manager and backup the archive database
noted in step 2. To backup a database, right-click on the database and select Tasks > Back up….
NOTE
A maintenance plan can be created in SQL Server® to schedule periodic backups of the
archive database.
7. Return to the GFI MailArchiver server and from the Services management console, restart all GFI
MailArchiver services.
GFI MailArchiver
7 Configuring GFI MailArchiver | 125
Backup Archive Store Based on Microsoft® SQL Server and File System
In this type of Archive Store, the following information is stored:
Archived email metadata - Stored on the Microsoft® SQL Server database.
Compressed email binary source - Stored on disk.
Search index entries - Stored on disk.
To backup an Archive Store:
1. From GFI MailArchiver, go to Configuration > Archive Stores and click
2. Take note of the following information for quick reference:
Server
Database
Path to email binary source
Path to search index
NOTE
Move pointer over the path to view the full path.
3. Launch the Services management console from Start > Run and type ‘services.msc’.
4. Stop all GFI MailArchiver services.
5. Using the paths determined in step 2, backup the Archive Stores’ email binary source and search
index, either by manually copying and pasting the folders or using a backup utility.
GFI MailArchiver
7 Configuring GFI MailArchiver | 126
Screenshot 73: Backup an SQL database
6. From the Microsoft® SQL Server, launch the Microsoft® SQL Server Manager and backup the archive
database noted in step 2. To backup a database, right-click on the database and select Tasks > Back
up….
NOTE
A maintenance plan can be created in Microsoft® SQL Server to schedule periodic
backups of the archive database.
7. Return to the GFI MailArchiver server and from the Services management console, restart all GFI
MailArchiver services.
Backup Archive Store Based GFI MailArchiver (Firebird) Database And File System
In this type of Archive Store, the following information is stored:
Archived email metadata - Stored on disk.
Compressed email binary source - Stored on disk.
GFI MailArchiver
7 Configuring GFI MailArchiver | 127
Search index entries - Stored on disk.
To backup an Archive Store:
1. From GFI MailArchiver, navigate to Configuration > Archive Stores and click
.
2. Store the following paths for quick reference:
Path to Firebird database
Path to email binary source
Path to search index
NOTE
Move pointer over the path to view the full path.
3. Launch the Services management console from Start > Run and type ‘services.msc’.
4. Stop all GFI MailArchiver services.
5. Using the paths determined in step 2, backup the Archive Stores’ database file, binary files and
search indexes, either by manually copying and pasting the files in a backup location or using a backup
utility.
6. From the Services management console, restart all GFI MailArchiver services.
Restoring an Archive Store Which is Added in GFI MailArchiver
1. From GFI MailArchiver, navigate to Configuration > Archive Stores and click
2. From the Archive Store Statistics dialog, note the following properties for quick reference:
Table 70: Archive Store properties
TYPE OF ARCHIVE
STORE
Microsoft® SQL Server
ARCHIVE STORE PROPERTIES
Server
Database
Path to search index
Microsoft®
SQL Server
and file system
Server
Database
Path to email binary source
Path to search index
Firebird Database
Path to Firebird database
Path to email binary source
Path to search index
3. Launch the Services management console from Start > Run and type ‘services.msc’.
4. Stop all GFI MailArchiver services.
5. Refer to the location of files noted in step 2 to override the Archive Store files with the restored
backup files as follows:
GFI MailArchiver
7 Configuring GFI MailArchiver | 128
Firebird database - replace the Firebird database on disk with the backed up Firebird database
SQL database - from the Microsoft® SQL Manager right-click the backed up database and select
Tasks > Restore.
Email binary source - replace the binary folder on disk with the backed up binary folder
Search index folder - replace the Search index folder on disk with the backed up Search index
folder.
6. From the Services management console, restart all GFI MailArchiver services.
Restoring an Archive Store Which is not Added in GFI MailArchiver
1. Depending on the type of Archive Store to restore, restore the applicable backed up data as
follows:
Firebird database - restore the Firebird database on disk
SQL database - from the Microsoft SQL Manager right-click the backed up database and select
Tasks > Restore.
Email binary source - restore the binary folder on disk
Search index folder - restore the search index folder on disk
Take note of the paths where all data has been restored.
2. Add the restored Archive Store in GFI MailArchiver ensuring that all paths configured during the
wizard, for example search index path or SQL database, are the paths of the restored data.
7.8.12 Moving Emails From One Database to Another
GFI MailArchiver supports various types of Archive Stores. The software enables you to move emails
from one database to another or to many other databases.
NOTE
This feature is only applicable when moving the original emails source stored on disk of
a Firebird database or SQL Server® file system. Emails cannot be moved from a SQL
Server® database when the source is stored on the SQL Server® database.
Examples:
A Firebird database becomes very large in size and hence slow to load data, so the administrator
decides to switch to a SQL Server® database.
An SQL file system stored on disc, stores emails of one whole year. It is recommended to separate
the emails to multiple databases, for example one database for each month.
Important Notes
1. It is highly recommended to backup the archive stores before moving emails. This process is
described in the Backup Archive Stores chapter of this manual.
2. Moving emails between archive stores requires a high amount of computer processing resources
and can reduce the performance of the GFI MailArchiver server substantially.
GFI MailArchiver
7 Configuring GFI MailArchiver | 129
3. The folder structure of emails is lost when moving emails, however the emails can be
resynchronized to retrieve the folder structure. The folder structure of emails deleted from the
mailbox is permanently lost.
4. Ensure that the new database where emails are going to be moved to, is added in the GFI
MailArchiver Archive Stores. This process is described in the Managing Archive Stores chapter of this
manual.
5. Multiple databases can be created to cover different emails date ranges.
7.8.13 Upgrading the Database Schema
It is important that all Database Schemas are upgraded to the latest schema to ensure GFI
MailArchiver works correctly. This process can be carried out either during the upgrade process (by
the Installation Wizard) or at a later stage using the Bulk Schema Upgrader.
Use the Bulk Schema Upgrader to:
Upgrade the GFI MailArchiver database schemas or
Verify that you are using the latest database schema
To launch the Bulk Schema Upgrader:
1. From the GFI MailArchiver machine, go to the GFI MailArchiver installation folder, open
BulkSchemaUpgrader folder and click BulkSchemaUpgrader.exe.
Screenshot 74: The Bulk Schema Upgrader
2. Select the databases to upgrade and click Upgrade.
NOTE
When upgrading the database schema of an SQL database, enter the credentials of the
System Administrator, SA user, or the database owner (dbo role) when prompted.
GFI MailArchiver
7 Configuring GFI MailArchiver | 130
7.8.14 Attaching a GFI MailArchiver 3 Database
IMPORTANT
You can only attach GFI MailArchiver 3 databases based on SQL Server®. Microsoft®
Access Databases are not supported.
IMPORTANT
Attached GFI MailArchiver 3 databases are read-only and can only be used for browsing
and searching.
1. Select Configuration tab and click Archive Stores. Click
.
2. Key in an Archive Store name, select whether to allow users to use the new Archive Store and the
method used to create it. Select Wizard option and click Next.
3. Select Microsoft SQL Server option and click Next.
Screenshot 75: Attach a GFI MailArchiver 3 database
4. Select Attach a GFI MailArchiver version 3 database and select the database to attach.
GFI MailArchiver
7 Configuring GFI MailArchiver | 131
5. Click Next to continue.
7.9 Email Access Control
By default, Active Directory® Users can browse and search only through their emails. Email Access
Control enables you to configure users to belong in a group with access to other users’ emails. The
pre-configured groups are listed in the table below.
Table 71: Email Access Control groups
OPTION
DESCRIPTION
Full
access
group
Enables users in Active Directory® groups to browse and search through all the emails stored in all the
archive stores.
NOTE
Since emails may contain confidential information it is highly recommended to select members of this
groups with extreme care.
Group
managers
Enables users that have a management or supervisory role in your organization to browse and search
through the emails of all the users forming part of that Active Directory® group.
User
access
control
Enables specific users to browse and search the emails of other users.
This feature enables, for example, to grant a user access to emails of another user which no longer forms
part of your company, and which Active Directory® account was deleted.
Shared
mailboxes
Enables a group to access archived emails in a specific mailbox. For example, enable all sales persons to
have access to [email protected].
7.9.1 Adding An Active Directory Group to the Full Access Group
Adding an Active Directory group of users to the GFI MailArchiver Full Access Group grants users
within that group access to all emails archived within GFI MailArchiver and to MailInsights reports.
1. Select Configuration tab and click Access Control label.
2. Click Configure Full Access Group.
3. Select the Active Directory group to set as the Full Access group and click Save.
7.9.2 Adding Users to the Group Manager Archive Access
Adding a user to the Group Manager Archive Access grants users access to all emails archived within
GFI MailArchiver for a particular Active Directory® group of users.
1. Select Configuration tab and click Access Control.
2. Click Configure Group Managers.
3. Select the user to add as a manager from the Manager field and the group to which full access will
be granted and click Add. Repeat to add other users to other groups.
NOTE
A user can be added to multiple groups by selecting the same user and a different Active
Directory® group.
4. Click Save to finalize settings.
7.9.3 Define User Access Control
User Access Control enables you to grant specific users access to email archived for other users.
1. Select Configuration tab and click Access Control.
GFI MailArchiver
7 Configuring GFI MailArchiver | 132
Screenshot 76: Configuring access control
2. Click Configure User Access Control.
3. Select the user to grant access to in the User field and the user to which mailbox access will be
granted from the Has access to User field. Click Add and repeat to add other users to other groups.
NOTE
A user can be added to users by selecting the same user and a different user to grant
access to archived emails.
4. Click Save to finalize settings.
7.9.4 Configuring Shared Mailboxes
Shared mailboxes are mailboxes that can be accessed by a whole set of users in a group.
1. Select Configuration tab and click Access Control.
2. Click Configure Shared Mailboxes.
3. Select the group to grant access to from the Group field and the mailbox to which access will be
granted from the Mailbox Account field. Click Add and repeat to add other groups to different
mailboxes.
GFI MailArchiver
7 Configuring GFI MailArchiver | 133
NOTE
The same group can be added to different mailboxes by selecting the same user and a
different mailbox to grant access to archived emails.
4. Click Save to finalize settings.
7.10 Configuring IMAP Server
Internet Message Access Protocol (IMAP) is an Internet protocol for e-mail retrieval. A number of email clients and mail servers use IMAP to transfer e-mail messages from a server to a client.
The IMAP service is used to retrieve email identifiers and users' email folder structures from GFI
MailArchiver Archive Stores. This data is stored within a Firebird database on the IMAP Server
machine.
NOTE
The IMAP Server back-end Firebird database is stored in Data\IMAPDB.FDB and
contains the folder structure of each user's mailbox. This database does NOT contain
any message data (subject, headers, body content etc). Such information is retrieved
directly from the GFI MailArchiver Store service when requested. This database is
created by the IMAP service on startup (if not found) and the synchronization will start
as soon as items are available from the archive stores. IMAP server will not return any
items for the users until the data is synchronized.
When a client makes a request, the IMAP Server looks in the local database for the email identifiers
and performs the following actions:
Folder names - sends the data directly
Message details - contacts the store service before returning the data.
Clients connect to the IMAP service using valid authentication.
NOTE
When GFI MailArchiver is installed (not upgraded) and IMAP is enabled for the first time,
it takes a long time for IMAP server to sync up with the store. The synchronization is a
background process transparent to the user.
To configure the IMAP Server:
1. From the Configuration page, select IMAP Server.
2. Click Configure IMAP Server.
GFI MailArchiver
7 Configuring GFI MailArchiver | 134
Screenshot 77: IMAP Server configuration
3. Select Enable IMAP Server checkbox.
IMPORTANT
The IMAP service is started automatically when the Enable IMAP server checkbox is
selected. If IMAP is disabled, service does not automatically start on startup.
4. (Optional) In the Port Number field, enter a value and click Check Availability.
NOTE
The default port number is 44143. Changing the port number effects clients that have
been configured to use this port.
5. In the Network Interface field, select the listening network card from the available options. GFI
MailArchiver scans your system and lists discovered network interface cards as possible options. It is
however recommended to retain default setting (All Network Interfaces).
6. In the Server URL field, key in the address of the IMAP server to be used by mail clients.
GFI MailArchiver
7 Configuring GFI MailArchiver | 135
NOTE
The IMAP Service is restarted whenever there are changes in IMAP server configuration
related to network card interface or listening port number. All clients are disconnected
when the IMAP service is restarted.
7. Use the Maximum months to show in mail clients field to set the period of time (in months) GFI
MailArchiver goes back and retrieves emails (default set to 12 months).
8. (Optional) Select Enable SSL Security checkbox to enable secure transmission of information. For
more information, refer to Working With Certificates (page 136).
NOTE
If Force SSL certificate is selected, email clients will authenticate using a valid
certificate. Authentication is refused if the client tries to connect unencrypted.
9. Click Save to finish the configuration.
7.10.1 Working With Certificates
Secure Sockets Layer (SSL) is a protocol designed to enable applications to transmit information back
and forth securely. Applications that use SSL, exchange encryption keys with other applications, and
are designed to encrypt and decrypt data sent between the two.
Applications that are configured to run SSL (for example, web browsers like Microsoft® Internet
Explorer and Firefox and email programs like Microsoft Outlook®, Mozilla Thunderbird and Apple Mail)
are automatically able to receive SSL connections. To establish a secure SSL connection, the
application must first have an encryption key assigned to it by a Certification Authority in the form of
a Certificate.
IMAP supports encryption via certificates. Certificates can be:
Purchased from an online vendor such as Verisign
Generated from IIS® (refer to KB article http://support.microsoft.com/kb/299875#appliesto)
To enable SSL and configure a security certificate:
1. In the IMAP Server configuration wizard, select Enable SSL checkbox.
2. In the SSL Certificate field, select the certificate to upload.
3. In the SSL Certificate Password field, type the certificate password. This will be validated when
you click save.
4. (Optional) Select Force SSL certificate checkbox to force encryption of transmitted data.
IMPORTANT
When Force SSL certificate is enabled, encryption is ‘forced’, meaning that clients using
the IMAP service will not be able to connect unless they configure encryption from their
side. If Force SSL certificate is not enabled, the clients can connect to the IMAP server
both in encrypted and unencrypted mode.
GFI MailArchiver
7 Configuring GFI MailArchiver | 136
5. Click Save.
7.11 Retention Policies
Retention Policies define the length of time that an archived email is retained in the Archive Store
before it is deleted. For example, you can configure GFI MailArchiver to retain emails marked ‘Sales’
for two years while keeping emails marked as ‘Legal’ indefinitely.
GFI MailArchiver also provides you with the facility to temporarily suspend (hold) retention policies so
that no email is deleted. For example, you can hold retention policies until a court case is resolved. In
this case, emails are marked for deletion and deleted once the hold is switched off.
7.11.1 How Are Retention Policies Applied?
GFI MailArchiver checks email content against any retention policies configured at the time of
archiving.
GFI MailArchiver first checks email against the highest priority retention policy. If the email matches
the configured conditions, retention policy is associated with the email. If the email does not match
the highest priority retention policy, GFI MailArchiver will check against the next retention policy
configured, according to priority.
This process is repeated until email either matches a configured retention policy or there are no
more retention policies. When an email does not match any retention policy, GFI MailArchiver stores
the email in archive store indefinitely.
Important Notes
Retention policies created or modified after GFI MailArchiver has already stored an email in an
archive store will not affect that email. This is because GFI MailArchiver checks emails against
retention policies only at the time of archiving.
An email can match only one retention policy. Thus, the priorities you assign to the retention policies are very important.
Any email that matches a retention policy where the configured action is ‘delete email immediately’ is discarded immediately without ever being stored in an archive store.
Any email that matches a retention policy where the configured action is set to delete after a
number of days, is stored in an archive store. On the pre-configured time elapsing, GFI MailArchiver purges the email from the archive store.
By default no retention policies exist within GFI MailArchiver upon installation
GFI MailArchiver
7 Configuring GFI MailArchiver | 137
7.11.2 Viewing Retention Policies
Screenshot 78: Viewing retention and spam policies
To view retention policies, select Configuration tab and click Retention and Spam Policies. The
retention policies are displayed in retention policy table, sorted by the order in which these will be
executed. Available fields are listed in the table below.
Table 72: Retention policy table fields
OPTION
DESCRIPTION
Policy name
Displays the name of the retention policy.
Active
Displays whether retention policy is active, inactive or disabled due to legal hold.
Action
Displays the action configured for this retention policy. For example: Retain emails for 2 years.
7.11.3 Adding a New Retention Policy
1. Select Configuration tab and click Retention and Spam Policies.
2. Click
GFI MailArchiver
.
7 Configuring GFI MailArchiver | 138
Screenshot 79: Select SPAM or email retention policy
3. From the Retention Policy wizard, select Email Retention Policy and click Next.
GFI MailArchiver
7 Configuring GFI MailArchiver | 139
Screenshot 80: Retention Policy details
4. In the Retention Policy Details screen, key in the details for the new retention policy and click
Next. Available options are:
Table 73: New retention policy options
OPTION
DESCRIPTION
Policy name
Defines the name for the new policy to be created.
GFI MailArchiver
7 Configuring GFI MailArchiver | 140
OPTION
DESCRIPTION
Email Criteria
Defines the conditions that will identify an email as being part of this retention policy. From the
drop down list select one of the following options and provide the values that an email must
match to fall under this retention policy. Click
condition. Select:
Subject – define an email subject
to add more conditions or
to delete a keyed in
Body – define key words that can be found in the body of emails
Sender – define the sender’s email address or specify the user name in the format
domain\username
Recipient – key in the recipient’s email address or specify the user name in the format
domain\username
NOTE
Wildcards are supported for both Sender and Recipient fields. For example, if you enter
'*@domain.com', the value will match all users of 'domain.com'.
Email size – select a parameter and provide the email size in MB. Available parameters are:
Equals to
Greater Than
Greater Or Equal Than
Smaller Than or
Smaller Or Equal Than
Attachment size - select a parameter and provide the email size in MB. Available parameters are:
Equals to
Greater Than
Greater Or Equal Than
Smaller Than or
Smaller Or Equal Than
Attachment Type - define the file type condition by selecting a category from the drop
down list of predefined values. For more information on File Types refer to Retention File
Types in this section.
Manual Archive - select to include all manually archived emails in the retention policy.
Enable Policy
Defines whether a policy is in effect or not and if emails are to be deleted immediately or
retained for a specific amount of time. Select Enable Policy and select an option between:
Do NOT retain emails matching above conditions, delete immediately.
Do NOT retain emails matching the above conditions, delete after x days
NOTE
To configure a number of years, specify the number of days. For example: To retain emails for
2 years, key in 730 days and to retain emails for 5 years, key in 1825 days.
5. Click Finish.
Retention File Types
The following table lists the file types associated with each Attachment Type category available when
filtering a Retention Policy by attachment type:
GFI MailArchiver
7 Configuring GFI MailArchiver | 141
Table 74: Pre-defined retention file types
CATEGORY
FILE TYPE
Images
*.jpg,*.jpeg, *.exif, *.tiff, *.raw, *.png, *.gif, *.bmp, *.ppm, *.pgm, *.pbm, *.pnm, *.webp, *.tga, *.pcx,
*.img, *.psd, *.psp, *.cgm, *.svg, *.ai, *.cdr, *.eps, *.hvif, *.odg, *.pict, *.pgml, *.swf, *.vml, *.wmf, *.emf,
*.xps, *.pns, *.jps
Documents
*.acl, *.csv, *.cwk, *.doc*, *.dot*, *.htm*, *.hwp*, *.lwp, *.mcw, *.odm, *.odt, *.ott, *.pages, *.pdax, *.pdf,
*.rtf, *.rpt, *.stw, *.sxw, *.tex, *.txt, *.wpd, *.wps, *.wpt, *.wrd, *.wri, *.xhtml, *.xml, *.xps, *.xls, *.xlsx,
*.ppt, *.pptx, *.mdb, *.accdb, *.accde
Music
*.aiff, *.au, *.cdda, *.raw, *.wav, *.flac, *.la, *.m4a, *.ape, *.wma, *.mp2, *.mp3, *.ogg, *.ra, *.rm, *.ots,
*.swa, *.vox, *.voc, *.mid, *.psf, *.mod, *.asf, *.asx, *.m3u, *.ram, *.xspf, *.omf, *.cel
Video
*.aaf, *.3gp, *.gif, *.asf, *.avchd, *.avi, *.dat, *.flv, *.mpeg, *.mpg, *.fla, *.flr, *.sol, *.m4v, *.mkv, *.mov,
*.mpe, *.mxf, *.ogg, *.rm, *.swf, *.wmv
7.11.4 Changing the Order of Retention Policies
The order in which retention policies are applied is very important within GFI MailArchiver. GFI
MailArchiver first checks email against the highest priority retention policy. If the email matches the
configured conditions, retention policy is associated with the email. If the email does not match the
highest priority retention policy, GFI MailArchiver checks against the next retention policy configured,
according to priority.
To change the order of the retention policies:
1. Select Configuration tab and click Retention and Spam Policies.
2. Select the retention policy to change the order for and click
or down respectively.
or
to move up
7.11.5 Adding a SPAM Retention Policy
By default, emails marked as spam are archived with all other emails and GFI MailArchiver does not
discriminate between valid emails and emails marked as SPAM by anti-spam solutions such as GFI
MailEssentials. Within GFI MailArchiver, you can set up a SPAM Retention Policy that enables you to
delete spam immediately on archival or after a specific number of days.
Creating a SPAM Retention Policy also enables users to browse emails marked as spam and if these
are not actually spam, mark them as not spam. This causes the SPAM Retention Policy not to delete
such emails.
1. Select Configuration tab and click Retention Policies.
2. Click
.
3. From the Retention Policy wizard, select Specify a SPAM policy and click Next.
GFI MailArchiver
7 Configuring GFI MailArchiver | 142
Screenshot 81: SPAM Retention Policy dialog
4. Fill in a name for the SPAM Retention Policy, configure whether the policy is active or not, and
select the retention period. The table below shows a list of available options.
Table 75: SPAM Retention Policy options
OPTION
DESCRIPTION
Policy Name
Defines the name for the policy being created/edited. Key in or edit the
name in this text box.
Enable policy
Defines whether the policy being created/edited is active or disabled.
Check or uncheck the checkbox to enable or disable the policy.
Do NOT retain emails marked as SPAM,
delete immediately
Instructs GFI MailArchiver to immediately delete all emails marked as
SPAM.
Do NOT retain emails matching the
above conditions, delete after x days
Instructs GFI MailArchiver to retain all emails marked as SPAM and delete
them only after the configured time elapses.
5. Click Next and Finish to complete retention policy configuration.
7.11.6 Configuring Legal Hold
Legal Hold instructs GFI MailArchiver to pause deleting archived emails and to retain them until
further notice. Enable this feature to temporarily halt archived email deletion until, for example, a
court case is resolved.
GFI MailArchiver
7 Configuring GFI MailArchiver | 143
Enabling this feature still causes GFI MailArchiver to mark the archived emails for deletion. Delete
instruction will be executed only once the legal hold is removed.
To enable Legal Hold:
1. Select Configuration tab and click Retention and SPAM Policies.
2. Select
.
NOTE
Verify that Legal Hold is enabled from the Home tab, under About GFI MailArchiver.
To disable Legal Hold:
1. Select Configuration tab and click Retention and SPAM Policies.
2. Select
.
IMPORTANT
Use this feature with caution, since emails are immediately deleted on disabling Legal
Hold.
7.12 Classification Rules
Classification Rules enable you to automatically classify emails according to the content. From the
moment that a classification rule is enabled, new emails are automatically reviewed according to the
classification rule set up and labeled accordingly in their respective Archive Store.
Using the Advanced Search functionality in the Archive tab, users can search archived emails for a
particular label. The search can also be saved in the Classifications window in the Archive tab for
ease of use. For more information, refer to Advanced Search (page 57).
This section will help you:
Add a New Classification Rule
Edit a Classification Rule
Remove a Classification Rule
7.12.1 Adding a New Classification Rule
1. Select Configuration tab and click Classification Rules.
2. Click
GFI MailArchiver
.
7 Configuring GFI MailArchiver | 144
Screenshot 82: Categorization rule details
3. Key in a rule name in the Policy Name field and configure the criteria that emails have to fulfill to
fall under this classification rule. Available options are:
Table 76: Classification Policy options
OPTION
DESCRIPTION
Subject
Key in the subject text that the email must match to fall under this categorization rule.
Body
Key in the body text that the email must match to fall under this categorization rule.
Sender
Select whether to classify by email address or user name. Provide the email address or select a
user name that the email must match to fall under this categorization rule.
NOTE
‘@’ sign must always be present in sender email address specified. Wildcard characters are
also supported as follows:
? - matches any letters
For example: ???n@?aster-domain.com will match both [email protected] and
[email protected].
- matches complete words
For example: *@master-domain.com matches all email addresses with the domain part
master-domain.com
Recipient
GFI MailArchiver
Key in the recipient email address that the email must match to fall under this categorization
rule.
7 Configuring GFI MailArchiver | 145
NOTE
Wildcards are supported for both Sender and Recipient fields. For example, if you enter
'*@domain.com', the value will match all users of 'domain.com'.
4. Click
to add further classification criteria or
to delete previously keyed in criteria.
5. Select Enable policy and key in the label with which emails should be labeled in the Emails that
match this categorization policy should be labeled field. Click Next to continue.
6. In the Summary page review the categorization rule details and click Finish.
7.12.2 Editing a Classification Rule
1. Select the classification rule to edit and click Edit.
2. Follow the instructions listed in the Adding a New Classification section for information on how to
edit a classification rule.
7.12.3 Removing a Classification Rule
Select the classification rule to remove and click
removed.
. Classification rule will automatically be
7.13 Auditing
GFI MailArchiver database activity auditing uses the tracing capabilities of SQL Server® to record all
activity affecting the archive databases.
Trace data is stored in a text file in a user specified location on the SQL Server® machine. There is
one trace file per server, containing trace data from all archive stores hosted on the server. The SQL
Server® service holds an exclusive lock on the trace file, ensuring the file is not tampered with. From
GFI MailArchiver, you can then trigger the process to upload trace files into the auditing database.
Following the upload, you can view auditing reports through the Auditing Reports page in the
console.
IMPORTANT
GFI MailArchiver only audits archive stores based on SQL Server®.
Auditing is not performed on Archive Stores based on:
SQL Server® database and file system
GFI MailArchiver (Firebird) database and file system.
In this chapter:
7.13.1 Configuring Database Activity Auditing
147
7.13.2 Editing Database Activity Auditing
149
7.13.3 Audit Reports
149
GFI MailArchiver
7 Configuring GFI MailArchiver | 146
7.13.1 Configuring Database Activity Auditing
1. Select Configuration tab click Auditing.
2. Click Configure.
Screenshot 83: Select authentication method
3. Select the SQL Server® to use from the Microsoft SQL Server drop-down box and choose the
Authentication method to use to connect to the selected SQL Server®.
Table 77: SQL Server® Authentication methods
OPTION
DESCRIPTION
Windows Authentication
Uses the currently logged on user to connect to SQL Server®.
Microsoft SQL
Server Authentication
Uses the credentials you key in the Login Name and Password: fields to connect to SQL Server®.
These will be used by GFI MailArchiver to read/write from the auditing database.
Click Next to continue setup.
IMPORTANT
The account specified must have sysadmin or database owner privileges.
GFI MailArchiver
7 Configuring GFI MailArchiver | 147
4. To create a new database within the previously selected SQL Server®, select New Auditing
Database and provide a name in the text box. To use an existing database, choose Select an Existing:
auditing database from the displayed list of databases. Click Next to continue.
Click Next to continue setup.
5. Specify whether to enable tracing on GFI MailArchiver archive stores. Select Enable trace on
Archive Stores to log database activity data and specify the path on the SQL Server® machine where
the trace files will be stored. Click Next to continue.
NOTE
Ensure that the location specified is accessible using the user account under which the
SQL Server® service is running
NOTE
Lock down the location where you store the SQL Server® trace files through NTFS
permissions, so that only the SQL Server® Service can access the location. This, together
with the exclusive lock held by the SQL Server® service, ensures that the data in the
trace files cannot be tampered with.
Screenshot 84: Enable user interaction auditing
6. Specify whether to enable user interaction auditing. This will record all the activity of the GFI
MailArchiver user interface by users. To enable, select Enable user interaction auditing. Click Next
to continue.
7. Review the Auditing Database setup summary and click Finish to finalize setup.
GFI MailArchiver
7 Configuring GFI MailArchiver | 148
7.13.2 Editing Database Activity Auditing
To edit an existing database activity auditing setup, select the previously configured settings and click
Configure. Follow the instructions listed in the Configuring Database Activity Auditing section to edit
an existing database activity auditing setup.
7.13.3 Audit Reports
Auditing reports are based on data generated by database activity auditing and user interaction
auditing. To access auditing reports:
1. Select Auditing tab and select the desired report.
2. Perform the following actions:
OPTION
DESCRIPTION
Filter
reports:
Use the Filter by: area by selecting a value to filter by and providing the details that a record has to match
to be displayed on screen. The Filter by: area is located at the top of each report page.
Print
reports:
Click on the print report button
, located at the top of each report page to print the report.
Configuration Management Auditing Report
Use this report to list all the configuration changes made in GFI MailArchiver. Information displayed
includes:
User who made the changes
Changes effected
NOTE
Clicking on any configuration change in the list will bring up a window with further
detailed information.
Access Control Auditing Report
Use this report to list all the changes made to the access control configuration of GFI MailArchiver.
Information displayed includes:
User who made the changes
The user affected by the change
What permissions were changed
Archived Emails Auditing Report
Use this report to list the number of emails archived in GFI MailArchiver Archive Stores per day.
Information displayed includes:
Date
Name of archive store
Number of archived emails
Bulk Import Auditing Report
Use this report to list the amount of emails imported into the archive stores through the bulk import
service, for each import. Information displayed includes:
GFI MailArchiver
7 Configuring GFI MailArchiver | 149
Date of import
Name of archive store
Number of emails imported
Retention Policy Auditing Report
Use this report to list the retention policies executed and the amount of emails deleted. Information
displayed includes:
Date on which the policy was executed
Name of archive store
Name of retention policy
Number of emails deleted
Clicking on any executed retention policy in the list will bring up a window with detailed information
on the policy executed.
Data Leakage Prevention Auditing Report
Use this report to list which users performed actions that could lead to data leakage, such as
forwarding of emails from the archive stores. Information displayed includes:
User that performed the action
Action performed
Number of emails affected.
User Audit Trail Auditing Report
Use this report to list the actions taken by users whilst using the GFI MailArchiver web interface.
Information displayed includes:
User name
Action taken
Date/time action was taken
The following report options are available:
To group the list by user, click on the Group by user button, located at the top of the report
page.
To group the list by date, click on the Group by date button, located at the top of the report
page.
Clicking on any user action in the list will bring up a window with detailed information on the
action taken.
Data Integrity Auditing Report
Use this report to list all the changes made to the GFI MailArchiver archive stores and auditing
databases, which were not carried out through the GFI MailArchiver services. Information displayed
includes:
Event type
Microsoft® SQL server and database affected
GFI MailArchiver
7 Configuring GFI MailArchiver | 150
Database user affected
Action taken
Machine from which action originated.
The following report options are available:
To group the list by event type, click on the Group by event type button, located at the top of the
report page.
To group the list by date, click on the Group by date button, located at the top of the report
page.
Clicking on any database change in the list will bring up a window with detailed information on
that change.
7.14 Configuring Email Deletion
The Email Deletion feature enables users to permanently delete emails from the GFI MailArchiver Mail
View. If enabled, an additional delete button is displayed in the Archive tab toolbar and in the Mail
View toolbar.
IMPORTANT
Enabling this feature may breach company policy or legal compliance related to email
retention.
IMPORTANT
Enabling this feature allows all GFI MailArchiver users to permanently delete archived
emails from mailboxes they have access to.
1. From Configuration tab, select Email Deletion.
2. Click Enable Email Deletion.
GFI MailArchiver
7 Configuring GFI MailArchiver | 151
Screenshot 85: Configuring Email deletion
3. (Optional) If you want to retain a copy of the deleted email in the Archive Stores, check Leave a
copy of the email in the Archive Stores accessible by a Full Access User. The retained emails are
only accessible by users with full access rights. If the checkbox remains unchecked, deleted emails will
be removed permanently from the Archive Stores.
4. Check the I agree checkbox.
5. Click OK.
NOTE
User cannot delete emails from a read-only Archive Store. Users are notified if delete
fails.
IMPORTANT
If Legal Hold is enabled, Email Deletion is disabled until Legal Hold is removed. For
more information, refer to Configuring Legal Hold (page 143).
GFI MailArchiver
7 Configuring GFI MailArchiver | 152
7.15 Viewing and Editing License Keys
A fully licensed version of GFI MailArchiver requires a license key. For information on GFI MailArchiver
licensing, refer to:
http://go.gfi.com/?pageid=MAR_Licensing
NOTE
To evaluate GFI MailArchiver, request a free evaluation key from GFI Software Ltd
http://go.gfi.com/?pageid=MAR_DownloadRegistrationForm.
To review the license key that is currently used within GFI MailArchiver select Configuration tab and
click Change license key label.
To change your current license key:
1. Click Edit Licensing Key.
2. Key in or paste the new license key in the License Key text box. Click Verify License Key to verify
that the new license key is correct.
3. Click Save to finalize settings.
NOTE
After installing GFI MailArchiver, the Post-installation Wizard redirects you
automatically to this page.
7.16 General Settings
The General Settings option enables you to define your administrator email address and the email
server details for notifications. It also enables you to enable, disable and configure the GFI
MailArchiver version checks. This enables GFI MailArchiver to check for and advise you of any new
versions of GFI MailArchiver.
In this chapter:
7.16.1 Changing General Settings
153
7.16.2 Changing Version Check Settings
154
7.16.1 Changing General Settings
1. Select Configuration tab and click General Settings.
2. Click Change Settings.
GFI MailArchiver
7 Configuring GFI MailArchiver | 153
Screenshot 86: General Settings
3. Perform all the required modifications from the list of available options.
Table 78: General Settings Options
OPTION
DESCRIPTION
Administrator email
address
Defines the administrator email address where important notifications are sent.
SMTP Server
Defines the SMTP server used by GFI MailArchiver to send notifications and to restore emails
from Archive Store.
Port Number
Defines the port number over which GFI MailArchiver will communicate to the SMTP server.
Default value: 25
Use SSL
Instructs GFI MailArchiver to connect and communicate with the SMTP Server using SSL.
The SMTP requires
authentication
Instructs GFI MailArchiver to connect to the SMTP server using a username and a password.
The username and password fields are automatically displayed if this option is chosen.
4. Click Save to save new setup.
5. Click Send a test email to confirm that details are correct.
7.16.2 Changing Version Check Settings
1. Select Configuration tab and click General Settings.
2. Click Change Check Version Settings.
GFI MailArchiver
7 Configuring GFI MailArchiver | 154
Screenshot 87: Version check configuration
3. Perform all the required modifications from the list of available options.
Table 79: Version Check settings
OPTION
DESCRIPTION
Enable Version
Check
Enables/Disables the GFI MailArchiver Version Check. Uncheck option to disable GFI
MailArchiver automated checks for newer versions.
Enable Proxy server
Instructs GFI MailArchiver to use a proxy server to connect to the GFI servers and check for
updated versions.
Proxy server/Port
Defines the Proxy server and the port that GFI MailArchiver uses to connect to the GFI servers
for version check purposes.
Proxy requires
authentication
Enable option if the Proxy server specified in the Proxy server and Port fields requires
authentication.
Username/Password
Defines the username and password that GFI MailArchiver uses if the proxy server uses
authentication.
4. Click Save to save new setup.
GFI MailArchiver
7 Configuring GFI MailArchiver | 155
8 Configuring Email Client Access
GFI MailArchiver provides integration with various email clients and technologies so that users can
access their archived emails from remote locations, while in the office or on the move. Use the Email
Client Access page to:
Download GFI MailArchiver Outlook Connector, a Microsoft Outlook® plugin that enables users to
view archived emails from their Microsoft Outlook client.
Download GFI MailArchiver Outlook Addon, a tool that enables users to manually archive emails
contained in their Microsoft Outlook® installation.
Configure an IMAP account on your email client of choice to view archived emails in mailboxes you
have access to.
8.1 Installing GFI MailArchiver Outlook Connector
The GFI MailArchiver Outlook Connector enables users to synchronize their Microsoft Outlook® folders
with the data archived by GFI MailArchiver. This connector can be installed via Active Directory®
Group Policy Objects (GPO) or via manual install.
8.2 How Does the GFI MailArchiver Outlook® Connector Work
Figure 2: How does GFI MailArchiver Outlook® connector work?
1. GFI MailArchiver Outlook Connector (installed on client machine) initiates a request
synchronize Microsoft Outlook® folders with GFI MailArchiver.
to
2. GFI MailArchiver retrieves the required email and folder data from the GFI MailArchiver archive
store
.
3. GFI MailArchiver sends the email data
GFI MailArchiver
to the Microsoft Outlook® client machines.
8 Configuring Email Client Access | 156
8.3 Downloading GFI MailArchiver Outlook Connector
The GFI MailArchiver Outlook Connector can be downloaded from the GFI MailArchiver web interface.
1. Open GFI MailArchiver.
2. Select Email Client Access tab.
3. Click Outlook Connector tab.
4. Select one of the available download options link to download GFI MailArchiver Outlook Connector.
Available options are:
Table 80: GFI MailArchiver Outlook Connector versions
OPTION
DESCRIPTION
Outlook Connector (32-bit Outlook)
Download the GFI MailArchiver Outlook Connector for Microsoft Outlook 32-bit version.
Outlook Connector (64-bit Outlook)
Download the GFI MailArchiver Outlook Connector for Microsoft Outlook 64-bit
version.
8.3.1 Changing the Outlook® Connector Tab Availability
By default, the Outlook® Connector tab is visible and available to all users when they log in GFI
MailArchiver. To disable users from seeing it:
1. In the Email Client Access page, click
on the GFI MailArchiver Outlook Connector tab.
2. Select an option and click Save. Available options are:
Table 81: Outlook® Connector Tab Availability options
OPTION
DESCRIPTION
Administrators only
Makes the Outlook® Connector tab available only to users that log on using domain
administrator privileges.
All users and Administrators
Makes the Outlook® Connector tab available to all users, regardless of their logon privileges.
8.4 Outlook® Connector System Requirements
8.4.1 Software
NOTE
The machines where GFI MailArchiver Outlook Connector is deployed must be able to
connect to the GFI MailArchiver server.
Table 82: GFI MailArchiver Outlook Connector software requirements
COMPONENT
Supported Microsoft
Outlook Versions
DESCRIPTION
Microsoft Outlook® 2003 (including Service Packs 1, 2, 3 or 4)
Microsoft Outlook® 2007 (including Service Packs 1 or 2)
Microsoft Outlook® 2010 (x86 and x64 versions)
GFI MailArchiver
8 Configuring Email Client Access | 157
COMPONENT
DESCRIPTION
Windows® 7
Supported Operating
Systems
Windows® Vista
Windows® XP
Windows® Server 2008
Windows® Server 2003
Windows® Server 2000
Internet Explorer® 7 or later (Internet Explorer® 9 Compatibility Mode only)/Mozilla
Firefox/Google Chrome/Safari®
Other Required
Components
HTTP port 80 (or HTTPS default port 443 for secure connections) - used by GFI
MailArchiver Outlook Connector to connect with GFI MailArchiver.
NOTE
GFI MailArchiver Outlook Connector cannot be installed on the Microsoft® Exchange
Server.
NOTE
When using a web-filtering tool, this must be configured to allow all HTTP requests
between GFI MailArchiver server and GFI MailArchiver Outlook Connector. Ensure that
the GFI MailArchiver server’s IP address, NETBIOS name and DNS name are not blocked
by the web filter. For more information, refer to:
http://go.gfi.com/?pageid=MAR_WebFiltering
8.4.2 Hardware
Table 83: GFI MailArchiver Outlook Connector hardware requirements
COMPONENT
REQUIREMENTS
Processor
1GHz processor or more.
Memory
Minimum: 512MB RAM
Recommended: 2GB RAM
Physical Storage
20MB physical disk space required for GFI MailArchiver Outlook Connector installation. More
space is required to store email headers and emails for offline access.
8.4.3 Installing GFI MailArchiver Outlook Connector Without GPO - Manual Install
1. Open GFI MailArchiver.
2. Select Email Client Access tab.
3. Select Outlook Connector tab and download the following to a share accessible by all domains:
MAROC_32bitOutlook.msi (Installer for Microsoft Outlook 2010 32-bit computers only)
MAROC_64bitOutlook.msi (Installer for Microsoft Outlook 2010 64-bit computers only)
GFI MailArchiver
8 Configuring Email Client Access | 158
NOTE
Make sure that when deploying the 32-bit version of the GFI MailArchiver Outlook
Connector, the domain policy used contains only computers with Microsoft Outlook®
2010 32-bit version installed.
Also, ensure to use a domain policy that applies only to computers where Microsoft
Outlook® 2010 64-bit version is installed when deploying GFI MailArchiver 2010 64-bit
edition.
2. Double click on the file and follow the wizard to install
NOTE
To check installation, from Microsoft Outlook®, check that a new folder called GFI
MailArchiver Mailbox is created.
3. <Optional>: Add the Outlook® connector administrator template that will set up Outlook
connector.
a. From command prompt, key in: mmc.exe
b. Click Enter to launch the Microsoft Management Console.
c. Click File > Add/Remove Snap-in… and click Add...
d. Select Group Policy Object Editor snap-in and click Add.
e. Click Browse… and select the domain policy to edit.
f. Select the domain policy and click OK.
g. Click Finish to close ‘Select Group Policy Object’ dialog. Click Close to close ‘Add standalone Snapin’ dialog and click OK to close ‘Add/Remove Snap-in’ dialog; to return to the Microsoft Management
Console.
h. Navigate to Console Root > <domain policy> > User Configuration, right-click Administrative
Templates, and select Add/Remove Templates….
i. Click Add…, browse for the file gfiapps.adm located in: <Program
Files\GFI\MailArchiver\Outlook> and click Open.
j. Click Close to return to the Microsoft Management Console.
For information on how to use the GFI MailArchiver Outlook Connector, refer to the GFI MailArchiver
Outlook Connector manual available from:
http://go.gfi.com/?pageid=MAR_DownloadDocumentation
8.5 Installing GFI MailArchiver Outlook Connector via GPO
This section will help you install GFI MailArchiver Outlook Connector via GPO in the following
environments:
Windows® Server 2003
Windows® Server 2008
Manual Installation (Without GPO)
GFI MailArchiver
8 Configuring Email Client Access | 159
8.5.1 Installing Outlook® Connector via GPO in Windows® Server 2003
1. Open GFI MailArchiver.
2. Select Email Client Access tab.
3. Select Outlook Connector tab and download the following to a share accessible by all domains:
MAROC_32bitOutlook.msi (Installer for Microsoft Outlook 2010 32-bit computers only)
MAROC_64bitOutlook.msi (Installer for Microsoft Outlook 2010 64-bit computers only)
NOTE
Make sure that when deploying the 32-bit version of the GFI MailArchiver Outlook
Connector, the domain policy used contains only computers with Microsoft Outlook®
2010 32-bit version installed.
Also, ensure to use a domain policy that applies only to computers where Microsoft
Outlook® 2010 64-bit version is installed when deploying GFI MailArchiver 2010 64-bit
edition.
4. From command prompt, key in:
mmc.exe
and click Enter to launch the Microsoft Management Console.
5. Click File > Add/Remove Snap-in… and click Add...
6. Select Group Policy Object Editor snap-in and click Add.
7. Click Browse… and select the domain policy to edit.
8. Select the domain policy and click OK.
9. Click Finish to close ‘Select Group Policy Object’ dialog. Click Close to close ‘Add standalone Snapin’ dialog and click OK to close ‘Add/Remove Snap-in’ dialog; to return to the Microsoft Management
Console.
10. Navigate to Console Root > <domain policy> > User Configuration, right-click Administrative
Templates, and select Add/Remove Templates….
11. Click Add…, browse for the file gfiapps.adm located in: <Program Files\GFI\MailArchiver\Outlook>
and click Open.
12. Click Close to return to the Microsoft Management Console.
13. Expand Console Root > <domain policy> > User Configuration > Administrative Templates > GFI
Applications.
GFI MailArchiver
8 Configuring Email Client Access | 160
Screenshot 88: Setting GFI MailArchiver server URL in Windows® Server 2003 GPO
14. From the right pane, double click GFI MailArchiver Server Location policy and select Enabled. In
the Server URL text box enter the URL where user machines can access GFI MailArchiver in the form
http://<hostname>/<GFI MailArchiver virtual folder name>
For example:
http://win2k3entsvr.master-domain.com/MailArchiver
15. <Optional> Click Next Setting and configure the following settings. For each option select Not
Configured to use the default value or click Enable to specify a custom value.
GFI MailArchiver Outlook® Connector Data Path Root - specify a different root location where
store configurations and local emails are stored on client machines. For example, type ‘%MyDocuments%’ to store in the My Documents folder of the logged on user.
GFI MailArchiver Outlook® Connector days span - specify the number of days for which emails
are synchronized. Only emails received within this time span are accessible through GFI MailArchiver Outlook® Connector.
GFI MailArchiver Outlook® Connector download batch size - Specify how many emails can be
downloaded during one synchronization session.
GFI MailArchiver Outlook® Connector connection timeout - Specify the timeout period in milliseconds for accessing data from the GFI MailArchiver server.
GFI MailArchiver Outlook® Connector maximum offline days - Specify the maximum number of
days which a user can set for emails offline access.
GFI MailArchiver
8 Configuring Email Client Access | 161
GFI MailArchiver Outlook® Connector offline support - Enable or disable offline support. If offline support is enabled, specify the number of days to support offline access. If this setting is enabled:
Users are not allowed to modify offline access
GFI MailArchiver Outlook® Connector maximum offline days setting is ignored.
16. Click OK when all settings are configured.
17. Select Console Root > <domain policy> > Computer Configuration > Software Settings.
18. Right click Software installation and select New > Package…
19. In the Open dialog, locate the share where msi file is saved.
NOTE
When selecting the location of the msi file ensure that this is done through ‘My network
locations’ so that the share name in GFI MailArchiver includes the full network share
location rather than the local path.
20. Choose the deployment option - select Assigned and OK.
21. GFI MailArchiver Outlook Connector will be installed the Next time each client machine is started.
To check installation, from Microsoft Outlook®, check that a new folder called GFI MailArchiver
Mailbox is created.
For information on how to use the GFI MailArchiver Outlook Connector, refer to the Outlook
Connector Manual available from:
http://go.gfi.com/?pageid=MAR_DownloadDocumentation
8.5.2 Installing Outlook® Connector via GPO in Windows Server 2008
1. Open GFI MailArchiver.
2. Select Email Client Access tab.
3. Select Outlook Connector tab and download the following to a share accessible by all domains:
MAROC_32bitOutlook.msi (Installer for Microsoft Outlook 2010 32-bit computers only)
MAROC_64bitOutlook.msi (Installer for Microsoft Outlook 2010 64-bit computers only)
NOTE
Make sure that when deploying the 32-bit version of the GFI MailArchiver Outlook
Connector, the domain policy used contains only computers with Microsoft Outlook®
2010 32-bit version installed.
Also, ensure to use a domain policy that applies only to computers where Microsoft
Outlook® 2010 64-bit version is installed when deploying GFI MailArchiver 2010 64-bit
edition.
4. From command prompt, key in:
mmc.exe
and click Enter to launch the Microsoft Management Console.
GFI MailArchiver
8 Configuring Email Client Access | 162
5. Click File > Add/Remove Snap-in… and click Add...
6. Select Group Policy Management Editor snap-in and click Add.
7. Click Browse… and select the domain policy to edit.
8. Select the domain policy and click OK.
9. Click Finish to close ‘Select Group Policy Object’ dialog. Click Close to close ‘Add standalone Snapin’ dialog and click OK to close ‘Add/Remove Snap-in’ dialog; to return to the Microsoft Management
Console.
10. Navigate to Console Root > <domain policy> > User Configuration > Policies, right-click
Administrative Templates, and select Add/Remove Templates….
11. Click Add…, browse for the file gfiapps.adm located in: <Program
Files\GFI\MailArchiver\Outlook> and click Open.
12. Click Close to return to the Microsoft Management Console.
13. Expand Console Root > <domain policy> > User Configuration > Policies > Administrative
Templates > Classic Administrative Templates (ADM) > GFI Applications.
Screenshot 89: Setting GFI MailArchiver server URL in Windows® Server 2003 GPO
14. From the right pane, double click GFI MailArchiver Server Location policy and select Enabled. In
the Server URL text box enter the URL where user machines can access GFI MailArchiver in the form
http://<hostname>/<GFI MailArchiver virtual folder name>
For example:
http://win2k3entsvr.master-domain.com/MailArchiver
GFI MailArchiver
8 Configuring Email Client Access | 163
15. <Optional> Click Next Setting and configure the following settings. For each option select Not
Configured to use the default value or click Enable to specify a custom value.
GFI MailArchiver Outlook® Connector Data Path Root - specify a different root location where
store configurations and local emails are stored on client machines. For example, type ‘%MyDocuments%’ to store in the My Documents folder of the logged on user.
GFI MailArchiver Outlook® Connector days span - specify the number of days for which emails
are synchronized. Only emails received within this time span are accessible through GFI MailArchiver Outlook® Connector.
GFI MailArchiver Outlook® Connector download batch size - Specify how many emails can be
downloaded during one synchronization session.
GFI MailArchiver Outlook® Connector connection timeout - Specify the timeout period in milliseconds for accessing data from the GFI MailArchiver server.
GFI MailArchiver Outlook® Connector maximum offline days - Specify the maximum number of
days which a user can set for emails offline access.
GFI MailArchiver Outlook® Connector offline support - Enable or disable offline support. If offline support is enabled, specify the number of days to support offline access. If this setting is enabled:
Users are not allowed to modify offline access
GFI MailArchiver Outlook® Connector maximum offline days setting is ignored.
16. Click OK when all settings are configured.
17. Select Console Root > <domain policy> > Computer Configuration > Policies > Software
Settings.
18. Right click Software installation and select New > Package…
19. In the Open dialog, locate the share where msi file is saved.
NOTE
When selecting the location of the msi file ensure that this is done through ‘My network
locations’ so that the share name in GFI MailArchiver includes the full network share
location rather than the local path.
20. Choose the deployment option - select Assigned and OK.
21. GFI MailArchiver Outlook Connector will be installed the Next time each client machine is started.
To check installation, from Microsoft Outlook®, check that a new folder called GFI MailArchiver
Mailbox is created.
For information on how to use the GFI MailArchiver Outlook Connector, refer to the Outlook
Connector Manual available from:
http://go.gfi.com/?pageid=MAR_DownloadDocumentation
8.6 Configuring Manual Archiving
The GFI MailArchiver Outlook Addon enables users to manually archive emails and files (such as
documents or images) from Microsoft Outlook®. This connector can be installed via Active Directory®
GFI MailArchiver
8 Configuring Email Client Access | 164
Group Policy Objects (GPO) or via manual install.
IMPORTANT
Emails archived through the GFI MailArchiver Outlook Addon get archived irrespective of
any rules set in Rules-based Archiving.
8.6.1 How Does Manual Archiving Work?
1. Within Microsoft Outlook®, user selects an email, a group of emails, a file or a number of files, or a
folder and uses the archive commands in the additional toolbar that is installed when GFI
MailArchiver Outlook Addon is deployed.
NOTE
Using the File Archiving feature of GFI MailArchiver Outlook Addon, you can easily
archive files from any location on your machine (including Microsoft Office documents),
into GFI MailArchiver. This feature is designed to provide a centralized location for user
data.
2. GFI MailArchiver Outlook Addon (installed on client machine) initiates a request to synchronize the
selected emails with GFI MailArchiver.
8.6.2 GFI MailArchiver Outlook Addon System Requirements
8.6.3 Software
NOTE
The machines where GFI MailArchiver Outlook Addon is deployed must be able to
connect to the GFI MailArchiver server.
Table 84: GFI MailArchiver Outlook Addon software requirements
SOFTWARE
Supported Microsoft
Outlook ® Versions
DESCRIPTION
Microsoft Outlook® 2003 (including Service Packs 1, 2, 3 or 4)
Microsoft Outlook® 2007 (including Service Packs 1 or 2)
Microsoft Outlook® 2010 (x86 and x64 versions)
Supported Operating
Systems
Windows® 8
Windows® 7
Windows® Vista
Windows® XP
Windows® Server 2008
Windows® Server 2003
Other Required
Components
HTTP port 80 (or HTTPS default port 443 for secure connections) - used by GFI
MailArchiver Outlook Addon to connect with GFI MailArchiver.
Microsoft .NET® Framework 4 Client Profile
GFI MailArchiver
8 Configuring Email Client Access | 165
NOTE
GFI MailArchiver Outlook Addon cannot be installed on the Microsoft® Exchange Server.
NOTE
When using a web-filtering tool, this must be configured to allow all HTTP requests
between GFI MailArchiver server and GFI MailArchiver Outlook Addon. Ensure that the
GFI MailArchiver server’s IP address, NETBIOS name and DNS name are not blocked by
the web filter. For more information, refer to:
http://go.gfi.com/?pageid=MAR_WebFiltering
8.6.4 Hardware
Table 85: GFI MailArchiver Outlook Addon hardware requirements
COMPONENT
REQUIREMENTS
Processor
1GHz processor or more.
Memory
Minimum: 512MB RAM
Recommended: 2GB RAM
Physical Storage
20MB physical disk space required for GFI MailArchiver Outlook Addon installation. More
space is required to store email headers and emails for offline access.
8.7 Enabling and Disabling GFI MailArchiver Outlook® Addon
To disable or enable GFI MailArchiver Outlook Addon:
1. Log on to GFI MailArchiver with a user that has administrative privileges.
2. From the Configuration page, select Archiving Method.
3. Click Configure Archiving Method.
GFI MailArchiver
8 Configuring Email Client Access | 166
Screenshot 90: Enable or disable Manual Archiving
4. Perform one of the following actions:
Select Manual Archiving to enable GFI MailArchiver Outlook Addon.
Unselect Manual Archiving to disable GFI MailArchiver Outlook Addon.
5. Click Save to complete the configuration.
8.8 Downloading and Installing GFI MailArchiver Outlook Addon
The GFI MailArchiver Outlook Addon can be downloaded from the GFI MailArchiver web interface.
IMPORTANT
GFI MailArchiver Outlook Addon is not available for download if Manual Archiving is not
enabled. For more information, refer to Configuring Archiving Method (page 98).
1. Open GFI MailArchiver.
2. Click Email Client Access tab.
3. From Manual Archiving area, click Download Outlook Addon.
4. Double click the downloaded file and follow the wizard to install.
GFI MailArchiver
8 Configuring Email Client Access | 167
NOTE
To verify successful installation, check that GFI MailArchiver Outlook Addon toolbar is
visible within Microsoft Outlook®.
8.8.1 Changing the Outlook® Addon Tab Availability
By default, the GFI MailArchiver Outlook Addon tab is visible and available to all users when they log
in GFI MailArchiver. To disable users from seeing it:
1. In the Email Client Access page, click
on the GFI MailArchiver Outlook Addon tab.
2. Select an option and click Save. Available options are:
Table 86: Outlook® Connector Tab Availability options
OPTION
DESCRIPTION
Administrators only
Makes the GFI MailArchiver Outlook Addon tab available only to users that log on using domain
administrator privileges.
All users and Administrators
Makes the GFI MailArchiver Outlook Addon tab available to all users, regardless of their logon
privileges.
8.8.2 Installing GFI MailArchiver Outlook Addon Manually
1. Open GFI MailArchiver.
2. Click Email Client Access tab.
3. From Manual Archiving area, click Download Outlook Addon.
4. Double click the downloaded file and follow the wizard to install.
NOTE
To verify successful installation, check that Archive buttons are now visible within
Microsoft Outlook®.
8.8.3 Installing Manual Archiving Plugin Through GPO
This section will help you install GFI MailArchiver Outlook Addon via GPO in the following
environments:
Windows® Server 2003
Windows® Server 2008
8.8.4 Installing GFI MailArchiver Outlook Addon Through GPO Windows® Server 2003
1. Open GFI MailArchiver.
2. Click Email Client Access tab.
3. From Manual Archiving area, click Download Outlook Addon.
4. Save the downloaded file in a shared location accessible by all domains.
5. From command prompt, key in mmc.exe and click Enter to launch the Microsoft Management
Console.
6. Click File > Add/Remove Snap-in….
GFI MailArchiver
8 Configuring Email Client Access | 168
7. Select Group Policy Object Editor snap-in and click Add.
8. Click Browse… and select the domain policy to edit.
9. Select the domain policy and click OK.
10. Click Finish to close ‘Select Group Policy Object’ dialog. Click Close to close ‘Add standalone
Snap-in’ dialog and click OK to close ‘Add/Remove Snap-in’ dialog; to return to the Microsoft
Management Console.
11. Navigate to Console Root > <domain policy> > User Configuration, right-click Administrative
Templates, and select Add/Remove Templates….
12. Click Add…, browse for the file gfiapps.adm located in: <Program
Files\GFI\MailArchiver\Outlook> and click Open.
13. Click Close to return to the Microsoft Management Console.
14. Expand Console Root > <domain policy> > User Configuration > Administrative Templates >
Classic Administrative Templates (ADM) > GFI Applications.
15. From the right pane, double click GFI MailArchiver Server Location policy and select Enabled. In
the Server URL text box enter the URL where user machines can access GFI MailArchiver in the form
http://<hostname>/<GFI MailArchiver virtual folder name>
For example:
http://win2k3entsvr.master-domain.com/MailArchiver
16. Click OK when all settings are configured.
17. Select Console Root > <domain policy> > User Configuration > Software Settings.
18. Right click Software installation and select New > Package…
19. In the Open dialog, locate the share where msi file is saved.
NOTE
When selecting the location of the msi file ensure that this is done through ‘My network
locations’ so that the share name in GFI MailArchiver includes the full network share
location rather than the local path.
20. Choose the deployment option - select Assigned and OK.
21. GFI MailArchiver Outlook Addon will be installed the Next time each client machine is started.
To check installation, verify that the GFI MailArchiver Outlook Addon toolbar is visible in Microsoft
Outlook®.
NOTE
For information on how to use the GFI MailArchiver Outlook Addon, refer to the GFI
MailArchiver Outlook Addon manual available from:
http://www.gfi.com/mar/manual/
8.8.5 Installing Manual Archiving Through GPO Windows® Server 2008
1. Open GFI MailArchiver.
GFI MailArchiver
8 Configuring Email Client Access | 169
2. Click Email Client Access tab.
3. From Manual Archiving area, click Download Outlook Addon.
4. From command prompt, key in mmc.exe and click Enter to launch the Microsoft Management
Console.
5. Click File > Add/Remove Snap-in… and click Add...
6. Select Group Policy Management Editor snap-in and click Add.
7. Click Browse… and select the domain policy to edit.
8. Select the domain policy and click OK.
9. Click Finish to close ‘Select Group Policy Object’ dialog. Click Close to close ‘Add standalone Snapin’ dialog and click OK to close ‘Add/Remove Snap-in’ dialog; to return to the Microsoft Management
Console.
10. Navigate to Console Root > <domain policy> > User Configuration > Policies, right-click
Administrative Templates, and select Add/Remove Templates….
11. Click Add…, browse for the file gfiapps.adm located in: <Program Files\GFI\MailArchiver\Outlook>
and click Open.
12. Click Close to return to the Microsoft Management Console.
13. Expand Console Root > <domain policy> > User Configuration > Policies > Administrative
Templates > Classic Administrative Templates > GFI Applications.
Screenshot 91: Setting GFI MailArchiver server URL in Windows® Server 2008 GPO
GFI MailArchiver
8 Configuring Email Client Access | 170
14. From the right pane, double click GFI MailArchiver Server Location policy and select Enabled. In
the Server URL text box enter the URL where user machines can access GFI MailArchiver in the form
http://<hostname>/<GFI MailArchiver virtual folder name>
For example:
http://win2k3entsvr.master-domain.com/MailArchiver
15. <Optional> Click Next Setting and configure the following settings. For each option select Not
Configured to use the default value or click Enable to specify a custom value.
Data Path Root - specify a different root location where store configurations and local emails are
stored on client machines. For example, type ‘%MyDocuments%’ to store in the My Documents
folder of the logged on user.
Days span - specify the number of days for which emails are synchronized. Only emails received
within this time span are accessible through GFI MailArchiver Outlook Addon.
Download batch size - Specify how many emails can be downloaded during one synchronization
session.
Connection timeout - Specify the timeout period in milliseconds for accessing data from the GFI
MailArchiver server.
Maximum offline days - Specify the maximum number of days which a user can set for emails offline access.
Offline support - Enable or disable offline support. If offline support is enabled, specify the
number of days to support offline access. If this setting is enabled:
Users are not allowed to modify offline access
GFI MailArchiver Outlook Addon maximum offline days setting is ignored.
16. Click OK when all settings are configured.
17. Select Console Root > <domain policy> > User Configuration > Software Settings.
18. Right click Software installation and select New > Package…
19. In the Open dialog, locate the share where msi file is saved.
NOTE
When selecting the location of the msi file ensure that this is done through ‘My network
locations’ so that the share name in GFI MailArchiver includes the full network share
location rather than the local path.
20. Choose the deployment option - select Assigned and OK.
21. GFI MailArchiver Outlook Addon will be installed the Next time each client machine is started.
To check installation, verify that the GFI MailArchiver Outlook Addon toolbar is visible in Microsoft
Outlook®.
GFI MailArchiver
8 Configuring Email Client Access | 171
NOTE
For information on how to use the GFI MailArchiver Outlook Addon, refer to the GFI
MailArchiver Outlook Addon manual available from:
http://www.gfi.com/mar/manual/
8.8.6 Configuring Outlook Addon
When GFI MailArchiver Outlook Addon is installed, default settings are sufficient for the add-in to
operate. However, various settings can be customized according to the user’s preferences.
To change default settings:
1. Open Microsoft Outlook®.
2. In Microsoft Outlook® ribbon, click
3. From the drop down menu, click
GFI MailArchiver
Addon.
Settings.
8 Configuring Email Client Access | 172
Screenshot 92: GFI MailArchiver Outlook Addon configuration settings.
4. In the Service address for GFI MailArchiver area, select from the following options:
Table 87: Outlook® Addon Server address configuration
OPTION
DESCRIPTION
Default
This field contains the server address if GFI MailArchiver Outlook Addon is
installed through GPO and your Systems Administrator has also deployed
the server address. If the field is blank, you will receive an error when
trying to archive an email.
Custom
Manually specify the address where GFI MailArchiver is installed.
Ignore SSL Policy errors
This option is enabled by default. It enables GFI MailArchiver Outlook
Addon to connect to GFI MailArchiver, ignoring SSL policy errors when
validating the remote certificate provided by the GFI MailArchiver for
authentication. This allows users to connect to GFI MailArchiver server
over SSL even if the server is using a self-signed, expired, withdrawn,
compromised, or otherwise invalid certificate.
GFI MailArchiver
8 Configuring Email Client Access | 173
IMPORTANT
The Service address for GFI MailArchiver is always set to Default, even when GFI
MailArchiver Outlook Addon is installed manually. If the field is blank, perform the
following actions:
1. Contact your System Administrator and ask for the server address
2. Click the Custom button and type the address provided in the address field.
5. Under Deletion policy for manually archived messages within Outlook select one of the following
options:
Table 88: Actions to perform on local emails
OPTION
DESCRIPTION
Do not delete
archived messages
Select this option to keep all emails from being deleted after they are archived.
Permanently delete
archived messages
immediately
When selected, the emails will be deleted as soon as they are archived.
Permanently delete
archived messages
after N days
Specify the number of days to keep local copies of messages after these have been archived
(Default 30 days).
Apply deletion policy retroactively
When enabled, the retention method selected will be applied to all old emails that were
archived but not yet deleted. If this option is not selected, email deletion will become effective
only on emails archived from that day onward.
NOTE
These settings do not effect emails stored within the archive store in GFI MailArchiver
and are not affected by retention policies configured in GFI MailArchiver.
6. In the Authentication area, specify one or both methods of authentication:
Table 89: Outlook Addon authentication method
OPTION
DESCRIPTION
Windows authentication
GFI MailArchiver Outlook Addon uses your Windows® credentials to connect with GFI
MailArchiver server. This method is used when you are working in an Intranet environment and connected to the same Active Directory® domain as the GFI MailArchiver
server.
Custom authentication
Select this method of authentication to connect to GFI MailArchiver from a remote
location outside your organization's network. The Username and Password provided
here are authenticated on the GFI MailArchiver server.
IMPORTANT
When forms authentication is configured on the server, GFI MailArchiver
Outlook Addon requires custom authentication.
7. In the Archiving Operations area, select from the following options:
GFI MailArchiver
8 Configuring Email Client Access | 174
Table 90: Outlook Addon archiving options
OPTION
DESCRIPTION
Automatically retry on
recoverable error
When selected, GFI MailArchiver Outlook Addon automatically retries to archive the
selected email when a problem is encountered and recovered.
Automatically close
dialog on completion
Select this option to automatically close the Archive Progress dialog after the selected
email is archived.
8. Click OK.
8.9 Configuring GFI MailArchiver IMAP Client Access
GFI MailArchiver supports a number of e-mail clients that use IMAP to transfer archived e-mail
messages from the Archive Stores to the email client. Users are able to access a read-only view of
their archived emails using one of the following supported email clients:
Android email application
Apple Mail
iOS5 email application
Microsoft Outlook® 2003
Microsoft Outlook® 2007
Microsoft Outlook® 2010
Microsoft Outlook® 2013
Microsoft Outlook® 2011 for Mac
Mozilla Thunderbird
Windows® Live Mail
NOTE
Internet Message Access Protocol (IMAP) is an Internet protocol for e-mail retrieval.
When IMAP is enabled for the first time, you may notice a delay until your email client
synchronizes with GFI MailArchiver to retrieve archived emails.
Viewing Shared Mailboxes
As a user with access to other users' mailboxes, you can use your IMAP account to view the shared
mailboxes you have access to. To do this, you need to configure a new account for each shared
mailbox. Follow the instructions on how to create a new IMAP client account in the email client of
your choice, however, as a username, type your username in the following format: <your email
address> ¦ <user email address> using your own password.
IMPORTANT
To configure email clients to use IMAP, you must first configure the IMAP Server. For
more information, refer to Configuring IMAP Server (page 134).
8.9.1 Configuring IMAP in Apple Mail 3.0
Follow these instructions to configure IMAP in Apple Mail 3.0:
GFI MailArchiver
8 Configuring Email Client Access | 175
NOTE
The following configuration requires an Internet connection.
1. Click Mail > Preferences....
2. On the Accounts tab, click the + button to add a new account.
3. Enter the following information:
OPTION
VALUE
Full Name:
[your name]
Email Address:
[full email address]
Password:
[your password]
4. Click Continue.
5. Enter the following Incoming Mail Server information:
OPTION
VALUE
Account Type:
Select IMAP
Description
Enter account description
Incoming Mail Server:
imap.gfi.com
User Name:
[full email address]
Password:
[your password]
6. Click Continue to view the Incoming Mail Security screen.
7. Select Use Secure Sockets Layer (SSL) to connect to GFI MailArchiver using an encrypted
connection.
NOTE
If SSL is not enabled, the connection will be unencrypted.
8. Enter the following Outgoing Mail Server information:
OPTION
VALUE
Outgoing Mail Server:
smtp.gfi.com
Use Authentication:
selected
User Name:
[User name]
Password:
[your password]
9. Click Continue.
10. Review your Account Summary, and click Create.
11. Select the account you just created.
12. In the Advanced tab, enter the following information:
OPTION
VALUE
Port
Use the default port number 44143 or the port number specified by your Systems Administrator.
Use SSL
Select to connect to GFI MailArchiver using an encrypted connection.
GFI MailArchiver
8 Configuring Email Client Access | 176
8.9.2 Configuring IMAP in iOS5
Follow these instructions to configure IMAP in iOS5:
NOTE
The following configuration requires an Internet connection.
1. Tap Settings and select Mail, Contacts, Calendars.
2. In the Accounts section, tap Add Account.
3. From the list, select Other.
4. Select Add Mail Account and enter the following information:
OPTION
VALUE
Name:
[your name]
Address:
[full email address]
Password:
[your password]
Description:
[meaningful description]
5. Tap Next. The device will connect to the Internet and check your account.
6. Select IMAP and enter the following information:
INCOMING MAIL SERVER DETAILS:
VALUE
Host Name:
[IMAP server name]
User Name:
[full email address]
Password:
[your password]
OUTGOING MAIL SERVER DETAILS:
VALUE
Host Name:
[SMTP server name]
User Name:
[User name]
Password:
[your password]
NOTE
Outgoing Mail Server details must be provided by your Systems Administrator.
7. Tap Next. If you receive an error indicating that you Cannot Connect Using SSL, tap Yes to
continue without SSL, then tap Save.
NOTE
SSL can be configured after you save the new email account. If SSL is not enabled, the
connection will be unencrypted.
8. From Mail, Contacts, Calendars, locate the account you created under the Accounts section.
9. Tap the account name, scroll to Advanced.
GFI MailArchiver
8 Configuring Email Client Access | 177
10. Under Incoming Settings, change Server Port number to the default port number 44143 or the
port number specified by your Systems Administrator.
11. Tap Use SSL to turn it on.
12. Tap Next. The device will verify the information you entered.
8.9.3 Configuring IMAP in Microsoft Outlook® 2003
1. Start Outlook®.
2. On the Tools menu, click E-mail Accounts.
3. Under E-mail Accounts, click Add a new e-mail account, and then click Next.
4. Click IMAP as the type of account that you are creating, and then click Next.
5. In the User Information section enter the following information:
OPTION
VALUE
Your Name:
[your name]
E-mail Address:
[full e-mail address]
6. In the Server Information section enter the following information:
OPTION
VALUE
Incoming mail server (IMAP):
[IMAP Server name]
Outgoing mail server (SMTP):
[SMTP server name provided by your Systems Administrator]
7. In the Logon Information section enter the following information:
OPTION
VALUE
User Name:
[full e-mail address]
Password:
[your password]
8. Click More Settings > Advanced enter the following information:
OPTION
VALUE
Incoming server (IMAP):
Use the default port number 44143 or the port number specified by your
Systems Administrator.
This server requires an encrypted
connection
Select this option to connect using an encrypted connection.
NOTE
If SSL is not enabled, the connection will be unencrypted.
9. Click Next after you have completed entering this configuration information, and then click Finish.
8.9.4 Configuring IMAP in Microsoft Outlook® 2007
1. Start Outlook®.
2. On the Tools menu, click Options.
3. On the Mail Setup tab, click Email Accounts.
4. Click New.
5. In the Auto Account Setup dialog box, select Manually configure server settings or additional
server types, then click Next.
6. Click Internet E-Mail, and then click Next.
GFI MailArchiver
8 Configuring Email Client Access | 178
7. In the User Information section enter the following information:
OPTION
VALUE
Your Name:
[your name]
E-mail Address:
[full e-mail address]
8. In the Server Information section enter the following information:
OPTION
VALUE
Account Type:
IMAP
Incoming mail server:
[IMAP server name]
Outgoing mail server (SMTP):
[SMTP server name provided by your Systems Administrator]
9. In the Logon Information section enter the following information:
OPTION
VALUE
User Name:
[full e-mail address]
Password:
[your password]
10. Click More Settings > Advanced enter the following information:
OPTION
VALUE
Incoming server (IMAP):
Use the default port number 44143 or the port number specified by your
Systems Administrator.
Use the following type of encrypted
connection:
Select the encryption method provided by your Systems Administrator.
NOTE
If prompted, accept the Security Certificate.
NOTE
If ‘NONE’ is selected as the type of encryption, the connection will be unencrypted.
11. Click Next after you have completed entering this configuration information, and then click
Finish.
8.9.5 Configuring IMAP in Microsoft Outlook® 2010
1. Start Outlook®.
2. On the File menu, click Info, then click Account Settings.
3. Select Account Settings from the list.
4. On the E-mail tab, click New.
5. Select the Manually configure server settings or additional server types check box, and then click
Next.
6. Click Internet E-Mail, and then click Next.
7. In the User Information section enter the following information:
OPTION
VALUE
Your Name:
[your name]
E-mail Address:
[full e-mail address]
8. In the Server Information section enter the following information:
GFI MailArchiver
8 Configuring Email Client Access | 179
OPTION
VALUE
Account Type:
IMAP
Incoming mail server:
[IMAP server name]
Outgoing mail server (SMTP):
[SMTP server name provided by your Systems Administrator]
9. In the Logon Information section enter the following information:
OPTION
VALUE
User Name:
[full e-mail address]
Password:
[your password]
10. Click More Settings > Advanced enter the following information:
OPTION
VALUE
Incoming server (IMAP):
Use the default port number 44143 or the port number specified by your
Systems Administrator.
Use the following type of encrypted
connection:
Select the encryption method provided by your Systems Administrator.
NOTE
If prompted, accept the Security Certificate.
NOTE
If ‘NONE’ is selected as the type of encryption, the connection will be unencrypted.
11. Click Next after you have completed entering this configuration information, and then click
Finish.
8.9.6 Configuring IMAP in Microsoft Outlook 2013
1. Start Outlook®.
2. On the File menu, click Info, then click Account Settings.
3. Select Account Settings from the list.
4. On the E-mail tab, click New.
5. Select the Manually configure server settings or additional server types check box, and then click
Next.
6. Click Internet E-Mail, and then click Next.
7. In the User Information section enter the following information:
OPTION
VALUE
Your Name:
[your name]
E-mail Address:
[full e-mail address]
8. In the Server Information section enter the following information:
OPTION
VALUE
Account Type:
IMAP
Incoming mail server:
[IMAP server name]
Outgoing mail server (SMTP):
[SMTP server name provided by your Systems Administrator]
9. In the Logon Information section enter the following information:
GFI MailArchiver
8 Configuring Email Client Access | 180
OPTION
VALUE
User Name:
[full e-mail address]
Password:
[your password]
10. Click More Settings > Advanced enter the following information:
OPTION
VALUE
Incoming server (IMAP):
Use the default port number 44143 or the port number specified by your
Systems Administrator.
Use the following type of encrypted
connection:
Select the encryption method provided by your Systems Administrator.
NOTE
If prompted, accept the Security Certificate.
NOTE
If ‘NONE’ is selected as the type of encryption, the connection will be unencrypted.
11. Click Next after you have completed entering this configuration information, and then click
Finish.
8.9.7 Configuring IMAP in Outlook® 2011 for Mac
Follow these instructions to configure IMAP Outlook® 2011 for Mac:
1. Open Outlook® 2011.
2. If you see a Welcome to Outlook® screen, click Add Account. Otherwise click Tools > Accounts and
click + in the menu bar.
3. Click E-mail Account.
4. Enter the following information:
OPTION
VALUE
Email Address:
[full email address]
Password:
[your password]
User Name:
[full email address]
Type:
Select IMAP
Incoming Server:
[IMAP server name]
Select Override default port and enter
port number:
Use the default port number 44143 or the port number specified by your
Systems Administrator.
Use SSL to connect (recommended)
Select to connect to GFI MailArchiver using an encrypted connection.
NOTE
If SSL is not enabled, the connection will be unencrypted.
Outgoing Server:
[SMTP server name provided by your Systems Administrator]
NOTE
Un-select Configure Automatically.
5. Click Add Account.
GFI MailArchiver
8 Configuring Email Client Access | 181
6. In the Accounts window, click on More Options and set Authentication to Use Incoming Server
Info.
7. Click Advanced and select Use IMAP IDLE (If the server supports it) to be notified when there are
new messages.
8. Click OK.
8.9.8 Configuring IMAP in Windows® Live Mail
1. Open Windows® Live Mail and from the Accounts tab, click Email.
2. In the Add your email accounts window enter the following information:
OPTION
VALUE
Email Address:
[full email address]
Password:
[your password]
Manually configure server settings:
[Selected]
3. Click Next.
4. In the Configure server settings window enter the following information:
OPTION
VALUE
Incoming server information:
Server type:
[port number]
Server address:
[IMAP server name]
Port:
Use the default port number 44143 or the port number specified by your Systems
Administrator.
Requires a secure connection
(SSL):
Select to connect to GFI MailArchiver using an encrypted connection.
NOTE
If SSL is not enabled, the connection will be unencrypted.
Authenticate using:
[Clear text]
Outgoing server information:
[Use details provided by your Systems Administrator]
5. Click Next, then click Finish.
8.9.9 Configuring IMAP on Android
Follow these instructions to configure IMAP on Android devices:
NOTE
The following configuration requires an Internet connection.
1. Launch Email client and select option to create a new IMAP email account.
2. Configure the following Incoming Mail Server settings:
OPTION
VALUE
Email Address:
[full email address]
Password:
[your password]
3. In Manual setup mode, enter the following information:
OPTION
VALUE
Username:
[full email address]
GFI MailArchiver
8 Configuring Email Client Access | 182
OPTION
VALUE
Password:
[your password]
IMAP server:
[IMAP server name]
Port:
Use the default port number 44143 or the port number specified by your Systems Administrator.
Security type:
Select the Security type provided by your Systems Administrator.
NOTE
If Security Type is set to None, your connection to the IMAP server will be unencrypted.
4. After entering your IMAP configuration parameters, the device checks your incoming settings.
5. When prompted, enter Outgoing server settings supplied by your System Administrator. The device
checks your outgoing settings.
NOTE
Configuration instructions depend on your Android OS version. Consult your device
documentation for more information on how to set up a new IMAP account.
8.9.10 Configuring IMAP in Mozilla Thunderbird 10
Follow these instructions to configure IMAP in Mozilla Thunderbird 10:
1. In Thunderbird, select File > New > Mail Account.
2. In the Mail Account Setup screen enter the following information:
OPTION
VALUE
Your name:
[first and last name]
Email address:
[full email address]
Password:
[your password]
3. Click Continue.
NOTE
Click Stop to prevent Thunderbird from automatically detecting account settings, then
click Manual config.
4. In Mail Account Setup, enter the following information:
OPTION
VALUE
Incoming:
From the drop down menu, select IMAP.
Server hostname:
[IMAP server name]
Port:
[use default]
SSL:
Select the encryption type provided by your Systems Administrator.
NOTE
If SSL is not enabled, the connection will be unencrypted.
Authentication:
[Normal password]
Outgoing:
[Use settings provided by your Systems Administrator]
GFI MailArchiver
8 Configuring Email Client Access | 183
5. Click Advanced Config and under the account name locate Server Settings. Enter the following
information:
OPTION
VALUE
Port:
Use the default port number 44143 or the port number specified by your Systems Administrator.
Username:
[full email address]
6. After Thunderbird verifies the account information, click Create Account.
7. Click Get Mail to download emails.
GFI MailArchiver
8 Configuring Email Client Access | 184
9 Import and Export Emails
GFI MailArchiver enables you to extract emails from various email databases and to import them into
the Archive Stores.
IMPORTANT
If Microsoft Outlook® is not detected on the machine where the tool is running, the
following import options are disabled:
Import from .pst files
Download to PST option when selecting Export data from GFI MailArchiver.
GFI MailArchiver supports only Microsoft Outlook® 2003/2007/2010 32bit.
Through GFI MailArchiver, you can also export emails from the Archive Stores, for example, to restore
deleted emails. GFI MailArchiver Import Export Tool can export emails:
to a specific email address
to a folder on disk in .eml or .msg format
to a PST file.
9.1 Import Emails From Microsoft® Exchange Mailboxes
The GFI MailArchiver Import Export Tool enables you to extract emails from Microsoft® Exchange
mailboxes and import them to the GFI MailArchiver Archive Stores.
GFI MailArchiver
9 Import and Export Emails | 185
The process of adding email from Microsoft® Exchange Mailboxes to
GFI MailArchiver involves the following procedure:
1. The GFI MailArchiver Import Export Tool extracts emails from
Microsoft® Exchange mailboxes.
2. The GFI MailArchiver Import Export Tool converts the emails to
MIME format.
3. The Import Service processes the extracted emails based on the
date of each email.
4. GFI MailArchiver stores emails in the appropriate archive store.
9.1.1 Step 1: Importing emails from a remote computer
IMPORTANT
This section only applies when extracting emails from a remote machine. If importing
emails from the same machine where GFI MailArchiver is installed, skip to Run the GFI
MailArchiver Import Export Tool in this manual.
GFI MailArchiver lets you extract email mailboxes located on remote machines. To do this:
1. From the GFI MailArchiver machine, navigate to <GFI MailArchiver installation path>\MAIS\
GFI MailArchiver
9 Import and Export Emails | 186
2. Share Pickup folder to give full read and write permissions to the remote machine from where the
GFI MailArchiver Import Export Tool is to run. To share a folder:
In Windows® Server 2003:
a. Right-click the Pickup folder and select Sharing and Security…
b. Select Share this folder and click Permissions button to enter the Permissions dialog.
c. Click Add.
d. Enter the username of the user where the tool is going to be run and click Check Names to confirm
the user.
e. Click OK to add the user in the Permissions dialog.
f. In the Permissions dialog select the username added and select the Allow checkbox for Full Control.
g. Click OK to save and exit the Permissions dialog.
h. Click OK to save and exit the folder properties sharing dialog.
In Windows® Server 2008:
a. Right-click Pickup folder and select Share…
b. Specify the credentials under which the GFI MailArchiver Import Export Tool will run and click Add.
c. From the Permission Level drop-down list next to the added user, select Co-owner.
d. Select Share and click Done.
3. Return to where GFI MailArchiver is installed and copy the MarcImportExport folder.
4. Paste the folder on remote machine.
5. Open an instance of CMD
6. Browse to the MarcImportExport Folder on the local machine
7. Run the following command: <regsvr32 redemption.dll>
8. Run MArcImportExport.exe.
9.1.2 Microsoft® Exchange mailbox access permissions – Grant Permissions
The Import from Microsoft Exchange Mailbox Wizard within GFI MailArchiver Import Export Tool
uses the credentials of the logged-on user when run on the Microsoft® Exchange Server machine
directly. To run the wizard on a server that is not the Microsoft® Exchange Server 2003/2007/2010
machine, specify a user name and a password. This account needs to be granted full mailbox access
(‘SendAs’ and ‘ReceiveAs’ permissions) on the mailboxes from which emails are to be extracted.
NOTE
It is recommended to remove these permissions after extracting the mailboxes.
See Also:
Importing mailboxes remotely from Microsoft Exchange 2003 server
Importing mailboxes remotely from Microsoft Exchange 2007
Importing mailboxes remotely from Microsoft Exchange 2007 SP1 / SP2 / SP3
Importing mailboxes remotely from Microsoft Exchange 2010
GFI MailArchiver
9 Import and Export Emails | 187
Importing mailboxes remotely from Microsoft® Exchange Server 2003 server
1. Open Microsoft® Exchange System Manager.
2. Navigate to Servers > [Server Name] > [Storage Group], right click on the Mailbox Store and
select Properties.
3. Select Security tab.
4. Click Advanced button and uncheck Allow inheritable permissions… checkbox.
5. In the Security dialog box, select Copy.
6. Click OK to apply changes and return to the Mailbox Store Security properties.
7. In the Security tab, select Administrator from the Group or user names.
8. From the Permissions list, check Allow check boxes for Receive As and Send As.
9. Repeat steps 7 and 8 to allow Receive As and Send As permissions for:
Domain Admins
Enterprise Admins
Microsoft® Exchange Domain Servers.
10. Click OK to save settings.
11. Restart the Information Store:
a. Navigate to Start > Run, type services.msc, and click OK.
b. In the Results pane, right-click Microsoft Exchange Information Store service and
click Restart.
Importing mailboxes remotely from Microsoft® Exchange Server 2007
1. Open the Microsoft Exchange Management Shell.
2. Run the following PowerShell commandlet:
Add-ADPermission -identity "Mailbox Store" -User "Trusted User" AccessRights GenericAll
NOTE
Replace Mailbox Store with the name of the mailbox store that contains the
mailboxes to import and ‘Trusted User’ with the user that will be granted full mailbox
access.
Example:
Add-ADPermission –Identity "Mailbox Database" -User "masterdomain\JohnSmith" –AccessRights GenericAll
Importing mailboxes remotely from Microsoft® Exchange Server 2007 SP1 SP2 SP3
1. Open the ‘Exchange Management Shell’ on the Microsoft® Exchange Server 2007.
2. Run the following Windows® PowerShell commandlet:
foreach ($exchangeServer in Get-ExchangeServer)
{
GFI MailArchiver
9 Import and Export Emails | 188
if ($exchangeServer.ServerRole -match 'ClientAccess')
{
Add-ADPermission -Identity $exchangeServer.DistinguishedName -User
'domain\user' -ExtendedRights ms-Exch-EPI-Impersonation
}
}
Example:
foreach ($exchangeServer in Get-ExchangeServer)
{
if ($exchangeServer.ServerRole -match 'ClientAccess')
{
Add-ADPermission -Identity $exchangeServer.DistinguishedName -User
'master-domain\administrator -ExtendedRights ms-Exch-EPI-Impersonation
}
}
Importing mailboxes remotely from Microsoft® Exchange Server 2010
1. Open the ‘Exchange Management Shell’ on the Microsoft® Exchange Server.
2. Run the following PowerShell commandlet:
New-ManagementScope -name "MAUMPolling" -recipientrestrictionfilter
{recipienttype -eq "UserMailbox"}
3. On completion, run the following PowerShell commandlet:
New-ManagementRoleAssignment -name "MAExportEmails" role:applicationimpersonation -user "[email protected]" customrecipientwritescope "MAUMpolling"
Example:
New-ManagementRoleAssignment -name " MAExportEmails " role:applicationimpersonation -user "[email protected]"
-customrecipientwritescope "MAUMpolling"
9.1.3 Step 2: Run the GFI MailArchiver Import Export Tool
To export emails from Microsoft® Exchange mailboxes:
1. Launch the GFI MailArchiver Import Export Tool by navigating to Start > Programs > GFI
MailArchiver > GFI MailArchiver Import Export Tool.
2. Click Import from Microsoft Exchange mailbox.
GFI MailArchiver
9 Import and Export Emails | 189
Screenshot 93: Importing from a Microsoft Exchange mailbox
3. From the Microsoft Exchange Version area, select the applicable Microsoft® Exchange Server
option:
Microsoft® Exchange Server 2003 or 2007
Microsoft® Exchange Server 2007 SP1 or 2010
4. From the Login Credentials area, configure a user with permissions to access the Microsoft®
Exchange mailboxes to import. Configure:
Login as current user – Login to Microsoft® Exchange Server using the credentials of the logged on
user.
Use other credentials – Specify the username (domain\username) and password of a user with full
mailbox access permissions.
Exchange Server – Specify the Microsoft® Exchange Server name or IP address.
Use SSL – Check this option if the Microsoft® Exchange Server requires SSL connection.
Extract emails from Public Folders – Check this option to extract emails from public folders.
Verify Credentials – Click this button to confirm access and authentication with Microsoft®
Exchange Server.
5. Click Next to continue.
GFI MailArchiver
9 Import and Export Emails | 190
Screenshot 94: Import from Microsoft Exchange: Mailbox and folder selection
6. Select the mailboxes and folders to import:
All mailboxes and folders – import all the emails in mailboxes that the configured user has access
to.
Select the mailboxes and folders from where to extract emails – select this option to import the
emails of a particular mailbox. Specify the Mailbox name or click … button to select a mailbox to
import. To import emails from a particular folder only, check Import emails from the following
folder only and key in the folder’s name.
Export from all Folders - Check this option to extract emails from public folders.
7. Click Next to continue.
GFI MailArchiver
9 Import and Export Emails | 191
Screenshot 95: Import from Microsoft Exchange: Configure import options
8. From Import destination area, select one of the following options:
Import to GFI MailArchiver – import emails to GFI MailArchiver Archive Stores.
Extract emails to given path – extract emails to a location on disk in .txt format
9. In the Cut-off time area, specify a date range. Emails sent between the specified dates are
extracted, while other emails are ignored.
10. In the Owner area, enable Select the owner of the emails to extract and specify the user in the
Owner text box.
Example: If [email protected] is specified in the Owner field, imported emails are displayed
under [email protected].
11. Click Next to start the export process.
12. When the process completes, click Finish.
NOTE
The duration of the process depends on the amount of emails to extract.
GFI MailArchiver
9 Import and Export Emails | 192
9.1.4 Microsoft® Exchange mailbox access permissions – Revoke Permissions
Importing mailboxes on the Microsoft® Exchange Server
There are no permissions to be revoked when running the GFI MailArchiver Import Export Tool
directly on the Microsoft® Exchange Server machine.
If the Import from Microsoft® Exchange Mailbox Wizard was run on a machine that is not the
Microsoft® Exchange Server 2003/2007/2010 server, ‘Send As’ and ‘Receive As’ permissions are
granted automatically to user credentials . It is recommended to revoke these permissions after
running the GFI MailArchiver Import Export Tool.
Importing mailboxes remotely from Microsoft Exchange 2003 server:
a. Open Exchange System Manager.
b. Navigate to Servers > <Server Name> > <Storage Group>, right click Mailbox Store and select
Properties.
c. Select Security tab.
d. From Group or user names box, select Administrator.
e. From the Permissions list, select Deny for Receive As and Send As.
f. Repeat steps 4 and 5 to deny Receive As and Send As permissions for:
Domain Admins
Enterprise Admins
Exchange Domain Servers.
g. Click Advanced button, select Allow inheritable permissions… option, and click OK.
h. Click OK to exit the Mailbox Store Properties dialog.
i. Restart the Information Store:
a. Navigate to Start > Run, type services.msc, and click OK.
b. In the Results pane, right-click Microsoft Exchange Information Store service and
click Restart.
Importing mailboxes remotely from Microsoft® Exchange Server 2007/2010 server:
1. Open the Microsoft Exchange Management Shell.
2. Run the following Windows® PowerShell commandlet:
Remove-ADPermission -identity "Mailbox Store" -User "Trusted User" AccessRights GenericAll
NOTE
Replace ‘Mailbox Store’ with the name of the mailbox store that contains the mailboxes
of the users and ‘Trusted User’ with the user that was previously granted full mailbox
access.
Example:
GFI MailArchiver
9 Import and Export Emails | 193
Remove-ADPermission -identity "Mailbox Database" -User "masterdomain/JohnSmith" -AccessRights GenericAll
9.2 Import emails from PST files locally
The GFI MailArchiver Import Export Tool enables you to extract emails from PST files. Emails can then
be imported into the GFI MailArchiver archive stores.
IMPORTANT
If Microsoft Outlook® is not detected on the machine where the tool is running, the
following import options are disabled:
Import from .pst files
Download to PST option when selecting Export data from GFI MailArchiver.
GFI MailArchiver supports only Microsoft Outlook® 2003/2007/2010 32bit.
GFI MailArchiver
9 Import and Export Emails | 194
The process of adding emails from PST files to GFI
MailArchiver involves the following procedure:
1. The GFI MailArchiver Import Export Tool
extracts emails from one or more PST files.
2. The GFI MailArchiver Import Export Tool
converts the emails to MIME format.
3. The GFI MailArchiver Import Service processes
the extracted emails based on the date of each
email.
4. GFI MailArchiver stores emails in the
appropriate archive store.
NOTE
Microsoft Outlook® 2003 (32 bit) or later must
be installed on the machine running the GFI
MailArchiver Import Export Tool.
NOTE
During extraction, emails in PST files are
copied and the PST file is left in its original
state.
9.2.1 Step 1: Importing emails from a remote computer
IMPORTANT
This section only applies when extracting emails from a remote machine. If importing
emails from the same machine where GFI MailArchiver is installed, skip to Run the GFI
MailArchiver Import Export Tool in this manual.
GFI MailArchiver lets you extract email mailboxes located on remote machines. To do this:
1. From the GFI MailArchiver machine, navigate to <GFI MailArchiver installation path>\MAIS\
GFI MailArchiver
9 Import and Export Emails | 195
2. Share Pickup folder to give full read and write permissions to the remote machine from where the
GFI MailArchiver Import Export Tool is to run. To share a folder:
In Windows® Server 2003:
a. Right-click the Pickup folder and select Sharing and Security…
b. Select Share this folder and click Permissions button to enter the Permissions dialog.
c. Click Add.
d. Enter the username of the user where the tool is going to be run and click Check Names to confirm
the user.
e. Click OK to add the user in the Permissions dialog.
f. In the Permissions dialog select the username added and select the Allow checkbox for Full Control.
g. Click OK to save and exit the Permissions dialog.
h. Click OK to save and exit the folder properties sharing dialog.
In Windows® Server 2008:
a. Right-click Pickup folder and select Share…
b. Specify the credentials under which the GFI MailArchiver Import Export Tool will run and click Add.
c. From the Permission Level drop-down list next to the added user, select Co-owner.
d. Select Share and click Done.
3. Return to where GFI MailArchiver is installed and copy the MarcImportExport folder.
4. Paste the folder on remote machine.
5. Open an instance of CMD
6. Browse to the MarcImportExport Folder on the local machine
7. Run the following command: <regsvr32 redemption.dll>
8. Run MArcImportExport.exe.
9.2.2 Step 2: Run the GFI MailArchiver Import Export Tool to Import from PST Files
Run GFI MailArchiver Import Export Tool to extract emails from PST file.
1. Navigate to Start > Programs > GFI MailArchiver > GFI MailArchiver Import Export Tool.
2. Click Import from .pst files.
GFI MailArchiver
9 Import and Export Emails | 196
Screenshot 96: Microsoft Outlook® personal folders (PST) files
3. Click Add PST File and select a PST file to extract. Repeat for each PST file to be added.
4. Click Next when all PST files are added.
GFI MailArchiver
9 Import and Export Emails | 197
Screenshot 97: Import from Microsoft Exchange: Configure import options
5. From Import destination area, select one of the following options:
Import to GFI MailArchiver – import emails to GFI MailArchiver Archive Stores.
Extract emails to given path – extract emails to a location on disk in .txt format.
6. In the Cut-off time area, specify a date range. Emails sent between specified dates are extracted,
all others are ignored.
7. In the Owner area, enable Select the owner of the emails to extract and specify the user in the
Owner text box.
Example: If [email protected] is specified in the Owner field, imported emails are displayed
under [email protected].
8. Click Next to start the export process.
9. When the process completes, click Finish.
NOTE
The duration of the process depends on the amount of emails to extract.
GFI MailArchiver
9 Import and Export Emails | 198
9.3 Import emails from PST files on the network
The GFI PST Exporter wizard included with GFI MailArchiver helps in archiving Microsoft Outlook® PST
files on the network created before installing GFI MailArchiver.
GFI PST Exporter is an agent-based utility part of the
GFI MailArchiver installation. Below is how it works:
1. GFI PST Exporter installs agents on end-user
machines.
2. It extracts emails from PST files stored on the enduser machines.
3. The GFI MailArchiver Import Service processes the
extracted emails based on the date of each email.
4. GFI MailArchiver stores emails in the appropriate
archive store.
NOTE
Microsoft Outlook® 2003 (32 bit) or later must be
installed on the machine running the GFI
MailArchiver Import Export Tool.
9.3.1 Step 1: Install GFI PST Exporter
1. Select Start > Programs > GFI MailArchiver > Import Tools > Install GFI PST Exporter.
2. Specify the path where to install GFI PST Exporter, and click Next.
GFI MailArchiver
9 Import and Export Emails | 199
Screenshot 98: GFI PST Exporter Master Service credentials
3. After the setup extracts the files, specify the credentials under which the GFI PST Exporter Master
Service will run.
4. Click Install to finalize the installation.
9.3.2 Step 2: Configure the General Settings of GFI PST Exporter
1. Select Start > Programs > GFI MailArchiver > Import Tools > GFI PST Exporter Management
Console.
2. From the GFI PST Exporter Management Console, click General Settings node.
GFI MailArchiver
9 Import and Export Emails | 200
Screenshot 99: GFI PST Exporter: general settings
3. In the Cut-off date (UTC time) field, specify a cut-off date and time. Only emails dated prior to this
date and time are extracted.
NOTE
If you set the date and time prior to the installation of GFI MailArchiver, the GFI PST
Exporter will extract emails that have not been processed by GFI MailArchiver, avoiding
duplicate emails in the archive store.
4. Specify the maximum email size in the Max exportable email size field. Emails larger than the size
specified are not exported.
5. Specify the pickup folder in the GFI MailArchiver pickup folder field where to pick up extracted
emails. To import the extracted emails into a GFI MailArchiver archive store, specify the pickup folder
of GFI MailArchiver Import Service. The default path of the GFI MailArchiver Import Service is: <GFI
MailArchiver Installation Path>\MAIS\Pickup
GFI MailArchiver
9 Import and Export Emails | 201
NOTE
If running GFI PST Exporter on a remote machine, do not specify mapped drives but use
the full UNC path: \\server\share.
NOTE
The import service pickup folder must have full read/write permissions.
6. In the Directory Services section, select the Directory Service Type.
Screenshot 100: GFI PST Exporter: General Settings: verify query root
7. Click Verify to launch the Directory Services Verification dialog. Specify the query root or click
Auto Detect to auto detect the query root.
8. Key in a valid username for the query root specified and click Test Lookup to verify. Click OK to
return to the PST Exporter General Settings.
9. Specify the name of the Microsoft® Exchange Server in the Microsoft Exchange Server field.
10. In the Domain, Username and Password fields, specify the credentials of a domain controller
account. These credentials will be used by the GFI PST Exporter agent to process and extract emails
on the end-user machine.
11. Select the Validate on save checkbox to check the credentials specified when confirming the
settings.
12. Click Save to save configuration or Revert to cancel all settings.
9.3.3 Step 3: Configure the Notification Settings of GFI PST Exporter
After configuring the General Settings, GFI PST Exporter can be configured to send email notifications
to monitor the PST processing status on end-user machines.
1. Select Start > Programs > GFI MailArchiver > Import Tools > GFI PST Exporter Management
Console.
2. Select Notification Settings Node.
GFI MailArchiver
9 Import and Export Emails | 202
Screenshot 101: GFI PST Exporter: notification settings
3. From the Mail Server Type drop down list, select SMTP.
4. Specify the Authorization Method applicable for your mail server.
5. Specify server IP address in the Mail Server Address field.
6. If the authorization method requires authentication, specify a valid username and password in the
Username and Password fields.
7. Specify an email address in the From Email Address field. This is the email address shown as the
sender of the notification. This address may not be an existing email address and can be dedicated for
the GFI PST Exporter notifications
Example:[email protected]
8. Specify the email address in the To Email Address field where to send notifications.
9. Click Send Test Email to test the connection settings and send a notification test email.
10. Click Save to save the configuration.
9.3.4 Step 4: Configure Computer Groups
After configuring the general and notification settings, GFI PST Exporter enables you to organize enduser machines into computer groups. For each computer group apply different settings and carry out
PST exports separately.
GFI MailArchiver
9 Import and Export Emails | 203
Computer groups can be configured by accessing the Computer Groups node from the GFI PST
Exporter Management Console.
Screenshot 102: GFI PST Exporter: computer groups
Adding new computer groups
1. Click the Create a new Computer Group button
.
Screenshot 103: GFI PST Exporter: create a computer group
2. Specify the group name and click OK.
GFI MailArchiver
9 Import and Export Emails | 204
Screenshot 104: GFI PST Exporter: computer group properties
3. From the properties dialog click General tab.
4. From the Ownership section, specify who will be the owner of extracted emails for this computer
group:
To assign a specific owner to all extracted emails, select the All PST’s belong to email option and
enter the owner email address.
To assign ownership to the Microsoft Outlook® email profile under which emails were extracted,
select Auto detect ownership option.
NOTE
Ownership of emails is important since only the specified owner will be able to browse
the archived emails.
GFI MailArchiver
9 Import and Export Emails | 205
5. Specify when to send notifications from the Notify when: drop-down list. The settings configured
previously in the Notification settings node are used.
6. Click the Sources tab.
Screenshot 105: GFI PST Exporter: computer group locations to search
7. In the Restrict to Folders section, manage the path(s) within which PST files can be processed. The
conditions you specify apply to all folders and subfolders within the path. The path(s) you specify can
be:
Local – referring to the end-user machine where the agent is deployed
Example: “Include”, “C:\”, “Local path” - to search all files in the local hard drive
Mapped – paths that are resolved using a drive letter.
UNC – in the format \\server\share
Click Add to add the path to the list.
8. Click OK to add the new computer group.
Editing Computer Groups
To edit computer groups configuration:
1. From the GFI PST Exporter Management Console, select the computer group to edit from the
Computer Groups node.
GFI MailArchiver
9 Import and Export Emails | 206
Screenshot 106: GFI PST Exporter: edit computer group configuration
2. Click Edit to launch the Computer Group Properties dialog.
3. Apply the required changes as explained in steps 4 to 8 in the Adding new computer groups section.
4. Click OK to save changes.
Computer Group Updates
The GFI PST Exporter Console displays the status of each computer in a group.
To configure when to update the status, select the computer group from the Computer Groups
node. In the Update every: drop-down list, select the time interval when to update the status.
Click Refresh now to manually update the status.
9.3.5 Step 5: Add end-user machines in computer groups
After configuring computer groups, specify which end-user machines belong in each group. To add
end-user machines:
1. From the GFI PST Exporter Console, click the Computer Groups node.
2. From the viewing pane, select the desired computer group.
GFI MailArchiver
9 Import and Export Emails | 207
Screenshot 107: GFI PST Exporter: add computer
3. Click Add computer button
to add a computer to the group.
4. Specify the computer name or IP address (example 192.168.4.50) to add to the group and click OK.
End-user machines
Configure end-user machines in computer groups by right clicking on the end-user machine and select
any of the following options:
Remove – delete the selected end-user machine from the computer group.
Move to Group – move the selected end-user machine to another computer group.
9.3.6 Step 6: Deploy the GFI PST Exporter agent to end-user machines
To extract PST files from end-user machines, the GFI PST Exporter agent must be deployed remotely
on the end-user machine. To deploy the agent:
1. From the GFI PST Exporter management console, select the Computer Groups node.
2. From the view pane, select the computer group.
3. Select the computer on which to deploy the agent.
GFI MailArchiver
9 Import and Export Emails | 208
Screenshot 108: GFI PST Exporter: deploying the agent
4. Click Deploy button
GFI MailArchiver
to launch the GFI PST Exporter – Deployment Manager wizard.
9 Import and Export Emails | 209
Screenshot 109: GFI PST Exporter: deploying the agent
5. In the Ownership from field, specify the owner of extracted emails for this computer. Ownership
options include:
OPTION
DESCRIPTION
Leave
unchanged –
The current owner
Group default
–
The owner specified in the computer group
Force autodetection –
Force the agent to detect the Microsoft Outlook® email profile
Force specific
owner –
Specify the email address of the owner that will be assigned to the extracted emails. Enter the owner
email address in the Forced owner email address field.
6. Click Next to continue.
GFI MailArchiver
9 Import and Export Emails | 210
Screenshot 110: GFI PST Exporter: remote computer requirements
7. Take note of the pre-requisites required to be able to deploy and run GFI PST Exporter agent on
end-user machines. Click Next to start deployment on the end-user machine.
NOTE
During or after deployment, click the server to view the log of deployment details.
NOTE
A window may pop-up on the end-user machine informing the user that the agent is
being deployed. The window closes automatically once deployment is complete.
8. Click Close when deployment is complete.
9.3.7 Step 7: Process PST files on end-user machines
After deploying the GFI PST Exporter agent on end-user machines, you can remotely trigger the agent
to start processing PST files on selected machines. To start the extraction process of PST files:
1. From the GFI PST Exporter Management Console, click Computer Groups node.
2. In the view pane, select the computer(s) on which to start processing.
GFI MailArchiver
9 Import and Export Emails | 211
3. Click Start button
to start processing the PST files on the selected computers.
Screenshot 111: GFI PST Exporter: processing at remote computer
4. The number of emails examined and the number of emails extracted is shown next to each
computer.
5. To view the detailed processing status on each machine, select the computer from the navigation
pane.
9.3.8 Reports and logs
GFI PST Exporter can display reports of extracted emails. Through the Reports node, you can view
the Export Report, which displays details on processed PST files. Besides details on successful
exports, any errors or warnings encountered are also displayed. Information shown includes status,
group, and computer names, date, and time when processing attempts were made, and number of
emails exported.
GFI MailArchiver
9 Import and Export Emails | 212
Screenshot 112: GFI PST Exporter: export report
To view report click Reports Node.
You can also print the report or export it in HTML format.
End-user machines processing details
Besides the export report, you can also view details about processed PST files for each end-user
machine.
1. From the GFI PST Exporter navigation pane select the Computer Groups node.
2. Expand the appropriate computer group to list all end-user machines
3. Select the end-user machine sub-node for which to display details.
GFI MailArchiver
9 Import and Export Emails | 213
Screenshot 113: GFI PST Exporter: processing logs
4. To view reports for the selected machine in the viewing pane:
Click the Logs tab to view a list of export jobs. Double-click a job to view more details for that
particular job.
Click the PST tab to view a list of PST files that were processed. Information displayed includes
PST file location, process success/failure, and number of emails exported.
NOTE
To re-export emails from a PST file, select a PST file and click the re-export button
. Exercise caution when doing this, as it may result in duplicate emails being archived.
9.3.9 Adding imported emails to the GFI MailArchiver archive stores
The extracted emails are saved in the pickup folder specified in the general settings of GFI PST
Exporter. To import the exported emails into a GFI MailArchiver archive store, place the exported
emails in the GFI MailArchiver Import Service pickup folder by:
GFI MailArchiver
9 Import and Export Emails | 214
Choosing the GFI MailArchiver Import Service pickup folder as the destination folder in the general settings of GFI PST Exporter, or
If emails are already exported, manually move the emails to the pickup folder.
Emails in the GFI MailArchiver Import Service pickup folder are processed as follows:
Emails are placed in the queue folder so that they can be placed in the appropriate archive store.
If an email in the pickup folder has a date that does not fit the date range of any of the archive
stores configured, GFI MailArchiver will automatically create a new Archive Store.
The Import Service will retry to upload Failed emails and notifications are sent on the progress of
the failed emails.
The default paths of these folders are:
Pickup folder: <GFI MailArchiver Installation Path>\MAIS\Pickup
Queue folder: <GFI MailArchiver Installation Path>\MAIS\Queue
9.4 Export emails from GFI MailArchiver Archive Stores
The GFI MailArchiver OneClick Restore feature enables you to restore individual emails to an email
address you define. If you however want to export or restore more than one email at a time, use the
GFI MailArchiver Import Export Tool. Through this tool, you can connect to a GFI MailArchiver
installation, search for emails to export and export all of the emails in one go using the following
options:
Restore to a specific email address
Download to a folder on disk in .eml or .msg format
Download to a PST file.
The export feature in the GFI MailArchiver Import Export Tool is useful to export a set of emails that
match specific search criteria, for example, to provide emails to satisfy a litigation support request.
NOTE
The export process exports a copy of the emails and does not remove the original emails
from the Archive Stores.
9.4.1 Exporting Emails
1. Navigate to Start > Programs > GFI MailArchiver > GFI MailArchiver Import Export Tool.
2. From the Export Data from GFI MailArchiver area, click Download emails from GFI MailArchiver.
GFI MailArchiver
9 Import and Export Emails | 215
Screenshot 114: Email Export: Connecting to GFI MailArchiver
3. In the Login Credentials area:
In the GFI MailArchiver URL field specify the URL used to connect to GFI MailArchiver.
Select Login as Current User to login using the credentials of the logged on user or select Use
Other Credentials to login using another username and password.
Click Verify Connection to confirm that a connection can be established to the GFI MailArchiver
URL using the specified credentials.
4. Click Next to continue.
GFI MailArchiver
9 Import and Export Emails | 216
Screenshot 115: Email Export: Search options
5. Select the type of search from the following options:
OPTION
DESCRIPTION
Entire mailbox
Search for all emails in a particular mailbox.
Emails containing specific
words
Search for emails that include particular words in subject, body and/or attachment.
Emails with specific search
criteria
Search for emails stored in a particular Archive Store, in a particular mailbox or emails
that contain a particular tag.
6. Click Next to continue.
7. Depending on the type of search selected in the previous step, specify the search criteria as
follows:
Table 91: Email export search criteria
TYPE OF
SEARCH
SEARCH CRITERIA
Entire mail- Mailbox Search
box
All emails in mailbox – Click … button and add the mailbox to search all containing emails.
Retrieve only the first 5000 emails – Search returns only the first 5000 emails that match search
criteria.
GFI MailArchiver
9 Import and Export Emails | 217
TYPE OF
SEARCH
SEARCH CRITERIA
Emails con- Simple Search
taining speLook for – Key in terms to search in emails’ subject and body.
cific words
Search in Attachments – check this option to include attachments when searching.
Return only the first 5000 occurrences – Search returns only the first 5000 emails that match
search criteria.
Only in mailbox(es) – Search only in particular mailboxes. Click … button to specify the mailbox to
search in.
GFI MailArchiver
9 Import and Export Emails | 218
TYPE OF
SEARCH
SEARCH CRITERIA
Emails
with specific search
criteria
Advanced Search
Search in all Archive Stores
Restrict search on particular Archive Stores – Run search through specific Archive Stores. Click
hyperlink to select the Archive Stores to search in.
Search in mailbox(es) – Check this option to search for emails in specific mailboxes. Click … button
to select the mailboxes to search in.
Retrieve only the first 5000 occurrences – Search returns only the first 5000 emails that match
search criteria.
Query Criteria - select the search criteria and specify the condition from the drop-down list. Click
to add more criteria. Available conditions are:
Subject – Search for emails having a specific subject.
Sender - Specify the email address or Active Directory® display name of the email sender for
which to search emails.
Recipient - Specify the email address or Active Directory® display name of the email recipient for
which to search emails.
Sent Date - Search for emails sent before, after or exactly on a specific date. Key in or select a
date, and select Is before, Is after or Is exactly.
Received Date - Search for emails received before, after or exactly on a specific date. Key in or
select a date, and select Is before, Is after or Is exactly.
Size (KB) - Search for emails that are bigger, smaller or equal to a particular size. Key in a size
and select Is greater than, Is smaller than and Is exactly.
Message ID - Search using the ‘Message ID’ field contained in the email header. Key in or paste
the message ID of the email to find.
Whole Email - Search for emails that have some specific content anywhere in the email (including the body, headers and attachments).
Body - Search for emails that have some specific content in the body.
Attachment - Search for emails that have some specific content anywhere in the attachment.
Folder - Search for emails contained in a specific mailbox folder.
Folder/Subfolders - Search for emails contained in a specific subfolder within a mailbox folder.
Personal Label - Search for emails labeled with a specific label.
Global Label - Search for emails labeled with a global label.
Classification Label - Search for emails labeled with a classification label.
SPAM Tag - Search for emails classified as SPAM.
Contains document - Search for emails with attachments of the following file types: .txt, .rtf,
.htm, .html, .xml, .zip, .pdf, .msg, .doc, .xls, .ppt, .docx, .xlsx, .pptx, .wpd, .wpf, .sxc, .sxd, .sxi,
.sxw, .sxg, .stc, .sti, .stw, .stm, .odt, .ott, .odg, .otg, .odp, .otp, .ods, .ots, .odf, .eml, .mht, .xps,
.zip.
NOTE
Click
displayed next to a search condition to remove it.
8. Click Find to show all matching emails. To export the returned emails click Next.
GFI MailArchiver
9 Import and Export Emails | 219
NOTE
After you perform a search, you might need to review particular emails from the result
set to check that they actually contain what you are looking for. Double-click on the
email to view. The GFI MailArchiver Bulk Export tool loads the email in a separate
window.
Screenshot 116: Email Export: Export options
9. Select how to export the emails:
Table 92: Email export options
EXPORT OPTION
CONFIGURATION
Restore to the following
email address
Select this option to export emails to a mailbox. Specify the email address and select the
method how to send the emails:
Send emails as separate attachments
Send emails as original
Download to path
GFI MailArchiver
Export emails to a location on disk. Key in the path or click Browse to select the folder
where to export the emails. Select the format how to export the emails in .eml or .msg
format.
9 Import and Export Emails | 220
EXPORT OPTION
CONFIGURATION
Download to PST
Export emails to a Microsoft Outlook® PST file. Key in the path or click Browse to select the
pst file where to export the emails. To maintain the folder structure of exported emails,
check Retain folder structure.
10. Click Next to start the export process.
11. When the export process completes, click Finish.
NOTE
The duration of the export process depends on the amount of emails to export.
GFI MailArchiver
9 Import and Export Emails | 221
10 Restoring Mailboxes
GFI MailArchiver provides you with the facility to restore emails archived within GFI MailArchiver
Archive Stores to a Mailbox in Microsoft® Exchange Server. Using the GFI MailArchiver Mailbox Restore
feature enables you to restore, for example, emails for deleted mailboxes.
10.1 Restore a mailbox
1. Launch the GFI MailArchiver Mailbox Restore utility from the GFI MailArchiver program group (GFI
MailArchiver > Mailbox Restore).
Screenshot 117: Restore mailbox utility
2. Select a mailbox to restore from the Restore from Mailbox field.
3. Select All messages to restore all messages or specify a ‘Date from’ and a ‘Date to’ to restore a
specific date range.
4. Key in the mailbox to restore emails to in the To mailbox field.
5. Click Start to start the mailbox restore process.
GFI MailArchiver
10 Restoring Mailboxes | 222
NOTE
The GFI MailArchiver Mailbox Restore utility require the following rights for the user
under which this utility is running:
Access to the emails in GFI MailArchiver (Source)
Read/write access to the Microsoft® Exchange Server mailbox (destination);
Executable rights on the server where GFI MailArchiver is installed.
For further information, refer to:
http://go.gfi.com/?pageid=MAR_MailboxRestorePermissions
GFI MailArchiver
10 Restoring Mailboxes | 223
11 Troubleshooting
Troubleshooting and supportIntroductionThis chapter explains how to resolve any issues encountered
during installation of GFI MailArchiver. The main sources of information available to solve these issues
are:This manual - most issues can be solved through the information in this section.GFI Knowledge
Base articlesWeb forumContacting GFI Technical Support
11.1 GFI SkyNet
GFI maintains a comprehensive knowledge base repository, which includes answers to the most
common problems. GFI SkyNet always has the most up-to-date listing of technical support questions
and patches. In case that the information in this guide does not solve your problems, next refer to GFI
SkyNet by visiting: http://kb.gfi.com/.
11.2 Web Forum
User to user technical support is available via the GFI web forum. Access the web forum by visiting:
http://forums.gfi.com/.
11.3 Request technical support
If none of the resources listed above enable you to solve your issues, contact the GFI Technical
Support team by filling in an online support request form or by phone.
Online: Fill out the support request form and follow the instructions on this page closely to submit your support request on: http://support.gfi.com/supportrequestform.asp
Phone: To obtain the correct technical support phone number for your region visit:
http://www.gfi.com/company/contact.htm
NOTE
Before contacting Technical Support, have your Customer ID available. Your Customer
ID is the online account number that is assigned to you when first registering your
license keys in the GFI Customer Area at: http://customers.gfi.com.
We will answer your query within 24 hours or less, depending on your time zone.
11.4 Documentation
If this manual does not satisfy your expectations, or if you think that this documentation can be
improved in any way, let us know via email on: [email protected].
GFI MailArchiver
11 Troubleshooting | 224
11.5 Installation problems
Table 93: Installation problems
ISSUE
DESCRIPTION
One of the following error messages is
displayed while installing GFI MailArchiver:
Error 1720. There is a problem with this
Windows® Installer package. A script
required for this install to complete
could not be run. Contact your support
personnel or package vendor.
1. Disable real-time scanning of anti-virus products or any other software
scanning your machine real-time.
2. Ensure that you do not have any software that automatically removes
files from the TEMP directory.
3. Log in the machine with the Domain Administrator account.
4. Download and install the latest version of Windows® Scripting Host &
Windows Installer for your Windows Operating System from:
http://www.microsoft.com/downloads/
5. Ensure that the following Windows® technologies are installed
correctly and not corrupt:
Windows® Management Instrumentation (WMI)
Setup failed to launch installation
engine: Access is denied.
Error installing Ikernel.exe, access is
denied.
Windows® Installer
Microsoft .Net Framework
Microsoft Data Access Components (MDAC)
6. Ensure that the following system libraries located at
<Windows\System32> are correctly registered:
Oleaut32.dll
urlmon.dll
ole32.dll
Actxprxy.dll
Scrrun.dll
Browseui.dll
Mshtml.dll
Shdocvw.dll
Shell32.dll
To register a library with the operating system, perform the following
steps:
1. Click Start and select Run
2. Key in cmd.exe and click Enter.
3. Key in ‘regsvr32 <path & filename of dll>’ Example: ‘regsvr32
c:\windows\system32\urlmon.dll’
4. Place the installation file in a temporary directory (Example C:\temp)
on the machine where you are installing the GFI product.
5. Also, check the Distributed Component Object Model (DCOM)
permissions as explained in:
http://support.microsoft.com/default.aspx?scid=kb;en-us;295278
GFI MailArchiver
11 Troubleshooting | 225
ISSUE
DESCRIPTION
During installation, the following error is
displayed:
The wizard was interrupted before GFI
MailArchiver could be completely
installed.
Cause:
Windows Scripting Host (WSH) is outdated or corrupted.
Solution:
Install latest version of Windows® Scripting Host (WSH) and reboot the
machine. WSH can be downloaded from:
http://www.microsoft.com/en-us/download/details.aspx?id=8247
Your system has not been modified. To
complete installation at another time,
please run setup again.
The wizard was interrupted before GFI
MailArchiver could be completely
installed.
11.6 General Issues
Table 94: General issues
ISSUE
DESCRIPTION
GFI MailArchiver fails to authenticate users on loading web interface in Windows® Server 2008.
Cause:
Problem caused by use of Forms Authentication and Http errors
module installation in IIS®7.
Solution 1:Uninstall HTTP Errors module.
Solution 2:Remove HTTP errors from GFI MailArchiver virtual
directory:
1. Unlock the Custom Errors Module from the server.
a. From IIS® Manager, select the server.
b. Double click Modules icon and select
CustomErrorModule.
c. Click Unlock from Actions pane.
2. Remove Custom Error Module from the GFI MailArchiver virtual
directory.
a. Select the GFI MailArchiver virtual directory
b. Select CustomErrorModule
c. Click Remove from Actions pane and YES to
confirm.
Blank page/HTML code/instructions to download
aspx is displayed in browser on loading GFI MailArchiver
Cause:
ASP.NET® not registered with IIS® Web Server.
Solution:
Register ASP.NET®:
1. From Command Prompt, change directory as follows:
32-bit machines: <WindowsDir>\Microsoft.NET\Framework\<version number>\
For 64-bit machines change to: <WindowsDir\Microsoft.NET\Framework64\<version number>\
2. Key in ‘aspnet_regiis.exe -i’ and press Enter.
GFI MailArchiver
11 Troubleshooting | 226
ISSUE
DESCRIPTION
GFI MailArchiver fails to authenticate when loading
the web interface: Error 401.
Cause:
This error occurs when the IIS® authentication method is not
configured correctly on the GFI MailArchiver server.
Solution:
Verify the IIS® authentication method used.
IIS® 6
1. Navigate to Start > Programs > Administrative Tools >
Internet Information Services (IIS®) Manager.
2. Expand <web server name> > Web Sites > Default Web Site,
right click MailArchiver and select Properties.
3. Select Directory Security tab and under Authentication and
access control, click Edit.
4. Check the Enable anonymous access check box.
5. In the Authenticated access area, select the authentication
method to use. Integrated Windows authentication is
recommended.
6. Click OK twice and close Internet Information Services (IIS®)
Manager.
IIS® 7
1. Navigate to Start > Programs > Administrative Tools >
Internet Information Services (IIS®) Manager.
2. Expand <web server name> > Sites > Default Web Site and
select MailArchiver.
3. In the Features view, double click Authentication.
4. Click Anonymous Authentication and from the right pane
select Enable.
5. Select the authentication method to use and from the right
pane click Enable. Windows Authentication is recommended.
6. Close Internet Information Services (IIS®) Manager.
GFI MailArchiver
11 Troubleshooting | 227
ISSUE
DESCRIPTION
GFI MailArchiver fails to authenticate when loading
the web interface: Error 4000.
Cause:
This error occurs when another application is installed on the GFI
MailArchiver server, which may be using the same ports required
by GFI MailArchiver.
Solution:
Verify that the default ports used by GFI MailArchiver are not
used by other software:
1. In GFI MailArchiver server, launch Command Prompt.
2. In the command line, type netstat -abn
>C:\netstat.txt. A text file named netstat.txt is created in
C:\.
3. Open netstat.txt and locate the following entries under Proto
column:
TCP 0.0.0.0: 8014 - [MArc.Core2.exe]
TCP 0.0.0.0: 8017 - [MArc.Core.exe]
TCP 0.0.0.0: 8018 - [MArc.Store.exe]
TCP 0.0.0.0: 8019 - [MArc.Search.exe]
TCP 0.0.0.0: 8020 - [MArc.MAIS.exe]
If any of the ports do not correspond with the executable files,
the GFI MailArchiver executable file must be configured to use a
different port. To change a default port:
1. Navigate to Start > Run and type services.msc.
2. Stop all GFI MailArchiver services.
3. Navigate to the GFI MailArchiver installation folder and backup
the following files:
..\Core\bin\MArc.Core.Remoting.exe.config
..\Core\bin\MArc.UMPolling.ExPolling.exe.config
..\Core2\bin\Marc.Core2.exe.config
..\Core2\bin\Marc.Core2.Remoting.exe.config
..\Mais\bin\MArc.MAIS.Remoting.exe.config
..\Mais\bin\MArc.MAIS.exe.config
..\Search\bin\MArc.Search.Remoting.exe.config
..\Search\bin\MArc.Search.exe.config
..\Store\bin\MArc.Store.Remoting.exe.config
..\Store\bin\MArc.Store.exe.config
..\ASPNET\remoting.config
4. Open each .config file listed in step 3 in a text editor, search
for the port number to change and replace by a new port
number.
Example: Search for 8017 and replace by 8117.
NOTE: Ensure that the new port number is not used by any
other application.
5. When changes are made in a .config file, save the file with
encoding set to UTF-8.
6. Click Save to apply changes.
7. When all .config files are updated, restart the GFI MailArchiver
services stopped in step 2.
8. Repeat netstat test in command prompt to confirm that the
GFI MailArchiver
11 Troubleshooting | 228
ISSUE
DESCRIPTION
GFI MailArchiver is now using the new ports.
When moving emails from the Sent Items folder of
the Microsoft® Exchange mailbox to another folder,
the move is not replicated in the folder structure of
GFI MailArchiver.
Cause:
This behavior occurs when Cached Exchange Mode is enabled in
the user’s Microsoft Outlook® account settings. For more
information about Cached Exchange Mode refer to:
http://go.gfi.com/?pageid=MAR_CachedExchangeMode
Solution:
Disable the Cached Exchange Mode from Microsoft Outlook® as
follows:
Microsoft Outlook ® 2003
1. Navigate to Tools > E-mail Accounts.
2. Select View or change existing e-mail accounts and click
Next.
3. Select the Microsoft® Exchange Server mailbox account and
click Change.
4. Unselect Use Cached Exchange Mode and click Next.
5. Click OK and click Finish.
6. Restart Microsoft Outlook® to apply change.
Microsoft Outlook ® 2007
1. Navigate to Tools > Account Settings.
2. In the E-mail tab, select the Microsoft® Exchange Server
mailbox account and click Change.
3. Unselect Use Cached Exchange Mode and click Next.
4. Click OK and click Finish.
5. Restart Microsoft Outlook® to apply change.
NOTE: This solution applies only to emails which are
archived after Cached Exchange Mode is disabled.
When opening emails or email attachments from the
GFI MailArchiver interface, one of the following
errors is encountered:
A Web filtering error specifying that the downloaded attachment is corrupted.
The downloaded attachment is opened in
Internet Explorer® instead of its default application.
Cause:
This may occur when a web filtering tool is installed between GFI
MailArchiver server and GFI MailArchiver Outlook Connector, and
is blocking HTTP requests.
Solution:
Configure the web filtering tool to allow all HTTP traffic
generated from GFI MailArchiver server. Ensure that the GFI
MailArchiver server’s IP address, NETBIOS name or DNS name are
not blocked by the web filter.
For more information, refer to:
http://go.gfi.com/?pageid=MAR_WebFiltering
11.7 Import Export Problems
Table 95: Import Export problems
ISSUE
DESCRIPTION
1. Importing/exporting displays: “'The GFI
MailArchiver Import Service is not running”
Cause:
The GFI MailArchiver Import Service is stopped.
Solution:
Ensure that the GFI MailArchiver Import Service is started:
1. Select Start > Run, key in ‘services.msc’ and click Enter.
2. Ensure that the ‘GFI MailArchiver Import Service’ is started. In case it is
not, right click it and select Start.
GFI MailArchiver
11 Troubleshooting | 229
ISSUE
DESCRIPTION
2. Importing/exporting displays: “Export
processes paused since no databases are
configured for the GFI MailArchiver Import
Service”
Cause:
No databases are configured in the GFI MailArchiver Import Service
Configuration.
Solution:
Ensure that the GFI MailArchiver Archive store configured within the GFI
MailArchiver Import Service is not a Read-Only archive Store:
1. From GFI MailArchiver, select Archive Stores node.
2. Click Edit Settings Icon next to the Archive store configured in the GFI
MailArchiver Import Service.
3. Ensure that the Do not allow further archiving into this archive store
is not enabled.
3. Importing/exporting displays: “The
number of files in the process queue is
growing large. Export processes have been
paused to give some time to the GFI MailArchiver Import Service to process the
email backlog.”
Cause:
GFI MailArchiver is not able to archive emails in the databases. This
results in emails backing up in the <\GFI\MailArchiver\MAIS\Pickup> folder.
When the amount of emails in this folder reaches 300, the GFI PST Export
tool is instructed to pause.
Solution:
Check if there are more than 300 files in the
<\GFI\MailArchiver\MAIS\Pickup> folder. If there are, this might indicate
that emails are not being uploaded to Archive Store.
1. Ensure that the GFI MailArchiver directory is excluded from real-time
backup and/or virus scanning software.
2. Ensure that GFI MailArchiver has a stable connection to the database
and that it has enough resources to cope with the load.
3. For SQL Server® databases, set the auto-growth settings of both the
data and the transaction log files to a fixed value in megabytes, instead of
a percentage value. Recommended values are 10 Mb for the Transaction
Logs and 100 MB for the Data Files. Also, ensure that the Maximum file size
option for both data and transaction files is left to ‘Unrestricted file
growth’.
4. Ensure that there is enough disk space on the server where the GFI
MailArchiver Import Service is running.
GFI MailArchiver
11 Troubleshooting | 230
ISSUE
DESCRIPTION
4. Importing/exporting displays: “A large
number of emails have a date that does not
match any of the date ranges covered by
the databases configured. Export processes
suspended indefinitely. Please check the
manual for troubleshooting”
Cause 1:
There are no databases configured in the GFI MailArchiver Import Service
Configuration that cover the date of some emails. Such emails cannot be
stored in any database, and will be stored in the
<\GFI\MailArchiver\MAIS\Unclassified> folder. When the amount of emails
in this folder reaches 500, the email extraction wizard is instructed to
pause.
Solution 1:
Navigate to the ‘Unclassified’ folder.
If any emails in the folder do not need to be archived, you can
delete these emails. GFI MailArchiver Import Service will automatically resume with the processing of other emails.
If any emails in the folder need to be archived:
1. Determine the date range of the unclassified emails.
NOTE: To determine the exact date of the email,
open the .eml file in the ‘Unclassified’ folder, and see
the email header.
2. Modify the GFI MailArchiver Import Service Configuration
archive stores’ date ranges, or create a new archive store
that covers the date range.
NOTE: For instructions on how to set the dates of the
archive stores, refer to the section Configure the GFI
MailArchiver Import Service in the appropriate
scenario of Import and Export Emails chapter in this
manual.
3. Move emails located in the Unclassified folder to the
<\GFI\MailArchiver\MAIS\Queue> folder.
4. The Import Service will automatically proceed with
archiving the emails.
NOTE: For more information and instructions about
emails in the Unclassified folder, refer to the
Unclassified emails chapter in one of the appropriate
scenarios described in the Import and Export Emails
chapter in this manual.
For more information on this solution refer to:
http://go.gfi.com/?pageid=MAR_ImportExportDateRange
Cause 2:
Spam emails are often sent with corrupt mail headers, making it
impossible for the GFI MailArchiver Import Service to determine the date
received for such emails. These emails will be found in the ‘Unclassified’
folder, with an incorrect date.
Solution 2:
It is recommended to delete such emails from the ‘Unclassified’ folder.
5. When exporting PST files, the following
error is displayed: “Either there is no
default mail client or the current mail
client cannot fulfil the messaging request.
Please run Microsoft Outlook® and set it as
the default mail client”
GFI MailArchiver
Cause:
To export emails from a PST file using the GFI PST-Exchange Email Export
tool Microsoft Outlook® version 2003 or higher must be installed on the
same machine.
Solution:
Install Microsoft® Office version 2003 or higher.
11 Troubleshooting | 231
ISSUE
DESCRIPTION
6. When using the GFI MailArchiver PSTExchange Email Export the following errors
are displayed: “Mailbox could not be
opened using current credentials.” “Access
is denied.” “Failed to enumerate folders.”
“The mailbox selected cannot be accessed.
Please check your credentials.”
Cause:
The GFI MailArchiver PST-Exchange Email Export tool uses the credentials
of the logged-on user when run on the Microsoft® Exchange Server
machine directly. When the GFI MailArchiver PST-Exchange Email Export
tool is run on a machine that is not the Microsoft Exchange server
machine, you need to specify a username and password. In both cases,
this account needs to have ‘SendAs’ and ‘ReceiveAs’ permissions on the
mailboxes from which emails are to be extracted.
Solution:
Refer to: http://go.gfi.com/?pageid=MAR_ImportExportCredentials for
detailed instructions on how to solve this issue.
11.8 Outlook® Connector Issues
Table 96: Outlook® connector issues
ISSUE
DESCRIPTION
GFI MailArchiver Outlook Connector shows a
warning sign in Microsoft Outlook® right after
installation
Cause:
This behavior is normal. Once you install the GFI MailArchiver Outlook
Connector, it would need to synchronize the emails with GFI
MailArchiver.
GFI MailArchiver Outlook Connector synchronizes and keeps only the last 365 days
worth of emails.
Cause:
By default GFI MailArchiver Outlook Connector only synchronizes and
keeps the last 365 days worth of emails.
Solution:
Default behavior can be modified by changing a special key in the
GeneralSettings.xml configuration file:
1. Close Microsoft Outlook®, navigate to:
Windows® XP and earlier:
<c:\Documents and Settings\user\Local Settings\Application
Data\GFI\MailArchiver 6\>
Windows® Vista:
<c:\Users\userA\AppData\Local\GFI\MailArchiver 6\>
2. Open GeneralSettings.xml file using a text editor.
3. Locate the SynchronizeDaysSpan element and change the value
from 365 (default) to the number of days worth of emails to see in the
Outlook® Connector. Example: To view the last 5 years worth of emails
set the line as: <SynchronizeDaysSpan>1826</SynchronizeDaysSpan>
4. Save and close the GeneralSettings.xml file.
5. Delete the local cache from the same directory. This is normally a
long number with FDB extension. If you are not sure which one to
delete, open the StoreSettings.xml and locate the Store ID attributed
with the user whose cache you want to affect.
6. Open Microsoft Outlook® and synchronize GFI MailArchiver Outlook
Connector with GFI MailArchiver to enable changes.
Delete this text and replace it with your own content.
GFI MailArchiver search page does not appear
in the Search folder in Microsoft Outlook® 2007
GFI MailArchiver
Cause:
In Microsoft Outlook® 2007, the home page setting is disabled for nondefault stores. The GFI MailArchiver Mailbox is a non-default store, and
is therefore affected by this policy.
Solution:
Refer to the Microsoft KBase below for more details on how to solve
this issue:
http://support.microsoft.com/kb/923933
11 Troubleshooting | 232
ISSUE
DESCRIPTION
One of the following issues is encountered: »
Cannot enable Offline Access from the settings dialog » Cannot set the number of days
for Offline Access greater than a particular
number
Possible cause
The offline access settings are automatically configured by the system
administrator or the feature is disabled by the system administrator.
Possible solution
Consult these issues with your system administrator.
GFI MailArchiver Outlook Connector is not synchronizing with GFI MailArchiver.
Cause 1:
No connection between the client machine and the GFI MailArchiver
server.
Solution 1:
Check with your system administrator to confirm the URL of GFI
MailArchiver. This can be modified from the GFI MailArchiver Outlook
Connector settings dialog.
Cause 2:
GFI MailArchiver Outlook Connector is disabled
Solution 2:
Enable GFI MailArchiver Outlook Connector from Start > Programs >
GFI MailArchiver Outlook Connector > Enable Outlook Connector
and restart Microsoft Outlook®.
Synchronization errors: HTTP Errors
Possible cause:
HTTP errors are due to network configuration issues.
Possible solution:
For more information refer to:
http://support.microsoft.com/kb/324069
http://msdn.microsoft.com/en-us/library/ms524996.aspx
http://support.microsoft.com/kb/907273
Synchronization errors: HTTP Error 500
Possible cause:
The GFI MailArchiver server is busy or inaccessible.
Possible solution:
Resynchronize the GFI MailArchiver Outlook Connector within a few
minutes.
Synchronization errors: GFI MailArchiver connection timeout
Possible cause:
The GFI MailArchiver server is busy and failed to send the required
data in a specified time interval.
Possible solution:
To increase the timeout value:
1. Navigate to:
Windows® XP and earlier:
<c:\Documents and Settings\user\Local Settings\Application
Data\GFI\MailArchiver6\>
Windows® Vista:
<c:\Users\userA\AppData\Local\GFI\MailArchiver6\>
2. Open GeneralSettings.xml using a text editor.
3. Locate the TryConnectionTimeout element and increase the default
value of 120000.
4. Save and close GeneralSettings.xml.
GFI MailArchiver
11 Troubleshooting | 233
12 Glossary
A
Access privileges
Permissions granted to users or group of users to perform various operations on diverse
emails.
Active Directory
A technology that provides a variety of network services, including LDAP-like directory services.
AD
See Active Directory
Archive Store management
A GFI MailArchiver technology that enables you to queue and schedule the archive stores to
use according to different time periods.
Archive Stores
A collection of email sources, email metadata and search indexes within GFI MailArchiver
C
Categorization policies
A categorization system within GFI MailArchiver that enables the categorization of email
according to its label.
Conversation thread
A list of emails forming a conversation between two or more users.
D
Database Activity Auditing
A system that uses the tracing capabilities of Microsoft SQL server to record all activity within
an archive database.
Database schema
The structure of a database that defines the tables, the fields in such tables and the relationship between fields and tables.
E
Exchange OLE DB provider
A method used to access the local Microsoft Exchange Server store by using OLE DB and Microsoft ADO.
GFI MailArchiver
12 Glossary | 234
Exchange System manager
A specialized MMC console that enables you to manage your Exchange organization.
ExOLEDB
See Exchange OLE DB provider
F
Firebird database
An open source relational database system.
G
GFI MailArchiver Import Service
A GFI MailArchiver tool that imports email data from file to the GFI MailArchiver.
GFI MailArchiver Outlook Connector
A GFI MailArchiver tool that enables you to synchronize Microsoft Outlook folders with the
email data archived by GFI MailArchiver.
GFI MailInsights
A reporting facility within GFI MailArchiver that leverages archived emails to deliver information related to email usage and trends.
GPO
See Group Policy Objects
Group Managers
A user group within GFI MailArchiver that members can browse and search through all users
forming part of their Active Directory group.
Group Policy Objects
An Active Directory centralized management and configuration system that controls what
users can and cannot do on a computer network.
H
Headers
Information that precedes the email text (body). This includes the sender, recipient, subject,
sending and receiving time stamps, etc.
I
IMAP
See Internet Message Access Protocol
GFI MailArchiver
12 Glossary | 235
Internet Message Access Protocol
One of the two most commonly used Internet standard protocols for e-mail retrieval, the
other being POP3.
J
Journaling
A Microsoft Exchange Server feature which stores email copies in a central mailbox for various
purposes, incl. mail archiving.
M
Mailbox
A directory or folder used for receipt, filing, and storing messages of emails.
Mailbox folder structure retrieval
A GFI MailArchiver feature that enables you to synchronize the mailbox folder structure in
Microsoft Exchange with GFI MailArchiver
MAIS
See GFI MailArchiver Import Service
MAPI
See Message Application Programming Interface
Message Application Programming Interface
A messaging architecture and a Component Object Model based API for Microsoft Windows.
Metadata
Data that provides information about email archived within GFI MailArchiver.
Microsoft SQL Server
A Microsoft relational database management system.
MIME
See Multipurpose Internet Mail Extensions
Mixed authentication mode
An SQL server authentication method that enables both Windows and SQL Server authentication.
Multipurpose Internet Mail Extensions
A standard that extends the format of e-mail to support text other than ASCII, non-text
attachments, message bodies with multiple parts and header information in non-ASCII character sets.
GFI MailArchiver
12 Glossary | 236
O
OneClick Restore
A user-friendly method of restoring archived emails to the user s inbox and either restores
emails as it was at the time of deletion or sends it to user as an email attachment.
Outlook Web Access
Microsoft Exchange Server s webmail service. Used to access email, contacts, tasks, etc.
using a web interface when Microsoft Office Outlook is unavailable.
OWA
See Outlook Web Access
P
POP3
See Post Office Protocol ver.3
Post Office Protocol 3
A protocol used by local email clients to retrieve emails from mailboxes over a TCP/IP connection.
PST exporter
An agent-based tool that once deployed on the target computers, extracts emails from PST
files for processing by the GFI MailArchiver Import Service.
PST file
A file used to store local copies of email, calendar events, contacts and other items within
Microsoft Office Outlook.
Public folders
A common folder shared between Microsoft Exchange a user, which enables information sharing.
R
Retention Policies
A system that enables you to control for how long to keep specific emails in your archive
stores.
S
Search index
A system that collects parses and stores data to enable fast and accurate information
retrieval.
GFI MailArchiver
12 Glossary | 237
U
User interaction auditing
A system that enables you to record all users activity while they are using the GFI MailArchiver web interface.
GFI MailArchiver
12 Glossary | 238
13 Appendix 1 - Microsoft Exchange Manual Operations
13.1 Create a Journal Mailbox in Microsoft® Exchange Server 2000/2003
13.1.1 Step 1: Create a New Journaling Mailbox.
1. Select Start > Programs > Microsoft Exchange > Active Directory Users and Computers.
Screenshot 118: Add new user in Microsoft® Exchange Server 2003
2. Expand the domain to archive emails from, right-click Users node and select New > User.
GFI MailArchiver
13 Appendix 1 - Microsoft Exchange Manual Operations | 239
Screenshot 119: New Object - User dialog
3. Key in a relevant ‘User logon name’ (For example journal), fill in other new user details, and click
Next.
4. Key in a password, unselect User must change password at next logon option and enable User
cannot change password and Password never expires options. Click Next to continue setup.
NOTE
Ensure that the password keyed in meets the password complexity requirements setup
for your Active Directory® users.
5. Click Next and review the new user details. Click Finish to create new user.
13.1.2 Step 2: Configure Email Archival to Journaling Mailbox
1. Select Start > Programs > Microsoft Exchange > System Manager.
GFI MailArchiver
13 Appendix 1 - Microsoft Exchange Manual Operations | 240
Screenshot 120: Mailbox store node properties
2. Expand Servers > <Your Server name> > Storage group, right click Mailbox Store node and select
Properties.
GFI MailArchiver
13 Appendix 1 - Microsoft Exchange Manual Operations | 241
Screenshot 121: Enabling journaling on a Microsoft® Exchange Server mailbox store
3. From the General tab, select Archive all messages sent or received by mailboxes on this store
check box and click Browse button.
4. Select the journaling mailbox name you created in step one, for example ‘journal’, and click OK.
5. Close the Mailbox Store Properties dialog and the Exchange System Manager Management
console.
13.1.3 Step 3: Enable BCC Information Journaling
IMPORTANT
It is highly recommended that you DO NOT enable this option but enable envelope
journaling instead. Envelope journaling journals all the header information, not just the
BCC data. For more information on envelope journaling refer to Step 4: Enable Envelope
Journaling
On Microsoft® Exchange Server 2000 and Microsoft® Exchange Server 2003 systems, BCC information
is not by default included in the journaled message. To enable BCC information journaling:
For Microsoft® Exchange Server 2000 only
1. Install hot fix available from:
http://support.microsoft.com/?kbid=810999
For both Microsoft® Exchange Server 2000 and Microsoft® Exchange Server 2003.
1. From command prompt, type regedit.exe
GFI MailArchiver
13 Appendix 1 - Microsoft Exchange Manual Operations | 242
2. Add the following registry key:
HKEY_LOCAL_
MACHINE\System\CurrentControlSet\Services\MSExchangeTransport\Parameters
3. Add the following registry key and values:
HKEY_LOCAL_
MACHINE\System\CurrentControlSet\Services\MSExchangeTransport\Parameters\
Key name: JournalBCC
Data type: Dword
Data value: 1
4. Close Registry editor and from command prompt type services.msc. Restart Simple Mail
Transport Protocol and the Information Store services.
13.1.4 Step 4: Enable Envelope Journaling
Envelope Journaling enables the archival of email header information and can be switched on using:
Microsoft® Exchange Server Email Journaling Advanced Configuration (exejcfg.exe), or
ADSI Editor Management console.
Using the exejcfg.exe tool
1. Download the exejcfg.exe tool from:
http://www.microsoft.com/downloads/details.aspx?familyid=E7F73F10-7933-40F3-B07EEBF38DF3400D&displaylang=en
2. From the command prompt, navigate to the folder in which you copied the exejcfg.exe tool.
3. Type exejcfg -e and press Enter.
NOTE
exejcfg -d disables Envelope Journaling for that organization.
Using the ADSI Editor
1. Locate the adsiedit.msc tool from the Windows® 2000 Server resource kit or the Windows®
2003 Server support tools.
2. From command prompt, navigate to the folder where adsiedit.msc is stored, type
adsiedit.msc and then press Enter.
GFI MailArchiver
13 Appendix 1 - Microsoft Exchange Manual Operations | 243
Screenshot 122: ADSI Edit
3. Expand ADSI Edit > Configuration > <CN=Configuration> > <CN=Services> > <CN=Microsoft
Exchange> node.
4. Right-click CN<your organization name> node and click Properties.
GFI MailArchiver
13 Appendix 1 - Microsoft Exchange Manual Operations | 244
Screenshot 123: Heuristics attribute
5. Select heuristics attribute from the Attributes list and click Edit.
Screenshot 124: Editing the heuristics attribute value
6. Key in ‘512’ and click OK.
7. Click OK to save and close the ADSIEdit console.
NOTE
A value of 512 enables Envelope Journaling, and a value of 0 disables Envelope
Journaling.
13.2 Disabling Journaling in Microsoft® Exchange Server 2000/2003
1. Select Start > Programs > Microsoft Exchange > System Manager.
GFI MailArchiver
13 Appendix 1 - Microsoft Exchange Manual Operations | 245
Screenshot 125: Mailbox store node properties
2. Expand Servers > <Your Server name> > Storage group, right click Mailbox Store node and select
Properties.
GFI MailArchiver
13 Appendix 1 - Microsoft Exchange Manual Operations | 246
Screenshot 126: Enabling journaling on a Microsoft Exchange mailbox store
3. From the General tab, unselect the Archive all messages sent or received by mailboxes on this
store check box. Click OK to save settings.
13.3 Removing Email from Microsoft® Exchange 2003
Once GFI MailArchiver is configured and your organization's email is being archived correctly, you may
want to create a Mailbox Management Recipient Policy in Microsoft Exchange to free up space on the
Exchange server by deleting email.
NOTE
Before you create a new recipient mailbox management policy, you must determine the
following:
What limits you want the policy to enforce
The group you want the policy to control
How you want the policy to handle messages that go past policy limits.
To create a mailbox management recipient policy:
1. Go to Start > Programs > Microsoft Exchange, and then click System Manager.
2. In the left pane of Exchange System Manager, expand Recipients, right-click Recipient Policies,
point to New, and then click Recipient Policy. The New Policy dialog box appears.
3. Click to select the Mailbox Manager Settings check box, and then click OK.
GFI MailArchiver
13 Appendix 1 - Microsoft Exchange Manual Operations | 247
NOTE
If you do not see the option for Mailbox Manager Settings, reapply the Exchange service
pack. It may not have been correctly applied.
4. The Properties dialog box appears. Type a name for the recipient policy in the Name box.
NOTE
We recommend that you use a descriptive name, such as "Accounts Department Mailbox
Settings."
5. Click Modify. The Find Exchange Recipients dialog box appears.
6. Click the General tab. In this example, mailbox management settings apply only to accounts that
have an Exchange mailbox. Select only the Users with Exchange mailbox.
7. Click Storage to configure mailbox management recipient policies that are specific to a particular
Exchange 2003 computer. Then, do one of the following:
Click Mailboxes on this server, and then click Browse. The Select Exchange Server list box
appears. Select the server that you want to use, and then click OK.
Click Mailboxes in this mailbox store, click Browse to search for a store, and then click OK.
8. Click the Advanced tab, and then click Field. You can now select any of the following options:
User
Contact
Group
Public Folder
NOTE
Points 8-11 are optional if you want to be specific for a particular
mailbox/user/group/folder
9. For this example, click User, and then click Department to select Department in the field Value.
10. Under Condition, click any of the following:
Starts with
Ends with
Is (exactly)
Is not
Present
Not present
GFI MailArchiver
13 Appendix 1 - Microsoft Exchange Manual Operations | 248
11. If you click Starts with, Ends with, Is (exactly), or Is not as your condition, type a value in the
Value field. For example, click Is (exactly), and then type Accounts to find all employees who work
for the accounts department.
12. Click Add to add the condition to the list.
NOTE
You can add additional conditions, but all conditions must be true for a match to be
displayed.
13. After you have finished adding conditions, click Find Now.
NOTE
Any matches to the conditions are displayed in the new list that appears in the Find
Exchange Recipients dialog box.
14. If the list displays the correct users for this recipient policy, click OK. If not, revise the search
conditions until your search displays the correct users for this recipient policy.
15. Click OK. You receive the following message:
When a recipient policy filter changes it does not mean that proxy
addresses for recipients who may no longer be under the control of the
policy will be automatically re-evaluated. For these recipients to receive
proxies from the new policies that they belong to, use 'Apply this policy
now' on the policies that now affect these recipients.
This message does not affect mailbox management recipient policies. Click OK.
16. Under Filter rules, the LDAP filter statement shows the current filter rule. Click the Mailbox
Manager Settings (Policy) tab.
17. Under When processing a mailbox, click one of the following options for handling messages that
go past the policy limits:
Generate report only
Move items to Deleted Items folder
Move to System Cleanup folder
Delete immediately
NOTE
Use caution when you use the Delete the message immediately option on folders,
because users may have to recover their messages.
18. In the list of folders, select the folder that you want to configure, and then click Edit.
19. In the Folder Retention Settings dialog box, type an age limit when you want the selected
processing action to occur, specify a size limit for the messages that you want the action to apply to,
and then click OK.
GFI MailArchiver
13 Appendix 1 - Microsoft Exchange Manual Operations | 249
For example, if you type 90 and 2048, all messages that are older than 90 days and over 2 megabytes
(MB) are processed. It is suggested to use a size of 1 KB if you want to remove even smaller messages.
20. Repeat steps 18 and 19 for each folder in the list that you want to configure.
21. Click Send notification mail to users after processing if you want to send users an e-mail message
notifying them when their mailboxes have been processed.
22. Click Message to edit the notification message. Click the Insert the number of messages
processed check box if you want a summary of the number of oversize messages processed. Click OK
to return to the Properties dialog box.
23. (Optional) If you want to exclude certain message classes (for example, to prevent the processing
task reports), click the Exclude specific message classes box, and then click Customize. The Message
Classes dialog box appears. Type a message class in the Exclude Message Classes field. For example,
type IPM. Task, and then click Add. Add all the classes you want to exclude.
Message class types include:
Calendar IPM.Appointment
Contacts IPM.Contact
Inbox IPM.Note
Journal IPM.Activity
Notes IPM.StickyNote
Tasks IPM.Task
Meeting Requests IPM.Schedule.Meeting.Request
For a full list of message classes, visit the following Microsoft Web site:
http://msdn2.microsoft.com/en-us/library/aa262246(office.10).aspx
24. After you have finished adding message classes, click OK to return to the Properties dialog box.
25. Click OK to close the Properties dialog box.
The new mailbox management recipient policy is displayed in the right pane in Exchange System
Manager.
13.3.1 Configure mailbox management at the server level
To schedule the day and time when a policy will run, change the settings at a server level. To do this,
follow these steps:
1. Click Start > Programs > Microsoft Exchange, and then click System Manager.
2. In the left pane of Exchange System Manager, expand the Servers object.
3. Right-click the computer that you want to configure, and then click Properties.
The <Servername> Properties dialog box appears.
4. Click the Mailbox Management tab to display the current settings.
5. Under Start mailbox management process, do one of the following:
Click the drop-down list to select a time for the mailbox management to run.
Click Customize, click a day in the left column, and then click a time on the top row. After you
select the times that you want, click OK.
GFI MailArchiver
13 Appendix 1 - Microsoft Exchange Manual Operations | 250
6. Click Reporting to select the type of report (either a detailed report or a summary) to create when
mailboxes are processed. You must also select a recipient to receive the reports. Click Browse, select
a recipient, and then click OK.
NOTE
You cannot send reports to distribution lists.
7. Click OK to accept the mailbox management settings
NOTE
Further information on how to use System Policies to configure mailbox storage limits in
Exchange Server 2003 is available here: http://support.microsoft.com/kb/822938
13.4 Creating a Journaling Mailbox in Microsoft® Exchange Server 2007
Microsoft® Exchange Server 2007 supports two types of journaling:
Standard journaling: Configure a Mailbox store that enables the recording of email in an organization. GFI MailArchiver can use Microsoft® Exchange Server journaling to centralize all the
emails in a single mailbox for archival. This type of journaling is also called per-mailbox database
journaling.
Premium journaling: Only available with Microsoft® Exchange Enterprise client access license. It
enables an administrator to setup custom journaling rules such as:
Archive only incoming emails
Archive only outgoing emails
Archive emails for a particular group.
GFI MailArchiver utilizes this type of journaling by detecting and displaying these rules in the Data
Sources Configuration Wizard.
Which journaling method shall I use?
Choose standard journaling to archive all emails (inbound and outbound) for all users in your
organization.
Choose premium journaling if you want more control over the emails to archive (For example, only
for specific users or for inbound or outbound only).
NOTE
Premium journaling requires a Microsoft® Exchange Enterprise client access license.
13.4.1 Set up standard journaling
Step 1: Create a new journaling mailbox
1. Select Start > All Programs > Microsoft Exchange Server 2007 > Microsoft Exchange Management
Console.
GFI MailArchiver
13 Appendix 1 - Microsoft Exchange Manual Operations | 251
2. Expand Recipient Configuration node and click on Mailbox node.
3. Select New Mailbox… from the Actions pane.
4. Select User Mailbox option and click Next.
5. Select New user option and click Next.
Screenshot 127: New user mailbox details
6. Key in the ‘User information’ details for the new user to which the new journaling mailbox will be
assigned and click Next.
7. Ensure that the mailbox settings are correct and click Next.
8. Review the new mailbox summary for the new mailbox to create and click New.
Step 2: Configure standard journaling
1. Select Start > All Programs > Microsoft Exchange Server 2007 > Microsoft Exchange Management
Console.
GFI MailArchiver
13 Appendix 1 - Microsoft Exchange Manual Operations | 252
Screenshot 128: Configuring a Mailbox Database
2. Expand Microsoft Exchange > Server Configuration > Mailbox node and click Properties from the
Actions pane.
GFI MailArchiver
13 Appendix 1 - Microsoft Exchange Manual Operations | 253
Screenshot 129: Mailbox Database properties
3. Select Journal Recipient option, click Browse, and select mailbox previously configured from the
Active Directory®.
4. Click OK to finalize setup.
13.4.2 Set up premium journaling
1. Select Start > All Programs > Microsoft Exchange Server 2007 > Microsoft Exchange Management
Console.
GFI MailArchiver
13 Appendix 1 - Microsoft Exchange Manual Operations | 254
Screenshot 130: Configuring Journaling rules
2. Expand Organization Configuration > Hub Transport node and select Journaling tab.
3. From the Actions tab and click on New Journaling Rule.
GFI MailArchiver
13 Appendix 1 - Microsoft Exchange Manual Operations | 255
Screenshot 131: Creating a new Journaling rule
4. Key in a name for the new rule and click Browse. Select the Journal e-mail address, preferably a
mailbox within the existing Microsoft® Exchange organization, from Active Directory®.
5. <Optional> Configure:
Scope - Select whether to journal all email (Global), internal or external email.
Journal e-mail for recipient - Select specific recipient(s) for which this journaling rule applies.
6. Ensure that the Enable Rule option is enabled and click New.
NOTE
In Microsoft® Exchange Server 2007, envelope journaling is automatically enabled by
default.
13.5 Disabling standard journaling in Microsoft® Exchange Server 2007
1. Select Start > All Programs > Microsoft Exchange Server 2007 > Microsoft Exchange Management
Console.
GFI MailArchiver
13 Appendix 1 - Microsoft Exchange Manual Operations | 256
Screenshot 132: Configuring a Mailbox Database
2. Expand Microsoft Exchange > Server Configuration > Mailbox node and click Properties from the
Actions pane.
GFI MailArchiver
13 Appendix 1 - Microsoft Exchange Manual Operations | 257
Screenshot 133: Mailbox Database properties
2. Unselect Journal Recipient option.
3. Click OK to finalize setup.
13.5.1 Disable standard journaling from the Microsoft Exchange Management Shell
In the Microsoft® Exchange Server Management Shell, use the following syntax to disable a journaling
rule:
Set-MailboxDatabase <Mailbox Database> -JournalRecipient $Null
13.5.2 Disable premium journaling
1. Select Start > All Programs > Microsoft® Exchange Server 2007 > Microsoft Exchange
Management Console.
GFI MailArchiver
13 Appendix 1 - Microsoft Exchange Manual Operations | 258
Screenshot 134: Configuring Journaling rules
2. Expand Organization Configuration > Hub Transport node and select Journaling tab.
3. Right click the journal rule to remove, and click Remove.
4. Click Yes to confirm that you want to remove the journal rule.
13.5.3 Disable premium journaling from the Microsoft® Exchange Server Management Shell
In the Microsoft® Exchange Server Management Shell, use the following syntax to disable a journaling
rule:
Remove-JournalRule <journal rule name>
13.6 Removing Email Microsoft® Exchange 2007
Once GFI MailArchiver is configured and your organization's email is being archived correctly, you may
want to create a Mailbox Management Recipient Policy in Microsoft Exchange to free up space on the
Exchange server by deleting email.
GFI MailArchiver
13 Appendix 1 - Microsoft Exchange Manual Operations | 259
NOTE
Before you create a new recipient mailbox management policy, you must determine the
following:
What limits you want the policy to enforce
The group you want the policy to control
How you want the policy to handle messages that go past policy limits.
13.7 To use the Microsoft® Exchange Management Console to create new managed
content settings:
1. Open the Exchange Management Console.
2. In the console tree, expand Organization Configuration, and then click Mailbox.
3. In the result pane, click the Managed Default Folders tab (or the Managed Custom Folders tab),
then select the managed folder for which you want to create managed content settings.
4. In the action pane, click New Managed Content settings. The New Managed Content Settings
wizard appears.
5. On the Introduction page, in the Name of the managed content settings to be displayed in the
Exchange Management Console box, enter the name for the new settings (for example, Accounts
Department Retention Policy).
6. In the Message type box, you can select the type of message for which you want to create managed
content settings. If you select All Items, the managed content settings that you create will apply to
all the items in the managed folder (except for message types for which you have created separate
content settings).
NOTE
You can use the New Managed Content Settings wizard repeatedly to create additional,
separate content settings for different message types. When there are multiple content
settings, specific settings always supersede general settings. For example, if there is a
setting for All Mailbox Content and one for Voicemail, the Voicemail policy is applied to
voice mail, but the All Mailbox Content policy applies to all other items.
7. To set message retention, select the Length of retention period (days) check box. The following
options become active:
a) In the box to the right of the Length of retention period (days) check box, type the number of days
after which the message is to expire.
b) In the Retention period starts list, select from the following options:
When delivered, end date for calendar and recurring tasks The retention period for mail starts
when it is delivered. The retention period for calendar items and recurring tasks starts at their
end date.
c) In the Action to take at end of retention period list, select from the following options:
GFI MailArchiver
13 Appendix 1 - Microsoft Exchange Manual Operations | 260
Permanently delete Messages are permanently deleted and not recoverable by the user.
Mark as past retention date Messages are displayed in a shaded, strikethrough font in Outlook,
but no other action is taken. This expiration action is used to prompt the user to take some kind
of action.
8. Click Next.
9. The New Managed Content Settings page provides a summary of the settings that you have
applied.
10. To complete the New Managed Content Settings wizard, click New.
11. On the Completion page, click Finish to exit the New Managed Content Settings wizard.
12. To view the new managed content settings, in the result pane of the Exchange Management
Console, expand the managed folder to which you applied the settings.
13. To edit a managed content setting that you have created, right-click it, and then click Properties.
NOTE
Further information on how to create an email retention policy in Exchange Server 2007
is available here: http://technet.microsoft.com/en-us/library/aa996014
(EXCHG.80).aspx
13.8 Create a Journal Mailbox in Microsoft® Exchange Server 2010
Microsoft® Exchange Server 2010 supports two types of journaling:
Standard journaling: Configure a Mailbox store that enables the recording of email in an organization. GFI MailArchiver can use Microsoft® Exchange Server journaling to centralize all the
emails in a single mailbox for archival. This type of journaling is also called per-mailbox database
journaling.
Premium journaling: Only available with Microsoft® Exchange Enterprise client access license. It
enables an administrator to setup custom journaling rules such as:
Archive only incoming emails
Archive only outgoing emails
Archive emails for a particular group.
GFI MailArchiver utilizes this type of journaling by detecting and displaying these rules in the Data
Sources Configuration Wizard.
Which journaling method shall I use?
Choose standard journaling to archive all emails (inbound and outbound) for all users in your
organization.
Choose premium journaling if you want more control over the emails to archive (For example, only
for specific users or for inbound or outbound only).
NOTE
Premium journaling requires a Microsoft® Exchange Enterprise client access license.
GFI MailArchiver
13 Appendix 1 - Microsoft Exchange Manual Operations | 261
13.8.1 Set up standard journaling
Step 1: Create a new journaling mailbox
1. Launch Microsoft Exchange Management Console.
2. Expand Recipient Configuration node and click on Mailbox node.
3. Select New Mailbox… from the Actions pane.
4. Select User Mailbox option and click Next.
5. Select New user option and click Next.
Screenshot 135: New user mailbox details
6. Key in the ‘User information’ details for the new user to which the new journaling mailbox will be
assigned and click Next.
7. Enter an ‘Alias’ for the journaling mailbox and click Next.
8. Click Next and review the new mailbox summary for the new mailbox to create and click New.
Step 2: Configure standard journaling
1. Launch Microsoft Exchange Management Console.
GFI MailArchiver
13 Appendix 1 - Microsoft Exchange Manual Operations | 262
Screenshot 136: Configuring a Mailbox Database
2. Expand Microsoft Exchange > Organization Configuration > Mailbox node. Right-click the Mailbox
database and select Properties.
GFI MailArchiver
13 Appendix 1 - Microsoft Exchange Manual Operations | 263
Screenshot 137: Mailbox Database properties
3. From the mailbox database properties dialog, select the Maintenance tab and select the Journal
Recipient checkbox. Click Browse, and select the journaling mailbox previously configured.
4. Click OK to finalize setup.
13.8.2 Set up premium journaling
1. Launch Microsoft Exchange Management Console.
2. Expand Organization Configuration > Hub Transport node and select Journaling tab.
3. From the Actions tab, click New Journal Rule.
GFI MailArchiver
13 Appendix 1 - Microsoft Exchange Manual Operations | 264
Screenshot 138: Creating a new Journaling rule
4. Key in a name for the new rule
5. Click Browse to select the journaling mailbox where to send journal reports.
6. <Optional> Configure:
Scope - Select whether to journal all email (Global), internal or external email.
Journal messages for recipient - Select specific recipient(s) for this journaling rule.
7. Ensure that the Enable Rule option is enabled and click New.
NOTE
In Microsoft® Exchange Server 2010, envelope journaling is automatically enabled by
default.
13.9 Disabling standard journaling in Microsoft® Exchange Server 2010
1. Launch the Microsoft Exchange Management Console.
GFI MailArchiver
13 Appendix 1 - Microsoft Exchange Manual Operations | 265
Screenshot 139: Configuring a Mailbox Database
2. Expand Microsoft Exchange > Organization Configuration > Mailbox > Database Management tab
and select Properties from the Actions pane.
GFI MailArchiver
13 Appendix 1 - Microsoft Exchange Manual Operations | 266
Screenshot 140: Mailbox Database properties
2. Unselect Journal Recipient option.
3. Click OK to finalize setup.
13.9.1 Disable standard journaling from the Microsoft Exchange Management Shell
In the Microsoft Exchange Management Shell, use the following syntax to disable standard
journaling:
Set-MailboxDatabase <Mailbox Database> -JournalRecipient $Null
13.9.2 Disable premium journaling
1. Launch the Microsoft Exchange Management Console.
2. Expand Organization Configuration > Hub Transport node and select Journal Rules tab.
3. Right click the journal rule to remove, and click Remove.
4. Click Yes to confirm that you want to remove the journal rule.
Disable premium journaling from the Microsoft Exchange Management Shell
In the Microsoft Exchange Management Shell, use the following syntax to disable a journaling rule:
Remove-JournalRule <journal rule name>
GFI MailArchiver
13 Appendix 1 - Microsoft Exchange Manual Operations | 267
13.10 Removing Email from Microsoft® Exchange 2010
Once GFI MailArchiver is configured and your organization's email is being archived correctly, you may
want to create a Mailbox Management Recipient Policy in Microsoft® Exchange to free up space on the
Exchange server by deleting email.
NOTE
Before you create a new recipient mailbox management policy, you must determine the
following:
What limits you want the policy to enforce
The group you want the policy to control
How you want the policy to handle messages that go past policy limits.
13.10.1 Use the Exchange Management Console to create a retention policy
1. Open the Exchange Management Console.
2. In the console tree, expand the forest you want, and then navigate to Organization Configuration
> Mailbox.
3. In the action pane, click New Retention Policy.
4. On the Introduction page, complete the following fields:
OPTION
DESCRIPTION
Name
Use this box to type a name for the retention policy.
Add
Click this button to add retention tags to the policy. To remove a tag from the policy, click the tag name, and
then click Remove.
5. On the Select Mailboxes page, click Add to select the mailboxes to which you want to apply the
retention policy.
NOTE
You can create a retention policy without applying it to any mailboxes. You can also
apply the policy to mailboxes at a later time.
6. On the New Retention Policy page, review your configuration settings. To make any configuration
changes, click Back.
7. To create the retention policy, click New.
8. On the Completion page, review the following, and then click Finish to close the wizard:
A status of Completed indicates that the wizard completed the task successfully.
A status of Failed indicates that the task wasn't completed. If the task fails, review the summary
for an explanation, and then click Back to make any configuration changes.
13.10.2 Use the EMC to apply a retention policy to a mailbox
1. In the console tree, expand the forest you want, and then navigate to Recipient Configuration >
Mailbox.
GFI MailArchiver
13 Appendix 1 - Microsoft Exchange Manual Operations | 268
2. In the result pane, select the mailbox to which you want to apply the retention policy. You can
select multiple mailboxes by using the Shift or Ctrl keys.
3. In the action pane, click Properties.
4. In Mailbox User> Properties, on the Mailbox Settings tab, select Messaging Records Management,
and then click Properties.
5. In Messaging Records Management, select the Apply Retention Policy check box, and then click
Browse to select the retention policy you want to apply to the mailbox.
6. Click OK, and then in <Mailbox User> Properties, click Apply.
NOTE
Further information on how to create a new retention policy in Exchange Server 2010 is
available here: http://technet.microsoft.com/en-us/library/ff625224.aspx
13.11 Creating a Journaling Mailbox in Microsoft® Exchange 2013
Step 1: Create a new Journal recipient
1. Launch Microsoft® Exchange admin center.
2. Click recipients node.
3. Under mailboxes, select New from the toolbar.
4. Select New user and enter the required mailbox details.
5. Click save.
Step 2: Create a new Journaling mailbox
1. Launch Microsoft® Exchange admin center.
2. Click servers node, then click on databases node.
3. Select an existing Mailbox Database and click Edit from the toolbar.
4. Click maintenance node.
5. In the Journal recipient field, click browse and select the Journal recipient created in Step 1
above.
6. Click save.
13.12 Removing Email from Microsoft® Exchange 2013
Once GFI MailArchiver is configured and your organization's email is being archived correctly, you may
want to create a Mailbox Management Recipient Policy in Microsoft® Exchange to free up space on the
Exchange server by deleting email.
GFI MailArchiver
13 Appendix 1 - Microsoft Exchange Manual Operations | 269
NOTE
Before you create a new recipient mailbox management policy, you must determine the
following:
What limits you want the policy to enforce
The group you want the policy to control
How you want the policy to handle messages that go past policy limits.
13.12.1 Step 1: Create a retention tag
Use the Microsoft® Exchange admin center to create a retention tag
1. Select compliance management > retention tags and click New.
2. Select one of the following options:
OPTION
DESCRIPTION
Applied automatically to entire mailbox (All)
Select to create a default policy tag
(DPT). You can use DPTs to create a
default deletion policy and a default
archive policy that applies to all items
in the mailbox.
Applied automatically to a specific folder
Select to create a retention policy tag
(RPT) for a default folder such as Inbox
and Deleted Items.
Applied by users to items and folders (Personal)
Use this option to create Personal Tags
which Outlook and Outlook Web App
users can use to apply a different
archive or deletion setting than the
folder or any archive or deletion policy
applied to the entire mailbox.
3. Fill in the required information and click save.
13.12.2 Step 2: Create a retention policy
Use the Microsoft® Exchange admin center to create a retention policy.
1. Select Compliance Management > Retention Policies and then click New.
2. On the new retention policy page, enter the following fields:
OPTION
DESCRIPTION
Name
Use this box to type a name for the retention policy.
Retention Tags
Click the Add button to select the Retention Tags you want to add to this retention policy. To remove a tag from the policy, click the tag name, and then click
Remove.
3. Click save.
NOTE
You can create a retention policy without applying it to any mailboxes. You can also
apply the policy to mailboxes at a later time.
GFI MailArchiver
13 Appendix 1 - Microsoft Exchange Manual Operations | 270
13.12.3 Step 3: Apply a retention policy to mailbox users
After you create a retention policy, you must apply it to mailbox users. You can apply different
retention policies to different set of users.
To assign the retention policy to a mailbox:
1. Launch Microsoft® Exchange admin center.
2. Click recipients node.
3. Under mailboxes, select Edit from the toolbar.
4. Click mailbox features.
5. Go to the Retention policy field and from the drop down list select the retention policy created in
the previous step.
6. Click save.
NOTE
Further information on how to create a new retention policy in Exchange Server 2013 is
available here: http://technet.microsoft.com/en-us/library/ff625224.aspx#EMC
GFI MailArchiver
13 Appendix 1 - Microsoft Exchange Manual Operations | 271
14 Appendix 2 - Role Based Installations
Role-based Deployment allows for scalability of GFI MailArchiver in large IT infrastructures dealing
with heavy email traffic. This is achieved through the deployment of multiple GFI MailArchiver
instances on separate servers. Each instance is configured to fulfill diverse roles, to balance workload
and collectively help for the smooth running of the email archiving process.
The following roles can currently be assigned to GFI MailArchiver instances:
Central Configuration Service
Data Collection
Storage
Search and Indexing
User Interface and Administration
Data Import Service
GFI MailArchiver
14 Appendix 2 - Role Based Installations | 272
14.1 How Role-based Deployment Works
Screenshot 141: How Role-based Deployment works
The GFI MailArchiver role-based deployment process in a distributed environment involves the
following steps:
1. Establish the number of GFI MailArchiver instances required and the role to assign to each
instance.
2. Install GFI MailArchiver on each server that will be participating in the deployment. This is a
normal installation as described in the previous sections in this manual.
3. Execute the Deployment Manager Wizard on each GFI MailArchiver instance.
4. Store each server’s deployment configuration file for future reference. This file may be required
when updating to newer GFI MailArchiver builds or when the administrator needs to reconfigure the
deployment roles.
GFI MailArchiver
14 Appendix 2 - Role Based Installations | 273
5. Configure GFI MailArchiver from the server with the User Interface and Administration role.
NOTE
GFI MailArchiver instances communicate with each other over the network using the
.NET ® Remoting protocol.
NOTE
A GFI MailArchiver instance can be assigned more than one role; the following roles can
be assigned to more than one GFI MailArchiver instance:
Data Collection
User Interface and Administration
Data Import Service
Though there may be a number of GFI MailArchiver instances distributed over the network, this fact is
transparent to the administrator when it comes to configuring GFI MailArchiver, since configuration is
centralized. Once the deployment process is complete, the administrator does not have to configure
individual servers but can carry out all configuration through the GFI MailArchiver management
console. In a distributed deployment, the GFI MailArchiver management console is accessible from the
server(s) assigned the User Interface and Administration role.
14.2 System Requirements
For the GFI MailArchiver Role-based deployment, you need:
Hardware and software specifications as described in the ‘Installing GFI MailArchiver’ chapter.
NOTE
For a Role-based deployment only SQL Server® based Archive Stores are supported.
NOTE
If you are using a SQL Server® and NTFS file system archive store, make sure that the
archived email binary source path is specified in UNC format.
GFI MailArchiver services running under Active Directory® credentials allowing communication
over the network.
14.3 Installing GFI MailArchiver in a Role-based Environment
You assign roles to GFI MailArchiver instances by using the Deployment Manager Wizard, which
simplifies and streamlines the process.
GFI MailArchiver
14 Appendix 2 - Role Based Installations | 274
14.3.1 Installing GFI MailArchiver
Install GFI MailArchiver on each instance where a role will be deployed. For more information, refer
to Installing GFI MailArchiver (page 29).
14.3.2 Executing the Deployment Manager Wizard on Each Instance
Execute the Deployment Manager Wizard on each GFI MailArchiver instance, according to the role(s) it
will be assigned, in the following order:
1. Central Configuration Service
2. Storage
3. Search and Indexing
4. Data Collection (more than one allowed)
5. User Interface and Administration (more than one allowed)
6. Data Import Service (more than one allowed)
7. User Mailbox Synchronization
8. IMAP Server
NOTE
Execute the wizard for the GFI MailArchiver instance that will be assigned the Central
Configuration Service role, then execute it for the GFI MailArchiver instance with the
Storage role, and so on.
14.3.3 Launching the Deployment Manager Wizard
To launch the Deployment Manager Wizard:
1. From Command Prompt, navigate to:
<Program Files Directory>\GFI\MailArchiver\DM\
2. Key in deploymentmanager.exe and press Enter.
Using the Deployment Manager Wizard
1. After launching the Deployment Manager Wizard you are presented with the welcome dialog. Click
Next to continue.
GFI MailArchiver
14 Appendix 2 - Role Based Installations | 275
Screenshot 142: Selecting roles
2. Specify which role(s) will be assigned to the GFI MailArchiver instance on this server and click Next.
NOTE
Move the mouse pointer over any role listed in the dialog to view the relevant
description for that role.
3. Based on the roles selected in the previous stage, you will be asked to configure some parameters.
For information on how to configure roles refer to the next sections. Click Next to continue.
4. Specify the Active Directory® credentials under which to run GFI MailArchiver services and click
Next.
NOTE
GFI MailArchiver services must run under an Active Directory® user account with
read/write access privileges on the Microsoft® Exchange Server configuration.
5. Click Next to initiate the process and apply all specified parameters.
GFI MailArchiver
14 Appendix 2 - Role Based Installations | 276
NOTE
During this process all GFI MailArchiver services need to be stopped and re-started. This
occurs automatically and may take minutes to complete.
6. Click Finish to finalize your settings and close the Deployment Manager Wizard.
Assigning the Central Configuration Service Role
Screenshot 143: Assigning the Central Configuration Service role
To assign the ‘Central Configuration Service Role’ select the appropriate option from the list of roles
in the ‘Server Role Selection’ dialog.
The server assigned this role maintains the central configuration database of the GFI MailArchiver
deployment and hosts miscellaneous services like email restore and licensing. You can only assign the
‘Central Configuration Service Role’ to one server in the deployment.
GFI MailArchiver
14 Appendix 2 - Role Based Installations | 277
Assigning the Data Collection Role
Screenshot 144: Assigning the Data Collection role
To assign the ‘Data Collection Role’ select the appropriate option from the list of roles in the ‘Server
Role Selection’ dialog.
The server assigned this role collects emails, to be archived, from Microsoft® Exchange Server
locations.
To achieve maximum performance, assign the ‘Data Collection Role’ to a GFI MailArchiver instance
residing directly on the Microsoft® Exchange Server.
You can assign this role to multiple servers in the deployment. However, ensure that the ‘server
tagging’ option is enabled when assigning the ‘User Interface and Administration Role’.
GFI MailArchiver
14 Appendix 2 - Role Based Installations | 278
Assigning the Storage Role
Screenshot 145: Assigning the Storage role
To assign the ‘Storage Role’ select the appropriate option from the list of roles in the ‘Server Role
Selection’ dialog. The server assigned this role provides email storage and retrieval services.
You can only assign the ‘Storage Role’ to one server in the deployment.
GFI MailArchiver
14 Appendix 2 - Role Based Installations | 279
Assigning the Search and Indexing Role
Screenshot 146: Assigning the Search and Indexing role
To assign the ‘Search and Indexing Role’ select the appropriate option from the list of roles in the
‘Server Role Selection’ dialog.
The server assigned this role provides email search and indexing services. GFI MailArchiver creates
search indexes for each archive store you configure. Each search index automatically indexes new
email content archived in the corresponding archive store, to keep the search index updated and
enable users to perform precise and fast searches.
You can only assign the ‘Search and Indexing Role’ to one server in the deployment.
GFI MailArchiver
14 Appendix 2 - Role Based Installations | 280
Screenshot 147: Specify the word breaker for the Search and Indexing role
You will be prompted to specify the word breaker to use. Word breakers for each language enable the
resulting terms to be more accurate for that language. If no word breaker is available for a particular
language, the neutral word breaker is used. With the neutral word breaker, words are broken at
neutral characters such as spaces and punctuation marks.
Select the indexing option available if you also want to index email message attachments.
GFI MailArchiver
14 Appendix 2 - Role Based Installations | 281
Assigning the User Interface and Administration Role
Screenshot 148: Assigning the User Interface and Administration role
To assign the ‘User Interface and Administration Role’ select the appropriate option from the list of
roles in the ‘Server Role Selection’ dialog.
The server assigned this role enables users to browse/search their archives and administrators to
configure GFI MailArchiver through the management console.
You can assign the ‘User Interface and Administration Role’ to multiple servers in the deployment.
GFI MailArchiver
14 Appendix 2 - Role Based Installations | 282
Screenshot 149: Specify User Interface and Administration role settings
You will be prompted to specify the authentication method to use (Windows® or Forms) to log in to
the GFI MailArchiver management console.
If more than one server is assigned the Data Collection role, select the Enable server tagging in the
Data Sources configuration option. Server tagging allows multiple GFI MailArchiver instances running
the Data Collection role to process different mailboxes without interfering with each other.
GFI MailArchiver
14 Appendix 2 - Role Based Installations | 283
Assigning the Data Import Service Role
Screenshot 150: Assigning the Data Import Service role
To assign the ‘Data Import Service Role’ select the appropriate option from the list of roles in the
‘Server Role Selection’ dialog.
The server assigned this role uploads imported emails to the GFI MailArchiver Archive Stores.
You can assign the ‘Data Import Service Role’ to multiple servers in the deployment.
GFI MailArchiver
14 Appendix 2 - Role Based Installations | 284
14.3.4 Assigning the User Mailbox Synchronization Role
Screenshot 151: Assigning the Data Import Service role
To assign the ‘User Mailbox synchronization Role’ select the appropriate option from the list of roles
in the ‘Server Role Selection’ dialog.
The User Mailbox Synchronization role is used to synchronize emails in a user mailbox between GFI
MailArchiver and Microsoft® Exchange Server. You can configure only one server to run the User
Mailbox Synchronization Role in the deployment.
GFI MailArchiver
14 Appendix 2 - Role Based Installations | 285
14.3.5 Assigning the IMAP Server Role
Screenshot 152: Assigning the IMAP Server role
To assign the ‘IMAP Server Role’ select the appropriate option from the list of roles in the ‘Server
Role Selection’ dialog.
NOTE
The IMAP Server Role must be on the same machine where Storage Role is configured.
The IMAP Server role enables IMAP email clients to connect to GFI MailArchiver and download
archived emails to their devices. You can configure only one instance of this role in the deployment.
GFI MailArchiver
14 Appendix 2 - Role Based Installations | 286
14.3.6 Assigning Multiple Roles to a Server
Screenshot 153: Assigning multiple roles
A GFI MailArchiver instance may be assigned more than one role. To assign the required roles, select
the appropriate options from the list of roles in the ‘Server Role Selection’ dialog.
GFI MailArchiver
14 Appendix 2 - Role Based Installations | 287
Identifying the Central Configuration Service Role Server
Screenshot 154: Identifying the Central Configuration Service Role server
If you are assigning a role other than the ‘Central Configuration Service Role’ to a GFI MailArchiver
instance, you are prompted to identify the server that has been assigned that role.
Click Test connection to verify that the ‘Central Configuration Service Role’ server you specified is
accessible.
GFI MailArchiver
14 Appendix 2 - Role Based Installations | 288
Identifying the Data Collection Role Server
Screenshot 155: Identifying the Data Collection Role server
If you are assigning the ‘User Interface and Administration Role’ to a GFI MailArchiver instance, but
not the ‘Data Collection Role’ to the same instance, you are prompted to identify the server with the
‘Data Collection Role’.
Click Test connection to verify that the ‘Data Collection Role’ server you specified is accessible.
GFI MailArchiver
14 Appendix 2 - Role Based Installations | 289
14.3.7 Identifying the Storage Role Server
Screenshot 156: Identifying the Storage Role server
If you are assigning a role other than the ‘Storage Role’ to a GFI MailArchiver instance, you are
prompted to identify the server that has been assigned that role.
Click Test connection to verify that the ‘Storage Role’ server you specified is accessible.
GFI MailArchiver
14 Appendix 2 - Role Based Installations | 290
14.3.8 Identifying the Search and Indexing Role Server
Screenshot 157: Identifying the Search and Indexing Role server
If you are assigning a role other than the ‘Search and Indexing Role’ to a GFI MailArchiver instance,
you are prompted to identify the server which has been assigned that role.
Click Test connection to verify that the ‘Search and Indexing Role’ server you specified is accessible.
GFI MailArchiver
14 Appendix 2 - Role Based Installations | 291
14.3.9 Recommended Deployment Scenario
Figure 4 - Deployment scenario
This is the recommended scenario for a GFI MailArchiver distributed deployment. In this scenario, an
organization will be deploying three GFI MailArchiver instances. Each instance is installed on a
separate server, with each server fulfilling roles as shown in the following table:
Table 97: Deployment scenario
SERVER ID
ROLE
Data Collection
User Mailbox Synchronization
User Interface and Administration
Central Configuration Service
Storage
Search and Indexing
Data Import Service
GFI MailArchiver
14 Appendix 2 - Role Based Installations | 292
NOTE
To achieve maximum performance, assign the ‘Data Collection Role’ and the User
Mailbox synchronization roles to a GFI MailArchiver instance residing directly on the
Microsoft® Exchange Server with the journaling mailbox.
These are the steps to follow for this deployment:
1. Install GFI MailArchiver on each server.
2. Execute the Deployment Manager Wizard on each of the three servers to assign roles to the GFI
MailArchiver instances. The roles should be assigned in the order as listed in the ‘Executing the
Deployment Manager Wizard on each instance’ section of this chapter. Run the Deployment Manager
Wizard in the order as shown in the following table:
Table 98: Deployment order
SERVER ID ORDER
DEPLOYMENT MANAGER WIZARD
Run Wizard to assign the following roles:
Central Configuration Service
Storage
Search and Indexing
Data Import Service
Run Wizard to assign the Data Collection role and User Mailbox synchronization roles.
Run Wizard to assign the User Interface and Administration role
3. Configure GFI MailArchiver through the management console, accessed from Server ID 2, which is
the server with the User Interface and Administration role.
Alternative Scenario
Another recommended scenario is to deploy servers with the following GFI MailArchiver roles:
Server 1:
Central Configuration Service
Storage
Server 2:
Search and Indexing
Server 3:
Data Collection
User Mailbox synchronization
GFI MailArchiver
14 Appendix 2 - Role Based Installations | 293
NOTE
To achieve maximum performance, assign the Data Collection role to a GFI MailArchiver
instance residing directly on the Microsoft® Exchange Server with the journaling
mailbox.
NOTE
You can have multiple servers assigned with the Data Collection role.
Server 4:
User Interface and Administration
Server 5 (Temporary server):
Data Import Service
NOTE
This temporary server can be used when past emails (before GFI MailArchiver was
installed) from PST files will be imported into the Archive Stores. Importing past emails
is normally a one-time process, thus the temporary nature of this server.
14.4 Uninstall Information
To uninstall GFI MailArchiver:
1. Click Start > Control Panel > Programs > Uninstall a Program.
2. Select GFI MailArchiver from the list, and click Uninstall.
3. When Are you sure you want to uninstall GFI MailArchiver 2012? appears, click Yes.
4. On completion, click Finish.
GFI MailArchiver
14 Appendix 2 - Role Based Installations | 294
15 Appendix 3 - Using the Port Changing Tool
The Port Changing Tool enables you to check for port conflicts on the server where GFI MailArchiver is
installed and change remoting ports quickly and easily.
IMPORTANT
After upgrading GFI MailArchiver from a previous version, port numbers are reverted
back to their original default setting, so you will need to run the Port Changing Tool
again.
Screenshot 158: Port Changing Tool user interface
To use the Port Changing Tool:
1. Launch the tool from Program Files > GFI\MailArchiver > Tools > PortChange and click
PortChange.exe
NOTE
Fields with a yellow background denote contents are read-only and cannot be changed.
2. Click Check Port Conflict to identify any ports on your machine that are being used by another
application. The tool stops and restarts GFI MailArchiver services during this process. If a conflict is
identified, the conflicting port number is marked in red. Ports without conflict are marked in green.
3. Type a new value in the Change To field of the port you want to update, then click Apply Change.
The tool checks again for any port conflicts with the newly entered value and applies the change.
GFI MailArchiver
15 Appendix 3 - Using the Port Changing Tool | 295
4. (Optional) If you need to restore default port numbers on the GFI MailArchiver machine, click
Reset, then click Apply Change.
GFI MailArchiver
15 Appendix 3 - Using the Port Changing Tool | 296
16 Index
A
GFI MailInsights
Access Control 62, 98, 132-133, 149, 227
Generating reports 63
Access control auditing report 149
Glossary 234
Active Directory 19, 29, 58, 66, 68, 70, 72, 80, 83, 85,
87, 89, 132, 156, 164, 174, 219, 239, 254, 274, 276
H
archive 28, 36, 42, 57, 62, 94, 100-101, 103-104, 108,
110, 116-120, 122-124, 126-129, 132, 141, 144,
165, 239, 247
headers 25, 33, 56, 58, 118, 134, 158, 166, 219, 231
I
Archived emails auditing report 149
IIS 19, 22, 136, 226
Auditing reports 146, 149
IMAP 19, 21, 23, 29, 44, 48, 93, 98, 103, 134, 136, 156,
175, 177-183, 275
B
Bulk import auditing report 149
C
Internet Explorer 19, 136, 158, 229
J
Journal Mailbox
categorization policies 56
choosing a hournaling method 24, 42, 101, 103-104,
239, 261
Central Configuration Service Role 277
Configure archive store 31-32, 34, 36
D
Data Collection Role 278
Data Import Service Role 284
Data integrity auditing report 150
Data leakage prevention auditing report 150
database 20, 24-28, 32, 34, 37, 116-117, 119, 123-124,
126, 128-129, 131, 134, 147, 188, 194, 251, 257,
261, 266, 277
Database activity auditing 146-147, 149
journaling 16, 24, 40, 42, 46, 49, 95, 99-101, 104, 239,
245, 251, 256, 261, 265, 269, 293
K
Knowledge Base 224
L
labeling 56, 98
license agreement 29, 50
License Key 31-32, 50-51, 93, 98
M
Database settings 18, 20, 22
mailboxes 25, 33, 43, 53-54, 62, 98, 102, 108, 110-112,
118, 132-133, 151, 175, 185-189, 193, 195, 218,
222, 242, 248, 268-270, 283
Documentation 183, 224
Microsoft Exchange 2003 187, 193
E
Microsoft Exchange 2007 187
database schema 49, 130
envelope journaling 242, 256, 265
Microsoft Exchange 2010 187
export 17, 49, 185-187, 189, 193-196, 215, 229
Microsoft Exchange server 24-25, 42, 47, 202, 232, 251,
256
F
Microsoft SQL Server 21, 25, 27, 33, 38, 124, 131, 147
Firebird 19, 25-26, 34-35, 49, 118, 120, 124, 128-129,
134, 146
O
Firewall port settings 18, 21
OneClick Restore 56, 215
Full Access Group 132
P
G
PowerShell 188-189, 193
GFI MailArchiver Import Service 231
R
Rebuilding a search index 122
GFI MailArchiver
Index | 297
recipient 24, 58, 106, 141, 145, 219, 247, 252, 258-259,
262, 267-269
Retention policies 64, 137-138, 142, 150, 174, 270
Retention policy auditing report 150
Role-based Deployment 272-274
S
Search and Indexing Role 280
Search Index 35, 40, 119-124, 126, 128-129
SQL Server 19-21, 25, 27-28, 33, 36, 49, 118, 120, 124,
126, 128-129, 131, 146-147, 150, 230, 274
Storage role 275
System requirements
Hardware 18, 23, 49, 157, 165, 274
T
Technical support 224
Time Zone 224
U
user access control 132
User audit trail auditing report 150
User interaction auditing 148
User Interface and Administration Role 278
User preferences 90
W
Web Forum 224
X
x64 20, 29, 50
x86 29, 50, 157, 165
GFI MailArchiver
Index | 298
USA, CANADA AND CENTRAL AND SOUTH AMERICA
15300 Weston Parkway, Suite 104 Cary, NC 27513, USA
Telephone: +1 (888) 243-4329
Fax: +1 (919) 379-3402
[email protected]
UK AND REPUBLIC OF IRELAND
Magna House, 18-32 London Road, Staines-upon-Thames, Middlesex, TW18 4BP, UK
Telephone: +44 (0) 870 770 5370
Fax: +44 (0) 870 770 5377
[email protected]
EUROPE, MIDDLE EAST AND AFRICA
GFI House, San Andrea Street, San Gwann, SGN 1612, Malta
Telephone: +356 2205 2000
Fax: +356 2138 2419
[email protected]
AUSTRALIA AND NEW ZEALAND
83 King William Road, Unley 5061, South Australia
Telephone: +61 8 8273 3000
Fax: +61 8 8273 3099
[email protected]