1
CHAPTER 1
GETTING STARTED
This chapter describes the procedures from unpacking the EM-200, to powering it on. The following topics
are described.
• Unpacking the machine on page 1
• Checking the package contents on page 2
• Identifying components on page 3
• Installing the battery pack on page 8
• Charging the battery pack on page 9
• “Powering on” on page 10
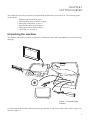
Unpacking the machine
The machine and cable accessories are packed in a cardboard carton with foam padding for protection during
shipping.
Figure 1.1 Unpacking the
machine
Carefully unpack the machine and keep the packing materials. If you need to ship it in the future, repack it as
shown in Figure 1.1.
1
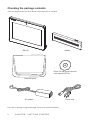
Checking the package contents
After you unpack the device, check that the following items are included.
EM-200
Battery
Driver CD with drivers and the
user manual PDF file.
Protection pack
AC adapter
If any item is missing or appears damaged, contact your dealer immediately.
2
C H A P T E R 1 G E T T I N G S TA R T E D
Power cord
Identifying components
This section describes the parts and connectors on the machine.
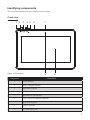
Front view
1
2
3
4 5
6
Figure 1.2 Front view
Component
7
8
9
Description
1
Power indicator
2
Battery charging indicator
3
HDD status indicator
4
WiFi On/ Off indicator
5
Bluetooth On/ Off indicator
6
3.5G LAN On/Off indicator (optional)
7
Built-in Microphone
8
Camera (optional)
9
10.1-inch touch panel
3
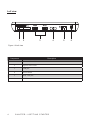
Left view
1
2
3
4
Figure 1.3 Left view
Component
4
Description
1
5-in-1 media card slot
2
Express card 34 slot
3
USB port
4
Power button
5
RJ45 LAN jack
6
DC IN
C H A P T E R 1 G E T T I N G S TA R T E D
5
6
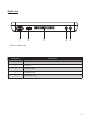
Right view
1
2
3
4
5
Figure 1.4 Right view
Component
Description
1
VGA port
2
USB port
3
Ventilation hole
4
Headphone jack
5
Microphone jack
5
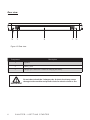
Rear view
3
1
2
1 3
Figure 1.5 Rear view
Component
Description
1
Speaker
2
Battery pack
3
Charger pin: connect to a cradle for charging the battery.
Do not short-circuit the 3 charger pins. A short-circuit may cause
damage to the machine and present risks for electric shock or fire.
IMPORTANT
6
C H A P T E R 1 G E T T I N G S TA R T E D
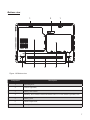
Bottom view
2
1
3
4
5
1
6
7
Figure 1.6 Bottom view
Component
Description
1
Mounting hole
2
Camera (optional)
3
Battery lock switch
4
Memory, WiFi module, Bluetooth module and 3.5G LAN module (optional) slots
5
Battery pack
6
HDD compartment
7
Battery release latch
7
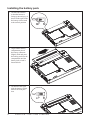
Installing the battery pack
1. Overturn the EM200
so that the bottom is
facing up toward you, as
shown in the right. Slide
the battery release latch
to the unlock position.
2. Align EM200 battery
compartment pins to
the battery connector.
Slightly slide and press
the battery pack into the
compartment until the
battery lock switch is
bounced back.
3. As shown in the right,
slide the battery release
latch to the lock position.
8
C H A P T E R 1 G E T T I N G S TA R T E D
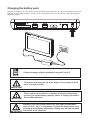
Charging the battery pack
Plug the AC adapter power cord into an electrical outlet, then connect the DC plug of the adapter cable to the
EM-200. It takes approximately 2–4 hours to fully charge the battery for the first time. Subsequent charges
might take longer.
Charge the battery within a temperature range 0˚C to 45˚C.
NOTE
To protect and prolong the life of the battery, do not charge it for 24
hours or longer at a time.
IMPORTANT
IMPORTANT
Please make sure to perform 3 complete full charge and discharge
cycles to get optimal battery capacity. Failure to comply will result in
shorter battery lifespan.
If battery is not used, please store in dry area within a temperature
range of -10˚C ~ 20˚C. It is necessary to charge the battery once every
3 months to avoid battery degradation. Battery may become unusable
IMPORTANT if the above is not respected.
9
Powering on
The power button located on the left side of the EM200, press the power button the turn it on.
To force power off , long press the power button for 4~5 seconds.
NOTE
10
C H A P T E R 1 G E T T I N G S TA R T E D