1
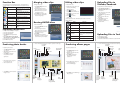
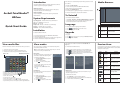
Function Bar
The Function Bar lists main function buttons. Click the button to
access the function. See the table below for a description of each
button.
Button
Name
Import
Video Merge
Create AVCHD
Function
Imports media files to the computer
from a camera, camcorder, or
storage device.
Produces movies with your video
files.
Burns AVCHD discs with your video
files.
Merging video clips
Editing video clips
To merge video clips:
To edit a video clip:
1. Click Video Merge. The work
area appears.
2. Click and drag the desired
video clips into the work area.
3. Double click clips to preview
and edit, if necessary.
4. Click Next to merge the clips.
5. Select the device and path to
save the merged clip.
1. Double click a video clip in the
work area. The Editing
windows appears.
2. Click
to select the
beginning of the trimmed clip.
3. Click
to select the end of
the trimmed clip.
4. Click
to save the
trimmed clip.
Uploads files to your YouTube
account.
Upload to Facebook Uploads files to your Facebook
account.
Upload to YouTube
Upload to YouKu
Uploads files to the YouKu website.
Photo Book
Produces photo books with your
pictures.
Album Page
Produces album pages with your
pictures.
Importing media files
To import media files to your computer:
1. Select the desired folder.
2. Select the desired files.
3. Click Import. The Import window
appears.
4. Select Import New Scenes, Import
Selected Scenes, or Import All Scenes.
5. Select or type a folder name.
6. Click OK to import files.
Producing photo books
Name
Button
Function
Play / Pause
Click to play or pause the clip.
Stop
Click to stop the clip.
Previous
Click to go to the previous clip.
Next
Click to go to the next clip.
Time box
Click on the number and use
arrows to view a certain point of the
video clip.
Volume level
Drag to change the volume.
Full screen
Click to enter full screen mode.
1. Click Upload to YouTube or
Upload to Facebook. The work
area appears.
2. Click and drag the desired file
into the work area.
3. Click Next. The Login window
appears.
4. Type your user name and
password.
5. Click Login to sign in to
YouTube/Facebook.
6. Follow the instructions to
upload the file.
To burn AVCHD discs:
1. Click Create AVCHD. The work
area appears.
2. Click and drag the desired
video clips into the work area.
3. Double click clips to preview
and edit, if necessary.
4. Click Next.
5. Select the drive to burn the
AVCHD disc or select the path to
save the files in your computer.
7. See the illustration below for descriptions of photo book design:
Lock / unlock
the design
To produce photo books:
Add pictures
Remove all
Producing album pages
Uploading files to YouKu
To upload files to YouKu:
1. Click Upload to YouKu.
2. Follow the YouKu website instructions to upload the file.
7. See the illustration below for descriptions of album page design:
Lock / unlock
the design
Save the design
To produce photo books:
Save the design
Restart
1. Click Photo Book. The work
area appears.
2. Drag the desired pictures into
the work area.
3. Click Next to launch the
ArcSoft Print Creations
application.
To upload files to YouTube/Facebook:
See the table below for a brief description of other tools in the
Editing window:
Burning AVCHD discs
Uploading files to
YouTube/Facebook
Restart
New project
or design
Change the photo
book template
Undo / Redo
4. Select photo book categories
to view photo books.
5. Select a photo book.
1. Click Album Page. The work
area appears.
2. Drag the desired picture into
the work area.
3. Click Next to launch the
ArcSoft Print Creations
application.
Add pictures
Remove all
New project
or design
Change the album
page template
Undo / Redo
4. Select album page categories
to view album pages.
5. Select an album page.
6. Click Next to enter Photo Book
Design screen.
Click the
icon to see
the located
page of the
picture
Auto fill
pictures to
empty pages
Click on text
or image to
edit
Preview the
photo book
Browse
Edit Page /
through Page layout
the pages
Share the photo
book by Email,
image, or SWF files
Print /
Print options
6. Click Next to enter Album Page
Design screen.
Click the
icon to see
the located
page of the
picture.
Auto fill
pictures to
empty pages
Preview the
album page
Share the album
page by Email or
the image file
Print /
Print options