1
Installation Instructions
PXR
5.
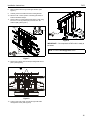
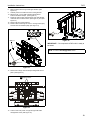
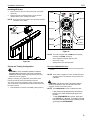
Open cable management covers on bottom of both PXR
arms and lay cables within arms. (See Figure 34) and (See
Figure 37)
6.
Close cable management covers, being careful to not pinch
cables under covers. (See Figure 37)
8.
If necessary, use cable management flap on PXR base to
route cables from left arm to PXR right side. (See Figure 34)
and (See Figure 39)
5
8
6
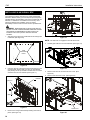
Figure 37
7.
Figure 39
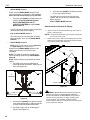
Continue to route cables through vertical cable
management slots. (See Figure 38)
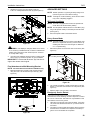
CAUTION: PINCH POINTS! Keep fingers, hands and
cables out of pinch point areas.
Set-Up and Configuration with Display Attached
WARNING: PINCH HAZARD! FINGER OR HANDS
BETWEEN MOVING PARTS CAN LEAD TO SEVERE
PERSONAL INJURY! Keep fingers and hands away from
PXR arms when in operation.
7
Setting or changing the configuration of the PXR is done using
the remote control provided with the mount.
Running LEARN MODE
1.
Plug power cord (Z) into PXR and into the nearest power
source.
NOTE: Once power is applied to the unit, the indicator lights
will flash 5 times. This indicates the unit needs to be
calibrated to your specific screen.
Figure 38
CAUTION: PXR SHOULD ONLY BE MOVED USING
REMOTE CONTROL!! After the PXR arms have been
engaged, do NOT move PXR by hand!
21