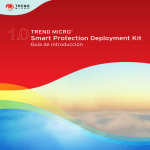
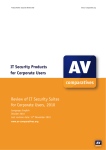
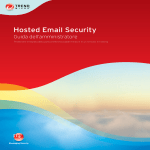
1
Network VirusWall Enforcer 2500
TM
Upgrade Guide
Trend Micro Incorporated reserves the right to make changes to this document and to
the products described herein without notice. Before installing and using the
software, please review the readme files, release notes, and the latest version of the
applicable user documentation, which are available from the Trend Micro Web site
at:
http://www.trendmicro.com/download
Trend Micro, the Trend Micro t-ball logo, Control Manager, OfficeScan,
ServerProtect, TrendLabs, and Trend Micro Damage Cleanup Services are
trademarks or registered trademarks of Trend Micro, Incorporated. All other product
or company names may be trademarks or registered trademarks of their owners.
Copyright©2005-2006 Trend Micro Incorporated. All rights reserved.
Document Part No. NVEM12677/60313
Release Date: August 2006
Protected by U.S. Patent No. 5,623,600 and pending patents.
The user documentation for Trend Micro Network VirusWall Enforcer is intended to
introduce the main features of the software and installation instructions for your
production environment. You should read through it prior to installing or using the
software.
Detailed information about how to use specific features within the software are
available in the online help file and the online Knowledge Base at Trend Micro’s
Web site.
Trend Micro is always seeking to improve its documentation. Your feedback is
always welcome. Please evaluate this documentation on the following site:
www.trendmicro.com/download/documentation/rating.asp
Contents
Preface
Network VirusWall™ Enforcer 2500 Documentation ...................... P-2
About This Upgrade Guide ................................................................ P-3
Audience ............................................................................................ P-4
Document Conventions...................................................................... P-4
Chapter 1:
Upgrading Network VirusWall™ Enforcer 2500
Performing an Upgrade ...................................................................... 1-2
Connecting to the Device ................................................................... 1-2
Using the Appliance Firmware Flash Utility ..................................... 1-9
Running the Appliance Firmware Flash Utility ............................. 1-9
Updating the BIOS and BMC ...................................................... 1-11
Upgrading the Boot Code and Program File ............................ 1-17
Performing a Rollback ..................................................................... 1-23
Index
i
Trend Micro™ Network VirusWall™ Enforcer 2500 Upgrade Guide
ii
Preface
Preface
Welcome to the Trend Micro™ Network VirusWall™ Enforcer 2500 Upgrade Guide.
This book contains information about the tasks you need to perform to upgrade to
Network VirusWall Enforcer 2500. This guide is intended for novice and advanced
users of Trend Micro Control Manager™ and Network VirusWall who want to plan,
deploy, and preconfigure Network VirusWall Enforcer 2500.
This preface discusses the following topics:
•
Network VirusWall™ Enforcer 2500 Documentation on page 2
•
About This Upgrade Guide on page 3
•
Audience on page 4
•
Document Conventions on page 4
P-1
Trend Micro™ Network VirusWall™ Enforcer 2500 Upgrade Guide
Network VirusWall™ Enforcer 2500
Documentation
The Network VirusWall Enforcer 2500 documentation consists of the following:
•
Online Help—Web-based documentation that is accessible from the Network
VirusWall Enforcer Web console.
The Network VirusWall Enforcer Online Help contains explanations about the
Network VirusWall Enforcer components and features.
•
Upgrade Guide (UG)—PDF documentation that is accessible from the Solutions
CD for Network VirusWall Enforcer 2500 or downloadable from the Trend
Micro Web site.
The UG contains explanations about upgrading from Network VirusWall 2500
1.5 and 1.8 to Network VirusWall Enforcer 2500.
•
Getting Started Guide (GSG)—PDF documentation that is accessible from the
Solutions CD for Network VirusWall Enforcer 2500 or downloadable from the
Trend Micro Web site
The GSG contains instructions on deploying Network VirusWall Enforcer, a task
that includes planning, testing, and preconfiguration. See About This Upgrade
Guide for chapters available in this book.
•
Administrator’s Guide (AG)—PDF documentation that is accessible from the
Solutions CD for Network VirusWall Enforcer 2500 or downloadable from the
Trend Micro Web site
The AG contains explanation of the Network VirusWall Enforcer architecture
and instructions on how to configure and administer Network VirusWall Enforcer
using the applicable management tools. Topics include Frequently Asked
Questions (FAQs), Troubleshooting, and Glossary chapters.
Tip:
P-2
Trend Micro recommends checking the corresponding Network VirusWall
Enforcer link from the Update Center
(http://www.trendmicro.com/download) or
http://www.trendmicro.com/en/products/network/nvwe/eval
uate/overview.htm for updates to the Network VirusWall Enforcer
documentation and program file.
Preface
About This Upgrade Guide
The Network VirusWall Enforcer 2500 Upgrade Guide discusses the following
topics:
•
Performing an Upgrade—instructions for upgrading to Network VirusWall
Enforcer 2500
•
Connecting to the Device—instructions for uploading the new image file
•
Using the Appliance Firmware Flash Utility—instructions for uploading the
BIOS and BMC files
•
Performing a Rollback—instructions for rolling back to a previous version of
Network VirusWall
P-3
Trend Micro™ Network VirusWall™ Enforcer 2500 Upgrade Guide
Audience
The Network VirusWall Enforcer 2500 documentation assumes a basic knowledge of
security systems, including:
•
Antivirus and content security protection
•
Network concepts (such as IP address, netmask, topology, LAN settings)
•
Various network topologies
•
Network devices and their administration
•
Network configuration (such as the use of VLAN, SNMP)
Document Conventions
To help you locate and interpret information easily, the Network VirusWall Enforcer
2500 documentation uses the following conventions.
CONVENTION
ALL CAPITALS
Acronyms, abbreviations, and names of certain commands and keys on the keyboard
Bold
Menus and menu commands, command buttons,
tabs, options, and tasks
Italics
References to other documentation
Monospace
Examples, sample command lines, program code,
Web URL, file name, and program output
Note:
Configuration notes
Tip:
Recommendations
WARNING!
Reminders on actions or configurations that should be
avoided
FAILOVER
Network VirusWall Enforcer interface connected to the
device in a failover pair
TABLE 1.
P-4
DESCRIPTION
Conventions used in the Network VirusWall Enforcer 2500
documentation
Chapter 1
Upgrading Network VirusWall™
Enforcer 2500
You can upgrade Network VirusWall 2500 from version 1.5 and 1.8 to Network
VirusWall Enforcer 2500 by using the Appliance Firmware Flash Utility. The utility
is included on the Trend Micro Network VirusWall Enforcer 2500 CD.
This chapter contains the following topics:
•
Performing an Upgrade on page 1-2
•
Connecting to the Device on page 1-2
•
Using the Appliance Firmware Flash Utility on page 1-9
•
Performing a Rollback on page 1-23
1-1
Trend Micro™ Network VirusWall™ Enforcer 2500 Upgrade Guide
Performing an Upgrade
To upgrade from Network VirusWall 2500 version 1.5 or 1.8 to Network VirusWall
Enforcer 2500, perform the following:
•
Make a copy of your current network settings to ensure that you can restore the
settings at anytime.
•
Configure HyperTerminal to connect to the device.
•
Update the BMC and BIOS.
•
Update the boot code (.B file).
WARNING! You must update the boot code (.B file) before updating the image (.R
file).
•
Update the image (.R file).
The following sections in this document will take you through the steps required for
upgrading your device.
Connecting to the Device
Connect your computer to the device before using the Appliance Firmware Flash
Utility.
Prepare the following before connecting to the device:
1-2
•
A computer running Microsoft™ Windows™ with a LAN port and configurable
IP address, as well as a CD drive
•
An account belonging to the Administrator's group of the local computer on
which the tool will run
•
The Trend Micro Solutions CD for Network VirusWall Enforcer 2500, which
contains the Application Firmware Flash Utility
Upgrading Network VirusWall™ Enforcer 2500
To connect your computer to the device:
1.
Connect one end of the included RJ45 Ethernet cable to port 5 (management
port) and the other end to your computer.
2.
Connect one end of a RS232 console cable to the back of the device and the other
end to the console port on your computer.
3.
Configure the Local Area Connection properties to use the following settings:
IP: 192.168.252.2 (or the same subnet with 192.168.252.x)
Netmask: 255.255.255.0
Default Gateway: blank
DNS: blank
Firewall: disabled
FIGURE 1-1.
Computer IP Address and Subnet Mask
1-3
Trend Micro™ Network VirusWall™ Enforcer 2500 Upgrade Guide
4.
Open a terminal configuration software such as HyperTerminal for Windows:
a.
Click Start > Programs > Accessories > Communications >
HyperTerminal.
HyperTerminal prompts you for connection information.
b.
Type a name for the connection and click OK.
FIGURE 1-2.
1-4
Connection Name
Upgrading Network VirusWall™ Enforcer 2500
c.
On the Connect To screen, select the communications port where the cable
is connected.
FIGURE 1-3.
d.
Connect To Settings
Click OK.
1-5
Trend Micro™ Network VirusWall™ Enforcer 2500 Upgrade Guide
e.
On the Properties window, set the following:
•
Bits per second: 115200
•
Data Bits: 8
•
Parity: None
•
Stop bits: 1
•
Flow control: None
FIGURE 1-4.
f.
1-6
COM Properties
Click OK.
Upgrading Network VirusWall™ Enforcer 2500
g.
Click File > Properties, and then click the Settings tab.
h.
Set the following properties:
•
Backspace key sends: Del
•
Emulation: VT100
•
Telnet Terminal ID: VT102
FIGURE 1-5.
Connection Settings
5.
Click Terminal Setup and select Block to have a clear view of the curser
location.
6.
Click OK. The Connection Settings screen displays.
7.
Click OK to complete the set up.
1-7
Trend Micro™ Network VirusWall™ Enforcer 2500 Upgrade Guide
8.
Turn on or reset the device. When the device resets, a message appears
prompting you to enter rescue mode.
9.
Type r at the prompt. The Network VirusWall Enforcer 2500 rescue mode
settings appear.
Note:
You will only have 5 seconds to type r at the prompt.
FIGURE 1-6.
1-8
Entering Rescue Mode
Upgrading Network VirusWall™ Enforcer 2500
Using the Appliance Firmware Flash Utility
Use the Appliance Firmware Flash Utility to update the device BMC (baseboard
management controller) firmware, BIOS (basic input/output system), LCM, and
program file. The utility is a graphical user interface tool that provides a user-friendly
method of uploading the latest program file and boot loader. The utility is included
on the Trend Micro Solutions CD for Network VirusWall Enforcer 2500.
Running the Appliance Firmware Flash Utility
Before running the utility, ensure that you are using the latest NIC driver and that you
have disabled any firewall applications on the computer used with the AFFU.
Running the Appliance Firmware Flash Utility (AFFU):
1.
Log on to the computer used with the AFFU using an Administrator account.
Note:
2.
The account used to log on to the computer on which the utility will run must
have administrator rights or should belong to the Administrator’s Group.
Otherwise, the utility cannot successfully execute.
Insert the Trend Micro Solutions CD for Network VirusWall Enforcer 2500, select
the Appliance Firmware Flash Utility, and then click Launch.
The main console appears and automatically searches for connected Network
VirusWall Enforcer 2500 devices.
1-9
Trend Micro™ Network VirusWall™ Enforcer 2500 Upgrade Guide
FIGURE 1-7.
3.
If the utility has not yet detected the Network VirusWall Enforcer 2500 device,
click Detect on the toolbar menu. The utility detects the Network VirusWall
Enforcer 2500 device connected to the computer and lists it in the detection table.
4.
Click the first row to select the detected device from the detection table.
Note:
1-10
The Appliance Firmware Flash Utility
You can only upgrade one Network VirusWall Enforcer 2500 device at a time.
Upgrading Network VirusWall™ Enforcer 2500
Updating the BIOS and BMC
To update the BIOS and BMC:
1.
Click Flash BIOS. The Flash screen appears.
FIGURE 1-8.
The Firmware Flash Utility
1-11
Trend Micro™ Network VirusWall™ Enforcer 2500 Upgrade Guide
2.
On the Flash dialog box, perform the following:
Note:
a.
The "Device" field value corresponds to the fixed Network VirusWall
Enforcer 2500 device IP in rescue mode.
Select Yes for Update Boot Block.
WARNING! If a power loss interrupts the BIOS boot block update, BIOS will no
longer be able to operate. Type the following user name and
password in the corresponding fields:
User name: nvw2500
Password: qZTSpdum
b.
Type or click Browse to determine the location of the BIOS file (.ROM
file). The default location of the file on the Network VirusWall Enforcer
2500 CD is [CD Drive]:\Programs\AFFU.
c.
Type the BIOS checksum value.
Note:
d.
1-12
You must type the checksum value to continue. Refer to the BIOS/BMC
Checksum Reference for the corresponding checksum value for your
BIOS version. You can download the latest version of the BIOS/BMC
Checksum Reference from http://www.trendmicro.com/download.
Click OK.
Upgrading Network VirusWall™ Enforcer 2500
e.
On the warning message that displays, click YES to continue and start the
Appliance Firmware Flash Utility process.
WARNING! During the Appliance Firmware Flash Utility process, do not turn
off, reset, or modify any device settings. Wait for the automatic
reboot before performing any further tasks.
The utility console displays the progress and informs you of a successful
BIOS firmware update.
While refreshing the settings, Network VirusWall Enforcer 2500 enables
failopen and allows network traffic to pass through the device. However,
there is approximately 30 seconds of downtime when the Network
VirusWall Enforcer 2500 ports are disconnected from the network. After
NVW refreshes the settings, it establishes the network connection.
3.
Turn on the device. When the device resets, a message appears prompting you to
enter rescue mode.
4.
Type r at the prompt. The Network VirusWall Enforcer 2500 rescue mode
settings appear.
5.
Run the Appliance Firmware Flash Utility again (see Step 2 through Step 4 in
Running the Appliance Firmware Flash Utility on page 1-9).
6.
Click Flash BMC. The Flash screen appears.
1-13
Trend Micro™ Network VirusWall™ Enforcer 2500 Upgrade Guide
7.
On the Flash dialog box, perform the following:
a.
Type the following user name and password in the corresponding fields:
User name: nvw2500
Password: qZTSpdum
Note:
FIGURE 1-9.
1-14
These values are the default fixed values and the system cannot accept
any changes to them.
The Firmware Flash Utility
Upgrading Network VirusWall™ Enforcer 2500
b.
Type or click Browse for the location of the BMC file (.BIN file). The
default location of the file on the Network VirusWall Enforcer 2500 CD is
[CD Drive]:\Programs\AFFU.
c.
Type the BMC checksum value.
Note:
You must type a checksum value to continue. Refer to the BIOS/BMC
Checksum Reference for the corresponding checksum value for your
BMC version. You can download the latest version of the BIOS/BMC
Checksum Reference from http://www.trendmicro.com/download.
d.
Click OK. A warning message displays.
e.
Click YES to continue and start the Appliance Firmware Flash Utility
process. A confirmation message displays.
f.
Click OK. The device will automatically shut down after the BMC file
update.
WARNING! During the Appliance Firmware Flash Utility process, do not turn
off, reset, or modify any device setting.
8.
Turn on the device.
1-15
Trend Micro™ Network VirusWall™ Enforcer 2500 Upgrade Guide
FIGURE 1-10. BIOS setup screen
9.
1-16
Reset the BIOS to the default setting:
a.
Type F4 during the countdown to enter BIOS
b.
Type the password: qZTSpdum
c.
Select Exit > Load Optimal Defaults
d.
Select Save Changes and Exit
e.
Select OK to exit.
Upgrading Network VirusWall™ Enforcer 2500
Upgrading the Boot Code and Program File
Before running the utility to upgrade the boot code, ensure that you have connected
to Network VirusWall Enforcer 2500 using HyperTerminal and you are in rescue
mode. See Connecting to the Device for more information. The upgrade procedure is
the same for upgrading the boot code and image file.
WARNING! You must upgrade the boot code (.B file) before upgrading the program file
(.R file).
To use the most up-to-date program file and boot loader, download them from the
following Web site to your computer before upgrading:
www.trendmicro.com/download.
Otherwise, use the program file with factory defaults and the original boot loader
located on the Trend Micro Solutions CD for Network VirusWall Enforcer 2500.
Note:
If you are running PC-cillin™ 2002 or later, set the Personal Firewall settings to
"low" or "medium" when using the utility.
To upgrade the boot code or program file:
1.
Turn on the device. A message prompts you to type r to enter rescue mode.
2.
Type r at the prompt. The rescue mode settings displays.
3.
Run the Appliance Firmware Flash Utility again (see Step 2 through Step 4 in
Running the Appliance Firmware Flash Utility).
4.
Click Flash DOM. The Flash screen appears.
1-17
Trend Micro™ Network VirusWall™ Enforcer 2500 Upgrade Guide
5.
On the Flash dialog box, perform the following:
a.
Click Browse and locate the boot code file (.B file). The default location of
the file on the Network VirusWall Enforcer 2500 CD is [CD
Drive]:\Programs\AFFU.
WARNING! You must update the boot code (.B file) before updating the image
(.R file).
b.
Click Open.
FIGURE 1-11. The Firmware Flash Utility
1-18
Upgrading Network VirusWall™ Enforcer 2500
6.
Click OK to begin the update process.
WARNING! During the update, do not turn off, reset the device, or modify any device
settings. If you uploaded the program file, wait for the device to finish the
automatic reset.
FIGURE 1-12. Upload Progress Example
1-19
Trend Micro™ Network VirusWall™ Enforcer 2500 Upgrade Guide
7.
After the update is complete, wait for the device to automatically reboot.
FIGURE 1-13. Boot code Version Upload Success Example
Note:
8.
The length and Kernel size may be different depending on the image.
Use the utility again to upload the new release version (.R file) of the program
file. The default location of the file on the Network VirusWall Enforcer 2500 CD
is [CD Drive]:\Programs\AFFU. Repeat this procedure from the beginning.
WARNING! You must update the boot code (.B file) before updating the image (.R
file).
1-20
Upgrading Network VirusWall™ Enforcer 2500
9.
After the update is complete, wait for the device to automatically reboot. The
Preconfiguration login screen appears after this screen.
FIGURE 1-14. Device Reboot Example
1-21
Trend Micro™ Network VirusWall™ Enforcer 2500 Upgrade Guide
10. Confirm the update by checking the version in the lower right hand corner of the
title box on the Preconfiguration login screen. In this example, the program
version is 1359.
FIGURE 1-15. Successful program version upload example
1-22
Upgrading Network VirusWall™ Enforcer 2500
Performing a Rollback
You can rollback Network VirusWall Enforcer 2500 to Network VirusWall 2500 1.5
and 1.8 by using the Appliance Firmware Flash Utility. The utility is included on the
Trend Micro Network VirusWall Enforcer 2500 CD. The rollback procedure is the
same as the upgrade procedure. However, to rollback to Network VirusWall 2500 1.5,
you must have a previously saved version of the image file.
Before running the Appliance Firmware Flash Utility to rollback the boot code,
ensure that you have connected to Network VirusWall Enforcer 2500 using
HyperTerminal and you are in rescue mode. See Connecting to the Device for more
information. The rollback procedure is the same for the boot code and image file.
WARNING! You must replace the boot code (.B file) before replacing the program
file (.R file).
Use the Network VirusWall 2500 1.8 program file with factory defaults and the
original boot loader located on the Trend Micro Solutions CD for Network VirusWall
Enforcer 2500 or use a previously saved Network VirusWall 2500 1.5 or 1.8 version.
Note:
If you are running PC-cillin™ 2002 or later, set the Personal Firewall settings to
"low" or "medium" when using the utility.
To replace the boot code or program file:
1.
Turn on the device. A message prompts you to type r to enter rescue mode.
2.
Type r at the prompt. The rescue mode settings displays.
3.
Run the Appliance Firmware Flash Utility again (see Step 2 through Step 4 in
Running the Appliance Firmware Flash Utility).
4.
Click Flash DOM. The Flash screen appears.
1-23
Trend Micro™ Network VirusWall™ Enforcer 2500 Upgrade Guide
5.
On the Flash dialog box, perform the following:
a.
Click Browse and locate the boot code file (.B file). The default location of
the file on the Network VirusWall Enforcer 2500 CD is [CD
Drive]:\Programs\AFFU\downgrade.
WARNING! You must replace the boot code (.B file) before replacing the
program file (.R file).
b.
Click Open.
FIGURE 1-16. The Firmware Flash Utility
1-24
Upgrading Network VirusWall™ Enforcer 2500
6.
Click OK to begin the update process.
WARNING! During the update, do not turn off, reset the device, or modify any device
settings. If you uploaded the program file, wait for the device to finish the
automatic reset.
FIGURE 1-17. Upload Progress Example
1-25
Trend Micro™ Network VirusWall™ Enforcer 2500 Upgrade Guide
7.
After the update is complete, wait for the device to automatically reboot.
FIGURE 1-18. Boot code Version Upload Success Example
Note:
1-26
The length and Kernel size may be different depending on the image.
Upgrading Network VirusWall™ Enforcer 2500
8.
Use the utility again to upload the previous version (.R file) of the program file.
The default location of the file on the Network VirusWall Enforcer 2500 CD is
[CD Drive]:\Programs\AFFU\downgrade.
WARNING! You must replace the boot code (.B file) before replacing the
program file (.R file).
FIGURE 1-19. Release Version Upload Success Example
9.
After the update is complete, wait for the device to automatically reboot. The
Preconfiguration login screen appears after this screen.
1-27
Trend Micro™ Network VirusWall™ Enforcer 2500 Upgrade Guide
10. Confirm the update by checking the version in the lower right hand corner of the
title box on the Preconfiguration login screen. In this example, the Network
VirusWall 2500 version is 1.8 and the program version is 1146.
FIGURE 1-20. Preconfiguration login screen
1-28
Index
A
Administrator’s Guide P-2
appliance firmware flash utility 1-9
audience P-4
B
P
performing an upgrade 1-2
Preface P-1
program file 1-17
R
RJ45 ethernet cable 1-3
rollback 1-23
RS232 console cable 1-3
boot code 1-17
T
C
Tips
documentation P-2
connecting to the device 1-2
Conventions P-4
document P-4
D
Document
conventions P-4
Document conventions P-4
Documentation P-2
G
Getting Started Guide P-2
GSG. See Getting Started Guide.
N
Network VirusWall 2500
Administrator’s Guide P-2
documentation P-2
audience P-4
conventions P-4
Getting Started Guide P-2
online help P-2
Upgrade Guide P-2
Notes
Update Center P-2
O
OLH P-2
Online help P-2
I–1
U
Update Center P-2
updating the BIOS and BMC 1-11
Upgrade Guide P-2
W
Who should read this document
audience P-4
Trend Micro™ Network VirusWall™ Enforcer 2500 Upgrade Guide
I–2