1
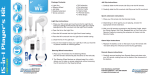
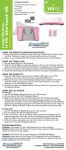
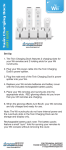
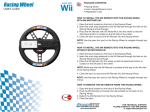
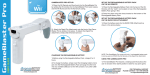
3
in 1 Bundle Quick Shot
USER’S GUIDE
PACKAGE CONTENTS:
• Quick Shot
• 2 Games
• User’s Guide/Warranty Card
• Registration Card
INSTRUCTIONS:
Note: The Quick Shot is not compatible with any sleeves or jackets that
go over the Wii Remote
1. To insert the Wii Remote into the Quick Shot, first open the cable
pass-through area by squeezing the hammer lock on the back of the
gun. Pull the cable pass-through cover back, allowing it to hang freely
from its hinge.
2. Lift the blue A button actuator and insert the Wii Remote into the Quick
Shot with the buttons facing upward and the directional pad directly
behind the front sight. Slide the Wii Remote forward until it locks into
place, and return the A button actuator to its original position. The A
button actuator will click when it is locked into place.
If using the Wii Remote only, continue to step 4.
3. To attach the Wii Nunchuck with the Wii Remote, first insert the
Nunchuck plug into the Quick Shot’s handle by passing it through the
gap in the bottom of the handle. Pull the cord through the pass-through
area and plug it into the Wii Remote.
4. Complete the set-up of your Quick Shot by squeezing the hammer lock
and replacing the cable pass-through cover to its original position. If
attached, ensure that the Nunchuck’s cable is aligned with the cable hole
in the bottom of the handle.
5. Your Quick Shot is now ready to use. The primary trigger activates the B
button on the Wii Remote and the secondary trigger activates the A
button.
CONTENIDO DEL PAQUETE:
• 1 Quick Shot
• 2 Juegos
• Guía del usuario/Tarjeta de garantía
• Tarjeta de inscripción
CONTENU DU PACK:
• 1 Quick Shot
• 1 Jeux
• Manuel d’utilisation/carte de garantie
• Carte d’enregistrement
INSTRUCCIONES:
Nota: el Quick Shot no es compatible con mangas o chaquetas que
pasan sobre el control remoto Wii
INSTRUCTIONS :
Remarque: Le Quick Shot n’est pas compatible avec la protection ou la
jaquette d’une Wii Remote.
1. Para insertar el control remoto Wii en el Quick Shot, primero abra el área
de salida de cable apretando la llave de martillo en la parte trasera de la
pistola. Tire la tapa del área de salida de cable hacia atrás, dejando que
cuelgue libremente de su bisagra.
1. Pour insérer la Wii Remote dans le Quick Shot, ouvrir d’abord l’espace
de passage de câbles en appuyant sur le dispositif de sécurité à l’arrière
du pistolet. Tirer sur le couvercle du cache afin qu’il puisse être reposer
librement sur son embase.
2. Levante el activador del botón A azul e inserte el control remoto Wii en
el Quick Shot con los botones hacia arriba y el pad direccional
directamente detrás de la vista delantera. Deslice el control remoto Wii
hacia delante hasta que se fije en su lugar, y regrese el activador del
botón A a su posición original. El activador del botón A hará un clic
cuando se fije en su lugar.
2. Lever le bouton de commande A bleu et insérer la Wii Remote dans le
Quick Shot, les touches situées vers le haut et les touches directionnelles se trouvant directement derrière le viseur avant. Faire glisser la
Wii Remote vers l’avant jusqu’à son verrouillage et remettre le bouton de
commande A à sa position initiale. Un clic se fera entendre une fois le
bouton de commande A verrouillé.
Si utiliza sólo el control remoto Wii, continúe con el paso 4.
Si vous utilisez la Wii Remote seule, allez directement à l’étape 4.
3. Para insertar el nunchuck Wii en Quick Shot, primero inserte el enchufe
del nunchuck en el mango del Quick Shot pasándolo por el orificio
ubicado en la parte inferior del mango. Tire el cable por el área de
salida de cable y enchúfelo en el control remoto Wii.
3. Pour rattacher la Wii Nunchuck à la Wii Remote, insérer d’abord la prise
Nunchuck à la manette du Quick Shot en la faisant passer au travers de
l’ouverture située sous la manette. Tirer sur le cordon dans l’espace de
passage de câbles et le brancher dans la Wii Remote.
4. Finalice la instalación de su Quick Shot apretando la llave de martillo y
colocando la tapa del área de salida de cable de regreso en su posición
original. Si se conecta, asegúrese de que el cable del nunchuck esté
alineado con el orificio para cables en la parte inferior del mango.
4. Terminer l’installation de votre Quick Shot en appuyant sur le dispositif
de sécurité et replacer le couvercle de protection du passage de câbles
à sa position initiale. S’il est joint, vérifier que le câble du Nunchuck soit
aligné sur l’espace du câble dessous la manette.
5. Ahora su Quick Shot está listo para ser usado. El disparador primario
activa el botón B en el control remoto Wii y el disparador secundario
activa el botón A.
5. Votre Quick Shot peut à présent être utilisé. Le premier déclenchement
active la touche B sur la Wii Remote et le second déclenchement active
la touche A.
PARA SOPORTE TÉCNICO
CONTACTE AL: 1-877-999-DREAM
o visítenos en la web @ www.dreamgear.net
POUR ASSISTANCE TECHNIQUE
VEUILLEZ CONTACTER : 1-877-999-DREAM
Ou visitez-nous sur le Web @ www.dreamgear.net