1
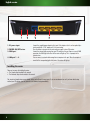
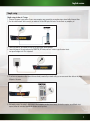
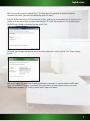
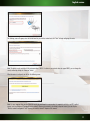
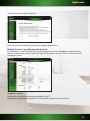
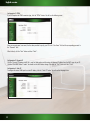
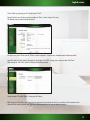
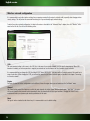
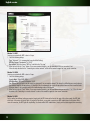
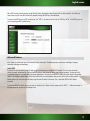
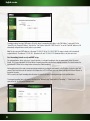
English version
LW320/LW321 Sweex Wireless 300N Router
• D onotexposetheSweexWireless300NRoutertoextremetemperatures.Donotplacethedeviceindirectsunlightorinthedirectvicinityof
heatingelements.
• DonotusetheSweexWireless300NRouterinextremelymoistordustysurroundings.
• Protectthedeviceagainstpowerfulshocksandfalls–theymaydamagetheinternalelectronics.
• Neverattempttoopenthedeviceyourself,therearenoserviceablepartsinside.Openingthedevicewillcausethewarrantytolapse.
Package Contents
Inthispackageyouwillfind:
• Wireless300Nrouter
• Poweradapter
• Networkcable
• QuickInstallationGuide
• CD-ROMwiththismanual
Ifyoufindthatanyofthepackagecontentsaremissing,pleasereturnthepackagetothesalespointwhereitwasbought..
Terminology list
Thismanualwillcontainanumberoftechnicalterms.Itisimportanttoknowwhattheymeanbeforeyoubegininstallingandconfiguringthe
router.
• Router:Thisistheproductyouhavejustbought.Arouteractsasaboundarybetweentwonetworks,WANandLAN.
• Networkcable.Anetworkcableisusedforconnectingnetworkdevicessuchascomputers,modemsandrouters.Youmayalreadyhavesuch
acable,thecableinthepackagecontentsisintendedtoconnecttheroutertoyourmodem.
• ISP:InternetServiceProvider,thisisthecompanythatsuppliesyouyourInternetconnection.
• Broadbandmodem:Fromhereon:modem.YourmodemisthedeviceyoualreadyhaveorthathasbeensuppliedtoyoubyyourISPthat
currentlyprovidesyourinternetconnection.ThetwomostcommonmodemtypesarecablemodemsandADSLmodems,butotherkindsof
modemsalsoexist.
• LAN:LANstandsfor“LocalAreaNetwork”,inthecaseofthisrouter,theLANconsistsofthefouryellowportsandthewirelessnetwork.With
therouter,allyourcomputerswillformasingleLAN.
• WAN:WANstandsfor“WideAreaNetwork”,inmostcasesthismeanstheInternet.
• Wirelesssecurity:Bydefault,therouter’swirelessnetworkisnotsecured.Thismeansthatanyoneinrange(includingyourneighbours)can
connecttothenetworkanduseyourinternetconnection.Wirelesssecurityprotectsyournetworksothatonlyauthoriseddevicescangain
access.SweexrecommendsalluserstosecuretheirwirelessnetworkafterinstallationusingeithertheWPAorWPSmethodsexplained
furtheroninthe“securingyourwirelessnetwork”chapterofthismanual.
4
English version
Product description
Front
1 2 4
5
6
3
7
1. Power LED:
2. READY LED:
3. WPS LED:
Thislightindicatesthattherouterreceivespower.
AconstantlyblinkingSYSlightindicatescorrectfunctioningoftherouter.
Whenthislightblinks,itispossibletoconnecttotherouterwithaWPSenableddevice.Formoreinformation,see
thechapter:“Securingyourwirelessnetwork”.
4. WIRELESS LED:
Thislightindicatesthatthewirelessnetworkisactive.Aflickeringlightindicateswirelessactivity.
5. LAN Port 1 - 4 LED: ThislightindicatesanactiveconnectiononthecorrespondingLANport.Aflickeringlightindicatesnetworkactivity.
6. WAN Port LED:
ThislightindicatesanactiveconnectionontheWANport.AflickeringlightindicatesWANactivity.
7. WPS button:
ThisbuttonactivatesWPSwirelesssecurity.FormoreinformationonWPS,seethechapter“Securingyourwireless
network”.Thisbuttonalsofunctionsastheresetbutton,formoreinformationontheresetprocedurerefertothe
troubleshootingsectionofthismanual
5
English version
1
2
3
4
Back
1. DC power input:
2. POWER ON/OFF button: 3. WAN port:
4. LAN port 1 - 4:
C onnectthesuppliedpoweradaptertothisinput.Iftheadapterislostitcanbereplacedbya
similarmodelwith9VDCoutputand0.6Acurrentrating.
Pressthebuttonintopowerontherouterandpressagaintoturnofftherouter.
ConnectthenetworkcablecomingfromyourISPmodemtothisport.UponasuccessfulWAN
connection,theWANlightatthefrontoftherouterwilllightup.Thisisaprerequisitefor
internetaccess.
Youcanconnectanetworkcablecomingfromacomputertothisport.Whenthecomputeris
turnedonthecorrespondinglightatthefrontoftherouterwilllightup.
Installing the router
Therearetwowaysofinstallingtherouter:
• TheSimplesetupdescribedinthismanual
• TheAdvancedsetupalsodescribedinthismanual.
Thewizardandsimplesetupassumedefaultsettingsandwillworkformostusers.Ifyouareanadvanceduserorifyouknowwhichsetup
methodyourISPrequires,youmayproceedtotheadvancedsetupimmediately.
6
English version
Simple setup
Simple setup is done in 7 steps:
1. Disconnectthepowertoyourmodem.Ifoneormorecomputerswereconnectedtoyourmodemusinganetworkcable,disconnectthem.
2. UsetheincludednetworkcabletoconnectyourmodemtotheblueWANportoftherouter.Donotconnectanycomputersyet!
3. Connectthepowertoyourmodemandwaituntilitslightsindicatenormaloperation
4. ConnectthepowertotherouterandpressthePOWERON/OFFbutton,andwait1minutetogivetheroutertimeto
startupandconfigureitself.Thisisimportant!
5. Ifyouhaveanycomputersorotherdevicesthatwerealreadyconnectedbyanetworkcable,youcannowconnectthesecablestotheyellow
LANportsoftherouter.
6. Waitanotherminute.Yourrouterisnowinstalled!Wiredcomputersnowhaveinternetaccess,forwirelesscomputersoneadditionalstepis
required,followtheinstructionsbelowfortheWindowsversionyouhave.
7
English version
Connecting to a wireless network
• WindowsXP:Rightclickonyourwirelessadapter’siconatthebottomrightofyourscreenandclick“ViewAvailableWirelessNetworks”:
Awindowtitled“Chooseawirelessnetwork”willappear.Inthiswindow,selectthe“SweexLW320/321”entry,clickthe“Connect”buttonand
followtheinstructionsonscreen:
• WindowsVista:RightclickontheNetwork&SharingCentericoninthebottomrightofyourscreen,andclick“Connecttoanetwork”:
Awindowtitled“Connecttoanetwork”willappear.Inthiswindow,selectthe“SweexLW320/321”entry,clickthe“Connect”buttonand
followtheinstructionsonscreen:
8
English version
Note:Ifyouseearedcrossnearthenetworkandthetext:“Thesettingssavedonthiscomputerforthenetworkdonotmatchthe
requirementsofthenetwork”,pleaserefertothetroubleshootingsectionofthismanual.
IfyouhaveWindowsVistawithServicePack2orFeaturePackforWirelessinstalledandyouareconnectingtherouterforthefirsttime,Vista
willallowyoutoeasilysetupandsecureyourwirelessnetworkthroughtheWPSmethod.Afterconnectingyouwillseethefollowingscreen.
EnterthePINcodeonthelabelonthebottomofyourrouterandclick“Next”:
Thefollowingscreenwillappear,enterthedesirednameforyourwirelessnetwork,enterasecuritykeyandclick“Next”tobeginconfiguring
therouter:
Note:Itisveryimportantthatyouwritedownthesecuritykeyandkeepitinasecureplace,itisrequiredtoaddolder,non-WPSenabled
devices(suchasaWindowsXPcomputer)toyournetwork.Becauseyournetworkisnowalreadysetupandsecured,youcanskipthe
“Wirelessnetworkconfiguration”and“Securingyourwirelessnetwork”chaptersofthismanual.
9
English version
indows7:Windows7willindicatewhenwirelessnetworksareavailable.Youcanrecognisethisbythefollowingiconinthebottom-rightof
W
yourscreen:
Note:Ifyouseeasmallredcrossthroughtheicon,nonetworksareinrangeofyourcomputer.Pleaseconsultthetroubleshootingsectionofthis
manualifthisisthecase.
Clicktheiconandalistofwirelessnetworkswillappear,selectthe“SweexLW320/321network,checkthe“ConnectAutomatically”checkbox,
click“Connect”andfollowtheinstructionson-screen:
Whenyouconnectforthefirsttime,Windows7willallowyoutoeasilysetupandsecureyourwirelessnetworkthroughtheWPSmethod.After
connectingyouwillseethefollowingscreen:
Afterclicking“OK”youwillbeaskedforthePINcodeofyourrouter.Youcanfindthiscodeprintedonthelabelonthebottomoftherouter.Fill
inthecodeandclick“Next”:
10
English version
Thefollowingscreenwillappear,enterthedesirednameforyourwirelessnetworkandclick“Next”tobeginconfiguringtherouter:
Note:ThedefaultsecuritymethodwiththissetupprocedureisWPA2.IfadeviceinyournetworkdoesnotsupportWPA2,youcanchangethe
securitymethodbyclickingthe“Advanced”button.
Whentherouterisconfigured,youwillseethefollowingscreen:
Note:Itisveryimportantthatyouwritedownthesecuritykeyandkeepitinasecureplace,itisrequiredtoaddolder,non-WPSenabled
devices(suchasaWindowsXPcomputer)toyournetwork.Becauseyournetworkisnowalreadysetupandsecured,youcanskipthe
“Wirelessnetworkconfiguration”and“Securingyourwirelessnetwork”chaptersofthismanual.
11
English version
Advanced setup
AdvancedsetupcanbedonewhenyouknowexactlywhichsettingsyourISPrequiresorwhenthesimplesetupfails.
Thereare4possibleconfigurations.Wehavelistedthemwithinstructionsonhowtoconfigurethem.Toknowwhichsettingmatchesthe
settingsrequiredbyyourISP,lookatthelistofprovidersfurtheroninthismanual.ThelistismadeoutofISP’sandtheircorrespondingservices.
Behindeachserviceislistedtherequiredsetting.
Note:Ifanyofthesettingsbelowdonotworkimmediately,itisrecommendedtopowerdownyourmodem,waitafewminutesandthen
connectthepowertoyourmodemagain.
Loggingintotherouter:
Foradvancedsetup,itisrequiredthatyoulogintotheroutertomanuallyconfigureitcorrectlyforyourinternetconnection.Tologintothe
router,startInternetExplorer,emptytheaddressbarandenter:http://192.168.32.1/,thenpressEnter.Thefollowingwindowshouldappear:
Enter“sweex”asusernameand“mysweex”aspassword,thenclickOK.Ifyouareunabletologin,pleaserefertothetroubleshootingsection
ofthismanual.
Thefollowingscreenshouldappear.Click“Next”tostarttheadvancedsetup.Ifyouseeadifferentscreen,click“QuickSetup”inthemenu
ontheleft:
12
English version
YoushouldseetheInternetConfigurationWizardscreen:
Youcannowproceedwiththeadvancedsetupusingoneoftheconfigurationsdescribedfurtheron.
Checking if the router is successfully connected to the internet
Forallconfigurations,itispossibletocheckintherouterifyouhaveaworkinginternetconnection.Afterapplyingtheconfiguration,therouter
willprocessthechangesandtakeyoutothe“SystemStatus”page.Ifthisdoesnothappen,youcanclick“Status”inthemenuontheleft.The
statuspagelooksasfollows:
Configuration1:Auto-Detect
ThisoptionwilltrytodetecttheinternetconnectiontypeautomaticallyforyourISP.
Iftheconnectioncannotbedetectedautomaticallythenitisneededtomanuallyconfiguretheinternetconnectiontype.
13
English version
Configuration2:PPPoE
IfyourISPrequiresthePPPoEconnectiontype,clickthe“PPPoE”button.Youwillseethefollowingscreen:
Enteryouraccountname(username)thathasbeenprovidedtoyoubyyourISPinthe“UserName”fieldandthecorrespondingpasswordin
the“Password”field.
Whenfinished,clickthe“Next”buttonandthen“Finish”.
Configuration3:DynamicIP
Clickthe“DynamicIP”button,usuallythisisusedforCablemodemandtherouterwillobtainanIPaddressfromtheDHCPserverofyouISP.
Clickthe“CloneMACAddress”button.YoushouldseetheMACAddresschange.Thenclickthe“Next”buttonandthen“Finish”
Configuration4:StaticIP
Toconfiguretherouter’sWANportforastaticIPaddress,clickthe“StaticIP”button.Youwillseethefollowingscreen:
14
English version
FilloutallfieldsasrequiredbyyourISPandthenchoose“Finish”.
Duringallselectionsyouwillhaveanoptiontoconfigurethe“Basic”wirelesssettingsoftherouter.
Thefollowingscreenispresentedduringeachchoice:
Fillallfieldsinasdesired.Pleaseviewthe“Wirelessnetworkconfiguration”sectionformoreinformationabouttheoptionspresented.
SomeISPsrequirestheMACaddresstobecloned,thiscanbedoneinthe“WAN”settings,pleasechoosetheoption“MACClone”
Whenchoosingthe“MACClone”optionthefollowingscreenwillbepresented:
Choosetheoption“CloneMACAddress”tocloneyourMACaddress.
Note:CloningyourMACaddressmustbedonefromthecomputerthatwasoriginallyconnectedtoyourmodem,andthiscomputermustbe
connectedtoyourrouterbynetworkcable.MACaddresscloningnormallydoesnotworkoverwirelessconnections.
15
English version
Wireless network configuration
Itisrecommendedtoonlyadjustwirelesssettingsfromacomputerconnectedtotherouterbynetworkcable,especiallywhenchangingwireless
securitysettings.Thiswillpreventtheconnectionfrombeinglostifyouaccidentallyapplyincorrectsettings.
Toadjustthewirelessnetworkconfiguration,firstlogintotherouterasdescribedinthe“AdvancedSetup”chapter,thenclick“Wireless”inthe
menuontheleftside.Youwillseethefollowingscreen:
SSID
ThemostimportantsettinginthisscreenistheSSID,thisisthenameofyourwirelessnetwork,usedforidentificationpurposes.WhenSSID
broadcastisenabled,youandeveryoneelseinrangeofyournetworkcanseethenameinthelistofavailablewirelessnetworks.
ItisrecommendedthatyouchangetheSSID,thedefaultSSID“SweexLW320/321”cancauseconflictsifmultipleroutersofthismodelarein
rangeofeachother.WhenchangingtheSSID,youwillneedtoconnecttoyourwirelessnetworkagainasdescribedinthechapter“Connecting
toawirelessnetwork”.
Region
Perregionthelawsforwirelessconfigurationscanbedifferent,choosetheregionwhereyouarelocatedfromthe“pulldown”menu.
Channel
TheChannelsettingcontrolsthefrequencyonwhichtheroutertransmitsitswirelesssignal.Withthedefaultoption,“AutoSelect”,therouter
willscanallchannelswhenpoweredupandautomaticallyselectthechannelwiththebestsignalconditions.Changingthechannelisonly
recommendedwhenyouexperiencepoorwirelessperformanceoftherouter.
Mode
Thetypeofwirelessstandardcanbechosenhere,itisrecommendedtousethedefaultsetting.
16
English version
Channel Width
Inthissectionitispossibletomanuallyselectthechannelwidth(20/40MHz),itisrecommendedtokeepthedefaultsetting.
Max Tx Rate
TheTxspeedcanbeselectedinthissection,itisrecommendedtomakeuseofthedefaultsetting.
Afterchanginganyofthesettings,clickthe“Save”buttontoapplythechanges.
Securing your wireless network
Wirelesssecurityprotectsyourwirelessnetworksothatonlyauthoriseddevicescangainaccess.Sweexrecommendsalluserstosecuretheir
wirelessnetwork.Securingyournetworkshouldonlybedoneafterinternetaccessthroughtherouterhassuccessfullybeensetup.
Therearefourmethodsforsecuringyourwirelessnetwork:
• W
PA/WPA2(Enterprise/Personal)isamanualmethodofsecuringyournetwork.Youconfigureasecuritykeyandonlydeviceswiththiskey
canaccessthenetwork.Youhavetomanuallyenterthekeyineachdevicethatyouwanttograntaccess.WPAissupportedbyWindowsXP
ServicePack2andnewerandbymostotherdevices.Itiscurrentlytherecommendedmethodforsecuringyourwirelessnetwork.WPA2isan
upgradetoWPAandrequiresatleastWindowsXPServicePack3.ToconnecttoaWPA/WPA2EnterpriseconnectionaRADIUSserverIPand
passwordisrequired.
• W
PSisbuiltontopofWPAandenablesautomaticconfigurationandexchangeofWPAkeysthroughaPINcodeorthesimplepushofa
button.WPSissupportedbyWindowsVistaServicePack2andWindows7.UnderWindowsXP,WPSsupportisdependentonsoftwareor
utilitiesprovidedbythemanufacturerofyourwirelessnetworkadapter.
• Someolderdevices,from2005orbeforeandinsomecasesWindows98,ME,2000andolderWindowsXPversions(beforeServicePack
2)maynotsupportWPA,inthiscaseyouwillhavetofallbacktotheolderWEPmethodforwirelesssecurity.WEPisnotrecommendedfor
normaloperationsinceitisnolongerconsideredfullysecurebytoday’sstandards.
TheSecuritySettingspagecanbeaccessedbyclicking“Wireless”–“WirelessSecurity”inthemenuontheleftside.
17
English version
Method 1: WEP
SecuringyournetworkwithWEPisdonein3steps:
1. Selectthefollowingsettings:
Type:“Automatic”(itisrecommendedtousethedefaultsetting)
WEPKeyFormat:“Hexadecimal”or“ASCII”
KeySelected:Insertthechosen“WEPkey”anddefinethe“Keytype”
2. Whenfinished,clickthe“Save”button.Ifyouwereconnectedwirelessly,youwillnowobservethatyourconnectionislost.
Followthestepsdescribedinthe“Connectingtoawirelessnetwork”sectionofthemanualtoregainthe(nowsecure)connection.
Method 2: WPA
SecuringyournetworkwithWPAisdonein2steps:
1. Selectthefollowingsettings:
SecurityMode:“MixedWPA/WPA2”
WPAAlgorithms:TKIP(onlyforEnterprise)&AES
PassPhrase:Hereyouhavetosetthesecuritykey(password)foryourwirelessnetwork.Thisshouldbeadifficulttoguesswordorphrase.
Theminimumlengthforthepassphraseis8characters.Wealsorecommendyoutowritethepassphrasedownandstoreitneartherouter.
Ifthepassphraseislostyoupleaserefertothetroubleshootingsectionofthismanual.
2. Whenfinished,clickthe“Save”button.Ifyouwereconnectedwirelessly,youwillnowobservethatyourconnectionislost.Followthesteps
describedinthe“Connectingtoawirelessnetwork”sectionofthemanualtoregainthe(nowsecure)connection.
Method 3: WPS
Forthismethodnoadditionalsettingsarerequired,simplypushtheWPSbuttonatthefrontoftherouter.Afterafewseconds,theWPSlight
atthefrontoftherouterwillstarttoblink.Aslongasthelightblinks,youareabletoconnectyourWPSenableddevicetotherouter.Aftera
successfulconnection,theWPSlightwillstopblinking.ToconnectanotherWPSenableddevice,simplypushthebuttonagainbeforeconnecting.
18
English version
AfteraWPSsecuredconnectionhasbeensetupforthefirsttime,allpreviouslyconnecteddeviceswilllosetheirconnection.Youwillhaveto
connectthemusingthesameWPSmethodorbymanuallyenteringtheWPAkeyasdescribedbelow.
Toconnectanon-WPSdevicetoaWPSsecuredrouter,click“WPS”inthemenuontheleftside,the“WPSKey(ASCII)”istheWPAkeyyoucan
useforconnectingnon-WPSenableddevices.
Advanced features
Inthischapterwewilldescribesomeoftheadvancedfeaturesintherouter.Thefollowingsectionsassumebasicknowledgeofcomputer
networkingtechnologyandterminology.
Static DHCP
Bydefault,therouterdynamicallyassignsIPaddressestoallconnecteddevicesthroughtheDHCPprotocol.Thisisthemostuser-friendly
methodofnetworkconfigurationbutitcanalsoleadtoIPaddressesthatchangeovertimeorwhenadevicereconnects.Incertaincasesthis
isundesirablebehaviour,forexamplewhenyouuseportforwardingitisnecessaryforthedevice’sIPaddresstoremainconstant.Onepossible
solutionistoconfigureastaticIPaddressinthedeviceitselfbutthiscancauseproblemswhenyoualsousethedeviceonothernetworks.
AnothersolutionistoinstructtheroutertoalwaysassignthesameIPaddresstothedevice.ThisiscalledstaticDHCPorDHCPaddress
reservation.
TosetupstaticDHCPforadevice,logintotherouterasdescribedinthe“Advancedsetup”chapterandclick“DHCP”–“AddressReservation”in
themenuontheleft.Youwillseethefollowingscreen:
19
English version
ToconfigureadeviceforastaticDHCPaddress,filloutthedevice’scorrespondingMACaddressinthe“MACAddress”sectionandfillinthe
“desiredIPinthe“ReservedIPAddress”,thenclickthe“Save”button.Lookatthe“DHCPClientsList”toseetheIPandMACaddressesofall
automaticallyconfigureddevicescurrentlyactiveonyournetwork.
Note:DonotassignstaticDHCPaddressesintherange192.168.32.100to192.168.32.200!Thisrangeisalreadyusedfordynamically
assignedaddresses.Theaddresses192.168.32.1(therouteritself)and192.168.32.255(broadcastaddress)mayalsonotbeused.
Port forwarding (virtual server) and DMZ setup
Forcertainapplications,devicesandservers,itmaybenecessarysosetupportforwardingforthemtooperateproperlybehindtherouter’s
firewall.Thisisbecausebydefault,thefirewallblocksallincomingconnectionsandallowsonlyoutgoingconnections.Fortechnicalreasonsthe
built-infirewallisinherenttotheroutingfunctionandcannotbedisabledcompletely.
PortforwardinginstructstheroutertoacceptanincomingconnectiononacertainportandforwardittotheIPaddressofadeviceinyourlocal
network.PleasenotethatuseofthetermportinthischapterreferstoTCPorUDPportsandisnotrelatedtothephysicalWANandLANportsat
thebackoftherouter.
DMZisaspecialcaseofportforwardingwheretherouterisinstructedtoforwardallincomingconnectionstothespecifiedaddress.
Tosetupportforwarding,logintotherouterasdescribedinthe“Advancedsetup”chapterandclick“Forwarding”–“VirtualServers”inthe
menuontheleft.Youwillseethefollowingscreen:
20
English version
ForaDMZ,click“DMZ”inthemenuontheleft,entertheIPaddressofthedevice,checkthe“Enable”checkboxandclickthe“Save”button.
Bandwidth Control
Bandwidthcontrolisalsoknownas“bandwidthmanagement”.Itallowsyoutoartificiallyrestrictbandwidthforoneormoredevicesonyour
network.Thiscanbeusefulwhen,forexample,youneedtoreservebandwidthforaVOIPphoneoryouwanttorestrictthebandwidthavailable
topeer-to-peerapplications.
TosetupBandwidthControl,logintotherouterasdescribedinthe“Advancedsetup”chapter,click“BandwidthControl”–“RulesList”inthe
menuontheleftandcheckthe“Enable”checkbox.Youwillseethefollowingscreen:
FirstentertheWANuploadbandwidthanddownloadbandwidthinkbps.Asarule,takethespeedsadvertisedbyyourISPandlowerthemby
10%oruseaspeedtestingwebsitetomeasureyourbandwidth,andlowertheoutcomeby5%.Nextyoucanstartcreatingrules.Enterthe
desiredport(s)andprotocol(s)thattheruleshouldapplytoorselectapredefinedservuce,andsettheIPaddressofyourdeviceoranIPrange
formultipledevicesandsetthedesiredguaranteedandmaximumbandwidth.Nextclickthe“Save”checkbox.
Note:Whenapplyingtrafficcontrolrulestoacertaindevice,itisadvisabletogiveitastaticDHCPIPaddressfirst.Otherwisethedevicemay
changeIPaddressandtherulewillnolongerapply,orapplytoadifferentcomputerinstead.
21
English version
Troubleshooting
Thischapterofthemanualwillexplainanumberofcommonissuesthatyoumayrunintoandpossiblesolutions.
• Icannotlogintomyrouterathttp://192.168.32.1/.WindowsindicatesthatIhaveaworkingnetworkconnection.
• ThisissuemayarisefromincorrectIPsettingsonyourcomputer.Youcancheckandadjustyoursettingsasfollows:
WindowsXP
1. Clickthestartbuttonatthebottomleftofyourscreenandclick“ControlPanel”
2. Inthecontrolpanel,click“NetworkandInternetConnectionsandopenthe“NetworkConnections”icon.IfyourcontrolpanelisinClassic
View,youmayopenthe“NetworkConnections”iconstraightaway.
22
English version
3. RightclickthefirstconnectedLANorHigh-SpeedInternetConnection,inthisexamplethe“LocalAreaConnection”,andclick“Properties”
fromthecontextmenu.Ifyouhavemultipleconnectedconnections,repeatsteps3to6foreachconnection.
4. Theconnection’spropertywindowappears.Inthiswindows,selectthe“InternetProtocol”fromthelistofitemsand
clickthe“Properties”Button:
23
English version
5. TheInternetProtocol’spropertywindowappears.Inthiswindow,ensurethatbothsettingsaresetto“Obtainautomatically”:
6. Confirmthesettingsbyclicking“OK”.ThenetworksettingsforXParenowproperlyconfiguredforyourrouter.
Windows Vista
1. Clickthestartbuttonatthebottomleftofyourscreenandclick“ControlPanel”
24
English version
2. IntheControlPanel,click“Viewnetworkstatusandtasks”.IfyourControlPanelisinclassicview,
openthe“NetworkandSharingCenter”icon:
3. TheNetworkandSharingCenterwindowshouldnowopen.
IntheNetworkandSharingCenter,click“Managenetworkconnections”inthebarontheleftside:
25
English version
4. RightclickthefirstconnectedLANorHigh-SpeedInternetConnection,inthisexamplethe“LocalAreaConnection”,andclick“Properties”
fromthecontextmenu.Ifyouhavemultipleconnectedconnections,repeatsteps4to7foreachconnection:
5. Theconnection’spropertywindowappears.Inthiswindows,selectthe“InternetProtocolVersion4”fromthelistofitemsandclickthe
“Properties”Button:
26
English version
6. TheInternetProtocolVersion4’spropertywindowappears.Inthiswindow,ensurethatbothsettingsaresetto“Obtainautomatically”:
7. Confirmthesettingsbyclicking“OK”.ThenetworksettingsforVistaarenowproperlyconfiguredforyourrouter.
Windows 7
1. Clickthestartbuttonatthebottomleftofyourscreenandclick“ControlPanel”
27
English version
2. IntheControlPanel,click“Viewnetworkstatusandtasks”.IfyourControlPanelisiniconview,
openthe“NetworkandSharingCenter”icon:
3. TheNetworkandSharingCenterwindowshouldnowopen.
IntheNetworkandSharingCenter,click“Changeadaptersettings”inthebarontheleftside:
28
English version
4. Rightclickthefirstconnectedconnection,inthisexamplethe“LocalAreaConnection”,andclick“Properties”fromthecontextmenu.
Ifyouhavemultipleconnectedconnections,repeatsteps4to7foreachconnection:
5. Theconnection’spropertywindowappears.Inthiswindows,selectthe“InternetProtocolVersion4”fromthelistofitemsandclickthe“Properties”Button:
29
English version
6. TheInternetProtocolVersion4’spropertywindowappears.Inthiswindow,ensurethatbothsettingsaresetto“Obtainautomatically”:
7. Confirmthesettingsbyclicking“OK”.ThenetworksettingsforWindows7arenowproperlyconfiguredforyourrouter.
• IappeartobeconnectedbutInternetExplorerstilldisplaysanerrormessage“InternetExplorercannotdisplaythewebpage”orsimilar.
• Thisproblemmayarisefromincorrectproxyserversettings.Youcanadjustthesesettingsasfollows:
1. InInternetExplorer,clickthe“Tools”menuoriconandchose“InternetOptions”.
2. The“InternetOptions”windowwillnowopen.
30
English version
3. Inthiswindow,clickthe“Connections”tabandinthistab,the“LANSettings”button.
4. The“LANSettings”windowwillnowopen.Ensurethatallcheckboxesareuncheckedandconfirmthesettingsbyclicking“OK”
31
English version
• Mycomputerindicatesthatitisnotconnectedtoanetwork.
• Thisproblemisusuallyresolvedbycarefullycheckingallconnectionsandindicatorlights.Forawiredcomputer,followthenetworkcableto
therouter’sbackside.ItmustbepluggedintooneoftheyellowLANports.Theyellowportsarealsonumberedandcorrespondingtoeach
LANportthereisanindicatorlightatthefrontoftherouter.Thislightmustbelittoindicateaworkingconnection.Ifthelightisoff,fiddle
thecableortryadifferentcable.Forawirelesscomputer,checkthewirelessconnectionstatusiconatthebottomrightofyourscreen,there
shouldnotbearedcross.Ifyouseearedcross,followthestepsdescribedinthe“Connectingtoawirelessnetwork”sectionofthemanual.
• IhaveWindowsVistaandIgettheerrormessage“thesettingssavedonthiscomputerforthenetworkdonotmatchthe
requirementsofthenetwork”whenItrytoconnectwirelessly.
• Thisproblemcanbesolvedasfollows:
1. IntheControlPanel,click“Viewnetworkstatusandtasks”.IfyourControlPanelisinclassicview,
openthe“NetworkandSharingCenter”icon:
2. TheNetworkandSharingCenterwindowshouldnowopen.
IntheNetworkandSharingCenter,click“Managewirelessnetworks”inthebarontheleftside:
32
English version
3. TheManageWirelessNetworkswindownowopens.Inthiswindow,selecttheconflictingnetworkandclick“Remove”.Afterthenetworkhas
beendeleted,youcanclosethewindowandfollowthestepsdescribedinthe“Connectingtoawirelessnetwork”sectionofthemanual.
• IhaveWindows7andIcannotconnecttomywirelessnetwork.Aredcrossisdisplayednexttothenetwork
• Thisproblemcanbesolvedasfollows:
1. ClicktheNetworkandSharingCentericoninthebottomrightofyourscreen:
2. Nextclick“OpenNetworkandSharingCenter”:
33
English version
3. IntheNetworkandSharingCenter,click“Managewirelessnetworks”:
4.Thefollowingwindowwillappear,rightclickthenetworkthatwasindicatedwitharedcrossinstep2andclick“Removenetwork”:
5. Afterthenetworkhasbeenremoved,youcanclosethewindowandfollowthestepsdescribedinthe“Connectingtoawirelessnetwork”
sectionofthemanual.
34
English version
• IhavelosttheWPAorWEPkeyrequiredtoaccessmywirelessnetwork.
• Therearetwopossiblesolutionsforthisissue:
1.Accesstherouterfromacomputerthatisconnectedbynetworkcableasdescribedinthe“Advancedsetup”sectionofthismanual.
Click“WirelessNetwork”–“SecuritySettings”,youcanviewthekeythere.
2.Resettheroutertoitsfactorydefaultsettings,whichisanunsecurednetwork.Theresetprocedureisdescribedfurtheron.
• Icannotfindanywirelessnetworks
• Thisproblemusuallyhappensonnotebooks,mostnotebookshaveaswitchorkeyboardcombinationtodisable/enableitsWireless
networkingmodule.Consultthemanualofyournotebookforenablingthewirelessmodule.
• Icanfindothernetworks,butIdon’tseetheSweexLW320/321network
• Therearetwopossiblesolutionsforthisissue:
1.Youareoutofrangeoftherouter.Pleasetrytoconnectinthesameroomthattherouterisin.
2.Therouteristransmittingonachannelthatyoucannotreceive.Thismaysometimesoccurwhentherouteristransmittingonchannels12
or13,whichnotalldevicescanreceive.Tochangethechannel,seechapter“WirelessNetworkConfiguration”.
• Myrouternolongerresponds,orIwanttostartwithacleansheet(reset).
• Thiscanbesolvedbyresettingtheroutertoitsfactorydefaultsettings.Afterthereset,yourrouterwillbeasyouunpackeditandyouhave
toinstallitagainaccordingtothismanual.Toresettherouter,presstheWPSbuttonfor15seconds.Afterasuccessfulresetyouwillseethe
SYSandWLANlightsgoout.
• Iwanttoconnectmorethan4wireddevicestotherouter.HowcanIexpandthenumberofports?
• ThiscanbedonebyconnectinganEthernetnetworkswitchtooneoftheLANports.
Ifyouexperienceanissuethatisnotlistedinthismanual,pleaseconsultthefrequentlyaskedquestionssectionofyourproductonthesweex.
comwebsite.
35
English version
Warranty
2-year standard warranty within the EU
• Inastandardmannerawarrantyperiodof2yearsasfromthepurchasedateisavailableforthisSweexproductwithintheEU.
• Shouldyouwishtoinvokethiswarrantywithinthefirst2yearsafterthepurchasethenyoucandirectlyapplytothepointofsale
whereyoupurchasedtheproductfortheconditionsandprocedures.
10-year manufacturer’s warranty
• However,inadditiontothestatutory2-yearstandardwarrantySweexoffersyouanextendedqualitywarrantyofnolessthan10years,
ifyoupurchasedyourproductwithintheEU.
• Formoreinformation,conditionsandtheregistrationformgotowww.sweex.com/12yearswarrantyandregisterwithin30daysafterthe
purchaseofyourproductfortheextendedwarrantyperiodofintotal12years.
Matters that are excluded from the warranty
• ThewarrantyofSweexonlycoversmanufacturingdefects.Excludedfromthewarrantyareaccessorieslikebatteries,rechargeablebatteries
andalsosuppliedsoftware,whereapplicable.
• TheliabilityofSweexislimitedtothecostsofrepairand/orreplacementoftheproductcoveredbythewarranty.
• Bothwarrantytypes(the2-yearstandardwarrantyandthe10-yearextendedmanufacturer’swarranty)arenullandvoidiftheproducthas
beenopened,changeshavebeenmade,physicaldamagewascausedtotheproductandiftheproductisusedforanotherpurposethanfor
whichitisoriginallymeant.
Allbrandnamesandassociatedrightsmentionedinthismanualareandremainthesolepropertyoftherightfulclaimant.
36