1
Operation
Intro
Operation
Customer
Assistance
Warranty
Warnings and
Included in this Package
Introduction
Customer
Assistance
Installation
Intro
Operation
Warnings
Operation
Customer
Assistance
Notice
Caution
Installation
Customer
Assistance
Customer
Assistance
Caution
Customer
Assistance
Customer
Assistance
Installation
Intro Installation
Operation Customer
Customer
Assistance
Assistance
Caution
Notice
•
A FEW RULES THAT SHOULD BE OBEYED
Notice
Caution
Warning
1. You are not allowed to carry on a conversation with another station for more than five minutes
atWarning
a time without taking a one-minute break to give others a chance to use the channel.
Warranty
2. You
are not allowed to blast others off the air by overpowering them with illegally
amplified transmitter power or illegally high antennas.
3. You are not allowed to use CB to promote illegal activities.
4. You are not allowed to use profanity.
5. You may not play music in your CB.
6. You may not use your CB to sell merchandise or professional service.
nocI nitransceiver
aM
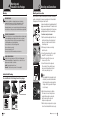
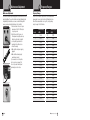
Select a location forsthe
and microphone bracket that is convenient for
operation. In automobiles, the transceiver is usually mounted to the underneath of
Customer
the dash panel, with the microphone
bracket beside it.
Installation
Assistance
A
universal
mounting
bracket is supplied along with self
Transceiver Bracket
Warning
Caution
Secondary Icons Notice
tapping screws and star washers. The transceiver is held
in the universal mounting bracket by two thumb screws,
remotsuC
noitarepO
ortnI
permitting adjustment at the most convenient angle.
ecnatsissA
remotsuC
noitallatsnI
ecnatsissA Antenna Connector
Main Icons
snocI yradnoceS
snocI niaM
gninraW
noituaC
ecitoN
Intro
Fuse Connection
remotsuC
ecnatsissA
noitarepO
ortnI Icons
Secondary
•
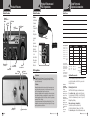
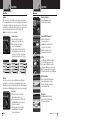
You should find all of the following items in this package:
Microphone
Notice
remotsuC
noitallatsnI
ecnatsissA Microphone Connector
Transceiver Bracket
snocI yradnoceS
Microphone Bracket
2
English
Operating Manual
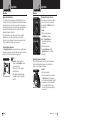
To mount
and connect
Caution
Warning your transceiver:
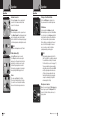
1. Hold the radio with mounting bracket in the exact
location desired. Remove the mounting bracket
and use it as a template to mark the location for
the mounting screws.
2. Drill necessary holes and secure mounting
bracket in location.
3. Connect the antenna cable plug to the receptacle
marked “ANT” on the back of the unit.
Operation
Customer
4. Connect
the redWarranty
lead of the DC power cord
Assistance
to an accessory 12 volt fuse.
5. Connect the black lead to the negative side
of theCustomer
automobile. This is usually the chassis.
Installation
Assistance
Any convenient location with good electrical
contact (remove paint) may be used.
Notice
CB Tranceiver
ytnarraW
CB Transceiver
•
Secondary Icons
REPLACEMENT WARNING
Customer
Replacement or substitution Installation
of certain parts
with replacements other than those
Assistance
recommended
by Cobra may be a violation
of the technical regulations of Part 95
Warning
of the FCC rules,
or of Type Acceptance requirements of Part 2 of those rules.
Secondary Icons
When making adjustments, be sure to re-read applicable portions of this instruction manual
to make certain you are following correct procedure and that the radio was properly installed.
Included in this Package
Warranty
Mounting and Connections
Warranty
CHANNEL 9 EMERGENCY MESSAGES
Use Channel 9 for emergency messages only. The FCC gives the following examples
of permitted
and prohibited types of communications for use on Channel 9. These are
Warning
guidelines and are not intended to be all-inclusive.
Permitted: “A tornado sighted six miles of town.”
Not Permitted: “This is observation post number 10. No tornado sighted.”
Warranty
Mounting and Connections
Introductionand Start-Up
Installation
Warranty
ytnarraW
Notice
Operation
Customer
Assistance
gninraW
noituaC
ecitoN
NOTE
Before installing the CB radio, visually check the
Caution
Warning
vehicle battery connections to determine which
battery terminal, positive or negative (positive is
the larger of the two) is grounded to the engine
block (or chassis).
6. Mount the microphone bracket on right side
of the transceiver or near it using two screws
supplied. When mounting in an automobile,
place the bracket under the dash so the
microphone is readily accessible.
7. Attach the four pin microphone cable to receptacle
on front of unit and install unit in bracket securely.
Nothing comes close to a Cobra®
3