1
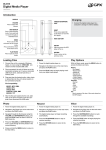
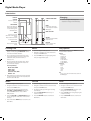
Digital Media Player
Introduction
DISPLAY
STEREO HEADPHONE
JACK
VOLUME
Press to adjust the
volume.
SKIP/SEARCH
Press to skip between
tracks. Press and hold
to search through an
individual track.
Charging
1 Connect the digital media player to a
computer to charge it’s internal battery.
RESET
Press using a paperclip
or like object to reset the
MP3 player.
MINI-USB PORT
MENU
Press to access the
sub-menu of the current
mode.
Press and hold to return
to the main menu.
ON/OFF
Adjust to power the MP3
player off or on.
PLAY/PAUSE
Press to play or pause
tracks.
RETURN
Press to return to the
previous menu.
Loading Files
Music
Play Options
1 Connect the unit to a computer (Windows,
Apple, or Linux) using the MINI-USB connection and the included USB cable.
1 Power the digital media player on.
While in Music mode, press the MENU button to
access the Music sub-menu.
2 Once connected, the unit will show up on the
connected computer as if it were a connected
USB thumb drive, external hard drive, or
memory card.
2 Navigate to the Music icon on the main menu
and press the PLAY button.
3 Press the PLAY button to begin playing music
from your digital media player.
3 Drag and drop the desired audio, video, photo,
or ebook files into the unit’s drive location on
the connected computer.
File Compatibility:
MUSIC: MP3, WMA
VIDEO: MTV
VOICE: WAV
PHOTOS: JPEG, BMP
EBOOK: TXT
4 After the files are loaded onto the unit, right-click
on the drive and eject it from the computer, then
disconnect the USB cable.
Repeat
• No Repeat
• Repeat One
• Repeat All
• Random All
• Folder Normal
• Folder Repeat
• Folder Random
Equalizer
• Normal
• Pop
• Rock
• Classic
• Jazz
• Bass
File
Use to access a file view of the music stored on
the MP3 player.
Photo
Record
Voice
1 Power the digital media player on.
1 Power the digital media player on.
1 Power the digital media player on.
2 Navigate to the Photo icon on the main menu
and press the PLAY button.
2 Navigate to the Record icon on the main menu
and press the PLAY button.
2 Navigate to the Voice icon on the main menu
and press the PLAY button.
3 Navigate through the file browser using the
VOLUME and SKIP/SEARCH buttons, and
press the PLAY button to select a JPEG or
BMP photo file.
3 The digital media player will begin recording
automatically.
3 Press the SKIP/SEARCH buttons to cycle
through the available recordings.
4 Press the PLAY/PAUSE button to stop or
resume recording.
4 Press the PLAY button to begin playing the
selected recording.
5 Press the RETURN button to return to the
Main Menu.
5 Press the RETURN button to return to the
Main Menu.
4 Press the VOLUME and SKIP/SEARCH buttons
to cycle through all of the photos in the current
directory.
5 Press and hold the MENU button to return to the
Main Menu.
Video
Running Video Conversion
Software
Using the Video Conversion
Software
File-type Requirements: MTV
System Requirements: Windows 98, ME, or XP
Use the included Video Conversion Software to
convert video files to the MTV format so that they
can play on the digital media player.
1 Connect the digital media player to a computer (Windows, Apple, or Linux) using the
MINI-USB connection and the included USB
cable.
System Requirements: Windows 2000, ME, or
XP
1 Power the digital media player on.
2 Navigate to the Video icon on the main menu
and press the PLAY button.
3 Press the VOLUME and SKIP/SEARCH
button to navigate through the file browser,
and press the PLAY button to select an MTV
video file.
4 Press the RETURN button to return to the Main
Menu.
2 Once connected, the unit will show up on the
connected computer as if it were a connected
USB thumb drive, external hard drive, or
memory card.
3 Open the drive for the connected digital media player on your computer to view the file
and folder contents
4 Double-click on the “VideoConvert” file to
open the Video Conversion software.
1 Follow the “Running Video Conversion Software” directions on the previous page.
2 After the program opens, click on the “Input
Video” button in the Video Converter software.
3 Browse to and double-click on any of the following video file types:
AVI, WMV, ASF, MPG, MOV, QT, VOB, RM,
RMVB, MPEG4, 3GP
4 Click on “Output Video” to select a destination for the converted video file.
5 Click “Start Conversion” to begin converting
the selected video file.
This video conversion software may be blocked by
some anti-virus applications. If you are experiencing
issues when attempting to run this program, please disable your anti-virus software or try using another computer. Re-enable your anti-virus software immediately
after you finish using the video conversion software.
Please note, disabling your anti-virus software exposes
your computer to potential threats. Disable at your own
risk.
Setup
Power
• Auto-Off
• 15 Minutes
• 30 Minutes
• 60 Minutes
• 90 Minutes
• 120 Minutes
• Close
Language
• English
• French
• Spanish
Display
• Brightness
• Low
• Medium
• High
• Maximum
• Backlight
• 15 Seconds
• 30 Seconds
• 1 Minute
• Close
Record Quality
• Long Time
• Normal
• High
System Tools
• Delete
• Format
• Reset
• System Information