1
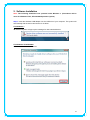
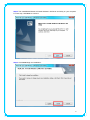
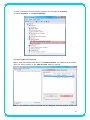
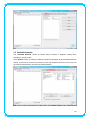
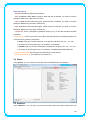
IEEE 802.11n
Wireless USB Adapter
User’s Manual
November 2009
FCC Warning
This equipment has been tested and found to comply with the limits for a Class C digital device,
pursuant to part 15 of the FCC Rules. These limits are designed to provide reasonable
protection against harmful interference in a residential installation. This equipment generates,
uses, and can radiate radio frequency energy and, if not installed and used in accordance with
the instructions, may cause harmful interference to radio communication. However, there is no
guarantee that interference will not occur in a particular installation. If this equipment does
cause harmful interference to radio or television reception, which can be determined by turning
the equipment off and on, the user is encouraged to try to correct the interference by one or
more of the following measures:
- Reorient or relocate the receiving antenna.
- Increase the separation between the equipment and receiver.
- Connect the equipment into an outlet on a circuit different from that to which
- Consult the dealer or an experienced radio/TV technician for help. the receiver is
connected.
FCC Caution: Any changes or modifications not expressly approved by the party responsible
for compliance could void the user’s authority to operate this equipment.
This device complies with Part 15 of the FCC Rules. Operation is subject to the following two
conditions: (1) This device may not cause harmful interference, and (2) this device must
accept any interference received, including interference that may cause undesired operation.
IMPORTANT NOTE:
FCC Radiation Exposure Statement:
This equipment complies with FCC radiation exposure limits set forth for an uncontrolled
environment. This equipment should be installed and operated with a minimum distance of
about eight inches (20cm) between the radiator and your body.
This transmitter must not be co-located or operated in conjunction with any other antenna or
transmitter.
Modular Approval Statement:
This device is intended to be used only for OEM integrator under the following conditions:
1) The antenna must be installed such that 20 cm is maintained between the antenna and
users, and
2) The transmitter module may not be co-located with any other transmitter or antenna.
1
IMPORTANT NOTE:
In the event that these conditions cannot be met (for example certain laptop configurations or
co-location with another transmitter), then the FCC authorization is no longer considered valid
and the FCC ID cannot be used on the final product. In these circumstances, the OEM
integrator will be responsible for re-evaluating the end product (including the transmitter) and
obtaining a separate FCC authorization.
Revision History
Revision
History
V2.0
Second release
All brand and product names mentioned in this manual are trademarks and/or registered
trademarks of their respective holders.
2
Contents
1. INTRODUCTION................................................................................................... 4 1.1 FEATURES ..................................................................................................... 4 1.2 LED INDICATOR ............................................................................................. 4 1.3 PACKAGE CONTENTS ....................................................................................... 4 2. SOFTWARE INSTALLATION .................................................................................. 5 3. WIRELESS LAN UTILITY ...................................................................................... 12 3.1 3.2 3.3 3.4 3.5 GENERAL .................................................................................................... 12 PROFILE ..................................................................................................... 12 AVAILABLE NETWORK .................................................................................... 13 STATUS ...................................................................................................... 15 STATISTICS .................................................................................................. 15 3.6 WI‐FI PROTECT SETUP ................................................................................... 16 4. SOFT‐AP FUNCTION........................................................................................... 17 4.1 4.2 4.3 4.4 4.5 SWITH TO AP MODE ..................................................................................... 17 GENERAL .................................................................................................... 18 ADVANCED ................................................................................................. 19 STATISTICS .................................................................................................. 19 ICS ........................................................................................................... 20 3
1. Introduction
This is a wireless 11n USB Adapter that provides unsurpassed wireless performance for your
Desktop PC or Notebook. It complies with IEEE 802.11n draft 2.0 wireless standard and is
backward compatible with IEEE 802.11b/g.
This USB adapter provides better wireless
reception and up to 150/300 Mbps data transfer rates in 11n mode. With this adapter, you
can easily upgrade your Desktop PC or Notebook wireless connectivity. Once connected, to
access the network with high-speed Internet connection while sharing photos, files, music,
video, printers, and storage.
Get a better Internet experience with a faster wireless
connection so you can enjoy smooth digital phone calls, gaming, downloading, and video
streaming.
The Wireless USB adapter provides peer-to-peer communication among any compatible
wireless client users and no Access Point required. It also supports WEP, WPA, WPA2,
WPS, 802.1x high-level WLAN security features that guarantee the best security for users.
1.1 Features
‧ Complies with draft IEEE 802.11n standard
‧ Up to 150/300 Mbps data transfer rates in IEEE 802.11n mode
‧ Backward compatible with IEEE 802.11b/g
‧ Legacy and High Throughput Modes
‧ Supports 64/128-bit WEP Data Encryption
‧ Supports WPA, WPA2 (802.11i), WPS, 802.1x advanced security
‧ Supports Quality of Service (QoS) - WMM, WMM-PS
‧ Supports both Infrastructure and Ad-Hoc Networking Modes
‧ Supports Multiple BSSID
‧ Simple user setup and diagnostics utilities
1.2 LED Indicator
LED
Light Status
ACT
Blinking
Description
Data is being transmitted or received
1.3 Package Contents
‧ One Wireless USB Adapter
‧ One USB A-type Extension Cable
‧ One Installation CD (Drivers, Utility, User’s Manual)
4
2. Software Installation
Note: The following installation was operated under Windows 7. (Procedures will be
same for Windows Vista, XP and 2000 Operation System)
Step1: Insert the Wireless USB adapter into the USB slot of your computer. The system will
automatically find the device and search for its driver.
For Windows 7
Î Windows System will pup-up the message for new searched device.
For Windows Vista/XP/2000
Î Please click Cancel to continue.
5
Step2: Insert Wireless USB Adapter Installation CD into CD-ROM drive then windows below
will appear. Click Install Driver & Utility to begin device driver installation.
Step3: Select the language for this installation from the choices below and click Next> to
continue.
6
Step4: The InstallShield Wizard will install Wireless LAN Driver and Utility on your computer.
For next step, click Next> to continue.
Step5: Click Install begin the installation..
7
Step6: Please wait for a while for installing process.
Step7: After Wizard has finished the installing, choose “Yes, I want to restart my computer
now” before you can use the utility. And then, click Finish to compete the setup.
Step8: When Utility setup is completed, a shortcut of Wireless LAN Utility will appear in the
computer’s desktop. Double click the shortcut and start using the WLAN USB adapter.
8
To check if Wireless PCI card is properly installed, you can right-click Computer
Æ choose Properties Æ click Device Manager.
[Configuring Wireless Network]
Step 1: Open the Wireless Utility and go to “Available Network” tab, double-click the network
which you want to connect or click “Add to Profile” button to continue.
Step 2: The Wireless network properties will be displayed, enter the network key if it is
9
necessary. And click “OK” to continue.
Step 3: In the “Profile” tab, you can see the available network is listed.
Step 4: And now, you can browse your Internet Explorer to surfing the web.
10
11
3. Wireless LAN Utility
The Wireless LAN Utility is an application that helps you to configure the USB Wireless LAN
adapter and monitor the link status and statistics during the communication process.
3.1 General
In the “General”, you can immediately monitor the link status.
Status: Current connection status
Speed: Show current transmit rate and receive rate.
Type: Network type in use.
Encryption: Encryption type in use.
SSID: The Current AP name of user type.
Signal Strength: Receive signal strength
Link Quality: Display link quality strength
Network Address: Display the current connection’s MAC Address, IP address, Subnet Mask,
and Gateway information.
Click “ReNew IP” button to refresh the current AP.
3.2 Profile
In the “Profile”, you can view the current using Available Point(s). You can add, remove and
edit the current Available Point(s). Also you can duplicate the AP or Set current AP as Default.
12
3.3 Available Network
The “Available Network” shows all Access Points, Routers or Adapters nearby when
operating in Ad-Hoc mode.
Click “Refresh” button to collect the SSID and Channel information of all the wireless devices
nearby. If you want to connect to any device on the list, double-click the item on the list, and
the card will automatically connect to the selected device.
If you want to add one Access Point to the profile, click “Add to Profile” button. The Wireless
13
network properties windows will display. You can configure your Wireless Network Security
for the card.
[Network Authentication]
-- Open System: No authentication is needed among the wireless devices.
-- Shared Key: Only Wireless device using a shared key (WEP Key identified) is allowed to
connecting each other. Setup the same key as the wireless device which the card intends to
connect.
-- WPA-PSK: It is a special modem of WPA for home users without an enterprise
authentication server and provides the same strong encryption protection.
-- WPA2-PSK (for WPA2 Personal): This option will be present only if the wireless network
adapter and its driver support WPA2.
-- WPA 802.1X: 802.1x authentication is required in WPA. In the 802.11 standard, 802.1x
authentication was optional.
-- WPA2 802.1X: WPA2 is the next-generation Wi-Fi security standard, combining the most
powerful authentication and encryption techniques to protect wireless networks from
unauthorized use. Based upon the recently-ratified IEEE 802.11i standard, WPA2 adds the
Advanced Encryption Standard (AES) to the original WPA specification to provide the greatest
levels of network security available. The National Institute of Standards and Technology (NIST)
advocate the use of AES security to protect sensitive digital information on government
networks.
-- WEP 802.1X: Accepts WEP clients and the encryption key is obtained dynamically through
802.1x.
14
[Data Encryption]
-- Disabled: Disable the WEP Data Encryption.
-- WEP: Enabled the WEP Data Encryption. When the item is selected, you have to continue
setting the WEP Key Length & the key Index.
-- TKIP: Enable the TKIP Data Encryption. When the item is selected, you have to continue
setting the Network Key & Confirm network key.
-- AES: Enabled the AES Data Encryption. When the item is selected, you have to continue
setting the Network Key & Confirm network key.
-- Passphrase: Enter a passphrase (password phrase) of up to 63 case-sensitive printable
characters.
-- Network Key: The keys are used to encryption data transmitted in the wireless network. Fill
in the text box by following rules below:
Æ 64-bit: Input any 5 ASCII characters or 10 digit Hex values (in the “A-F”, “a-f”, and
“0-9” range) as the encryption keys. For example: “0123456aef”
Æ 128-bit: Input any 13 ASCII characters or 26 digit Hex values (in the “A-F”, “a-f”, and
“0-9” range) as the encryption keys. For example: “01234567890123456789abcdef”
-- Confirm Network Key: Re-type again the Network key in this text box.
-- Key Index (Advanced): The maximum of key index is 4.
3.4 Status
In the “Status”, you can view the current link status of USB Wireless LAN adapter.
3.5 Statistics
In the “Statistics”, you can get the real time information about the packet transmission and
15
receiving status.
3.6 Wi-Fi Protect Setup
In the “Wi-Fi Protect Setup”, you can setup the Wi-Fi network more easily and secure. . There
are two methods for you: Pin Input Config (PIN) Method & Push Button Config (PBC)
Method”. Select one of following methods to setup your AP.
The primary goal of Wi-Fi Protected Setup (Wi-Fi Simple Configuration) is to simply the
security setup and management of Wi-Fi networks. This Wireless LAN utility as an Enrollee or
external Registrar supports the configuration setup using PIN configuration method or PBC
16
configuration setup using PIN configuration method or PBC configuration method through an
internal or external Registrar.
Pin Input Config (PIN): Start to add to Registrar using PIN configuration method. IF STA
Registrar, remember that enter PIN Code read from you Enrollee before starting PIN.
Push Button Config (PBC ): Start to add to AP using PBC configuration method.
4. Soft-AP Function
Except becoming a wireless client of other wireless access points, this USB Wireless LAN
utility can acts as a wireless service provider. You can switch the operating mode to “Access
Point” mode to simulate the function of a real wireless access point by software, and all other
computers and wireless devices can connect to your computer wirelessly, even share the
internet connection you have.
To the Wireless LAN USB Adapter to bridge your wired and wireless network, the following
requirements must be met:
1. The Wireless LAN USB Adapter must be installed on a computer connected to the wired
network.
2. Either configure network sharing (refer to the appendix for an example) or bridge the two
interfaces (wireless and wired) on the computer.
3. Set the wireless station’s IP address to be in the same subnet as the computer in which the
Wireless LAN USB Adapter is installed.
4.1 Swith to AP Mode
Select “Access Point” from Mode(M) tab to make the Wireless LAN USB adapter act as a
wireless AP.
After you select “Access Point” mode, the Wireless LAN USB adapter available options will
change.
17
You will see the basic configuration menu of the AP function:
4.2 General
SSID: The SSID is the uniqure name shared among all points in your wireless network. The
name must be identical for all devices and points attempting to connect to the same network. It
18
shows the current SSID setting of the Wireless USB adapter.
BSSID: It shows the current BSSID’s MAC address.
AID: Raise value by current connection.
MAC Address: The station MAC address of current connection
Life Time: The status of current connection.
4.3 Advanced
Beacon Interval: The time between two beacons. (The system default is 100 ms.)
DTIM Period: DTIM is a countdown informing clients of the next window for listening to
broadcast and multicast messages. 3 is the default setting.
Preamble Mode: This function will show up when Ad-hoc network type be selected. A
preamble is a signal used in wireless environment to synchronize the transmitting timing
including Synchronization and Start frame delimiter. Select from the pull-down menu to change
the Preamble type into Long or Short.
4.4 Statistics
19
If you want to know detailed information about how your software access point works, you can
view the statistics of the access point.
You can click “Reset” button to reset all counters to zero.
4.5 ICS
The Internet Connection Sharing (ICS) function allows wireless clients to share a single
internet connection. In the setup, Wireless USB adapter automatically assigns a virtual IP
address to each of the wireless clients. (Please make sure your local network connection is
connecting.)
20
21