1
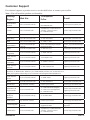
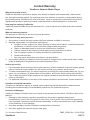
903 1HWZRUNPHGLDSOD\HU 8VHU*XLGH *XLGHGHO¶XWLOLVDWHXU *XtDGHOXVXDULR %HGLHQXQJVDQOHLWXQJ *XLGDGHOO¶XWHQWH 3RGUĊF]QLNXĪ\WNRZQLND 3\ɤɨɜɨɞɫɬɜɨɩɨɥɶɡɨɜɚɬɟɥɹ $QYlQGDUKDQGERN ٺҢЙыȞᖅᡝϛМȟ - 使用手冊(简体中文) 0RGHO1R96 &RPSOLDQFH,QIRUPDWLRQ &(&RQIRUPLW\IRU(XURSHDQ&RXQWULHV 7KHGHYLFHFRPSOLHVZLWKWKH(0&'LUHFWLYH(&DQG/RZ9ROWDJH 'LUHFWLYH(& )ROORZLQJLQIRUPDWLRQLVRQO\IRU(8PHPEHUVWDWHV 7KHPDUNLVLQFRPSOLDQFHZLWKWKH:DVWH(OHFWULFDODQG(OHFWURQLF(TXLSPHQW 'LUHFWLYH(&:((( 7KHPDUNLQGLFDWHVWKHUHTXLUHPHQW127WRGLVSRVHWKHHTXLSPHQWLQFOXGLQJDQ\ VSHQWRUGLVFDUGHGEDWWHULHVRUDFFXPXODWRUVDVXQVRUWHGPXQLFLSDOZDVWHEXW XVHWKHUHWXUQDQGFROOHFWLRQV\VWHPVDYDLODEOH ,IWKHEDWWHULHVDFFXPXODWRUVDQGEXWWRQFHOOVLQFOXGHGZLWKWKLVHTXLSPHQW GLVSOD\WKHFKHPLFDOV\PERO+J&GRU3EWKHQLWPHDQVWKDWWKHEDWWHU\KDV DKHDY\PHWDOFRQWHQWRIPRUHWKDQ0HUFXU\RUPRUHWKDQ &DGPLXPRUPRUHWKDQ/HDG i 9LHZ6RQLF 903 'HFODUDWLRQRI5R+6&RPSOLDQFH 7KLVSURGXFWKDVEHHQGHVLJQHGDQGPDQXIDFWXUHGLQFRPSOLDQFHZLWK'LUHFWLYH (&RIWKH(XURSHDQ3DUOLDPHQWDQGWKH&RXQFLORQUHVWULFWLRQRIWKHXVHRIFHUWDLQ KD]DUGRXVVXEVWDQFHVLQHOHFWULFDODQGHOHFWURQLFHTXLSPHQW5R+6'LUHFWLYHDQGLV GHHPHGWRFRPSO\ZLWKWKHPD[LPXPFRQFHQWUDWLRQYDOXHVLVVXHGE\WKH(XURSHDQ 7HFKQLFDO$GDSWDWLRQ&RPPLWWHH7$&DVVKRZQEHORZ 3URSRVHG0D[LPXP &RQFHQWUDWLRQ $FWXDO&RQFHQWUDWLRQ /HDG3E 0HUFXU\+J &DGPLXP&G +H[DYDOHQW&KURPLXP&U 3RO\EURPLQDWHGELSKHQ\OV3%% 3RO\EURPLQDWHGGLSKHQ\OHWKHUV3%'( 6XEVWDQFH &HUWDLQFRPSRQHQWVRISURGXFWVDVVWDWHGDERYHDUHH[HPSWHGXQGHUWKH$QQH[RIWKH 5R+6'LUHFWLYHVDVQRWHGEHORZ ([DPSOHVRIH[HPSWHGFRPSRQHQWVDUH 0HUFXU\LQFRPSDFWÀXRUHVFHQWODPSVQRWH[FHHGLQJPJSHUODPSDQGLQRWKHUODPSV QRWVSHFL¿FDOO\PHQWLRQHGLQWKH$QQH[RI5R+6'LUHFWLYH /HDGLQJODVVRIFDWKRGHUD\WXEHVHOHFWURQLFFRPSRQHQWVÀXRUHVFHQWWXEHVDQG HOHFWURQLFFHUDPLFSDUWVHJSLH]RHOHFWURQLFGHYLFHV /HDGLQKLJKWHPSHUDWXUHW\SHVROGHUVLHOHDGEDVHGDOOR\VFRQWDLQLQJE\ZHLJKW RUPRUHOHDG /HDGDVDQDOORWWLQJHOHPHQWLQVWHHOFRQWDLQLQJXSWROHDGE\ZHLJKWDOXPLQLXP FRQWDLQLQJXSWROHDGE\ZHLJKWDQGDVDFRRSHUDOOR\FRQWDLQLQJXSWROHDGE\ ZHLJKW ii 9LHZ6RQLF 903 &RS\ULJKW,QIRUPDWLRQ &RS\ULJKW 9LHZ6RQLF&RUSRUDWLRQ$OOULJKWVUHVHUYHG 9LHZ6RQLFWKHWKUHHELUGVORJR2Q9LHZ9LHZ0DWFKDQG9LHZ0HWHUDUHUHJLVWHUHG WUDGHPDUNVRI9LHZ6RQLF&RUSRUDWLRQ 'LVFODLPHU9LHZ6RQLF&RUSRUDWLRQVKDOOQRWEHOLDEOHIRUWHFKQLFDORUHGLWRULDOHUURUVRU RPLVVLRQVFRQWDLQHGKHUHLQQRUIRULQFLGHQWDORUFRQVHTXHQWLDOGDPDJHVUHVXOWLQJIURP IXUQLVKLQJWKLVPDWHULDORUWKHSHUIRUPDQFHRUXVHRIWKLVSURGXFW ,QWKHLQWHUHVWRIFRQWLQXLQJSURGXFWLPSURYHPHQW9LHZ6RQLF&RUSRUDWLRQUHVHUYHVWKHULJKW WRFKDQJHSURGXFWVSHFL¿FDWLRQVZLWKRXWQRWLFH,QIRUPDWLRQLQWKLVGRFXPHQWPD\FKDQJH ZLWKRXWQRWLFH 1RSDUWRIWKLVGRFXPHQWPD\EHFRSLHGUHSURGXFHGRUWUDQVPLWWHGE\DQ\PHDQVIRUDQ\ SXUSRVHZLWKRXWSULRUZULWWHQSHUPLVVLRQIURP9LHZ6RQLF&RUSRUDWLRQ )RU<RXU5HFRUGV 3URGXFW1DPH 903 9LHZ6RQLF1HWZRUN0HGLD3OD\HU 0RGHO1XPEHU 96 'RFXPHQW1XPEHU 903B8*B(1*5HY% 6HULDO1XPEHU BBBBBBBBBBBBBBBBBBBBBBBBBBBBB 3XUFKDVH'DWH BBBBBBBBBBBBBBBBBBBBBBBBBBBBB 3URGXFWGLVSRVDODWHQGRISURGXFWOLIH 9LHZ6RQLFLVFRQFHUQHGDERXWWKHSUHVHUYDWLRQRIRXUHQYLURQPHQW3OHDVHGLVSRVHRI WKLVSURGXFWSURSHUO\DWWKHHQGRILWVXVHIXOOLIH<RXUORFDOZDVWHGLVSRVDOFRPSDQ\PD\ SURYLGHLQIRUPDWLRQDERXWSURSHUGLVSRVDO iii 9LHZ6RQLF 903 This product is manufactured under license from Dolby Laboratories. “Dolby” and the double-D symbol are trademarks of Dolby Laboratories. This product is manufactured under license under U.S. Patent #'s: 5,451,942; 5,956,674; 5,974,380; 5,978,762; 6,487,535 & other U.S. and worldwide patents issued & pending. DTS and the Symbol are registered trademarks, & DTS 2.0+ Digital Out and the DTS logos are trademarks of DTS, Inc. ViewSonic Network Media Player ViewSonic Network Media Player are warranted for 1 year for labor from the date of the first customer purchase. 1 9LHZ6RQLF 903 Safety Information WARNING: Failure to follow these safety instructions could result in fire, electric shock, or other injury or damage. z Read these instructions; Keep these instructions; Heed all Warnings; Follow all instructions z Do not use this apparatus near water. z Clean only with dry cloth z Do not install near any heat sources such as radiators, stoves, or other apparatus (including amplifiers) that produce heat. z Unplug this apparatus during lightning storms or when unused for long periods of time. WARNING: To reduce the risk of electronic shock, do not remove the cover. WARNING: The device can display static images, which can cause “burn in” of certain displays. Avoid leaving static images (such as photos or paused videos) onscreen for long periods of time. WARNING: This device should be used only indoors in well-ventilated areas. Do not operate this device outside the temperature range of 5℃~35℃. To reduce the risk of fire, electric shock, or interference, do not expose this appliance to rain, liquid, moisture, excessive hear, or naked flame. For technical support, please go to http://www.viewsonic.com/ CAUTION: About Laser and LED Use of controls or adjustments, or performance of procedures other than those specified herein my result in hazardous radiation exposure. This device complies with International Standard IEC 60825-1:2001-08 for a Class 1 and Class 2 laser product. This device also complies with 21CFR 1040.10 and 1040.11 except for deviations pursuant to Laser Notice No. 50, dated July 26, 2001. Class 1 Laser Devices Beam description: Collimated (parallel) beam of infrared light (invisible to user) Laser power output: <716 microwatts (at 832 nanometers) to 834 microwatts (at 865 nanometers) Emitted laser wavelength: nominal: 850 nanometers, range: (832 – 865 nanometers) A Class 1 laser product is safe under reasonable foreseeable conditions of operation as described by IEC 60825-1 and 21 CFR 1040.10. However, it is recommended that you not direct the laser beam (which is emitted from the bottom of the device) at anyone’s eyes. 2 9LHZ6RQLF 903 About This Guide This Guide gives you the fastest way for hand-on procedure to enjoy multimedia with Media Player. There will be user manual which describes usage information in detail. Please go to http://www.viewsonic.com/ to download it. For a quick help, press “ ” on the remote control unit. Package Contents The product package should contain the following items: z Media Player unit (Weight: 0.75Kg; Dimension: 130mm x 100mm x 25mm) z Remote control unit z 2 AAA batteries for remote control unit (1.65 ~ 1.725 Volt). The batteries are NOT rechargeable. CAUTION: There’s danger of explosion if battery is incorrectly replaced. Replace only with the same or equivalent type. z Power adapter WARNING: Be sure to use the power adapter shipped with Media Player unit. Other power adapters such as the one with 12V output generally for laptop PC will damage or even burn the unit. z HDMI cable z Quick Start Guide z Phone Jack to Composite (CVBS) A/V cable 3 9LHZ6RQLF 903 Hardware Overview Power light FRONT VIEW On/Off Button S/PDIF HDMI USB Host Ethernet Power eSATA /USB Host Composite REAR VIEW Power Off: Press the Power On/Off button on the back of the set for more than 5 seconds in operation status will force the system to power off. Front Panel LED indicator: Red●- Power Off Green●- Operating 4 9LHZ6RQLF 903 Peripheral Connections Video & Audio HDMI is for high-definition video and audio quality. Optical S/PDIF is for high-quality audio connected to an external decoder or amplifier. Please press hotkey on the remote control unit and go to ‘System Setup’ → ‘Audio Setup’ to select for Analog or Digital Audio Output. A/V is for general RCA connector; please see the adapter cable below which is included in the product package. Storage Device The USB host is for external HDD enclosure or flash drive and other USB devices (keyboard, mouse etc.). The eSATA/USB combo port can be employed for by either a SATA or USB device. Please take special attention to insert a USB cable or device into the eSATA/USB combo port and not to damage the connector when you plug or unplug it. 5 9LHZ6RQLF 903 Network Connection The ETHERNET port is to connect to your home router for local area network or Internet connection. You can also connect your Media Player to the network wirelessly by ViewSonic authorized wireless USB dangle. Using Remote Control Use the remote control to navigate menus, and to select and watch videos, listen to music, or view photos on your television. 6 9LHZ6RQLF 903 1 2 3 5 6 8 9 11 4 7 10 12 14 13 37 16 17 15 18 19 20 22 21 23 24 27 25 29 26 28 30 31 33 34 32 36 35 7 9LHZ6RQLF 903 The table below describes the function of the remote control unit. REMOTE CONTROL KEY FUNCTION TABLE No. 1 2 KEYPAD POWER HOME 3 OUTPUT 4 5 6 7 HELP SETUP SORT/EPG FUNC 8 BGM 9 RECORD 10 COPY 11 MUTE 12 NUMBERS 13 PREV 14 NEXT 15 BACK 16 INFO 17 18 19, 20 22, 23 VOLUME ─ VOLUME ┼ 1. Skip to the previous page when browsing media files. 2. Skip to the previous file when playing media files. 1. Skip to the next page when browsing media files. 2. Skip to the next file when playing media files. 1. Return to previous page. Save/cancel setting in setup pages. 2. Escape from Web Browser. Display media info. Pressing twice will show more information about video. Decrease the volume. Increase the volume. DIRECTIONS To move cursor for item selection. 24 25 26 27 28 29 Play/ Pause OK VIDEO MUSIC PICTURE iMEDIA SUBTITLE STOP 30 REPEAT 31 32 33 AUDIO ZOOM ROTATE 34 MENU 35 36 37 A-B SLOW/SLIDE GOTO 21 FUNCTION DESCRIPTION Turn On/Off “Media Player”. Return to Main Menu. Switch the video output among HDMI 1080p (AUTO), HDMI 480p and CVBS. Hot key on-screen instruction Enter Setup main page. Sort and re-arrange the order of all the files in one folder. (Reserved) Add/Remove a music file or iMedia station as background music. (Reserved) Copy or delete files/folders between USB storage and SATA HDD. Mute audio output. 1. Input numbers or alphabet when required. 2. Go to 00%-99% progress of current video or music file. 1. Play or pause media files 2. Enter the highlighted item. Jump to VIDEO mode Jump to MUSIC mode Jump to PHOTO mode Jump to Internet Media mode Select different subtitles Stop the media play. 1. Video & Music: Repeat current file or Repeat all files in this folder or cancel repeat function. 2. Photo: Repeat Background music. Select different languages/audio tracks Zoom video or photo. Rotate the picture being viewed. 1. Go to the Menu of DVD films. 2. Choose directory levels when navigating. Set/Cancel A-B repeat mode. Slow forward / backward the media with speed 1/2x, 1/4x,1/8x… Go to the specified time of current file. 8 9LHZ6RQLF 903 Networking Diagram A connection example with network and peripheral devices is shown below. NETWORK DIAGRAM Setup for TV Mode Please set the video sources selector of your TV to match the connection from your Media Player. For example, if you use HDMI, set the TV to use the corresponding HDMI input port. 1. Turn on the Media Player. The LED on the front panel of the Media Player will turn orange during system loading and then green when it’s finished. START-UP PAGE 2. Check the TV display by going to ‘Setup’ → ‘System Setup’ → ‘TV Mode Setup‘ → ‘Video Output’. The default display of Media Player is HDMI. If you use CVBS, use the remote control and press “Output” Key. You can cycle through the TV modes to get the correct display mode. 9 9LHZ6RQLF 903 Wired Network Setup 1) Press “Setup” hotkey on the remote control or select “SETUP” mode from the Main Menu. 2) Select “Network Setup” → “IP Setup”, and Enable DHCP or set your static IP address according to your local configuration. Wireless Network Setup Media Player supports wireless Ethernet with an USB Wi-Fi dongle (option) authorized by ViewSonic. To enable wireless function, please make sure you plug the Wi-Fi dongle into the USB port before Powering on Media Player. For high-definition video with high big-rates, streaming with a wired connection between Media Player and home router is recommended. It is ok for playing music and photo with 10 9LHZ6RQLF 903 wireless connection. 1) Press “SETUP” key on the remote control or select “SETUP” from the OSD Main Menu. 2) Select “Network Wizard” from setup main menu to start setup wizard and choose “Wireless” 3) Media Player scans and displays all available networks, choose yours from the list. 4) If the network you choose is locked by password, a “Lock” icon will be shown. And the signal strength is indicated by the red (poor quality), yellow (fair quality) or green (good quality) symbol. 5) Select “Key Value”, and have your password ready to enter. 11 9LHZ6RQLF 903 The key length of each Key Format is described in the table below. For WPA and WPA2 format, Media Player will detect and switch automatically. Key Format Key Length WEP64(ASCII) 5 digits WEP64(HEX) 10 digits WEP128(ASCII) 13 digits WEP128(HEX) 26 digits WPA-PSK/WPA2-PSK 8 digits or more 6) Input password and choose “Enter” to save. UPnP The Media Player will automatically detect all available UPnP AV compliant content severs on boot-up and list them on UPnP column of the main menu. No additional setup is needed for Media Player itself. 12 9LHZ6RQLF 903 Network Neighborhood (Samba Client) As long as the network is linked and no firewall is blocking the shares from remote sites, there is no additional set-up needed to enable this feature. Following steps show how to access media through the Samba Client Protocol. 1. Select “Network Shared Folders” in the main menu and all available sources will be detected and shown automatically. 13 9LHZ6RQLF 903 2. Press “down” button to choose the one target machine and navigate to the destination files you require to play. Local Storage Device The Media Player supports USB flash disk, USB Hard Disk Drive and SATA HDD. In the main menu, just choose “Removable Device” and navigate to play the files you require. The number of USB ports can be extended using a USB hub, please use a powered hub for higher power consumption devices. Media Player itself supplies limited power for the USB port. File Management by Remote Control Unit 1. Go to “Removable Device” at the Main Page. 2. Select the name of your storage device from the list and press “COPY”. 14 9LHZ6RQLF 903 3. Select the origin and destination. Press “OK” if you wish to proceed or “Cancel” to go back. Copy/Delete local files from PC Media Player supports the Samba server function which shares your local storage space with client PC over the network. For PC with Windows OS, it’s generally known as My Network Places. At first, check the IP address number of your Media Player in the “Network Setup” item under “Setup” menu. Then key in this IP address (for example, \\192.168.1.5) on the address bar of client PC’s My Network Places. After successful connection, type “admin” for both default user name and password to log in. Or see the following example as an alternative method based on Microsoft Windows XP platform. Please note that when both eSATA HDD and USB disk exist, the eSATA one will be the sole storage device for this function 15 9LHZ6RQLF 903 1. Click “My Network Place” icon on your PC. My Network Place 2. Click “Entire Network” → “Workgroup” 3. The default Media Player Local HDD location is “Workgroup”, double click it and you will see the Media Player (ShareHDD) icon. 4. Double click the Media Player (Sharehdd) icon, a login menu pops up. Input the default user name and password “admin”. 16 9LHZ6RQLF 903 5. Manage your media files between your PC to Media Player local HDD by using PC mouse. Playing Music, Photo and Video files For the supported file format and container in detail, please refer to the relevant section in the user manual. Some frequent usage of functions is highlighted as follows: 1. Viewing Video Information: Press “Info” button to get video information; press again to see more info. 2. Searching elapsed time and percentage of a music or video playing: Press “0(GOTO)” button on the remote control unit to enter time seek mode, and press the numeric buttons directly for a certain percentage of the file being played. 17 9LHZ6RQLF 903 3. Photo Slide Show: Press ‘OK’ for the selected photo in thumbnail for full-screen display and press again to start the slide show. 4. Location Directory Navigation: Press “MENU” button to go to the ‘directory’ bar on the top of the screen. By pressing the numerical buttons on the remote control unit during navigation will sort the file names by the first letter of the key pressed. This will help you find the targeted file among many. 6. If you would like to use some functions (like iMEDIA or audio settings etc) while you’re navigating directories and files, always press hot keys such as ‘HOME’, ‘SETUP’…on the remote control unit instead of just pressing ‘BACK’ button numerous time. Then it will be easy to go back to where you were in a long directory path by pressing ‘VIDEO’, ‘MUSIC’ or ‘PICTURE’ hot keys. Web Browser & RSS Wherever you are in the user interface, press ‘Home’ button on the remote control to return to the main menu as shown below. Select the icon which shows ‘Web Browser’ and press ‘ok’. 18 9LHZ6RQLF 903 The homepage of the web browser will be displayed, then you can surf the web using the remote control or keyboard and mouse. An USB keyboard and mouse can be plugged to facilitate the web surfing. Make sure you plug it before you enter the Web Browser. A virtual keyboard is also available there by pressing to facilitate input. Press the yellow button for help; you’ll get instructions of all function hot keys as below. When there’s an RSS(Really Simple Syndication) icon like on a webpage, that means the page 19 9LHZ6RQLF 903 can be viewed with RSS format used to publish frequently updated works—such as blog entries, news headlines, audio, and video. An RSS document (which is called a "feed", "web feed" or "channel") includes full or summarized text, plus metadata such as publishing dates and authorship. Web feeds benefit publishers by letting them syndicate content automatically. To add the feed into the RSS list of Media Player, please click on the icon on the page. Press “ok” to confirm or “Cancel” to skip. Go into the RSS page from the main page, and select the one you wish to view. There’re already some built-in feeds. 20 9LHZ6RQLF 903 BBC iPlayer BBC iPlayer is an internet television, P2P, and cable television service, developed by the BBC to extend its former RealPlayer-based "Radio Player" and other streamed video clip content. The audio/video is streamed directly over the Internet. You can select whatever radio station, TV episodes by remote control. Play Internet Radio- Live 365™ Live365™ is an Internet radio service that provides virtually unlimited on-demand access to thousands of radio stations. The audio is streamed directly over the Internet. Follow below steps to access the radio stations: 1. Make sure your network setting is correct and be able to access the internet. 2. Select “iMedia” from main menu or press “iMedia” button on the remote control. 3. Select “Live 365” and press “OK” button on remote control. 4. Select a catalog you prefer from the list, or select “All Broadcasts” to browse all radio stations. 21 9LHZ6RQLF 903 5. Select a radio station from list, and press “OK”, “Play”, or “Left” button to play it. Note: indicates stands for a radio station. Note: Press “BGM” hotkey on the remote control to add the station into background music list. Viewing Youtube Content You can use the Media Player to view Youtube content without the need for a PC. To view YouTube content, follow these steps: 1. Select “iMedia” from main menu or choose “YouTube”. 22 9LHZ6RQLF 903 2. Navigate to choose one to play. Because the content is directly streaming from the Internet, please be patient while the content is loading. The waiting time depends on your local network bandwidth, the wide area network situation 23 9LHZ6RQLF 903 and the situation of correspondent YouTube server. 3. Video Search Please select the search icon on the right side, a virtual keyboard will be there for a keyword is available to key-in search criteria. ShoutCast You can use the Media Player to listen to ShoutCast station without the need for a PC. Follow these steps: 1. Select “iMedia” from main menu or choose “ShoutCast”. 2. Navigate to choose one to play. Because the content is directly streaming from the Internet, please be patient while the content is being loaded. Firmware Upgrade There’re two ways to upgrade the firmware. Go to ‘Setup’ in the main menu and select ‘Version’. The first way to upgrade the firmware is by ‘Internet Upgrade’, which can be more convenient without the necessity of a PC. Make sure Media Player is connected to the Internet beforehand. Follow the steps below: 1. Go to “Setup Main Menu”, Select “Version”, and choose ‘Firmware upgrade”. 24 9LHZ6RQLF 903 2. Choose “Internet Upgrade”, the system will automatically search available firmware code from the Internet. 3. Select ‘Yes’ if you wish to proceed. Please note that the power must not be turned off or interrupted during the process, otherwise the firmware can be corrupted and Media Player will not able to boot again. 4. When the process is successfully finished, Media Player will reboot automatically. 5. An alternative way is to choose “USB Upgrade”. The latest firmware binary file is compressed and located on http://www.ViewSonic.com , ensure that the correct file/model is located before downloading. 6. Download the firmware file, store it in your USB flash disk and uncompress it. The “upgrade.bin” 25 9LHZ6RQLF 903 file must be stored in the root directory for Media Player to detect it. 7. Insert the USB disk/stick to the USB port of Media Player. Go to “Setup” → “Version” → “Firmware upgrade” → “USB Upgrade”. 8. Select “Yes” to proceed or “No” to cancel. Please note that the power must not be turned off or interrupted during the process, otherwise the firmware can be corrupted and Media Player will not able to boot again. 9. When the process is successfully finished, Media Player will reboot automatically. 26 9LHZ6RQLF 903 Miscellaneous Settings System Language and other settings apply on system are configured in the “System Setup” of the Setup Main Menu”. Please select the item that you want to configure and press “OK” button or “Right” button on remote control to enter sub menu. After configuration, please press “Back” button or “Left” button to leave the setup menu and save the configurations that you’ve changed. System Setup If you want to change the configuration of your setup, you can select the “Setup” from Main Page, and select “System Setup” from Setup Main Menu. You can select, configure or adjust Language, TV mode, Audio, Video, HDD sharing and other settings here. System Setup main page 27 9LHZ6RQLF 903 Below table is a brief description for the System Setup selection. Item Name Language TV Mode Setup Value Use Language Selecct TV System/ Video Output/ Video Scale Digital Audio Output/Analog Audio Setup Audio Output Brightness/ Contrast/ HUE/ Video Setup Saturation Music, Photo & Video Display Other Setting Option /Advance Setting HardDisk Share Set Up User Name / Password Configure Configure Adjust Configure Configure SYSTEM SETUP TABLE Language Language Table Item Name Language Value Use Chinese Simp./ Chinese Tradi. /Czech /English / French/ German/ Greek/ Hebrew/ Italian /Japan Select /Netherlandish/ Polish/ Portugese /Russia /Serbian/ Spanish/ Swedish / Turkish 28 9LHZ6RQLF 903 TV Mode Setup You can go to the “System Setup” menu to change the TV mode setting, including the Video output, TV system and aspect ratio. TV Mode Setup Table Item Name Value Use Video Output P-SCAN Composite/ HDMI Select TV System NTSC/480p/720p60/1080i60/1080p24/1080p60 Select Aspect Ratio 4:3 PS/ 16:9/ 4:3 LB Select HDMI EDID Enable/Disable Switch Audio Setup For DTS (Digital Theater System) audio tracks, the device passes it through digital audio output port (Optical or Coaxial cable) to an external decoder. Please make sure the Digital Audio Output mode (SPDIF-PCM / SPDIF-RAW) is turned on, if you are connecting the Optical/Coaxial cable. 29 9LHZ6RQLF 903 Audio Setup Table Item Name Value Use Digital Audio Output On/Off Switch Analog Audio Output MONO R/ MONO L/ MIX MONO/ STEREO Select DTS SPDIF/RAW PCM Select AAC SPDIF/RAW PCM Select AC3 SPDIF/RAW PCM Select WMA PRO SPDIF/RAW PCM Select Video Setup Video Setup Table Item Name Value Use Brightness 0 ~ 32 Adjust Contrast 0 ~ 32 Adjust HUE 0 ~ 32 Adjust Saturation 0 ~ 32 Adjust Location Setup You can setup whatever location/weather your favoured country, city shown on the main page. 30 9LHZ6RQLF 903 Other Settings You can set the screen saver time as well as time shown on the main page. Network Setup This section contains the following items: Media Setup This section contains the following items, description in detail is below the table. 31 9LHZ6RQLF 903 TABEL OF MEDIA SETTINGS Category Item Name Value Use Photo Display Opton Slide Show Time 1 sec ~ 3 min Select Orientation Correction Enable/Disable Switch Transition Effect Enable/Disable Switch Music Playing Option Music Auto Play Off/ Repeat One/ Repeat All/ Random Switch Video Playing Option Video Playing Videos Ask/On/Off Switch Play Next Video Enable/Disable Switch Video Subtitle Enable/Disable Switch Auto Sync Enable/Disable Switch DVD Settings Preferred Subtitle Preferred Audio English/ German/ French/ Italian/ Spanish/ Portugal/ Turkish/ Dutch/ Russian English/ German/ French/ Italian/ Spanish/ Portugal/ Turkish/ Dutch/ Russian Select Select Auto Sync For some video film with 24 frames per second, you may see poor quality on the display due to frame rate conversion. Please turn on Auto Sync, then the TV output will be adjusted automatically to the correct mode. Make sure the HDMI EDID is turned on at the same time. 32 9LHZ6RQLF 903 Hard Disk Share Setup If you have installed a Hard Disk Drive into your media player, you can see the “Hard Disk Share Setup” here to configure your HDD Settings. You can rename the default Share Name, Group Name, User Name and Password by onscreen keyboard. 33 9LHZ6RQLF 903 Trouble Shooting No Television display or Poor quality image. 1. Make sure your TV is turned on and switched to the correct input. 2. Make sure Media Player is turned on and switched to the correct TV mode. If the TV Mode that you are using is not correct one for your television, you may not be able to see any image displayed. To fix this problem, push “Output” key on the remote control. You can cycle through each of the possible TV modes to find and select the correct one. 3. Make sure you are using the correct video cables and that they are connected firmly to Media Player and to your TV. 4. The Power cords for Media Player and your TV are securely connected to a working power source. Unstable Display with 1080p24 films For some video film which is with 24 frames per second, you may see poor quality on the display. Please select 1080p24 as the TV output mode, or turn on “Auto Sync” function. No Audio Output with with DTS encoded films Media Player does not decode audio with DTS format, but pass through to S/PDIF for external AV amplifier. For the films with DTS sound tracks, pls enable ‘Digital Audio Output’ and use an external decoder. Media Player does not find my network. If you use wireless networks, make sure that the Wireless Network Name (SSID) and the security settings of Media Player and media server match exactly. If you use wired network, make sure the cable is connected correctly. Digital Media Server can only be seen for a short time Some firewall or antivirus software may cause failures of the UPnP communications between Media Player and Digital Media Server. Please configure your firewall setting to allow the access of “UPnP” and Digital Media Server. Or you may disable the firewall or antivirus applications while using Digital Media Server! 34 9LHZ6RQLF 903 Media Player does not receive a valid IP Address 1. Verify that a working DHCP server is on your network. PCs on the network should get IP addresses in the correct range. 2. You can use a Static IP Address of there is a problem connecting to the server. 3. If you are using a wireless network, verify that Media Player is associated with the correct SSID, and that the WEP settings on Media Player match the setting on your access point. No Subtitle when playing “mpeg2” files Please make sure to enable the “subtitle” function by pressing “subtitle button” every time when you are watching mpeg2 video files; also please enable this function with each mpeg2 video file that has subtitle file included. Please note if you have enabled the “Transcoding” function, the subtitle function might not work for some video files. No Subtitle when playing “mpeg2” files after pressing “subtitle” button Please make sure the conversation of the mpeg2 video file has begun before pressing “subtitle” button. Fast forward or slow forward is not working Please note if you have enabled the “Transcoding” function, the “fast forward”, “fast backward”, “slow forward”, and “slow backward” functions will not work due to limitation. Can not add music files to BGM list? Please make sure you did not add more than 500 music files to BGM list since the capacity of BGM list is 500 files. Can not find Firmware Upgrade file in the USB device Please check if you put the latest firmware file under root directory of USB device, or Media Player system can not find it. Display of metadata (Artist, Album, Title etc.) of audio files is not correct Please set the Language (in Settings) as the same as the language coding of metadata of the audio files to avoid scrambled characters. 35 9LHZ6RQLF 903 FAQ Q: Why I can not see anything on TV screen? Answer: Please select the correct signal input on your TV set. If you connect the player to TV via HDMI, please select the right HDMI port no. on your TV set; If you connect the player to TV via A/V port, please select the right A/V port no. on your TV set. Q: Why I can not connect the player to my home network? Answer: If you use wireless connection, please make sure the right encryption protocol is selected and right password is entered. Choose the ‘iMedia’ icon on the main menu and press enter, you’ll see if an IP address is assigned. Q: USB HDD External Enclosure is not supported? Answer: Please use external power supply for USB HDD External Enclosure, although many drives can be driven directly through USB power, some may exceed the ports power capability. 36 9LHZ6RQLF 903 &XVWRPHU6XSSRUW )RUWHFKQLFDOVXSSRUWRUSURGXFWVHUYLFHVHHWKHWDEOHEHORZRUFRQWDFW\RXUUHVHOOHU 1RWH<RXZLOOQHHGWKHSURGXFWVHULDOQXPEHU 7 7HOHSKRQH &RXQWU\ 5HJLRQ :HE6LWH $XVWUDOLD1HZ =HDODQG ZZZYLHZVRQLFFRPDX &DQDGD ZZZYLHZVRQLFFRP 77ROO)UHH 77ROO ) (XURSH ZZZYLHZVRQLFHXURSHFRP ZZZYLHZVRQLFHXURSHFRPXN6XSSRUW&DOOGHVNKWP +RQJ.RQJ ZZZKNYLHZVRQLFFRP 7 VHUYLFH#KNYLHZVRQLFFRP ,QGLD ZZZLQYLHZVRQLFFRP 7 VHUYLFH#LQYLHZVRQLFFRP ,UHODQG(LUH ZZZYLHZVRQLFHXURSH FRPXN ZZZYLHZVRQLFHXURSHFRPXN VXSSRUWFDOOGHVN VHUYLFHBLH#YLHZVRQLFHXURSH FRP .RUHD ZZZNUYLHZVRQLFFRP 7 VHUYLFH#NUYLHZVRQLFFRP /DWLQ$PHULFD $UJHQWLQD ZZZYLHZVRQLFFRPOD 7 VRSRUWH#YLHZVRQLFFRP /DWLQ$PHULFD &KLOH ZZZYLHZVRQLFFRPOD 7 VRSRUWH#YLHZVRQLFFRP /DWLQ$PHULFD &ROXPELD ZZZYLHZVRQLFFRPOD 7 VRSRUWH#YLHZVRQLFFRP /DWLQ$PHULFD 0H[LFR ZZZYLHZVRQLFFRPOD 7 VRSRUWH#YLHZVRQLFFRP ) )D[ $86 1= (PDLO VHUYLFH#DXYLHZVRQLFFRP VHUYLFHFD#YLHZVRQLFFRP 5HQWD\'DWRV685&2//$3$=38(%/$38(7HO&21/,1($6 (OHFWURVHU$Y5HIRUPD1R*[\0HULGD<XFDWDQ7HO 2WKHUSODFHVSOHDVHUHIHUWRKWWSZZZYLHZVRQLFFRPODVRSRUWHLQGH[KWP0H[LFR /DWLQ$PHULFD 3HUX ZZZYLHZVRQLFFRPOD 7 VRSRUWH#YLHZVRQLFFRP 0DFDX ZZZKNYLHZVRQLFFRP 7 VHUYLFH#KNYLHZVRQLFFRP 0LGGOH(DVW DSYLHZVRQLFFRPPH &RQWDFW\RXUUHVHOOHU VHUYLFH#DSYLHZVRQLFFRP 3XHUWR5LFR 9LUJLQ,VODQGV ZZZYLHZVRQLFFRP 7 (QJOLVK 7 6SDQLVK ) VHUYLFHXV#YLHZVRQLFFRP 6LQJDSRUH 0DOD\VLD 7KDLODQG ZZZYLHZVRQLFFRPVJ 7 VHUYLFH#VJYLHZVRQLFFRP 6RXWK$IULFD DSYLHZVRQLFFRP]D &RQWDFW\RXUUHVHOOHU VHUYLFH#DSYLHZVRQLFFRP 8QLWHG.LQJGRP ZZZYLHZVRQLFHXURSH FRPXN ZZZYLHZVRQLFHXURSHFRPXN VXSSRUWFDOOGHVN VHUYLFHBJE#YLHZVRQLFHX URSHFRP 8QLWHG6WDWHV ZZZYLHZVRQLFFRP 77ROO)UHH 77ROO ) VHUYLFHXV#YLHZVRQLFFRP 9LHZ6RQLF VRSRUWH#YLHZVRQLFFRP 903 /LPLWHG:DUUDQW\ 9LHZ6RQLF1HWZRUN0HGLD3OD\HU :KDWWKHZDUUDQW\FRYHUV 9LHZ6RQLFZDUUDQWVLWVSURGXFWVWREHIUHHIURPGHIHFWVLQPDWHULDODQGZRUNPDQVKLSXQGHUQRUPDO XVHGXULQJWKHZDUUDQW\SHULRG,IDSURGXFWSURYHVWREHGHIHFWLYHLQPDWHULDORUZRUNPDQVKLSGXULQJ WKHZDUUDQW\SHULRG9LHZ6RQLFZLOODWLWVVROHRSWLRQUHSDLURUUHSODFHWKHSURGXFWZLWKDOLNHSURGXFW 5HSODFHPHQWSURGXFWRUSDUWVPD\LQFOXGHUHPDQXIDFWXUHGRUUHIXUELVKHGSDUWVRUFRPSRQHQWV +RZORQJWKHZDUUDQW\LVHIIHFWLYH 9LHZ6RQLF1HWZRUN0HGLD3OD\HUDUHZDUUDQWHGIRU\HDUIRUODERUIURPWKHGDWHRIWKH¿UVWFXVWRPHU SXUFKDVH :KRWKHZDUUDQW\SURWHFWV 7KLVZDUUDQW\LVYDOLGRQO\IRUWKH¿UVWFRQVXPHUSXUFKDVHU :KDWWKHZDUUDQW\GRHVQRWFRYHU $ Q\SURGXFWRQZKLFKWKHVHULDOQXPEHUKDVEHHQGHIDFHGPRGL¿HGRUUHPRYHG 'DPDJHGHWHULRUDWLRQRUPDOIXQFWLRQUHVXOWLQJIURP D $FFLGHQWPLVXVHQHJOHFW¿UHZDWHUOLJKWQLQJRURWKHUDFWVRIQDWXUHXQDXWKRUL]HGSURGXFW PRGL¿FDWLRQRUIDLOXUHWRIROORZLQVWUXFWLRQVVXSSOLHGZLWKWKHSURGXFW E 5HSDLURUDWWHPSWHGUHSDLUE\DQ\RQHQRWDXWKRUL]HGE\9LHZ6RQLF F & DXVHVH[WHUQDOWRWKHSURGXFWVXFKDVHOHFWULFSRZHUÀXFWXDWLRQVRUIDLOXUH G 8 VHRIVXSSOLHVRUSDUWVQRWPHHWLQJ9LHZ6RQLF¶VVSHFL¿FDWLRQV H 1RUPDOZHDUDQGWHDU I $ Q\RWKHUFDXVHZKLFKGRHVQRWUHODWHWRDSURGXFWGHIHFW $ Q\SURGXFWH[KLELWLQJDFRQGLWLRQFRPPRQO\NQRZQDV³LPDJHEXUQLQ´ZKLFKUHVXOWVZKHQDVWDWLF LPDJHLVGLVSOD\HGRQWKHSURGXFWIRUDQH[WHQGHGSHULRGRIWLPH +RZWRJHWVHUYLFH ) RULQIRUPDWLRQDERXWUHFHLYLQJVHUYLFHXQGHUZDUUDQW\FRQWDFW9LHZ6RQLF&XVWRPHU6XSSRUWSOHDVH UHIHUWR&XVWRPHU6XSSRUWSDJH<RXZLOOQHHGWRSURYLGH\RXUSURGXFW¶VVHULDOQXPEHU 7 RREWDLQZDUUDQWHGVHUYLFH\RXZLOOEHUHTXLUHGWRSURYLGHDWKHRULJLQDOGDWHGVDOHVVOLSE\RXU QDPHF\RXUDGGUHVVGDGHVFULSWLRQRIWKHSUREOHPDQGHWKHVHULDOQXPEHURIWKHSURGXFW 7 DNHRUVKLSWKHSURGXFWIUHLJKWSUHSDLGLQWKHRULJLQDOFRQWDLQHUWRDQDXWKRUL]HG9LHZ6RQLFVHUYLFH FHQWHURU9LHZ6RQLF ) RUDGGLWLRQDOLQIRUPDWLRQRUWKHQDPHRIWKHQHDUHVW9LHZ6RQLFVHUYLFHFHQWHUFRQWDFW9LHZ6RQLF /LPLWDWLRQRILPSOLHGZDUUDQWLHV 7KHUHDUHQRZDUUDQWLHVH[SUHVVRULPSOLHGZKLFKH[WHQGEH\RQGWKHGHVFULSWLRQFRQWDLQHGKHUHLQ LQFOXGLQJWKHLPSOLHGZDUUDQW\RIPHUFKDQWDELOLW\DQG¿WQHVVIRUDSDUWLFXODUSXUSRVH ([FOXVLRQRIGDPDJHV 9LHZ6RQLF¶VOLDELOLW\LVOLPLWHGWRWKHFRVWRIUHSDLURUUHSODFHPHQWRIWKHSURGXFW9LHZ6RQLFVKDOOQRWEH OLDEOHIRU ' DPDJHWRRWKHUSURSHUW\FDXVHGE\DQ\GHIHFWVLQWKHSURGXFWGDPDJHVEDVHGXSRQ LQFRQYHQLHQFHORVVRIXVHRIWKHSURGXFWORVVRIWLPHORVVRISUR¿WVORVVRIEXVLQHVVRSSRUWXQLW\ ORVVRIJRRGZLOOLQWHUIHUHQFHZLWKEXVLQHVVUHODWLRQVKLSVRURWKHUFRPPHUFLDOORVVHYHQLIDGYLVHG RIWKHSRVVLELOLW\RIVXFKGDPDJHV $Q\RWKHUGDPDJHVZKHWKHULQFLGHQWDOFRQVHTXHQWLDORURWKHUZLVH $Q\FODLPDJDLQVWWKHFXVWRPHUE\DQ\RWKHUSDUW\ 9LHZ6RQLF'03:DUUDQW\'03B/:5HY$ 9LHZ6RQLF 903