1
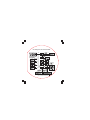
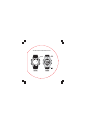
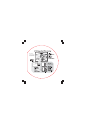
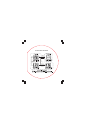
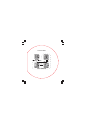
1.0 General Guide
Thank you for your purchase. This watch includes 5 functional modes:
Current Time, Heart Rate Alert, Daily Alarm, Chronograph and Timer
Mode.
With this watch, you also get ECG accurate heart rate readings without
the use of a chest strap! How ?
Simply put the watch on you wrist, place two fingers on the sensors
located on the face of the watch, and watch your heart rate display in
the digital window within seconds!
WARNING!
DO NOT use this Watch for commercial or professional
purposes.
Make sure that you fully understand the functions and
limitations of this watch before using it.
This Watch is a supplementary device for measuring heart
rate; it is NOT a substitute for medical devices. You should
periodically compare the heart rate reading acquired with this
watch with the reading from a doctor.
Consult a doctor or trainer before setting your Upper and
Lower heart rate limits.
2.0 Care and Maintenance
Press any key to switch on the watch
Read this manual thoroughly before using the watch.
Do not expose the instrument to extreme temperatures, vibration or
shock
Clean it with a soft damp cloth. Do not use solvents or scouring
agents.
Please contact a specialized dealer for battery change of the watch
( CR2025 3V Lithium battery).
Please do not dispose of old electronic devices and empty batteries
in household waste. To protect the environment, take them to your
retail store or to appropriate collection sites according to national or
local regulations.
Please do not try to repair the unit. Contact the original point of
purchase. Please let change the battery before complaining. No
guarantee if the instrument is handled or opened improperly.
3.0 Designation of the watch
4.0 Button Operation Summary
[mode] Button
Press the button to select one of the 5 functional modes In functional
modes: Press and hold the button to select setting display In any
setting display: Press the button to choose between different settings.
Press and hold the button to exit setting sequence.
[start/stop] Button
In Current Time Mode: press the button to select between the Date
Display and Time Display In Daily Alarm Mode: Press the button to
select between ON and OFF for daily alarm In Chronograph Mode
and Timer Mode: Press the button to start/stop the counting In setting
displays: press the button to scroll through the settings.
[reset] Button
In Daily Alarm Mode: Press the button to select between ON and
OFF for hourly chime In Chronograph Mode (stop-counting): Press
the button to reset to zero display In Timer Mode (stop-counting):
Press the button to reset the timer to target time In setting displays:
press the button to scroll through settings.
[light] Button
In any functional mode/display, press the button once to turn ON the
EL back light for about 3 seconds.
5.0 Functional Mode
1) Current Time Mode
2) Heart Rate Alert Mode
3) Daily Alarm Mode
4) Chronograph Mode
5) Timer Mode.
To select among the above functional
modes, press the[mode] button.
6.0 Current Time mode
Time Display and Date Display
Press the [start/stop] button once to select between the Time
Display and Date Display.
The Date Display will change to Time Display automatically if
NO keystroke has been activated for about 8 seconds.
6.1 Setting the Current Time Mode
6.1 Setting the Current Time Mode
To Set the Current Time Mode
To set the current time and date, and their display formats, press
and hold the [mode] button for about 2 seconds to select the setting
display (the second digits will start flashing).
The Setting Sequence
When the seconds digits start to flash, press the [mode] button to
move the flashing following the setting sequence of the adjacent
diagram or press the [start/stop] or [reset] button to reset the second
digits to zero.
If one of the settings (minute, hour, year, month, date) is flashing,
press the [start/stop] or [reset] button to scroll through the setting
(hold the button down to scroll the setting at a faster pace).
When the ‘month-date’ or ‘date-month’ digits is flashing, press the
[start/stop] or [reset] button to switch between month-date (‘m’ icon
appear) and date-month (‘d’ icon appear).
When the ‘12’ or ‘24’ icon is flashing, press the [start/stop] or [reset]
button to switch between ‘12’ (12 hour format) and ‘24’ (24 hour
format).
When the beep ‘on’ or ‘oF’ icon is flashing, press the [start/stop] or
[reset] button to switch between ‘on’ (key tone ON) and ‘oF’ (key
tone OFF).
When the designated setting appears, press and hold the [mode]
button for about 2 seconds to exit the setting sequence. The setting
display will change to Current Time Mode automatically if NO keystoke has been activated for about 1 minute.
7.0 About Heart Rate Measurement
7.0 About Heart Rate Measurement
In exercise or sports, your heart naturally speeds up in pumping
blood to the body in accordance with your increased energy level.
This watch can calculate that increase expressed as the number of
beats per minutes (bpm) to determine a safe target heart rate for
each individual.
PRECAUTIONS/TIPS
1. A heart rate sensor is located on the back of the watch. The back
sensor must make firm contact with the user’s skin during
measurement.
2. DO NOT take heart rate measurement when diving or under water.
3. Clean the back cover occasionally by applying a few drops of water;
wipe it dry with a paper towel, removing any residual grease.
4. DO NOT use hand cream; it will insulate the signal between the skin
and the sensors.
5. Clean skin and fingers with soap and water for better signal
transmission.
6. DO NOT use the fingertips where the skin is dry and thick. For those
with extremely dry skin, moisten fingers and wrist with tap water or
apply a conductive gel.
7. Hold the watch firmly when taking measurement in motion,
8. During the measurement, avoid any awkward motion. Awkward
motion creates undesired muscle noise; hence an erogenous heart
beat reading may result.
Make sure the
sensor on the back
of the watch sits
firmly on your skin.
8.0 Heart Rate Alert Function
About the Heart Rate Alert Function
By presetting a target heart rate range, you can activate the heart
rate alert function. This function helps prevent the user from going
over or under a target heart rate.
In course of doing exercise or sports: When the user takes a heart
rate measurement that is out of the preset desirable range, this
watch will beep twice. Hence, the user could render the appropriate
actions such as slowdown or speed up the exercise.
For example, some training sessions may require the trainee
maintaining his / her heartbeat at a predefined range (the desirable
range) to achieve training objective. This watch can remind the
trainee whether his/her heartbeat is out of the objective range all
the time.
Upper & Lower Limits and Desirable Heart Rate Range
The desirable heart rate range is the realm that defined by the upper
and lower limits.
1) Get the limits by consulting a doctor or trainer.
2) Calculate the limits by using the user’s age andgender.
Check the coming ‘8.2 Setting the Heart Rate Alert Mode’ Section
for more detail on setting the Limits.
8.1 Heart Rate Alert Mode
8.1 Heart Rate Alert Mode
When Heart Rate Alert Function is ON
The following displays will be appeared on the display every 2
seconds:
1) Upper Limit Display - the preset upper limit that set for the heart
rate alert function
2) Lower Limit Display - the preset lower limit that set for the heart rate
alert function
3) Age and Gender Display (see note 1) - the age and gender that set
for the upper and lower limit calculation.
When Heart Rate Alert Function is OFF
The ‘---’ and ‘oF’ will be appeared on the display.
Select ON or OFF in Heart Rate Alert Function
To select ON or OFF in Heat Rate Alert Function, press the [start/
stop] button once.
Heart Rate Alert Indications
1) When your heart rate results fall within the set range: The watch
will beep once, and the digits will remain still.
2) If your heart rate is higher than the set range: The watch will beep
twice, and the ‘H’ indicator and acquired heart rate reading will start
flashing.
3) If your heart rate is lower than the set range: The watch will beep
twice, and the ‘L’ indicator and acquired heart rate reading will start
flashing.
8.2 Setting the Heart Rate Alert Mode
8.2 Setting the Heart Rate Alert Mode
To Set the Heart Rate Alert Mode
To preset your target heart rate:
1) Input your target heart rate range (lower and upper limits), or
2) In put your age and gender ( lower and upper upper limits will be
automatically calculated).
To set the heart rate alert mode, press and hold the [mode] button
for about 2 seconds to select the setting display (the ‘age’ digits will
start flashing).
The Setting Sequence
When the ‘age’ digits start to flash, press the [mode] button to move
the flash following the sequence of the adjacent diagram, or press
the [start/stop] or [reset] button to scroll through the setting (hold
the button down to scroll at a faster pace). If the ‘gender’ is flashing,
press the [start/stop] or [reset] button to scroll the setting between
‘M’ (male) and ‘F’ (female).
If one of the settings (upper limit and lower limits) is flashing, press
the [start/stop] or [reset] button to scroll through the setting (hold
the button down to scroll at a faster pace).
When the designated setting appears, press and hold the [mode]
button for about 2 seconds to exit the setting sequence. The setting
display will change to Current Time Mode automatically if NO
keystroke has been activated for about 1 minute.
9.0 Daily Alarm Mode
To turn the Daily Alarm on or off, press the [start/stop] button. When
the daily alarm is on, the watch starts beeping at the alarm time for
30 seconds. Press any button to stop the alarm (except light).
To turn the Hourly Chime on or off, press the [reset] button. When
the hourly chime is on, the watch will beep once every hour.
9.1 Setting the Daily Alarm Mode
Press and hold the [mode] button to select the setting display
The ‘hour’ digits start to flash. Press the [start/stop] button or [reset]
button to scroll through the setting.
Cnfirm with [mode] button. Set the ‘minute’ digits in the same way.
Press and hold the [mode] button to exit the setting sequence. The
setting display will change to Currant Time Mode automatically if
NO keystroke has been activated for 1 minute.
10.0 Chronograph mode
10.0 To Use the Chronograph Mode
In ‘Zero’ Display, press the [start/stop] button once to start the
counting. When it is counting, press the [start/stop] button once
again to stop the counting, and the elapsed time of which the
chronograph is counting will appear.
When the elapsed time is displaying, repeat the above mentioned
key operations to get the accumulative elapsed time or press the
[reset] button to reset the chronograph (ready for a new counting).
The maximum counting range of the chronograph is 99 hours, 59
minutes and 59.99 seconds.
11.0 Timer Mode
11.0 Timer Mode
Press and hold the [mode] button to select the setting display. The
‘hour’ digits start to flash. Press the [start/stop] button or [reset]
button to scroll through the setting.
Confirm with [mode] button. Set the ‘minute’ and ‘second’ digits in
the same way. The maximum time is 99 hours, 59 minutes and 59
second.
Press and hold the [mode] button to exit the setting sequence. The
setting display will change to Currant Time Mode automatically if
NO keystroke has been activated for 1 minute.
11.0 Using the Timer Mode
11.1 Using the Timer Mode
To Use the Timer Mode
Once a target time has been set (for example 30 minutes), press
the [start/stop] button once to start the countdown. The countdown
time will be displayed continuously throughout the countdown.
To stop countdown, press the [start/stop] button once.
To Reset the Timer
To reset the timer to the preset target time before the countdown
reaches zero, press the [reset] button once (when the timer has
stopped counting).
To start the counter at a target time, set a new value for the target
time. Check the previous ’11.1 Setting the Timer Mode’ Section for
more detail on how to set the Timer Mode.
Timer Alarm Sound
When the timer nears the last 5 seconds, the watch will beep once
for each second left. When it hits zero, the watch will beep for about
10 seconds
You can stop the beeping by pressing any button (except the [light]
button).
12.0 Specifications
Current Time Mode
Hour, minute and second
Month, day, day of week and year
12 / 24 hour format selectable
Month-day/Day-month selectable
Auto calendar from year 2000 to 2099
Hourly Chime on the hours
Hearth Rate Alert Mode
Measuring range: 43 to 200 beats per minute
1 Heart Rate Alert (upper and lower limit)
Daily Alarm Mode
Daily Alarm: 1 daily alarm
Alarm Duration: about 30 seconds
Chronograph Mode
Resolution: 1/100 second
Counting range: 99 hours, 59 minutes, 59.99 seconds
Measuring mode: Elapsed time and accumulative elapsed
Timer Mode
Resolution: 1 second
Setting limit: 99 hours, 59 minutes, 59 seconds
Others
Electro-luminescent backlight
13.0 Potential Causes for: NO Heart Rate
Reading or Long Response Time
1) Cause: Dry Skin.
Solution: Apply conductive gel or saliva thoroughly to fingers and wrist
area.(Even water will help if conductive gel is not available).
2) Cause: Fingers are not placed firmly over the sensors.
Solution: Make sure fingers (not the tips) lay flat and firmly over the
sensorsand watch is placed securely on wrist. Do not use the very
tips of your fingers (i.e. visualize tip toeing with your fingertips.)
Fingertips do not allow for enough contact, therefore, ECG will not be
picked up.
3) Cause: Muscle tremors, caused by: A) Pressing down too hard
on the sensors with fingertips. B) Person is in motion and
holding the watch in an awkward manner.
Solution: It is best to place your index finger on the 6:00 sensor, and
middle finger on the 12:00 sensor. This will ensure good and consistent
readings even while walking or jogging with arms swung naturally.
4) Cause: Dead skin on wrist.
Solution: Usually rubbing your skin with a towel will help.
5) Cause: A thin layer of body grease can insulate the ECG signalbasically prevents the back sensor on the watch from picking
up one’s ECG.
Solution: Wipe wrist and the back of watch with a tissue or soft towel.
6) Cause: Hairy arms.
Solution: Apply conductive gel to wrist area.
7) Cause: Irregular heartbeats.
Solution: N/A It is difficult to consistently pick up a reading for those
with irregular heart beats. Inconsistent response times are expected
for those with arrhythmia.