Transcript
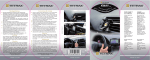
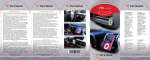
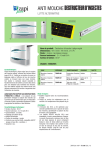
Istruzioni di montaggio
Assembly instructions
Instructions de montage
Montageanleitung
Instrucciones de montaje
Assembly instructions
Clear the rear device surface with a damp cloth or paper and dry;
Take the clip and place it on Tetrax , leaving the adhesive part free
(photo 1, photo 2);
Remove the clip adhesive film;
Use the blister as a Template to find the centre of the device in a
smooth area, being careful to place it in the upper half of the
device (photo 3);
Adequately press the Tetrax against the device for about 10
seconds so that the clip 3M adhesive perfectly adheres to the
surface (photo 3);
Remove Tetrax and make sure the clip is well-adhered to the
device (photo 4);
EGO-GEO version: place Tetrax on the car vent, turning the ring
until the clamps are adequately tightened, without forcing (photo 5);
FIX version: apply Tetrax after removing the adhesive film on a flat
and smooth surface and slightly press down for about 10 seconds
so that the 3M adhesive perfectly adheres to the surface (photo 5);
Near the Tetrax device clip, the four magnets' force of attraction
will do the rest (photo 6).
To remove the device, slide it sideways or down.
®
®
®
®
1
2
®
®
3
4
Warnings
Do not assemble or adjust Tetrax while driving;
Due to its size, it is not suitable for children under 5;
Do not use for purposes other than those intended;
Roughness or surface wrinkles may alter clip adhesion;
Magnetic device: do not leave credit cards or other magnetic
storage supports near Tetrax since saved information may be
cancelled;
WARNING: particularly critical driving situations (i.e.: off-road or
on particularly uneven roads), may compromise good Tetrax
operations.
®
®
®
5
6
WWW.TETRAX.COM
M A DE IN ITA LY
Maximum load capacity: 150 gr.
Warranty: 24 months
MADE IN ITALY