1
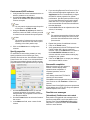
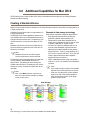
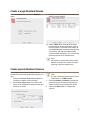
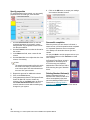
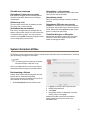
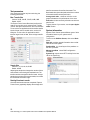
ATTO Express Power Center Utility
Installation and Operation Manual
ATTO Technology, Inc.
155 CrossPoint Parkway
Amherst, New York 14068 USA
www.attotech.com
Tel
Fax
(716) 691-1999
(716) 691-9353
Sales support:
[email protected]
Technical support: Monday -- Friday, 8am-6pm EST
[email protected] Tel (716) 691-1999 x242
© 2010 ATTO Technology, Inc. All rights reserved. All brand or product names are trademarks of their respective
holders. No part of this manual may be reproduced in any form or by any means without the express written
permission of ATTO Technology, Inc.
1/2011.......................................................................................................................................................PRMA-0368-000
Contents
1.0 ATTO Express Power Center Provides Storage Solutions ........... 1
2.0 RAID Level 0 Overview ................................................................. 2
3.0 Using ATTO Express Power Center ............................................. 3
Express Power Center for Windows
Express Power Center for Mac OS X
4.0 Creating RAID 0 Volumes ............................................................. 7
Creating RAID 0 Volumes in Windows
Creating RAID 0 Volumes in Mac OS X
5.0 Deleting RAID 0 Volumes ............................................................. 12
Deleting RAID 0 Volumes in Windows
Deleting RAID 0 Volumes in Mac OS X
6.0 Additional Capabilities for Mac OS X ............................................ 16
Creating a Standard Volume
System Information Utilities
Glossary..................................................................................................i
1.0 ATTO Express Power Center Provides Storage
Solutions
Congratulations on your choice of the premier volume creation and management application for the Windows®
and Macintosh® OS X operating systems.
With its easy-to-use interface, ATTO Express Power
Center gives you the power to optimize your storage
without a complicated user interface. Whether using
your system for high-end digital video editing,
database management or other high performance
applications, Express Power Center gives you the
power you need to work more efficiently with volume
creation and management.
Using a wizard-based interface, Express Power
Center makes volume creation simple. By following a
series of straight-forward steps, you can set up and
begin to use your storage faster than ever.
Express Power Center provides RAID Level 0
functionality. Using this application, you can make
several storage devices work together, making a
larger virtual disk taking advantage of the combined
performance of those devices to match the needs of
high-bandwidth applications.
This software package also includes the ATTO
Benchmark tool (for Mac OS X only). This user-friendly
utility reports and graphs the peak, average and
minimum read transfer rates.
If you need additional assistance, comprehensive online help text is available along the way. Click on the
help button for additional information on the specific
operation.
•
•
•
•
•
•
•
•
•
•
System Requirements
•
•
Express Power Center highlights
•
•
•
Creates Standard and RAID 0 volumes
Support for volume sizes up to 8 exabytes
Support for multiple Windows and Mac file
system formats
Creates multiple volumes simultaneously
Supports SCSI, SAS, Fibre Channel, FireWire
and ATA storage protocols
Includes the ATTO Benchmark utility (Mac OS X
only)
Wizard-style interface for easy setup
Optimized for ATTO ExpressPCI, SAS and
Celerity host adapters
Striping interleave sizes of 4KB to 4MB allow
application tuning
Support for sector sizes greater than 512 Bytes
Retrieves drive information
Provides a visual representation of volumes,
partition maps and system logs
Supports hot swap of drives attached to ATTO
Celerity, ATTO ExpressPCI FC, ATTO
ExpressPCI SCSI Ultra3 and ATTO ExpressPCI
SCSI Ultra 320 adapters
•
Windows XP, 2003, 2008, Vista & 7 (x64, x86) or
Mac OS X (10.4.x or newer).
Attached storage and cables. For SCSI, SAS
and Fibre Channel storage, we recommend an
ATTO ExpressPCI SCSI, ExpressSAS
SAS/SATA, ExpressPCI FC or Celerity FC Host
adapter.
Minimum one hard drive for volume creation; two
hard drives for RAID compatibility in addition to
the root drive.
1
ATTO Technology Inc. ATTO Express Power Center Installation and Operation Manual
2.0 RAID Level 0 Overview
Originally Redundant Array of Inexpensive Disks, now Redundant Array of Independent Drives, RAID is a storage
system using multiple disk drives. ATTO Express Power Center Utility creates a virtual disk using two or more
physical drives to increase capacity and performance.
Large amounts of data can be supported over many
smaller drives when the drives are combined into one
large “virtual” drive. Management is easier because,
instead of several drives to consider when deploying
data as in a JBOD (Just a Bunch of Disks)
configuration, the system only has one address or
LUN on a storage bus or network.
RAID overlaps disk seeks, minimizing aggregate seek
time delays for the storage group as a whole. Data is
written in equal, short operations to each member of
the RAID group in turn so that when the first member
of a group begins writing to disk, the second member
is available to take data. This continues until the last
member of a group is writing to disk, and the first
member of a group is ready for data.
RAID Level 0 is commonly used when performance is
more important than data protection. RAID Level 0, or
striping, achieves higher I/O performance by breaking
data into smaller units (volumes), then writing the data
to separate physical drives. These striped volumes
can then be read from the separate, physical drives,
and re-assembled into the actual data. You must have
at least two physical drives to create a striped volume.
ATTO recommendations
•
•
•
•
Although RAID Level 0 volumes can be created
among different types and models of drives, use
similar types/models to ensure access time will
be equal to the average access time of a single
drive rather than the access time of the slowest
drive.
For maximum performance, use a multi channel
host adapter with drives equally distributed
across busses.
Use RAID 0 in environments that demand high
I/O rates such as video production and editing,
image editing and prepress.
Since RAID 0 does not provide fault tolerance,
establish a backup policy to protect data stored
on RAID 0 volumes.
2
ATTO Technology Inc. ATTO Express Power Center Installation and Operation Manual
3.0 Using ATTO Express Power Center
The ATTO Express Power Center offers blazing fast RAID performance for Windows® and Mac OS X based
applications.
ATTO Express Power Center is a disk storage RAID
software application that supplies you with the power
to maximize attached storage when using ATTO
ExpressPCI SCSI, Celerity Fibre Channel and
ExpressSAS host and ExpressSAS RAID adapters.
Vital for audio/video and digital content creation, largescale database and other high-performance
applications, the ATTO Express Power Center
incorporates the exclusive Advanced Data Streaming
(ADS™) technology to transfer data reliably and
quickly in Windows and Mac environments.
Included with your Express Power Center software
application is the Express Power Center setup utility
which allows quick and easy installation to create
RAID Level 0 stripe groups.
Express Power Center for Windows
Installation
1
2
3
4
Install an ATTO Celerity Fibre Channel,
ExpressSAS or ExpressPCI UL4 or UL5 host
adapter following the guidelines in the host
adapter Installation and Operation manual
supplied with your adapter.
Install the latest driver, corresponding to the
ATTO host adapter in use, available from the
ATTO website, www.attotech.com.
Insert the Express Power Center CD into the
host computer.
If the installation CD does not load immediately,
a. Click on the Start button.
b. Click on Run.
c. Find the Installation CD on your system
d. Click on autorun.bat.
When the Installation CD screen appears (see
Exhibit 3-1), click on the operating system
platform for your setup:
• Windows X86 32 bit systems
• Windows X64 64-bit systems
• Windows IA64 Itanium systems
5 When the driver setup program window
appears, select Install to install the Power
Center drivers.
6 Remove the installation CD.
7 Reboot the host computer.
8
After the reboot is complete, the
Express Power Center Utility icon
is on your desktop. Click on the
icon to enter the Power Center and
continue with the instructions
Creating RAID 0 Volumes on
page 7.
Removal
1
2
Insert the Express Power Center CD into the
host computer.
If the installation CD does not load immediately,
a. Click on the Start button.
b. Click on Run.
c. Find the Installation CD on your system.
d. Click on autorun.bat.
When the Installation CD screen appears, click
on the operating system platform for your setup:
• Windows X86 32 bit systems
• Windows X64 64-bit systems
• Windows IA64 Itanium systems
3 When the driver setup program window
appears, select Remove to remove the Power
Center drivers.
Note
You may remove the drivers using the
setup.exe application in the Express Power
Center application folder.
3
ATTO Technology Inc. ATTO Express Power Center Installation and Operation Manual
4
In the Power Center screen, select Remove to
remove the Power Center application.
Note
You may remove the Express Power Center
using the Add/Remove Programs in the
control panel after you have removed the
Power Center drivers.
5
6
Remove the installation CD.
Reboot the host computer.
Express Power Center for Mac OS X
Installation
1
2
3
4
5
Begin with either 1a or 1b, depending on how
you received your Express Power Center
software:
a. If you purchased Express Power
Center for Mac OS X online and
downloaded the files from the ATTO
website, double-click the compressed
file *.tgz and extract the contents to
your desktop. The application installer
*.app displays. Proceed to step 2.
b. If you are installing Express Power
Center for Mac OS X from a CD, locate
the application auto-installer (*.app) on
the CD.
Double-click the auto-installer *.app.
Follow the on-screen prompts.
When prompted, reboot your computer to
complete the installation.
Register your software online by following “Web
software authorization” instructions on this
page.
Note
The RAID driver is activated upon reboot.
Web software authorization
To start Express Power Center for Mac OS X the first
time, or when upgrading from earlier versions, you
need the authorization code that was sent to you via
Email. Please contact ATTO Technology Tech Support
if you have not received this code.
The authorization code is generated from the ATTO
Technology website.
1 On the Internet, go to software registration
www.attotech.com/license.html
2 Select Express Power Center for Mac OS X
and the current version number.
3 Type in your Email address, company name,
and serial number (found on the Express Power
Center CD case).
Note
Your authorization code is sent to you via
Email message.
4
Enter the authorization code when prompted to
do so.
Quick Start
If you are already familiar with partitions, volumes and
RAID 0 configurations, Express Power Center gives
you easy access to information and configuration
parameters.
Note
Close all other applications before using
Express Power Center.
•
•
•
Click on the Create button to create a new
Standard or RAID 0 volume.
Click on the Delete button to delete a currently
mounted Standard or RAID 0 volume.
Click on the Utilities button, then the
Benchmark or Sys Info buttons for detailed
information about your storage.
4
•
•
Click on the Quit button at the bottom of the
screen to exit the application.
Settings in the application are not persistent. If
you make changes on one screen and then
make changes on a previous screen (using the
back button), the original screen is reset to the
default settings.
Removal
1
2
3
Navigate to the "/Applications/Express Power
Center/UninstallerData" directory using Finder.
Double-click on the "Uninstall Express Power
Center" application bundle.
The uninstaller will run and uninstall all
previously installed components from the
system.
Error messages
The following generic error messages may be
displayed during any operation. Error messages for
specific operations may be found in those chapters.
Error: Could not unmount volumes.
Your system has not been changed.
The system did not unmount the volumes in time. You
can drag the drives to the trash, and then try again. If
the system can’t unmount the drives because another
program has them locked, an error message displays
when you try to drag to the trash.
FileNotFoundException: /dev/[diskname]
(device busy).
IOException: /dev/[diskname] (device busy)
IOException: /dev/[diskname] (not supported)
IOException: /dev/[diskname] (I/O Error)
Every operation needs to open the disk, and read from
it or write to it. Sometimes the system prevents this
process, such as when a volume is still mounted, and
Express Power Center displays a
FileNotFoundException message.
IOException messages are usually read or write
failures. If the device is unmounted (the device is not
listed when the user types df in the terminal), then
another program may have a lock on the disk. Quit the
other programs, and/or reboot. Depending upon which
operation failed, and in what part of the process, the
disks may or may not have been changed.
NullPointerException
This may be caused by low memory.
5
ATTO Technology Inc. ATTO Express Power Center Installation and Operation Manual
Exhibit 3-1
The Express Power Center Installation CD welcome screen.
6
4.0 Creating RAID 0 Volumes
ATTO Express Power Center allows you to create RAID Level 0 volumes.
RAID Level 0, or striping, achieves higher I/O
performance by breaking data into smaller units, then
writing the data to separate physical drives. These
striped volumes can then be read from the separate,
physical drives, and re-assembled into the actual data.
You must have at least two physical drives to create a
striped volume. You should strictly follow a backup
policy to protect data stored on RAID 0 volumes.e
Creating RAID 0 Volumes in Windows
1
Click on the Express Power Center Utility
icon on your desktop. The Express Power
Center Utility window appears. See Exhibit 4-1.
Note
A rectangle with a broken border indicates the
Stripe Groups panel is active: selected
commands will affect stripe groups.
2
3
4
You may choose one of three ways to create a
stripe group:
• Press the INS key.
• Select the Edit menu item and then select
Insert.
• Click on the Insert icon on the toolbar.
The New Stripe Group name dialog box
appears (see Exhibit 4-2). Enter the name for
the stripe group.
Click OK.
The Stripe Groups panel displays the stripe
group name.
Note
A rectangle with a broken border indicates the
Members panel is active: selected commands
will affect stripe group members.
Add drives to the named stripe group in one of
these ways:
• Press the INS key.
• Select the Edit menu item and then select
Insert.
5
6
7
8
• Click on the Insert icon on the toolbar.
The Add Drives to Stripe Group selection box
displays (see Exhibit 4-2). The box lists all
drives available for the new stripe group.
Highlight the drives you wish to add to the
group in one of two ways:
• Click on the drive with the mouse pointer.
• Use the up arrow or down arrow.
Click the OK button when the desired drive is
highlighted. Click on the Cancel button if you
do not want to add a drive.
The Members panel displays the selected
drive. Continue to add drives as in Step 4.
When all the drives have been added to the
stripe group, the Express Power Center Utility
window appears.
The default interleave is 64KB. If you want to
change this value, select the value from the
Stripe Interleave drop down box.
Save the stripe group using one of these three
methods:
• Press the CTRL and S keys.
• Select the File menu item and then select
Save.
• Click on the Save icon on the toolbar.
An information box displays Updated Stripe
Groups saved successfully when the
process is complete (see Exhibit 4-2).
The Stripe Groups panel becomes the active
panel in the Express Power Center Utility
screen.
7
ATTO Technology Inc. ATTO Express Power Center Installation and Operation Manual
Exhibit 4-1
The Express Power Center Utility screen.
Delete icon Insert icon
Repair icon: if enabled, contact ATTO Tech Support
Save icon
Stripe Group to which
you will be adding/
deleting members
Stripe Group Member
Stripe Interleave
Exhibit 4-2
Current status
Dialog boxes walk you through the setup process.
8
Creating RAID 0 Volumes in Mac OS X
You must have at least two physical drives to create a
RAID 0 striped volume.
Note
Click on the Back button at any time to go
back one screen without making any changes
on the current screen
Create a single RAID Volume
1
From the Create screen, click on the RAID 0
button.
Note
All selected drives must have the same sector
size. Drive sector size must be a factor of a
supported interleave.
3
Click the Next button to continue the setup
process and set volume parameters, such as
size and number of volumes to be created, or
click the Finish button to skip the setup process
and create a new RAID 0 volume using
common default parameters.
Note
Only valid options are shown. Interleave must
be a product of sector size.
2
Using the mouse, highlight the drives where
you want the volume to be created.
9
ATTO Technology Inc. ATTO Express Power Center Installation and Operation Manual
Create several RAID volumes
1
2
Verify that the Drive name matches the drive on
which to create the new volumes.
Use the Free space slider bar to choose the
portion of the available free space that the new
volumes occupies.
Note
You may use the keyboard to enter the portion
of free space, i.e. xx MB, xx GB.
3
5
Using the Number of volumes pull-down list,
select the number of RAID 0 volumes you wish
to create from the selected free space portion.
Note
The number of volumes that can be created
depends on the disk free size and the space
remaining in the disk’s partition map.
4
4
Click on the Next button to configure the
volumes.
Note
The graphical representation of the drive at the
left of the screen displays how much volume
space has been allocated and how much free
space remains.
6
7
8
Specify properties
For each RAID 0 volume being created, you may
specify properties such as format type, name,
interleave and volume size. Also available in Express
Power Center v2.0, or later, is one click optimization.
This feature automatically detects and sets common
properties based on the applications that you specify.
1
2
3
Use the Select Volume list box to view the
requested properties for a specific volume
being created. The properties for that volume
can then be modified.
Use the Format list box to select the format of
the volume.
In the Name text field, enter a name for the
volume.
If you are using Express Power Center v2.0, or
later, select the appropriate application in the
Application list box to automatically configure
the RAID 0 volume properties for optimal
performance. Use the Interleave list box only if
you are using Express Power Center version
older than v2.0, or if your application vendor
has recommended an interleave size different
than that displayed.
Use the Size slider bar to adjust the size of the
volume, if necessary.
9
Repeat the process for additional volumes.
Click on the Finish button.
Verify parameters before ATTO Express Power
Center for Mac OS X tries to create any
volumes. Click on the Back button to return to
the Create RAID 0 Volumes number of
volumes selection screen without making any
changes to your system.
Click on the OK button to accept your settings
and create a RAID 0 volume.
Successful completion
When the process you have chosen is
finished, a screen displays which
operations were completed or if
requested operations were not
completed.
Your desktop shows the ATTO RAID 0
volumes you have created.
Click Quit to end the program and use your new RAID
Level 0 volume or click Continue to create more
volumes.
Express Power Center RAID 0 groups are represented
on the desktop as an ATTO drive array and clipboard
labelled Express Power Center.
Possible error messages
[VolumeName]: Partitions were not created.
Each partition is tagged with this message before it
has been manipulated. Look for the partition in the
Express Power Center Utilities/Sys Info partition
map section. If a partition exists, use the Initialize
function to erase the disk.
10
Partition map is full.
[VolumeName] created.
You can create no more than 30 partitions per disk The
system has not been changed.
This is the success message; everything worked as
expected.
[VolumeName]: Partitions were not registered.
[VolumeName]: BSD name does not exist.
The partitions have been saved, but not yet registered.
You can manually register them by running
ATTORAIDStamp, and then newfs.
If IOKit does not make the volume devices after the
new partition map has been saved, there is nothing to
format. Reboot and either newfs the proper volume
device or initialize the entire drive.
[VolumeName]: Could not register partitions.
ATTORAIDStamp has failed. Initialize the drives and
try again.
[VolumeName] - is not alive!
[VolumeName]: Partitions registered.
Group Code: ATTO_XXXXXXXX
Message the volume is tagged with after running the
ATTORAIDStamp. Run newfs to make the volume
usable.
The object could not be found in the registry. Either the
driver is not loaded or IOKit is unusable. Check to see
if the driver is loaded.
[VolumeName] was not formatted.
•
Each volume is tagged with this message after the
partition map has been saved. The volume is not
mounted and takes up space. You may mount the
volume if you use newfs to lay down the proper format
on the proper disk.
kextstat | grep -i ATTORAID
[VolumeName] – could not format.
May be generated by a RAID Stamp exec( ) failure or
during a format or Partition Map Save operation.
The program can’t lay down the format on this volume.
Other volumes may be formatted.
The driver did not load. Reboot the system.
In Mac OS X 10.2.x or later, use the command
If the driver ATTORAID_OS10.kext is in
/System/Library/Extensions, rebooting reloads it.
IOException.
11
ATTO Technology Inc. ATTO Express Power Center Installation and Operation Manual
5.0 Deleting RAID 0 Volumes
The ATTO Express Power Center software allows you to delete RAID Level 0 volumes.
Deleting RAID 0 Volumes in Windows
Note
A stripe group cannot be deleted if the stripe
group contains active partitions. You must
remove active partitions using the Disk
Management Utility before deleting groups.
1
2
3
4
Click on the Express Power Center Utility
icon on your desktop.
The Express Power Center Utility window
appears. See Exhibit 5-1.
Open the program.
The Express Power Center Utility window
appears. The Stripe Groups panel is active.
Select the stripe group you wish to delete in one
of two ways:
• Click on the drive by clicking with the mouse
pointer.
• Use the up arrow or down arrow.
Delete the stripe group in one of these ways:
• Press the Delete key.
• Select the Edit menu item and then select
Delete.
• Click on the Delete icon on the toolbar.
5
The Express Power Center Utility refreshes and
the selected stripe group name is removed from
the Stripe Groups panel which displays the
remaining stripe groups. The Members panel
will list the drives in the highlighted stripe group.
To permanently delete the stripe group, use
one of these three methods:
• Press the CTRL and S keys.
• Select the File menu item and then select
Save.
• Click on the Save icon on the toolbar.
An information box displays Updated Stripe
Groups saved successfully when the
process is complete.
12
ATTO Technology Inc. ATTO Express Power Center Installation and Operation Manual
Exhibit 5-1
The Express Power Center Utility screen.
Delete icon Insert icon
Repair icon: if enabled, contact ATTO Tech Support
Save icon
Stripe Group to which
you will be adding/
deleting members
Stripe Group Member
Stripe Interleave
Current status
Deleting RAID 0 Volumes in Mac OS X
Deleting a volume from a drive frees up available
space on your system. This free space can be made
into one or more new volumes.
2
Use the mouse to highlight the volume to
delete.
Note
All data on a deleted volume is permanently
erased, and all associated partitions are
deleted as well.
1
Click on the Delete button
13
3
4
Note
You may only delete one volume at a time.
UninitializedPartitionMapException: A fatal error
occurred while trying to erase a partition on the
drive [VolumeName].
Click on the Next button.
Verify parameters before ATTO Express Power
Center for Mac OS X tries to delete any
volumes.
You tried to delete a DOS volume or a volume on a
disk without an Apple partition map structure. Do not
try to delete DOS or other operating systems’ volumes
with Express Power Center for Mac OSX. The system
is unchanged.
Note
Click on the Back button to return to the
Delete screen without making any changes to
your system.
5
Click the OK button if the parameters in the task
list are acceptable.
6 ATTO Express Power Center for Mac OS X
deletes the volume.
7 Click Quit to end the program or Continue to
delete or create volumes
Refer to Exhibit 5.1-1 to see the effect of deleting a
volume.
Possible error messages
Volume [VolumeName] was not deleted.
Each volume is tagged with this message before
manipulation. If you attempt to delete a volume and
this message appears, try the process again.
Volume [VolumeName] was cleared, but not
deleted.
Each volume is tagged with this message after the file
system has been wiped but before the partition map
has been saved. Volumes in this state are not
mounted but take up space on the disk.
SystemCallException: Can’t find volume
[VolumeName].
The system didn’t return the mount point. The
filesystem has been destroyed and is unmountable.
Reboot. Newfs the volume device or initialize the disk.
SystemCallException: ATTORAIDStamp...
returned exit code X.
The tool that unregisters RAID partitions returned an
error when you deleted a RAID Volume.
Volume [VolumeName] was deleted.
A success message; everything worked as expected.
FileNotFoundException or IOException.
8
Indicates the load of the old partition map or the
save of the updated partition map failed. Wiping
the filesystem may have also failed. Close the
program with the lock on the disk, and/or reboot
before trying again.
14
ATTO Technology Inc. ATTO Express Power Center Installation and Operation Manual
Exhibit 5.1-1 The effect of deleting a volume.The top figure in Exhibit 5.1-1 represents a storage
configuration with LP1, LP2 and LP3 as striped volume 1. The diagram below shows the effect of deleting
striped volume 1.
15
6.0 Additional Capabilities for Mac OS X
ATTO Express Power Center for Mac OS X offers some additional functionality such as Creating Standard
Volumes and Benchmarking.
Creating a Standard Volume
Express Power Center for Mac OS X allows you to create Standard Volumes to store data on a single partition on
a single physical drive.
A Standard Volume stores data on a single partition on
a single physical drive.
The Express Power Center application creates one or
more partitions with one or more Standard Volumes on
a physical drive at the same time. The partition(s) can
use the entire drive or may leave free space for use
later.
Standard Volumes are convenient to create and use
but are limited by the speed and size of the drive on
which they are located.
Note
Standard Volumes do not offer any data
recovery mechanism to restore lost data.
The Express Power Center application can create one
or more partitions with Standard Volumes on a
physical drive. The partition(s) and volume(s) are
created at the same time. The partition(s) can use the
entire drive or they can leave free space that can be
used later.
Note
Click on the Back button at any time to go
back one screen without making any changes
on the current screen.
Example of data storage technology
Each cylinder represents a separate physical drive.
• Each physical drive has been divided into
partitions, labelled logical partition (LP)
• Physical Drive 4 has been initialized and is
empty with no partitions or data. It may be used
to create a Standard or striped volume.
• LP7 and LP11 are free partitions that can be
used to create Standard or striped volumes.
• Data has been striped (RAID Level 0) across
physical drives 1, 2 and 3, using partitions LP1,
LP 2 and LP3, named Volume 1. LP4, LP5 and
LP6 are stripe data across three separate
physical drives into Volume 2.
• LP8 is a Standard Volume using one partition.
• LP9, LP 10, LP12, LP 13 and LP14 are Standard
Volumes.
Note
If you create a striped volume across multiple
physical drives and the partitions are not the
same size, only the portion of each partition
equal to the size of the smallest partition is
used, leaving unused space on the larger
partitions of the volume.
16
ATTO Technology Inc. ATTO Express Power Center Installation and Operation Manual
Create a single Standard Volume
From the Create screen, click on the Standard
button.
9
Using the mouse, highlight the drive where you
want the volume created.
10 Click the Next button to continue the setup
process and set volume parameters, such as
size and number of volumes to be created, or
click the Finish button to skip the setup process
and create a new Standard Volume using
common default parameters. The volume uses
all the free space on the selected drive.
Note
The number of volumes that can be created
depends on the disk size and the free space
remaining in the disk’s partition map.
Create several Standard Volumes
ATTO Express Power Center for Mac OS X can
simultaneously set up several Standard Volumes on a
drive.
1 Verify that the Drive name matches the drive
on which to create the new volume(s).
2 Use the Free space slider bar to choose the
portion of the available free space that the new
volume(s) occupies.
Note
You may use the keyboard to enter the portion
of free space, i.e. xx MB, xx GB.
3
4
Using the Number of volumes pull-down list,
select the number of Standard Volumes you
wish to create from the selected free space.
Click on the Next button to configure the
volumes.
17
Specify properties
For each Standard Volume created, you may specify
properties such as format type, name and size.
1
2
3
4
Use the Select Volume list box to view the
requested properties for a specific volume
being created. The properties for that volume
can then be modified.
Use the Format list box to select the format for
the volume.
In the Name text field, enter a name for the
volume.
Use the Size slider bar to adjust the size of the
volume, if necessary.
Note
The graphical representation of the drive at the
left of the screen helps you determine how
much volume space has been allocated and
how much free space remains.
5
6
7
Repeat this process for additional volumes.
Click on the Finish button.
Verify parameters before ATTO Express Power
Center for Mac OS X tries to create any
volumes. Click on the Back button to return to
the Create Standard Volumes number of
volumes selection screen without making any
changes to your system.
8
Click on the OK button to accept your settings
and create a Standard Volume.
Successful completion
When the process you have chosen is finished, a
screen informs you which operations were completed
or if requested operations were not completed.
Your desktop now shows the volumes you have
created.
You may click Quit to end the program and use your
new Standard Volume or click Continue to create
more volumes.
An Express Power Center volume is
represented on the desktop as an
ATTO drive array and clipboard
labelled either Fibre Channel, SAS or
SCSI, denoting the type of attached
drives.
Deleting Standard Volume(s)
Deleting a Standard Volume in
Express Power Center for Mac OS X
can be accomplished in the same
manner as deleting a RAID 0 Volume.
Please refer to Deleting RAID 0
Volumes in Mac OS X on page 13 of this manual.
18
ATTO Technology Inc. ATTO Express Power Center Installation and Operation Manual
Possible error messages
[VolumeName] – could not format.
[VolumeName]: Partition was not created.
The program can’t lay down the format on this volume.
Other volumes may be formatted.
Each partition is tagged with this message before it
has been manipulated. Reboot and try creating a
volume again.
[Partition map is full.
You can create no more than 30 partitions per disk.
The system has not been changed.
[VolumeName] was not formatted.
Each volume is tagged with this message after the
partition map has been saved. The volume cannot be
mounted but takes up space. You may mount the
volume if you use newfs to lay down the proper format
on the corresponding volume device.
[VolumeName] created.
This is the success message; everything worked as
expected.
[VolumeName]: BSD name does not exist.
If IOKit does not make the volume devices after the
new partition map has been saved, there is nothing to
format. Reboot and either newfs the proper volume
device or initialize the entire drive.
FileNotFoundException or IOException.
Indicates that the partition map could not be saved
which could occur after a partition map has been
saved. No changes are made.
System Information Utilities
ATTO Express Power Center includes utilities to monitor system information and to benchmark drives, measuring
peak and average throughput for disk reads.
Note
The following section pertains to the System
Information Utilities in Mac OS X only.
Click on the Utilities button from the main screen to
access benchmark and system information utilities.
Benchmarking a Volume
Express Power Center reports and graphs the read
transfer rates on the drives being tested.
These benchmarks are non-destructive: they do not
harm the data on volumes in any way.
1 Select Benchmark from the Utilities menu.
2
3
4
5
Highlight a volume in the volume window.
Modify test parameters.
Click Start.
Benchmark results are displayed in an autoscaling, easy-to-read graph.
Additional mounted volumes may be tested by
selecting them from the volume menu of the
benchmark utility.
19
Test parameters
Your benchmark results may be tuned using the
following parameters.
Max. Transfer Size
Choices: 32 KB, 128 KB, 512 KB, 2 MB, 8 MB
Default: 32 KB
The Express Power Center Benchmark performs disk
reads of varying sizes on the volume tested. The Max.
Transfer Size option determines the size of the transfers.
To test a drive for applications which transfer smaller
blocks of data, select a smaller value, such as 32
Kilobytes. To test a drive for applications which
transfer larger blocks of data, select a larger transfer
size.
transfer rate across all transfer sites tested. The
Benchmark also reports the peak and minimum values
of the read transfer rate test performed.
Average read value, shown as a flat line on the
graph, indicates the true performance of the drive.
Peak value is also commonly referred to as the burst
transfer rate.
To get a printout of your results, use the open Appleshift3 function.
System information
Express Power Center reports different types of drive
information based on your system and its
configuration.
To return to the Utilities Screen, click on the Back
button.
Disk Info provides general information about a disk
retrieved from the system.
Partition Map is a visual layout of the partitions on
the drive you select.
Management Data shows RAID configuration
information
System Log reports recent ATTO activity for the last
10K of the system log.
Sample Size
Choices: 8, 16, 32, 48, 64, 80 MB
Default: 48 MB
Adjusting the sample size changes the number of times
each transfer is done during the benchmark test. The
transfers are then averaged for the final result. A larger
sample size provides more accurate results, but causes
the benchmark test to take longer.
Reading Benchmark results
Once the benchmark tests are completed, Express
Power Center graphically displays the average read
20
ATTO Technology Inc. ATTO Express Power Center Installation and Operation Manual
Glossary
Some common terms used in the storage industry are defined below. More information about Fibre
Channel, SCSI, SAS and Storage Area Networks is available through the ATTO Technology website,
www.attotech.com, the Fibre Channel Industry Association, www.fibrechannel.org, the SCSI Trade
Association, www.scsita.org, and the Storage Area Networking Industry Association, www.snia.org.
Term
address
ANSI
asynchronous
block
case sensitive
CRC
FC
firmware
full duplex
half duplex
hierarchical file
system
host
initiator device
JBOD
journaling
LUN
Mac OS X Extended
Mac OS X Extended
(Journaled)
Mac OS X Extended
(case sensitive)
Mac OS X Extended
(case sensitive,
journaled)
originator
partition
Definition
a specific location in memory
American National Standards Institute
a way of sending data over a bus in which an initiator sending data does not wait
for an acknowledgement (ACK) that the data has been received before sending
more data. Refer to “synchronous”.
a sector of a disk which stores a group of bytes that must be read or written
together.
a file system distinguishes between names which are the same but uses a different
case for some or all of the letters.
Cyclic Redundancy Check: an error-correcting code which calculates a numeric
value for received and transmitted data. If no error has occurred during
transmission, the CRC for both received and transmitted data should be the same.
Fibre Channel
software stored in read-only memory (ROM) or programmable ROM (PROM).
Firmware is often responsible for a system’s behavior when it is first switched on.
a communication protocol which allows transmission in both directions at the same
time
a communication protocol which allows transmission in both directions, but only
one direction at a time
a file system commonly used on older Macintosh computers.
a processor, usually a CPU and memory, which communicates with devices over
an interface
a component which originates a command
Just a Bunch Of Disks: a storage subsystem using multiple independent disk
drives with or without RAID configuration.
feature which protects a file system’s integrity against power outages and other
disruptive events. It does not protect the user data buffer at the time of failure.
Logical Unit Number: a SCSI or Fibre Channel identifier of a device
a hierarchical file system (HFS+) which supports longer file names and volumes
than in older file systems.
an HFS+ file system with journaling capability
an HFS+ file system with case sensitive capability
an HFS+ file system with case sensitive and journaling capabilities
an initiating device; a component which originates a command
a logically separate portion of a disk used to allow multiple systems to coexist on a
single disk drive.
i
ATTO Technology Inc. ATTO Express Power Center Installation and Operation Manual
Term
PCI
RAID
RAID Volume
receiver
SCSI
SAS
Stripe Group
synchronous
Standard Volume
target
topology
transfer rate
volume
Definition
Peripheral Component Interconnect: a bus which allows devices to communicate
with the CPU.
Originally Redundant Array of Inexpensive Disks, now Redundant Array of
Independent Drives: a storage system spanning multiple disk drives.
RAID Level 0: disk striping in which fixed-length sequences of data are mapped to
member disks in a regular rotating pattern. Refer to “RAID Volume”.
a volume created from two or more partitions which all reside on different drives.
the ultimate destination of data transmission; a terminal device
Small Computer Systems Interface: a processor-independent Standard for systemlevel interface between a computer and intelligent devices including hard disks,
floppy disks, CD-ROM, printers, scanners, etc.
Serial Attached SCSI
Two or more standard RAID 0 volumes.
a method of sending data over a bus in which an initiator sends data then waits for
an acknowledgement (ACK) that the data has been received. Both the initiator and
receiver must support synchronous mode. Refer to “asynchronous”.
a volume created from a single partition which resides on a single drive.
a device which responds to commands by an initiator
logical layout of the parts of a computer system or network and their
interconnections
the rate at which bytes or bits are transferred, as in megabytes or gigabits per
second.
a usable quantity of storage managed by a file system composed of one or more
partitions. The volume is formatted with the file system which manages the blocks
within the volume. Refer to “Standard Volume”.
ii