1
Installation Instructions
Model: K-Series
DISPLAY INSTALLATION
5. Using Phillips screwdriver, install two remaining
screws (20) through the lower mounting holes in
Centris bracket into the display.
SINGLE DISPLAY AND KCY-210/-220
NOTE: If you are installing DUAL / TRIPLE displays
(Except KCY-210/-220), then proceed to page 9.
The mounting holes on the back of your display will either
be flush with the back surface, or recessed into the back
surface. Refer to the applicable installation procedure.
FLUSH MOUNTING HOLES
1. Verify that you have the following parts:
6. Tighten all four screws (20). Do not overtighten!
7. KCY-210/-220 Only: Repeat Steps 1-6 for second
display.
8. Proceed to "CABLE MANAGEMENT."
RECESSED MOUNTING HOLES
1. Verify that you have the following parts:
Item
Description
Qty
10
MOUNT, K-Series
1
Item
Description
Qty
4
10
MOUNT, K-Series
1
20
SCREW, Phillips Pan Machine, M4 x 12mm
CAUTION: Using screws of improper size may
damage your display! Proper screws will easily and
completely thread into display mounting holes.
CAUTION: Inadequate thread engagement in display
may cause display to fall! Back out screws ONLY as
necessary to allow installation of Centris bracket!
2. Ensure Centris bracket is able to swivel and tilt easily,
yet still be tight enough to hold display in desired
position. Adjust as required before proceeding. See
"ADJUSTMENT" for detail.
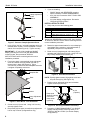
3. Using Phillips screwdriver, carefully install two screws
(20) into the upper mounting holes on the display.
Thread screws completely into display, then back out
3 complete turns.
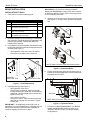
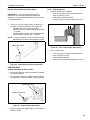
4. Pick up and align display so that screws (20) (installed
on the back of the display in the previous step) fit into
the mounting holes on the Centris bracket; rotate the
bracket as required (See Figure 11). Lower the
display firmly into place.
20
SCREW, Phillips Pan Machine, M4 x 20mm
4
30
SCREW, Phillips Pan Machine, M4 x 30mm
4
40
SPACER, Nylon, 3/8" long
4
50
SPACER, Nylon, 3/4" long
4
2. Ensure Centris bracket is able to swivel and tilt easily,
yet still be tight enough to hold display in desired
position. Adjust as required before proceeding. See
"ADJUSTMENT" for detail.
3. Carefully place display face down on protective
surface.
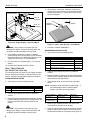
4. Determine depth of recessed mounting holes relative
to back surface of display (against which Centris head
will contact).
5. Select proper length spacer and screw from table
below:
NOTE: All spacers used should be the same length. If
the recess depths result in multiple spacer
lengths, then select the longer spacer.
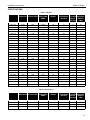
IF recess DEPTH is: THEN use spacer:
AND screw:
3/8" or less
40 (3/8" long)
20 (M4 x 20mm)
More than 3/8" up to
and including 3/4"
50 (3/4" long)
30 (M4 x 30mm)
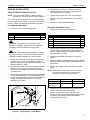
6. Place the four selected spacers over each of the
mount holes on the back of the display.
20
(2 places)
10
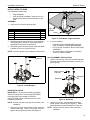
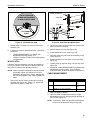
7. Pick up and orient the mount (10) so that the
mounting holes in the Centris bracket are aligned with
the holes in the spacers; rotate the bracket as
required (See Figure 12).
Centris Bracket
Figure 11: Single Display - Flush Mount
7