Transcript
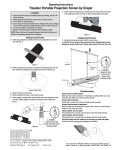
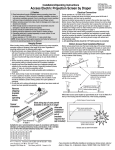
Operating Instructions
RoadWarrior Portable Projection Screen by Draper
Caution
① Read instructions through completely before proceeding, and save for
future reference.
② Nothing should be fastened to screen case or viewing surface.
③ Do not write on viewing surface.
④ This screen is for indoor use only.
⑤ Screen must rest on a flat surface. Do not use on slanted or uneven
floors.
⑥ Do not use solvents or abrasives for cleaning.
⑦ Beware of pinching hands and fingers.
NOTE: Screen has been thoroughly inspected and tested at factory and
found to be operating properly prior to shipment.
Caution: Avoid
“pinch points”
while lowering
screen.
Setting Up the Screen
➀ Rotate legs (attached to bottom) until they are perpendicular to screen
case (see Fig. 1).
Audience
Scissors
Lid
Figure 1
➁ Rotate carrying strap so it does not interfere with opening case. You can
also remove the carrying strap by sliding down then off (see Fig. 2).
Screen
case
+
+
+
Case snaps
Legs
+
Troubleshooting
Figure 2 (side view)
➂ Unsnap and open screen case.
➃ Grasp handle marked “Lift Here” (see Fig. 3), and slowly raise screen to
desired height. Keep screen dowel level while raising.
Screen will not fully extend:
Make sure the screen surface is not “catching” on anything. Make sure case
lid is fully open.
Screen will not close:
Check roller and scissors to make sure nothing is interfering with their
operation.
Screen tips forward or backward:
Make sure legs are perpendicular to screen case. If they are, screen may be
located on too severe an incline.
Snaps will not open:
Press gently down on screen case just above each snap while opening.
Figure 3
Snaps will not close:
Collapsing the Screen
➀ Generally reverse procedures used for screen setup.
®
Copyright © 2010 Draper Inc.
Form RoadWarrior_Inst10-R
Printed in U.S.A.
Press gently down on screen case just above each snap while closing.
Carrying strap will not rotate out of the way so case will open:
Loosen or remove carrying strap altogether (see below).