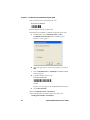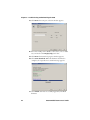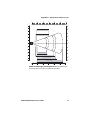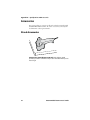
1
SR30
User’s
Guide
Handheld Scanner
Intermec Technologies Corporation
Worldwide Headquarters
6001 36th Ave.W.
Everett, WA 98203
U.S.A.
www.intermec.com
The information contained herein is provided solely for the purpose of allowing
customers to operate and service Intermec-manufactured equipment and is not to be
released, reproduced, or used for any other purpose without written permission of
Intermec Technolgies Corporation.
Information and specifications contained in this document are subject to change
without prior notice and do not represent a commitment on the part of Intermec
Technologies Corporation.
© 2007-2008 by Intermec Technologies Corporation. All rights reserved.
The word Intermec, the Intermec logo, Norand, ArciTech, Beverage Routebook,
CrossBar, dcBrowser, Duratherm, EasyADC, EasyCoder, EasySet, Fingerprint, INCA
(under license), i-gistics, Intellitag, Intellitag Gen2, JANUS, LabelShop, MobileLAN,
Picolink, Ready-to-Work, RoutePower, Sabre, ScanPlus, ShopScan, Smart Mobile
Computing, SmartSystems, TE 2000, Trakker Antares, and Vista Powered are either
trademarks or registered trademarks of Intermec Technologies Corporation.
There are U.S. and foreign patents as well as U.S. and foreign patents pending.
ii
SR30 Handheld Scanner User’s Guide
Document Change Record
This page records changes to this document. The document was
originally released as Revision 001.
Version
Number Date
002
9/2008
Description of Change
Revised to support the both the linear
and area versions of the SR30.
SR30 Handheld Scanner User’s Guide
iii
iv
SR30 Handheld Scanner User’s Guide
Contents
Contents
Before You Begin . . . . . . . . . . . . . . . . . . . . . . . . . . . . . . . . . . . . vii
Safety Information . . . . . . . . . . . . . . . . . . . . . . . . . . . . . vii
Global Services and Support . . . . . . . . . . . . . . . . . . . . vii
Warranty Information . . . . . . . . . . . . . . . . . . . . vii
Web Support . . . . . . . . . . . . . . . . . . . . . . . . . . . . .viii
Telephone Support . . . . . . . . . . . . . . . . . . . . . . . viii
Service Location Support. . . . . . . . . . . . . . . . . .viii
Who Should Read This Manual . . . . . . . . . . . . . . . . . . ix
Related Documents . . . . . . . . . . . . . . . . . . . . . . . . . . . . . ix
Patent Information . . . . . . . . . . . . . . . . . . . . . . . . . . . . . ix
1 Learning About the SR30
....................1
Introducing the SR30 Handheld Scanner. . . . . . . . . . . . . . . 2
Powering the SR30 . . . . . . . . . . . . . . . . . . . . . . . . . . . . . . . . . . . 2
Understanding the Status Light . . . . . . . . . . . . . . . . . . . . . . . 3
Understanding the Beeps . . . . . . . . . . . . . . . . . . . . . . . . . . . . . 3
Scanning Bar Codes . . . . . . . . . . . . . . . . . . . . . . . . . . . . . . . . . . 4
2 Connecting and Configuring the SR30
....7
Connecting Your SR30 to a Host Device. . . . . . . . . . . . . . . . 8
Removing a Cable . . . . . . . . . . . . . . . . . . . . . . . . . . . . . . 11
Configuring Your SR30 Parameters . . . . . . . . . . . . . . . . . . . 11
International Keyboard Bar Codes. . . . . . . . . . . . . . . 12
Serial Parameter Bar Codes . . . . . . . . . . . . . . . . . . . . . 14
Troubleshooting and Maintaining the
3 SR30
. . . . . . . . . . . . . . . . . . . . . . . . . . . . . . . . . . . . . . . . . . 17
Troubleshooting the SR30 . . . . . . . . . . . . . . . . . . . . . . . . . . . 18
Calling Product Support . . . . . . . . . . . . . . . . . . . . . . . 18
Problems and Possible Solutions . . . . . . . . . . . . . . . . 19
SR30 Handheld Scanner User’s Guide
v
Contents
Resetting the SR30 . . . . . . . . . . . . . . . . . . . . . . . . . . . . . 20
Maintaining the SR30 . . . . . . . . . . . . . . . . . . . . . . . . . . . . . . . 21
Upgrading the SR30. . . . . . . . . . . . . . . . . . . . . . . . . . . . 21
Cleaning the SR30 . . . . . . . . . . . . . . . . . . . . . . . . . . . . . 25
A Specifications and Accessories
. . . . . . . . . . . 27
Specifications . . . . . . . . . . . . . . . . . . . . . . . . . . . . . . . . . . . . . . . 28
Linear Imager Specifications for EV12 . . . . . . 29
Imager Specifications for EA15 . . . . . . . . . . . . 30
Accessories. . . . . . . . . . . . . . . . . . . . . . . . . . . . . . . . . . . . . . . . . . 32
Stand Accessories . . . . . . . . . . . . . . . . . . . . . . . . . . . . . . 32
Cable Accessories . . . . . . . . . . . . . . . . . . . . . . . . . . . . . . 34
B Default Settings
. . . . . . . . . . . . . . . . . . . . . . . . . . . . 37
Default Configuration . . . . . . . . . . . . . . . . . . . . . . . . . . . . . . . 38
vi
SR30 Handheld Scanner User’s Guide
Before You Begin
Before You Begin
This section provides you with safety information, technical
support information, and sources for additional product
information.
Safety Information
Your safety is extremely important. Read and follow all warnings
and cautions in this document before handling and operating
Intermec equipment. You can be seriously injured, and
equipment and data can be damaged if you do not follow the
safety warnings and cautions.
This section explains how to identify and understand warnings,
cautions, and notes that are in this document.
A warning alerts you of an operating procedure,
practice, condition, or statement that must be
strictly observed to avoid death or serious injury
to the persons working on the equipment.
A caution alerts you to an operating procedure,
practice, condition, or statement that must be
strictly observed to prevent equipment damage or
destruction, or corruption or loss of data.
Note: Notes either provide extra information about a
topic or contain special instructions for handling a
particular condition or set of circumstances.
Global Services and Support
Warranty Information
To understand the warranty for your Intermec product, visit the
Intermec web site at www.intermec.com and click Support >
Returns and Repairs > Warranty.
SR30 Handheld Scanner User’s Guide
vii
Before You Begin
Disclaimer of warranties: The sample code included in this
document is presented for reference only. The code does not
necessarily represent complete, tested programs. The code is
provided “as is with all faults.” All warranties are expressly
disclaimed, including the implied warranties of merchantability
and fitness for a particular purpose.
Web Support
Visit the Intermec web site at www.intermec.com to download
our current manuals (in PDF). To order printed versions of the
Intermec manuals, contact your local Intermec representative or
distributor.
Visit the Intermec technical knowledge base (Knowledge Central)
at www.intermec.com and click Support > Knowledge Central
to review technical information or to request technical support
for your Intermec product.
Telephone Support
In the U.S.A. and Canada, call 1-800-755-5505.
Outside the U.S.A. and Canada, contact your local Intermec
representative. To search for your local representative, from the
Intermec web site, click About Us > Contact.
Service Location Support
For the most current listing of service locations, click Support >
Returns and Repairs > Repair Locations.
For technical support in South Korea, use the after service
locations listed below:
AWOO Systems
102-1304 SK Ventium
522 Dangjung-dong
Gunpo-si, Gyeonggi-do Korea, South 435-776
Contact: Mr. Sinbum Kang
Telephone: +82-31-436-1191
E-mail: [email protected]
IN Information System PTD LTD
6th Floor
Daegu Venture Center Bldg 95
Shinchun 3 Dong
Donggu, Daegu City, Korea
E-mail: [email protected] or [email protected]
viii
SR30 Handheld Scanner User’s Guide
Before You Begin
Who Should Read This Manual
This guide is for the person who is responsible for installing,
configuring, and maintaining the SR30 Handheld Scanner.
This guide provides you with information about the features of
the SR30, and how to install, configure, operate, maintain, and
troubleshoot it.
Related Documents
The Intermec web site at www.intermec.com contains our
documents (as PDF files) that you can download for free.
To download documents
1 Visit the Intermec web site at www.intermec.com.
2 Click Support > Manuals.
3 In the Select a Product field, choose the product whose
documentation you want to download.
To order printed versions of the Intermec manuals, contact your
local Intermec representative or distributor.
Patent Information
Product is covered by one or more patents. There may be other
U.S. and foreign patents pending.
SR30 Handheld Scanner User’s Guide
ix
Before You Begin
x
SR30 Handheld Scanner User’s Guide
1
Learning About the
SR30
Use this chapter to familiarize yourself with
the SR30 Handheld Scanner. This chapter
covers these topics:
•
Introducing the SR30 Handheld
Scanner
•
Powering the SR30
•
Understanding the Status Light
•
Understanding the Beeps
•
Scanning Bar Codes
1
Chapter 1 — Learning About the SR30
Introducing the SR30 Handheld Scanner
The Intermec SR30 Handheld Scanner is a general duty scanner
designed to collect data at the point of service (POS) for
customer applications. The SR30 comes with either a linear or
area imager.
Scanner
Status
light
Trigger
SR30 Handheld Scanner
Powering the SR30
The SR30 is powered through the accessory cable connected to a
host device. Depending on which accessory cable you are using,
power comes from either the host device or the external power
supply. For more information about each cable, see “Cable
Accessories” on page 34.
2
SR30 Handheld Scanner User’s Guide
Chapter 1 — Learning About the SR30
Understanding the Status Light
The status light on the SR30 indicates a successful decode of a
configuration or data bar code.
Status Light Descriptions
Light State
What It Means
Blinks green
once
The SR30 successfully scanned a data bar code.
Blinks green
two times
The SR30 successfully scanned a configuration
bar code.
Blinks green
five times
A configuration bar code was unsuccessfully
scanned.
Blinks red six
times
The SR30 tried to send data to a host device,
but there was a communications error:
• The PS2 port on the host device is not
initialized.
• An RS-232 protocol timeout has occurred.
That is, ENQ, ACK, NAK, and RTS/CTS.
Understanding the Beeps
The SR30 beeps to give you audio feedback when performing
some functions. For example, you hear a beep each time you scan
a valid bar code.
Beep Sequence Descriptions
Beep Sequence
What It Means
Single beep
The SR30 successfully decoded a bar code.
Two beeps
The SR30 successfully scanned a
configuration bar code.
Five beeps
The SR30 scanned a configuration bar code
that it did not recognize.
Six beeps
Data was not successfully sent to the host.
You are using RS-232 communications and a
timeout has occurred. That is, ENQ, ACK,
NAK, and RTS/CTS.
SR30 Handheld Scanner User’s Guide
3
Chapter 1 — Learning About the SR30
Scanning Bar Codes
The SR30 is used to scan bar code data. When you unpack the
SR30, these bar code symbologies are enabled:
•
Code 39
•
Code 128/GS1-128
•
UPC/EAN
•
DataMatrix (SR30 Area Imager only)
•
PDF 417 (SR30 Area Imager only)
If you are using bar code labels that are encoded in a different
symbology, you need to enable the symbology on your SR30. Use
EasySet version 5.6.0.0 or later to enable and disable symbologies
for your scanner. EasySet is available on the Intermec web site at
www.intermec.com/EasySet.
To scan a bar code
1 Point the scanner window at the bar code label and hold the
SR30 steady about two feet from the label.
A
ABCD
Status
light
4
SR30 Handheld Scanner User’s Guide
Chapter 1 — Learning About the SR30
2 Pull the trigger and direct the red beam so that it falls across
all bars in the bar code label.
Use this test bar code:
Code 39 Test Bar Code
*123456*
*123456*
Tip: Depending on your screen resolution, you may be able
to scan bar codes displayed on your computer screen.
When the SR30 successfully reads a bar code label, the SR30
creates a single beep and the status light briefly turns green.
3 Release the trigger.
SR30 Handheld Scanner User’s Guide
5
Chapter 1 — Learning About the SR30
6
SR30 Handheld Scanner User’s Guide
2
Connecting and
Configuring the SR30
Use this chapter to understand how to connect
the SR30 to a host device and configure the
SR30. This chapter covers these topics:
•
Connecting Your SR30 to a Host Device
•
Configuring Your SR30 Parameters
7
Chapter 2 — Connecting and Configuring the SR30
Connecting Your SR30 to a Host Device
To connect your SR30 to a host device, you need the appropriate
accessory cable. For a list and description of each cable, see
“Cable Accessories” on page 34.
To creating a USB connection
1 Make sure that you have the USB cable (P/N 236-164-xxx).
2 Turn on your host device.
3 Connect the cable to your SR30 and host device.
To host device
4 If necessary, configure your SR30 for an International
keyboard. The default keyboard is North America. For help,
see “International Keyboard Bar Codes” on page 12.
To create an RS-232 connection
1 Make sure that you have the appropriate RS-232 cable
(P/N 236-159-xxx, P/N 236-161-xxx, P/N 236-166-xxx,
or P/N 236-167-xxx) for your host device and appropriate
power supply (if necessary).
2 Turn off your host device.
3 Connect the cable to your SR30 and host device.
To host device
8
SR30 Handheld Scanner User’s Guide
Chapter 2 — Connecting and Configuring the SR30
4 If you are using the external power RS-232 cable, connect the
power supply to the RS-232 cable and an AC power outlet.
AC power supply
To host device
5 Turn on your host device.
6 If necessary, configure your SR30 serial parameters to match
the host device.
The default serial parameters for the SR30 are:
Baud Rate:
Data Bits:
Parity:
Stop Bits:
19200
8
none
1
For help, see “Serial Parameter Bar Codes” on page 14 or
EasySet version 5.6.0.0 or later. EasySet is available on the
Intermec web site at www.intermec.com/EasySet.
To create a keyboard wedge connection
1 Make sure that you have the keyboard wedge cable
(P/N 236-162-xxx) and appropriate power supply (if
necessary).
2 Turn off your host device.
3 Connect the cable to your SR30 and host device.
SR30 Handheld Scanner User’s Guide
9
Chapter 2 — Connecting and Configuring the SR30
AC power supply
To host device
4 Connect the power supply to the keyboard wedge cable and
an AC power outlet.
5 Turn on your host device.
6 If necessary, configure your SR30 for an International
keyboard. The default keyboard is North America. For help,
see “International Keyboard Bar Codes” on page 12.
To create a keyboard wedge (Y cable) connection
1 Make sure that you have the keyboard wedge cable
(P/N 236-204-xxx) and appropriate power supply (if
necessary).
2 Turn off your host device.
3 Connect the cable to your SR30 and host device(s).
AC power supply
To host devices
4 Turn off your host device.
5 Connect the cable to your SR30 and host device(s).
10
SR30 Handheld Scanner User’s Guide
Chapter 2 — Connecting and Configuring the SR30
6 Connect the power supply to the keyboard wedge Y cable and
an AC power outlet.
7 Turn on your host device.
8 If necessary, configure your SR30 for an International
keyboard. The default keyboard is North America. For help,
see “International Keyboard Bar Codes” on page 12.
To create a wand emulation connection
1 Make sure that you have the wand emulation cable
(P/N 236-163-xxx).
2 Turn off your host device.
3 Connect the cable to your SR30 and host device.
To host device
4 Turn on your host device.
Removing a Cable
Straightened
paper clip
Configuring Your SR30 Parameters
After you connect your SR30 to a host device, you may need to
configure your SR30 to communicate properly with the host
device. This section contains bar codes to configure your SR30:
•
for an International keyboard.
•
serial parameters.
SR30 Handheld Scanner User’s Guide
11
Chapter 2 — Connecting and Configuring the SR30
To configure additional SR30 settings, see EasySet version
5.6.0.0 or later. EasySet is available on the Intermec web site at
www.intermec.com/EasySet.
International Keyboard Bar Codes
If your SR30 is connected to a host with a USB cable or a
keyboard wedge cable, you may need to configure your SR30 for
an International keyboard.
* = default
North America*
French Windows
French Canadian Windows 95/98
French Canadian
Windows XP/2000
German Windows
Spanish Windows
12
SR30 Handheld Scanner User’s Guide
Chapter 2 — Connecting and Configuring the SR30
Italian Windows
Swedish Windows
UK English Windows
Brazilian Portuguese
Windows
Japanese Windows
IBM/NCR Terminals
SR30 Handheld Scanner User’s Guide
13
Chapter 2 — Connecting and Configuring the SR30
Serial Parameter Bar Codes
If your SR30 is connected to a host with an RS-232 cable,
configure your SR30 serial parameters to match the host device.
This section contains bar codes for basic serial parameters. To
configure additional serial parameters, see EasySet version
5.6.0.0 or later.
Note: By default, RTS/CTS hardware protocol is disabled. To
enable this parameter, use EasySet version 5.6.0.0 or later. RTS/
CTS hardware protocol operates only in one direction. The
SR30 requests permission from the host to transmit and
monitors host transmissions.
* = default
Baud Rate
1200
2400
4800
9600
19200*
38400
57600
14
SR30 Handheld Scanner User’s Guide
Chapter 2 — Connecting and Configuring the SR30
115200
128000
230400
256000
460800
Data Bits
7
8*
Parity
None*
Even
Odd
SR30 Handheld Scanner User’s Guide
15
Chapter 2 — Connecting and Configuring the SR30
Stop Bits
1*
2
16
SR30 Handheld Scanner User’s Guide
3
Troubleshooting and
Maintaining the SR30
Use this chapter to solve problems you may
have while using the SR30. This chapter
contains these topics:
•
Troubleshooting the SR30
•
Maintaining the SR30
17
Chapter 3 — Troubleshooting and Maintaining the SR30
Troubleshooting the SR30
If you have problems using the SR30, use this chapter to find a
possible solution.
Calling Product Support
To talk to an Intermec Product Support representative:
•
In the U.S.A. and Canada, call 1-800-755-5505
•
Outside the U.S.A. and Canada, contact your local Intermec
representative. For help, go to www.intermec.com > About
Us > Contact Us.
Before you call Intermec Product Support, make sure you have
the following information:
•
SR30 firmware version
•
SR30 decode version
•
SR30 sub-system version, which includes Host Interface
Processor (HIP) firmware and electronic hardware version
To get the firmware version, decode version, and sub-system
version
1 Run an application that can accept bar code information
from the SR30:
•
If you are using a USB or keyboard wedge cable, use
Microsoft® Notepad.
•
If you are using an RS-232 cable, use the EasySet ISCP
Terminal window. For help, see the EasySet software.
2 Scan one of these bar codes:
Get Firmware Version
Get Decode Version
Get Sub-System Version
18
SR30 Handheld Scanner User’s Guide
Chapter 3 — Troubleshooting and Maintaining the SR30
Problems and Possible Solutions
Use this section to find possible solutions to problems you may
have.
Problem
Possible Solution
You pull the trigger, but The SR30 receives power from either a
nothing happens.
host computer or external power
supply through an accessory cable.
Make sure:
• you are using the appropriate
cable. For more information, see
“Cable Accessories” on page 34.
• the cable is connected to the
appropriate port on the host
computer.
• the universal power supply (if
necessary) is properly plugged in.
You pull the trigger, the Try these possible solutions:
red scanning beam
• Make sure that the SR30 is at the
turns on, but you
appropriate scanning distance
cannot successfully scan
from the bar code. Move the SR30
a bar code.
closer and farther to find the
appropriate distance.
• Make sure that the SR30 is
configured for the type of bar code
you are scanning.
• The bar code you are trying to scan
may be poorly printed or too small.
Scan a known good bar code to
make sure that the SR30 is working
properly.
For more information, see “Scanning
Bar Codes” on page 4.
You scan a bar code and
the status light turns
on, but the SR30 does
not beep.
SR30 Handheld Scanner User’s Guide
The beep duration, volume,
frequency, and number may be
configured so the SR30 does not beep.
To reset the SR30, scan this bar code:
Reset Factory Defaults
19
Chapter 3 — Troubleshooting and Maintaining the SR30
Problem
Possible Solution
You scan a bar code, the Try these possible solutions:
SR30 beeps once, and
• Make sure that the accessory cable
the status light blinks
is properly plugged in to the SR30
green two times, but the
and host device.
data is not transmitted
• Make sure that your data collection
to the host device.
application is set up to receive data
from the SR30.
• If you are using an RS-232 cable,
make sure that the serial
parameters on the SR30 match the
serial parameters of the host
device. The default serial
parameters for the SR30 are: 19200
baud, 8 data bits, no parity, and 1
stop bit.
Note: You can use EasySet version
5.6.0.0 or later to connect to your
SR30 and test the serial connection.
For help, see the EasySet software.
You scan a
configuration bar code
and the SR30 beeps
three times.
The SR30 does not recognize or
support the configuration bar code
you scanned, or the bar code is not
enabled. Use EasySet to enable the bar
codes.
Resetting the SR30
If your SR30 does not respond when you pull the trigger, you can
reset your SR30. When you reset your SR30, the scanner control
firmware is restarted.
To reset your SR30
• Scan this bar code.
Reset Factory Defaults
20
SR30 Handheld Scanner User’s Guide
Chapter 3 — Troubleshooting and Maintaining the SR30
Maintaining the SR30
To keep your SR30 in good working order, you may need to
upgrade the SR30 and clean the scanner window.
Upgrading the SR30
Use the procedures below to upgrade the:
•
Host Interface Processor (HIP)
•
Imager engine firmware
The SR30 contains a Host Interface Processor (HIP). You can
upgrade the HIP firmware.
To upgrade the SR30, you need:
•
an RS-232 accessory cable. For more information, see “Cable
Accessories” on page 34.
•
a PC running Microsoft® Windows® XP with SP2 or
Microsoft Windows 2000.
•
EasySet version 5.6.0.0 or later.
•
the SR30 HIP upgrade package.
To upgrade the SR30 HIP or imager firmware
1 Download the latest SR30 HIP upgrade package from the
Intermec web site at www.intermec.com.
a
Go to Support > Downloads.
b
If necessary, click the link to search the product
downloads.
c
From the Select A Product drop-down list, choose Bar
Code Scanners: SR30 Handheld Scanner.
d Click the link to download the HIP firmware upgrade
package and save it to your PC.
e Unzip the .zip file.
2 Connect your SR30 to a host PC with an RS-232 cable.
SR30 Handheld Scanner User’s Guide
21
Chapter 3 — Troubleshooting and Maintaining the SR30
3 Scan the Reset Factory Defaults bar code:
Reset Factory Defaults
4 Start EasySet version 5.6.0.0 or later.
5 Verify that your SR30 is communicating with the host PC.
a
From EasySet, select Communication > Select
Communication Interface. The Communication
Interface screen appears.
b
Select the appropriate connection parameters, and click
OK.
c
Select Communication > Terminal. The ISCP Terminal
window appears.
d
Scan this sample data bar code:
Code 39 Test Bar Code
*123456*
123456
e
The bar code data appears in the ISCP Terminal window.
Click Close window.
6 Select Communication > Disconnect.
7 From the EasySet Commands window, double-click
Configuration modes and utilities.
22
SR30 Handheld Scanner User’s Guide
Chapter 3 — Troubleshooting and Maintaining the SR30
8 Double-click Co-processor upgrade (HIP). The firmware
upgrade bar code is added to the setup sheet.
Note: After you scan the firmware upgrade bar code, you
have 1 minute to start the upgrade process.
9 Scan the firmware upgrade bar code on screen, or print the
bar code set up sheet and scan the bar code.
10 From the Tools menu, select Upgrade product firmware.
The next screen appears.
11 Select the component you want to upgrade and click Next.
The Firmware selection window appears.
12 Click Browse to browse to the location of the HIP firmware
upgrade file, select the file, and click Open.
SR30 Handheld Scanner User’s Guide
23
Chapter 3 — Troubleshooting and Maintaining the SR30
13 Click Next. The Com port selection window appears.
14 Select the COM port the SR30 is connected to, select a baud
rate, and deselect the Display help check box.
15 Click Next. The Download progress window appears.
16 Click Start download. When the firmware download is
complete, the “Operation successful” message appears.
17 Click Finish. You have successfully upgraded your SR30
firmware.
24
SR30 Handheld Scanner User’s Guide
Chapter 3 — Troubleshooting and Maintaining the SR30
Cleaning the SR30
Clean the scanner window as often as needed for the
environment in which you are using the SR30. To clean the
scanner window, you can use soapy water, a solution of ammonia
and water, or isopropyl alcohol.
Opening the SR30 will void the warranty and may cause
damage to the internal components.
To clean the scanner window
1 Dip a clean towel or rag in soapy water, ammonia and water
solution, or isopropyl alcohol and wring out the excess. Wipe
the scanner window. Do not allow any abrasive material to
touch the window.
2 Wipe dry with a lint-free cloth.
SR30 Handheld Scanner User’s Guide
25
Chapter 3 — Troubleshooting and Maintaining the SR30
26
SR30 Handheld Scanner User’s Guide
A
Specifications and
Accessories
27
Appendix A — Specifications and Accessories
Specifications
Use this section to find technical information about the SR30.
Physical Dimensions
Length:
10.79 cm (4.25 in)
Height:
17.27 cm (6.80 in)
Width:
7.37 cm (2.90 in)
Weight:
184.3 g (6.5 oz)
Power and Electrical Specifications
Electrical rating:
x 5 V, 0.5 A
Temperature and Environmental Specifications
Operating:
0°C to 50°C (32°F to 122°F)
Storage:
-20°C to 60°C (-4°F to 140°F)
Relative humidity:
5 to 95% non-condensing
Environmental rating:
IP30
Bar Code Symbologies
• Aztec*
• Matrix 2 of 5
• Codabar
• MaxiCode*
• Codablock*
• MicroPDF 417*
• Code 11
• MSI Code
• Code 39
• PDF417*
• Code 93/Code 93i
• Plessey Code
• Code 128/GS1-128
• QR Code*
• DataMatrix*
• RSS
• EAN/UPC
• Standard 2 of 5
• GS1 Composite*
• Telepen
• GS1 DataBar (RSS)
• TLC 39
• Interleaved 2 of 5
* = Symbologies that are supported by the SR30 Area Imager
only.
28
SR30 Handheld Scanner User’s Guide
Appendix A — Specifications and Accessories
Linear Imager Specifications for EV12
The following reading distances apply to the EV12 decoded 1D
linear imager (P/N 3-103013-00-51) installed in the SR30.
Symbology Density
Minimum
Distance*
Maximum
Distance
Code 39
0.125 mm (5 mils)
9.5 cm (3.2 in)
17.5 cm (7.4 in)
0.25 mm (10 mils)
7.5 cm (2.5 in)
22.5 cm (9.3 in)
0.5 mm (20 mils)
6.5 cm (2.1 in)
28.5 cm (11.5 in)
1 mm (40 mils)
9.5 cm (3.2 in)
32.5 cm (13.3 in)
7.0 cm (2.3 in)
23.5 cm (9.7 in)
UPC/EAN 0.33 mm (13 mils)
*Minimum reading distances are measured in the dark (0 lux).
0"
in
4"
8"
12"
16"
20"
24"
28"
32"
36"
16"
40
14"
12"
30
10"
UPC/EAN 100%
8"
20
6"
10
4"
2"
0
0"
2"
10
4"
6"
0.125 mm / 5 mils
20
8"
0.25 mm / 10 mils
10"
12"
30
0.5 mm / 20 mils
14"
1 mm / 40 mils
40
16"
cm
0
10
20
30
40
50
60
70
80
90
EV12 Linear Imager Typical Reading Distances: This graphic does
not include the 1.5 mm (0.1 in) setback for the SR30.
SR30 Handheld Scanner User’s Guide
29
Appendix A — Specifications and Accessories
Imager Specifications for EA15
The following reading distances apply to the EA15 decoded 2D
area imager (P/N 3-140019-01-01) installed in the SR30.
Minimum
Distance*
Maximum
Distance
7.2 cm (3.2 in)
3.8 cm (1.5 in)
3.4 cm (1.3 in)
8 cm (3.1 in)
2.8 cm (5.1 in)
22.5 cm (8.8 in)
27 cm (10.5 in)
83 cm (32.4 in)
EAN/UPC 0.33 mm (13 mils)
5 cm (2 in)
32 cm (12.5 in)
Data
Matrix
0.191 mm (7.5 mils)
0.254 mm (10 mils)
0.381 mm (15 mils)
6.3 cm (2.5 in)
4.8 cm (1.9 in)
*
17.3 cm (6.7 in)
22 cm (8.6 in)
29 cm (11.3 in)
PDF417
0.16 mm (6.6 mils)
0.254 mm (10 mils)
0.381 mm (15 mils)
6.2 cm (2.4 in)
4.5 cm (1.8 in)
4 cm (1.6 in)
15.4 cm (6 in)
23 cm (9 in)
37 cm (14.4 in)
Symbology Density
Code 39
0.125 mm (5 mils)
0.20 mm (8 mils)
0.25 mm (10 mils)
1 mm (40 mils)
*Minimum reading distances are measured in the dark (0 lux).
30
SR30 Handheld Scanner User’s Guide
Appendix A — Specifications and Accessories
0"
2"
4"
6"
8"
10"
12"
in
6"
15
5"
12
Data Matrix 7.5 mils
4"
9
3"
PDF417 6.6 mils
6
2"
3
1"
0
0"
1"
3
2"
6
3"
0.125mm / 5 mils
4"
9
0.25 mm / 10 mils
12
5"
100% contrast UPC EAN
6"
15
0.5 mm / 20 mils
cm
0
5
10
15
20
25
30
EA15 Area Imager Typical Reading Distances: This graphic does
not include the 1.5 mm (0.1 in) setback for the SR30.
SR30 Handheld Scanner User’s Guide
31
Appendix A — Specifications and Accessories
Accessories
You can use these accessories (sold and ordered separately) with
the SR30 Handheld Scanner. To order accessories, contact your
local Intermec sales representative.
Stand Accessories
SR30 Desktop Stand (P/N 203-846-xxx): The desktop stand
provides you with a convenient way to store the SR30 when you are
not using it.
32
SR30 Handheld Scanner User’s Guide
Appendix A — Specifications and Accessories
SR30 Hands-Free Stand (P/N 203-845-xxx): The hands-free stand
provides you with a convenient way to store the SR30 when you are
not using it or scan items without having to hold your scanner.
SR30 Wall Mount Stand (P/N 203-847-xxx): The wall mount
stand provides you with a convenient way to store the SR30 when
you are not using it.
SR30 Handheld Scanner User’s Guide
33
Appendix A — Specifications and Accessories
Cable Accessories
USB Cable (P/N 236-164-xxx)
Powered RS-232 (P/N 236-159-xxx. P/N 236-160-001): This cable
supports the Intermec 700, 2435, 5055, 6400, CK3, CK30, CK31,
CK61, CN3, CV60, and CV30 computers.
External powered RS-232 (P/N 236-161-xxx): This cable also
requires one of these universal power supplies: U.S.A. and Canada
(Model AE26) or all other countries (P/N 851-086-xxx).
Keyboard Wedge Cable (P/N 236-162-xxx): This cable also requires
one of these universal power supplies: U.S.A. and Canada (Model
AE26) or all other countries (P/N 851-086-xxx).
34
SR30 Handheld Scanner User’s Guide
Appendix A — Specifications and Accessories
Keyboard Wedge Y Cable (P/N 236-204-xxx): This cable also
requires one of these universal power supplies: U.S.A. and Canada
(Model AE26) or all other countries (P/N 851-086-xxx).
Wand Emulation (P/N 236-163-xxx): This cable supports the
Intermec 242X, 2455, 2475, 246X, 248X, and 5020 computers.
SR30 Handheld Scanner User’s Guide
35
Appendix A — Specifications and Accessories
36
SR30 Handheld Scanner User’s Guide
B
Default Settings
37
Appendix B — Default Settings
Default Configuration
Use the following tables to see the default values of the
configuration commands supported on your SR30. The
commands are grouped by function and reflect the organization
of the Commands window in EasySet version 5.6.0.0 or later.
For detailed command descriptions, see the EasySet online help.
The latest version of EasySet is available at no charge from the
Intermec web site at www.intermec.com.
* = Symbologies and/or settings that are supported by the with
area imager only.
Command
Default Value
Reset factory defaults except locked
parameters
N/A
Interface Setting Commands
Command
Default Value
RS-232 parameters
Baud rate
19200
Data bits
8
Parity
None
Stop bits
1
Hardware/software protocols timeout 1000 ms
ENQ
Not active (default
05h)
ACK
Not active (default
06h)
NAK
Not active (default
15h)
XON/XOFF software protocol
Not active
RTS/CTS hardware protocol
Not active
LRC (longitudinal redundancy check) Not active
38
SR30 Handheld Scanner User’s Guide
Appendix B — Default Settings
Interface Setting Commands (continued)
Command
Default Value
Inter-character delay
None
Inter-message delay
None
USB parameters
USB cable mode
Keyboard HID
Keyboard selection
North America
Override caps lock key
Active
Keyboard wedge
Keyboard selection
North America
Override caps lock key
Active
Data Transmission Commands
Command
Default Value
Data transmission settings
ISCP
Not Active
Data format
Transmission frame size (TFS)
Raw
2048
Event notification
EasySet label
Active
Preprocessing ISCP bar code
Not active
Wake-up
Not active
Unsuccessful decoding
Not active
Start of read session
Not active
End of read session
Not active
Start-up
Not active
Trigger pulled
Not active
Trigger released
Not active
Symbology identifier
Not transmitted
Preamble
Keyboard wedge
None
RS-232
None
SR30 Handheld Scanner User’s Guide
39
Appendix B — Default Settings
Data Transmission Commands (continued)
Command
Default Value
USB
Keyboard HID
None
Generic HID
None
Postamble
Keyboard wedge
Carriage Return +
Line Feed
RS-232
Carriage Return +
Line Feed
USB
Keyboard HID
Carriage Return +
Line Feed
Generic HID
Carriage Return +
Line Feed
Data editing
Active scenarios
N/A
Scenario 1
Not active
Scenario 2
Not active
Scenario 3
Not active
Scenario 4
Not active
Scenario 5
Not active
Scenario 6
Not active
Scenario 7
Not active
Symbology Setting Commands
Command
Default Value
Disable all symbologies
N/A
Disable all extended reading ranges
N/A
Aztec*
Not active
Codabar
Not active
Codablock*
Codablock A
40
Not active
SR30 Handheld Scanner User’s Guide
Appendix B — Default Settings
Symbology Setting Commands (continued)
Command
Codablock F
Default Value
Not active
Code 11
Not active
Code 39
Active
Reading range
Extended
Reading tolerance
High
Code 93/Code 93i
Not active
Code 128/GS1-128
Active
Reading range
Extended
Reading tolerance
High
DataMatrix*
Active
EAN/UPC
UPC-A
Active
UPC-E
Active
EAN-8
Active
EAN-13
Active
UPC-E1
Not active
GS1 Composite*
Not active
CC-A/B
Not active
CC-CC
Not active
GS1 DataBar (RSS)
Omni-directional
Not active
Limited
Not active
Expanded
Not active
Interleaved 2 of 5
Not active
Reading range
Extended
Reading tolerance
High
Matrix 2 of 5
Not active
Maxi Code*
Not active
MicroPDF417*
Not active
MSI Code
Not active
PDF417*
Active
Plessey Code
Not active
SR30 Handheld Scanner User’s Guide
41
Appendix B — Default Settings
Symbology Setting Commands (continued)
Command
Default Value
QR Code*
Not active
Standard 2 of 5
Not active
Telepen
Not active
TLC 39
Not active
Operating Setting Commands
Command
Default Value
Scanning/Triggering
Triggering modes
Level
Trigger Timeout
2 sec
Hardware trigger
Active
Software trigger
Not active
Start character <STX>
(02h)
Stop character <ETX>
(03h)
Turn off after good read
Active
Aiming beam
Activation
Off
Duration
0.5 sec
Data decoding security
Predefined security levels
Normal
Consecutive same read data
validation
Auto read count before
transmission
Timeout between identical
consecutive codes
300 ms
Timeout between different
consecutive codes
None
Sensor optimization
Lighting
LED brightness 100%
Center decoding*
Activation
42
Not active
SR30 Handheld Scanner User’s Guide
Appendix B — Default Settings
Operating Setting Commands (continued)
Command
Tolerance
Default Value
No tolerance
Beeps/green indicator LED
Volume
High
Note (tone frequency)
High (2090 Hz)
Power-up beeps/Power-up LED
On
Good read beeps
Number
1
Duration
80 ms
Timing
Before transmission
Good read LED duration
80 ms
Error beep
On
Setup beep
On
Bad read message
Not active
Default=“NOREAD”
Note: The next table applies to area imagers only.
Imager Setting Commands
Command
Default Value
Pre-defined imager settings
1D codes only
N/A
Standard 1D and 2D codes
N/A
1D and 2D codes, bright environment
N/A
1D and 2D codes with reflective surface
N/A
General
Aimer flashing
Aimer flashing
(optimized for
decode)
Decode mode
2D imager
SR30 Handheld Scanner User’s Guide
43
Appendix B — Default Settings
Imager Setting Commands (continued)
Command
Default Value
Illumination level
Maximum 100%
Illumination mode
Illumination
LEDs always on
Image data interface
RS-232
Image data transmission
Synchronous
Image flip
None
Image rotation
Sensor view (no
rotation)
Initial 1D search area
Center
Lighting goal
42
Lighting mode
Illumination
priority
Snapshot
Snapshot compression
None
Snapshot resolution
Full resolution
Events
Snapshot ready event
Not active
Video
Select video start condition
N/A
Select video stop condition
N/A
Video on
N/A
Video off
N/A
Video compression
None
Video compression quality
No compression
Video resolution
Full resolution
Video decode mode
Not active
Events
Video start event
Not active
Video stop event
Not active
Signature capture
Scenario 1-4
Activation
44
Not active
SR30 Handheld Scanner User’s Guide
Appendix B — Default Settings
Imager Setting Commands (continued)
Command
Default Value
Capture area definition
Automatic correction
Both horizontal
and vertical
Image validation
Focus check
Not active
Image ratio check
Not active
Image processing
Projective mapping and resolution
Not active
Contrast enhancement
Disable
Noise reduction
No noise
reduction
Edge enhancement
Disable
Image output
Output format
Grayscale
Output compression
None
Output compression quality
50
Reset scenario
Configuration and Utility Commands
Command
Default Value
Get firmware version
N/A
Get decode version
N/A
Get shutter speed
N/A
Get configuration signature
N/A
Get 1D filter sequence
N/A
Get filter list
N/A
Firmware upgrade with RS-232 cable
N/A
Host Interface Processor (HIP) firmware
upgrade
N/A
Optical setup (using configuration bar
codes)
Enable
SR30 Handheld Scanner User’s Guide
45
Worldwide Headquarters
6001 36th Avenue West
Everett, Washington 98203
U.S.A.
tel 425.348.2600
fax 425.355.9551
www.intermec.com
© 2008 Intermec Technologies
Corporation. All rights reserved.
SR30 Handheld Scanner User’s Guide
*123-456-789*
P/N 934-017-002