1
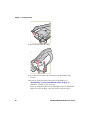
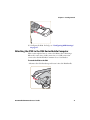
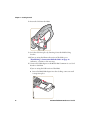
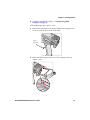
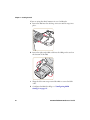
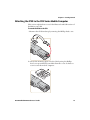
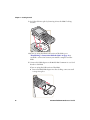
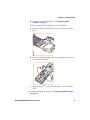
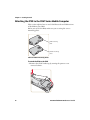
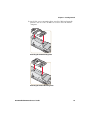
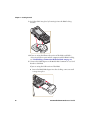
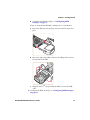
IP30
Handheld
RFID Reader
IP30, IP30NI
User’s Guide
Intermec Technologies Corporation
Worldwide Headquarters
6001 36th Ave.W.
Everett, WA 98203
U.S.A.
www.intermec.com
The information contained herein is provided solely for the purpose of allowing customers to
operate and service Intermec-manufactured equipment and is not to be released, reproduced, or
used for any other purpose without written permission of Intermec Technologies Corporation.
Information and specifications contained in this document are subject to change without prior
notice and do not represent a commitment on the part of Intermec Technologies Corporation.
© 2008-2010 by Intermec Technologies Corporation. All rights reserved.
The word Intermec, the Intermec logo, Norand, ArciTech, Beverage Routebook, CrossBar,
dcBrowser, Duratherm, EasyADC, EasyCoder, EasySet, Fingerprint, i-gistics, INCA (under license),
Intellitag, Intellitag Gen2, JANUS, LabelShop, MobileLAN, Picolink, Ready-to-Work, RoutePower,
Sabre, ScanPlus, ShopScan, Smart Mobile Computing, SmartSystems, TE 2000, Trakker Antares,
and Vista Powered are either trademarks or registered trademarks of Intermec Technologies
Corporation.
There are U.S. and foreign patents as well as U.S. and foreign patents pending.
ii
IP30 Handheld RFID Reader User’s Guide
Document Change Record
This page records changes to this document. The document was
originally released as Revision 001.
Version
Number
Date
Description of Change
006
4/2010
This document was revised to include:
• new operating temperature specifications.
• new CN4NI and CK61 information.
005
6/2009
Revised specifications for new read and write ranges.
004
2/2009
Revised specifications for new 865 MHz EU
standard.
003
8/2008
Revised to support the CK3 Mobile Computer.
002
4/2008
Revised to include correct part numbers for the CK61
power supply.
IP30 Handheld RFID Reader User’s Guide
iii
IP30 Handheld RFID Reader User’s Guide
iv
Contents
Contents
Before You Begin. . . . . . . . . . . . . . . . . . . . . . . . . . . . . . . . . . . . . . . . . . . . . . . . . . . . . . . . . . . . . . . . . vii
Safety Information . . . . . . . . . . . . . . . . . . . . . . . . . . . . . . . . . . . . . . . . . . . . . . . . . . . . . . . vii
Global Services and Support . . . . . . . . . . . . . . . . . . . . . . . . . . . . . . . . . . . . . . . . . . . . . . vii
Warranty Information. . . . . . . . . . . . . . . . . . . . . . . . . . . . . . . . . . . . . . . . . . . . vii
Web Support . . . . . . . . . . . . . . . . . . . . . . . . . . . . . . . . . . . . . . . . . . . . . . . . . . . . vii
Telephone Support . . . . . . . . . . . . . . . . . . . . . . . . . . . . . . . . . . . . . . . . . . . . . . vii
Service Location Support . . . . . . . . . . . . . . . . . . . . . . . . . . . . . . . . . . . . . . . . viii
Who Should Read This Manual . . . . . . . . . . . . . . . . . . . . . . . . . . . . . . . . . . . . . . . . . . viii
Related Documents . . . . . . . . . . . . . . . . . . . . . . . . . . . . . . . . . . . . . . . . . . . . . . . . . . . . . . ix
Patent Information . . . . . . . . . . . . . . . . . . . . . . . . . . . . . . . . . . . . . . . . . . . . . . . . . . . . . . ix
1 Getting Started
.......................................................... 1
Introducing the IP30 . . . . . . . . . . . . . . . . . . . . . . . . . . . . . . . . . . . . . . . . . . . . . . . . . . . . . . . . . . . . . . 2
Unpacking the IP30 . . . . . . . . . . . . . . . . . . . . . . . . . . . . . . . . . . . . . . . . . . . . . . . . . . . . . . . 3
What You Need . . . . . . . . . . . . . . . . . . . . . . . . . . . . . . . . . . . . . . . . . . . . . . . . . . . . . . . . . . . 3
Learning About the IP30. . . . . . . . . . . . . . . . . . . . . . . . . . . . . . . . . . . . . . . . . . . . . . . . . . . . . . . . . . . 4
Understanding the LEDs . . . . . . . . . . . . . . . . . . . . . . . . . . . . . . . . . . . . . . . . . . . . . . . . . . 4
About the Intermec Ready-to-Work Indicator . . . . . . . . . . . . . . . . . . . . . . . . . . . . . . . 5
Understanding the Ports. . . . . . . . . . . . . . . . . . . . . . . . . . . . . . . . . . . . . . . . . . . . . . . . . . . 6
Using the Battery . . . . . . . . . . . . . . . . . . . . . . . . . . . . . . . . . . . . . . . . . . . . . . . . . . . . . . . . . . . . . . . . . 7
Charging and Installing the Battery . . . . . . . . . . . . . . . . . . . . . . . . . . . . . . . . . . . . . . . . 7
Attaching the IP30 . . . . . . . . . . . . . . . . . . . . . . . . . . . . . . . . . . . . . . . . . . . . . . . . . . . . . . . . . . . . . . . . 9
Attaching the IP30 to the CN3B or CN3F Mobile Computer. . . . . . . . . . . . . . . . . . 9
Attaching the IP30 to the CN4 Series Mobile Computer . . . . . . . . . . . . . . . . . . . . . 11
Attaching the IP30 to the CK3 Series Mobile Computer . . . . . . . . . . . . . . . . . . . . . 15
Attaching the IP30 to the CK61 Series Mobile Computer . . . . . . . . . . . . . . . . . . . . 18
Establishing a Connection With the IP30 . . . . . . . . . . . . . . . . . . . . . . . . . . . . . . . . . . . . . . . . . . 22
2 Creating and Using RFID Applications
. . . . . . . . . . . . . . . . . . . . . . . . . . . . . . . 25
RFID Applications and the IP30. . . . . . . . . . . . . . . . . . . . . . . . . . . . . . . . . . . . . . . . . . . . . . . . . . . 26
Using the RFID Resource Kit. . . . . . . . . . . . . . . . . . . . . . . . . . . . . . . . . . . . . . . . . . . . . . 26
Creating Applications for the IP30. . . . . . . . . . . . . . . . . . . . . . . . . . . . . . . . . . . . . . . . . . . . . . . . . 26
Configuring RFID Settings . . . . . . . . . . . . . . . . . . . . . . . . . . . . . . . . . . . . . . . . . . . . . . . . . . . . . . . 27
v
IP30 Handheld RFID Reader User’s Guide
Configuring the BRI Server . . . . . . . . . . . . . . . . . . . . . . . . . . . . . . . . . . . . . . . . . . . . . . . . . . . . . . . 28
3 Upgrading and Troubleshooting
. . . . . . . . . . . . . . . . . . . . . . . . . . . . . . . . . . . . . . 29
Upgrading the IP30 Firmware . . . . . . . . . . . . . . . . . . . . . . . . . . . . . . . . . . . . . . . . . . . . . . . . . . . . . 30
Upgrading the IP30 Firmware Using a Media Card . . . . . . . . . . . . . . . . . . . . . . . . . . 30
Upgrading the IP30 Using SmartSystems Foundation. . . . . . . . . . . . . . . . . . . . . . . 31
Calling Intermec Product Support. . . . . . . . . . . . . . . . . . . . . . . . . . . . . . . . . . . . . . . . . . . . . . . . . 32
Troubleshooting the IP30. . . . . . . . . . . . . . . . . . . . . . . . . . . . . . . . . . . . . . . . . . . . . . . . . . . . . . . . . 32
Problems While Working With RFID . . . . . . . . . . . . . . . . . . . . . . . . . . . . . . . . . . . . . . 32
Problems With Connectivity . . . . . . . . . . . . . . . . . . . . . . . . . . . . . . . . . . . . . . . . . . . . . . 34
A Specifications
. . . . . . . . . . . . . . . . . . . . . . . . . . . . . . . . . . . . . . . . . . . . . . . . . . . . . . . . . 35
IP30 Specifications . . . . . . . . . . . . . . . . . . . . . . . . . . . . . . . . . . . . . . . . . . . . . . . . . . . . . . . . . . . . . . . 36
RFID Specifications . . . . . . . . . . . . . . . . . . . . . . . . . . . . . . . . . . . . . . . . . . . . . . . . . . . . . . . . . . . . . . 36
Port Pin Assignments. . . . . . . . . . . . . . . . . . . . . . . . . . . . . . . . . . . . . . . . . . . . . . . . . . . . . . . . . . . . . 37
Serial Port (COM1) . . . . . . . . . . . . . . . . . . . . . . . . . . . . . . . . . . . . . . . . . . . . . . . . . . . . . . 37
Adapter Port. . . . . . . . . . . . . . . . . . . . . . . . . . . . . . . . . . . . . . . . . . . . . . . . . . . . . . . . . . . . . 38
IP30 Handheld RFID Reader User’s Guide
vi
Before You Begin
Before You Begin
This section provides you with safety information, technical support
information, and sources for additional product information.
Safety Information
This section explains how to identify notes that are in this document.
Note: Notes either provide extra information about a topic or contain
special instructions for handling a particular condition or set of
circumstances.
Global Services and Support
Warranty Information
To understand the warranty for your Intermec product, visit the
Intermec web site at www.intermec.com and click Support >
Returns and Repairs > Warranty.
Disclaimer of warranties: The sample code included in this document
is presented for reference only. The code does not necessarily
represent complete, tested programs. The code is provided “as is with
all faults.” All warranties are expressly disclaimed, including the
implied warranties of merchantability and fitness for a particular
purpose.
Web Support
Visit the Intermec web site at www.intermec.com to download our
current manuals (in PDF).
Visit the Intermec technical knowledge base (Knowledge Central) at
www.intermec.com and click Support > Knowledge Central to
review technical information or to request technical support for your
Intermec product.
Telephone Support
In the U.S.A. and Canada, call 1-800-755-5505.
vii
IP30 Handheld RFID Reader User’s Guide
Before You Begin
Outside the U.S.A. and Canada, contact your local Intermec
representative. To search for your local representative, from the
Intermec web site, click About Us > Contact Us.
Service Location Support
For the most current listing of service locations, go to
www.intermec.com and click Support >Returns and Repairs >
Repair Locations.
For technical support in South Korea, use the after service locations
listed below:
AWOO Systems
102-1304 SK Ventium
522 Dangjung-dong
Gunpo-si, Gyeonggi-do Korea, South 435-776
Contact: Mr. Sinbum Kang
Telephone: +82-31-436-1191
E-mail: [email protected]
IN Information System PTD LTD
6th Floor
Daegu Venture Center Bldg 95
Shinchun 3 Dong
Donggu, Daegu City, Korea
E-mail: [email protected] or [email protected]
Who Should Read This Manual
This document is for the person who is responsible for installing,
configuring, and maintaining the IP30.
This document provides you with information about the features of
the IP30, and how to install, configure, operate, maintain, and
troubleshoot it.
IP30 Handheld RFID Reader User’s Guide
viii
Before You Begin
Related Documents
Here are some related Intermec documents that you might find
useful:
•
Basic Reader Interface Programmer’s Reference Manual
•
Intermec Computer Command Reference Manual
The Intermec web site at www.intermec.com contains our
documents (as .pdf files) that you can download for free.
To download documents
1 Visit the Intermec web site at www.intermec.com.
2 Click the Products tab.
3 Using the Products menu, navigate to your product page. For
example, to find the CN3 computer product page, click
Computers > Handheld Computers > CN3.
4 Click the Manuals tab.
5 If your product does not have its own product page, click Support
> Manuals. Use the Product Category field, the Product Family
field, and the Product field to help you locate the documentation
for your product.
Patent Information
Product is covered by one or more of the following patents:
4864158, 4888591, 4999636, 5030807, 5055659, 5280159, 5504485,
5521601, 5550547, 5673037, 5763867, 5777561, 5825045, 5828318,
5828693, 5850181, 5850187, 5942987, 5995019, 6078251, 6121878,
6122329, 6172596, 6195053, 6249227, 6280544, 6286762, 6286763,
6288629, 6360208, 6384712, 6404325, 6429775, 6486769, 6501807,
6525648, 6639509, 6645327, 6677852, 6768414, 6784789, 6816063,
6919793, 7039359, 7103087, 7117374, 7121467, 7158046, 7207486,
7298268
There may be other U.S. and foreign patents pending.
ix
IP30 Handheld RFID Reader User’s Guide
Before You Begin
IP30 Handheld RFID Reader User’s Guide
x
1
Getting Started
Use this chapter to familiarize yourself with the IP30 Portable
RFID Reader. This chapter covers these topics:
•
Introducing the IP30
•
Learning About the IP30
•
Using the Battery
•
Attaching the IP30
•
Establishing a Connection With the IP30
1
Chapter 1 — Getting Started
Introducing the IP30
The IP30 allows you to connect via Bluetooth or USB. Together, the
IP30 and your mobile computer provide a high-performance mobile
RFID solution that allows you to bring the read/write device to the
tagged product rather than moving tagged products past a fixed
reader.
The IP30 supports the following mobile computers:
•
CN3B and CN3F Mobile Computers. CN3 WAN configurations
are not supported with the IP30.
•
CN4 Series Mobile Computer.
•
CK3 Series Mobile Computer.
•
CK61 and CK61ex Series Mobile Computers.
Note: When paired with CN4NI and CN4ENI products, the IP30
supports North America NI, Division 2, Class I, II and III as defined in
ANSI/ISA 12.12.01 for operation in environments where flammable
and explosive gases and vapors may be present.
The Bluetooth Version of the IP30 Attached to the CN3
2
IP30 Handheld RFID Reader User’s Guide
Chapter 1 — Getting Started
Unpacking the IP30
When you unpack the IP30, these items are included:
•
IP30 RFID Handle
•
Product documentation
•
Mounting plates (for CK3 and CK61 Series Mobile Computers
only)
What You Need
To use the IP30, you need these items:
•
Battery (Model AB3 or AB19)
•
Battery charger or dock with power supply
•
CN3B, CN3F, CN4, CK3, or CK61 Series Mobile Computer
•
A custom application to read and write tags. For help, see “RFID
Applications and the IP30” on page 26.
You may also need to upgrade your Windows operating system and
SmartSystems Platform Bundle (SSPB) before you can connect the
IP30 to your mobile computer.
Microsoft Windows Mobile and SmartSystems Platform Bundle Versions Needed
Mobile
Computer
Windows Mobile Version
SmartSystems Platform
Bundle Version
CK3
Windows Mobile 6.1 or later.
SSPB version 6.20 or later.
•
•
CN3B, CN3F •
•
CK61
Windows Mobile 5.0 version 3.21 or later.
Windows CE version 5.0 or later.
SSPB version 5.50 or later.
Windows Mobile 5.0 version 3.21 or later.
Windows Mobile 6.1 version 4.41.32 or
later.
• SSPB version 5.50 or later for
Windows Mobile 5.0.
• SSPB version 7.00.36 or later
for Windows Mobile 6.1.
CN4
Windows Mobile 6.1 version 4.41.32 or later.
SSPB version 7.00.36 or later.
For more information on how to upgrade your Windows operating
system and SmartSystems Platform Bundle (SSPB), see your mobile
computer user’s manual.
IP30 Handheld RFID Reader User’s Guide
3
Chapter 1 — Getting Started
Learning About the IP30
This section explains the LEDs and ports on the IP30.
Understanding the LEDs
The IP30 has five LEDs that show you the operating status of the
reader.
LED Icon Descriptions
LED Icon LED Name
Intermec Ready-to
WorkTM indicator
Description
Blue LED remains on when an the IP30
is connected to the mobile computer.
For more information, see the next
section.
Data Communications Flashes when there is data
communications between the reader
and the mobile computer.
4
RFID Transmit
Flashes when the IP30 RFID reader is
transmitting data.
Tag ID
Flashes when an RFID tag ID is
successfully read or written to.
Battery
This LED indicates the status of the
battery:
• Green: The battery is fully charged
(more than 80% capacity).
• Orange: The battery is charged (from
20% to 80% capacity).
• Red: The battery is low (less than 20%
capacity).
IP30 Handheld RFID Reader User’s Guide
Chapter 1 — Getting Started
About the Intermec Ready-to-Work Indicator
The blue Ready-to-WorkTM indicator shows when a connection is
established between your mobile computer and IP30. The next table
explains the different states of the Ready-to-Work indicator.
Ready-To-Work Indicator Descriptions
LED
Description
Off
The IP30 is not yet ready for operation, or the IP30 is in low
power mode.
Blinking
The IP30 is not associated with or connected to the mobile
computer.
Steady
A connection has been established between the IP30 and the
mobile computer.
The IP30 enters low power mode if there is no host activity after 5
minutes. The IP30 will remain Ready-to-Work as long as the mobile
computer maintains a a communications link. To determine if the
IP30 is ready to work, pull the trigger.
IP30 Handheld RFID Reader User’s Guide
5
Chapter 1 — Getting Started
Understanding the Ports
The USB version of the IP30 for the CK61 has two ports located on
the IP30 adapter. To access these ports, you must remove the port
cover.
To remove the port cover
•
On the bottom of the IP30 adapter, remove the port cover by
pulling it away from the right side of the IP30.
Power
port
COM 1
IP30 USB Adapter Port Descriptions
6
Port
Description
Power
Connect a power supply to the CK61 to power and charge
the CK61. Use power supply P/N 851-065-005. For North
America use power supply P/N 851-065-105.
Note that this does not charge the IP30. To charge the IP30
battery see the next section.
COM 1
Connect other RS-232 devices such as printers to the
CK61.
IP30 Handheld RFID Reader User’s Guide
Chapter 1 — Getting Started
Using the Battery
The IP30 uses the Model AB3 and Model AB19 batteries as a main
power source.
You must use the Model AB19 (P/N 318-037-001) battery for NI
environments where flammable and explosive gases and vapors
may be present.
The battery used in this device may present a fire or chemical
burn hazard if it is mistreated. Do not disassemble it, heat it,
above 100C (212F), or incinerate it.
Disposed of used batteries promptly. Keep away from children.
Contact your Intermec representative for replacement batteries.
Charging and Installing the Battery
To charge the IP30 battery you need to have a power supply
(P/N 851-082-103), a country specific power cord, and one of these
chargers or accessories:
•
AC6 2-Bay Charger (P/N 852-907-001)
•
AC7 4-Bay Charger (P/N 852-908-001)
•
AC20 Quad Charger with IP30 Battery Pack Adapter
(P/N 871-233-001)
•
AD20 Single Charger with IP30 Battery Pack Adapter
(P/N 871-233-001)
The IP30 does not ship with any of these accessories. For more
information on these accessories, contact your local Intermec sales
representative.
IP30 Handheld RFID Reader User’s Guide
7
Chapter 1 — Getting Started
To charge the IP30 battery
•
Insert the battery into a slot on the battery charger. A fully
discharged battery charges to full capacity in approximately 4
hours.
10
11 12 1
2
9
3
8
7
6 5
4
To install the battery
1 Insert the battery into the IP30.
Battery release
button
2 Once the battery is in the IP30, push the battery release button
and slide the battery in until the battery is secure.
8
IP30 Handheld RFID Reader User’s Guide
Chapter 1 — Getting Started
To remove the battery
•
Push the battery release button on the bottom of the IP30 battery
to remove it.
Note: Charging the IP30 battery does not charge the mobile
computer that it is connected to. See the mobile computer user’s
manual for charging options.
Attaching the IP30
You can connect the IP30 using a Bluetooth connection, a USB
connection, or a USB connection connected to a common access card
reader. The IP30 can connect to the following mobile computers:
•
CN3B, and CN3F Mobile Computers
•
CN4 Series Mobile Computers
•
CK3 Series Mobile Computers
•
CK61 Series Mobile Computers
The next sections describe how to connect the IP30 to your mobile
computer.
Attaching the IP30 to the CN3B or CN3F Mobile Computer
This section explains how to connect the IP30 to the CN3 using a
Bluetooth connection, a USB connection, or a USB connection
connected to the Model AR6 Common Access Card Reader.
To attach the IP30 to the CN3
1 Remove the CN3 handstrap and insert it into the IP30 handle.
IP30 Handheld RFID Reader User’s Guide
9
Chapter 1 — Getting Started
2 Insert the CN3 into the IP30.
3 Lock the CN3 into place by lowering it into the IP30 locking
bracket.
4 If you are using the Bluetooth version of the IP30, go to
“Establishing a Connection With the IP30” on page 22.
Otherwise, continue to the next step.
If you are using the USB version of the IP30, insert the IP30 USB
adapter into the docking connector until it snaps into place.
10
IP30 Handheld RFID Reader User’s Guide
Chapter 1 — Getting Started
5 Configure the IP30. For help, see “Configuring RFID Settings”
on page 27.
Attaching the IP30 to the CN4 Series Mobile Computer
This section explains how to connect the IP30 to the CN4 using a
Bluetooth connection, a USB connection, or a USB connection
connected to the Model AR6 Common Access Card Reader.
To attach the IP30 to the CN4
1 Remove the CN4 handstrap and insert it into the IP30 handle.
IP30 Handheld RFID Reader User’s Guide
11
Chapter 1 — Getting Started
2 Insert the CN4 into the IP30.
3 Lock the CN4 into place by lowering it into the IP30 locking
bracket.
4 If you are using the Bluetooth version of the IP30, go to
“Establishing a Connection With the IP30” on page 22.
Otherwise, continue to the next step.
5 Connect the USB adapter or the Model AR6 Common Access Card
Reader to the IP30.
If you are using the USB version of the IP30:
a Insert the IP30 USB adapter into the docking connector until
it snaps into place.
12
IP30 Handheld RFID Reader User’s Guide
Chapter 1 — Getting Started
b Configure the IP30. For help, see “Configuring RFID
Settings” on page 27.
If the USB adapter has captive screws:
a Remove the side fasteners from the CN4 by unscrewing the two
screws located on the bottom of the CN4.
Screw
(2 places)
b Insert the USB adapter and secure it by screwing in the two
captive screws.
IP30 Handheld RFID Reader User’s Guide
13
Chapter 1 — Getting Started
If you are using the AR6 Common Access Card Reader:
a Insert the AR6 into the docking connector until it snaps into
place.
b Insert the right-angle USB cable into the USB port located on
the bottom of the AR6.
c
Wrap the VelcroTM strap around the AR6 to secure the USB
cable.
d Configure the IP30. For help, see “Configuring RFID
Settings” on page 27.
14
IP30 Handheld RFID Reader User’s Guide
Chapter 1 — Getting Started
Attaching the IP30 to the CK3 Series Mobile Computer
This section explains how to attach the Bluetooth and USB version of
the IP30 to your CK3.
To attach the IP30 to the CK3
1 Remove the CK3 handstrap by removing the Phillips head screw.
2 Attach the mounting plate onto the CK3 by using the Phillips
head screw provided with your IP30. Turn the screw clockwise to
secure it onto the mobile computer.
IP30 Handheld RFID Reader User’s Guide
15
Chapter 1 — Getting Started
3 Lock the CK3 into place by lowering it into the IP30’s locking
bracket.
4 If you are using the Bluetooth version of the IP30, go to
“Establishing a Connection With the IP30” on page 22 to
establish a connection between your mobile computer and the
IP30.
5 Connect the USB adapter or the Model AR6 Common Access Card
Reader to the IP30.
If you are using the USB version of the IP30:
a Insert the IP30 USB adapter into the docking connector until
it snaps into place.
16
IP30 Handheld RFID Reader User’s Guide
Chapter 1 — Getting Started
b Configure the IP30. For help, see “Configuring RFID
Settings” on page 27.
If you are using the AR7 Common Access Card Reader:
a Insert the AR7 into the docking connector until it snaps into
place.
b Insert the right-angle USB cable into the USB port located on
the bottom of the AR7.
c
Wrap the VelcroTM strap around the AR7 to secure the USB
cable.
6 Configure the IP30. For help, see “Configuring RFID Settings”
on page 27.
IP30 Handheld RFID Reader User’s Guide
17
Chapter 1 — Getting Started
Attaching the IP30 to the CK61 Series Mobile Computer
This section explains how to attach the Bluetooth and USB versions
of the IP30 to your CK61.
Before you attach the IP30, make sure you are using the correct
mounting plates.
CK61 mounting
plate
CK61ex mounting
plate
CK61 and CK61ex Mounting Plates
To attach the IP30 to the CK61
1 Remove the CK61 handstrap by turning the quarter screw
counterclockwise.
18
IP30 Handheld RFID Reader User’s Guide
Chapter 1 — Getting Started
2 Attach the correct mounting plate onto the CK61 and turn the
quarter screw or screws clockwise to secure it onto the mobile
computer.
Attaching the CK61 Mounting Plate
Attaching the CK61ex Mounting Plate
IP30 Handheld RFID Reader User’s Guide
19
Chapter 1 — Getting Started
3 Lock the CK61 into place by lowering it into the IP30 locking
bracket.
4 If you are using the Bluetooth version of the IP30, establish a
connection between your mobile computer and the IP30. For help,
see “Establishing a Connection With the IP30” on page 22.
5 Connect the USB adapter or the Model AR5 Common Access Card
Reader to the IP30.
If you are using the USB version of the IP30:
a Insert the IP30 USB adapter into the docking connector until
it snaps into place.
20
IP30 Handheld RFID Reader User’s Guide
Chapter 1 — Getting Started
b Configure the IP30. For help, see “Configuring RFID
Settings” on page 27.
If you are using the Model AR5 Common Access Card Reader:
a Insert the AR5 into the docking connector until it snaps into
place.
b Insert the right-angle USB cable into the USB port located on
the bottom of the AR5.
c
Wrap the VelcroTM strap around the AR5 to secure the USB
cable.
6 Configure the IP30. For help, see “Configuring RFID Settings”
on page 27.
IP30 Handheld RFID Reader User’s Guide
21
Chapter 1 — Getting Started
Establishing a Connection With the IP30
To use the IP30, you must first establish a connection between the
IP30 and mobile computer using the Wireless Reader Wizard applet.
Note: The USB version of the IP30 establishes a connection with your
mobile computer once the IP30 USB adapter is plugged in. For help,
see “Attaching the IP30” on page 9.
To connect to the IP30 using the Wireless Reader Wizard
1 Make sure you have your Bluetooth radio enabled on your mobile
computer. See the mobile computer user’s manual for more
information.
2 For Windows Mobile 5.0 or Windows Mobile 6.1, select Start >
Settings > System and tap the Wireless Readers icon. The
Wireless Reader Wizard appears.
For Windows CE, select Start > Programs > Windows Explorer.
The Windows Explorer screen appears.
a Go to Program Files > Intermec > Network. The Network
screen appears.
b Double-tap the BluetoothReaderWizard icon.
3 Tap Add Reader. The wizard advances to the next screen.
4 Select how you would like to find your reader (the default is
Search) and then click Next. The computer starts discovering
readers.
5 Select the reader you want to connect to from the Devices list and
then tap Next.
Note: The Devices list will show all data collection devices,
including RFID readers that are Bluetooth enabled. To connect to
the right reader, verify that the serial number you selected matches
the one located on the bottom of the IP30’s antenna.
6 When prompted to add the reader to your device list, tap Yes.
7 In the Passcode text box, enter the passcode for your reader. The
default passcode for Intermec Bluetooth readers is 0000.
22
IP30 Handheld RFID Reader User’s Guide
Chapter 1 — Getting Started
8 Tap Next. The computer connects to the reader and displays the
remote device information.
9 Tap Finish.
10 Refresh Intermec Settings to see the Bluetooth reader under RFID.
You can now configure and modify your device. For help, see
“Configuring RFID Settings” on page 27.
IP30 Handheld RFID Reader User’s Guide
23
Chapter 1 — Getting Started
24
IP30 Handheld RFID Reader User’s Guide
2
Creating and Using RFID Applications
This chapter explains how you can use RFID applications for
the IP30 and includes these topics:
•
RFID Applications and the IP30
•
Creating Applications for the IP30
•
Configuring RFID Settings
•
Configuring the BRI Server
25
Chapter 2 — Creating and Using RFID Applications
RFID Applications and the IP30
The IP30 communicates with the mobile computer through the Basic
Reader Interface (BRI) Server, which can be accessed in the
Application Connection screen within Intermec Settings. The BRI
Server controls the reader by issuing various BRI commands.
•
To configure the BRI Server, see “Configuring the BRI Server”
on page 28.
•
For more information on the BRI, see the Basic Reader Interface
Programmer’s Reference Manual or the Intermec Computer
Command Reference Manual.
Using the RFID Resource Kit
The Intermec Developer Library RFID Resource Kits includes Java
and .NET tools you can use to develop applications that control the
reader and data management.
The resource kit is available as part of the Intermec Developer Library
(IDL). To learn more about the RFID Resource Kit, go to
www.intermec.com and choose Products > Applications and
Software > Development Tools > Developer Resource Kits.
Creating Applications for the IP30
You must create an application for the IP30 before it can read and
write tags. Intermec recommends this general outline for developing
your RFID application:
•
Write your application on a development workstation (your
desktop PC).
•
Install and test the application on your mobile computer.
Note: European regulatory requirements state that a reader operating
in the 869 MHz frequency can only operate for 6 minutes every hour.
The IP30 provides event messages periodically informing the user of
the remaining time the reader can be used before this time limit
expires. For more information, see the RFID Resource Kits.
26
IP30 Handheld RFID Reader User’s Guide
Chapter 2 — Creating and Using RFID Applications
If you do not have an application but want to verify that your IP30 can
read and write tags, you can download the Intermec demo application
from the Intermec web site.
To download the Intermec RFID demo application
1 Go to www.intermec.com and choose Support > Downloads.
The Download screen appears.
2 Select IP30 Handheld RFID Reader from the Downloads list.
The Downloads page displays all of the downloads available for
the IP30.
3 Download the installation (.cab) file you need and install it onto
your mobile computer. For information on how to install
applications onto your mobile computer, see your mobile
computer user’s manual.
Configuring RFID Settings
This section explains how you use Intermec Settings to change the
settings for the RFID module in the IP30. As you install and test
applications, you can configure the RFID settings for the best system
performance.
To change RFID module settings
1 Go to Intermec Settings on your mobile computer.
2 For Windows Mobile 5.0, tap RFID > Reader 1 > RFID Module.
The RFID Module screen appears.
For Windows Mobile 6.1, tap RFID > Enable Reader Service, and
select the Enable RFID Service check box.
For Windows CE, tap RFID > Reader 1 > RFID Module. The
RFID Module screen appears.
IP30 Handheld RFID Reader User’s Guide
27
Chapter 2 — Creating and Using RFID Applications
3 Change the RFID settings as needed. For help, see the Basic Reader
Interface Programmer’s Reference Manual or the Intermec
Computer Command Reference Manual.
4 Save your settings.
Configuring the BRI Server
The IP30 BRI server handles communications between your
application and the RFID module. You can configure many settings
for the BRI server.
To configure BRI server settings
1 Go to Intermec Settings on your mobile computer.
2 Tap RFID > Application Connection. The BRI application server
settings appear.
3 Change the BRI application server settings as needed. For help, see
the Basic Reader Interface Programmer’s Reference Manual or the
Intermec Computer Command Reference Manual.
4 Save your settings.
28
IP30 Handheld RFID Reader User’s Guide
3
Upgrading and Troubleshooting
This chapter includes information on upgrading the IP30 and
includes these topics:
•
Upgrading the IP30 Firmware
•
Troubleshooting the IP30
•
Calling Intermec Product Support
29
Chapter 3 — Upgrading and Troubleshooting
Upgrading the IP30 Firmware
This section explains how to upgrade the IP30 firmware using your
mobile computer. There are two ways to upgrade your IP30:
•
Use a media card.
•
Use SmartSystemsTM Foundation.
You need to download the latest upgrade files from the Intermec web
site to your desktop PC.
Upgrading the IP30 Firmware Using a Media Card
To upgrade the IP30 firmware, you need:
•
a media card. The CN3 uses a miniSDTM card, the CK3 uses a
microSDTM card, and the CK61 uses an SD card.
•
a media card reader (optional).
You can use any file transfer method (ActiveSync, FTP server, and so
on) to copy the upgrade files to your media card. Intermec
recommends using a media card reader.
To upgrade firmware using a media card
1 Make sure you have an active USB or Bluetooth connection with
your mobile computer and IP30. For help, see “Attaching the
IP30” on page 9.
2 Download the device upgrade (.cab) file from the Intermec web
site to your desktop PC.
3 Load the upgrade (.cab) file onto the media card.
4 Insert the media card into your mobile computer.
5 The upgrade (.cab) file will automatically install onto the IP30.
30
IP30 Handheld RFID Reader User’s Guide
Chapter 3 — Upgrading and Troubleshooting
Upgrading the IP30 Using SmartSystems Foundation
You can use the SmartSystems Console to upgrade the firmware on
your IP30. The console is part of SmartSystems Foundation, which is
available from the Intermec web site.
To upgrade firmware using SmartSystems Foundation
1 Make sure you have an active USB or Bluetooth connection with
your mobile computer and IP30. For help, see “Attaching the
IP30” on page 9.
2 Make sure that your device is Discovered in the SmartSystems
Console. For help, see the SmartSystems Foundation Online help.
3 Download the device upgrade (.exe) file onto your desktop PC.
4 Double-click the application file to install it. The application file
should appear in the software vault.
5 From the SmartSystems Console in the software vault, locate the
upgrade file, and drag-and-drop it to the mobile computer your
IP30 is connected to.
IP30 Handheld RFID Reader User’s Guide
31
Chapter 3 — Upgrading and Troubleshooting
Calling Intermec Product Support
You may need to call Intermec Product Support if you have problems
operating the IP30. Before calling, be sure you can answer the
following questions:
•
What were you doing when the error occurred?
•
What error message did you see?
•
Can you reproduce the problem?
•
What is the IP30 serial number?
•
What versions of the IP30 and RFID software are you using? For
help viewing software versions, refer to your mobile computer
user’s manual.
When you have gathered this information, call Intermec Product
Support at 1-800-755-5505.
Troubleshooting the IP30
This section includes a list of problems and possible solutions.
Problems While Working With RFID
Many problems that you may encounter when working with your
RFID system can be solved by carefully checking the RFID settings
and changing them accordingly. For help, see “Configuring RFID
Settings” on page 27. If you are still having trouble connecting your
IP30, look at the table on the next page for possible solutions.
.
32
IP30 Handheld RFID Reader User’s Guide
Chapter 3 — Upgrading and Troubleshooting
Troubleshooting RFID Problems
Problem
Solution
The IP30 is unable to read • Check to see if you have an active Bluetooth or USB connection
RFID tags, or seems to
between your IP30 and mobile computer. For help, see
read tags slowly or
“Establishing a Connection With the IP30” on page 22.
inconsistently.
• To maximize IP30 performance, make sure you have chosen the
correct tag types for your application. For help, see “Configuring
RFID Settings” on page 27.
• Adjust the FIELDSTRENGTH attribute to 26dB. For more
information on how to adjust this attribute, see “Configuring
RFID Settings” on page 27.
• The IP30 uses a linear antenna. It can only read a tag’s antenna
which is oriented in the same way as the IP30’s antenna. A tag’s
antenna is oriented the same as the IP30 antenna if the tag
element is parallel to the front edge of the IP30 antenna.
• Move slightly closer or farther from the tag attempting to be read.
Environmental factors can reduce the read range or create
deadspots.
• Make sure that you are not putting metal or other objects on the
antenna. Large rings, or hand jewelry can also affect the
performance of the IP30.
• Check to see if the mobile computer is working properly. If the
device is busy, the IP30 will not be able to work as well if there are
too many applications running in the background.
• Make sure that the battery is fully inserted into the handle.
• Make sure your battery is not low, it may affect the performance of
the IP30.
The IP30 does not respond • Your application may not be communicating with the IP30, the
to your RFID application.
BRI server on your mobile computer, or both.
• You may need to change BRI server settings to communicate with
your application. For help, see “Configuring the BRI Server” on
page 28.
IP30 Handheld RFID Reader User’s Guide
33
Chapter 3 — Upgrading and Troubleshooting
Problems With Connectivity
The IP30 connects to your mobile computer via Bluetooth and USB
connections. For information on how to connect your mobile
computer, see “Establishing a Connection With the IP30” on
page 22. If you are still having trouble connecting your IP30, look at
the table below for possible solutions.
Troubleshooting Connectivity Problems
Problem
Solution
You cannot connect to the
IP30 via Bluetooth.
• Make sure your Bluetooth radio is enabled and that you have
established a connection between your IP30 and your mobile
computer.
• Verify that your IP30 is not connected to different mobile
computer than the one you are trying to connect to.
• Make sure that the battery is fully inserted into the handle. For
help, see “Using the Battery” on page 7.
• Set the BTPWROFF attribute in Intermec Settings to its default
value of 500. See the Intermec Computer Command Reference
Manual.
• Check your IP30 battery to see if it still has power. For help, see
“Understanding the LEDs” on page 4.
You cannot connect to the
IP30 via USB.
34
• Make sure that you have secured the USB adapter to your mobile
device. For help, see “Attaching the IP30” on page 9.
• Make sure that the battery is fully inserted into the handle. For
help, see “Using the Battery” on page 7.
• Check your IP30 battery to see if it still has power. For help, see
“Understanding the LEDs” on page 4.
IP30 Handheld RFID Reader User’s Guide
A
Specifications
This appendix includes physical and electrical specifications
for the IP30 and information about the port pin assignments.
35
Appendix A — Specifications
IP30 Specifications
Height
19 cm (7.5 in)
Length
19 cm (7.5 in)
Width
10.1 cm (4 in)
Weight
.43 kg (1.9 lbs) without handheld
computer.
Electrical rating
x
Operating temperature
-15ºC to 50ºC (5ºF to 122ºF)
Storage temperature
-30ºC to 70ºC (-22ºF to 158ºF)
Humidity
(non-condensing)
10 to 95%
3.7 V, 2400 mA
RFID Specifications
Protocols supported
EPCglobal Class 1 Gen 2
ISO 18000-6B (Fairchild and Phillips)
ISO 18000-6C
Phillips v1.19
Frequency range
865-867 MHz, 869 MHz, or 915 MHz
Output power
915 MHz
865-867 MHz, 869 MHz
Maximum: 30 dBm (26 dB for use with
WWAN connection on the CN4.)
Maximum: 23 dBm
Read range (typical maximum)
915 MHz
457 cm (15 ft)
865-867 MHz, 869 MHz
198 cm (6.5 ft)
Write range (typical maximum)
915 MHz
228 cm (7.5 ft)
865-867 MHz, 869 MHz
100 cm (3.3 ft)
36
IP30 Handheld RFID Reader User’s Guide
Appendix A — Specifications
Port Pin Assignments
This section describes the port pin assignments for the USB version of
the IP30 for the CK61.
Serial Port (COM1)
Pin 1
Pin 9
Serial Port Pin Assignments
Pin
Description
1
DCD
Receive data (RXD)
Transmit data (TXD)
DTR
Signal ground
DSR
RTS
CTS
5.0 V (up to 500 mA)
2
3
4
5
6
7
8
9
IP30 Handheld RFID Reader User’s Guide
Active Polarity
High
High
37
Appendix A — Specifications
Adapter Port
Pin 1
Ground
Adapter Port Pin Assignment
38
Pin
Description
1
12 V
IP30 Handheld RFID Reader User’s Guide
Worldwide Headquarters
6001 36th Avenue West
Everett, Washington 98203
U.S.A.
tel 425.348.2600
fax 425.355.9551
www.intermec.com
© 2010 Intermec Technologies
Corporation. All rights reserved.
IP30 Handheld RFID Reader User’s Guide
*934-018-006*
P/N 934-018-006