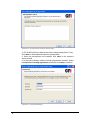
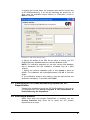
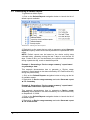
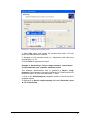
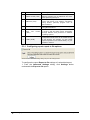
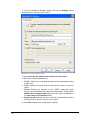
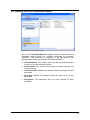
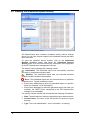
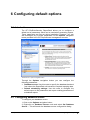
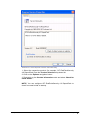
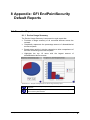
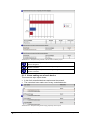
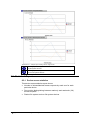
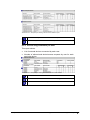
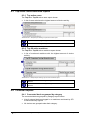
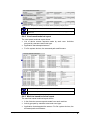
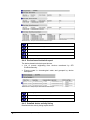
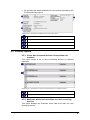
1
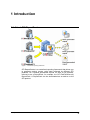
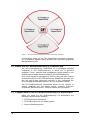
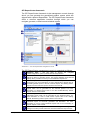
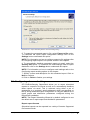
GFI EndPointSecurity 4.2 ReportPack Manual By GFI Software Ltd http://www.gfi.com Email: [email protected] Information in this document is subject to change without notice. Companies, names, and data used in examples herein are fictitious unless otherwise noted. No part of this document may be reproduced or transmitted in any form or by any means, electronic or mechanical, for any purpose, without the express written permission of GFI SOFTWARE Ltd. GFI EndPointSecurity Report Pack–Last updated 25 September 2009 Version number: ESECRP-ACM-EN-01.00.00 Contents 1 Introduction 1.1 1.2 1.3 1.4 2 Installation 2.1 2.2 2.3 2.4 3 Introduction Scheduling a report Configuring advanced settings Viewing the list of scheduled reports Viewing the scheduled reports activity Enable/disable a scheduled report Editing a scheduled report Deleting a scheduled report Example: Scheduling a report Configuring default options 6.1 6.2 6.3 6.4 7 Introduction Creating a new custom report Configuring data filter conditions Run a custom report Editing a custom report Deleting a custom report Adding custom reports to the list of favorite reports Scheduling reports 5.1 5.2 5.3 5.4 5.5 5.6 5.7 5.8 5.9 6 Introduction Generating a default report Analyzing the generated report Adding default reports to the list of favorite reports Custom reports 4.1 4.2 4.3 4.4 4.5 4.6 4.7 5 System requirements Installation procedure Launching the GFI EndPointSecurity reports for GFI ReportCenter Selecting a product Getting started: Default reports 3.1 3.2 3.3 3.4 4 About GFI ReportCenter About the GFI EndPointSecurity 4.0 ReportPack Components of the GFI EndPointSecurity 4.0 ReportPack Key features Introduction Configuring database source Viewing the current database source settings Configuring default scheduling settings General options 7.1 GFI ReportCenter Entering your license key after installation 3 3 4 4 6 9 9 9 11 11 13 13 14 16 17 19 19 19 20 25 25 26 26 29 29 29 31 35 36 37 37 38 38 43 43 43 45 45 47 47 Contents i 7.2 7.3 8 Appendix: GFI EndPointSecurity Default Reports 8.1 8.2 8.3 8.4 8.5 9 Executive Reports Statistical Reports Top active users/machines reports Technical Reports Security reports Troubleshooting 9.1 9.2 9.3 9.4 9.5 Index Contents ii Viewing product ReportPack(s) version details Checking the web for newer builds Introduction Knowledge Base Web Forum Request technical support Build notifications 48 48 51 51 54 56 56 59 61 61 61 61 61 62 63 GFI ReportCenter 1 Introduction 1.1 About GFI ReportCenter Figure 1 - Centralized reporting framework GFI ReportCenter is a centralized reporting framework that allows you to generate various reports using data collected by different GFI products. GFI releases specialized reports for each of its products, referred to as a ReportPack; for example, the GFI EndPointSecurity ReportPack. A ReportPack can be downloaded as an add-on to the GFI product. GFI ReportCenter Introduction 3 Figure 2 – Several ReportPacks plugged into the GFI ReportCenter framework A ReportPack plugs into the GFI ReportCenter framework; allowing you to generate, analyze, export and print the information generated through these reports. 1.2 About the GFI EndPointSecurity 4.0 ReportPack The GFI EndPointSecurity ReportPack is a full-fledged reporting companion to GFI EndPointSecurity. It allows you to generate graphical IT-level, technical and management reports based on the portable device usage events recorded by GFI EndPointSecurity. From trend reports for management (ROI) to daily drill-down reports for technical staff; the GFI EndPointSecurity ReportPack provides you with the easy-to-view information required, to fully understand the ever-changing portable device activity on your corporate network. The GFI EndPointSecurity ReportPack allows for the creation of various graphical and text based reports including: Executive summaries, Statistical reports, Technical reports and Top reports. 1.3 Components of the GFI EndPointSecurity 4.0 ReportPack When you install the GFI EndPointSecurity 4.0 ReportPack, the following components are installed: 4 Introduction GFI ReportCenter framework GFI EndPointSecurity 4.2 default reports Report scheduling service GFI ReportCenter GFI ReportCenter framework The GFI ReportCenter framework is the management console through which you can generate the specialized product reports which are shipped with a product ReportPack. The GFI ReportCenter framework offers a common application interface through which you can navigate, generate, customize and schedule reports. Screenshot 1 – The GFI ReportCenter management console The GFI ReportCenter management console is organized as follows: Navigation Pane – Use this pane to access the buttons/configuration options provided with GFI ReportCenter. navigation Product Selection drop-down list – Use this drop-down list to select the GFI product for which to generate reports. The Product Selection drop-down list displays all the products for which you have installed a ReportPack. Favorite Reports – Use this navigation button to access your favorite/most used reports. For more information on how to add reports to this list refer to the „Adding default reports to the list of favorite reports‟ and „Adding custom reports to the list of favorite reports‟ sections in this manual. Default Reports – Use this navigation button to access the default list of reports which can be generated for the selected product. For more information on default reports refer to the „GFI EndPointSecurity default reports‟ section in this manual. Custom Reports – Use this navigation button to access the list of customized reports which can be generated for the selected product. For more information on how to create custom reports refer to the „Getting Started: Entertaining custom reports‟ section in this manual. Scheduled Reports – Use this navigation button to access the list of scheduled reports for automatic generation and distribution. For more information on how to create scheduled reports refer to the „Scheduling of reports‟ chapter in this manual. Options – Use this navigation button to access the general configuration settings for the GFI product selected in the Product Selection drop down list. GFI ReportCenter Introduction 5 Help – Use this navigation button to show this Quick Reference Guide in the Report Pane of the GFI ReportCenter management console. Report Pane - Use this multi-functional pane to: View and analyze generated reports. Maintain the scheduled reports list. Explore samples and descriptions of default reports. Export – Use this button to export generated reports to various formats including HTML, Adobe Acrobat (PDF), Excel (XLS), Word (DOC), and Rich Text Format (RTF). Send email – Use this button to instantly distribute the last generated report via email. GFI EndPointSecurity 4.2 default reports The GFI EndPointSecurity 4.2 default reports are a collection of specialized pre-configured reports which plug into the GFI ReportCenter framework. These reports present the portable device usage activity recorded by GFI EndPointSecurity and allow for the generation of both graphical and tabular IT-Level, technical and management reports. Default reports can also serve as the base template for the creation of customized reports which fit specific network-reporting requirements. Report scheduling service The report scheduling service controls the scheduling and automatic distribution of reports by email. Reports generated by this service can also be saved to a specific hard disk location in a variety of formats which include DOC, PDF, RTF and HTML. 1.4 Key features Centralized reporting GFI ReportCenter is a one-stop, centralized reporting framework which enables the generation and customization of graphical and tabular reports for a wide array of GFI Products. Wizard assisted configuration Wizards are provided to assist you in the configuration, scheduling and customization of reports. Report scheduling With GFI ReportCenter you can schedule reports to be generated on a pre-defined schedule as well as at specified intervals. For example, you can schedule lengthy reports to be generated after office hours. This allows you to maximize the availability of your system resources during working hours and avoid any possible disruptions to workflow. 6 Introduction GFI ReportCenter Distribution of reports via email GFI ReportCenter allows you to automatically distribute generated reports via email. In scheduled reports, this can be achieved automatically after the successful generation of a scheduled report. Report export to various formats By default, GFI ReportCenter allows you to export reports to various formats. Supported formats include HTML, PDF, XLS, DOC and RTF. When scheduling reports, you can optionally configure the preferred report output format. Different scheduled reports can also be configured to output generated reports to different file formats. Default reports The GFI EndPointSecurity ReportPack ships with a default set of graphical and tabular reports. These reports can be generated without any further configuration effort immediately after the installation. The default reports in this ReportPack are organized into four different report-type categories: Executive, Statistical and Technical. For a detailed description of every report refer to „Appendix 1‟ in this manual. Report customization The default reports that ship with every ReportPack can serve as the base template for the creation of customized reports. Report customization is achieved by building up custom data filters which will analyze the data source and filter the information that matches specific criteria. In this way, you create reports tailored to your reporting requirements. Favorites GFI ReportCenter allows you to create bookmarks to your most frequently used reports – both default and custom. Printing By default, all reports generated by GFI ReportCenter are printer friendly and can be printed through the windows printing services provided by the system where GFI ReportCenter is installed. GFI ReportCenter Introduction 7 2 Installation 2.1 System requirements Install the GFI EndPointSecurity ReportPack on a computer that meets the following requirements: Microsoft Windows 2000 (SP4) Microsoft Windows XP Professional Microsoft Windows Vista (Enterprise, Business or Ultimate edition) Microsoft Windows 7 Microsoft Windows 2003 Server Microsoft Small Business Server 2003 Microsoft Windows 2008 Server (Standard or Enterprise Editions) Microsoft Small Business Server 2008 Windows 2000 (SP4) / XP (SP2) / 2003 operating system. Internet Explorer 5.1 or higher. .NET Framework version 1.1 or higher. NOTE: The GFI EndPointSecurity ReportPack only allows you to generate reports for data contained in the SQL Server database backend of GFI EndPointSecurity. 2.2 Installation procedure The GFI EndPointSecurity ReportPack includes an installation wizard which will assist you through the installation process. During the installation process this wizard will: Verify that you are running the latest version of the GFI ReportCenter framework; if you are installing the framework for the first time or the currently installed framework version is outdated, the installation wizard will automatically download the latest one for you. Automatically install all the required components distributed including the GFI ReportCenter framework, the GFI EndPointSecurity default reports and the Report Scheduling service. To start the installation: 1. Double-click on EndPointSecurity4rp.exe. GFI ReportCenter Installation 9 Screenshot 2 - GFI ReportCenter framework detection dialog 2. GFI EndPointSecurity detects and lists missing prerequisites, if any. Click Next to download and install the prerequisites. 3. When all prerequisites are installed, click Next in the welcome screen wizard. 4. In the license dialog, read the licensing agreement carefully. Select I accept the Licensing agreement option and click Next to continue. Screenshot 3 - Licensing details dialog 10 Installation GFI ReportCenter 5. Specify the full user name, the company name and the license key of GFI EndPointSecurity. If you will be evaluating the product for 10 days, leave the evaluation key as default (i.e. “Evaluation”). Click on Next to continue. Screenshot 4 – SQL Server selection dialog 6. Specify the details of the SQL Server which is hosting your GFI EndPointSecurity database backend, and the database name. NOTE: For evaluation purposes you can also use the test database that is distributed with this installation (available only as a Beta version). 7. Specify the product installation path or click Install to leave as default. The installation will need approximately 100 MB of free disk space. 8. The installation wizard is now ready to copy the required files and finalize the installation. To proceed click Finish. 2.3 Launching the GFI EndPointSecurity reports for GFI ReportCenter Following the installation, launch the GFI EndPointSecurity Reports for GFI ReportCenter from Start ► Programs ► GFI ReportCenter ► EndPointSecurity 4.2 ReportPack. 2.4 Selecting a product When more than one product ReportPack is installed, use the Product Selection drop down list to select the GFI product ReportPack to be used. GFI ReportCenter Installation 11 Screenshot 5 – Product Selection drop down list For example, to run the reports provided in the GFI EndPointSecurity ReportPack: 1. Launch GFI ReportCenter from Start ► Program Files ► GFI ReportCenter. 2. Select „GFI EndPointSecurity 4.2 ReportPack‟ from the Product Selection drop down list. NOTE: Select the „ALL PRODUCTS‟ option to display and navigate all the ReportPacks that are currently installed in GFI ReportCenter. 12 Installation GFI ReportCenter 3 Getting started: Default reports 3.1 Introduction After installing the GFI EndPointSecurity ReportPack, a number of specialized pre-configured reports can immediately be generated on the data stored in the database backend of GFI EndPointSecurity. These default reports are organized into the following categories: Executive Reports: Use the reports in this category to generate a high-level activity summary of all devices being controlled across the network. The information presented in these executive reports is mostly graphical and includes: o The percentage amount of allowed versus denied device access requests. o o o Device usage activity by user, machine and device class. Trend reports such as device access attempts per day. The top 10 device users who have been mostly allowed and denied access to controlled devices. Statistical Reports: Use the reports in this category to generate a statistical overview of the device usage activity on a user and/or device basis. Top active users/machines reports: Use the reports in this category to pinpoint top authorized/unauthorized device users as well as to enumerate the devices which were most frequently accessed across a network. Technical Reports: Use the reports in this category to generate detailed technical information related to controlled devices. This includes the number of times that each device was connected to computers protected by GFI EndPointSecurity. Technical reports allow you to generate report grouped by; users accessing each device, computers to which the devices were connected and the device class to which every connected device belongs. Security reports: Use the reports in this category to generate a list of; o users that connected devices during weekends or outside working hours o o users that tried to access devices on multiple machines. machines used to access devices by multiple users. GFI EndPointSecurity default reports are accessed by clicking on the Default Reports navigation button provided in the management console. NOTE: Click a report node to view a description and a sample output of what the selected report will contain. GFI ReportCenter Getting started: Default reports 13 3.2 Generating a default report To generate a default report: 1. Click on the Default Reports navigation button to launch the list of default reports available. Screenshot 6 – Selecting the data set period 2. Right-click on the report that you wish to generate, select Generate report and specify which device activity data will be represented in the report. NOTE: Default reports can be based on the device activity data collected today, yesterday, during the last 7 days or over the last 30 days. Further to this, you can also base your reports on data collected during a particular day, month or date/time period. Example 1: Generating a “Device usage summary” report based on yesterday’s data. This example demonstrates how to generate a “Device usage summary” report based on the data collected by GFI EndPointSecurity during the previous day. 1. Click on the Default Reports navigation button to bring up the list of available reports. 2. Right-click on Device usage summary and select Generate report ► For Yesterday. Example 2: Generating a “Device usage summary” report based on that data collected on a particular day. This example demonstrates how to generate a Device usage summary report based on the data collected by GFI EndPointSecurity on September 15, 2009. 1. Click on the Default Reports navigation button to launch the list of available reports. 2. Right-click on Device usage summary and select Generate report ► For Custom Date. 14 Getting started: Default reports GFI ReportCenter Screenshot 7 - Configuring custom date/time period 3. Select Day option and expand the provided drop down. This will launch the date selection calendar. 4. Navigate to the required month (i.e. September) and select the required day (i.e. 15). 5. Click Finish to generate the report. Example 3: Generating a “Device usage summary” report based on data collected over a specific date/time period. This example demonstrates how to generate a Device usage summary report based on the data collected by GFI EndPointSecurity between August 18, 2009 and September 1, 2009. 1. Click on the Default Reports navigation button to launch the list of available reports. 2. Right-click on Device usage summary and select Generate report ► For Custom Date. GFI ReportCenter Getting started: Default reports 15 Screenshot 8 - Configuring custom date/time period 3. Select Date range option and specify the required parameters: From – 08/18/2009 12:00:00 AM To – 09/01/2009 12:00:00 PM NOTE: Date and time format are based on the regional settings configured on your computer. 4. Click Finish to generate the report. 3.3 Analyzing the generated report Screenshot 9 – Generated reports are displayed in the right pane of the management console 16 Getting started: Default reports GFI ReportCenter Generated reports are shown in the right pane of the GFI ReportCenter. Use the toolbar at the top of the report pane to access common report related functions: Report browsing options Browse the generated report page by page. Zoom in/Zoom out. Search the report for particular text or characters. Go directly to a specific page. Breakdown the report into a group tree (e.g. by date/time). Print report. Report storage and distribution options Export the generated report to a specific file format. Distribute the generated report via email. NOTE: For information on how to configure report storage and distribution options refer to the „Configuring Advanced Settings‟ section in this manual. 3.4 Adding default reports to the list of favorite reports Screenshot 10 – Favorite Reports navigation button You can group and access frequently used reports through the Favorite Reports navigation button. To add a default report to the list of favorite reports: 1. Click on the Default Reports navigation button to launch the list of available reports. 2. Right-click on the default report that you wish to add to favorites and select Add to favorites list. GFI ReportCenter Getting started: Default reports 17 4 Custom reports 4.1 Introduction GFI ReportCenter allows you to create custom reports which are tailored to your reporting requirements. This is achieved by building up custom data filters which will analyze the data source and filter out the information that matches the specified criteria. 4.2 Creating a new custom report To create a custom report: 1. Click on the Default Reports navigation button. 2. Right-click on the default report that will be used as a custom report template and select New ► Custom Report. This will launch the Custom Report Wizard.Click Next. Screenshot 11 – Selecting the data source to use 3. Select the data source that will be used to generate the custom report. GFI ReportCenter Getting started: Default reports 19 Screenshot 12 – Specifying data filter conditions 4. Configure the data filter conditions that will be applied against the selected data source. Click on Next to continue. NOTE: For more information on how to configure filter conditions, refer to the section „Configuring data filter conditions‟ in this manual. 5. Specify a name and description for the customized report. Click on Next to continue. 6. Click on Finish to finalize your configuration settings. 4.3 Configuring data filter conditions Use data filter conditions to specify which device usage activity will be included in the report. Only the device usage activity which matches the specified criteria will be processed and presented within the report. 20 Getting started: Default reports GFI ReportCenter Screenshot 13 - Custom Report Wizard: Filters dialog Click Add… to launch the „Edit filter properties‟ dialog. Configurable options in this dialog include: Filter condition – This is the data source area on which the filter will focus (for example, select „Computer Name‟ to filter the device activity data that is related to a particular computer). Logical relation – The condition comparison parameter. Value – The string to which source data will be compared. For example to generate a report which contains only information related to a workstation called “WinXp01”, configure your filter parameters as shown below: GFI ReportCenter Getting started: Default reports 21 Screenshot 14 - Filter conditions configuration dialog For more specific reports, you can limit the range of information to be displayed by tightening your search criteria. This is achieved by configuring and applying multiple data filters against the selected data source. When more than one filter is used, you will also have to specify how these filters will be logically linked. This is achieved by selecting a logical grouping condition from „Filter property condition…‟ drop down list provided at the bottom of the dialog. Select And to include ALL the scan data information that satisfies ALL of the conditions specified in the filters. Select Or to include ALL the scan data information that matches at least one of the specified filter conditions. Example: Using multiple filters Consider the situation where a custom report has 2 filters configured as follows: Screenshot 15 - Using multiple filters 22 Getting started: Default reports GFI ReportCenter Parameters Filter 1 Filter 2 Filter condition Computer Name User Name Logical relation Is equal to Includes Value „WinXp01 „BJones‟ The data which will be included in this custom report will vary according to how these filters will be applied against your data. This is defined through the „Filter property condition…‟ drop-down. Filters applied Filter 1 and Data output Filter 2 The report will show: Filter 1 or Filter 2 All the device usage activity made by users called „JBjones‟ on the computer called „WinXP01‟. The report will show: All the device usage activity made by users called „Bjones‟ – (no matter on which computer the connections were made) AND All device connections made to the computer called „WinXp01‟ – (no matter who the users are). Example: Creating a custom report based on data collected during a particular month This example demonstrates how to generate a device usage summary report called „Device Usage on September 2009‟. This report will be based on the device usage activity: Collected from the computer called „WinXp01‟ Made by a particular user called „Bob Jones‟ Recorded during the month of „September 2009‟. To create this report: 1. Click on the Default Reports navigation button. 2. Right-click on the report that you wish to customize and select New ► Custom Report. This will launch the „Custom Reports Wizard‟. 3. As soon as the welcome dialog is displayed, click Next. GFI ReportCenter Getting started: Default reports 23 Screenshot 16 – Selecting the data source to use 4. Select Month option and specify the following parameters: Month : September. Year : 2009. 5. Click on Next to proceed to the data filters dialog. Screenshot 17 - Filter conditions dialog(s) 24 Getting started: Default reports GFI ReportCenter 5. Click on the Add… button and configure the parameters of filter 1 as follows: Filter condition : Computer Name Condition : Equal to Value : WinXp01 7. Click OK to finalize your filter configuration settings. 8. Click again on the Add… button and configure the parameters of filter 2 as follows: Filter condition : User Name Condition : Equal to Value : Bob Jones Filter Property condition… : and 9. Click OK to finalize your filter configuration settings. 10. Click Next and specify the following parameters: Report Name : Device usage on September 2009 Report Title : Device usage by Bob Jones on computer WinXp01 Report Description: This report shows the device connections made by user Bob Jones on computer WinXp01 during September 2009. 11. Click Next to proceed to the final dialog. 12. Click Finish to finalize your custom report configuration settings. 4.4 Run a custom report To run a custom report: 1. Click on the Custom Reports navigation button. 2. Right-click on the custom report that you wish to generate and select Generate. 4.5 Editing a custom report To edit the configuration settings of a custom report: 1. Click on the Custom Reports navigation button. GFI ReportCenter Getting started: Default reports 25 Screenshot 18 - Custom Report Wizard: Welcome dialog 2. Right-click on the custom report that you wish to modify and select Edit. This will launch the Custom Reports Wizard through which you can make the required changes. NOTE: For more information on how to configure the parameters of a custom report refer to the Creating a custom report section in this chapter. 4.6 Deleting a custom report To delete a custom report: 1. Click on the Custom Reports navigation button. 2. Right-click on the custom report that you wish to permanently remove from the list and select Delete. 3. Click Yes to confirm. 4.7 Adding custom reports to the list of favorite reports Screenshot 19 - Favorite reports navigation button 26 Getting started: Default reports GFI ReportCenter You can group and access frequently used reports through the Favorite Reports navigation button. To add a custom report to the list of favorite reports: 1. Click on the Custom Reports navigation button to launch the list of available reports. 2. Right-click on the custom report that you wish to add to favorites and select Add to Favorites List. GFI ReportCenter Getting started: Default reports 27 5 Scheduling reports 5.1 Introduction GFI ReportCenter allows you to generate reports on a pre-defined schedule as well as at specified intervals. In this way you can automate the generation of reports which need to be created and delivered on a regular basis. Further to this, GFI ReportCenter can also be configured to automatically distribute scheduled reports via email. For every scheduled report, you can configure custom emailing parameters including the list of report recipients and the file format (e.g. pdf) in which the report will be attached to the email. Use the report scheduling feature to automate your report generation requirements. For example, you can schedule lengthy reports after office working hours and automatically email them to the intended recipients. In this way, you maximize the availability of your system resources during working hours and avoid any possible disruptions to workflow. Both default and custom reports can be scheduled for automatic generation. 5.2 Scheduling a report To schedule a report 1. Click on the Default or Custom Reports option pane. 2. Right-click on the report to be scheduled and select New ► Scheduled report. This will launch the „Scheduled Report Wizard‟. Click on Next to continue. GFI ReportCenter Scheduling reports 29 Screenshot 20 – Report Scheduling Wizard: Data-set selection dialog 3. Select the device usage period to be covered by this report. Screenshot 21 – Report Scheduling Wizard: Time schedule dialogue 4. Specify the report scheduling parameters (date/time/frequency). Click on Next to continue. 30 Scheduling reports GFI ReportCenter Screenshot 22 – Report Scheduling Wizard: Advanced Settings dialog 5. To export the generated report to file, select Export to file option. To customize the report export configuration settings click on the Settings button underneath this option. NOTE: For information on how to configure export-to-file settings refer to Configuring report export to file options section in this chapter. 6. To automatically distribute generated reports via email, select the Send by mail option. To customize the email settings used for report distribution click on the Settings button underneath this option. NOTE: For information on how to configure email settings refer to the Configuring report emailing options in this chapter. 7. Specify a name and description for this scheduled report. Click on Next to continue. 8. Click on Finish to finalize your settings. 5.3 Configuring advanced settings GFI EndPointSecurity ReportPack allows you to export scheduled reports to a specific file format as well as to automatically distribute these reports via email. This is achieved using either a set of parameters (e.g. recipient‟s email addresses) which are specified on the fly during scheduled report configuration or using the default set of report export and distribution parameters configured during the ReportPack installation. NOTE: The Report Scheduling Wizard is by default configured to use the default set of report export and distribution parameters. Report export formats Scheduled reports can be exported in a variety of formats. Supported file formats include: GFI ReportCenter Scheduling reports 31 Format Description Adobe Acrobat (.PDF) Use this format to allow distribution of a report on different systems such as Macintosh and Linux while preserving the layout. 2 MS Excel (.XLS) Use this format if you want to further process the report and perform more advance calculations using another (external) program such as Microsoft Excel. 3 MS Word (.DOC) Use this format if you want to access this report using Microsoft Word. 4 Rich text (.RTF) Use this format to save the report in a format that is small in size and which allows accessibility through different word processors in different operating systems. 1 5 HTML (.HTM) format Use this format to save the report in a platform independent format which can be viewed through a web browser. For example, you can include reports exported in html format directly on your website or intranet. 5.3.1 Configuring report export to file options Screenshot 23 - Advanced Settings dialog: Export to file settings button To configure the report Export to file settings of a scheduled report; 1. From the Advanced Settings dialog, click Settings button underneath the Export to file option. 32 Scheduling reports GFI ReportCenter Screenshot 24 - Advanced Settings: Export to file options 2. Select the Override the default folder options for this report. 3. Specify the complete path where the exported report will be saved. 4. Specify the file format in which the exported report will be saved. 5. Click OK to finalize your configuration settings. NOTE: For information on how to configure the default export to file settings refer to the Configuring default scheduling options section in this manual. 5.3.2 Configuring report emailing options To configure the report emailing options of a scheduled report do as follows: Screenshot 25 - Advanced Settings dialog: Send by email settings button GFI ReportCenter Scheduling reports 33 1. From the „Advanced Settings‟ dialog, click on the Settings button underneath the „Send by email‟ option. Screenshot 26 - Report distribution options 2. Select Override the default email options for this report. 3. Specify the following parameters: To/CC : Specify the email address(es) where the generated report will be sent. From: Specify the email account that will be used to send the report. Server: Specify the name/IP of your SMTP (outbound) email server. If the specified server requires authentication, select option SMTP Server requires login and specify the logon credentials in the User name and Password fields. Report format: Reports are sent via email as attachments. Select the file format in which to send out your report. 4. Click OK to finalize your configuration settings. 34 Scheduling reports GFI ReportCenter 5.4 Viewing the list of scheduled reports Screenshot 27 - List of Scheduled reports Click on the Scheduled Reports navigation button to show the list of scheduled reports which are currently configured for automatic generation. This information is displayed in the right pane of the management console and includes the following details: GFI ReportCenter Schedule Name: The custom name that was specified during the creation of the new scheduled report. Report Name: The names of the default or custom report(s) that will be generate. Last Generated: Indicates the date/time when the report was last generated. Next Sent: Indicate the date/time when the report is to be next generated. Description: The description that you have entered for each schedule. Scheduling reports 35 5.5 Viewing the scheduled reports activity Screenshot 28 - Schedule activity monitor GFI ReportCenter also includes a schedule activity monitor through which you can view events related to all scheduled reports that have been executed. To open the schedule activity monitor, click on the Scheduled Reports navigation button and select the Scheduled Reports Activity node. This will launch the activity information in the right pane of the GFI ReportCenter management console . The activity monitor displays the following events: - Information: The scheduled report was successfully executed and sent by email and/or saved to disk. - Warning: The scheduled report was not executed because product license is invalid or has expired. - Error: The scheduled report was not executed due to a particular condition/event. Typical conditions include: Errors when attempting to save the generated report to a specific folder (for example, out of disk space). Errors when attempting to send the generated report via email (for example, the SMTP server configured in the GFI ReportCenter settings is not reachable). The activity monitor records and enumerates the following information: Date: The date and time when the scheduled report was executed. Product name: The name of the GFI product to which the report belongs. Type: The event classification - error, information, or warning. 36 Scheduling reports GFI ReportCenter Description: Information related to the state of a scheduled report that has been executed. The format and contents of the activity description vary, depending on the event type. NOTE: The description is often the most useful piece of information, indicating what happened during the execution of a scheduled report or the significance of the event. 5.6 Enable/disable a scheduled report Scheduled reports can be enabled or disabled as required. Use the Scheduled Reports navigation button to view the list of scheduled reports as well as to identify their current status. The status of scheduled reports is shown through the icon included on the left hand side of each schedule: Indicates that the scheduled report is disabled. Indicates that the scheduled report is enabled or pending. To enable or disable a scheduled report, right-click on the respective report and select Enable/Disable accordingly. 5.7 Editing a scheduled report To make changes to the configuration settings of a scheduled report: 1. Click Scheduled Reports ►Scheduled Reports list navigation button. 2. Right-click on the scheduled report that you wish to re-configure and select Properties. This will launch the Scheduled Reports Wizard. Screenshot 29 - Scheduled Reports wizard GFI ReportCenter Scheduling reports 37 3. Click on Next and perform the required changes. For information on how to configure the parameters of a scheduled report refer to the Creating a scheduled report section in this chapter. 5.8 Deleting a scheduled report To delete a scheduled report: 1. Click on the Scheduled Reports navigation button. 2. Right-click on the scheduled report that you wish to permanently remove from the list and select Delete. 5.9 Example: Scheduling a report This example demonstrates how to schedule a device usage summary report called Daily Device Usage Report. This schedule will be configured to: Generate the first report on 09/16/2009 at 12:00. Continue generating the same report on daily basis. Export the generated report(s) to folder „C:\Daily Reports‟ in PDF format. Email the generated report using the following custom parameters: o Send from email account: [email protected] o Send to email account: [email protected] o SMTP server details: Win2k3serv To create the scheduled report: 1. Click on the Default Reports navigation button. 2. Right-click on Device Usage Summary and select New ► Scheduled Report. In the welcome dialog, click Next. Screenshot 30 - Select device usage period 38 Scheduling reports GFI ReportCenter 3. Select the option Relative and from the provided drop down list select Today. Click on Next to proceed to the next dialog. 4. Since no data filters will be applied in this example, click Next to proceed to the next dialog. Screenshot 31 – Specifying the scheduling options 5. To generate this report on daily basis, select option Generate this report every: and set the interval to 1 Day. 6. Set the start date to 09/16/2009 and time to 12:00:00 AM. Click Next to proceed to the next dialog. GFI ReportCenter Scheduling reports 39 Screenshot 32 - Advanced Settings dialog 7. From the Advanced Settings dialog, click Settings under Export to file option. 40 Scheduling reports GFI ReportCenter Screenshot 33 - Advanced Settings: Export to file options 8. Select Override the default folder options for this report: 9. Specify the complete path where this report will be saved i.e. C:\Daily Reports. 10. From the report format drop down select PDF and click OK. Screenshot 34 - Advanced Settings dialog: Send by email settings button 11. From Advanced Settings dialog, click Settings button under Send by email option. GFI ReportCenter Scheduling reports 41 Screenshot 35 - Report distribution options 12. Select Override the default email options for this report: 13. Specify the following parameters: To : [email protected] From : [email protected] Server : Win2k3serv 14. From the report format drop down select PDF and click OK to finalize your email settings. 15. Click Next and specify the following parameters: Report Name : Daily device usage report Report Title : Daily device usage report Report Description: This report is generated on a daily basis at 12:00 AM. It shows all device usage activity recorded throughout the day. 16. Click Next to proceed to the final dialog. 17. Click Finish to finalize your custom report configuration settings. 42 Scheduling reports GFI ReportCenter 6 Configuring default options 6.1 Introduction The GFI EndPointSecurity ReportPack allows you to configure a default set of parameters which can be used when generating reports. These parameters are first set during installation. However, you can still reconfigure any of these parameters via the Options navigation button provided in the GFI ReportCenter management console. Screenshot 36 - Options navigation button Through the Options navigation button you can configure the following parameters: Database source: Use this node to specify the database backend from where the ReportPack will extract the required reporting data. Default scheduling settings: Use this node to configure the default export to file parameters and report emailing parameters of scheduled reports. 6.2 Configuring database source To configure your database source: 1. Click on the Options navigation button. 2. Right-click on Database Source node and select Set Database Source… This will launch the database source configuration dialog. GFI ReportCenter Configuring default options 43 Screenshot 37 - Database source configuration dialog 3. Select the database type (e.g. MS SQL Server) from the provided list of supported databases. NOTE: GFI EndPointSecurity database backend supports only MSDE/MS SQL Server. 4. Specify the name or IP address of your MSDE/MS SQL Server database backend. 5. To use the credentials of an SQL Server account, select Use SQL Server authentication option and specify the user name and password in the provided fields. NOTE: By default, the GFI EndPointSecurity ReportPack uses Windows logon credentials to authenticate to the SQL Server. 6. Click on OK to finalize your configuration settings. 44 Configuring default options GFI ReportCenter 6.3 Viewing the current database source settings Screenshot 38 - Database source configuration settings Click Database Source to view in the right pane window the current database source settings. 6.4 Configuring default scheduling settings To configure the default settings to be used by scheduled reports: 1. Click on the Options navigation button. Screenshot 39 - Default Scheduling Options node 1. From the pull-down menu, click on the Tools ► Default Scheduling Options. 2. Configure the required parameter as described in the „Configuring Advanced Settings‟ section of the Scheduling Reports chapter. GFI ReportCenter Configuring default options 45 7 General options 7.1 Entering your license key after installation If you have purchased GFI EndPointSecurity, enter your License key using the Options ► Licensing node (no re-installation/reconfiguration required) NOTE: Entering the License Key should not be confused with the process of registering your company details on our website. This is important since it allows us to give you support and notify you of important product news. You may register and obtain your GFI customer account from: http://www.gfi.com/pages/regfrm.htm To input your GFI EndPointSecurity license key in the ReportPack: Screenshot 40 – Product Selection drop down list 1. Select the respective product (e.g. GFI EndPointSecurity 4.2) from the Product Selection drop down list. 2. Click on the Options navigation button. 3. Right-click on the Licensing node and select Set Licensing…. This will launch the „Licensing‟ dialog. GFI ReportCenter General options 47 Screenshot 41 - Licensing dialog 4. Type the GFI EndPointSecurity license key in the space provided. 5. Click on OK to finalize license key entry. 7.2 Viewing product ReportPack(s) version details To view the version information of a currently installed product ReportPack: 1. Select the product report from the Product Selection drop down list. 2. Click on the Options navigation button. 3. Click on the Version Information node. The version details are displayed in the right pane of the GFI ReportCenter management console. 7.3 Checking the web for newer builds Periodically GFI releases product and ReportPack updates which can be automatically downloaded from the GFI website. To check if a newer built is available for download: 48 General options GFI ReportCenter Screenshot 42 - Version Properties: Check for newer builds dialog 1. Select the respective product (for example, GFI EndPointSecurity 4.0 ReportPack) from the Product Selection drop down list. 2. Click on the Options navigation button. 3. Right-click on the Version Information node and select Check for newer builds… NOTE: You can configure GFI EndPointSecurity 4.2 ReportPack to check for newer builds on startup. GFI ReportCenter General options 49 8 Appendix: GFI EndPointSecurity Default Reports 8.1 Executive Reports 8.1.1 Device Usage Summary The Device Usage Summary is an executive style report that: Provides a usage summary of all controlled devices across the network. Graphically represents the percentage amount of allowed/denied access requests. Breaks down activity in device categories to allow comparisons of devices contributing to access requests. Highlights the top 10 users with the largest amount of allowed/denied device access. Screenshot 43 – Samples showing extracts of device usage summary report A pie chart showing the percentage of allowed vs. denied access requests. A bar chart showing how requests were distributed between file-system and non-file system devices. GFI ReportCenter Appendix: GFI EndPointSecurity Default Reports 51 Screenshot 44 – Sample showing extracts of device access summary report A bar chart showing how requests were distributed between different device categories. A list showing the top 10 users having the highest amount of allowed access to devices. A list showing the top 10 users having the highest amount of denied access to devices. 8.1.2 Users making use of each device This executive style report shows: A list of all controlled devices used across the network. The users that have made use of every controlled device. Screenshot 45 – Sample showing device usage grouped by device report 52 Appendix: GFI EndPointSecurity Default Reports GFI ReportCenter Device name and the category to which it belongs. List of users who have used that device. 8.1.3 Devices used by each user This executive style report shows: A list of users that have made use of controlled devices. The devices that have been used across the network. Screenshot 46 – Sample showing device usage grouped by user report Logged on user name and the computer on which the devices were connected. List of devices that were connected and accessed by the user. Device access trends This device usage trend report shows: GFI ReportCenter The change in device access attempts over time. Allowed/Denied access counts per day in graphs. Appendix: GFI EndPointSecurity Default Reports 53 Screenshot 47 - Sample report showing device usage trends A line graph showing the trend of allowed and denied access attempts for file system devices. A line graph showing the trend of allowed and denied access attempts for non-file system devices. 8.2 Statistical Reports 8.2.1 Device access statistics This device access statistics report shows: Number of allowed/denied access requests by each user for each particular device. Row entries distinguishing between read-only and read-write (full) access requests. Distinct file system and non file-system devices. 54 Appendix: GFI EndPointSecurity Default Reports GFI ReportCenter Screenshot 48 – Sample report showing device access statistics report A list of non-file system device access statistics per user for each device. A list of file system device access statistics per user for each device. 8.2.2 Device usage statistics per user This report shows: List of external devices connected by each user. Number of allowed and denied access requests by user for each particular device. Screenshot 49 - Sample report showing user based device access statistics Username A list of devices and the number of times it was plugged in. A list of device access statistics per each user for each device. GFI ReportCenter Appendix: GFI EndPointSecurity Default Reports 55 8.3 Top active users/machines reports 8.3.1 Top active users The Top 20 or Top 50 active users report shows: A list of users who have the highest amount of device activity. Screenshot 50 – Sample report showing Top 20 active users report Top list of users having the highest count of allowed access to devices. Top list of users having the highest count of denied access to devices. 8.3.2 Top 20 active machines The Top 20 or Top 50 active machines report shows: A list of monitored machines with the highest amount of device activity. Screenshot 51 - Sample report showing Top 20 active machines report Top list of machines having the highest count of allowed access to devices. Top list of machines having the highest count of denied access to devices. 8.4 Technical Reports 8.4.1 Connected devices grouped by category The connected devices grouped by category report shows: List of external devices plugged in to machines monitored by GFI EndPointSecurity Agents. All devices are grouped under their category. 56 Appendix: GFI EndPointSecurity Default Reports GFI ReportCenter Screenshot 52 – Sample report showing connected devices grouped by category report The category to which a device belongs. A list of devices used with the number of times they were plugged in by each user 8.4.2 User based technical report The user based technical report shows: List of device access requests made by each user. Activities grouped by username and event type. Application that attempted access. For file system devices, the accessed path and filename. Screenshot 53 - Sample report showing user based technical report List of read-only access allowed for user. List of read-only access denied for user. 8.4.3 Machine based technical report The machine based technical report shows: GFI ReportCenter A list of device access requests made from each machine. Activity grouped by machine name and event type. Application that attempted the access. For file system devices, the accessed path and filename. Appendix: GFI EndPointSecurity Default Reports 57 Screenshot 54 – Sample machine based technical report Computer name List of dates/times when agent was started List of dates/times when device was connected List of dates/times when device was disconnected List of read-only access allowed events. 8.4.4 Device based technical report The device based technical report shows: List of events originating from devices monitored by GFI EndPointSecurity. Events sorted in chronological order and grouped by device description Screenshot 55 - Sample report device based technical report The category to which a device belongs. Device description. List of events in chronological order. 8.4.5 Detailed device activity listing Detailed device activity listing report shows: 58 Appendix: GFI EndPointSecurity Default Reports GFI ReportCenter All the technical details available for every activity reported by GFI EndPointSecurity Agents. Screenshot 56 – Sample report detailed device activity listing report Event details. Logged on user name and machine name. Device details. Access details. 8.5 Security reports 8.5.1 Users who accessed devices on more than one machine This report shows a list of users accessing devices on different machines. Screenshot 57 – Sample report, users who accessed devices on multiple computers User accessing devices Computer used to access the devices 8.5.2 Machines which had more than one user accessing devices This report displays the machines which had more than one user accessing devices. GFI ReportCenter Appendix: GFI EndPointSecurity Default Reports 59 Screenshot 58 – Sample report, devices accessed by multiple users on a machine Computer name where the activity was detected. Users that accessed devices on a particular machine. 8.5.3 Connected devices outside working hours This report shows devices connected outside normal working hours. Screenshot 59 – Sample report, connected devices outside working hours Events occurred outside working hours. 8.5.4 Connected devices during weekends This report shows devices connected during the weekends. Screenshot 60 – Sample report, connected devices during weekends Events occurred during weekends. 60 Appendix: GFI EndPointSecurity Default Reports GFI ReportCenter 9 Troubleshooting 9.1 Introduction The troubleshooting chapter explains how you should go about resolving any software issues that you might encounter. The main sources of information available to users are: The manual – most issues can be solved by reading this manual. GFI Knowledge Base articles Web forum Contacting GFI Technical Support 9.2 Knowledge Base GFI maintains a Knowledge Base, which includes answers to the most common problems. If you have a problem, please consult the Knowledge Base first. The Knowledge Base always has the most upto-date listing of technical support questions and patches. To access the Knowledge Base, visit http://kbase.gfi.com/. 9.3 Web Forum User to user technical support is available via the web forum. The forum can be found at: http://forums.gfi.com/. 9.4 Request technical support If you have referred to this manual and our Knowledge Base articles, and you still cannot solve issues with the software, contact the GFI Technical Support team by filling in an online support request form or by phone. Online: Fill out the support request form on: http://support.gfi.com/supportrequestform.asp. Follow the instructions on this page closely to submit your support request. Phone: To obtain the correct technical support phone number for your region please visit: http://www.gfi.com/company/contact.htm. NOTE: Before you contact our Technical Support team, please have your Customer ID available. Your Customer ID is the online account number that is assigned to you when you first register your license keys in our Customer Area at: http://customers.gfi.com. We will answer your query within 24 hours or less, depending on your time zone. GFI ReportCenter Troubleshooting 61 9.5 Build notifications We strongly suggest that you subscribe to our build notifications list. This way, you will be immediately notified about new product builds. To subscribe to our build notifications, visit: http://www.gfi.com/pages/productmailing.htm. 62 Troubleshooting GFI ReportCenter R Index Report scheduling 4, 6 S schedule activity monitor 36 scheduled reports 5, 7, 35, 37 Statistical 54 C Statistical reports 4 configuration settings 45 System requirements 9 custom reports 5, 7, 19, 26, 29 T D Technical 56 data filters 7, 19 Technical reports 4, 13 database source 43, 45 Top 20 reports 4 default reports 5, 13, 14, 17 distribution of reports 6, 7 U user interface 5, 16, 35, 36, 43 E email settings 11 W executive reports 13 wizard 9, 11, 37, 38 export reports 7 F favorite reports 5, 17, 26 filter conditions 20 framework 3, 4, 5, 6, 9 I installation 7, 9, 11, 43, 47 L license 10, 11, 36, 47, 48 N navigation button 5, 13, 14, 15, 17, 19, 23, 25, 26, 27, 32, 34, 35, 36, 37, 38, 40, 41, 43, 45, 47, 48, 49 P product ReportPack 5 Product Selection drop down list 12, 47, 48, 49 GFI ReportCenter Index 63