1
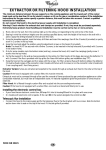
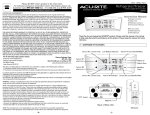
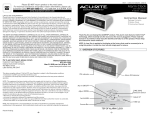
31833199.fm Page 5 Monday, March 13, 2006 12:00 PM
GB
EXTRACTOR OR FILTERING HOOD INSTALLATION
The minimum distance between the cooker support surface and the lowest part of the hood must not be less than
40 cm, for gas and 30 cm for electric cookers (65 cm from controls as per enclosed drawing) If the installation
instructions for the gas cooker specify a greater distance, this must be taken into account. The fume hose and
hose clamps are not supplied. We recommend that you contact a qualified engineer to have the hood installed.
Gas cooker
Electric cooker
Also consult the drawings on the first pages of this booklet, with alphabetical references in the description.
Always comply with the instructions and recommendations given in this manual. The Manufacturer declines all liability for any
faults, damage or fires caused by the appliance as a result of failure to observe the instructions and recommendations given in
this manual.
If the hood is used in FILTER version it is used without an exhaust fume discharge pipe.
Fumes and vapour are recycled through the deflector F (11F).
If the product is to be used in EXTRACTOR version, it is necessary to provide an exhaust pipe from the top outlet B to the
external outlet vent.
In this case a collar (11A) must be fitted on the exhaust outlet B and the carbon filter must be removed.
A telescopic flue is also available (as an accessory).
Preliminary information for installing the hood:
Expansion plugs are provided to secure the hood to most types of ceilings. However, a qualified technician is needed to make
sure that the plugs are suitable for your ceiling. The ceiling must be strong enough to take the weight of the hood.
Only for some models
An aesthetic flue can be purchased as an optional accessory. Please check with your After-sales Service to find out whether or
not your model. has this option.
In order to ensure that it is installed in the most suitable way, it is recommended that you only fit the hood after purchasing the
flue.
Disconnect the power supply at the domestic main switch before carrying out electrical connections.
• Apply the (adhesive) rubber strips C to the back of the hood.
If necessary (if the wall is not perfectly vertical or if it is partially tiled) fit two spacers D in correspondance with the final
fixing holes (snap-fitting).
• Trace a centre line on the wall to facilitate installation (1), position the drilling template on it so that the central line printed
on the template matches the central line marked on the wall and the bottom part of the template is aligned with the
bottom of the hood when mounted (2).
• Drill two holes (Ø 8 mm) and fix the support bracket to the wall using two wall plugs and screws (3).
• Remove the steam deflector and take out the grease filter (see relevant paragraph).
• Hang the hood (4), adjust its position (5-6) and from the inside of the hood mark two points for final fastening (7), remove
the hood and drill two holes (Ø 8 mm) (8), insert two wall plugs, hang the hood again and fasten it to the wall with two
screws (9).
• Carry out the electrical connection (10), but leave the hood disconnectedfrom the main power supply.
• If the hood is to be used in the extractor version, fit the collar supplied on the hood outlet (11A - extractor version - also
install an exhaust pipe of suitable diameter) in place of the deflector (11F - filter version).
• Fit the grease filter, fit and close the steam deflector.
Warning! If the hood is to be used in the extractor version, remove the carbon filter if there is one, along with the fixing
elements (behind the grease filter - see relevant paragraph).
If the hood is to be used in filter version, check that the carbon filter has already been fitted at the back of the grease filter,
and if this is not the case, purchase a carbon filter and fit it.
• Connect the hood to the main power supply.
5019 318 33199
D
GB
F
NL
E
P
I
GR
31833199.fm Page 6 Monday, March 13, 2006 12:00 PM
5019 318 33199
D
GB
F
NL
E
P
I
GR
31833199.fm Page 7 Monday, March 13, 2006 12:00 PM
CONTROL PANEL
Light switch: press rapidly for partial lighting, twice for full
lighting. Press again to turn the lights off.
Press and hold, for at least two seconds, to turn the secondary
lighting system on; press again for one second to turn it off.
Motor switch: Press to turn the hood on and off. Once it has
been turne on, the hood will operate at the speed selected
previously.
Speed 1.
Fig.1
Speed 2.
1. Control panel
2. Grease filter
3. Grease filter release handle
4. Halogen bulb
5. Steam deflector
6. Neon light (only certain models)
7. Air outlet
Steam deflector (Fig. 2)
The steam deflector must always be left closed, and should only be
opened to carry out maintenance (e.g. Cleaning or changing the
filters).
Opening the steam deflector:
To open the steam deflector, pull the bottom part (the pins at the
centre will disconnect-A), lift the deflector slightly (B) to allow the
side pins to come out of their slots (X) To fit and close, proceed in
reverse order.
Grease filter
This should be washed once a month either by hand or in a
dishwasher at a low temperature and with short cycle.
Cleaning in a dishwasher may cause the metal grease filter to
discolour, but htis in no way affects its filtering efficiency.
To remove the grease filter - Fig. 3
Remove the steam deflector.
Pull the handle downwards and extract the filter.
Carbon filter (filter version only)
Retains any unpleasant odours produced during cooking.
The carbon filter can be washed every two months in hot water and
a suitable detergent or in a dishwasher at 65°C (when washing in a
dishwasher, run a complete cycle without any dishes).
Remove excess water without damaging the filter, then remove the
wadding within the plastic frame and put it in the oven at 100°C for
10 minutes to dry it out completely.
Replace the wadding every 3 years or whenever it is seen to be
damaged.
• Assembly - Fig. 4
Remove the steam deflector and take out the grease filter.
Install the carbon filter behind the grease filter and fasten with
two fixing elements.
Warning! The fixing elements are included in the carbon filter
pack, not with the hood.
• To remove the filter, proceed in reverse order.
Changing lamps
Before doing so, check that the lamps have cooled down.
Halogen lamps (detail No. 4): press at the point marked PUSH, open,
remove the old lamp and replace it with another that has the same
characteristics. Caution: the halogen lighting unit must be opened
completely, otherwise it will not close again.
Neon lamp (detail No. 6): open the lighting unit by unfastening the 2
screws and change the neon lamp (only certain models).
If the lamps are not working, check that they are fitted
properly in place before contacting the After Sales Service.
5019 318 33199
D
GB
F
NL
Speed 3.
Intensive speed: maintains intensive speed for 5 minutes, after
which the hood returns to the speed set previously.
Timer: press to use the following timer functions:
Speed 1 for 20 minutes.
Speed 2 for 15 minutes.
Speed 3 for 10 minutes.
Intensive speed for 5 minutes.
When the timer function expires the hood switches itself off.
Press
or
to come out of the function.
Fig.3
Fig.2
Cleaning the hood
Fig.4
Always wait until the hood has cooled down before cleaning
it!
Warning! Failure to remove oil and grease (at least once a month)
could lead to fire.
Use a soft cloth with a neutral detergent. Never use abrasive
substances or alcohol.
BEFORE USING THE HOOD
Please read these instructions carefully and keep them for future
reference, in order to ensure best use of your hood.
Packaging materials can be dangerous for children. Keep packaging
materials (plastic bags, polystyrene, etc.) well out of their reach.
Make sure the hood has not been damaged during transport.
Installation and electrical connections must be carried out by a
qualified technician in compliance with the current local regulations.
E
P
I
GR
31833199.fm Page 8 Monday, March 13, 2006 12:00 PM
SAFEGUARDING THE ENVIRONMENT
1. Packaging
Packing materials are 100% recyclable and are marked with the
recycling symbol
. Comply with local regulations for their
disposal. Packaging materials can be dangerous for children. Keep
packaging materials (plastic bags, polystyrene, etc.) well out of their
reach.
2. Product
This appliance is marked in compliance with European Directive
2002/96/EC on Waste Electrical and Electronic Equipment (WEEE).
By ensuring that this appliance is scrapped suitably, you can help
prevent potentially damaging consequences for the environment and
health.
The
symbol on the appliance or accompanying documentation
indicates that this product should not be disposed of as unsorted
municipal waste but must be taken to a collection point for the
treatment of WEEE.
Disposal must be carried out in accordance with local environmental
regulations for waste disposal.
For further information on the treatment, recovery and recycling of
this appliance, contact your competent local authority, the collection
service for household waste or the shop where you purchased the
appliance.
PRECAUTIONS AND GENERAL
RECOMMENDATIONS
WARNING!
• Do not allow children or infirm persons to operate the
appliance without supervision.
• Make sure children do not play with the appliance.
1. Do not connect the appliance to the mains electricity supply until
installation is completed. Always disconnect the hood from the
mains before performing any cleaning or maintenance.
2. Do not “flambé” food under the hood. Naked flames could
cause a fire.
3. Do not leave pans unattended when frying. Cooking oil can
catch fire.
4. Regular cleaning and maintenance is essential to correct
functioning and good performance. Regularly remove dirt
deposits. Regularly clean or replace filters. Never use flammable
materials as hoses for extracted air.
5. If the hood is used together with non-electrically powered
appliances, ambient negative pressure must not exceed 4Pa
(4 x 10 -5 bars). Make sure the room is adequately ventilated.
5019 318 33199
D
GB
F
NL
Electrical connections
Before connecting the hood to the power supply, make sure the
voltage specified on the dataplate matches that in your home. The
dataplate is located inside the hood behind the grease filter.
If the appliance is fitted with a power cable and plug, the plug must
be placed in an accessible position.
If the hood does not come pre-fitted with a mains plug, fit one that
conforms to applicable standards or use a double-pole switch with a
minimum breaking gap of 3 mm.
Replacement of the power supply cable with power plug or flexible
cable may only be carried out by an authorized Service Centre or a
qualified electrician.
Declaration of conformity
This product has been designed, manufactured and sold in
conformity to the following standards:
- safety objectives of "Low Voltage" Directive 73/23/EEC
- protection requirements of “EMC” Directive 89/336/EEC
amended by Directive 93/68/EEC.
Troubleshooting guide
The hood does not work:
• Is the plug properly inserted in the power socket?
• Is there a power failure?
• Is the fuse blown?
The hood is not extracting efficiently:
• Is the right speed selected?
• Do the filters need cleaning or replacing?
• Are the air outlets blocked?
The light does not work:
• Does the bulb need replacing?
• Is the bulb correctly fitted?
• Is the fuse blown?
AFTER-SALES SERVICE
Before calling the After-sales Service
1. Check if you can fix the problem yourself (see ”Troubleshooting
guide”).
2. Switch the hood off and then on again to check if the problem
has gone.
3. If the problem persists, contact the After-sales Service.
Specify:
• the nature of the problem,
• the model of hood, stated on the data plate inside the hood,
accessible by removing the grease filters.
• your full address,
• your telephone number and area code.
• the service code (the number appearing below the word
SERVICE on the data plate inside the hood behind the grease
filter).
If any repairs are needed, contact an authorised Service Centre (to
ensure that only original spare parts are used and that repairs are
made correctly).
Failure to comply with these instructions may compromise the safety
and quality of the product.
E
P
I
GR